1
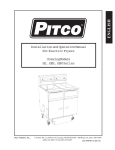
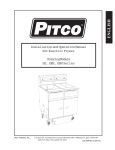
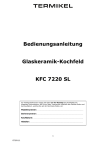
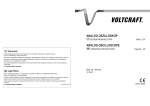
ENGLISH
Installation and Operation Manual
For Electric Fryers
Covering Models
SE, SEH Series
Pitco Frialator, Inc.,
P.O. Box 501, Jct I-89 & I-93 Concord, NH 03302-0501 • 509 Route 3A, Bow, NH 03304
(800) 258-3708 • (603) 225-6684 • FAX (603) 225-8497
L20-246 Rev 0 (01/03)
WARNING! FIRE HAZARD
THE OIL LEVEL SHOULD NOT FALL BELOW THE MINIMUM INDICATED LEVEL AT ANY
TIME. THE USE OF OLD OIL CAN BE DANGEROUS AS IT WILL HAVE A REDUCED FLASHPOINT AND BE MORE PRONE TO SURGE BOILING.
WARNING
INSTALLATION AND ALL CONNECTIONS MUST BE MADE ACCORDING TO NATIONAL
AND LOCAL REGULATIONS AND CODES IN FORCE.
WARNING
A COUNTRY APPROVED ALL POLE CIRCUIT BREAKER WITH A MINIMUM OPEN CONTACT GAP OF 3mm MUST BE USED FOR PROPER INSTALLATION.
WARNING
THE FRYER IS NOT JET STREAM APPROVED. DO NOT CLEAN THE APPLIANCE WITH A
WATER JET.
NOTICE
INSTALLATION SHOULD ONLY BE DONE BY A COMPETENT SERVICE TECHNICIAN. THE
MODEL & SERIAL NUMBER, AND ELECTRICAL REQUIREMENTS STAMPED INTO THE
DATA PLATE, LOCATED ON THE INSIDE PANEL OF THE DOOR.
NOTICE
THIS APPLIANCE IS INTENDED FOR PROFESSIONAL USE ONLY, AND AS SUCH,
SHOULD BE OPERATED BY FULLY TRAINED PERSONNEL.
NOTICE
IT IS RECOMMENDED THAT THIS MACHINE BE INSPECTED BY A QUALIFIED TECHNICIAN ON A YEARLY BASIS.
WARNING
THE POWER SUPPLY MUST BE DISCONNECTED SERVICING OR CLEANING THE UNIT.
WARNING
SHORTENING, WHEN IT IS AT OPERATING TEMPERATURES, IS VERY HOT AND
DANGEROUS! USE EXTREME CAUTION WHEN HANDLING! USE PROPER PROTECTIVE GEAR SUCH AS INSULATED GLOVES, APRONS, FACE SHIELD, AND SLEEVES
WHEN HANDLING HOT SHORTENING. DO NOT ATTEMPT TO MOVE MACHINE THAT
HAS HOT OIL IN IT. ALLOW TO COOL TO ROOM TEMPERATURE OR DRAIN THE OIL
INTO A SUITABLE CONTAINER BEFORE MOVING THE FRYER.
L20-246 Rev 0 (12/02)
Pitco Frialator, Inc. makes the following limited warranties to the original purchaser only for this equipment and replacement parts:
FOR YOUR SAFETY:
DO NOT STORE OR USE GASOLINE OR
OTHER FLAMMABLE VAPORS AND
LIQUIDS IN THE VICINITY OF THIS OR
ANY OTHER APPLIANCE.
1.
WARRANTY PROVISIONS - FRYERS
A. Pitco Frialator, Inc. warrants all parts, with
the exception of the frypot, elements and
computer for 1 year after the date of installation of the fryer.
B. If any parts become defective during the first
year after the installation date, Pitco Frialator will also pay for the labor, freight and
travel costs involved in replacing said part.
WARNING:
IMPROPER INSTALLATION, ADJUSTMENT, ALTERATION, SERVICE OR
MAINTENANCE CAN CAUSE PROPERTY
DAMAGE, INJURY OR DEATH. READ
THE INSTALLATION, OPERATING AND
MAINTENANCE MANUALS THOROUGHLY BEFORE INSTALLING OR SERVICING THIS EQUIPMENT.
2.
WARRANTY PROVISIONS - FRYPOTS
A. If a frypot develops a leak due to a defect in
material or workmanship within the first 10
years after installation, Pitco Frialator, Inc.
will either weld or replace, at its discretion,
the frypot.
B. The customer will be responsible for all
freight, labor and travel charges for this repair.
WARNING:
This machine is intended to be hard wired
when installed in its final location.
3.
WARRANTY PROVISIONS - COMPUTER
A. Pitco Frialator, Inc. will warrant the Intellifry Computer from defects in material or
workmanship for a period of two years.
B. If the computer is found to be defective during the first 2 years after the installation date,
Pitco Frialator Inc. will also pay for the labor, freight and travel costs involved in replacing said part.
4.
WARRANTY PROVISIONS - ELEMENTS
A. Pitco Frialator, Inc. will warrant the Electric
Elements from defects in material or workmanship for a period of 3 years.
B. The customer will be responsible for all
freight, labor and travel charges for this repair.
WARNING:
If a manufacturer supplied cord is damaged, it
must be replaced by the manufacturer or its
service agent or a similarly qualified person in
order to avoid a hazard.
Retain this manual for future reference.
L20-246 Rev 0 (12/01)
ENGLISH
WARRANTY STATEMENT
INSTALLATION INSTRUCTIONS
tion, maintenance and servicing.
CAUTION:
This equipment is manufactured for the use on a
particular voltage and phase which is specified on
the rating plate located on the inside of the door.
Wiring diagram(s) are located in the back of
the service manual and inside the fryers.
Regular cleaning of this equipment, as well as
the hood, is an important part of proper maintenance.
When your fryers arrive, inspect carefully
noting any damage on the freight bill. If concealed
damage is found after you have accepted the
equipment, report it to the carrier immediately as
all claims must be filled within 15 days of the
receipt of the shipment. Also, be sure to keep all
packing materials as these will be necessary to
make any claim.
Once the fryers are in place:
Leveling the fryers will help ensure proper
operation. To level the fryers loosen the two set
screws on the caster stem. Rotate the collar of the
caster to raise or lower the height of the unit.
Tighten set screws to lock the adjustment. Casters
should be adjusted so that the fryers are level and
at the correct height under the hood system.
Follow these installation instructions carefully. A proper installation is important for the
operation of the fryers.
All installations must conform to all local and
national codes.
Do not block the area around the casters and
under the fryers. Contact the Authorized Pitco
Frialator representative for any service related
problems. Routine maintenance may be performed
by qualified personnel.
The duct system, the hood system and the
fryers must be cleaned on a regular basis and must
be kept clear of any grease build up.
Ventilation:
A proper ventilation system is also an important part of the installation.
Clearances:
Minimum clearance of 6" (15cm) must be
maintained from combustible construction on each
side and the rear of the equipment. This equipment
may be installed on combustible floors.
Maintain a minimum of 24"(61cm) clearance
in front of the fryer to provide for proper opera-
L20-246 Rev 0 (12/02)
1
NOTE: Should you experience a power failure, your
fryers will shut off automatically. Once the power
key to turn the fryer
has been restored, press the
back ON. If the machine is being filtered, close the
Make sure that the shortening is at the proper
RED return valve so that the filter does not run if the
level after cooking temperature has been reached.
machine is left unattended. Do not attempt to restart
It may be necessary to add shortening to maintain
the fryers until the power is restored.
the proper level.
Filling the fryer with oil:
NOTE: When adding solid shortening to an empty
fry tank, first remove the baskets and support racks
and fill the bottom of the tank with shortening, continue to pack the remaining shortening into the tank.
Place the basket support rack on top of the shortening before turning the unit ON.
For liquid shortening fill to the level lines indicated
on the side of the tank.
It is very important to make sure the oil level
is correct before attempting to heat shortening in
your Pitco fryer.
Liquid shortening can be poured directly into
the fry tank until the correct level has been
reached. This is indicated by a line on the right
hand side of the inside of the tank.
NOTE: Maximum cooking load is not to exceed
3lbs (6.6kg) per basket.
NOTE: The “COLD” level is considered to be the
CAUTION:
“MINIMUM” oil level and the “HOT” level is conExcessive loading or loading of over-wet food can
sidered to be the “MAXIMUM” oil level.
cause surge boiling.
For solid shortening, the shortening must be
cut into small blocks about 1" (2.54 Cm) in size.
These small blocks must be placed under and
around the heating elements.
Shut Down:
Press the corresponding
key to turn the
fryer OFF. The Computer display will go blank
and all heating functions will cease.
The fryer can now be turned ON.
Set-Up:
NOTE: When the fryer is not being used, place the
cover over the fry tank. (The covers are optional and
do not come with fryer unless ordered)
NOTE: Please read the Operating instructions thoroughly before attempting to operate this equipment.
Press the
key on either side of the full vat
computer, or the right
key for the right side
and the left
key for the left side of a split vat
computer to turn the unit ON.
The computer display will light and the
heating elements will begin to heat and will be
controlled by the computer/controller.
2
L20-246 Rev 0 (12/01)
ENGLISH
NOTE: It is recommended that melt cycle be used
. This will extend the shortening life. In melt cycle
the shortening turns from solid to liquid gradually
through short, controlled bursts of heat. Once the
predetermined temperature has been reached, the unit
will exit the melt cycle and go to normal operation.
EQUIPMENT SET UP AND SHUT DOWN
PROCEDURES
FILTER PROCEDURES FOR
FLAT PAPER FILTER SYSTEMS
return valve to the tank you are filtering.
This will start the pump and return the oil to
the bottom of the fry tank.
NOTE
When working with hot oil ALWAYS wear oil
proof, insulated gloves.
f.
When bubbles are seen coming out of the oil
return spout, close the red handled valve to
turn the pump off.
If necessary add more oil to the tank to return
the oil level to the fill mark. The fryer is
now ready for use.
WARNING
NEVER - Run the filter system without a filter
bag/paper.
DRAINING A TANK
The filter system is also used to drain the fryers. You
will need a container capable of holding 4000F oil and
protective gloves.
NEVER - Empty the oil from the fryer before
turning OFF the fryer burners.
NEVER - Store the Filter Unit anywhere other
than in the fryer filter cavity.
a.
b.
c.
c.
a.
Slide the filter pan out. Carefully remove
filtered residue off the filter media. Examine
the filter media for clogged or torn areas.
Refer to filter media replacement instructions
following this section. Reinstall the pan.
b.
Turn the fryer that is to be filtered OFF (See
Standby Shutdown). Remove the baskets
from the fryer tank(s). Use the clean out
brush to lift out the tube screens.
c.
Check the pickup tube screen by unscrewing
the cap counterclockwise. Any debris should
be cleaned from the screen before using the
filter system. Reinstall the screen by scewing
the cap back on clockwise. Do not overtighten.
Preparing the filter for use:
Slowly open the green handled drain valve
for the tank being filtered. If necessary use
the clean-brush to clear the crumbs from the
drain. Use the brush to clean the sides of the
tank as the oil drains.
·
·
·
·
·
Slide drawer forward until it stops.
Grasp the Left and Right handles of the Paper
Retaining Frame and lift upward to remove it.
Remove the filter paper or pad by folding the edges
inward so that the debris is collected.
Lift the Paper Support Screen out of the pan.
The Pan, Paper Support Screen and Paper Retaining Frame can now be cleaned.
NOTE: Be sure that the filter pan is free of any debris
which could cause the paper and hold down ring not
to seat properly.
When the tank is empty, close the green
handled drain valve. Open the red handled
L20-246 Rev 0 (12/02)
Once tank is completely empty add new
shortenning and follow fryer start up procedures.
WARNING
The power supply must be disconnected before
servicing or cleaning the appliance.
WARNING
This filter pan is only large enough to hold the
contents of one (1) tank at once, during the
filter process.
e.
Rotate the drain down spout so that it extends in the container that you want to drain
the shortening into.
Open the green handled drain valve for the
tank to be drained. The oil will drain into the
container you have chosen. When the container is full or the fry tank is empty, close
the green handled drain valve. If the container was full repeat this step until fryer tank
is empty.
3
·
·
·
Place the Paper Support Screen in the bottom of the
pan.
Place filter Paper or Pad over screen making sure
that there is an equal amount of excess paper on
each side.
Place the Retaining Frame on the paper or pad
making sure that all edges are being pressed down
evenly.
Slide filter drawer back under fryer making sure
that the oil return pipe locates into its mating
connection.
ENGLISH
·
CAUTION:
Be careful when using the clean out rod.
Damage to the drain valve may result.
WARNING:
Hot shortening can cause severe injury.
Take care when filtering or disposing of
hot shortening. Protective gear such as
gloves, apron, face shield and sleeves
should be worn.
·
·
·
Allow all of the shortening to return to the tank.
Bubbles will be produced in the vat when all the
shortening has been returned. This means that
the return lines have been cleared.
Close the RED Return Valve, by pushing upward
on the Red Return Valve Handle. This will turn
the pump off.
Press the
key and the Display will show
“OFF”.
Allow the Drain and Return lines to drain for at
least 5 minutes before removing filter pan to reduce dripping.
Your machine is now ready to use.
4
L20-246 Rev 0 (12/01)
FILTER PROCEDURES FOR
ENVELOPE PAPER FILTER SYSTEMS
NOTE
When working with hot oil ALWAYS wear
oil-proof, insulated gloves.
WARNING
This filter pan is only large enough to hold the
contents of one (1) tank at once, during the
filter process.
g.
When the tank is empty, close the green handled
drain valve. Open the red handled return valve
to the tank you are filtering. This will start the
pump and return the oil to the bottom of the fry
tank.
h.
When bubbles are seen coming out of the oil
return spout, close the red handled valve to turn
the pump off.
If necessary add more oil to the tank to return
the oil level to the fill mark. The fryer is now
ready for use.
WARNING
NEVER • Run the filter system without a
filter bag/paper.
NEVER • Empty the oil from the fryer
before turning OFF the fryer burners.
NEVER • Store the UFM Filter Unit
anywhere other than in the fryer filter
cavity.
a.
Slide the filter pan out. Carefully remove
filtered residue off the filter media. Examine
the filter media for clogged or torn areas.
Refer to filter media replacement instructions
following this section. Reinstall the pan.
b.
Turn the fryer that is to be filtered OFF (See
Standby Shutdown). Remove the baskets
from the fryer tank(s). Use the clean out
brush to lift out the tube screens. If there are
excess crumbs in the fryer tank, remove them
with the crumb scoop.
c.
d.
e.
f.
If you have replaced the filter media or
remove crumbs and debris, sprinkle Precoat
Filter Aid on the filter paper.
Check the drain spout to ensure that it is in
the drain tower and over the filter pan opening.
Slowly open the green handled drain valve
for the tank being filtered. If necessary use
the clean-brush to clear the crumbs from the
drain. Use the brush to clean the sides of the
tank as the oil drains.
Slowly open the green handled drain valve
for the tank being filtered. If necessary use
the clean-brush to clear the crumbs from the
drain. Use the brush to clean the sides of the
tank as the oil drains.
L20-246 Rev 0 (12/02)
DRAINING A TANK
The filter system is also used to drain the fryers. You will
need a container capable of holding 4000F oil and protective gloves.
a.
b.
c.
Rotate the drain down spout so that it extends in
the container that you want to drain the shortening into.
Open the green handled drain valve for the tank
to be drained. The oil will drain into the container you have chosen. When the container is
full or the fry tank is empty, close the green
handled drain valve. If the container was full
repeat this step until fryer tank is empty.
Once tank is completely empty add new
shortenning and follow fryer start up procedures.
WARNING
The power supply
must be disconnected
before servicing or
cleaning the appliance.
FILTER MEDIA REPLACEMENT
The filter module stores neatly under the fryer when not
in use. The unit is very easy to use and allows for quick
installation and filtration, even under the busiest conditions. Follow the procedures below to change the filter
media.
a.
With the filter pan empty of oil, remove the
filter media by grasping the filter pan handle
and gently pull the assembly toward the front
of the fryer.
b.
Separate the filter pickup tube from the filter
pickup screen assembly by pulling up on the
pickup tube just above where it connects to
the pickup screen assembly. Lift pickup tube
and swing it to the left, until it rests on the left
hand side of the filter pan.
c.
Grab filter screen pickup assembly lift
handles and carry it to a trash barrel and
shake off heavy discard any debris that may
be built upon the top of the assembly.
d.
Unscrew the filter paper clip bracket from
the filter paper support screen and slide the
filter paper support screen out of the filter
paper clip bracket.
e.
Remove filter paper support screen from the
filter envelope.
f.
All of the filter pick up assembly parts can be
washed in a dish washer or a pot sink. Flush
out the suction tube assembly with hot water.
After cleaning, it is very important to thoroughly dry the parts before reassembling.
Water and oil do not mix. Water in hot oil
will cause the oil to splatter.
g.
Start reassembling the filter pick up assembly
by sliding the new filter paper on to the filter
paper support rack. Ensure that the hole in
the filter paper goes over the pick up tube
assembly threaded connector.
h.
Fold the open end of the bag in two folds.
The first fold should be approximately 1
inch from the end and the second should be
over the edge of the rack assembly.
i.
Slide the clip screen over the folded end of
the filter paper. Ensure the opening of the
clip screen goes over the pick up tube
connection. Screw the suction tube connection onto the threaded connection.
j.
Place the filter pickup assembly into the
filter pan and slide the filter pan assembly
back into the fryer cabinet.
k.
Filter unit is now ready for use.
L20-246 Rev 0 (12/01)
ENGLISH
WARNING
At operating temperature, the shortening in
the fryer may be hotter than 375°F (190°C).
This hot, melted shortening will cause severe
burns. Do not let the hot shortening touch
your skin or clothing. Always wear insulated oil-proof gloves when working on the
filter system. It will be easier and safer if
the filter assembly has cooled to room temperature before handling any filter parts.
MULTIPLE LEVEL COMPUTER
PROGRAMMING INSTRUCTIONS
POWER ON/OFF KEY
PROGRAM KEY
TEMPERATURE KEY
TIME KEY
POWER ON/OFF KEY
PRODUCT KEYS
TO CHECK ACTUAL TEMP.
After 5 secs. machine will return to run mode.
TO CHECK SET TEMP.
After 5 secs. machine will return to run mode.
TO CHECK COOK, SHAKE, AND HOLD TIMES
THEN THE PRODUCT KEY DESIRED
NOTE: THE TIMES WILL BE DISPLAYED IN SEQUENCE PAUSING MOMENTARILY ON EACH TIME AND THEN RETURN TO COOK MODE.
TO ENTER BOIL MODE
enter
(
if using ºC mode) when last digit of
temperature is entered, boil mode will start automatically. You
must turn off both fryers to exit Boil mode.
CHECKING THE REMAINING TIME WHEN USING MULTIPLE TIMERS
TO VIEW REMAINING TIME ON ANY FUNCTION KEYS WHEN MULTIPLE TIMERS ARE COUNTING IS AS FOLLOWS:
PRESS
THEN PRESS FUNCTION KEY OF ANY NON DISPLAYED ACTIVE TIMERS YOU WANT TO VIEW
FIRST LEVEL PROGRAMMING
USING AND ENTERING FIRST LEVEL PROGRAMMING AND
PROGRAMMING FUNCTION KEYS
Press the
key (display shows "PROGRAM"), then enter pass word if needed.
If you are unable to remember the set pass word use (6684).
TO PROGRAM SINGLE OR DUAL TANK
COMPUTER SET TEMP LEFT SIDE
ENTER DESIRED TEMP.
TO PROGRAM DUAL TANK
COMPUTER SET TEMP RIGHT SIDE
TO SAVE OR EXIT
TO SET
COOK TIME
TO SET
SHAKE TIME
ENTER TIME
TO SET
HOLD TIME
ENTER TIME AND
TO SAVE OR EXIT
L20-246 Rev 0 (12/02)
5
AND A PRODUCT KEY THEN
ENTER TIME
ENGLISH
6
L20-246 Rev 0 (12/01)
L20-246 Rev 0 (12/02)
7
ENGLISH
8
L20-246 Rev 0 (12/01)
TROUBLESHOOTING
PROBLEM
PROBABLE CAUSE
CORRECTIVE ACTION
Computer does not come on
nothing shows in either display
A. Main circuit breaker is
turned off
B. Fryer fuse is blown
A. Locate the correct building circuit breaker
and turn OFF and back ON again.
B. Call an Authorized Service Technician
Computer heat light comes on
but elements do not heat
A. If the oil is hot the
Hi - Limit may be tripped
A. Allow the oil to cool, reset the Hi Limit and
turn the computer OFF and back ON
again.
Computer display shows
"OFF" and cannot be turned
"ON".
A. Bad computer
A. Locate the correct building circuit breaker and
turn OFF and back ON again. If this does not
reset the computer call an Authorized Service
Technician.
RED return valve is open no
pump sound can be heard
A. RED return valve not fully
open
B. Filter circuit breaker may be
tripped
C. Filter motor Thermal Overload may be tripped
D. Sensor switch may be loose
A. Pull slightly on the RED return valve handle
Drain valve is closed and
the computer has been
reset but still shows
"DRAINING" or
"TURN OFF"
A. GREEN drain valve is not
fully closed
B. Sensor switch may be loose
A. Apply a little more pressure to close the valve
Drain valve is open, the oil is
draining slowly or not at all.
A. GREEN drain valve is not
fully open
B. Drain is plugged with debris
A. Apply a little more pressure to open the valve
L20-246 Rev 0 (12/02)
9
B. Locate the filter circuit breaker behind the door
of the left hand fryer and reset it.
C. Push RED reset button located on end of filter
motor, behind the door of left hand fryer.
D. If the mounting screws are loose try to tighten
them, if this is not possible call an Authorized
Service Agency.
B.
If the mounting screws are loose try to tighten
them, if this is not possible call an Authorized
Service Agency.
B. Use the clean out rod to clear the drain valve
from inside the fry vat. If this does not clear the
blockage, CLOSE the GREEN drain valve and
follow the instructions for clearing the main
drain line.
CAUTION:
Some HOT oil may come out when the cap is
removed.
Remove the two wing nuts from the end cap
(do NOT lose these.) Use the clean out rod to
clear the main drain tube. Install the end cap
along with its gasket and four screws. Do not
overtighten these screws or remove drain "T"
cleanout access covers, by removing thumb
screws (do not loose screws). Then clean drain,
replace access cover and thumb screws.
ENGLISH
10
L20-246 Rev 0 (12/01)
In the event of problems with or questions about
your order, please contact the Pitco Frialator factory at:
(800)258-3708 US and Canada only or
(603)225-6684 World Wide
L20-246 Rev 0 (12/02)
In the event of problems with or questions about
your equipment, please contact the Pitco Frialator
Authorized Service and Parts representative
(ASAP) covering you area, or contact Pitco at the
numbers listed to the left.
DEUTSCH
Installations - Und Bedienungsanleitung
Elektrsche Friteuse
SE, SEH Serie
Pitco Frialator, Inc.,
P.O. Box 501, Jct I-89 & I-93 Concord, NH 03302-0501 • 509 Route 3A, Bow, NH 03304
(800) 258-3708 • (603) 225-6684 • FAX (603) 225-8497
L20-246 Über. 0 (12/02)
WARNUNG! BRANDGEFAHR
DER ÖLSTAND SOLLTE NIEMALS UNTER DIE ANGEGEBENE UNTERGRENZE SINKEN.
WARNUNG
INSTALLATION UND ALLE ANSCHLÜSSE MÜSSEN DEN JEWEILS GELTENDEN
LANDESWEITEN BZW. ÖRTLICHEN VORSCHRIFTEN ENTSPRECHEN.
WARNUNG
DIESE FRITEUSE DARF NICHT MIT WASSER ABGESPRITZT ODER ÜBERGOSSEN WERDEN.
WARNUNG
ZUR KORREKTEN INSTALLIERUNG MUSS EIN VOM LAND GELIEFERTER, ALLPOLIGER
AUSSCHALTER MIT OFFENER KONTAKTLÜCKE VON MINDESTENS 3MM VERWENDET WERDEN.
HINWEIS
DIE INSTALLATION SOLLTE VON EINER KOMPETENTEN SERVICEFACHKRAFT
DURCHGEFÜHRT WERDEN. MODELL- UND SERIENNUMMER SOWIE
ELEKTRISCHE ANSCHLUSSDATEN BEFINDEN SICH AUF DEM DATENSCHILD
AN DER INNENSEITE DER TÜR.
HINWEIS
DIESE MASCHINE DIENT AUSSCHLIESSLICH KOMMERZIELLEN ZWECKEN UND SOLLTE
DAHER NUR VON FACHLICH AUSGEBILDETEM PERSONAL VERWENDET WERDEN.
HINWEIS
ES WIRD EMPFOHLEN, DIESE MASCHINE EINMAL JÄHRLICH VON EINER
QUALIFIZIERTEN FACHKRAFT ÜBERPRÜFEN ZU LASSEN.
WARNUNG
VOR JEDER WARTUNG ODER REINIGUNG DES GERÄTES MUSS DER STROMANSCHLUSS
UNTERBROCHEN WERDEN.
WARNUNG
ÖL AUF BETRIEBSTEMPERATUR IST SEHR HEISS UND GEFÄHRLICH! BEI DER
HANDHABUNG IST ÄUSSERSTE VORSICHT GEBOTEN! ES SOLLTE UNBEDINGT
SCHUTZKLEIDUNG GETRAGEN WERDEN, WIE Z.B. ISOLIERTE HANDSCHUHE,
SCHÜRZE, AUGENSCHUTZ UND LANGE ÄRMEL. NIEMALS DIE MIT HEISSEM ÖL
GEFÜLLTE MASCHINE BEWEGEN. AUF ZIMMERTEMPERATUR ABKÜHLEN LASSEN ODER
DAS ÖL VOR DEM BEWEGEN DER FRITEUSE IN EINEN ENTSPRECHENDEN BEHÄLTER
ABLAUFEN LASSEN.
L20-246 Über. 0 (12/02)
Pitco Frialator, Inc. gewährt dem Erstkäufer
ausschließlich für dieses Gerät und Ersatzteile die
folgende beschränkte Garantie:
1.
2.
GARANTIEBEDINGUNGEN - FRITEUSE
A. Pitco Frialator, Inc. leistet Garantie auf alle
Teile mit Ausnahme der Wanne, der
elektrischen Elemente und des Computers für
die Dauer von 1 Jahr ab dem Datum der Installation der Friteuse..
B. Für jegliche während des ersten Jahres ab dem
Installationsdatum schadhaft werdende Teile
übernimmt Pitco Frialator auch die mit dem
Austauschen jenes Teiles verbundenen Kosten
für Arbeit, Versand und Anreise.
GARANTIEBEDINGUNGEN FRITEUSENWANNE
A. Sollte in der Friteusenwanne während der
ersten 10 Jahre ab Installation aufgrund
schadhaften
Materials oder mangelhafter Verarbeitung ein
Leck auftreten, wird Pitco Frialator, Inc. nach
eigenem Ermessen die Wanne entweder
schweißen oder austauschen.
B. Für diese Reparatur trägt der unde die Kosten
für Versand, Arbeit und Anreise.
3.
GARANTIEBEDINGUNGEN -COMPUTER
A. Pitco Frialator, Inc. leistet Garantie auf
Schäden bei Material oder Verarbeitung des
Intellifry
Computers für die Dauer von 2 Jahren.
B. Sollte sich der Computer während der ersten
2 Jahre ab dem Installationsdatum als
schadhaft erweisen, übernimmt Pitco Frialator
Inc. auch die mit dem Austauschen jenes
Teiles verbundenen Kosten für Arbeit,
Versand und Anreise.
4.
GARANTIEBEDINGUNGEN
ELEMENTE
A. Pitco Frialator, Inc. leistet Garantie auf
Schäden bei Material oder Verarbeitung der
elektrischen Elemente für die Dauer von 3
Jahren.
B. Für diese Reparatur trägt der Kunde die
Kosten für Versand, Arbeit und Anreise.
FÜR IHRE SICHERHEIT:
NIEMALS BENZIN ODER ANDERE
BRENNBARE GASE ODER
FLÜSSIGKEITEN IN DER NÄHE DIESES
ODER ANDERER HAUSHALTSGERÄTE
LAGERN ODER VERWENDEN.
WARNUNG:
UNSACHGEMÄSSE INSTALLATION,
ÄNDERUNGEN, SERVICE- ODER
WARTUNGSARBEITEN KÖNNEN ZU
BESCHÄDIGUNGEN, VERLETZUNGEN
UND TODESFÄLLEN FÜHREN. VOR DER
INSTALLATION ODER WARTUNG DIESES
GERÄTS IMMER DIE INSTALLATIONS-,
BETRIEBS- UND
WARTUNGSANLEITUNGEN SORGFÄLTIG
DURCHLESEN.
WARNUNG:
FALLS EIN VOM HERSTELLER
GELIEFERTES KABEL BESCHÄDIGT IST,
MUß DIESES VOM HERSTELLER ODER
SEINEM SERVICEVERTRETER ODER
EINER ÄHNLICH QUALIFIZIERTEN PERSON ERSETZT WERDEN, UM GEFAHREN
ZU VERHINDERN.
WARNUNG:
Diese Maschine muss für die Installation auf
ihrem endgültigen Standort fix montiert
werden.
Diese Anleitung für zukünftiges
Nachschlagen aufbewahren.
L20-246 Über. 0 (12/02)
DEUTSCH
GARANTIEERKLÄRUNG
INSTALLATIONSANLEITUNGEN
Dieses Gerät kann auf nicht feuerfestem Fußboden
installiert werden.
VORSICHT:
Diese Maschine eignet sich nur für eine bestimmte Vor der Friteuse sollte ein Mindestfreiraum von 61
Spannung. Diese Information befindet sich auf dem cm eingehalten werden, um ordnungsgemäßen
Datenschild auf der Innenseite der Tür.
Betrieb, Wartung und Service zu gewährleisten.
Überprüfen Sie Ihre Friteusen bei Erhalt und
vermerken Sie jegliche Beschädigungen auf dem
Frachtbrief. Versteckte Mängel, die nach der
Annahme des Gerätes entdeckt werden, sind
unverzüglich dem Spediteur zu melden, da alle
Ansprüche innerhalb von 15 Tagen ab Erhalt der
Lieferung eingereicht werden müssen. Es wird
unbedingt empfohlen, auch das Verpackungsmaterial
aufzuheben, da dies zur Geltendmachung eines
Anspruches erforderlich ist.
Diese Anleitungen gewissenhaft befolgen. Die
richtige Installation ist für den korrekten Betrieb der
Friteusen unerlässlich.
Alle
Installationsarbeiten
müssen
in
Übereinstimmung mit den örtlichen und
landesweiten Vorschriften vorgenommen werden.
Niemals den Bereich um die Gleitrollen und unter
den Friteusen blockieren. Wenden Sie sich zwecks
servicebezogener Probleme bitte an den autorisierten
Vertreter von Pitco Frialator. Routinemäßige
Wartungsarbeiten können von qualifiziertem
Fachpersonal vorgenommen werden.
Die Rohrleitungen, das Abzugssystem und
die Friteusen müssen regelmäßig gereinigt und
jegliche Anhäufung von Fett vermieden werden.
Ventilation:
Ein ordnungsgemäß funktionierendes
Ventilationssystem ist ebenfalls ein wichtiger Teil
der Installation.
Einbaumaße:
Ein Mindestfreiraum von 15 cm muss bei
nicht feuerfester Konstruktion an jeder Seite,
einschließlich Rückseite, eingehalten werden.
L20-227 Über. 1 12/2001
15
Der Schaltplan befindet sich am Ende der
Serviceanleitungen und in den Friteusen.
Regelmäßige Reinigung dieses Gerätes und der
Abzugshaube ist ein wichtiger Teil ordnungsgemäßer
Wartung.
Friteusen waagrecht aufstellen:
Waagrechtes Aufstellen der Friteusen ist für den
richtigen Betrieb unerlässlich. Zu diesem Zweck
müssen die zwei Stellschrauben an den Gleitrollen
gelockert werden. Den Ring der Gleitrollen drehen,
um die Höhe des Gerätes zu verändern. Die
Stellschrauben nach Erreichen der gewünschten
Einstellung festziehen. Die Gleitrollen müssen
eingestellt werden, um die Friteusen in waagrechte
Lage und die richtige Höhe unter dem Abzugssystem
zu bringen.
VORBEREITUNG UND AUSSCHALTEN DES
GERÄTES
Die Friteuse mit flüssigem Öl anfüllen:
Es ist sehr wichtig, den richtigen Ölstand
einzuhalten, bevor das Öl in Ihrer Pitco-Friteuse
erhitzt wird.
Flüssiges Öl kann direkt in die Friteusenwanne
geleert werden, bis der richtige Ölstand erreicht
ist. Dieser ist durch eine Linie an der rechten
Innenseite der Wanne markiert.
HINWEIS: “COLD” (KALT) zeigt die erforderliche
Mindesteinfüllgrenze und “HOT” (HEISS) die
“MAXIMALE” Einfüllgrenze an.
Festes Bratfett in kleine Stücke von etwa 2,5 cm
schneiden und unter sowie rund um die
Heizelemente plazieren.
Nun kann die Friteuse eingeschaltet werden.
Vorbereitung :
HINWEIS: Es wird empfohlen, den Schmelzzyklus
zu verwenden. Dadurch wird die Verwendbarkeit des
Öls verlängert. Im Schmelzzyklus wird das feste
Bratfett allmählich durch kurze gesteuerte
Hitzeimpulse verflüssigt. Sobald die vorbestimmte
Temperatur erreicht ist, schaltet das Gerät vom
Schmelzzyklus auf den Normalbetrieb um.
Nach Erreichen der Kochtemperatur den Ölstand
überprüfen. Es muss möglicherweise zusätzlich Öl
nachgefüllt werden, um den richtigen Ölstand zu
erreichen.
HINWEIS: Wenn festes Bratfett in die leere Wanne
hinzugefügt wird, müssen zuerst die Körbe und
Haltegitter entfernt werden, bevor der Boden der
Wanne mit Bratfett gefüllt wird. Danach Korb mit
Haltegitter wieder einsetzen und das Gerät
einschalten.
Bei flüssigem Öl muss die Wanne bis zu den
Markierungslinien auf der Seite der Wanne angefüllt
werden.
HINWEIS: Die empfohlene, maximale Kochmenge
pro Korb beträgt 6,6kg.
Ausschalten:
Die entsprechende Taste
drücken, um die Friteuse auszuschalten. Die Computeranzeige schaltet
sich aus und alle Heizfunktionen werden beendet.
HINWEIS: Vor Inbetriebnahme dieses Gerätes HINWEIS: Die Abdeckung über die
unbedingt die Betriebsanleitungen sorgfältig Friteusenwanne plazieren, wenn die Friteuse nicht
verwendet wird. (Die Abdeckungen sind als Option
durchlesen.
erhältlich und werden nur auf Bestellung mit der
Friteuse mitgeliefert.)
Die Taste
auf einer Seite des Computers für die
gefüllte Wanne drücken, oder die rechte Taste
für die rechte Seite bzw. die linke Taste
für die
linke Seite am Computer für Doppelwanne drücken,
um das Gerät einzuschalten. Die Computeranzeige
leuchtet auf, die Heizelemente erhitzen sich und
werden vom Computer / Controller gesteuert.
16
L20-227 Über. 1 12/2001
DEUTSCH
HINWEIS: Bei Stromausfall schalten sich die
Friteusen automatisch aus. Nach Wiedereinschalten
des Stroms die Taste
drücken, um die Friteuse
wieder einzuschalten. Wird die Maschine gefiltert,
muss das ROTE Rücklaufventil geschlossen werden,
damit der Filter nicht läuft, wenn die Maschine
unbeaufsichtigt ist. Niemals versuchen, die Friteusen
während des Stromausfalls wieder einzuschalten.
FILTERUNGSANLEITUNGEN
WARNUNG:
Öl auf Betriebstemperatur ist sehr HEISS und
GEFÄHRLICH! Bei der Handhabung ist äußerste
Vorsicht geboten! Es sollte unbedingt
Schutzkleidung getragen werden, wie z.B. isolierte
Handschuhe, Schürze, Augenschutz und lange
Ärmel. Für die Entfernung von gebrauchtem Öl die
Friteuse in einen entsprechenden Auffangbehälter
ablaufen lassen. Danach das ausgeschiedene Öl vom
Aufangbehälter in das Ölbehältnis pumpen.
·
·
·
·
WARNUNG:
Niemals mehr als eine Wanne ablaufen lassen. Das
Ablaufen von mehr als einer Wanne könnte die ·
Filterpfanne zum Überlaufen bringen und schwere
Verletzungen und Beschädigungen am Gerät
verursachen.
Vorbereitung des Filters:
·
·
·
·
·
·
·
Die Filterfachriegel lösen, indem der Griff an der
Vorderseite der Pfanne nach oben gezogen und
die Pfanne herausgezogen wird.
Das Fach bis zum Anschlag nach vorne ziehen.
Die Pfannenabdeckung durch Halten des Griffes
an der vorderen rechten Seite entfernen. Die
Abdeckung etwa 2,5 cm nach hinten schieben
und die Rückseite der Abdeckung von der Pfanne
lösen. (Die Abdeckung muss dabei
möglicherweise etwas geschüttelt werden.)
Mit dem linken und rechten Griff des
Papierhalterahmens diesen nach oben heben und
entfernen.
Das Filterpapier oder Filterkissen entfernen,
indem die Ränder nach innen gefaltet werden,
um jeglichen Schmutz einzusammeln.
Das Papierhaltegitter aus der Pfanne heben.
Pfanne, Papierhaltegitter und -halterahmen
können nun gereinigt werden.
VORSICHT:
Vorsicht bei der Verwendung der Reinigungsbürste.
Das Ablaufventil könnte sonst beschädigt werden
WARNUNG:
Heißes Öl kann schwere Verletzungen verursachen.
Vorsicht bei der Filterung oder Entsorgung von
heissem Öl. Es sollte unbedingt Schutzkleidung
getragen werden, wie z.B. Handschuhe, Schürze,
Augenschutz und lange Ärmel.
Betriebsanleitungen für den Filter
VORSICHT
Nur Filtern, wenn das Öl auf Kochtemperatur ist.
·
HINWEIS: Sicherstellen, dass die Pfanne von ·
jeglichem Schmutz befreit wird, da sonst Papier und
Haltering nicht fest eingesetzt werden können.
·
·
Das Papierhaltegitter auf dem Boden der
L20-227 Über. 1 12/2001
Pfanne plazieren, wobei sich das Gitter auf den
beiden Haltestiften am Boden der Pfanne
befinden muss.
Filterpapier so auf das Gitter legen, dass auf
jeder Seite gleich viel Papier übersteht.
Den Halterahmen auf dem Papier oder Kissen
plazieren, wobei alle Seiten gleichmäßig
niedergedrückt werden müssen.
Falls Pulver verwendet wird, dieses gemäß den
Anleitungen auf der Packung hinzufügen.
Die Abdeckung anbringen, indem die hintere
Kante über die Rückseite der Pfanne gedrückt
wird. Nun die Abdeckung auf die Pfanne legen
und nach vorne ziehen. Damit sollte sich die
Abdeckung in die Pfannenkanten einpassen.
Das Filterfach zurück unter die Friteuse schieben
und sicherstellen, dass das Ölrückflaufrohr mit
dem richtigen Anschluss verbunden wird. Nun
müssen beide Seiten korrekt eingeklinkt werden,
damit sich die Filterpfanne unter der Friteuse
nicht bewegen kann.
17
Das Ablaufventil öffnen, indem der grüne
Ventilhebel nach unten gezogen wird. Es wird
“DRAINING TURN OFF” (ABLAUFEN
ABDREHEN) angezeigt.
Das Öl bis zur Höhe der Heizelemente
ablaufen lassen.
Das Ablaufventil schließen, indem der grüne
Hebel nach oben gezogen wird. Es wird
·
·
·
·
·
·
·
DEUTSCH
·
weiterhin “TURN OFF” (ABDREHEN)
angezeigt.
Die Wände der Wanne und die Heizelemente
mit der mitgelieferten Reinigungsbürste
reinigen. Unbedingt Schutzhandschuhe,
Schürze und Augenschutz tragen.
Das GRÜNE Ablaufventil öffnen.
Das ROTE Rücklaufventil öffnen, indem der
rote Hebel nach unten gezogen wird, bis das
Betriebsgeräusch der Pumpe hörbar ist.
Den verbliebenen Schmutz am Boden der
Wanne in den Abfluss bürsten. (Weiterhin
Schutzkleidung tragen.) Bei übermäßiger
Verschmutzung des Wannenbodens die
mitgelieferte Krümelkelle zur Entfernung von
Schmutzanhäufungen verwenden.
Das GRÜNE Ablaufventil schließen. Es wird
weiterhin “TURN OFF” (ABDREHEN)
angezeigt, und die Wanne wird sich wieder
anfüllen. Das gesamte Öl wieder in die Wanne
fließen lassen. Blasenbildung in der Wanne
zeigt an, dass das gesamte Öl zurückgeflossen
ist. Das bedeutet, dass die Rücklaufleitungen
leer sind.
Das ROTE Rücklaufventil schließen, indem
der rote Hebel nach oben gedrückt wird. Damit
wird die Pumpe ausgeschaltet.
Die Taste
drücken. “OFF” (AUS) wird
angezeigt.
Vor dem Entfernen der Filterpfanne sollten die
Ablauf- und Rücklaufleitungen mindestens 5
Minuten ablaufen, um die Möglichkeit des
Tropfens zu verringern.
Ihre Maschine ist nun betriebsbereit.
18
L20-227 Über. 1 12/2001
ANLEITUNGEN FÜR COMPUTERPROGRAMMIERUNG MEHRERE EBENEN
PROGRAMMIERTASTE
TEMPERATURTASTE
ZEITTASTE
EIN/AUSSCHALTER
EIN/AUSSCHALTER
PRODUKTTASTEN
ÜBERPRÜFEN DER
TATSÄCHLICHEN TEMPERATUR
drücken. Nach 5 Sekunden kehrt die Maschine in den
Betriebsmodus zurück.
ÜBERPRÜFEN DER
PROGRAMMIERTEN TEMPERATUR
drücken. Nach 5 Sekunden kehrt die Maschine in den
Betriebsmodus zurück.
UM DIE ZEITEN FÜR KOCHEN,
PRODUKTTASTE
ZU ÜBERPRÜFEN
DRÜCKEN UND DANN DIE GEWÜNSCHTE
SCHÜTTELN UND RUHEZEIT DRÜCKEN.
HINWEIS: DIE ZEITEN WERDEN SEQUENTIELL MIT JEWEILS EINER KURZEN PAUSE
ANGEZEIGT. DANACH KEHRT DIE ANZEIGE IN DEN KOCHMODUS ZURÜCK.
AUSKOCHMODUS
Nachdem EINGEBEN
Auskochmodus
um
drücken und
eingeben (oder
im Celsius-Modus).
die letzte Ziffer der Temperatur eingegeben wurde, wird der
automatisch begonnen. Beide Friteusen müssen ausgeschaltet werden,
denAuskochmodus zu verlassen.
DIE VERBLEIBENDE ZEIT BEI VERWENDUNG MEHRERER TIMER ÜBERPRÜFEN
DIE VERBLEIBENDE ZEIT FÜR EINE BELIEBIGE FUNKTIONSTASTE BEI VERWENDUNG
MEHRERER TIMER KANN FOLGENDERMASSEN ABGELESEN WERDEN:
UND DANACH DIE GEWÜNSCHTE FUNKTIONSTASTE DRÜCKEN, DEREN AKTIVER TIMER
NICHT ANGEZEIGT WIRD.
PROGRAMMIERUNG - ERSTE EBENE
VERWENDUNG UND EINGABE DER PROGRAMMIERUNG - ERSTE EBENE - SOWIE
PROGRAMMIERUNGSFUNKTIONSTASTEN
Die Taste
drücken (“PROGRAM” wird angezeigt). Danach Passwort eingeben, falls erforderlich. Wenn Sie
das programmierte Passwort vergessen haben, “6684” eingeben.
UM DIE TEMPERATUR FÜR EINE EINZELWANNE ODER DIE LINKE SEITE EINER DOPPELWANNE ZU
PROGRAMMIEREN
DRÜCKEN.
UM DIE TEMPERATUR FÜR DIE RECHTE SEITE EINER DOPPELWANNE ZU
DRÜCKEN.
PROGRAMMIEREN,
SPEICHERN ODER VERLASSEN:
KOCHZEIT PROGRAMMIEREN:
SCHÜTTELZEIT PROGRAMMIEREN:
RUHEZEIT PROGRAMMIEREN:
DRÜCKEN.
UND EINE PRODUKTTASTE DRÜCKEN.
DANACH ZEIT EINGEBEN.
DRÜCKEN UND ZEIT EINGEBEN.
DRÜCKEN UND ZEIT EINGEBEN.
UM ZU SPEICHERN ODER VERLASSEN:
L20-227 Über. 1 12/2001
19
PROGRAMMIEREN - ZWEITE EBENE
EINGABE FÜR PROGRAMMIERUNG - ZWEITE EBENE
Die Taste
drücken (“PROGRAM” wird angezeigt). IST EIN PASSWORT ERFORDERLICH, und Sie
haben das programmierte Passwort vergessen, “6684” eingeben. Danach . drücken. Sie befinden sich nun
in der zweiten Programmierungsebene. Alle verwendbaren Tasten leuchten auf und “SELECT OPTIONS”
(OPTIONEN WÄHLEN) wird angezeigt.
HINWEIS: Immer wenn
verwendet wird, um eine Einstellung zu speichern, muß
zu “Select Option” zurückzukehren.
gedrückt werden, um
FUNKTIONSPROGRAMMIERUNG
FAHRENHEIT-/ CELSIUSSKALA - Schaltet durch Drücken der Taste
hin und her. Änderungen können durch Drücken der Taste
zwischen Fahrenheit und Celsius
gespeichert werden.
PASSWORT EINGEBEN - Schaltet die Passwort-Funktion ein und aus. Es kann auch ein numerisches
Passwort eingegeben werden. Passwort ein- oder ausschalten. , wählt zwischen “PASS REQ”
(PASSWORT ERFORDERLICH) oder “NO PASS” (KEIN PASSWORT). Wurde ein Passwort gewählt,
drücken, und das Passwort wird angezeigt. Mit den Nummerntasten kann ein neues Passwort
eingegeben werden und durch Drücken der Taste
gespeichert werden.
SIGNALLAUTSTÄRKE - Damit kann die Lautstärke des Alarmsignals eingestellt werden.
drücken, um zu speichern.
SPRACHE - Zwischen Englisch, Spanisch, Französisch, Deutsch und Holländisch wählen.
eine der Sprachoptionen wählen.
drücken und
drücken, um zu speichern.
SCHMELZZYKLUS - Es stehen 3 Zyklen zur Wahl: NO MELT (Schmelzzyklus ist deaktiviert), MELT S
(Schmelzzyklus für festes Bratfett), MELT L (Schmelzzyklus für flüssiges Bratfett).
drücken, um zu
speichern.
TESTZEIT FÜR TEMPERATURANSTIEG - Zeigt die voreingestellte sowie die tatsächliche Testzeit des
Temperaturanstiegs von 104° auf 138°C (220°F auf 280°F) Can. Die voreingestellte Testzeit ist nicht
relevant. Die tatsächliche Testzeit vor Ort verwenden, um etwaige Probleme beim Temperaturanstieg bzw.
-steuerung festzustellen. HINWEIS: Der Ölstand beeinflußt diese Testzeit. drücken. Es wird “F065
LXXX” angezeigt, wobei die angezeigte Zeit 065 beträgt und die zuletzt gemessene Testzeit “LXXX”
beträgt.
STEUERUNG / TIMER - Schaltet den Computer von Steuerung aller Friteusenfunktionen auf
ausschließliche Steuerung des Timers bei einem Computer für nur eine Wanne bzw. für die linke Wanne
einer Doppelwannenfriteuse um.
drücken, um zu speichern.
drücken, um zwischen Steuerung und Timer hin- und herzuschalten.
STEUERUNG / TIMER - Schaltet den Computer von Steuerung aller Friteusenfunktionen auf
ausschließliche Steuerung des Timers für die rechte Seite eines Computers für Doppelwanne um.
drücken, um zwischen Steuerung und Timer hin-
und herzuschalten.
drücken, um zu speichern.
UM DIE ZWEITE EBENE DES PROGRAMMIERUNGSMODUS ZU VERLASSEN,
FUNKTIONSTASTE
DRÜCKEN
20
L20-227 Über. 1 12/2001
DEUTSCH
aus Lautstärke 1, 2 und 3 wählen.
drücken und
PROGRAMMIERANLEITUNG FÜR DIGITAL STEUERUNG
STEUERUNGSANZEIGE
PROGRAMMIERTASTE
EIN/AUS-SCHALTER
RECHTER TIMER/
LEUCHTANZEIGE EIN
LINKER TIMER/
LEUCHTANZEIGE EIN
RECHTE TIMER-TASTE
LINKE TIMER-TASTE
TEMPERATURTASTE
STEUERFUNKTIONEN
DRÜCKEN, UM STEUERUNG EINZUSCHALTEN
DRÜCKEN UND FÜR 3 SEKUNDEN HALTEN. UM STEUERUNG
AUSZUSCHALTEN
DRÜCKEN, UM TATSÄCHLICHE TEMPERATUR ANZUZEIGEN
ZWEIMAL DRÜCKEN, UM EINGESTELLTE TEMPERATUR ANZUZEIGEN
DRÜCKEN, UM TIMER FÜR LINKEN KORB EINZUSCHALTEN
DRÜCKEN, UM TIMER FÜR RECHTEN KORB EINZUSCHALTEN
DRÜCKEN, UM PROGRAMMIERMODUS ZU AKTIVIEREN
ZEIGT AN, OB PROGRAMMIERMODUS DURCH PASSWORT
GESICHERT IST
PROGRAMMIERANLEITUNGEN - ERSTE EBENE
HINWEIS: SIND DIE TIMER AKTIVIERT, KANN NICHT PROGRAMMIERT WERDEN
SCHRITT 1
PROGRAMM EINGEBEN
DRÜCKEN. Erscheint
auf der Anzeige, mit SCHRITT 2 fortsetzen. Leuchtet
die LEUCHTANZEIGE für den LINKEN TIMER AUF und die ANZEIGE zeigt die für den
linken Timer eingestellte Zeit an (die angezeigte Zeit zählt nicht rückwärts), befinden
Sie sich im PROGRAMMIERMODUS. Mit SCHRITT 3 fortsetzen.
SCHRITT 2
PASSWORTMODUS
Wird
angezeigt, die Tasten
(Passwort) drücken, um den
Programmiermodus zu erreichen. HINWEIS: Beginnt der Timer mit dem Countdown,
wurde das Passwort nicht schnell genug eingegeben. Die Steuerung muß aus- und
wieder eingeschaltet und SCHRITT 1 wiederholt werden.
PROGRAMMIEROPTIONEN DER STEUERUNG
UM EINGABEN ZU SPEICHERN UND DEN PROGRAMMIERMODUS ZU VERLASSEN,
DRÜCKEN UND 5 SEKUNDEN HALTEN
SCHRITT 3
LINKE TIMER-TASTE
PROGRAMMIEREN
SCHRITT 4
RECHTE TIMER-TASTE
PROGRAMMIEREN
SCHRITT 5
PROGRAMMIEREN DER
TEMPERATUR
L20-227 Über. 1 12/2001
Wenn die LEUCHTANZEIGE für den LINKEN TIMER aufleuchtet und die für den
linken Timer programmierte Kochzeit auf der ANZEIGE erscheint,
oder
drücken, um die programmierte linke Kochzeit zu ändern. ZUM SPEICHERN VON
EINGABEN SIEHE ANLEITUNG OBEN.
DRÜCKEN. Die LEUCHTANZEIGE für den RECHTEN TIMER leuchtet auf und
die programmierte Zeit für den RECHTEN TIMER erscheint auf der ANZEIGE.
oder
drücken, um die programmierte rechte Kochzeit zu ändern. ZUM
SPEICHERN VON EINGABEN SIEHE ANLEITUNG OBEN.
DRÜCKEN. Auf der ANZEIGE erscheint die VORPROGRAMMIERTE
TEMPERATUR.
oder
drücken, um die vorprogrammierte TEMPERATUR zu
ändern. ZUM SPEICHERN VON EINGABEN SIEHE ANLEITUNG OBEN.
21
PROGRAMMIEROPTIONEN - ERSTE EBENE - FORTSETZUNG
HINWEIS: SIND DIE TIMER AKTIVIERT, KANN NICHT PROGRAMMIERT WERDEN
UM EINGABEN ZU SPEICHERN UND DEN PROGRAMMIERMODUS ZU VERLASSEN,
UND 5 SEKUNDEN HALTEN
DRÜCKEN
SCHRITT 6
SCHMELZZYKLUS
PROGRAMMIEREN
,
DRÜCKEN.
oder
wird angezeigt.
oder
DRÜCKEN, um die
vorprogrammierte “SCHMELZ”-Einstellung zu ändern. (
= Schmelzzyklus festes
= Schmelzzyklus flüssiges Bratfett, und
= kein Schmelzzyklus.)
Bratfett,
ZUM SPEICHERN VON EINGABEN SIEHE ANLEITUNG OBEN.
SCHRITT 7
/ PASSWORT
PROGRAMMIEREN
oder
DRÜCKEN, um
DRÜCKEN.
oder
RECHTS wird angezeigt.
Passwort zu aktivieren (ON) bzw. deaktivieren (OFF). ZUM SPEICHERN VON
EINGABEN SIEHE ANLEITUNG OBEN.
SCHRITT 8
CELSIUS / FAHRENHEIT
PROGRAMMIEREN
DRÜCKEN. [C] oder [F] (Celsius oder Fahrenheit) wird angezeigt.
oder
DRÜCKEN, um die programmierte Temperaturskala zu ändern. ZUM SPEICHERN VON
EINGABEN SIEHE ANLEITUNG OBEN.
SCHRITT 9
DRÜCKEN. Der Programmierzyklus ist nun zu SCHRITT 3 oder zum Beginn
zurückgekehrt.
PROGRAMMIERANLEITUNGEN - ZWEITE EBENE
SCHRITT 1
SCHRITT 1 und SCHRITT 2 der PROGRAMMIERANLEITUNGEN - ERSTE EBENE
folgen.
SCHRITT 2
KORB ANHEBEN,
EINFACHE BZW.
DOPPELHEBEOPTION
SCHRITT 3
ANZEIGE DER
TATSÄCHLICHEN
TEMPERATUR
DRÜCKEN und HALTEN. Während die Taste.
gedrückt gehalten wird
drücken.
oder
wird angezeigt.
oder
DRÜCKEN, um die Anzahl der
Hebefunktionen in der Friteuse zu ändern. ZUM SPEICHERN VON EINGABEN SIEHE
ANLEITUNG OBEN.
oder
DRÜCKEN, um die
DRÜCKEN.
oder
wird angezeigt.
programmierte Einstellung zu ändern (
= tatsächliche Temperatur wird nur
angezeigt, wenn die Taste gedrückt wird,
tatsächliche Temperatur wird ständig
angezeigt).
ZUM SPEICHERN VON EINGABEN SIEHE ANLEITUNG OBEN.
ERKLÄRUNG DER STEUERUNGSANZEIGEN
DIE FRITEUSE BEFINDET SICH IN EINEM SCHMELZZYKLUS.
DIE TEMPERATUR DER FRITEUSE IST NIEDRIGER ALS DIE PROGRAMMIERTE
TEMPERATUR UND FRITEUSE IST IM AUFHEIZEN BEGRIFFEN.
DIE FRITEUSE HAT DIE PROGRAMMIERTE TEMPERATUR ERREICHT UND IST
BETRIEBSBEREIT
WENN DER PUNKT AUFLEUCHTET, IST DAS HEIZSYSTEM AKTIVIERT.
22
L20-227 Über. 1 12/2001
FEHLERSUCHE
PROBLEM
WAHRSCHEINLICHE URSACHE
Computer schaltet sich
nicht ein, die beiden
Anzeigen bleiben leer.
A. Hauptschalter ist ausgeschaltet. A. Den entsprechenden Hauptschalter im
Gebäude AUS- und wieder
EINSCHALTEN.
B. Durchgebrannte
B.
Einen autorisierten Servicetechniker
Friteusensicherung.
kontaktieren.
A. Öl abkühlen lassen, Reset auf dem
A. Ist das Öl heiss, wurde
Begrenzungschalter drücken und
möglicherweise der
den Computer AUS- und wieder
Begrenzungsresetschalter
EINSCHALTEN.
ausgelöst.
Die Heizanzeige auf dem
Computer leucht auf, aber die
Heizelemente erwärmen sich
nicht.
Computer zeigt “OFF” (AUS)
und kann nicht eingeschaltet
werden.
Das ROTE Rücklaufventil ist
offen aber kein
Pumpengeräusch hörbar.
Ablaufventil ist geschlossen
und der Computer wurde neu
gestartet (Reset), zeigt aber
weiter “DRAINING”
(ABLAUFEN) oder “TURN
OFF” (ABDREHEN) an.
Ablaufventil ist offen, das Öl
äuft nur langsam oder
überhaupt nicht ab.
MASSNAHME
A. Den Überlastschalter im Gebäude
AUS- und wieder EINSCHALTEN.
Schaltet sich der Computer nicht ein,
muss ein autorisierter
Servicetechniker kontaktiert werden.
A. Vorsichtig am Hebel des ROTEN
A. Das ROTE Rücklaufventil ist
Rücklaufventils ziehen.
nicht völlig offen.
B. Reset drücken auf dem hinter der Tür
B. Der Filter-Überlastschalter
der linken Friteuse befindlichen Filterwurde ausgelöst.
Überlastschalter.
C. Den ROTEN Reset-Knopf am Ende
C. Überlastschalter des
des Filtermotors hinter der Tür der
Filtermotors wurde ausgelöst.
linken Friteuse drücken.
D. Fühlerschalter könnte locker sein. D. Versuchen, die lockeren
Befestigungsschrauben, festzuziehen.
Sollte dies nicht möglich sein, muss
ein autorisiertes Serviceunternehmen
kontaktiert werden.
A. Das GRÜNE Ablaufventil ist nicht A. Versuchen, mit leichtem Druck das
Ventil zu schließen.
völlig geschlossen.
B.
Versuchen, die lockeren
B. Fühlerschalter könnte locker
Befestigungsschrauben,
sein.
festzuziehen. Sollte dies nicht
möglich sein, muss ein autorisiertes
Serviceunternehmen kontaktiert
werden.
A.Das GRÜNE Ablaufventil ist nicht A. Versuchen, mit leichtem Druck das
Ventil zu öffnen.
völlig offen.
B.
Mit Hilfe der Reinigungsbürste das
B.Abfluss ist verstopft.
Ablaufventil von der Innenseite der
Wanne aus reinigen. Wird dadurch
die Verstopfung nicht gelöst, das
GRÜNE Ablaufventil SCHLIESSEN
und den Anleitungen zur Reinigung
der Hauptabflussleitung folgen.
A. Fehlerhafter Computer
VORSICHT:
Beim Entfernen des Deckels könnte
HEISSES Öl austreten. Die beiden
Flügelmuttern vom Deckel entfernen
(NICHT verlieren). Mit der
Reinigungsbürste die
Hauptabflussleitung reinigen. Den
Deckel mit Dichtungsring und vier
Schrauben wieder anbringen. Diese
Schrauben nicht zu fest anziehen, und
das T-Stück nicht entfernen.
Flügelschrauben (nicht verlieren)
entfernen und Abdeckungen reinigen.
Abfluss reinigen, Abdeckung und
Flügelschrauben wieder anbringen.
L20-227 Über. 1 12/2001
23
24
L20-227 Über. 1 12/2001
Bei Problemen oder Fragen zu Ihrer Bestellung
wenden Sie sich bitte von Montag bis Freitag
zwischen 8.00 und 17.00 Uhr Ortzeit (Ostküste)
gebührenfrei an das Pitco Frialator Werk unter der
Ruf-Nr.:
Bei Problemen oder Fragen zu Ihren Geräten
wenden Sie sich bitte an den für Ihren Bereich
zuständigen ASAP-Vertreter (Authorized Service
and Parts) von Pitco Frialator über das National
Service Network unter der Ruf-Nr.:
(800) 258-3708 für USA und Kanada oder
(603) 225-6684 weltweit
(800) 298-1862 nur für USA, 24 Stunden täglich
L20-227 Über. 1 12/2001