1
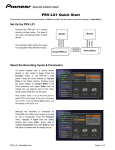
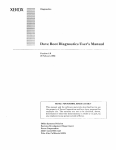
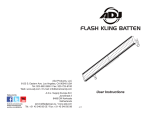
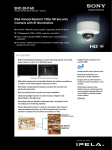
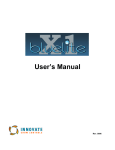
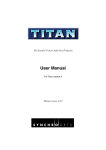
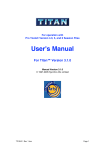
PRODUCT INFORMATION BULLETIN
PIB # 190109
PRV-LX1 – How To Export a Recorded Clip as a VOB File
OVERVIEW:
When recording a video sequence, called a clip, you may want to share that clip electronically with
colleagues or send it to clients for review. To move a clip from a video recording device to another
device such as a computer, the clip must be made transferable as a single electronic file called a
Video Object Set (VOB). A VOB file contains the multiplexed recorded video and audio material in a
single file; the file type that makes up a DVD Video disc. Most computer-based DVD playback
applications as well as a number of DVD authoring applications recognize VOB files.
The Pioneer PRV-LX1 offers a unique feature that allows selecting a clip recorded on the Hard Disc
Drive (HDD) then converting and copying it to a special area on the HDD. From this location, the VOB
file is ready for transfer via FTP software.
Using the Project > Export command in the PRV-LX1’s Edit menu, a clip within the currently selected
project can be renamed and exported as a VOB file. The file name can be input using the VOB
Name command and saved in the VOB folder for access using the recorder’s Eithernet connection or
through FTP. To rename a VOB file, use a keyboard (sold separately) connected to the USB port.
The following sections provide the steps for exporting VOB files.
TECHNICAL DETAILS:
Below are some factors you need to be aware of before attempting to export VOB files.
• The maximum file size for a VOB file is 1 Gigabyte. When an exported clip has a file size
exceeding 1 Gigabyte, the exported VOB consists of multiple file names. The actual file name is
what is typed in using the “VOB name” command followed by a sequential number and “.VOB”.
Clip Name
Clip Size
Test
2.3 Gigabytes
Created VOB File Name
Test_001.VOB
Test_002.VOB
Test_003.VOB
VOB Fie Size
1 Gigabyte
1 Gigabyte
0.3 Gigabyte
Note: Data recorded at a high (9.8 Megabits per second or Mbps) variable bit rate (VBR) is approximately
14 minutes of material in a 1 Gigabyte VOB file while a recording at 5.3 Mbps VBR is approximately
27 minutes of material.
• Sometime video recorded by the PRV-LX1 at the highest bit rates (~ 7.0 to 9.8 Mbps) may exhibit
a slight hesitation during playback on a computer. This can be caused by multiple factors, such as
the decoder used in your playback software or the CPU processing power. If your computer
displays hesitation or skips during playback, we recommend setting the PRV-LX1 to record a lower
bit rate which should eliminate any skips or hesitations when playing the VOB.
For more information about recording rates please refer to the rate chart in the PRV-LX1 Operating
Instructions, (Pg 78).
• To play back VOB files on your computer, it must be equipped with software and hardware that
can play and display VOB files. Most DVD player software can also play single VOB files.
Pioneer Electronics (USA) Inc.
Home & Business Group of America
(310) 952-2000
(800) 872-4159
Released: July 21, 2006
Page 1 of 6
PIB # 190109
Select the VOB file to be Exported
Follow the instructions below to select and prepare a video clip for exportation as a VOB file.
1)
Press the Function button on the PRV-LX1’s front panel to access the menu.
2)
Select a project already recorded on the PRV-LX1’s HDD.
Before continuing, if you are unfamiliar with projects please read the Operating
Instructions, section entitled, Video Clip Management and Disc Authoring.
3)
Select Project from the Edit submenu.
4)
Highlight the Export command.
5)
Select the Clip option to view a list of available clips from the selected project.
6)
Choose a clip from the scrollable list and press Enter.
7)
Highlight VOB Name from the Export submenu.
The “VOB Name” command provides the default file name “exptxxx” each time the
command is executed. The number “xxx” automatically increments.
Pioneer Electronics (USA) Inc.
Home & Business Group of America
(310) 952-2000
(800) 872-4159
Released: July 21, 2006
Page 2 of 6
PIB # 190109
8)
Rename the VOB file using an attached keyboard (sold separately).
9)
Click on the Export button to place the file in the HDD’s VOB folder.
Access the VOB folder on the recorder’s HDD using either the Eithernet connection
or from FTP.
Note: When the exported clip has a file size exceeding 1 Gigabyte, the exported VOB consists
of multiple file names. The actual file name is that typed in using the “VOB name”
command followed by consecutive numbers and an extension.
Export the VOB File Using a Network Connection
VOB files can be exported from the PRV-LX1 using FTP when it is connected to a network via the
Ethernet connector on the unit’s rear panel. Any FTP software can be used to transfer VOB files.
For this example Internet Explorer version 6.0 is used. The instructions below provide step-by-step
directions to connect the PRV-LX1 to a network and to transfer files from the PRV-LX1 to a PC.
Activate the Network Option on the PRV-LX1
Follow the steps below to turn ON the network option.
1) Connect the PRV-LX1 to a network using either a straight cable connected to a hub or
a cross cable.
2) Select the Function button on the PRV-LX1’s front panel to access the main menu.
3) Select System under the SETUP section.
4) Select Network (far left column) to display the Network submenu.
5) Select Network (middle column) to display the options.
6) Select ON to activate.
7) Verify that an orange box ( ) appears next to ON.
Example: Network set to ON
Pioneer Electronics (USA) Inc.
Home & Business Group of America
Example: Network Selections
(310) 952-2000
(800) 872-4159
Released: July 21, 2006
Page 3 of 6
PIB # 190109
DHCP or Manual Option
There are two network options to choose from, DHCP and Manual. DHCP automatically seeks an
available IP address on your network and assigns it to the PRV-LX1. Manual mode requires that the
user type in the IP address, Subnet Mask, and Gateway parameters, which can be obtained from
your network administrator.
Note: If DHCP is selected but no DHCP server exists, the PRV-LX1 takes additional time to start up
after the power is turned ON. If this option is not being used, set DHCP to OFF.
Follow the directions below to set the network connection.
1)
Select DHCP/Manual from the Network submenu.
2)
Select DHCP to activate this option.
3)
Verify that an orange box ( ) appears next to DHCP.
4)
Write down the automatically assigned IP Address for use in the next section.
The IP address may not auto-refresh. If the IP address assigned to the PRV-LX1
fails to appear, follow the directions below to refresh the IP address:
1. Select the Back button located at the bottom of the menu.
2. Select System under the SETUP section.
3. Select Network (far left column) to access the Network submenu.
Note: If the IP address still fails to appear, verify that the network cables are connected securely and
that there is an active Network connection. Repeat steps 1-3 to try again.
Connect via FTP to Export the VOB File
The following steps are to be completed from a computer with an active Network connection. Verify
that both the PC and the PRV-LX1 are connected to the Network via a hub or a crossover cable.
1)
Launch Internet Explorer (must be version 6.0 or higher).
Pioneer Electronics (USA) Inc.
Home & Business Group of America
(310) 952-2000
(800) 872-4159
Released: July 21, 2006
Page 4 of 6
PIB # 190109
2)
Enter the PRV-LX1’s IP address from the previous section into the browser:
Example: ftp://172.018.004.124
Note: Your IP address will be different from the address used in this example.
Refer to previous section to obtain the IP address for your PRV-LX1.
3)
Press Enter on the keyboard to display the Login As dialog box.
It may take up to one minute to establish the FTP connection.
4)
Type in the user name and password.
Both the user name and password are case sensitive.
User Name: PRVUser
Password: prv-lx1
5)
Click on the Login button.
The various HDD folders appear in the browser window.
Pioneer Electronics (USA) Inc.
Home & Business Group of America
(310) 952-2000
(800) 872-4159
Released: July 21, 2006
Page 5 of 6
PIB # 190109
6) Copy the VOB file(s) from the PRV-LX1’s VOB Folder into the PC folder(s).
Copying files from the PRV-LX1 is the same as copying files on a computer. Either
drag & drop, cut & paste, or copy the selected VOB file to your workstation.
ADDITIONAL INFORMATION:
For questions about connecting a PRV-LX1 to a Network (LAN / FTP), refer to the document entitled,
“Importing Menu Backgrounds & EDLs / Importing Using a Network Connection”, document section
3.4 Troubleshooting, available from the Pioneer Electronics website under the Support - Business
Products - Profession DVD tab.
For additional assistance please contact your Pioneer representative or send an email to Support at:
[email protected]
Pioneer Electronics (USA) Inc.
Home & Business Group of America
(310) 952-2000
(800) 872-4159
Released: July 21, 2006
Page 6 of 6