1
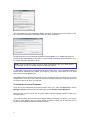
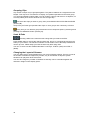
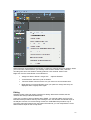
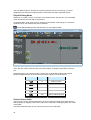
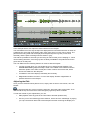
Getting Started with SADiE6 Software
Congratulations for purchasing SADiE6 software, the finest Professional Audio Editing system
in the world.
This short guide aims to help you install the software and get started on your first editing
project.
Contents
The SADiE6 software pack contains:•
The SADiE6 installation CD – this includes installers for the software and for other
software options, plus documentation for the SADiE hardware platforms in PDF
format, and if ordered with a dongle, the dongle key file.
•
The SADiE6 USB memory stick (*optional) – containing the same files as the CD
but in a handy USB stick format.
•
Your SADiE6 USB Dongle Key (*optional) which is used to authorise the SADiE6
software.
•
This booklet.
Note: If this pack is included with a ‘Turnkey’ system, where the software is already
installed to the PC, you can skip the next few sections, but you may wish to read from
page 5 which gives a quick start guide to the software.
To distinguish the USB memory stick from the dongle (as both are USB devices), the memory
stick has pale blue round cover with a ‘6’ logo on one side, the dongle is a darker blue.
DO NOT INSERT THE DONGLE YET.
Pull on the chain to remove the memory stick from its circular cover in order to reveal its USB
port.
Dongle
Memory Stick
1
Installing the Software
The first step is to run the software installer.
NOTE: If you have previously been using an earlier version of the SADiE software on
this computer, it is best to uninstall the old version first. Go to the Start button / Control
Panel / Add/Remove Programs (or Programs / Uninstall a Program) then select the older
SADiE program and uninstall it.
Uninstalling the SADiE software does not alter data, settings, hotkeys or licences.
1. Insert your software CD, or the USB memory stick. You may need to wait a moment
while your computer is dealing with this.
2. If installing from CD a menu will appear. You will be asked to select your platform
(between ‘Native’ and ‘SADiE Hardware Platform’) and then press the ‘Install’ button
If installing from Memory Stick. Navigate to the \Software directory of the USB
memory stick and run ‘SADiE6_installer.exe’ by double clicking on it.
3. Follow the instructions on screen. There will be a few messages with some
configuration choices, but if in doubt, press enter to continue through the installer.
4. Once the installer has finished, you will see a SADiE6 icon on your desktop. Doubleclick on the icon to start the SADiE software.
Running SADiE6
Audio Hardware
The first time you run SADiE, if you are running without SADiE hardware you will see a
message about the selection of audio hardware. At the time of this first start, SADiE chooses
some hardware automatically, but you can choose from available hardware in SADiE’s
‘Native Drivers’ setup page which can be found in the Setup Window from the ‘View’ menu.
We recommend that you use hardware with an ASIO driver. SADiE is able use WDM drivers
also, but performance is much better with an ASIO driver.
Licences
To run SADiE your software installation must be authorised. The first time you install SADIE
on a PC it will operate in trial mode for 30 days.
If you have the USB Dongle key you should install it now. If not, skip this section and move to
‘Requesting a Licence’.
Installing the Dongle
The CD or USB memory stick that you installed the software from should still be inserted.
Don’t insert the Dongle just yet.
If you are installing from the CD go back to the main menu of the CD wizard, and click
on ‘Install a Dongle’.
If you are installing from a USB memory stick navigate to the root directory of the
stick, and run the program ‘SADiE_Dongle_Installer.exe’ by double-clicking on it.
Once again the software installation is automatic. You may need to press ‘enter’ to move
through the installer. A driver and a key file for your dongle will be installed to your PC.
2
At the end of the dongle installation you will be prompted to restart the PC. (There are two
installers running to install the dongle, so please wait until the full process is complete.)
On re-starting the PC, connect the dongle to a USB port.
The installation of the driver for the dongle will be completed and you will be able to start
SADiE. The first ‘plug-and-play’ of the dongle may take a while and you should be able to
watch its progress in the Windows plug-and-play wizard. If starting SADiE doesn’t find the
dongle, wait just a while longer. Subsequent re-insertion of the dongle will be quicker.
The dongle will need to be present to start and run SADiE on that PC. To be able to use
SADiE on other PCs, run the same procedure of a) installing SADiE software and b) installing
the Dongle.
NOTE: To install the Dongle on a PC you will need both the Dongle and its installer and
its individual key file; the Dongle alone is not enough. Therefore it’s important to keep
the Dongle installer files safe. Once the Dongle is correctly installed to a PC however,
just plugging in the Dongle will authorise SADiE operation that PC.
Lost dongles
We must stress that it’s important to insure your dongle for the full amount of the software
that’s licensed to it. If a dongle is missing, to replace it will cost the price of the dongle plus a
full SADiE licence. If a dongle is broken or faulty, its licences can be moved to a new dongle
once the faulty one has been returned to the factory. We can provide users who have support
contracts with temporary licences to bridge a period while a faulty dongle is being replaced or
repaired.
Having installed the dongle, there is no need to ‘Request a Licence’ and so you can skip the
next section.
Requesting a Licence
If you haven’t purchased a dongle, SADiE is authorised to run on a single computer.
You will need to ‘request a licence’, send the licence request file to us by e-mail, then a
‘licence response’ file will be sent back to you which unlocks SADiE on that PC.
It’s not necessary to have email on the computer that is running SADiE – the ‘licence request’
is a file which can be copied to another computer that does have email.
To Request a Licence
Go to the Help Menu in SADiE. Choose the Manage Licences option. (If your licence has
timed out, you won’t be able to start SADiE, but you will see this next dialog box)
Select Create New Request
3
You will be asked for some registration details, and then, on pressing OK you will save a '.arq'
file - the licence request file. Remember where you have saved this!
Having saved this, the file should be emailed to [email protected] - SADiE will ask if you
want to do this automatically or manually. You will need an email client to be installed on your
PC for the automatic operation to work.
Note: If nothing happens when you press 'Send e-mail directly' then your email client is
not working, and so you should resort to the manual method.
To 'Send the e-mail myself', find the ARQ file (it will usually be in your Documents folder and
will be named something like 'Sadie6_yourcompany_yourpc.arq' ) then attach it to an email
and send it to [email protected].
The SADiE office will process this request as soon as possible and you will be sent a Licence
Response file, in the form of a '.ARP' file, which will usually include your company name and
the name of the PC to which it is licensed.
To Install the Licence Response
Once the Licence Response file has been sent back to you, from the Help menu, choose
Manage Licences, then from the next dialog box choose Install Licence Response.
Browse to the '.arp' file, press OK, and then SADiE will automatically install the option you
have purchased.
If you wait until after the trial period has elapsed before requesting your licence, you will not
be able to open SADiE. But you will be offered an option to allow you to make the licence
request, which follows the same procedure as above.
4
Getting Started with SADiE6 software
SADiE6 Overview
The following topics describe the fundamental functions in the SADIE6 software - recording,
importing and editing. There is further detailed explanation of these functions in the User
manual itself, which may duplicate some of this however it's recommended that you read
these pages to help you master some of the simplest concepts, and make your earliest tasks
with SADiE run more smoothly and quickly.
You can view the SADiE User Manual either within the software itself, by going to the Help
menu and selecting Help on SADiE6, or from the installation CD or the SADiE download
page on our website, where it is saved in PDF format as ‘SADIE6 User Manual.pdf’
Basic SADiE Terms & Concepts
PROJECT:
A Project is a folder, located on a PC Drive, where SADiE creates the files, or project
components, that are used in the editing, compilation and mixing process. By ‘managing’ the
project you basically add, remove, name or update these components; this is more easily
done within SADiE itself, via its ‘Project Management Window. The project components
comprise the basics: EDLs, Clipstores & Mixers (as many of these as you wish), and can also
include any other Windows™ document - Word Docs, PDFs, pictures, etc), which may be of
use in your work. On top of this, the Project Folder normally contains all the audio you use
within a Project. Although audio can be referenced to external locations, it is advisable to
keep it in the Project Folder (and there is a function to do this) so that copying and backing up
becomes a simple Drag & Drop process under Windows™. SADiE’s Projects are created,
saved & loaded again either as you first launch SADiE, or from within the application itself.
EDL - ‘Edit Decision List’:
An EDL is a file created using SADiE’s™ Playlist window. It shows the ‘Clips’ joined together
as you want them, with all their basic levels, cross-fades, automation data, names and so on.
This file is the one we edit with the various tools of the Playlist window, together with a
number of ‘hot keys’ and the hardware controllers if you are using them, and is the window in
which we spend most of our time editing and compiling.
The EDL basically tells SADiE which parts of which raw audio tracks to play, in which order,
at which level, etc. It has to be saved if you are to use it again and is normally saved within
the Project.
CLIP:
A ‘Clip’ is a reference to all or any part of a raw ‘track’ of audio. It is the Clips that are edited
and manipulated within SADiE, never the original audio. There can be many Clips in an EDL,
each referring to either different audio tracks, different parts of the same track or even many
clips referring to the same part of a track, all playing back at the same time if you wish. Clips
can be duplicated many times without duplicating the original audio track.
CLIPSTORE:
The Clipstore component of a project contains clips that refer to the raw audio ‘tracks’ on the
hard-drive(s). There is always a 'Source Tracks Folder' within the project's main Clipstore; this
contains clips that refer to entire audio tracks so that they can be dragged into your Playlist
and edited. Other clips can be put into the Clipstore that have already been edited in the
Playlist for repetitive use or use in the future. A Clipstore is one of the components of a
project and extra Clipstores can be imported form other Projects.
5
EDL ENTRY:
A Clip becomes an EDL entry when you place it into an EDL (basically a SADiE EDL just
sees a ‘list’ of entries, but displays them to us as Clips for easy editing and manipulation). So,
when you see the term ‘Entry’ referred to it simply means the Clip within the EDL.
AUDIO TRACK:
An audio ‘track’ is the actual audio as it was originally ingested (recorded, imported, ripped
form CD or internally bounced) into the project and put onto the hard disk. You never edit this
audio itself, just the Clips that refer to it.
STREAM:
The ‘streams’ are the linear parts of the Playlist where you place your clips, building up the
EDL that makes your production. You can add or remove streams as necessary. The streams
have their own sets of controls that affect the clips on those streams such as mute, solo,
record enable, etc. Streams can be mono, stereo or multi-track and can be changed
whenever desired, added to or removed by right-clicking in the Stream control area.
Best Practice: select (or create) a stereo Stream to record stereo material, so that the two
channels remain in sync no matter how you manipulate them in SADiE.
How the audio on a Stream is played out of SADiE is determined by the relevant Stream’s
mixer channel - this can determine the pan/balance, level, EQ, dynamics and so forth.
MIXER:
The Mixer is where you route audio around the SADiE system, and generally balance the mix
of your work. Each ‘Stream’ on the Playlist will normally have a 'mixer strip' in the Mixer
assigned to it, enables you to control the level and pan position of all the Clips on that
particular Stream. Each of these mixer strips has its own EQ, dynamics (compression, etc)
and auxiliary sends to the outside world (hardware permitting) as well as other tools including
Direct X and VST plug-ins - these are all just inserted onto mixer strips.
Many of the mixer operations (levels, panning, EQ, aux sends) can be 'automated' so that
your movements can be remembered and played back.
A Mixer is one of the components of a Project and saved & loaded with that Project.
HOT-KEYS:
These are user-defined keyboard shortcuts to make your workflow faster. You can create a
Hot-Key for virtually any function within SADiE. There are default ones, and user-defined
ones, and you can load them up as desired from the Environment>Hotkeys menu. If you
select Load you will find some pre-defined ones, and selecting the ‘SADiE 5 using BB2’ set
will enable the BBC-friendly key set, referred to in this training guide.
Ingesting Audio 1
Recording with SADiE
To make a recording in SADiE you need to have set up a few things first. Once set up they
will remain this way, even when you exit SADiE, unless you change them again.
You can do this via the Transport Window:
6
Generally the quick key for this is F10, but you can also open it with the icon in the toolbar
In this window, click on the 'SETUP' button at the bottom and you will go to SADiE’s™ ‘Audio
Settings’ window. In here you should change the audio source to either digital (AES) or
analogue depending on where the source audio is coming.
In the Setup window, you can also change whether SADiE 6 is using ASIO hardware, internal
Windows™ Media drivers or its own hardware (if you have it connected) - see earlier in this
section.
If you have selected Analogue as your input then you may need to change the sample rate at
which SADiE will record the audio. Make sure that this is the same as the rest of the audio
within the project if possible.
NOTE: If you have selected a digital input then, when you hit the record button, SADiE may ask you
if you want the sample rate changed to reflect that of the digital source. Always click yes if it asks you
so that the ‘profiles’ (pictures of audio you see on screen) will be properly matched.
Once this is set up, close the settings window. Back in the transport controls, you should
name the track of audio you are about to record. Click to the right of where it says 'Track',
enter a name, and then hit return.
Best Practice though not essential to name your new recording, SADiE will force you to
do so unless ‘Auto-Take’ is enabled (see below).
Auto-Take: you might want to turn on 'Auto-Take'. This will put a number after the track name
so you don't have to name each take. With Auto-Take enabled, you could leave the name
blank and SADiE will call the track “Un-named Track-01” and increment this number with
each subsequent recording.
Next, decide whether you want a mono or stereo recording. For mono, chose a mono stream
to record on to, choose a stereo stream for a stereo track.
Click on the green 'record enable" button in the stream controls to the left of the streams.
To get a level, click on the pause button on the transport controls (you may get a level as you
hit the 'R' button on the stream controls, depending on the set up of your SADiE).
When you are ready to start recording, hit the RECORD button in the transport controls (if you
just hit the pause button again you will not be recording, just playing - though you can hit the
RECORD button at any time to 'drop-in' to record whilst playing).
You will notice the ‘Profiles’ (pictures of the audio) being created in the Playlist as you record.
Assuming you don’t stop SADiE, you can actually razor or scissor cut this audio, rename it
and move it from stream to stream (select the Clip and CTRL-Down/Up Arrow)whilst it is
recording!
7
Recording Quick Guide
•
Open the Transport Controls.
•
Hit SETUP - confirm audio settings, close Setup Window.
•
Name the Track to be recorded
•
Arm the stream with the green "LED" button on stream controls.
•
Hit RECORD button.
Ingesting Audio 2
Importing Existing Material
If you already have the material in the system because it:
•
already exists in another project
•
exists on any other accessible Windows™ ™ PC drive (including the network or CDRom)
•
was recorded onto a Compact Flash card using a portable recorder, and you have it
(or a card-reader) attached.
… then this audio can be Copied and Imported directly into your project folder. This of
course is very much faster than loading material in real time!
Here’s the process:
1. Open the Clipstore.
2. Select COPY AND IMPORT SOURCE TRACKS. This will open a window where you
can find the audio you want to Copy & Import. On the left hand panel of this window,
double-click on ‘System’ to reveal ‘My Computer’ and all the drives connected to it.
8
3. Click on the Drive that contains the audio you want (you may need to REFRESH if
you have recently changed a drive or Flash Card - to do this click on the little button
at the bottom right of the window with the blue circular arrows).
Double click on this Drive to reveal the folders or files, which shows up as little blue
icons on the right hand side.
4. If you want to audition your audio before ‘copy and importing’, then select one of the
little blue icons and click on the green arrow button next to the refresh button. Select
all the audio files you want (by CONTROL or SHIFT-clicking them) and then click the
‘OK’ button at the bottom of the window.
5. The audio files you selected will then be COPIED and IMPORTED into your Source
Tracks folder ready for you to drag & drop into the EDL.
These audio files are now part of your project and are, once copied, physically located in your
project folder.
The audio will be represented as ‘Source Tracks’ within the Clipstore. Simply drag & drop
them into the Playlist window to start editing them...
9
Best Practice: unless you really want to, always choose ‘Copy & Import’ rather than just
‘Import’ Source Tracks. By Copy & Importing the audio is actually duplicated and copied
from its original location into your Project Folder, so that you don’t need the original drive
to always be attached, and keeps all your Project material together. Copy & Import also
performs a ‘Sample-Rate Convert’ so that the imported audio matches the sample-rate of
your EDL.
Ingesting Audio 3
Importing Audio CDs
You can import audio from a CD into SADiE 6, easily and quickly. Here’s how to do it:
1. Insert your audio CD into the PC’s CD drive.
2. Open the Clipstore as with other importing.
3. Right-Click in within the Clipstore and select ‘Import CD Tracks’
4. All the tracks on the CD will appear (you may have to wait for a few seconds for the
CD to be read…)
5. All the audio tracks default to being selected so you may want to click on ‘Deselect
All’ and then tick the tracks you want. You may also wish to click on ‘Set Base Name’
and enter the name of the CD (if it doesn’t contain CD Text). SADiE will then title the
audio in the Source Tracks Folder by that name.
6. You can right-click on a track in the list to audition it.
7. Click the ‘Start’ button and off it goes! When it has finished importing, close the CD
Import window and remove the CD from the PC.
8. You can now drag and drop the audio you want into your Playlist.
10
CD Import is actually a ‘background task’; you can in fact close the CD Import window once
you have started importing, and carry on working within the EDL!
Note: from within the Clipstore, just drag and drop individual audio files, not the CD icon itself!
SADiE Projects and Project Folders
A ‘Project’ in SADiE is the way to organise all the audio, EDLs and other components
of your SADiE work in one place. This is normally achieved through SADiE’s ‘Project
Manager’ window, which simply manipulates the folder on the PC drive that is created when
you create a new project.
This Project Folder contains all the components of your project (EDLs, Mixers, Clipstores) and
all the audio you have ingested (by either recording, copying, ripping a CD or internally
‘bouncing’).
It makes sense to work this way as you then just have one folder which can be copied or
moved around any Windows™ system for backing up or moving to other SADiE machines.
Note: a project’s EDL could refer to audio files not in the project folder but we need to ensure
that this isn’t the case by following the procedures for ‘Copying and Importing’ audio files into
our Project Folders in this guide.
Creating a New Project in SADiE
Launch SADiE and select ‘New Project’ in the Project Startup Menu that appears
11
... or from within SADiE if it is already running, choose ‘New Project’ from the Project dropdown menu.
Best Practice: Assuming SADiE has been setup appropriately, the location you chose for
creating your Project at the creation stage will be the place everything (Project
components and audio) goes. You can also setup SADiE to always look in a certain
location for creating new Projects, and this will be the place it first looks to open existing
Projects.
NOTE: It is possible to set SADiE to record audio to a different location, though this is clearly not
advisable in most circumstances as you could end up with Project components and audio on different
drives!
Using the Playlist
12
The Playlist
The Playlist is a window that is used to create and manipulate your EDL - ‘Edit Decision List’.
An EDL or in SADiE is basically like a word processor document; you can cut, copy,
paste, add clips of audio & save the file. When you first start a new Project, SADiE will
open a Playlist window containing an empty EDL, named after the Project. You can then build
up the EDL by recording directly into it, or by pasting in Clips from the Clipstore, and editing.
You can save this EDL as another within the same project if you wish by selecting ‘Save
As…’ under the File dropdown menu.
All the EDLs in your Project can be opened via the ‘Project Window’.
Best Practice: save your Project via ‘Save Project’ under the Project dropdown menu.
This saves ALL the EDLs (and indeed all other components) at the same time. This way
you don’t have to save each component separately, and reduces the risk of forgetting to
save anything!
Alternatively of course, you may want open an existing Project and do further work on that
EDL. As SADiE is 100% non-destructive editing, you can work on an EDL made years before
and simply continue to manipulate the edits.
Scrolling & Zooming
When moving around the Playlist to access different parts of your EDL, you may want to
change which part, or how much of it is displayed. These scrollbars work in the same way as
any word processor.
You can also use the Hot-Key (default: SHIFT-Left/Right Arrow) to zoom in and out.
Playing Back the Audio Using the Time-bar
As well as using the transport controls and space bar for playing & stopping SADiE, you can
also use the mouse in the time bar at the top of the Playlist window.
•
Double-click in the white time-bar area to start playback immediately from that point.
•
Single-click anywhere in the time-bar to stop playback.
•
Single-click in the time bar when playback is stopped to locate the current-time cursor
to that point.
•
Keep double-clicking in the time-bar to play from that point to find something you are
looking for.
You can set up SADiE so that you can double click anywhere in the Playlist, rather than just
the time-bar, to start and stop, even on a clip itself. Do this via the ‘Setup’ window.
Manipulating Clips (‘EDL Entries’) in the Playlist
You can view the clips in the EDL as either blocks (representing bits of tape) or as profiles - a
graphic waveform display that accurately represents the original audio.
You manipulate Clip(s) by first clicking on it (them) so that they turn red. Whatever you do
next - drag, CTRL-Drag to copy, cut/copy/paste, level change (default Hot-Key ‘L’), Remove
Gap, delete, etc - will affect only those Clips selected.
13
If you want to select more than one Clip, either SHIFT-select multiple Clips, or ‘rubber-band’
them as you would do sections of text in a word-processor. To de-select ALL clips, just click in
a blank area of the Playlist.
Note: EDL "ENTRIES”: don’t be alarmed when you see the word 'entry'. This just means one of
the clips in the EDL (each clip is actually an 'entry' in the edit decision 'list').
Renaming Clips within your EDL
Right-click over the Clip itself and select “Edit Entry Name”.
Razor-Cut
The RAZOR-CUT button (on the main Playlist Tools toolbar or default Hot-Key F5) in the
Playlist divides the Clip(s) under the current-time cursor into two at that point.
You also have the option of using the ‘scissors’ to make cuts. Whereas the RAZOR
button always cuts at the current-time cursor, and across all Streams (unless you have
disabled them for cutting), when you press the SCISSORS button (on the main Playlist Tools
toolbar), the mouse-pointer will change into a scissors icon with a cross to show the target
point. You can then make a freehand cut anywhere in the Playlist, which will cut only the clip
over which you clicked - useful if you can see exactly where to cut from the waveform profile.
Cut, Copy & Paste
These techniques can be used to remove, move and add EDL Clips in the same way that text
is manipulated in a word processor.
Note: when cutting or copying Clips, they are in fact ‘loaded’ into a temporary store called the
'Paste Buffer'. This buffer is what is then ‘pasted’ into the EDL at the point you wish. So you
can move Clips by Cutting & Pasting them in somewhere else and you can repeat them by
copying them and pasting the copy somewhere else. This paste buffer continues to keep its
contents until you cut or copy another selection, or close SADiE. Thus you can continue to
paste the same content many times by just pasting again and again.
These tools are on the Playlist PASTE toolbar, but you can also use the standard Windows™
Hot-Keys: CTRL-X, CTRL C, CTRL V…
Cutting (Removing) Clips from the EDL
Select the Entry/Entries as described above, then:
Press CUT ENTRIES TO PASTE BUFFER.
Copying EDL Clips to the Paste Buffer
Select the Entry/Entries, then:
Press COPY ENTRIES TO PASTE
BUFFER.
Pasting clips into the EDL
NOTE: The Paste Buffer first needs to be loaded from cutting or copying EDL Clips as
described above. If it is not loaded, its button picture will appear faint.
Press LOAD PASTE BUFFER TO CURSOR. When you move your mouse pointer (or
cursor) over the Playlist Streams, you will see that it has changed to a reel of tape with a
cross indicating where the in-point of the Clip/Clips will be positioned. The mouse time display
will give you the exact EDL time. Click to paste the Clip/Clips into the Playlist.
You can also paste by right-clicking the mouse at the point you want to past and select
‘Paste’
14
Pressing the PASTE TO CURRENT TIME button will place the contents of the paste
buffer into the Playlist at the current time.
Multiple Clips cut or copied from the EDL will be pasted back with the same time and Stream
relationships between them.
NOTE: To cancel pasting and drop the paste symbol from the mouse pointer, press the
button again, or right-click with the mouse.
To repeat one or more Clips, either:
•
Copy them and then paste them in at a new point, as described above.
•
Select them, and then hold the Ctrl key whilst dragging a copy to the required position.
Or:
Remove Gap
This is a useful tool (on the main Playlist Tools toolbar) for moving any selected Clip to
the left so that it butts up to the previous Clip on that Stream. The start of the selected Clip’s
fade-in will be changed to coincide with the start of the preceding Clip’s fade-out.
Slip - Keeping Everything in Sync
Probably one of the most important functions of SADiE, certainly for radio production, is the
‘Slip’ function. When enabled, this makes ALL clips to the right (or left if desired) of a selected
Clip(s) move by the amount of that selected Clip.
Therefore, if you select a Clip and move it, everything that starts after the beginning of this
Clip will move by that amount, keeping all subsequent edits intact. Similarly, if you cut a
selected Clip, all subsequent Clips will move up by that Clips duration. If you paste a Clip with
Slip enabled, all subsequent Clips will move out of the way by the pasted Clips duration. If
you Remove-Gap on a selected Clip, with Slip-Right enabled, it will butt up accordingly,
bringing the rest of you EDL with it.
This is fundamental to radio programme making where you are not tied to a time-code without it you would have to keep selecting all Clips in the EDL to the right of the clip you are
moving and ensure they are all selected so that things don’t go out of sync later.
To Enable Slip: click on the ‘Slip Enable’ icon in the Slip toolbar, and MAKE SURE either
Slip-Left or Slip-Right is also selected (once you have first chosen Slip-Left/Right it will remain
the selection each time you enable Slip, so you only have to this once). Generally Slip-Right
is the option to choose for radio and Podcasting work.
Tip: if you have the SADiE-BBC Hot-Keys loaded, the Hot-Key for Slip is ‘S’ – this will
speed up your workflow enormously.
Snap To Cursor
This is a very useful tool for synching up Clips. Right-click over the Clip you want to move and
select “Snap In-Point to Current-Time”. The Clip will jump to a new position with its in-point on
the current-time cursor.
This is useful:
•
On the fly whilst listening to music to run alongside speech. A voice Clip can be
snapped to cursor during playback.
•
After positioning the current-time cursor by double-clicking on the current-time
display and typing a new value.
•
After positioning the cursor by scrubbing with the Edit section of the transport
controls, perhaps scrubbing to picture to find a visual synch point.
15
Grouping Clips
Any number of Clips may be grouped together. They will be redrawn as a single block in the
Playlist. This may be for convenience of display, for repeated operations to the same group,
or to avoid accidentally undoing edits. You can rename a group, and store it in a Clipstore, so
a heavily edited piece can be stored as if it were a single Clip.
First select the Clips you want to group, then press GROUP SELECTED EDL ENTRIES
(Hot-Key G).
Groups may be further grouped with other Clips or other groups and a hierarchy is formed.
At any time you can break a group back down into its component parts by selecting it and
pressing the UNGROUP button (Hot-Key U).
Undo & Redo
Pressing UNDO can reverse the last change that you made to the EDL.
Press UNDO again to reverse the change before that, and so on, stepping back through the
history of your actions. The maximum number of undo levels is set in the Setup window and
can be up to 50. REDO steps you back the other way after using undo.
You can of course use the standard Windows™ Hot-Keys: CTRL-Z (Undo) and CTRL-Y
(Redo).
Changing the Layout of Streams
You may want more or fewer Streams than your current Playlist contains. There is no limit to
the number of Streams a Playlist may contain, only to the number of Clips the system
hardware can play back at the same time.
You can also merge any number of Streams so that they can be controlled together and
reduced in height to save display space.
16
Stereo Streams can be added to the Playlist or created by merging two mono Streams. When
you record onto a stereo Stream, you actually create a stereo 'Audio Track', whereas
recording onto two mono Streams actually produces a two-channel 'Audio Track'.
Right-click over the small Stream control buttons to:
•
“Merge Into Stereo Stream” merges two
•
“Insert Streams” will insert a pair of streams
•
“Remove Stream” will remove the one you clicked on and renumber them.
•
Right-clicking on merged Streams gives you options to change how they are
displayed and to ungroup them again.
adjacent Streams.
Editing
SADiE provides a fast and intuitive interface for editing. With stereo material, the two
channels are always edited simultaneously.
There are a number of ways of editing within SADiE. For general editing, the PLAYLIST
EDITING mode provides a fast way of accessing the ins, outs & fades of individual clips on
the Playlist. However, for the fine-tuning of edits, the TRIM EDITOR provides a way of
accurately 'trimming' between two clips. With both methods, you can manipulate the crossfades between Clips as well as Clip levels.
17
The Trim Editor however, provides an extremely powerful tool for 'de-umming' your work,
designing music edits and creating powerful cross-fades that seem impossible at first.
Playlist Editing Mode
Whenever you make a 'razor' or 'scissors' cut to divide an EDL Clip into two, you will actually
create a new fade-out and fade-in at that point.
In Playlist Editing mode, when a Clip is selected in the Playlist, it will change to a waveform
profile and its in, out & fade points can be adjusted.
Activate Playlist Editing mode with this button on the Playlist toolbar.
Then, with the mouse, select the Clip you want to adjust - its graphic profile will be shown in
red.
Depending where you point the mouse over the Clip, a handy little graphic at the mouse
pointer will appear to tell you which bits of the Clip are going to move as follows:
• Mouse Graphic Point Selected
Operation
In
Fade-in moves
In
Body and Fade-out move
Hot
Whole Entry moves
Out
Fade-out moves
Out
Fade-in and Body move
Fades & Cross-fades
There are four more mouse symbols which let you increase the length of the fades at the in
and out points by dragging out the start or the end of each fade. Overlapping them will create
cross-fades.
Hold the keyboard Ctrl key as you move the mouse over the edit point:
18
Mouse Graphic
Click and Drag
Start of the Fade-in
End of the Fade-in
Start of the Fade-out
End of the Fade-out
If you want to alter the type of fade curve, you can, with Playlist editing still enabled, simply
hold down the ALT key. Your mouse pointer will turn into a wavy line; click and drag it to
change the shape of the fade in or fade out.
That said, greater flexibility for adjusting crossfades is possible with the Trim Editor.
Using the Trim Editor
The Trim Editor is primarily intended for 'trimming' the edit between two clips. The Trim Editor
is opened and loaded with the two Clips in question selected from the Playlist. You then make
precise and fine adjustments to the edit in the Trim Editor itself, writing the result back to the
Playlsit once you are happy.
As well as how tightly one Clip joins to another, you can also adjust how they join, for
example how a piece of music fades down under a voice-over, how one piece of atmosphere
cross-fades into the next, or how one word merges to the following one. This timing and the
quality of cross-fade is crucial to the pace of the person speaking if you are editing speech,
the timing of the music if you are music editing, or the flow of sound if you are merging
atmospheres for sound design..
Because the Trim Editor is so precise, you can easily trim between words, parts of words,
letters and phonemes if you are speech editing. Having cut out a chunk of speech, say, in the
Playlist, you can trim the join, precisely merging the letters together. For example if the result
of your cut is ‘So this…(cut) ….saves us time and money’, and the joined up Clips are
between ‘this’ and ‘saves’ you could end up with two s’s. By merging one s into the other, you
effectively get a more natural ‘So thi’ saves us money’. This elision in speech has been
crafted more naturally, and therefore far more convincing that a straight butt-edit…. assuming
this is appropriate for your interviewers way of speaking!
Once you are happy with the many things you can do in the Trim Editor, you then Write Back
the edited version to the Playlist
Opening the Trim Editor
Select the Clips you want to load into the Trim Editor, either side of the edit in question.
They do not have to be on the same Stream.
Press the OPEN TRIM EDITOR button on the Playlist toolbar. A Trim Editor window will now
appear containing the Clips that you loaded.
19
In the example above, two Clips have been loaded from the Playlist.
The main difference in the way the Clips are displayed here is that because each is drawn on
a different line, the profile of the whole Audio Track from which it comes can be shown. The
parts that are being used and will be played as Playlist Clips are in green (or red when
selected), and the parts not being used are shown in grey.
This makes it possible to see what you are losing as well as what you are keeping in - which
can aid editing decisions, since the grey bits are always available to be pulled back into the
green side of an edit point.
The Trim Editor has the following features in common with the Playlist:
•
An EDL time bar which you can double-click on to start and stop playback. The
current-time cursor (playback head) is fixed in the middle of the window while the
waveform profile of the audio scrolls past. There is also a second time bar, which
shows time relative to the edit point.
•
Scrollbars to move the display horizontally and vertically.
•
Magnification buttons to zoom in or out of the display. Greater magnification is
possible here than in the Playlist.
Adjusting the Edit:
Once you have selected which parts to move, simply click on them to move them, as in the
Playlist.
To hear the audio as it moves across the edit point, press the audio scrub button. Then
click & hold the clip and move the mouse left-right to jog and up-down to shuttle.
To hear the results of your adjustments, you can:
20
•
Start playback from any point in the Trim Editor's time bar (double-click).
•
Use any one of the following preview buttons, which have the advantage of playing
you a pre-set amount either side of the edit point and then returning the display to it.
Plays up to the edit point, plays through the edit point, and plays from the edit point.
Note: The play through preview is the one that lets you hear how the edit will sound in the Playlist.
It also usefully resets the display to the edit point. The up-to and from previews are useful for
determining which side of the edit unwanted sounds may be.
Preview in context - when pressed, all previews will include the other audio in the source
EDL as well as the current contents of the Trim Editor. When you are happy with the
adjustments, WRITE-BACK what you have done, as described below.
Trim Editor Fades and Cross-fades
The fade lengths of Clips in the Trim Editor can be adjusted graphically, with the mouse on
the profile display as follows:At each in/out point there is actually a fade-in or fade-out (however short) and these fades
have a start and an end. Move the mouse pointer over the fade. It will change to a double
arrow. You can then click & hold to move the start of a fade to the left and the end of a fade to
the right, so lengthening the fade and setting it to where you want over the audio.
Fades are shown in lighter green on the profile and turn dark blue when selected to move.
The type of fade curve can be altered in the Clip Details window for the Entry by doubleclicking on the clip in question.
Once the fade-out of one Clip overlaps with the fade-in of the next Clip, you have created a
cross-fade. There is a useful tool available when there are two Clips in the Trim Editor:
Mirror & Align Fades - aligns the start of the later Clips fade-in with the start of the earlier
Clips fade-out, and alters the length of the later Clips fade-in to match the earlier Clips fadeout. This results in a matched cross-fade between the two Clips.
With two Clips in the window, selecting either fade automatically selects them both. Then the
whole cross-fade between two Clips can be moved easily in relation to the audio.
When you are happy with the adjustments, WRITE-BACK what you have done...
Writing Back the Finished Edit
The Trim Editor is actually a temporary area for adjusting edits. Once done, the edit (and any
other changes you have made) needs to be written-back to a Playlist, which will then be
updated.
If you have loaded the Trim Editor from a Playlist, press WRITE BACK TO SOURCE EDL
to update that Playlist.
Other Trim Editor tools:
The four SNAPSHOT buttons allow you to store and recall four different arrangements
of the Clips in the Trim Editor, so you can compare different attempts at an edit. Click once to
take a snapshot, and the button will turn blue to show it has a snap stored. After making
adjustments, click on the button again to return the Trim Editor to the stored snap. The button
of the displayed snap will turn red. To overwrite a button with a new snap, hold Ctrl. while
clicking on it.
21
Clipstore
Every piece of audio on the hard disk is represented by a clip, which can be accessed via the
Clipstore. When you make a recording within your project, or otherwise ingest material, a clip
will appear in your Clipstore (if you are actually recording, it will also be drawn on the Playlist).
You simply drag any clip from the Clipstore and drop it onto a stream on the Playlist.
If you need to get a piece of audio that wasn’t recorded as part of your project, it won't initially
appear in your Clipstore . . .
. . . however, you can import audio at any time into your Clipstore by right-clicking in the
Clipstore...
This then takes you to a window where you can select a location, then the folder, then the
specific audio track or tracks to import.
22
When you then hit OK a clip will be drawn of the audio you chose and this clip will be put into
your Clipstore.
The Mixer
SADiE has a very powerful mixer to allow you to mix your work. The normal
procedure is to edit your clips on the Playlist and compile them into the right
order/positions. Once you've done that, it's time to start mixing the sound.
Although the mixer is extremely powerful, in normal operation there is basically nothing to set
up. Even if you create or take away streams from the Playlist, the mixer will automatically
create/remove faders for each stream for you.
To manipulate the mixer, open the mixer window (which may be minimised at the bottom of
the screen - if it’s not there, open the project manager and double click on the mixer icon).
Each stream on the Playlist will have associated with it a 'Channel Strip' fader in the mixer.
You use this fader to control the level of all the audio on that particular stream.
Where you have stereo streams, you would normally have a stereo fader (these are single
faders that control both sides of the stereo stream together), but you could have two mono
faders panned left & right if you prefer.
To change a pair of mono faders into a stereo fader, simply RIGHT CLICK over one of the
faders & choose "Make Stereo".
If you want to change the pan position of a mono stream to the centre, Double-click over the
little pan control at the top of the fader, then click on the tiny "c" button on the right - this
'centres’ the pan control.
Levels & Panning
23
Now you have your faders matching the Playlist, you are able
to control the levels of audio as they pass from the Playlist, through the Mixer to the outside
world. To change the level, simply click on the fader controlling the stream you want with the
mouse, hold it and move it up & down. To change the pan position within the stereo mix, click
& hold the little pan button at the top of the fader. If you wish you can double-click on the pan
control and move the little slider, type in a figure (double-click on the little number - use the +
& - keys plus a number), click away from the slider and this new position is set for that stream.
To reset the fader to 'zero' i.e. no change, click on the little fader lock button. This also locks
the fader - you can unlock it again & the fader will stay put.
Automation
Now, the really clever bit is to be able to 'automate' the movements of the fades & pans as the
EDL is played back through the Playlist.
To do this you need to enable the Automation function with this icon (normally to the
left of the faders).
When this button is active (it lights up bright yellow to warn you), every move you now make
with the faders/pans/EQs/Dynamics/VSTs will be recorded 'into' the clips on the Playlist.
Consequently, if you then move a clip around or cut/copy/paste it, the automation data will go
with it. There is no problem therefore in doing some automation and then continuing editing.
If you want to see what the automation looks like in your EDL, switch on the 'Show All
Automation Data' button at the top left of the Playlist. You will also then be able to manipulate
it directly on the Playlist.
You will notice that when you first switch on automation, there will be a little toolbar created
with fader buttons and the red button will be active. This is known as 'overwrite' mode and
when you move the fader it 'overwrites' any fader automation data into the clips you are
controlling.
When you stop playback, the green button will be active. This green button is 'auto-update'
which means that the faders will playback according to how you first moved the faders, but if
you 'grab' the fader at any time it will go into 'write' mode for the period you hold the fader.
When you let go again the fader will 'auto-return' back to its original level. This allows you to
build up a basic mix and then go back and tweak it at any time by just touching the faders!
(This of course works better with the SADiE Fader Panel as it has touch sensitive, motorised
faders - but the function works perfectly well with just the mouse).
There is no need to save anything else other than the project as the automation data is now
recorded into the clips, which are on the EDL (which gets saved with the project).
You can record pan, EQ, dynamics and VST automation in exactly the same way - just click &
hold pan controls whilst playing.
The automation data has been written into the clips but you can switch off automation at any
time by just hitting the automation (yellow) button again. The data is still there, just not
commanding the faders to move. You can turn it on and off as you wish.
Snapshot Automation
This is a brilliant function if you want to change the level of a number of clips at the
same time. You simply select the clips you want, click on the little camera button on the
automation toolbar, change the level of the fader that controls the stream the selected clips
are on, then click the camera again.
24
The clips are set at the new level.
EQs & Dynamics
If you want to change the EQ of a stream, you can do that within the mixer either for a whole
stream or you can automate it to affect as much of it as you wish.
Above each channel strip you should see at least one little box, which can contain a process.
To the left of the faders is a 'palate' containing the processes.
You simply click & hold on the process you want from the process palate and drag & drop it
into the little box above the fader. The process is now active and waiting for you to use it.
You can drag & drop more processes into these boxes. If you need to see more just make the
mixer larger.
Tip: hold your mouse over the process palate and a message will tell you which process
you are about to select.
To change the settings of a particular process, once you have dropped it into your mixer strip,
simply click on it and its parameters will appear for use to manipulate.
If you want to automate the movements of these processes, you need to switch off the
'automation disable' button in the top right of each process. Then, with the mixer automation
switched on (yellow button - remember), you can change the processes and these changes
will be recorded.
25
Aux Send
You can also send a level from the channel to the outside world via the aux send control.
Drag & drop the 'aux' process to a spare slot above the fader you want to send. Click on the
process and select the output to be a spare output of your SADiE. You can then use this
control to send a level from the stream to an external effects unit for example.
Deleting Processes
To delete a process, simply RIGHT CLICK on the process in the channel strip and select
'Delete Process'.
Sample Rate Conversion, Varispeed & "Timemod"
This is a very powerful feature of SADiE. If you need to change the sample rate,
varispeed or timestretch an EDL you can do it with these processes. Firstly open the Process
window with this icon. You will then have a representation of an effects rack. Select the
Sample Rate Converter from the toolbar at the top and drag it onto the 'rack'. You can then
change the input & output sample rates.
Try the Varispeed and Timemod also. In Timemod, you can select a clip or number of
clips and it will tell you the length of your selection, you can then just type the new length you
want and it will do just that - keeping the original pitch.
These three processes will change the output of SADiE, that is the whole EDL will change. If
you just want to process a single clip or group of clips, then set up this process as you want it
and 'Bounce Down' the selection through the 'Bounce Window' (see notes).
Make sure you then switch off the process afterwards (right click to the left of the process)
otherwise it will still be processing!
Project Management
In SADiE, the work we do is managed within a 'Project'. Basically this is a folder on
your PC's hard disk that contains all the EDLs, Mixers and Clipstores; this folder to
ALSO hold all the audio. Each time you save, you are updating these files.
When you first log into SADiE, you are presented with a window as shown below.
26
With this window, you can either:
1. Open the Project that was last worked on (the current Project).
2. Open an existing Project that you have previously saved.
3. Create (and name) a new Project.
4. Restore a Project that has been backed up to a storage device.
When you create a new Project . . .
1. If SADiE detects more than one audio disk connected, you will be asked which disk
you want to use to record to.
2. Then you will be asked to give the Project a name and the Project window will open.
SADiE will have created a new EDL, Clipstore and Mixer, each named after this
Project name. These will start off in a default state and after use in the normal way
can be saved, closed and re-opened as part of the Project.
Once you are working in SADiE, the best way to save your work is by selecting "Save Project"
from the Project drop-down menu at the top of the screen. This saves ALL your work (i.e. all
the EDLs, Mixers, Clipstores) within your project in one go.
The Project Management Window
You can also open the Project Management window at any time. This is normally minimised
at the bottom of your screen. From within this window you can manipulate the project and
create new EDLs, Mixers & Clipstores. You can also import EDLs from other projects.
27
Tip: If you cannot find a window (eg the Mixer) because it is hidden or has been closed,
open the Project Management window. Then just double-click on the icon representing that
window and it will open.
To create a new component (EDL, Mixer or Clipstore), just click on the icon
and give it a name.
If you need to import a component from another project, then just click on this icon.
Customising SADiE
There are several things you can set-up in SADiE to make it look and work the way
you want. Once these settings are set up, you won't have to change them again,
even after you close down SADiE. Basically these settings fall into three areas:
TEMPLATES
There are two kinds of template you can set up, one for the Playlist and one for the mixer.
The template is just a way of telling SADiE how many streams you want in your Playlist and
whether they are to be stereo or mono. Also included in the Playlist templates are any
locators you may want pre-set up and the sample rate. For those wanting to make CDs, there
is a 'PQ' stream that can be shown - this is included in your template.
USER SETTINGS
These belong to a specific user (i.e.: the one who logs onto SADiE at the beginning of a
session).
The settings file (or '.ini' file) is automatically loaded up as you log on and includes your
favourite system settings such as default crossfades, hot keys etc. You change these from
the SETUP window. As you make a change, the file is saved automatically.
28
One of the settings however is the use of templates mentioned above. This setting tells
SADiE how you want to use the templates (i.e.: each time you create a new Playlist or mixer)
or that you don’t want to use them at all (i.e.: stick with the default 16 mono streams & 16
mono faders).
THE DESKTOP
This is just a small file that you can set up from within SADiE that determines the position of
all the Windows™ ™. It will also remember the icons toolbars you have set up, their positions
on the screen and the zoom settings you want.
Here's how you set it all up . . .
Log on to SADiE and create a new project. In the Playlist window, delete the Streams you
don’t want, make them mono or stereo, or create new Streams. You do this by right clicking in
the stream controls (the area to the left of the streams themselves). Next, set the sample rate
to the way you want it to be each time you create a new Playlist (open the transport controls
(F10), then click on SETUP).
Next, with the Playlist window the active window, go to the File Menu and select "Save
Current Playlist As Template". Call it something like 'Default'.
Now go to the mixer and set it up how you wish. If you made mono streams in the Playlist,
make the faders mono in the mixer and pan them to the centre. Create stereo faders for the
stereo streams (again, right click on the faders).
Next, with the Mixer window the active window, go to the File Menu and select "Save Current
Mixer As Template". Also call it something like 'Default'.
You now have two templates stored. You now have to tell SADiE to use these templates
when you create new Playlists or Mixers (or when you create a new project).
SETTINGS
This is very simple to achieve. You go to the Set Up window under Windows™ menu. In this
window you can change the settings of SADiE. As you make a change, the file is updated
automatically - no need to save anything.
There are many settings you can make, but there are a few that are crucial for efficient
working. Here are some essential suggestions:
If you have created templates for the Playlist & Mixer (see above) then you tell SADiE to use
them here in the setting window. Double click on 'Project Management' about half way down
on the left side of the window. On the right you will see three options. Select "Use Specified
Templates" and click on the select buttons - chose the templates you saved earlier.
29
Trim Window Setup:
We suggest that you select trim window on the left side and make sure of the following. Make
sure "Trim Slips Follow Playlist Slip" is UN-TICKED.
Bouncing
Clips may be permanently grouped together by re-recording them internally as a new
track of audio. The bounce button is on the Playlist Toolbar.
You may choose to bounce entries down for a number of reasons:
30
•
Convenience. You want the mixed or processed result to always appear as a single
EDL entry, or you don’t want to bother with setting the Mixer or Automation to process
the required entries every time you play the EDL.
•
There is not enough DSP power available to carry out the processing you require in
real time and/or play the number of simultaneous Entries you require. Process the
necessary entries through the Mixer and 'bounce down' your selection. Then you can
use the processed versions in the full EDL.
•
First, select the clips in the EDL. You normally re-record these clips through the mixer,
so check the mixer balance is correct.
Click on the bounce icon
to open the Bounce Window.
You need to enter a name for the recording. The first section of this window serves the same
purpose as the Record tab of the Transport window.
Next tick Selected Clips in the Source section.
The Source section tells Bounce what to re-record - Complete EDL or Selected Streams are
the other possibilities.
We must choose, in the Destination section, what’s going to happen to the new track after rerecording:
Stream - tells Bounce to put it into the same EDL on streams specified in the pop-up list.
Auto-replace source clips - only works in conjunction with Stream - when this is ticked, at
the end of the bounce process, the source clips are deleted.
Clipstore - leaves the Playlist unaffected, and places the new track into the current Clipstore.
PC Disk - makes a bounce recording directly to your PC's hard disk.
The bottom section allows you to choose Bounce in non real time. If this is selected the
bounce will be performed as quickly as possible, but will not be audible. The other two options
allow you to turn off automation and/or the mixer for the bounce.
Press Start. The process will start, and during the bounce the ball icon in the Bounce button
will “bounce”. Be careful not to click on the time-line in the Playlist or press transport buttons you will stop the bounce.
31
Special Bounce Functions:
Multi-Bounce - with MULTI selected as the source for the bounce, every entry in the EDL will
be re-recorded as a separate audio file on the audio drive. If you want a group of entries to
become a single audio track then simply group the entries - a Group Entry is treated as 1
entry. You must have Autotake selected - the new tracks will be automatically named using
this function.
Reverse bounce - The reverse option in the Bounce window allows you to make a backwards
copy of an EDL entry or entries. Note also that right mouse clicking over an entry will initiate
the Bounce window with Reverse enabled. Otherwise the Bounce window works in the normal
way.
Reverse cannot be used in conjunction with Resample, Varispeed or Timemod.
Note that the Bounce records the Output of the mixer including any level changes or
processing.
32