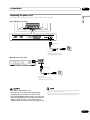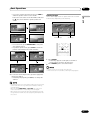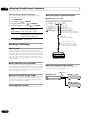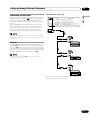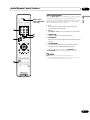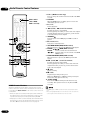
1
PLASMA DISPLAY SYSTEM
PRO-1120HD
PRO-920HD
Register Your Product on
www.pioneerelectronics.com
Operating Instructions
1)
2)
3)
4)
5)
6)
7)
Read these instructions.
Keep these instructions.
Heed all warnings.
Follow all instructions.
Do not use this apparatus near water.
Clean only with dry cloth.
Do not block any ventilation openings. Install in
accordance with the manufacturer’s instructions.
8) Do not install near any heat sources such as
radiators, heat registers, stoves, or other apparatus
(including amplifiers) that produce heat.
9) Do not defeat the safety purpose of the polarized or
grounding-type plug. A polarized plug has two
blades with one wider than the other. A grounding
type plug has two blades and a third grounding
prong. The wide blade or the third prong are
provided for your safety. If the provided plug does
not fit into your outlet, consult an electrician for
replacement of the obsolete outlet.
10) Protect the power cord from being walked on or
pinched particularly at plugs, convenience
receptacles, and the point where they exit from the
apparatus.
11) Only use attachments/accessories specified by the
manufacturer.
12) Use only with the cart, stand, tripod, bracket, or
table specified by the manufacturer, or sold with the
apparatus. When a cart is used, use caution when
moving the cart/apparatus combination to avoid
injury from tip-over.
13) Unplug this apparatus during lightning storms or
when unused for long periods of time.
14) Refer all servicing to qualified service personnel.
Servicing is required when the apparatus has been
damaged in any way, such as power-supply cord or
plug is damaged, liquid has been spilled or objects
have fallen into the apparatus, the apparatus has
been exposed to rain or moisture, does not operate
normally, or has been dropped.
Note to CATV system installer.
This reminder is provided to call the CATV system installer’s attention to Article 820-40 of the NEC that provides
guidelines for proper grounding and, in particular, specifies that the cable ground–shall be connected to the
grounding system of the building, as close to the point of cable entry as practical.
CAUTION:
This product satisfies FCC regulations when shielded
cables and connectors are used to connect the unit to
other equipment. To prevent electromagnetic interference with electric appliances such as radios and televisions, use shielded cables and connectors for connections.
WARNING: Handling the cord on this product or
cords associated with accessories sold with the product will expose you to lead, a chemical known to the
State of California and other governmental entities to
cause cancer and birth defects or other reproductive
harm. Wash hands after handling.
NOTE: This equipment has been tested and found to
comply with the limits for a class B digital device, pursuant to Part 15 of the FCC Rules. These limits are designed to provide reasonable protection against harmful
interference in a residential installation. This equipment
generates, uses, and can radiate radio frequency energy
and, if not installed and used in accordance with the
instructions, may cause harmful interference to radio
communications. However, there is no guarantee that
interference will not occur in a particular installation. If
this equipment does cause harmful interference to radio
or television reception, which can be determined by turning the equipment off and on, the user is encouraged to
try to correct the interference by one or more of the following measures:
— Reorient or relocate the receiving antenna.
— Increase the separation between the equipment and
receiver.
— Connect the equipment into an outlet on a circuit
different from that to which the receiver is connected.
— Consult the dealer or an experienced radio/TV technician for help.
Information to User
Alteration or modifications carried out without appropriate authorization may invalidate the user’s right to
operate the equipment.
[For Canadian model]
This Class B digital apparatus complies with Canadian
ICES-003.
FEDERAL COMMUNICATIONS COMMISSION
DECLARATION OF CONFORMITY
This device complies with part 15 of the FCC Rules. Operation is subject to the following two conditions: (1) This
device may not cause harmful interference, and (2) this
device must accept any interference received, including
interference that may cause undesired operation.
Product Name:
Plasma Display System
(Plasma Display)
(Media Receiver)
Model Number:
PRO-1120HD
PRO-920HD
(PRO-505PU)
(PRO-435PU)
(PRO-R05U)
(PRO-R05U)
Product Category: Class B Personal Computers & Peripherals
Responsible Party Name: PIONEER ELECTRONICS
(USA), INC., Customer Support Div.
Address: P.O. BOX 1760, LONG BEACH, CA., 90801-1760
U.S.A.
Phone: (800) 421-1625
For Business Customer URL
http://www.PioneerUSA.com
IMPORTANT NOTICE: The serial number for this
equipment is located on the rear panel. Please write this
serial number on your enclosed warranty card and keep
it in a secure area. This is for your security.
WARNING: Be sure to plug this equipment into a
grounding-type AC outlet.
English
WARNING: THE APPARATUS IS NOT WATERPROOFS, TO PREVENT FIRE OR SHOCK HAZARD, DO
NOT EXPOSE THIS APPLIANCE TO RAIN OR MOISTURE
AND DO NOT PUT ANY WATER SOURCE NEAR THIS
APPARATUS, SUCH AS VASE, FLOWER POT, COSMETICS CONTAINER AND MEDICINE BOTTLE ETC.
Contents
Thank you for buying this Pioneer product.
Please read through these operating instructions so you will know how to operate your model properly. After you have finished
reading the instructions, put them away in a safe place for future reference.
In some countries or regions, the shape of the power plug and power outlet may sometimes differ from that shown in the explanatory drawings. However the method of connecting and operating the unit is the same.
01 Important User Guidance Information
02 Safety Precautions
03 Operational Precautions
04 Supplied Accessories
Plasma Display ................................................................... 11
Media Receiver .................................................................... 11
05 Part Names
Plasma Display ................................................................... 12
Media Receiver .................................................................... 12
Remote control unit ............................................................ 14
06 Preparation
Installing the Plasma Display ............................................ 15
Installing the Media Receiver ............................................ 16
Installing the Media Receiver vertically ...................... 16
Connecting the system cable ............................................ 18
Routing cables .................................................................... 19
Preparing the remote control unit ..................................... 20
Inserting batteries ......................................................... 20
Cautions regarding batteries ....................................... 20
Allowed operation range of the remote
control unit .................................................................... 20
Cautions regarding the remote control unit .............. 20
Cable connections for watching digital and/or
conventional TV channels .................................................. 21
Connecting VHF/UHF antennas and a Cable
Converter ....................................................................... 21
Cable connections for watching digital
TV channels over air (VHF/UHF) ........................................ 21
Connecting VHF/UHF antennas .................................. 21
Switching between antenna A and B ............................... 22
Inserting the cable card ..................................................... 22
Connecting the power cord ............................................... 23
07 Basic Operations
Turning on the power (Standby) ........................................ 24
Turning off the power (Standby) ........................................ 24
Watching TV channels ........................................................ 25
Selecting the antenna .................................................. 25
Changing channels ...................................................... 25
Changing the volume and sound ................................ 26
Viewing a channel banner ........................................... 26
Using the POD service ................................................. 27
Changing the language ................................................ 27
Setting MTS/SAP mode ............................................... 27
4
En
Using the multiscreen functions ....................................... 28
Splitting the screen ...................................................... 28
Freezing images ............................................................ 29
08 Menu Setup
Menu configuration ............................................................ 30
AV mode menus............................................................ 30
PC mode menus ........................................................... 30
Menu operations ................................................................. 30
09 Tuner Setup
Setting up TV channels ...................................................... 31
Using Auto Channel Preset ......................................... 31
Setting for skipping unwanted channels .................... 31
Setting up TV channels manually ............................... 31
Naming TV channels .................................................... 32
Checking signal strength ............................................. 32
Checking the Cable Card ID ........................................ 32
Enabling data acquisition ............................................ 32
Parental Control .................................................................. 33
Changing the password ............................................... 33
Clearing the password ................................................. 34
Activating the Parental Control ................................... 34
Setting the voluntary movie rating system
(MPAA) .......................................................................... 34
Setting the TV ratings ................................................... 35
Setting the TV Parental Guidelines (TV Guidelines) ... 35
Blocking Not Rated TV programs ................................ 35
Canadian rating systems ............................................. 36
Setting Canadian English ratings ............................... 36
Setting Canadian French ratings ................................ 37
Temporarily deactivating the Parental Control ........... 37
Setting your favorite channels ........................................... 37
Setting up closed captions ................................................ 37
Activating the closed caption ...................................... 38
Selecting the type of conventional closed captions .. 38
Selecting digital closed captions ................................ 38
Selecting digital closed caption parameters ............. 38
Clock Setting ....................................................................... 39
Contents
10 Adjustments and Settings
Connecting other audio equipment .................................. 53
Connecting an AV receiver .......................................... 53
Watching a D-VHS image ................................................... 54
What is i.LINK? .............................................................. 54
Which i.LINK devices are connectable? ..................... 54
What can be recorded through i.LINK? ...................... 54
Connecting D-VHS recorders ...................................... 54
When connecting a single D-VHS recorder ............... 54
When connecting two D-VHS recorders ..................... 54
Displaying a D-VHS image ................................................. 55
Useful and important notification ............................... 55
Setting up for controlling a D-VHS recorder .............. 56
Editing the i.LINK list .................................................... 56
Setting up for i.LINK standby....................................... 57
Operating the control panel screen ............................ 57
Watching an image from a personal computer ............... 58
Connecting a personal computer ............................... 58
Displaying an image from a personal computer ....... 58
Computer compatibility chart ............................................ 58
Connecting the VCR controller .......................................... 59
The lists of controllable recording
equipment manufactures ............................................ 60
Connecting control cords .................................................. 61
About SR+ .................................................................... 61
English
Sleep Timer .......................................................................... 40
AV Selection ........................................................................ 40
Picture adjustments ........................................................... 41
Pro Adjust ...................................................................... 41
Color Management ....................................................... 42
Sound adjustments ............................................................ 43
FOCUS ........................................................................... 43
Front Surround .............................................................. 43
Power Control ...................................................................... 44
Energy Save ................................................................... 44
No Signal off (AV mode only) ....................................... 44
No Operation off (AV mode only) ................................. 44
Power Management (PC mode only) .......................... 44
Adjusting image positions (AV mode only) ...................... 45
Adjusting image positions and clock automatically
(PC mode only) .................................................................... 45
Adjusting image positions and clock manually
(PC mode only) .................................................................... 45
Selecting a screen size ....................................................... 46
Changing the brightness at both sides of the screen
(Side Mask) .......................................................................... 47
Language setting ................................................................ 47
11 Timer Presetting
Presetting TV programs using the timer ........................... 48
Priority rules for overlapped presettings ........................... 49
12 Enjoying through External Equipment
Watching a DVD image ...................................................... 50
Connecting a DVD player ............................................. 50
Displaying a DVD image .............................................. 50
Watching a VCR image ...................................................... 50
Connecting a VCR ........................................................ 50
Displaying a VCR image ............................................... 50
Using HDMI Input ............................................................... 51
Connecting HDMI equipment ..................................... 51
Enjoying a game console or watching camcorder
images ................................................................................. 52
Connecting a game console or camcorder ................ 52
Displaying an image of the game console or
camcorder ..................................................................... 52
Recording digital TV programs using a VCR or
DVD recorder ....................................................................... 52
Avoiding unwanted feedback ...................................... 52
Connecting a recorder ................................................. 53
13 Useful Remote Control Features
Learning function of the remote control unit ................... 62
Using the learning function ......................................... 62
Presetting manufacture codes .................................... 62
Manufacture codes ...................................................... 63
Using the remote control unit to control other
devices ................................................................................. 64
Receiver control buttons .............................................. 64
Cable control buttons ................................................... 65
SAT control buttons ...................................................... 66
VCR control buttons ..................................................... 67
DVD/DVR control buttons ............................................ 68
14 Appendix
Troubleshooting .................................................................. 69
Specifications ...................................................................... 79
5
En
01
Important User Guidance Information
In order to obtain maximum enjoyment from this Pioneer
PureVision PRO-1120HD/PRO-920HD Plasma Display System,
please first read this information carefully.
With the Pioneer PureVision PRO-1120HD/PRO-920HD, you can
be assured of a high quality Plasma Display System with longlife and high reliability. To achieve images of exceptional quality,
this Pioneer Plasma Display System incorporates state-of-theart design and construction, as well as very precise and highly
advanced technology.
The Pioneer PureVision PRO-1120HD/PRO-920HD incorporates
the latest in color filter technology – 1st Surface Pure Color
Filter. This improves the color / picture reproduction of these
models as compared to previous models. It also eliminates the
need for a physical glass panel to be placed in front of the
plasma panel, which furthers Pioneer’s continued goal of
reducing environmental waste in consumer electronics, now
during the manufacturing process and in the future during the
recycling process.
Over the course of its lifetime, the luminosity of the Pioneer
PRO-1120HD/PRO-920HD Plasma Display System will diminish
very slowly, such as with all phosphor-based screens (for
example, a traditional tube-type television). To enjoy beautiful
and bright images on your Pioneer Plasma Display System for
many years to come, please carefully read and follow the usage
guidelines below.
Usage guidelines
All phosphor-based screens (including conventional tube-type
televisions) can be affected by displaying static images for a
prolonged period. Plasma Display Systems are no exception to
this rule. After-image and permanent effects on the screen can
be avoided by taking some basic precautions. By following the
recommendations listed below, you can ensure longer and
satisfactory results from your plasma:
• Whenever possible, avoid frequently displaying the same
image or virtually still moving pictures (e.g. closed-captioned
images or video game images which have static portions).
• Avoid viewing the On Screen Display for extended periods,
from a DVD player, VCR, and all other components.
• Do not leave the same picture freeze-framed or paused
continuously over a long period of time, when using the still
picture mode from a TV, VCR, DVD player or any other
component.
• Images which have both very bright areas and very dark
areas side by side should not be displayed for a prolonged
period of time.
• When playing a game, the “GAME” mode setting within “AV
Selection” is strongly recommended. However, please limit its
use to less than 2 hours at a time.
• After playing a game, or displaying a PC image or any still
image, it is best to view a normal moving picture in the
“WIDE” or “FULL” screen setting for over 3 times longer than
the previous still/moving image.
• After using the Plasma Display System, always switch the
display to “STANDBY” mode.
6
En
Installation guidelines
The Pioneer PureVision PRO-1120HD/PRO-920HD Plasma
Display System incorporates a very thin design. To ensure
safety, please take the proper measures to mount or install the
Plasma Display, in order to prevent the unit from tipping over in
the event of vibration or accidental movement.
This product should be installed by using only parts and
accessories designed by PIONEER. Use of accessories other
than the PIONEER stand or installation bracket may result in
instability, and could cause injury. For custom installation,
please consult the dealer where the unit was purchased. To
ensure correct installation, experienced and qualified experts
must install the unit. PIONEER will not be held responsible for
accident or damage caused by the use of parts and accessories
manufactured by other companies.
To avoid malfunction and overheating when installing, make
sure that the vents on the main unit are not blocked. To ensure
proper heat emission:
• Distance the unit slightly from other equipment, walls, etc.
For the minimum space required around the unit, see pages
15 to 16.
• Do not fit the unit inside narrow spaces where ventilation is
poor.
• Do not cover with a cloth, etc.
• Clean the vents on the sides and rear of the unit to remove
dust build-up by using a vacuum cleaner set to its lowest
suction setting.
• Do not place the product on a carpet or blanket.
• Do not leave the product tilted over except the case of vertical
installation of the Media Receiver.
• Do not reverse the product.
Using the unit without proper ventilation may cause the
internal temperature to rise, and could result in possible
malfunction. When the surrounding or internal temperature
exceeds a certain degree, the display will automatically power
off in order to cool the internal electronics and prevent a
hazardous occurrence.
Malfunction can be caused by many factors: inappropriate
installation site, improper assembly/installation/mounting,
improper operation of or modifications made to this product.
However, PIONEER cannot be held responsible for accidents or
malfunction caused by the above.
The following are typical effects and characteristics of a
phosphor-based matrix display and as such, are not covered by
the manufacturer’s limited warranties:
• Permanent residual images upon the phosphors of the panel.
• The existence of a minute number of inactive light cells.
• Panel generated sounds, examples: Fan motor noise, and
electrical circuit humming / glass panel buzzing
Important User Guidance Information
• Displaying the same images such as still images for a long
time may cause after-image lagging. This may occur in the
following two cases.
English
Panel sticking and after-image lag
01
1. After-image lagging due to remaining electric
load
When image patterns with very high peak luminance are
displayed more than 1 minute, after-image lagging may occur
due to the remaining electric load. The after-images remaining
on the screen will disappear when moving images are
displayed. The time for the after-images to disappear depends
on the luminance of the still images and the time they had
been displayed.
2. After-image (lag image) due to burning
Avoid displaying the same image on the Plasma Display
continuously over a long period of time. If the same image is
displayed continuously for several hours, or for shorter periods
of time over several days, a permanent after-image may remain
on the screen due to burning of the fluorescent materials. Such
images may become less noticeable if moving images are later
displayed, but they will not disappear completely.
• The Energy save function can be set to help prevent damage
from screen burning (see page 44).
About operations through i.LINK
PIONEER shall not always assure normal video/audio recording
or playback when a D-VHS is operated through i.LINK.
DO NOT PLACE THIS PRODUCT ON AN UNSTABLE CART,
STAND, TRIPOD, BRACKET, OR TABLE. THE PRODUCT MAY
FALL, CAUSING SERIOUS PERSONAL INJURY AND SERIOUS
DAMAGE TO THE PRODUCT. USE ONLY WITH A CART, STAND,
TRIPOD, BRACKET, OR TABLE RECOMMENDED BY THE
MANUFACTURER, OR SOLD WITH THE PRODUCT. FOLLOW
THE MANUFACTURE’S INSTRUCTIONS WHEN INSTALLING
THE PRODUCT AND USE MOUNTING ACCESSORIES
RECOMMENDED BY THE MANUFACTURER.
A PRODUCT AND CART COMBINATION SHOULD BE MOVED
WITH THE CARE. QUICK STOPS, EXCESSIVE FORCE, AND
UNEVEN SURFACES MAY CAUSE THE PRODUCT AND CART
COMBINATION TO OVERTURN.
7
En
02
Safety Precautions
Electricity is used to perform many useful functions, but it can
also cause personal injuries and property damage if improperly
handled. This product has been engineered and manufactured
with the highest priority on safety. However, improper use can
result in electric shock and/or fire. In order to prevent potential
danger, please observe the following instructions when installing, operating and cleaning the product. To ensure your safety
and prolong the service life of your product, please read the
following precautions carefully before using the product.
1. Read instructions—All operating instructions must be read
and understood before the product is operated.
2. Keep this manual in a safe place—These safety and
operating instructions must be kept in a safe place for
future reference.
3. Observe warnings—All warnings on the product and in the
instructions must be observed closely.
4. Follow instructions—All operating instructions must be
followed.
5. Cleaning—Unplug the power cord from the AC outlet before
cleaning the product. Use a damp cloth to clean the
product. Do not use liquid cleaners or aerosol cleaners.
6. Attachments—Do not use attachments not recommended
by the manufacturer. Use of inadequate attachments can
result in accidents.
7. Water and moisture—Do not use the product near water,
such as bathtub, washbasin, kitchen sink and laundry tub,
swimming pool and in a wet basement.
8. Stand—Do not place the product on an unstable cart,
stand, tripod or table. Placing the product on an unstable
base can cause the product to fall, resulting in serious
personal injuries as well as damage to the product. Use
only a cart, stand, tripod, bracket or table recommended by
the manufacturer or sold with the product. When mounting
the product on a wall, be sure to follow the manufacturer’s
instructions. Use only the mounting hardware
recommended by the manufacturer.
9. When relocating the product placed on a cart, it must be
moved with utmost care. Sudden stops, excessive force and
uneven floor surface can cause the product to fall from the
cart.
10. Ventilation—The vents and other openings in the cabinet
are designed for ventilation. Do not cover or block these
vents and openings since insufficient ventilation can cause
overheating and/or shorten the life of the product. Do not
place the product on a bed, sofa, rug or other similar
surface, since they can block ventilation openings. This
product is not designed for built-in installation; do not place
the product in an enclosed place such as a bookcase or
rack, unless proper ventilation is provided or the
manufacturer’s instructions are followed.
11. Power source—This product must operate on a power
source specified on the specification label. If you are not
sure of the type of power supply used in your home, consult
your dealer or local power company.
12. Power cord protection—The power cords must be routed
properly to prevent people from stepping on them or objects
from resting on them. Check the cords at the plugs and
product.
8
En
13. The plasma Display used in this product is made of glass.
Therefore, it can break when the product is dropped or
applied with impact. Be careful not to be injured by broken
glass pieces in case the plasma Display breaks.
14. Overloading—Do not overload AC outlets or extension
cords. Overloading can cause fire or electric shock.
15. Entering of objects and liquids—Never insert an object into
the product through vents or openings. High voltage flows
in the product, and inserting an object can cause electric
shock and/or short internal parts. For the same reason, do
not spill water or liquid on the product.
16. Servicing—Do not attempt to service the product yourself.
Removing covers can expose you to high voltage and other
dangerous conditions. Request a qualified service person to
perform servicing.
17. Repair—If any of the following conditions occurs, unplug
the power cord from the AC outlet, and request a qualified
service person to perform repairs.
a. When the power cord or plug is damaged.
b. When a liquid was spilled on the product or when
objects have fallen into the product.
c. When the product has been exposed to rain or water.
d. When the product does not operate properly as described in the operating instructions.
Do not touch the controls other than those described in
the operating instructions. Improper adjustment of
controls not described in the instructions can cause
damage, which often requires extensive adjustment work
by a qualified technician.
e. When the product has been dropped or damaged.
f. When the product displays an abnormal condition. Any
noticeable abnormality in the product indicates that the
product needs servicing.
18. Replacement parts—In case the product needs replacement parts, make sure that the service person uses
replacement parts specified by the manufacturer, or those
with the same characteristics and performance as the
original parts. Use of unauthorized parts can result in fire,
electric shock and/or other danger.
19. Safety checks—Upon completion of service or repair work,
request the service technician to perform safety checks to
ensure that the product is in proper operating condition.
20. Wall or ceiling mounting—When mounting the product on
a wall or ceiling, be sure to install the product according to
the method recommended by the manufacturer.
21. Heat sources—Keep the product away from heat sources
such as radiators, heaters, stoves and other heat- generating products (including amplifiers).
22. Unplug the power cord from the AC outlet before installing
the speakers.
23. Never expose the screen of the Plasma Display to a strong
impact, for example, by hitting it. The screen may be
broken, resulting in fire or personal injury.
24. Do not expose the Plasma Display to direct sunlight for a
long period of time. The optical characteristics of the front
protection panel changes, resulting in discoloration or
warp.
25. The Plasma Display weighs about 32.8 kg (72.3 lbs.) for the
PRO-505PU and about 26.8 kg (59.1 lbs.) for the PRO435PU. Because it has small depth and is unstable, unpack,
carry, and install the product with one more person at least
and use the handles.
Safety Precautions
02
Installation Precautions
Observe the following precautions when installing with any items such as the optional stand.
English
When using the optional stand, brackets, or equivalent items
• Ask your dealer to perform the installation.
• Be sure to use the supplied bolts.
• For details, see the instruction manual that comes with the optional stand (or equivalent items).
When using other items
• Consult your dealer.
• The following six mounting holes can be used for the installation:
Side view
Rear view
Plasma
Display
Mounting hole
Mounting surface
Mounting
bracket (or
equivalent item)
Mounting hole
Median line
M8 screw
12 to 18 mm
(0.5 to 0.7 inches)
Median line
• Be sure to use four or more mounting holes symmetrical to the vertical and horizontal median lines.
• Use M8 screws, which go 12 to 18 mm (0.5 to 0.7 inches) in depth from the mounting surface of the Plasma Display. See the side
view above.
• Be careful not to block the ventilation opening at the rear of the Plasma Display.
• Be sure to install the Plasma Display on a flat surface because it contains glass.
• The screw holes other than the above are to be used only for the specified products. Never use them for mounting non-specified
products.
• Do not mount or remove the Plasma Display to or from the stand, with speakers attached.
• It is strongly recommended to use the optional PIONEER mounting products.
• PIONEER shall not be liable for any personal injury or product damage that results from the use of mounting items other than the
optional PIONEER products.
9
En
03
Operational Precautions
Condensation
PIONEER bears no responsibility for any damages arising from
incorrect use of the product by you or other people,
malfunctions when in use, other product related problems, and
use of the product except in cases where the company must be
liable.
• Condensation may take place on the surface or inside of the
product when the product is rapidly moved from a cold place
to a warm place or just after a heater is switched on in winter
morning, for example. When condensation takes place, do
not switch on the product and wait until condensation
disappears. Using the product with condensation may result
in malfunction.
Plasma Display protection function
When still images (such as photos and computer images) stay
on the screen for an extended period of time, the screen will be
slightly dimmed. This is because the protection function of the
Plasma Display automatically adjusts the brightness to protect
the screen when detecting still images; so this does not
designate malfunction. The screen is dimmed when a still
image is detected for about three minutes.
Infrared rays
The Plasma Display releases infrared rays because of its
characteristics. Depending on how the Plasma Display is in
use, the remote controls of nearby equipment may be adversely
affected or wireless headphones using infrared rays are
interfered by noise. If this is the case, place that equipment at a
location where its remote control sensor is not affected.
Radio interference
While this product meets the required specifications, it emits a
small amount of noise. If you place such equipment as an AM
radio, personal computer, and VCR close to this product, that
equipment may be interfered. If this happens, place that
equipment far enough from this product.
Fan motor noise
When ambient temperature of the Media Receiver becomes
high, the rotation speed of the cooling fan motor increases.
This may make you feel that the fan motor is noisy at such an
occasion.
The fan motor keeps running until the power cord of the Media
Receiver is removed from a wall outlet.
Do not attach such items as labels and tape to the
product.
En
• When cleaning the screen of this product, gently wipe it with
a soft dry cloth; the supplied cleaning cloth or other similar
cloths (e.g., cotton and flannel). If you use a hard cloth or rub
the screen hard, the surface of the screen will be scratched.
• If you clean the surface of the screen with a wet cloth, water
droplets on the surface may enter into the product, resulting
in malfunction.
Cleaning the cabinet
• When cleaning the cabinet of this product, gently wipe it with
a soft dry cloth; the supplied cleaning cloth or other similar
cloths (e.g., cotton and flannel). If you use a hard cloth or rub
the cabinet hard, the surface of the cabinet will be scratched.
• The cabinet of this product is mostly composed of plastic. Do
not use chemicals such as benzine or thinner to clean the
cabinet. Using these chemicals may result in quality deterioration or coating removal.
• Do not expose the product to volatile gas or fluid such as
pesticide. Do not make the product contact with rubber or
vinyl products for a long period of time. The effect of
plasticizer in the plastic may result in quality deterioration or
coating removal.
• If you clean the surface of the cabinet with a wet cloth, water
droplets on the surface may enter into the product, resulting
in malfunction.
Handles at the rear of the Plasma Display
• Do not remove the handles from the rear of the Plasma
Display.
When not using the product for a long period of time
• When moving the Plasma Display, ask another person for
help and use the handles attached to the rear of the Plasma
Display. Do not move the Plasma Display by holding only a
single handle. Use the handles as shown.
• If you do not use the product for a long period of time, the
functions of the product may be adversely affected. Switch on
and run the product occasionally.
• Do not use the handles to hang the product when installing
or carrying the product, for example. Do not use the handles
for the purpose of preventing the product from tilting over.
• This may result in the discoloration or scratch of the cabinet.
10
Cleaning the screen
Supplied Accessories
04
Plasma Display
English
Speed clamp × 3
Cleaning cloth
Power cord (2 m/6.6 feet)
Bead band × 3
Warranty card
Media Receiver
Power cord (2 m/6.6 feet)
Remote control unit
AA size battery × 2
(Alkaline battery)
Screw hole cap × 4
System cable (3 m/9.8 feet)
Screw × 4
(for stand)
Stand
VCR controller
(1.8 m/5.9 feet)
• Always use the power cord supplied with the Plasma Display and the
one supplied with the Media Receiver for each respective unit.
Operating Instructions
Instruction guide
11
En
05
Part Names
Plasma Display
Front view
(right view)
1
2
5
4
5
6
7
button
STANDBY indicator
Lights red when the unit is standby mode.
(page 24)
POWER ON indicator
Lights green when the Plasma Display is
operating. (page 24)
Remote control sensor
STANDBY/ON button
INPUT button
VOLUME +/– buttons
8
CHANNEL +/– buttons
9
SYSTEM CABLE terminal (BLACK)
6
3
7
8
4
Rear view
10 SYSTEM CABLE terminal (WHITE)
11 SPEAKER (right/left) terminals
12 AC INLET terminal
9
11
10
12
The terminals have faced downward.
Media Receiver
Front view
POWER
ON
1
STANDBY
REC
TIMER
DATA
ACQUISITION
2 3 4 5
Pull this section to open the door.
INPUT 4
COMPONENT VIDEO
CR / PR
CB / PB
Y
6
12
En
S-VIDEO
PC
VIDEO
AUDIO
(STEREO)
AUDIO
L
ANALOG RGB
R
7 8 9 10 11
1
2
3
4
5
6
POWER button
POWER ON indicator
STANDBY indicator
REC TIMER indicator
DATA ACQUISITION indicator
INPUT 4 terminals
(COMPONENT VIDEO: Y, CB/PB, CR/PR)
7 INPUT 4 terminal (S-VIDEO)
8 INPUT 4 terminal (VIDEO)
9 INPUT 4 terminals (AUDIO)
10 PC INPUT terminal (AUDIO)
11 PC INPUT terminal (ANALOG RGB)
Part Names
05
Rear view
3 4
IN
OUT
CONTROL
VCR CONTROL
5
6
7 8
9
10
11
12
English
1 2
13
DIGITAL OUT
OPTICAL
ANTENNA/
CABLE A IN
IN
Cable
CARD
ANTENNA B
(TS)
S400
INPUT 2
VIDEO
R-AUDIO-L
AC IN
INPUT 1
INPUT 2
S-VIDEO
VIDEO
R-AUDIO-L
INPUT 1 COMPONENT VIDEO
Y
C B /P B C R /P R
BLACK
SERVICE ONLY
OUT
INPUT 1
MONITOR OUT S-VIDEO
14
1
2
3
4
5
6
7
8
9
10
11
12
15 16
VIDEO
17 18
R-AUDIO-L
19
S-VIDEO
20 21
R-AUDIO-L INPUT
INPUT 33 Y
22
CONTROL IN terminal
CONTROL OUT terminal
VCR CONTROL terminal
ANTENNA B IN terminal
ANTENNA/CABLE A IN terminal
INPUT 2 terminal (VIDEO)
INPUT 2 terminals (AUDIO)
i.LINK terminals
Cable CARD slot
INPUT 1 terminals (AUDIO)
DIGITAL OUT terminal (OPTICAL)
INPUT 1 terminals
(COMPONENT VIDEO: Y, CB/PB, CR/PR)
13 AC IN terminal
C B /P B
C R /P R
INPUT 3
24
23
WHITE
SYSTEM CABLE
HDMI
25
26
14
15
16
17
18
19
20
21
22
23
RS-232C terminal (used for factory setup)
ANTENNA B OUT terminal
INPUT 2 terminal (S-VIDEO)
MONITOR OUT terminal (S-VIDEO)
MONITOR OUT terminal (VIDEO)
MONITOR OUT terminals (AUDIO)
INPUT 1 terminal (VIDEO)
INPUT 1 terminal (S-VIDEO)
INPUT 3 terminals (AUDIO)
INPUT 3 terminals
(COMPONENT VIDEO: Y, CB/PB, CR/PR)
24 HDMI terminals (INPUT1/INPUT3)
25 SYSTEM CABLE terminal (WHITE)
26 SYSTEM CABLE terminal (BLACK)
13
En
05
Part Names
Remote control unit
1
2
Mode switch (with
“TV” selected)
14
3
15
16
17
4
5
18
6
19
7
20
21
8
22
9
23
10
11
12
13
24
25
26
27
With the mode switch set to TV
1 TV : Turns on the power to the Plasma
Display or places it into standby mode.
2 Transmission confirmation LED
3 INPUT: Selects an input source of the Plasma
Display. (INPUT 1, INPUT 2, INPUT 3, INPUT 4,
PC, i.LINK)
4 •(dot): Enters a dot.
5 CH RETURN: Returns to the previous channel.
14
En
6 CH +/–: Selects the channel.
7 RETURN: Returns to the previous menu
screen.
/ / / : Selects a desired item on the menu
8
screen.
9 DTV INFO: Shows more information on DTV
programs.
10 SPLIT: Switches the screen mode among 2screen, picture-in-picture, and single-screen.
11 FREEZE: Freezes a frame from a moving
image. Press again to cancel the function.
12 SWAP: Switches between the two screens
when in the 2-screen or picture-in-picture
mode.
13 SHIFT: Moves the location of the small screen
when in the picture-in-picture mode.
:When pressed, all buttons on the remote
control unit will light. The lighting will turn
off if no operations are performed within
about 5 seconds. This button is used for
performing operations in dark places.
15 ANT: Selects the antenna (A, B). See pages 21
and 22 for details.
16 MTS: Selects the MTS/SAP.
17 0 – 9: Selects the channel.
18 CH ENTER: Executes a channel number.
19 VOL +/–: Sets the volume.
14
20
MUTING: Mutes the sound.
21 HOME MENU: Displays the menu screen.
22 ENTER: Executes a command.
23 FAVORITE CH (A, B, C, D):
Selects any of the four preset channels. See
page 37 for details to set the FAVORITE CH.
While watching, you can toggle the set channels by pressing A, B, C and D.
24 SCREEN SIZE: Selects the screen size.
25 DISPLAY: Displays the channel information.
26 AV SELECTION: Selects audio and video
settings. (AV mode: STANDARD, DYNAMIC,
MOVIE, GAME, USER. PC mode: STANDARD,
USER.)
27 SLEEP: Sets the sleep timer.
• When using the remote control unit, point it at the Plasma Display.
• See pages 62 to 68 for operating buttons not listed on this page.
Preparation
Installing the Plasma Display
06
Using the optional PIONEER stand
• This product may be used only with model PDK-1012 stand.
Use with other stands may result in instability causing
possible injury.
Over 50 cm (19 11/16 inches)
English
For details on installation, refer to the instruction manual
supplied with the stand.
Using the optional PIONEER speakers
For details on installation, refer to the instruction manual
supplied with the speaker.
Operating Environment
Over 10
cm (3 15/16
inches )
Operating environment temperature and humidity: +0°C to
+40°C (+32°F to +104°F); less than 85% RH (cooling vents not
blocked)
Avoid installing at the following locations:
• Under direct exposure to sunlight
• Under strong artificial light
• In high humidity
• Poorly ventilated
Locating
• Avoid direct sunlight. Maintain adequate ventilation.
• The length of the system cable used to connect the Plasma
Display and the Media Receiver is about 3 m (9.8 feet).
• Because the Plasma Display is heavy, be sure to have
someone help you when moving it.
• If you place anything on the top of the Media Receiver it will
not receive enough ventilation and will not operate properly.
• Allow enough space around the upper and back parts when
installing to ensure ventilation around the backside.
15
En
06
Preparation
Installing the Media Receiver vertically
Installing the Media Receiver
POWER
ON
STANDBY
Plasma Display
You can use the supplied stand to install the Media Receiver
vertically.
TIMER
REC
ACQUISITION
DATA
1. Insert the stand into the side of the Media
Receiver.
Media Receiver
(vertical installation)
(horizontal installation)
Right side
POWER
ON
STANDBY
REC
DATA
TIMER
ACQUISITION
System cable (approx. 3 m/9.8 feet)
• Do not place a VCR or any other device on the top of the
Media Receiver.
• When installing, allow enough space on the sides and
above the Media Receiver.
• Do not block the side cooling vents or the rear ventilation fan opening of the Media Receiver.
2. Secure the stand with the supplied screws.
Screws
Over 5 cm
(2 inches)
POWER
ON
STANDBY
REC
DATA
TIMER
ACQUISITION
Over 5 cm
(2 inches)
Over 5 cm
(2 inches)
Over 10 cm
(3 15/16 inches)
Over 5 cm
(2 inches)
POWER
ON
STANDBY
TIMER
REC
ACQUISITION
DATA
Over 5 cm Over 5 cm
(2 inches) (2 inches)
16
En
Over 10 cm
(3 15/16 inches)
Preparation
06
3. Remove the shock absorbing pads.
English
Shock absorbing pad
Keep the shock absorbing pads and screws. They are required
when you place the Media Receiver in the horizontal position.
4. Plug the screw holes using the supplied caps.
Remove the separation sheet.
Align with the
hole and attach.
Screw hole cap
• When you have installed the Media Receiver vertically,
be sure to use the supplied stand. If you place the unit
directly on the floor, the cooling vents will be blocked,
resulting in mechanical failure.
17
En
06
Preparation
Connecting the system cable
Connecting the system cable to the Plasma Display
Plasma Display (rear view)
For details on optional PIONEER speaker
installation, refer to the instruction manual
that came with the speaker.
(BLACK)
(WHITE)
System cable
Connecting the system cable to the Media Receiver
Media Receiver (rear view)
DIGITAL OUT
OPTICAL
IN
OUT
CONTROL
VCR CONTROL
IN
ANTENNA/
CABLE A IN
Cable
CARD
ANTENNA B
(TS)
(BLACK)
S400
AC IN
S-VIDEO
INPUT 2
VIDEO
R-AUDIO-L
VIDEO
INPUT 1 COMPONENT VIDEO
R-AUDIO-L
Y
C B /P B C R /P R
BLACK
SERVICE ONLY
OUT
MONITOR OUT S-VIDEO
INPUT 1
VIDEO
R-AUDIO-L
S-VIDEO
R-AUDIO-L INPUT
INPUT 33 Y
C B /P B
C R /P R
INPUT 3
HDMI
WHITE
SYSTEM CABLE
(WHITE)
• THESE SPEAKER TERMINALS CAN BE APPLIED WITH HAZARDOUS VOLTAGE WHEN YOU CONNECT OR DISCONNECT THE SPEAKER CABLES. TO PREVENT THE RISK OF ELECTRIC SHOCK, DO NOT TOUCH
UNINSULATED PARTS BEFORE DISCONNECTING THE POWER CORD.
18
En
Preparation
06
Routing cables
(rear view)
When the speakers are installed on the sides
Speaker cable
Cable binders (supplied
with the stand)*
Speed clamps
English
Speed clamps and bead bands are supplied for bunching cables. Once properly bunched, follow the steps below to route the
cables.
Speaker cable
* Cable binder
Using the cable binders supplied with the stand, put the
speaker and system cables together so that the cables are
invisible from the front. At that time be careful not to apply
any force to the connection sections of the cables.
Attaching speed clamps to the main unit
Attaching and removing speed clamps
Attach the speed clamps using the 4 holes marked with
below, depending on your routing system.
Insert [1] into an appropriate hole on the rear of the Plasma
Display and snap [2] into the back of [1] to lock the clamp.
Speed clamps are designed to be difficult to undo once in
place. Please attach them carefully.
Use pliers to twist the clamp 90°, pulling outward. The clamp
may deteriorate over time and become damaged if removed.
2
1
19
En
06
Preparation
Preparing the remote control unit
Inserting batteries
1 Open the battery cover.
Allowed operation range of the remote control
unit
Operate the remote control unit while pointing it toward the
remote control sensor located at the bottom right of the front
panel of the Plasma Display. The distance from the remote
control sensor must be within 7 m (23 feet) and the angle
relative to the sensor must be within 30 degrees in the right or
left direction.
2 Insert the supplied two AA size batteries.
t)
ee
• The battery polarities must correspond with the (+) and
(–) indicators in the battery compartment.
3 Close the battery cover.
Cautions regarding batteries
• The remote control unit cannot operate the system if the
batteries in the unit are empty. When this happens, replace
the batteries with new ones.
• Do not use manganese batteries. When you replace the
batteries, use alkaline ones.
• Do not mix batteries of different types. Different types of
batteries have different characteristics.
• Do not mix old and new batteries. Mixing old and new
batteries can shorten the life of new batteries or cause
chemical leakage in old batteries.
• Do not leave dead batteries in the remote control unit;
chemical leakage will occur. If you find any chemical leakage,
wipe thoroughly with a cloth.
• The batteries supplied with this product may have a shorter
life expectancy due to storage conditions.
• If you will not use the remote control unit for an extended
period of time, remove the batteries from it.
• WHEN DISPOSING OF USED BATTERIES, BE SURE
TO COMPLY WITH GOVERNMENT REGULATIONS
AND ENVIRONMENTAL PROTECTION GUIDELINES
THAT APPLY IN YOUR COUNTRY OR AREA.
20
En
30°
7m
f
(23
30°
Remote control
sensor
Cautions regarding the remote control unit
• Do not expose the remote control unit to shock, liquid, or
high humidity.
• Do not place the remote control unit under direct sunlight;
the unit may deform.
• The remote control unit may not work properly if the remote
sensor window of the Plasma Display is under direct sunlight
or strong lighting. In such case, change the angle of the
lighting or Plasma Display, or operate the remote control unit
closer to the remote sensor window.
• When any obstacle exists between the remote control unit
and the remote control sensor, the remote control unit may
not function.
• As the batteries become empty, the remote control unit can
function within a shorter distance from the remote control
sensor. Replace the batteries with new ones if necessary.
• The Plasma Display emits very weak infrared rays from its
screen. If you place such equipment operated through
infrared remote control as a VCR nearby, that equipment may
not receive commands from its remote control unit properly
or entirely. If this is the case, place that equipment at a
location far enough from the Plasma Display.
• Depending on the installation environment, infrared rays
from the Plasma Display may not allow this system to
properly receive commands from the remote control unit or
may shorten allowable distances between the remote control
unit and the remote control sensor. The strength of infrared
rays emitted from the screen differs, depending on images
displayed on the screen.
Preparation
06
Cable connections for watching digital
TV channels over air (VHF/UHF)
This system is equipped with two terminals for inputting TV
broadcasting signals: ANTENNA/CABLE A IN and ANTENNA B.
The ANTENNA/CABLE A IN terminal accepts both digital and
conventional TV broadcasting signals while the ANTENNA B
terminal accepts only conventional TV broadcasting signals.
When using a cable TV to watch digital and/or conventional TV
channels, connect to the ANTENNA/CABLE A IN terminal as
shown. In addition, you may connect an antenna to the
ANTENNA B terminal as shown; use an outdoor antenna to
enjoy clearer pictures. If your outdoor uses a 75-ohm coaxial
cable with an F-type connector, plug it into the antenna
terminal at the rear of the Media Receiver.
If using VHF and UHF antennas to watch digital TV channels,
connect the coaxial cables as shown.
English
Cable connections for watching digital
and/or conventional TV channels
Connecting VHF/UHF antennas
VHF antenna
UHF antenna
U/V mixer
Connecting VHF/UHF antennas and a Cable
Converter
Media Receiver (rear)
ANTENNA/
CABLE A IN
Cable TV
Splitter
Splitter
Cable Converter
ANTENNA B
IN
ANTENNA/
CABLE A IN
ANTENNA B
Media Receiver
(rear)
IN
OUT
Media Receiver (rear)
• Be sure to connect coaxial cables as shown above. Signal reception
may fail if not properly connected.
OUT
• Be sure to connect coaxial cables as shown above. Signal reception
may fail if not properly connected.
21
En
06
Preparation
3 Insert the specified cable card into the Cable CARD slot
Switching between antenna A and B
as far as it goes.
To watch broadcasts via the two antennas, you can select it by
pressing ANT on the remote control unit.
• While watching a broadcast, press ANT to view the image
received from the other antenna.
UT
AL O
DIGIT AL
OPTIC
• Pressing ANT while watching in the 2-screen mode (TV
image and video image) with TV selected will display the TV
image of the other antenna.
• Pressing ANT while watching in the 2-screen mode with two
TV images displayed will not have any effect.
• Pressing ANT while watching in the 2-screen mode with two
video images displayed will switch the selected screen to a
TV image.
Cable
CARD
/
NNA
ANTE E A IN
L
CAB
V ID E
T 2
N P U ID E O
V
R -A U
Inserting the cable card
V ID E
The Media Receiver is equipped with a slot for inserting a cable
card. When you are watching digital and/or High Definition TV
channels over cable, the card allows you to use the POD
service provided by the cable TV company; the POD stands for
Point of Deployment. This service presents various types of
useful information, using HTML text.
1 Confirm that the ANTENNA/CABLE A IN terminal has
2
been connected with the coaxial cable from the Cable
Converter. See page 21.
Hold the tab of the slot cover on the rear of the Media
Receiver, and remove the cover while releasing the tab’s
latch.
Tab
UT
AL O
DIGIT AL
OPTIC
Cable
CARD
IDEO
NT V R /P R
C
PONE
COM C B /P B
1
T
IN P U
Y
S400
(TS)
O
V ID E
R -A U
D IO -L
T1
INPU
IO -L
AUD
C R /P
22
En
R
O
O
R -A U
D IO -L
T1
INPU
D IO -L
S -V ID
R -A U
IDEO
NT V R /P R
C
PONE
COM C B /P B
Y
S400
(TS)
EO
D
R -A U
IO -L
T3
INPU
Y
D IO -L
• Be sure to insert only the specified cable card.
• Do not insert a PCMCIA card.
C B /P
B
C
R /P R
H
Preparation
06
Connecting the power cord
Plasma Display (rear view)
English
Connect the power cord after all component connections have been completed.
Power cord
Noise filter
Partially eliminates noise
caused by the power source.
Media Receiver (rear view)
DIGITAL OUT
OPTICAL
IN
OUT
CONTROL
VCR CONTROL
IN
ANTENNA/
CABLE A IN
Cable
CARD
ANTENNA B
(TS)
S400
ACACINLET
IN
INPUT 2
S-VIDEO
INPUT 2
VIDEO
R-AUDIO-L
VIDEO
R-AUDIO-L
INPUT 1 COMPONENT VIDEO
Y
C B /P B C R /P R
BLACK
AC IN
SERVICE ONLY
OUT
MONITOR OUT S-VIDEO
INPUT 1
VIDEO
R-AUDIO-L
S-VIDEO
R-AUDIO-L INPUT
INPUT 33 Y
C B /P B
C R /P R
INPUT 3
HDMI
WHITE
SYSTEM CABLE
Power cord
Noise filter
Partially eliminates noise
caused by the power source.
• Use only the supplied power cord.
• Be sure to use the specified power supply voltage;
neglecting this can result in fire or electric shock.
• Always turn off the power of the Plasma Display and Media Receiver
when connecting the power cords.
• Disconnect the power cord from the power outlet when the Plasma
Display System is not going to be used for a long period of time.
• For the Plasma Display System, a three-core power cord
with a ground terminal is used for efficiency protection.
Always connect the power cord to a three-pronged
outlet and make sure that the cord is properly grounded.
23
En
07
Basic Operations
Plasma Display
Turning on the power (Standby)
1 Press
2
on the Plasma Display if the STANDBY indicator
is off.
• The STANDBY indicator on the Plasma Display lights
up red.
Confirm that the STANDBY indicators light up red, and
then press TV on the remote control unit or
STANDBY/ON on the Plasma Display or POWER on the
Media Receiver to turn the system on.
• The POWER ON indicators on the Plasma Display and
Media Receiver light up green.
STANDBY indicator
POWER ON indicator
button
(right view)
• In this manual, “system” means the Plasma Display Panel and Media
Receiver.
STANDBY/
ON button
Turning off the power (Standby)
1 Press TV
on the remote control unit or STANDBY/ON
on the Plasma Display or POWER on the Media Receiver.
• The system enters the standby mode and the image on
the screen disappears.
• Both STANDBY indicators light up red.
• It is recommended to place the system into the standby
mode by pressing TV on the remote control unit.
This allows the system to automatically receive digital
TV program information in the standby mode.
• If you are not going to use this system for a long period of time, press
on the Plasma Display and remove the power cord from the power
outlet.
Media Receiver
POWER
ON
STANDBY
REC
TIMER
DATA
ACQUISITION
STANDBY indicator
POWER ON indicator
POWER button
Plasma Display/Media Receiver status indicators
Indicator Status
Plasma Display
Media Receiver
POWER ON
STANDBY
POWER ON
System Status
STANDBY
Power to the Plasma Display and Media Receiver is off. Or the power cords
have been disconnected.
Power to the system is on.
The system is in the standby mode.
The power cord has been disconnected from the Media Receiver.
Flashing
Flashing
Power to the Plasma Display is off. Or the power cord has been disconnected
from the Plasma Display.
For other than the above, see “Troubleshooting” on page 69.
24
En
Basic Operations
07
Plasma Display
(right view)
Watching TV channels
English
Unless you set up TV channels that you can watch under the
current conditions, you cannot tune in those channels. For the
procedure, see “Setting up TV channels” on page 31.
CHANNEL +/–
• When watching a digital TV program, you may see emergency alert
messages scrolling at the top of the screen. Those messages are
broadcasted by TV stations as necessary when in emergency
situations.
Selecting the antenna
After confirming that the Mode switch on the remote control
unit has been set to “TV”, press ANT on the remote control unit
to select antenna A or B.
• Make this selection depending on the connections to the
antenna input terminals on the Media Receiver (page 21).
Changing channels
To increase the channel number, press CH + on the remote
control unit. To decrease the channel number, press CH –.
• CHANNEL +/– on the Plasma Display operates the same as
CH +/– on the remote control unit.
• Press CH RETURN to switch the currently tuned channel to
the previously tuned channel.
Press CH RETURN again to restore the currently tuned
channel.
Using 0 – 9 and • (dot) on the remote control unit
Select channels directly by pressing buttons 0 to 9. To select
subchannels, also use the • (dot) button.
EXAMPLE
• To select channel 5 (1-digit channel), press 5.
• To select channel 25 (2-digit channel), press 2 then 5.
• To select channel 125 (3-digit channel), press 1, 2, then 5.
• To select subchannel 10.01, press 1, 0, • (dot), 0, then 1.
• To select subchannel 10.001 (for the cable TV), press 1, 0,
• (dot), 0, 0, then 1.
Channel banner
12:33pm
DTV 2 • 1002.102 A
XXXXXXXXXX
12:30pm — 2:00pm
• After entering a channel or subchannel number, you may press
CH ENTER to tune in the channel more quickly.
• Each time you change a channel, such a channel banner appears
that shows information about the currently selected channel. To clear
the channel banner, press DTV INFO. For more information about
the channel banner, see “Viewing a channel banner” on page 26.
25
En
07
Basic Operations
Changing the volume and sound
Viewing a channel banner
To increase the volume, press VOL + on the remote control
unit. To decrease the volume, press VOL –.
• VOLUME +/– on the Plasma Display operates the same as
VOL +/– on the remote control unit.
While watching a digital TV program, pressing DTV INFO
causes the following banner to appear. Pressing DTV INFO
again causes the banner to disappear.
• To mute the sound output, press MUTING. “ ” appears on
the screen. To quit muting, press MUTING again. Pressing
VOL + also quits muting.
Plasma Display
(right view)
1
VOLUME +/–
2
3
4
12:33pm
WXCD • 1000 Ant. A
********************************************************
*********************************************
******************************************
XXXXXXXXXX
12:30pm – 2:00pm
5
1
2
3
4
5
6
7
6
7
Station name
Current time
Channel number
Input (Ant. A or Ant. B)
Program time schedule
Program title
TV rating and program description (This may be unavailable
for some programs.)
Volume adjustment
• The above information is not displayed if not included in broadcast
signals.
• If “ ” is shown at the bottom right of the channel banner containing
program description, press / to scroll the program description.
Muting
26
En
Basic Operations
07
Setting MTS/SAP mode
If you have watched digital and/or High Definition TV channels
over cable, you can use the POD service provided by the cable
TV company. This service presents various types of useful
information, using HTML text.
When watching conventional TV programs, you may enjoy
stereo sound and/or Secondary Audio Programs (SAP), using
the Multi-channel Television Sound (MTS) function.
• Stereo broadcasts
You can enjoy, for example, sports, shows, and concerts in
dynamic stereo sound.
English
Using the POD service
• SAP broadcasts
MAIN sound: The normal program soundtrack (either in
mono or stereo).
SAP sound: Listen to second language, supplementary
commentary and other information. (SAP is mono sound.)
Press HOME MENU, 9, 9, then 9 to view the POD display.
• If you have enabled data acquisition using the menu, POD
information is automatically acquired even when the system is in the
standby mode. See page 32.
Changing the language
If you have selected a digital TV program that provides multilanguage services, you can switch among the languages by
pressing MTS on the remote control unit.
Each time you press MTS, the language switches.
• Conventional TV channels in this manual designate TV channels that
are received through the conventional VHF/UHF frequencies or
conventional cable TV channels.
• When stereo sound is difficult to hear, you may manually switch to
the MONO mode to obtain clearer sound.
• Once the MONO mode is selected, the Plasma Display System
sound remains mono even if the system receives a stereo broadcast.
You must reselect the STEREO mode if you want to hear stereo
sound again.
• Selecting MTS while the input source is INPUT 1 to 4 or PC does not
change the type of sound. In this case, sound is determined by the
video source.
Each time you press MTS, MTS toggles as shown below.
STEREO mode
• Switchable languages differ depending on the current broadcast.
• If the language selected through language setting is available when
the channel or program is changed, you will hear that language.
STEREO
SAP mode
SAP
MONO mode
MONO
• In each of the MTS/SAP modes selected using the MTS button, the
display changes depending on broadcasting signals being received.
27
En
07
Basic Operations
When receiving STEREO sound signals
Using the multiscreen functions
A 125
STEREO
In STEREO mode
Splitting the screen
A 125
STEREO
In SAP mode
Use the following procedure to select the 2-screen or picture-inpicture mode.
2-screen
A 125
MONO
In MONO mode
When receiving MAIN + SAP sound signals
A 125
MAIN (SAP)
In STEREO mode
Picture-in-picture
A 125
SAP (MAIN)
In SAP mode
A 125
MONO (SAP)
In MONO mode
When receiving STEREO + SAP sound signals
A 125
STEREO (SAP)
In STEREO mode
A 125
SAP (STEREO)
In SAP mode
A 125
MONO (SAP)
In MONO mode
When receiving MONO sound signals
A 125
MONO
In STEREO mode
A 125
MONO
In SAP mode
A 125
MONO
28
En
In MONO mode
1 Press SPLIT to select the display mode.
• Each time you press SPLIT, the display mode is
switched among 2-screen, picture-in-picture, and
single-screen.
Basic Operations
Freezing images
Use the following procedure to capture and freeze one frame
from a moving image that you are watching.
Normal image
English
• In 2-screen or picture-in-picture mode, press SWAP to
switch the position of the 2 screens shown.
Left screen is the active screen which will be indicated
by “ ”. The user is allowed to operate picture and
sound.
07
Still image
• In 2-screen mode, press SCREEN SIZE to change the
size of the left screen.
• In picture-in-picture mode, press SHIFT to move the
position of the small screen in anti-clockwise.
1 Press FREEZE.
2
• A still image appears on the right screen while a
moving image is shown on the left screen.
Press FREEZE again to cancel the function.
• With the screen split, any image cannot be frozen.
• When this function is not available, a warning message appears.
2 To select the desired input source, press the appropriate
input source button.
• If watching TV programs, press CH +/– to change the
channel.
• The multiscreen function cannot display images from the same input
source at the same time. If you make such an attempt, a warning
message appears.
• When you press HOME MENU or DTV INFO, the single-screen
mode is restored and the corresponding menu is displayed.
• When the two screens show the same analog broadcasting coming
through antenna A and B, the picture quality may differ between the
two screens.
29
En
08
Menu Setup
PC mode menus
Menu configuration
AV mode menus
Home Menu
Picture
Item
AV Selection
Contrast
Brightness
Color
Tint
Sharpness
Pro Adjust
Reset
Page
40
41
41
41
41
41
41
41
Treble
Bass
Balance
Reset
FOCUS
Front Surround
43
43
43
43
43
43
Energy Save
No Signal off
No Operation off
44
44
44
Sleep Timer
—
40
Option
Position
Side Mask
HDMI Input
Monitor Out
Digital Audio Out
Language
45
47
51, 52
52, 53
54
47
Channel Setup
Parental Control
Favorites
Closed Captions
Recorder Setup
Clock
31, 32
33–37
37
37–39
56–57
39
—
48, 49
Sound
Power Control
Tuner Setup
Timers
Home Menu
Picture
Item
AV Selection
Contrast
Brightness
Red
Green
Blue
Reset
Page
40
41
41
41
41
41
41
Sound
Treble
Bass
Balance
Reset
FOCUS
Front Surround
43
43
43
43
43
43
Power Control
Energy Save
Power Management
44
44
Sleep Timer
—
40
Option
Auto Setup
Manual Setup
45
45
Menu operations
The following describes the typical procedure for setting up the
menus. For the actual procedures, see the appropriate pages
that describe individual functions.
1 Press HOME MENU.
2 Press / to select a menu item, and then press ENTER.
3 Repeat step 2 until you access the desired submenu item.
• The number of menu layers differs depending on menu
items.
• If you select “Tuner Setup” or “Timers” , a menu bar
appears at the bottom of the screen. To select a
submenu item on the bar, press / instead of / .
4 Press / to select an option (or parameter), and then
press ENTER.
• For some menu items, press
/
instead of
/ .
5 Press HOME MENU to exit the menu.
• You can return to the upper menu levels by pressing RETURN.
30
En
Tuner Setup
09
Setting for skipping unwanted channels
Setting up TV channels
Using Auto Channel Preset
Auto Channel Preset automatically searches and sets up TV
channels.
1
2
3
4
5
6
Press HOME MENU.
Select “Tuner Setup”. ( /
then ENTER)
Select “Channel Setup”. ( /
Ant. A
Auto Ch. Preset
Auto Channel Preset
D
7
Cancel
then ENTER)
Select “Channel Keep/Skip”. ( /
then ENTER)
Select a channel to be skipped. ( /
then ENTER)
Channel Keep/Skip
Channel Keep/Skip
2.0
4.0
6.0
2.0
4.0
6.0
Cancel
One Moment Please …
xxxxxxxxxxxxxxxxxxxxx
xxxxxxxxxxxxxxxxxxxxx
xxxxxxxxxxxxxxxxxxxxx
Home Menu Exit
xxxxxxxxxxxxxxxxxxxxx
xxxxxxxxxxxxxxxxxxxxx
xxxxxxxxxxxxxxxxxxxxx
Home Menu Exit
Auto Ch. Preset Cable
Auto Channel Preset • Cable
then ENTER)
Select “Ant. A” or “Ant. B”. ( /
then ENTER)
• Channel search automatically starts.
Ant. A
then ENTER)
Select “Channel Setup”. ( /
Ant. A
Cable
D
Channel Setup Ant. A
Select “Tuner Setup”. ( /
then ENTER)
Air
Cable
Enter Begin Preset
Press HOME MENU.
Channel Setup Ant. A
then ENTER)
Select “Auto Channel Preset”. ( /
Channel Setup Ant. A
1
2
3
4
5
6
then ENTER)
Select “Ant. A” or “Ant. B”. ( /
Select “Air” or “Cable”. ( /
From among TV channels searched and set up using Auto
Channel Preset, you can select channels to be skipped when
CH +/– are operated.
English
This section describes how to search and set up TV channels
that you can watch under the current conditions. Unless you set
up TV channels using Auto Channel Preset, you may not be able
to tune in those channels.
xxxxxxxxxxxxxxxx
xxxxxxxxxxxxxxxx
xxxxxxxxxxxxxxxx
Home Menu Exit
• To quit Auto Channel Preset halfway, press D.
After Auto Channel Preset has been finished, press
HOME MENU to exit the menu.
• When using the Cable Converter, you may need to manually add
Cable Converter output channels.
7
• For the skipped channel, a check mark disappears.
Press HOME MENU to exit the menu.
• To restore skipped channels, use the above procedure except that you
select a skipped channel in step 6.
• When using the Cable Converter, you may need to manually add
Cable Converter output channels.
Setting up TV channels manually
This section describes how to manually set up TV channels that
have not been set up by Auto Channel Preset.
1
2
3
4
5
6
Press HOME MENU.
Select “Tuner Setup”. ( /
then ENTER)
Select “Channel Setup”. ( /
then ENTER)
Select “Ant. A” or “Ant. B”. ( /
Select “Add Channel”. ( /
then ENTER)
then ENTER)
Select a channel number to be added. ( / then ENTER)
• You can also use buttons 0 – 9 to enter a channel
number.
Channel Setup Ant. A
Ant. A
Add Channel
Add Channel
0000.000
1
xxxxxxxxxxxxxxxxxxxxx
xxxxxxxxxxxxxxxxxxxxx
xxxxxxxxxxxxxxxxxxxxx
Home Menu Exit
7
8
• After ENTER has been pressed, a confirmation screen
appears.
Press A to complete the setup processing.
Press HOME MENU to exit the menu.
31
En
09
Tuner Setup
Naming TV channels
Checking the Cable Card ID
You can name TV channels that you have set up for antenna B.
This may help you easily identify the channels during selections.
The Media Receiver has a slot for a cable card that is used for
managing your information by the cable TV company. The
following procedure allows you to check your Cable Card ID and
the Host ID.
1
2
3
4
5
6
Press HOME MENU.
Select “Tuner Setup”. ( /
then ENTER)
Select “Channel Setup”. ( /
Select “Ant. B”. ( /
then ENTER)
then ENTER)
Select “Name Channel”. ( /
then ENTER)
Select a channel. ( / then ENTER)
• You can also use buttons 0 – 9 to enter a channel
number.
Channel Setup Ant. B
Ant. B
Name Channel
Name Channel
Home Menu Exit
7 Enter up to 7 alphanumeric characters using / ,
/ , and ENTER.
• To clear the last character, press B.
Ant. B
A
Name Channel
Name: DTV2
A
K
U
5
)
Name Channel
Accept
B
B
L
V
6
,
C
M
W
7
–
D
N
X
8
_
E
O
Y
9
:
F
P
Z
0
'
G
Q
1
.
&
Clear
H I J
R S T
2 3 4
@ / (
S PA C E
D Cancel
xxxxxxxxxxxxxxxxxxxxx
xxxxxxxxxxxxxxxxxxxxx
xxxxxxxxxxxxxxxxxxxxx
Home Menu Exit
8 Press A.
9 Press HOME MENU to exit the menu.
Checking signal strength
When you have selected antenna A, you can check the current
channel’s signal strength. You may use this function when
receiving a channel through a VHF/UHF antenna.
1
2
3
4
5
Press HOME MENU.
Select “Tuner Setup”. ( /
then ENTER)
Select “Channel Setup”. ( /
Select “Ant. A”. ( /
Ant. A
Signal Strength
then ENTER)
then ENTER)
Select “Signal Strength”. ( /
Channel Setup Ant. A
then ENTER)
Signal Strength
Maximum: 100
Current: 100
xxxxxxxxxxxxxxxxxxxxx
xxxxxxxxxxxxxxxxxxxxx
xxxxxxxxxxxxxxxxxxxxx
Home Menu Exit
6
32
En
5
Press HOME MENU.
Select “Tuner Setup”. ( /
then ENTER)
Select “Channel Setup”. ( /
then ENTER)
Select “POD ID”. ( / )
• The Host ID and Cable Card ID appear.
Press HOME MENU to exit the menu.
Enabling data acquisition
xxxxxxxxxxxxxxxxxxxxx
xxxxxxxxxxxxxxxxxxxxx
xxxxxxxxxxxxxxxxxxxxx
Channel Setup Ant. B
1
2
3
4
• Adjust the direction of the antenna so that the current
signal strength reaches as close to the maximum signal
strength as possible.
Press HOME MENU to exit the menu.
Use this function to enable the system to automatically acquire
information about digital TV programs even when in the standby
mode.
1
2
3
4
5
6
Press HOME MENU.
Select “Tuner Setup”. ( /
then ENTER)
Select “Channel Setup”. ( /
Select “Data Acqu”. ( /
Select “Enabled”. ( /
then ENTER)
then ENTER)
then ENTER)
Press HOME MENU to exit the menu.
• The DATA ACQUISITION indicator on the front of the Media
Receiver lights while data is being acquired.
Tuner Setup
09
Parental Control
Rating
Description
General audiences. All ages admitted.
PG
Parental guidance suggested. Some material
may not be suitable for children.
PG-13
Age-Base R
Parents strongly cautioned. Some material
may be inappropriate for children under 13.
Restricted. Under 17 requires accompanying
parent or adult guardian (age varies in some
jurisdictions).
NC-17
No one 17 and under admitted.
Adult
A rating that has now been superseded by
NC-17.
NR
Not rated.
Content
V
S
L
D
(Violence) (Sexual
(Adult
(Sexually
situations) language) suggestive
dialog)
TV-Y
(All children)
TV-Y7
(Directed to older children)
X
TV-G
Age-Base (General audience)
Voluntary movie rating system (MPAA)
Rating
G
FV
(Fantasy
violence)
English
With the Parental Control, parents can prevent their children
from watching inappropriate TV programs, VCR or DVD
contents. When an attempt is made to watch a program (or
content) blocked by parents, the Plasma Display shows nothing
but a message. The Parental Control functions for both
conventional and digital TV channels.
In the U.S. three rating systems have been provided: the TV
ratings, TV Parental Guidelines, and movie ratings. Movie
ratings are provided by the Motion Picture Association of
America (MPAA) and are used for original movies not edited for
television.
For the rating system in Canada, see pages 36 and 37.
TV Parental Guidelines
TV-PG
(Parental guidance suggested)
X
X
X
X
TV-14
(Parents strongly cautioned)
X
X
X
X
TV-MA
(Mature audience only)
X
X
X
X: Content rating can be set.
Changing the password
Using a password prevents other persons from changing
Parental Control settings. A default password (1234) has been
set before shipment. Use the following procedure to change the
password.
1
2
3
4
5
Press HOME MENU.
Select “Tuner Setup”. ( /
then ENTER)
Select “Parental Control”. ( /
Select “Password”. ( /
then ENTER)
then ENTER)
Select “Change Password”. ( /
then ENTER)
• The voluntary movie rating system only uses an age-based rating.
TV ratings
Age-Base
Rating
TV-Y
Description
All children
TV-Y7
Children 7 and above
TV-G
General audiences
TV-PG
Parental guidance suggested
TV-14
Parents strongly cautioned
TV-MA
Mature audiences only
Parental Control
Password
Password
Change Password
Clear Password
xxxxxxxxxxxxxxxxxxxxx
xxxxxxxxxxxxxxxxxxxxx
xxxxxxxxxxxxxxxxxxxxx
Home Menu Exit
6 Enter the current 4-digit password, using buttons 0 – 9.
7 Enter a 4-digit password to be newly set, using buttons
0 – 9.
8 Enter the same password that you have entered in step 7.
• A confirmation screen appears.
9 Press A.
10 Press HOME MENU to exit the menu.
• Take a note of the newly set password and keep it handy.
33
En
09
Tuner Setup
Clearing the password
Use the following procedure to clear the password.
1
2
3
4
5
Press HOME MENU.
Select “Tuner Setup”. ( /
then ENTER)
Select “Parental Control”. ( /
Select “Password”. ( /
then ENTER)
then ENTER)
Select “Clear Password”. ( /
then ENTER)
Setting the voluntary movie rating system
(MPAA)
1 Press HOME MENU.
2 Select “Tuner Setup”. ( / then ENTER)
3 Select “Parental Control”. ( / then ENTER)
4 Select “MPAA Ratings”. ( / then ENTER)
5 Select the desired rating and change the setting. ( /
then ENTER)
Parental Control
Password
Password
Change Password
Clear Password
xxxxxxxxxxxxxxxxxxxxx
xxxxxxxxxxxxxxxxxxxxx
xxxxxxxxxxxxxxxxxxxxx
Home Menu Exit
Parental Control
MPAA Ratings
MPAA Ratings
G
PG
PG-13
Blocked MPAA Ratings
G, PG, PG-13, R, NC-17, Adult, NR
xxxxxxxxxxxxxxxxxxxxx
xxxxxxxxxxxxxxxxxxxxx
xxxxxxxxxxxxxxxxxxxxx
Home Menu Exit
6 Enter the current 4-digit password, using buttons 0 – 9.
7
8
• A confirmation screen appears.
Press A.
Press HOME MENU to exit the menu.
• The above procedure will reset the password to the factory default
(1234).
Activating the Parental Control
1 Press HOME MENU.
2 Select “Tuner Setup”. ( / then ENTER)
3 Select “Parental Control”. ( / then ENTER)
4 Select “Status”. ( / then ENTER)
5 Select “On”. ( / then ENTER)
6
6
• The password entry screen appears. Enter your 4-digit
password using buttons 0 – 9.
• Each time you press ENTER, the setting is switched.
• A lock icon appears beside the blocked rating.
• All the ratings have been unblocked before shipment.
Press HOME MENU to exit the menu.
• Blocking a rating causes more severe ratings to be automatically
blocked as well. Likewise, unblocking a rating causes less severe
ratings to be automatically unblocked.
• The password entry screen appears. Enter your 4-digit
password using buttons 0 – 9.
Press HOME MENU to exit the menu.
• If you select “Off” in step 5, then select “Reset on Startup” or “Don’t
Reset”. With “Reset on Startup” selected, the Parental Control is
automatically activated when the power to the system is turned off
and on. With “Don’t Reset” selected, the Parental Control remains off
when the power to the system is off and on.
We suggest you write down your password so you don’t forget it.
PRO-1120HD/PRO-920HD
Your password No.:
34
En
If you forget the password
When the message “Enter your Password” is displayed in
step 6 under “Clearing the password”, press the ENTER
button on the remote control unit and hold it down for 3
seconds or longer.
The password reverts to “1234”.
Tuner Setup
09
then ENTER)
Parental Control
TV Ratings
TV Ratings
TV-Y
TV-Y7
TV-G
TV-PG
Blocked TV Ratings
Blocking Not Rated TV programs
Use the following procedure to block TV programs whose rating
information is unavailable.
1
2
3
4
5
Press HOME MENU.
Select “Tuner Setup”. ( /
Select “Parental Control”. ( /
Select “Block” or “Don’t Block”. ( /
Unavailable Ratings
Home Menu Exit
then ENTER)
Select “Unavailable Ratings”. ( /
Parental Control
xxxxxxxxxxxxxxxxxxxxx
xxxxxxxxxxxxxxxxxxxxx
xxxxxxxxxxxxxxxxxxxxx
then ENTER)
English
Setting the TV ratings
1 Press HOME MENU.
2 Select “Tuner Setup”. ( / then ENTER)
3 Select “Parental Control”. ( / then ENTER)
4 Select “TV Ratings”. ( / then ENTER)
5 Select the desired rating and change the setting. ( /
then ENTER)
then ENTER)
Unavailable Ratings
Block
Don’t Block
xxxxxxxxxxxxxxxxxxxxx
xxxxxxxxxxxxxxxxxxxxx
xxxxxxxxxxxxxxxxxxxxx
Home Menu Exit
6
• The password entry screen appears. Enter your 4-digit
password using buttons 0 – 9.
• Each time you press ENTER, the setting is switched.
• A lock icon appears beside the blocked rating.
• All the ratings have been unblocked before shipment.
Press HOME MENU to exit the menu.
6
• The password entry screen appears. Enter your 4-digit
password using buttons 0 – 9.
• The factory default is “Don’t Block”.
Press HOME MENU to exit the menu.
• Blocking a rating causes more severe ratings to be automatically
blocked as well. Likewise, unblocking a rating causes less severe
ratings to be automatically unblocked.
Setting the TV Parental Guidelines (TV
Guidelines)
1 Press HOME MENU.
2 Select “Tuner Setup”. ( / then ENTER)
3 Select “Parental Control”. ( / then ENTER)
4 Select “TV Parental Guidelines”. ( / then ENTER)
5 Select the desired rating and change the setting. ( /
then ENTER)
Parental Control
TV Parental Guidelines
TV Parental Guidelines
Fantasy Violence
Violence
Sexual Situations
Blocked TV Parental Guidelines
xxxxxxxxxxxxxxxxxxxxx
xxxxxxxxxxxxxxxxxxxxx
xxxxxxxxxxxxxxxxxxxxx
Home Menu Exit
6
• The password entry screen appears. Enter your 4-digit
password using buttons 0 – 9.
• Each time you press ENTER, the setting is switched.
• A lock icon appears beside the blocked rating.
• All the ratings have been unblocked before shipment.
Press HOME MENU to exit the menu.
• Blocking a rating causes more severe ratings to be automatically
blocked as well. Likewise, unblocking a rating causes less severe
ratings to be automatically unblocked.
35
En
09
Tuner Setup
Canadian rating systems
Canadian French ratings
In Canada you can choose the Canadian English ratings or the
Canadian French ratings. These ratings are based on the
Canadian Radio-Television and Telecommunications
Commission (CRTC) policy.
Rating
E
Description
Exempt programming.
G
General: All ages and children, contains
minimal direct violence, but may be
integrated into the plot in a humorous or
unrealistic manner.
8ans+
General but inadvisable for young children:
May be viewed by a wide public audience,
but could contain scenes disturbing to
children under eight who cannot distinguish
between imaginary and real situations.
Recommended for viewing with parent.
13ans+
Over 13 years: Could contain scenes of
frequent violent scenes and therefore
recommended for viewing with parent.
16ans+
Over 16 years: Could contain frequent
violent scenes and intense violence.
18ans+
Over 18 years: Only for adult viewing. Could
contain frequent violent scenes and extreme
violence.
Canadian English ratings
Rating
E
Description
Exempt: Includes news, sports, documentaries and other information programming; talk
shows, music videos, and variety
programming.
C
Children: Intended for younger children
under the age of 8 years. Pays careful
attention to themes that could threaten their
sense of security and well-being.
C8+
Children over 8 years old: Contains no
portrayal of violence as the preferred,
acceptable, or only way to resolve conflict;
nor encourage children to imitate dangerous
acts which they may see on the screen.
G
Age-Base PG
14+
18+
General: Considered acceptable for all age
groups. Appropriate viewing for the entire
family, contains very little violence, physical,
verbal or emotional.
Parental Guidance: Intended for a general
audience, but may not be suitable for
younger children (under the age of 8)
because it could contain controversial
themes or issues.
Over 14 Years: Could contain themes where
violence is one of the dominant elements of
the storyline, but it must be integral to the
development of plot or character. Language
usage could be profane and nudity present
within the context of the theme.
Age-Base
Setting Canadian English ratings
1 Press HOME MENU.
2 Select “Tuner Setup”. ( / then ENTER)
3 Select “Parental Control”. ( / then ENTER)
4 Select “Canadian English Ratings”. ( / then ENTER)
5 Select the desired rating and change the setting. ( /
then ENTER)
Parental Control
Canadian English Ratings
Adults: Intended for viewers 18 years and
older and might contain depictions of
violence, which while related to the development of plot, character or themes, are
intended for adult viewing. Could contain
graphic language and portrayals of sex and
nudity.
En
E
C
C8+
xxxxxxxxxxxxxxxxxxxxx
Blocked Canadian English Ratings xxxxxxxxxxxxxxxxxxxxx
xxxxxxxxxxxxxxxxxxxxx
Home Menu Exit
6
36
Canadian English Ratings
• The password entry screen appears. Enter your 4-digit
password using buttons 0 – 9.
• Each time you press ENTER, the setting is switched.
• A lock icon appears beside the blocked rating.
• All the ratings have been unblocked before shipment.
Press HOME MENU to exit the menu.
Tuner Setup
09
then ENTER)
Parental Control
Canadian French Ratings
Canadian French Ratings
E
G
8 ans+
Setting your favorite channels
Set up to 10 TV channels to each of the four color buttons on
the remote control unit (40 channels in total). You can then
quickly select from only your favorite channels.
1
2
3
4
5
Blocked Canadian French Ratings xxxxxxxxxxxxxxxxxxxxx
E, G, 8 ans+, 13 ans+, 16 ans+, 18 xxxxxxxxxxxxxxxxxxxxx
xxxxxxxxxxxxxxxxxxxxx
ans+
Select “Tuner Setup”. ( /
Select “Favorites”. ( /
A 2.0
A 4.0
A 6.0
Current Favorites A Line Up
A4.0 A6.0
• A star appears beside the favorite channels currently
selected.
• To register another TV channel under the same color
button, repeat step 5. To register another TV channel
under a different color button, repeat steps 4 and 5.
Press HOME MENU to exit the menu.
When the Parental Control is working and censors a blocked TV
program (or content), the Plasma Display shows nothing but a
message.
The method for temporarily deactivating the Parental Control
differs, depending on the currently selected input source.
Setting up closed captions
Parental Control
WWWWWWW
1000.0000
(Ant. B)
xxxxxxxxxxxxxxxxxxxxx
xxxxxxxxxxxxxxxxxxxxx
xxxxxxxxxxxxxxxxxxxxx
xxxxxxxxxxxxxxxxxxxxx
xxxxxxxxxxxxxxxxxxxxx
xxxxxxxxxxxxxxxxxxxxx
Home Menu Exit
6
Press ENTER and then enter your 4-digit password.
then ENTER)
Favorites A
Temporarily deactivating the Parental Control
Antenna A, antenna B, or i.LINK:
then ENTER)
Select a TV channel to be registered. ( /
Favorites A
• The password entry screen appears. Enter your 4-digit
password using buttons 0 – 9.
• Each time you press ENTER, the setting is switched.
• A lock icon appears beside the blocked rating.
• All the ratings have been unblocked before shipment.
Press HOME MENU to exit the menu.
then ENTER)
then ENTER)
Select a color button (A, B, C, D). ( /
Favorites
Home Menu Exit
6
Press HOME MENU.
English
Setting Canadian French ratings
1 Press HOME MENU.
2 Select “Tuner Setup”. ( / then ENTER)
3 Select “Parental Control”. ( / then ENTER)
4 Select “Canadian French Ratings”. ( / then ENTER)
5 Select the desired rating and change the setting. ( /
Your Plasma Display System is equipped with an internal closed
caption decoder. Closed caption allows you to view
conversations, narration, and sound effects in TV programs and
home videos as subtitles on your Plasma Display screen.
You may enjoy digital closed captions when watching digital TV
programs. Digital closed captions allow you to change
parameters such as fonts and colors.
• Not all programs and videos offer closed caption. Please look
for the “
” symbol to ensure that captions will be shown.
Enter Disable Parental Control
• The password entry screen stays only for one minute. After
the screen disappears, pressing ENTER causes it to appear
again.
Input 1 – 4:
Enter your 4-digit password. You need not press ENTER first,
pressing ENTER causes the password entry screen to
disappear.
Please Input Your Password.
• The above password entry screen will also be shown during
2-screen mode, picture-in-picture, and while freezing an
image.
• The password entry screen stays only for one minute. After
the screen disappears, pressing ENTER causes it to appear
again.
37
En
09
Tuner Setup
Activating the closed caption
1 Press HOME MENU.
2 Select “Tuner Setup”. ( / then ENTER)
3 Select “Closed Captions”. ( / then ENTER)
4 Select “Status”. ( / then ENTER)
5 Select “On” or “On If Mute”. ( / then ENTER)
Closed Captions
Status
Status
xxxxxxxxxxxxxxxxxxxxx
xxxxxxxxxxxxxxxxxxxxx
xxxxxxxxxxxxxxxxxxxxx
Off
On
On If Mute
Selecting digital closed captions
Use the following procedure to select digital closed captions.
1
2
3
4
5
6
Press HOME MENU.
Select “Tuner Setup”. ( /
Select “Digital Settings”. ( /
Select “Digital Service”. ( /
Closed Captions
Digital Settings
On
Always shows closed captions.
On If Mute
Shows closed captions only while sound is
being muted.
• For MONITOR OUT, only conventional closed caption signals are
output; digital closed caption signals are not output.
Selecting the type of conventional closed
captions
Select the type of conventional closed captions that you will
watch after tuning to a conventional TV channel. This selection
also becomes effective when a selected digital TV program
provides only conventional closed captions.
• “CC1”, “CC2”, “CC3”, or “CC4” displays subtitles of TV dramas
and news programs while allowing a full view of the picture.
• “Text1”, “Text2”, “Text3”, or “Text4” superimposes on the
picture other information (e.g. TV guide, weather) that is
independent of the TV in progress.
Press HOME MENU.
Select “Tuner Setup”. ( /
Digital Settings
Select “Analog Settings”. ( /
then ENTER)
Select the desired closed caption. ( /
Analog Settings
CC1
CC2
CC3
CC4
Text 1
then ENTER)
xxxxxxxxxxxxxxxxxxxxx
xxxxxxxxxxxxxxxxxxxxx
xxxxxxxxxxxxxxxxxxxxx
Home Menu Exit
• The factory default is “CC1”.
6 Press HOME MENU to exit the menu.
38
En
xxxxxxxxxxxxxxxxxxxxx
xxxxxxxxxxxxxxxxxxxxx
xxxxxxxxxxxxxxxxxxxxx
Home Menu Exit
• The factory default is “Service 1”.
7 Press HOME MENU to exit the menu.
Selecting digital closed caption parameters
Use the following procedure to change such parameters of
digital closed captions as font size, font type, foreground and
background colors.
1
2
3
4
5
Press HOME MENU.
Select “Tuner Setup”. ( /
then ENTER)
Select “Closed Captions”. ( /
Select “Digital Settings”. ( /
then ENTER)
then ENTER)
Select “Font Size”, “Font”, or any other item. ( /
ENTER)
then
6 Select the desired parameter. ( / then ENTER)
Closed Captions
Digital Settings
Digital Settings
Font Size
Font Size
Large
Standard
Small
xxxxxxxxxxxxxxxxxxxxx
xxxxxxxxxxxxxxxxxxxxx
xxxxxxxxxxxxxxxxxxxxx
Home Menu Exit
then ENTER)
Analog Settings
Digital Service
then ENTER)
Digital Service
Service 1
Service 2
Service 3
Service 4
Service 5
then ENTER)
Select “Closed Captions”. ( /
Closed Captions
then ENTER)
then ENTER)
• The Primary Caption Service is usually offered for Service 1,
and the Secondary Language Service is usually offered for
Service 2 if these services are available.
6 Press HOME MENU to exit the menu.
1
2
3
4
5
then ENTER)
Select the desired closed caption. ( /
Home Menu Exit
Item
Description
Off
Does not show closed captions.
(factory default)
then ENTER)
Select “Closed Captions”. ( /
7 Repeat steps 5 and 6 as necessary. ( ,
8 Press HOME MENU to exit the menu.
/ )
Tuner Setup
09
The following table shows the parameters selectable for each
item.
Selection
Auto/ Large/ Standard/ Small
Font1
Auto/ Font 1/ Font 2/ Font 3/ Font 4/
Font 5/ Font 6/ Font 7
Clock
Font Color
Auto/ Black/ White/ Red/ Green/ Blue/
Yellow/ Magenta/ Cyan
Font Opacity
Auto/ Solid/ Transparent/ Translucent/
Flashing
Background Color
Auto/ Black/ White/ Red/ Green/ Blue/
Yellow/ Magenta/ Cyan
Background Opacity Auto/ Solid/ Transparent/ Translucent
1
• Make this selection, depending on whether summer
time is employed in your area.
Font 1 (monospaced with serifs)/ Font 2 (proportionally spaced with
serifs)/ Font 3 (monospaced without serifs)/ Font 4 (proportionally
spaced without serifs)/ Font 5 (casual font)/ Font 6 (cursive font)/
Font 7 (small capitals font)
D.S.T.
Daylight Savings Time
Current Time:
9:56 pm EDT
Monday
05/17/04
Applies
Does Not Apply
xxxxxxxxxxxxxxxxxxxxx
xxxxxxxxxxxxxxxxxxxxx
xxxxxxxxxxxxxxxxxxxxx
English
Item
Font Size
7 Select “Applies” or “Does Not Apply”. ( / then ENTER)
Home Menu Exit
8 Select “Auto/Manual Set”. ( , / , then ENTER)
9 Select “Auto Set” or “Manual Set”. ( / then ENTER)
10 If you select “Auto Set”, select an antenna (A or B) and a
channel number using
Clock
Auto/Manual Set
Auto/Manual Set •Auto Set
/
and ENTER.
Clock Set Channel
Ant. A
2.0
Current Time:
11:58 pm PDT
Monday
05/17/04
xxxxxxxxxxxxxxxxxxxxx
xxxxxxxxxxxxxxxxxxxxx
xxxxxxxxxxxxxxxxxxxxx
Home Menu Exit
With “Auto” selected, parameters specified by the provider are
used; if not specified by the provider, the bolded default
parameters are used. If you select parameters other than
“Auto”, the selected parameters are used regardless of
provider’s specifications.
• The date and time will be automatically corrected using
data from the selected channel.
If you select “Manual Set”, manually set the date and
time using / , / and ENTER.
Clock
Clock Setting
With “Auto Set” selected for Clock Setting, the system acquires
and sets time information automatically. You can also manually
set the correct time. If you disconnect the power cord from the
power outlet or power blackout occurs, the set time is cleared.
1
2
3
4
5
Press HOME MENU.
Select “Tuner Setup”. ( /
Select “Clock”. ( /
then ENTER)
Select a time zone for your area. ( /
Clock
Time Zone
Auto/Manual Set •Manual Set
Date and Time
3
4
3 /17/04 11:58pm
5
6
Current Time:
11:58 pm PDT
Monday
05/17/04
xxxxxxxxxxxxxxxxxxxxx
xxxxxxxxxxxxxxxxxxxxx
xxxxxxxxxxxxxxxxxxxxx
Home Menu Exit
11 Press HOME MENU to exit the menu.
then ENTER)
then ENTER)
Select “Time Zone”. ( /
Auto/Manual Set
then ENTER)
• When the time has not been set, the REC TIMER indicator on the
front of the Media Receiver blinks.
• When the time has not yet been set, you cannot view channel banner
information, use auto channel select, and preset TV programs for
recording.
Time Zone
Atlantic
Eastern
Central
Mountain
Current Time:
9:55 pm EDT
Monday
05/17/04
xxxxxxxxxxxxxxxxxxxxx
xxxxxxxxxxxxxxxxxxxxx
xxxxxxxxxxxxxxxxxxxxx
Home Menu Exit
6 Select “D.S.T.” ( ,
/ , then ENTER)
39
En
10
Adjustments and Settings
You can also use the menu to change the options.
Sleep Timer
When the selected time elapses, the Sleep Timer automatically
places the system into the standby mode.
Press SLEEP to select the desired time.
• The timer starts counting.
1
2
3
4
Press HOME MENU.
Select “Picture”. ( /
Select “AV Selection”. ( /
60
then ENTER)
Select the desired option. ( /
• Each time you press SLEEP, the selection is switched as
below:
30
then ENTER)
then ENTER)
AV Selection
STANDARD
90
DYNAMIC
(cancel) Off
120
(minutes)
MOVIE
GAME
• The factory default is “Off”.
USER
• To cancel the Sleep Timer, select “Off” by pressing SLEEP.
• Five minutes before the selected time elapses, the remaining time
appears every minute.
You can also use the menu to set the Sleep Timer.
1
2
3
4
Item
STANDARD
Description
For a highly defined image in a normally
bright room
DYNAMIC
For a very sharp image with the maximum
contrast
This mode does not allow manual image
quality adjustment.
MOVIE
For a movie
GAME
Lowers image brightness for easier viewing.
USER
Allows the user to customize settings as
desired. You can set the mode for each input
source.
Press HOME MENU.
Select “Sleep Timer”. ( /
Select the desired time. ( /
then ENTER)
then ENTER)
Press HOME MENU to exit the menu.
AV Selection
Select from the five viewing options, depending on the current
environment (e.g., room brightness), the type of the current TV
program, or the type of images input from external equipment.
1 Press AV SELECTION.
2
For AV source
• The current AV Selection mode appears.
Press AV SELECTION again before the displayed mode
disappears.
• For AV source, the mode is switched in the order;
STANDARD, DYNAMIC, MOVIE, GAME, then USER.
• For PC source, the mode is switched between
STANDARD and USER.
For PC source
Item
Description
STANDARD
For a highly defined image in a normally
(factory default) bright room
USER
Allows the user to customize settings as
desired. You can set the mode for each input
source.
5 Press HOME MENU to exit the menu.
40
En
Adjustments and Settings
10
For PC source
Picture adjustments
1 Press HOME MENU.
2 Select “Picture”. ( / then ENTER)
3 Select an item to be adjusted. ( / then ENTER)
Item
Contrast
button
For less contrast
button
For more contrast
Brightness
For less brightness
For more brightness
Red
For weaker red
For stronger red
Green
For weaker green
For stronger green
Blue
For weaker blue
For stronger blue
English
Adjust the picture to your preference for the chosen AV
Selection option (except DYNAMIC).
Picture
AV Selection
STANDARD
Contrast
40
Brightness
0
Color
0
Tint
0
Sharpness
0
• To make settings for “PureCinema”, “Color Temp”, “MPEG NR”,
“DNR”, “CTI”, and “DRE”, select “Pro Adjust” in step 3, and then press
ENTER. For the subsequent procedures, see “Pro Adjust”.
• To restore the factory defaults for all the items, press / to select
“Reset” in step 3, and then press ENTER. A confirmation screen
appears. Press / to select “Yes”, and then press ENTER.
Pro Adjust
Reset
Pro Adjust
This system provides various advanced functions for optimizing
the picture quality.
For PC source, the following screen appears:
Picture
AV Selection
1
2
3
4
STANDARD
Contrast
40
Press HOME MENU.
Select “Picture”. ( /
then ENTER)
Select “Pro Adjust”. ( /
then ENTER)
Brightness
0
Red
0
Green
0
Select an item to be adjusted. ( / then ENTER)
• You can select “PureCinema”, “Color Temp”,
“MPEG NR”, “DNR”, “CTI”, or “DRE”.
Blue
0
5 Select the desired parameter. ( / then ENTER)
• For the selectable parameters, see the table.
Reset
PureCinema
Automatically detects a film-based source (originally encoded at
24 frames/second), analyzes it, then recreates each still film
frame for high-definition picture quality.
4 Select the desired level. ( / then ENTER)
40
Contrast
Selections
Off
Deactivates the PureCinema.
Standard
Produces smooth and vivid moving
images (film specific) by
automatically detecting recorded
image information when displaying
DVD or 1080i HDTV images (e.g.,
movies) having 24 frames per
second.
ADV
Produces smooth and quality moving
images (as shown on theater
screens) by converting to 72 Hz
when displaying DVD images (e.g.,
movies) having 24 frames per
second.
• When an adjustment screen is in display, you can also
change an item to be adjusted, by pressing / .
5 Press HOME MENU to exit the menu.
For AV source
Item
Contrast
button
For less contrast
button
For more contrast
Brightness
For less brightness
For more brightness
Color
For less color intensity For more color intensity
Tint
Skin tones become
purplish
Skin tones become
greenish
Sharpness
For less sharpness
For more sharpness
Remark
You cannot select “Standard” when 480p or 720p
signals are being input.
41
En
10
Adjustments and Settings
Color Temp
Adjusts the color temperature, resulting in a better white
balance.
Selections
High
White with bluish tone
Mid-High
Intermediate tone between High and
Mid
Mid
Natural tone
Mid-Low
Intermediate tone between High and
Low
Low
White with reddish toneMid-Low
Manual
Allows you to manually adjust the
color temperature. Use the following
procedure.
1 Select “Manual”, and then press and hold ENTER for more
than three seconds to display the manual adjustment
screen.
2 Select an item to be adjusted. ( /
3 Select the desired level. (
Item
then ENTER)
/ then ENTER)
button
DNR
Eliminates video noise for clean crisp images. The DNR stands
for Digital Noise Reduction.
Selections
Off
Deactivates the DNR.
High
Enhanced DNR
Mid
Standard DNR
Low
Moderate DNR
CTI
Provides images with clearer color contours. The CTI stands for
Color Transient Improvement.
Selections
Off
Deactivates the CTI.
On
Activates the CTI.
DRE
Adjusts dark and bright portions on images so that the contrast
between brightness and darkness becomes clearer.
Selections
button
Off
Deactivates the DRE.
High
Enhanced DRE
Mid
Standard DRE
Low
Moderate DRE
R High
For weaker red
For stronger red
G High
For weaker green
For stronger green
B High
For weaker blue
For stronger blue
R Low
For weaker red
For stronger red
G Low
For weaker green
For stronger green
Color Management
B Low
For weaker blue
For stronger blue
Adjusts the hue for each basic color. Use the following
procedure.
• To perform adjustment for another item, press RETURN,
and then repeat steps 2 and 3.
• You may press / to immediately change an item to be
adjusted.
4 Press HOME MENU to exit the menu.
MPEG NR
Eliminates mosquito noise from video images when a digital TV
channel is watched or a DVD is played, resulting in noise-free
images.
Selections
Off
Deactivates the MPEG NR.
High
Enhanced MPEG NR
Mid
Standard MPEG NR
Low
Moderate MPEG NR
1 Select an item to be adjusted. ( /
2 Select the desired level. ( / )
then ENTER)
Item
Red
button
Closer to magenta
button
Closer to yellow
Yellow
Closer to red
Closer to green
Green
Closer to yellow
Closer to cyan
Cyan
Closer to green
Closer to blue
Blue
Closer to cyan
Closer to magenta
Magenta
Closer to blue
Closer to red
• To perform adjustment for another item, press
RETURN, and then repeat steps 1 and 2.
• You may press / to immediately change an item to
be adjusted.
3 Press HOME MENU to exit the menu.
42
En
Adjustments and Settings
10
FOCUS
Sound adjustments
This shifts the sound coming direction (sound images) upward
and produces clear sound contours.
1
2
3
4
1
2
3
4
Press HOME MENU.
Select “Sound”. ( /
then ENTER)
Select an item to be adjusted. ( / )
Select the desired level. ( / )
Press HOME MENU.
Select “Sound”. ( /
Select “FOCUS”. ( / )
Select the desired parameter. ( / )
Treble
2
Item
Off
(factory default)
Bass
0
On
Balance
0
Sound STANDARD
Reset
FOCUS
Off
Front Surround
Off
then ENTER)
English
Adjust the sound to your preference for the chosen AV
Selection option. See page 40.
Description
Deactivates the FOCUS.
Activates the FOCUS.
5 Press HOME MENU to exit the menu.
Front Surround
This provides three-dimensional sound effects and/or deep, rich
bass.
Item
Treble
button
For weaker treble
button
For stronger treble
Bass
For weaker bass
For stronger bass
Balance
Decreases audio from Decreases audio from
the right speaker
the left speaker
1
2
3
4
5 Press HOME MENU to exit the menu.
• To restore the factory defaults for all the items, press / to select
“Reset” in step 3, and then press ENTER. A confirmation screen
appears. Press / to select “Yes”, and then press ENTER.
Press HOME MENU.
Select “Sound”. ( /
then ENTER)
Select “Front Surround”. ( / )
Select the desired parameter. ( / )
Item
Off
Description
Deactivates both the SRS and TruBass.
SRS
Reproduces highly effective threedimensional sound.
TruBass
(factory default)
Provides deep, rich bass using a new
technology.
TruBass + SRS
Provides both TruBass and SRS effects.
5 Press HOME MENU to exit the menu.
•
•
(WOW) designates a status where the FOCUS is on and
TruBass + SRS has been selected for Front Surround.
is a trademark of SRS Labs, Inc.
• WOW technology is incorporated under license from SRS Labs, Inc.
43
En
10
Adjustments and Settings
No Operation off (AV mode only)
Power Control
Power Control provides convenient functions for power saving.
Energy Save
You can save power consumption by decreasing the picture
brightness. When you need not watch the screen and want to
enjoy only audio, you can also deactivate the screen.
1
2
3
4
The system will be automatically placed into the standby mode
when no operation is performed for three hours.
1
2
3
4
Press HOME MENU.
Select “Power Control”. ( /
Select “Energy Save”. ( /
then ENTER)
Save
Decreases picture brightness to save power.
Picture Off
Deactivates the screen to save power. To
restore the screen display, press any button
other than VOL +/– and MUTING.
This setting is not memorized by the system.
then ENTER)
Select “No Operation off”. ( /
Select “Enable”. ( /
Enable
then ENTER)
Item
Description
Standard
Does not decrease picture brightness.
(factory default)
Select “Power Control”. ( /
then ENTER)
then ENTER)
Item
Description
Disable
Does not place the system into the
(factory default) standby mode.
then ENTER)
Select “Save” or “Picture Off”. ( /
Press HOME MENU.
Places the system into the standby mode if
no operation is performed for three hours.
5 Press HOME MENU to exit the menu.
• Five minutes before the system is placed into the standby mode, a
message appears every minute.
Power Management (PC mode only)
5 Press HOME MENU to exit the menu.
The system will be automatically placed into the standby mode
when no signal is received from the personal computer.
• You can also select this function using the Home menu when the
input source is a PC.
1
2
3
4
No Signal off (AV mode only)
The system will be automatically placed into the standby mode
if no signal is received for 15 minutes.
1
2
3
4
Press HOME MENU.
Select “Power Control”. ( /
Select “No Signal off”. ( /
Select “Enable”. ( /
Press HOME MENU.
Select “Power Control”. ( /
Select “Mode1” or “Mode2”. ( /
• Places the system into the standby mode
when no signal is received from the
personal computer for eight minutes.
• Even when you start using the computer
and a signal is received again, the system
stays off.
• The system is switched on again by
pressing STANDBY/ON on the Plasma
Display or TV on the remote control
unit.
Mode2
• Places the system into the standby mode
when no signal is received for eight
seconds.
• When you start using the computer and a
signal is received again, the system is
switched on.
• The system is switched on again by
pressing STANDBY/ON on the Plasma
Display or TV on the remote control
unit.
then ENTER)
then ENTER)
5 Press HOME MENU to exit the menu.
• Five minutes before the system is placed into the standby mode, a
message appears every minute.
• The system may not be placed into the standby mode when noise
signals are present at the Media Receiver after a TV program finishes.
then ENTER)
Mode1
then ENTER)
Places the system into the standby mode if
no signal is received for 15 minutes.
then ENTER)
Item
Description
Off
No power management
(factory default)
Item
Description
Disable
Does not place the system into the
(factory default) standby mode.
Enable
then ENTER)
Select “Power Management”. ( /
5 Press HOME MENU to exit the menu.
44
En
Adjustments and Settings
Adjust the horizontal and vertical positions of images on the
Plasma Display.
1
2
3
4
Press HOME MENU.
Select “Option”. ( /
Select “Position”. ( /
then ENTER)
• When Auto Setup is finished, “Auto Setup completed.” appears.
• Even when “Auto Setup completed.” appears, Auto Setup may have
failed, depending on conditions.
• Auto Setup may fail with a PC image composed of similar patterns or
monochrome. If not successful, change the PC image and try again.
• Be sure to connect the computer to the Media Receiver and switch it
on before starting Auto Setup.
English
Adjusting image positions
(AV mode only)
10
then ENTER)
Select “H/V Position Adjust”. ( /
then ENTER)
Position
H/V Position Adjust
Reset
5 Adjust the vertical position ( / ) or horizontal position
( / ).
6 Press HOME MENU to exit the menu.
Adjusting image positions and clock
manually (PC mode only)
Usually you can easily adjust the positions and clock of images
using Auto Setup. Use Manual Setup to optimize the positions
and clock of images when necessary.
1
2
3
4
Press HOME MENU.
Select “Option”. ( /
then ENTER)
Select “Manual Setup”. ( /
then ENTER)
Select an item to be adjusted. ( /
then ENTER)
Manual Setup
• To restore the factory defaults for all the items, press / to select
“Reset” in step 4, and then press ENTER. A confirmation screen
appears. Press / to select “Yes”, and then press ENTER.
• Adjustments are stored separately according to input source.
H/V Position Adjust
Clock
0
Phase
0
Reset
Adjusting image positions and clock
automatically (PC mode only)
Use Auto Setup to automatically adjust positions and clock of
images coming from a personal computer.
1 Press HOME MENU.
2 Select “Option”. ( / then ENTER)
3 Select “Auto Setup”. ( / then ENTER)
Option
Auto Setup
5 Perform adjustment. ( / and / )
6
• Use / only when you adjust the vertical position
after selecting “H/V Position Adjust”.
Press HOME MENU to exit the menu.
• To restore the factory defaults for all the items, press / to select
“Reset” in step 4, and then press ENTER. A confirmation screen
appears. Press / to select “Yes”, and then press ENTER.
Manual Setup
4
• Auto Setup starts.
Press HOME MENU to exit the menu.
45
En
10
Adjustments and Settings
AV mode
Selecting a screen size
In single-screen mode, press SCREEN SIZE to change the size
of the screen from among the selectable options for the type of
video signals currently received.
• The selectable screen sizes differ depending on the types of
input signals.
4:3
WIDE
FULL
CINEMA
ZOOM
AV mode
Item
4:3
Description
For 4:3 “standard” pictures. A side bar appears on
each side.
FULL
For 16:9 squeeze pictures.
ZOOM
For 16:9 letterbox pictures. Bars may appear on the
top and bottom with some programs.
CINEMA
For 14:9 letterbox pictures. Bars may appear on the
top and bottom on some programs.
WIDE
In this mode pictures are progressively stretched
toward each side of the screen.
PC mode except for XGA signals
PC mode except for XGA signals
4:3
Dot by
Dot
FULL
Item
4:3
Description
Fills the screen without altering the input signal
aspect ratio.
FULL
Full 16:9 screen display
Dot by Dot
Matches input signal with same number of screen
pixels.
PC mode for XGA signals
(Ex. 1024 × 768 input at PRO-1120HD)
PC mode for XGA signals
Item
4:3
Description
Matches input signal with the same number of
screen pixels.
Optimized for 1024 × 768 display
FULL1
Full 16:9 screen display
Optimized for 1024 × 768 display
FULL2
For wide signal display
Use when displaying 1280 × 768 signal resolution.
4:3
FULL2
FULL1
• In 2-screen mode, press SCREEN SIZE to change the size of left
screen.
• The PC mode above is for the PRO-1120HD. For the PRO-920HD the
number of panel pixels is different, so signal processing and actual
viewing conditions will vary slightly.
• While watching High Definition TV broadcasting, pressing SCREEN
SIZE switches between FULL and WIDE.
• If you watch High Definition TV broadcasting with WIDE
selected, part of the screen (e.g., images, graphic interface)
can be missed. If this is the case, select FULL.
46
En
Adjustments and Settings
With the 4:3 screen size selected for the AV mode, you can
change the brightness of the gray side masks that appear at
both sides of the screen.
1
2
3
4
English
Changing the brightness at both sides of
the screen (Side Mask)
10
Press HOME MENU.
Select “Option”. ( /
then ENTER)
Select “Side Mask”. ( /
then ENTER)
Select the desired parameter. ( /
then ENTER)
Item
Description
Fixed
Always sets the same brightness for the
(factory default) gray side masks.
Auto
Adjusts the brightness of the gray side masks
according to the brightness of images.
5 Press HOME MENU to exit the menu.
Language setting
You can select a language to be used for on-screen display such
as menus from among three languages: English, French, and
Spanish.
1
2
3
4
Press HOME MENU.
Select “Option”. ( /
then ENTER)
Select “Language”. ( /
then ENTER)
Select a language. ( / )
Language
Menu
English
5 Press HOME MENU to exit the menu.
47
En
11
Timer Presetting
Presetting TV programs using the timer
Using the menu, you can easily preset TV programs for
watching later (auto channel select), recording with a D-VHS
recorder, or recording via the supplied VCR controller.
With the power to the system left on, the Auto Channel Preset
automatically selects the preset TV program when its on-air
time comes. Then you will not miss an important TV program
when you are enjoying another TV program.
For the connections with a D-VHS recorder, see pages 54 and
55. For the connections with the supplied VCR controller, see
page 59.
7 Specify a channel number. ( / then ENTER for each
digit)
Timers
•1
A
•1
A
Start/End Times Channel
Mon 5/17 9:58p - 10:58p A
New Timer
B
Suspend Timer
None
D
Clear Timer
Wed 5/19
3:58p - 10:58p
None
B
A
2.0
Suspend Timer
D
Clear Timer
xxxxxxxxxxxxxxxxxxxxx
xxxxxxxxxxxxxxxxxxxxx
xxxxxxxxxxxxxxxxxxxxx
Home Menu Exit
• To preset for auto channel select, select “None”.
•1
A
Day(s)
Tue.
Start/End Times Channel
5/18
New Timer
12:03a - 1:03a
B
Suspend Timer
Recording Device
Name
xxxxxxxxxxxxxxxxxxxxx
Advantz
xxxxxxxxxxxxxxxxxxxxx
D-VHS
xxxxxxxxxxxxxxxxxxxxx
A 2.0
D
Clear Timer
Home Menu Exit
9 Press HOME MENU to exit the menu.
Recording Device
2.0
Recording Device
8 Select a recording device. ( / then ENTER)
• You can make up to 32 presettings in total.
• In steps 4 to 8, you can also press / to move the cursor.
TimersTimers Day(s)
Start/End Times Channel
New Timer
Timers
1 Press HOME MENU.
2 Select “Timers”. ( / then ENTER)
3 Select a list number. ( / then ENTER)
Day(s)
xxxxxxxxxxxxxxxxxxxxx
xxxxxxxxxxxxxxxxxxxxx
xxxxxxxxxxxxxxxxxxxxx
An alarm screen appears slightly before the preset timer is
activated. If watching a TV channel through antenna A or B in a
single-screen mode, the screen allows you to cancel the
presetting by pressing D.
Home Menu Exit
Timer Alert
The Following timer is about to begin:
Sun. 1/0 12:00 am – 12:00 am
Ant. A 0.0
4 Specify a date. ( / then ENTER)
• The selections include the days of the week (e.g.,
Mondays), “Weekdays”, “Weekends”, and “Everyday”.
Selecting one of these will cause the timer to activate
periodically.
Day(s)
Mon.
Tue.
•1
Wed.
Thu.
Fri.
A New Timer
Start/End Times Channel
Timers
5/17
5/18
5/19
5/20
5/21
9:58p - 10:58p
B
A
Suspend Timer
None
D
Clear Timer
xxxxxxxxxxxxxxxxxxxxx
xxxxxxxxxxxxxxxxxxxxx
xxxxxxxxxxxxxxxxxxxxx
REC
REC
each field)
Day(s)
6 Select antenna A or B. ( / then ENTER)
Timers
•1
A
48
En
Cancel Timer
Meaning
Preset for recording; no conflicts with other timers
exist.
Preset for recording; conflicts with other timers exist.
Preset for auto channel select; conflicts with other
timers exist.
Recording Device
Start/End Times Channel
1
xxxxxxxxxxxxxxxxxxxxx
2
xxxxxxxxxxxxxxxxxxxxx
•1
Wed 5/19 3:58p - 10:58p A
2.0
None
xxxxxxxxxxxxxxxxxxxxx
4
5
A New Timer
B Suspend Timer
D Clear Timer
Home Menu Exit
Timers
D
Preset for auto channel select; no conflicts with
other timers exist.
Home Menu Exit
5 Specify the start and end times. ( / then ENTER for
Accept
The icons beside the list numbers have the following meanings.
Icon
Recording Device
2.0
A
Day(s)
Start/End Times Channel
Recording Device
Wed 5/19
3:58p - 10:58p
None
New Timer
B
A
Suspend Timer
2.0
D
Clear Timer
xxxxxxxxxxxxxxxxxxxxx
xxxxxxxxxxxxxxxxxxxxx
xxxxxxxxxxxxxxxxxxxxx
Home Menu Exit
REC
Preset for recording; the timer start has been
delayed.
Preset for auto channel select; the timer start has
been delayed.
Timer Presetting
11
English
• If you set a timer to record a future digital program on a VCR, you
must first turn off Parental Control. Otherwise, you will record only a
black screen. See “Temporarily deactivating the Parental Control” on
page 37.
• To change the TV program presetting, repeat the above procedure. To
cancel the presetting, press D after selecting a list number in step 4.
• Switch on the recording equipment at least 30 seconds before the
start of the preset program; otherwise recording will not be executed.
• When presetting for recording, finish the operations two minutes
(one minute for auto channel select) before the start of the program;
otherwise presetting may fail.
• Auto channel select is not executed when the system is in the
standby mode.
• Recording is not executed if recordable D-VHS tape is not present in
the D-VHS recorder when the preset program starts. This is also true
when a specified D-VHS recorder is not in connection.
• For recording with a VCR, confirm that the video output terminals on
the Media Receiver have been connected to the signal input
terminals on the VCR.
• Presettings become ineffective if the start time and the end time are
identical.
Priority rules for overlapped presettings
When preset TV programs are overlapped, the following three
rules are used to determine a higher priority. If more than one of
the three rules are met, the rules are applied in the order; 1, 2,
then 3.
Rule 1: Presetting for recording is given a higher priority over
presetting for auto channel select.
Presetting for recording
Presetting for auto
channel select
The shaded area is not executed.
Rule 2:
If two presettings are overlapped, presetting with
earlier start time is given a higher priority. If two
presettings are sequential, the last portion of the first
program may not be recorded for 60 seconds (or
less) because recording of the second program is
started at the exact start time.
Program A
Program B
The shaded area is not executed.
Rule 3:
If presettings at the same start time are overlapped,
presetting with a higher list number is given a higher
priority.
49
En
12
Enjoying through External Equipment
You can connect many types of external equipment to your
Plasma Display System, like a DVD player, VCR, personal
computer, game console, and camcorder.
To view images coming from external equipment, select the
input source using the INPUT buttons on the remote control
(page 14) or the INPUT button on the Plasma Display.
• To protect all equipment, always turn off the system before
connecting to a DVD player, VCR, personal computer, game
console, camcorder, or other external equipment.
• Refer to the relevant instruction manual (DVD player, personal
computer, etc.) carefully before making connections.
Watching a DVD image
Displaying a DVD image
To watch a DVD image, press INPUT 1 on the remote control
unit or press INPUT on the Plasma Display to select INPUT1.
• Refer to your DVD player instruction manual for the signal type.
• The INPUT 1 terminals are checked for cable connections in the
order where; 1) Component Video, 2) S-Video, 3) Video.
• Connect external equipment to only terminals that are to be actually
used.
• You can also use the INPUT 3 terminals when connecting only with
the Component Video output terminals on a DVD player.
Watching a VCR image
Connecting a VCR
Use the INPUT 2 terminals when connecting a VCR and other
audiovisual equipment.
Connecting a DVD player
Use the INPUT 1 terminals when connecting a DVD player and
other audiovisual equipment.
Media Receiver (rear view)
DIGITAL OUT
OPTICAL
AV cable (commercially available)
IN
OUT
CONTROL
VCR CONTROL
IN
Component Video cable
(commercially available)
DIGITAL OUT
OPTICAL
ANTENNA/
CABLE A IN
(TS)
NPUT 2
VIDEO
R-AUDIO-L
VIDEO
VIDEO
R-AUDIO-L
S-VIDEO
S400
R-AUDIO-L
R-AUDIO-L
VIDEO
VIDEO
R-AUDIO-L
S-VIDEO
S400
R-AUDIO-L
INPUT 1 COMPONENT VIDEO
C B /P B C R /P R
Y
SERVICE ONLY
OUT
MONITOR OUT S-VIDEO
INPUT 1
R-AUDIO-L INPUT
INPUT 33 Y
C B /P B
C R /P R
INPUT
HDMI
INPUT 1 COMPONENT VIDEO
Y
C B /P B C R /P R
INPUT 1
R-AUDIO-L
INPUT 2
VIDEO
AV cable
(commercially available)
Cable
CARD
(TS)
Cable
CARD
ANTENNA B
S-VIDEO
Media
Receiver
(rear view)
ANTENNA/
CABLE A IN
INPUT 3 Y
C B /P B
C R /P R
HDMI
S-Video cable
(commercially available)
S-Video cable
(commercially available)
VCR
Displaying a VCR image
To watch a VCR image, press INPUT 2 on the remote control
unit or press INPUT on the Plasma Display to select INPUT2.
DVD player
• The INPUT 2 terminals are checked for cable connections in the
order where; 1) S-Video, 2) Video.
• Connect external equipment to only terminals that are to be actually
used.
50
En
Enjoying through External Equipment
12
To activate the HDMI terminal:
Using HDMI Input
1
2
3
4
5
Press HOME MENU.
Select “Option”. ( /
then ENTER)
Select “HDMI Input”. ( /
then ENTER)
Select “Setting”. ( /
then ENTER)
Select “Enable”. ( /
then ENTER)
Item
Description
Disable
Deactivates the HDMI terminal.
(factory default)
Input signal correlation table
1920∗[email protected]/60Hz
Enable
Activates the HDMI terminal.
720∗[email protected]/60Hz
6 Press HOME MENU to exit the menu.
720(1440)∗[email protected]/60Hz
To specify the type of digital video signals:
1280∗[email protected]/60Hz
1
2
3
4
5
• PC signals are not supported.
Connecting HDMI equipment
Media Receiver (rear view)
DIGITAL OUT
OPTICAL
(TS)
VIDEO
INPUT 1 COMPONENT VIDEO
C B /P B C R /P R
Y
INPUT 1
S-VIDEO
R-AUDIO-L INPUT
INPUT 33 Y
C B /P B
C R /P R
Press HOME MENU.
Select “Option”. ( /
then ENTER)
Select “HDMI Input”. ( /
Select “Video”. ( /
then ENTER)
then ENTER)
Select the type of digital video signals. ( / then
ENTER)
• If you select “Auto”, an attempt will be made to identify
the type of digital video signals when digital video
signals are received.
Item
Description
Auto
Automatically identifies input digital video
(factory default) signals.
S400
R-AUDIO-L
English
The INPUT 1 and INPUT 3 terminals include HDMI terminals to
which digital video and audio signals can be input. To use the
HDMI terminal, activate the terminal and specify the types of
video and audio signals to be received from the connected
equipment. For the types of these signals, see the operation
manual that came with the connected equipment.
Before starting the menu, press INPUT 1 (or INPUT 3) on the
remote control unit or press INPUT on the Plasma Display to
select INPUT 1 (or INPUT 3).
INPUT 3
HDMI
HDMI cable
(commercially available)
Audio cable
(commercially available)
Make this connection
when inputting analog
audio signals.
HDMI equipment
Color-1
Digital Component Video signals (4:2:2)
locked
Color-2
Digital Component Video signals (4:4:4)
locked
Color-3
Digital RGB signals locked
6 Press HOME MENU to exit the menu.
• If you select a parameter other than “Auto”, make such a setting that
results in natural color.
• If no image appears, specify another digital video signal type.
• For the digital video signal types to be specified, check the operation
manual that came with the connected equipment.
To specify the type of audio signals:
1
2
3
4
5
Press HOME MENU.
Select “Option”. ( /
then ENTER)
Select “HDMI Input”. ( /
Select “Audio”. ( /
then ENTER)
then ENTER)
Select the type of audio signals. ( / then ENTER)
• If you select “Auto”, an attempt will be made to identify
the type of audio signals when audio signals are
received.
51
En
12
Enjoying through External Equipment
Item
Description
Auto
Automatically identifies input audio
(factory default) signals.
Digital
Accepts digital audio signals.
Analog
Accepts analog audio signals.
6 Press HOME MENU to exit the menu.
• If no sound is output, specify another audio signal type.
• For the audio signal types to be specified, check the operation
manual that came with the connected equipment.
• Depending on the equipment to be connected, you also need to
connect analog audio cables.
Enjoying a game console or watching
camcorder images
Connecting a game console or camcorder
Use the INPUT 4 terminals to connect a game console,
camcorder and other audiovisual equipment.
Media Receiver (front view)
• The INPUT 4 terminals are checked for cable connections in the
order where; 1) Component Video, 2) S-Video, 3) Video.
• Connect external equipment to only terminals that are to be actually
used.
Displaying an image of the game console or
camcorder
To watch an image coming from the game console or
camcorder, press INPUT 4 on the remote control unit or press
INPUT on the Plasma Display to select INPUT4.
Recording digital TV programs using a
VCR or DVD recorder
If you connect recording equipment such as a VCR or DVD
recorder to the MONITOR OUT terminals on the rear of the
Media Receiver, you can record, for example, digital TV
programs using the recording equipment.
You can also record digital TV programs more easily by using
the supplied VCR controller. Connect the VCR controller to the
VCR control terminal on the rear of the Media Receiver and
then position the controller so that its light emitting section
faces the remote control sensor on the recording equipment.
For more information, see page 59.
Avoiding unwanted feedback
INPUT 4
COMPONENT VIDEO
CR / PR
Y
CB / PB
S-VIDEO
PC
VIDEO
AUDIO
(STEREO)
AUDIO
L
ANALOG RGB
R
AV cable
(commercially available)
You can prevent unwanted feedback from adversely affecting
the quality of images. Specify the output terminal whose output
is to be inhibited.
1
2
3
4
Press HOME MENU.
Select “Option”. ( /
then ENTER)
Select “Monitor Out”. ( /
then ENTER)
Select “INPUT1 Prohibit”, “INPUT2 Prohibit”, “INPUT3
Prohibit”, or “INPUT4 Prohibit”. ( / then ENTER)
5 Press HOME MENU to exit the menu.
S-Video cable
(commercially available)
Component Video cable
(commercially available)
Game console/Camcorder
52
En
Enjoying through External Equipment
Connecting a recorder
Connecting other audio equipment
DIGITAL OUT
OPTICAL
VCR CONTROL
IN
ANTENNA/
CABLE A IN
Cable
CARD
ANTENNA B
(TS)
S-VIDEO
INPUT 2
VIDEO
R-AUDIO-L
VIDEO
VIDEO
R-AUDIO-L
S-VIDEO
S400
R-AUDIO-L
INPUT 1 COMPONENT VIDEO
Y
C B /P B C R /P R
English
The digital audio output terminal (optical) on this system can
output Dolby Digital signals. Using an optical digital cable,
connect an AV receiver to the digital audio output terminal
(optical) on the rear of the Media Receiver. This allows audio
such as digital TV broadcasting to be played in high quality.
If your AV receiver does not have a digital audio input terminal
(optical), connect the MONITOR OUT terminals (AUDIO) on the
rear of the Media Receiver to the audio input terminals on the
AV receiver.
Media Receiver (rear view)
IN
OUT
CONTROL
12
SERVICE ONLY
OUT
INPUT 1
MONITOR OUT S-VIDEO
R-AUDIO-L INPUT
INPUT 33 Y
C B /P B
C R /P R
HDM
AV cable
(commercially available)
• When using the digital audio output terminal (optical), you need to
make settings depending on your AV receiver. For more information,
see the instruction manual that came with the AV receiver.
Connecting an AV receiver
S-Video cable
(commercially available)
VCR controller (for
presetting digital TV
programs for recording)
Media Receiver (rear view)
DIGITAL OUT
OPTICAL
IN
OUT
CONTROL
VCR CONTROL
ANTENNA/
CABLE A IN
IN
Cable
CARD
ANTENNA B
S400
(TS)
S-VIDEO
INPUT 2
VIDEO
R-AUDIO-L
VIDEO
VIDEO
R-AUDIO-L
S-VIDEO
R-AUDIO-L
INPUT 1 COMPONENT VIDEO
C B /P B C R /P R
Y
SERVICE ONLY
OUT
MONITOR OUT S-VIDEO
C B /P B
C R /P R
H
Audio cable
(commercially available)
VCR or DVD recorder
• About the MONITOR OUT terminals
The MONITOR OUT terminals cannot output the following signals:
INPUT 1
R-AUDIO-L INPUT 3 Y
Optical digital cable
(commercially available)
1 Video signals input from the COMPONENT VIDEO terminal
2 Video signals from a personal computer
3 S-Video signals when a conventional TV channel is being received
4 S-Video signals when Video signals (INPUT 1, 2, and 4) are being
input
5 Digital video and audio signals from the HDMI terminals
• When watching images played back on a VCR or DVD recorder
connected to the MONITOR OUT terminals, select an input source
(e.g., TV channel reception) on the recording equipment other than
external input sources. Selecting an external input source may result
in distorted images or noise.
• Analog broadcasting signals are not sent to the MONITOR OUT
(S-VIDEO) terminal. This is also true of composite signals coming
from INPUT 1, 2, or 4.
AV receiver
53
En
12
Enjoying through External Equipment
Switching the optical audio signal type
Set up for the DIGITAL AUDIO output terminal (OPTICAL),
depending on your AV receiver.
1
2
3
4
Media Receiver (rear view)
Press HOME MENU.
Select “Option”. ( /
When connecting a single D-VHS recorder
then ENTER)
DIGITAL OUT
OPTICAL
CR CONTROL
Select “Digital Audio Out”. ( /
then ENTER)
Select “Dolby Digital” or “PCM”. ( /
Dolby Digital
Cable
CARD
S400
(TS)
S-VIDEO
then ENTER)
Item
Description
PCM
Always outputs in the PCM format
(factory default) regardless of the types of signals.
ANTENNA/
CABLE A IN
IN
INPUT 2
VIDEO
R-AUDIO-L
VIDEO
VIDEO
R-AUDIO-L
S-VIDEO
R-AUDIO-L
INPUT 1 COMPONENT VIDEO
Y
C B /P B C R /P R
OUT
INPUT 1
ITOR OUT S-VIDEO
R-AUDIO-L
INPUT 3 Y
C B /P B
C R /P R
IN
HDMI
(The function and performance
are the same for both terminals.)
For Dolby Digital encoded signals, outputs in
the Dolby Digital format. For PCM encoded
signals, outputs in the PCM format.
i.LINK cable
(commercially available)
5 Press HOME MENU to exit the menu.
To use i.LINK, you need to
connect only an i.LINK cable;
you need not connect cables to
the video and audio terminals.
Watching a D-VHS image
What is i.LINK?
i.LINK is a digital serial interface for handling digital video,
digital audio, and other data in two directions. i.LINK is Sony’s
term for the IEEE 1394 data transport bus. Digital AV equipment
compatible with i.LINK can be connected using a single i.LINK
cable. The i.LINK interface allows this PDP system to control
one of up to two i.LINK compatible devices (in connection) that
can be identified.
D-VHS recorder
Which i.LINK devices are connectable?
For i.LINK devices, this system supports only D-VHS recorders.
The i.LINK terminals on this system cannot be connected with
other equipment such as DVD recorders, digital video cameras,
personal computers, and PC peripheral devices because of
differences in the specifications.
When connecting two D-VHS recorders
You can connect two D-VHS recorders directly to the i.LINK
terminals on the rear of the Media Receiver.
i.LINK cables
What can be recorded through i.LINK?
With D-VHS recorders connected to this system through i.LINK,
you can record only digital TV programs. You cannot record
conventional TV channels nor contents coming from external
input sources and personal computers.
Media Receiver
D-VHS recorder
POWER
ON
STANDBY
REC
DATA
TIMER
ACQUISITION
D-VHS recorder
Connecting D-VHS recorders
Use the i.LINK terminals when connecting D-VHS recorders.
54
En
Enjoying through External Equipment
Using i.LINK cables you can also connect up to two
D-VHS recorders in a daisy chain.
Media Receiver
D-VHS recorder
Displaying a D-VHS image
To watch a D-VHS image, press i.LINK on the remote control
unit or press INPUT on the Plasma Display to select i.LINK.
Useful and important notification
English
i.LINK cable
12
POWER
ON
STANDBY
REC
DATA
TIMER
ACQUISITION
Useful information
• D-VHS recorders connected through i.LINK can play back
digital TV programs recorded using this system.
D-VHS recorder
Precautions about i.LINK connections
• Use S400 i.LINK cables that have 4-pin plugs and are shorter
than 3.5 m (11.48 feet).
• Some i.LINK devices cannot relay data when their power is
off.
• Do not make the following loop connections:
Media Receiver
D-VHS recorder
POWER
ON
STANDBY
REC
TIMER
DATA
ACQUISITION
D-VHS recorder
Media Receiver
POWER
ON
STANDBY
REC
TIMER
DATA
ACQUISITION
D-VHS recorder
• D-VHS recorders connected through i.LINK can record only
digital TV programs. Using i.LINK, those recorders cannot
record conventional TV channels nor contents coming from
external input sources.
• This system can be simultaneously connected with up to two
D-VHS recorders that support i.LINK. You can control one of
these D-VHS recorders (basic functions only).
• Some D-VHS recorders connected through i.LINK may not
allow this system to control through the control panel screen
or to display images and output sound.
• To record digital TV programs using connected D-VHS
recorders, use D-VHS tape. You cannot use VHS tape nor
S-VHS tape.
• Some D-VHS recorders connected though i.LINK may not
allow this system to play back images and sound recorded on
VHS tape, S-VHS tape, or (if with analog signals) D-VHS tape.
If this is the case, connect the analog output terminals on the
D-VHS recorder to INPUT 1, 2, 3, or 4 terminals on this
system. See page 50.
• This system supports the Digital Transmission Content
Protection (DTCP) technology. The DTCP is a copy protection
technology that presents data coding and device
authentication.
• i.LINK may not allow copy-restricted video, audio, and other
data to be copied from one i.LINK device to another. It also
may not allow video, audio, and other data to be transferred
with equipment that does not support the DTCP.
Precautions
• While one D-VHS recorder connected through i.LINK is
recording or playing back, do not switch on or off the other
connected D-VHS recorder (not in use) or do not connect or
disconnect the i.LINK cable from that D-VHS recorder. Doing
so can result in image and sound interruption.
• Some D-VHS recorders that support i.LINK cannot relay data
when their power is off. Check the instruction manual that
came with your D-VHS recorder. This system allows you to
change the setting for data relay in the standby mode. See
“Setting up for i.LINK standby” on page 57.
55
En
12
Enjoying through External Equipment
Setting up for controlling a D-VHS recorder
Editing the i.LINK list
You can operate the connected D-VHS recorder from the
Plasma Display that shows the control panel screen. After
making the connections, use the menu to specify the model of
the D-VHS recorder to be operated. You can operate only a
single D-VHS recorder from the Plasma Display.
The i.LINK list shows all devices connected through i.LINK
interfaces. In this list, you can change the name or order of
devices or delete device information.
1
2
3
4
5
6
Press HOME MENU.
Select “Tuner Setup”. ( /
then ENTER)
Select “Recorder Setup”. ( /
Select “i.LINK Setup”. ( /
Select “i.LINK List”. ( /
then ENTER)
then ENTER)
then ENTER)
1
2
3
4
5
6
Select the D-VHS recorder model to be operated.
( / then ENTER)
Press HOME MENU.
Select “Tuner Setup”. ( /
Select “i.LINK Setup”. ( /
Select “i.LINK List”. ( /
i.LINK Setup
A
Connect
i.LINK List
Recorder Setup i.LINK Setup
B
Rename
XXXX XXXX Control
----C Move
D Delete
A
xxxxxxxxxxxxxxxxxxxxx
xxxxxxxxxxxxxxxxxxxxx
xxxxxxxxxxxxxxxxxxxxx
Home Menu Exit
7 Press A to select “Connect”.
8 Press HOME MENU to exit the menu.
i.LINK List
D-VHS
XXXX XXXX Control
----C Move
D Delete
The D-VHS recorder has been physically connected, and can be controlled if it is selected for
control.
—:
Currently not physically connected
• When connected to any device other than a D-VHS, the device is not
listed in the i.LINK List.
Connect
B
Rename
xxxxxxxxxxxxxxxxxxxxx
xxxxxxxxxxxxxxxxxxxxx
xxxxxxxxxxxxxxxxxxxxx
Home Menu Exit
The following procedure differs depending on what you want to
perform.
To change the name of a device:
7 Press B to select “Rename”.
8 Enter up to 7 characters using / , / , and ENTER.
• The following information appears at the right end of the i.LINK list to
indicate the connection status of the D-VHS recorders:
Control:
Data connection with the D-VHS recorder has been
established and the recorder is ready for control.
Link:
then ENTER)
then ENTER)
i.LINK List
i.LINK List
D-VHS
then ENTER)
Select the desired device. ( / )
i.LINK Setup
Recorder Setup i.LINK Setup
then ENTER)
Select “Recorder Setup”. ( /
Recorder Setup i.LINK Setup
i.LINK Setup
A
Accept
i.LINK List
New Name: D-VHS
A
K
U
5
)
i.LINK List
B
B
L
V
6
,
C
M
W
7
–
D
N
X
8
_
E
O
Y
9
:
F
P
Z
0
'
Clear
G
Q
1
.
&
D
H
R
2
@
I
S
3
/
J
T
4
(
S PA C E
Cancel
xxxxxxxxxxxxxxxxxxxxx
xxxxxxxxxxxxxxxxxxxxx
xxxxxxxxxxxxxxxxxxxxx
Home Menu Exit
9 Press A.
10 Press HOME MENU to exit the menu.
To change the order of devices:
7 Press C to select “Move”.
8 Select the new desired position. ( / then ENTER)
• The selected device is moved to the selected position.
9 Press HOME MENU to exit the menu.
To delete information about a device:
7 Press D to select “Delete”.
8
9
56
En
• A confirmation message appears.
• A warning message appears if the selected device has
been preset for recording with the timer or if its power
is on. If this is the case, you cannot delete the device
that you have selected.
Press A to execute the deletion.
Press HOME MENU to exit the menu.
Enjoying through External Equipment
12
Operating the control panel screen
Use the following procedure to enable data transfer between
multiple i.LINK devices even when the system is in the standby
mode.
The control panel screen appears when you press i.LINK. It
disappears when you press i.LINK again. To select a button on
the control panel screen, press / or / , and then press
ENTER on the remote control.
1
2
3
4
5
6
7
Press HOME MENU.
Select “Tuner Setup”. ( /
then ENTER)
Select “Recorder Setup”. ( /
Select “i.LINK Setup”. ( /
Select “i.LINK Standby”. ( /
Select “Enable”. ( /
1
then ENTER)
2
Media Receiver
DATA
STANDBY
No data relay
Device List
D
• D-VHS4
A i.LINK Setup
i.LINK device
10
1
2
3
4
POWER
ACQUISITION
20
REC
In standby mode
REC
6 7 8 9
ON/OFF
then ENTER)
TIMER
5
D-VHS4
XXXXXXX XXX
No1394 00:00:00
then ENTER)
• With “Enable” selected, the system relays data between multiple
i.LINK devices even when in the standby mode; the i.LINK circuits
are energized in that mode.
ON
4
then ENTER)
Press HOME MENU to exit the menu.
i.LINK device
3
English
Setting up for i.LINK standby
5
6
7
8
9
10
11
12
13
14
15
16
17
18
19
20
11
12 13
14
15 16 17
18
19
Shows the current status of the D-VHS recorder.
Shows the name of the currently selected device.
Shows counter time output by the D-VHS recorder.
Shows the manufacture name of the D-VHS recorder to be
operated.
Shows the model name of the D-VHS recorder to be
operated.
Shows the type of inserted video tape; D for D-VHS, S for
S-VHS, and no display for VHS.
Appears when any tape has been inserted.
Appears when the inserted tape has been write protected.
The inserted tape cannot be used for recording when this
indicator appears.
Appears when the D-VHS recorder has been preset for
recording and is in the standby mode.
Switches on and off the D-VHS recorder.
Starts recording.
Rewinds to the start of the current program.
Rewinds the tape.
Pauses the tape.
Stops the current tape motion.
Starts playing back.
Forwards to the start of the next program.
Forwards the tape.
Exits the control panel screen and displays the i.LINK Setup
menu.
Allows you to change the D-VHS recorder to be operated.
After pressing this button, press / to select the desired
model from the list, and then press ENTER.
• If no i.LINK device has been connected, “No i.LINK devices are
connected.” appears. If this is the case, connect i.LINK devices.
• If none of the connected equipment has been supported for control,
you cannot execute control.
57
En
12
Enjoying through External Equipment
Watching an image from a personal
computer
Signal names for 15-pin mini D-sub connecter
5
4
10
15
14
2
3
13
1
6
7
8
9
12
11
Connecting a personal computer
Use the PC terminals to connect a personal computer.
• The PC input terminals are DDC2B-compatible.
• Plug & Play may not correctly function, depending on personal
computers in use.
Media Receiver (front view)
INPUT 4
EC
ER
DATA
ACQUISITION
COMPONENT VIDEO
Y
CR / PR
CB / PB
ø 3.5 mm stereo miniplug cable
(commercially available)
S-VIDEO
PC
VIDEO
AUDIO
(STEREO)
AUDIO
L
ANALOG RGB
R
(front view)
Pin No.
1
2
3
4
5
6
7
8
9
10
11
12
13
14
15
Signal name
R
G
B
Not connected
Not connected
GND (ground)
GND (ground)
GND (ground)
+5V
GND (ground)
Not connected
SDA
HD
VD
SCL
RGB cable
(commercially available)
• A Macintosh adaptor may be required for use with some Macintosh
computers.
Computer compatibility chart
Personal computer
Resolution
720 × 400
Frequency
70 Hz
640 × 480
60 Hz
Displaying an image from a personal computer
65 Hz
When connecting to a personal computer, the input signal type
is automatically identified. If the personal computer image does
not come in clearly, you may need to use Auto Setup in the
menu. See page 45.
To watch an image coming from the personal computer, press
PC on the remote control unit or press INPUT on the Plasma
Display to select “PC”.
72 Hz
Remarks
Macintosh 13" (67 Hz)
75 Hz
800 × 600
56 Hz
60 Hz
72 Hz
75 Hz
• The PC terminals cannot be used for audiovisual equipment.
832 × 624
74.5 Hz
1024 × 768
60 Hz
Macintosh 16"
70 Hz
75 Hz
1280 × 768
56 Hz
60 Hz
70 Hz
58
En
Macintosh 19"
Enjoying through External Equipment
12
Use the following procedure to set the manufacture of the
recording equipment:
Connecting the VCR controller
1
2
3
4
5
• Make sure to leave the VCR power on when presetting TV programs
for recording with the VCR controller.
• Be sure to firmly connect the VCR controller to the VCR control
terminal on the rear of the Media Receiver. If you have mistakenly
connected it to the CONTROL IN or CONTROL OUT terminal, remote
control or other operations may be disabled.
Press HOME MENU.
Select “Tuner Setup”. ( /
then ENTER)
Select “Recorder Setup”. ( /
Select “VCR Setup”. ( /
then ENTER)
English
Connect the supplied VCR controller to the Media Receiver. This
allows you to preset digital TV programs for recording; see page
48. When the specified time comes, the system in the standby
mode is automatically switched on and the specified TV
program is recorded using the connected VCR or DVD recorder.
then ENTER)
Select the manufacture of the recording equipment.
( / then ENTER)
Recorder Setup
VCR Setup
VCR Setup
• XXXXX
XXXXX
XXXXX
xxxxxxxxxxxxxxxxxxxxx
xxxxxxxxxxxxxxxxxxxxx
xxxxxxxxxxxxxxxxxxxxx
Home Menu Exit
Media Receiver (rear view)
DIGITAL O
OPTICA
IN
OUT
CONTROL
VCR CONTROL
IN
ANTENNA/
CABLE A IN
Cable
CARD
ANTENNA B
(TS)
S-VIDEO
INPUT 2
VIDEO
R-AUDIO-L
VIDEO
VIDEO
R-AUDIO-L
S-VIDEO
6
S400
R-AUDIO-L
INPUT 1 COMPON
Y
CB/
SERVICE ONLY
OUT
MONITOR OUT S-VIDEO
R-AUDIO-L INPUT
INPUT 33 Y
CB/
(Once you have positioned the
VCR controller, secure with the
supplied tape.)
VCR CONTROL
VCR or DVD
recorder
Position the light
emitting section
on the VCR
controller cable
so that it faces
the VCR.
Remote control sensor
7
8
9
.
• The screen for recording test appears.
Check that the power to the recording equipment is on,
and insert tape into the slot.
• Insert tape you think it all right to erase its contents.
The contents will be erased because Rec and Stop
codes are output in the test.
• Check that the light emitting section on the VCR
controller cable faces the recording equipment.
Press A to execute recording test.
• If the recording equipment fails to start and stop
recording, check and change the specified recording
equipment manufacture.
Press A to select “Yes, Store Setting”.
Press HOME MENU to exit the menu.
• Even if you correctly specify the manufacture of the recording
equipment, control of some models may be disabled.
• Perform the recording test when the recording equipment is not in
recording standby or is not recording.
• The recording test takes approximately 10 seconds.
• The PIONEER has been set as the factory default.
59
En
12
Enjoying through External Equipment
The lists of controllable recording
equipment manufactures
60
En
Manufacture
Admiral
Manufacture
Harley Davidson
Manufacture
Philco
Manufacture
Toshiba
Advantz
Harman/Kardon
Philips
Totevision
Adventura
Harwood
Pilot
Unitech
Aiko
Headquarter
Pioneer
Vector
Aiwa
Hitachi
Portland
Vector Research
Akai
JVC
Profitronic
Video Concepts
American High
Jensen
Proscan
Videosonic
Asha
KEC
Protec
Wards
Audiovox
KLH
Pulsar
White Westinghouse
Beaumark
Kenwood
Quarter
XR-1000
Bell & Howell
Kodak
Quartz
Yamaha
Broksonic
LXI
Quasar
Zenith
CCE
Lloyd's
RCA
Calix
Logik
Radio Shack
Canon
MEI
Radix
Capehart
MGA
Randex
Carver
MGN Technology
Realistic
Cineral
MTC
Ricoh
Citizen
Magnasonic
Runco
Colt
Magnavox
STS
Craig
Magnin
Salora
Curtis Mathes
Marantz
Samsung
Cybernex
Marta
Sanky
Daewoo
Matsushita
Sansui
Daytron
Memorex
Sanyo
Denon
Minolta
Scott
Dynatech
Mitsubishi
Sears
Electrohome
Motorola
Semp
Electrophonic
Multitech
Sharp
Emerex
NAD
Shintom
Emerson
NEC
Shogun
Fisher
Nikko
Singer
Fuji
Nikon
Sony
Funai
Noblex
Sylvania
GE
Olympus
Symphonic
Garrard
Optimus
TMK
Go Video
Optonica
Tatung
GoldStar
Orion
Teac
Gradiente
Panasonic
Technics
Grundig
Penney
Teknika
HI-Q
Pentax
Thomas
Some modes of the listed
manufactures may not allow
control through the VCR
controller.
Enjoying through External Equipment
Connecting control cords
• Make sure that the power is turned off when making connections.
• Complete all component connections before making control cord
connections.
Media Receiver (rear view)
DIGITAL OUT
OPTICAL
IN
OUT
CONTROL
VCR CONTROL
IN
ANTENNA/
CABLE A IN
Cable
CARD
ANTENNA B
(TS)
S-VIDEO
English
Connect control cords between the Media Receiver and other
PIONEER equipment having the
logo. You can then operate
the connected equipment by sending commands from its
remote control unit to the remote control sensor on the Media
Receiver.
After the CONTROL IN terminals have been connected, the
remote control sensors on the connected equipment do not
accept commands from the remote control units. Face the
remote control units to the remote control sensor on the
Plasma Display when operating the connected equipment.
12
INPUT 2
VIDEO
R-AUDIO-L
VIDEO
VIDEO
R-AUDIO-L
S-VIDEO
S400
R-AUDIO-L
INPUT 1 COMPONENT VIDEO
C B /P B C R /P R
Y
SERVICE ONLY
OUT
MONITOR OUT S-VIDEO
INPUT 1
R-AUDIO-L INPUT
INPUT 33 Y
C B /P B
C R /P R
INPUT 3
HDMI
IN
OUT
CONTROL
CONTROL
IN
OUT
About SR+
The CONTROL OUT terminal on the rear of the Media Receiver
supports SR+ that allows linked operations with a PIONEER
AV receiver. SR+ presents functions such as the input switch
linkage operation function and the DSP surround mode display
function. For more information, see the instruction manual that
came with the PIONEER AV receiver supporting SR+.
CONTROL
IN
OUT
• While in connection through SR+, the volume on this system is
temporarily minimized.
CONTROL
IN
OUT
The control cables (commercially available) are mono sound
cables with mini plugs (no resistance).
61
En
13
Useful Remote Control Features
Learning function of the remote control
unit
You can operate the connected AV products (AV Receiver, Cable
Box, SAT tuner, VCR, DVD, DVD recorder, LD) using the learning
function of your remote control unit. This remote control unit
has a function that can memorize each remote control code.
2 to 5 cm (0.8 to 2.0 inches)
Remote control
(Supplied accessory)
Remote control of
AV product
Using the learning function
1 Slide the Mode switch to match the device whose remote
control signal you want to be learned.
2 Press EDIT/LEARN and 2 at the same time.
•The LED flashes.
3 Press a button to be learned.
4
• The LED lights up.
• For the functions that can be learned, see pages 64 to
68.
• When learning is finished, the LED starts flashing
again.
Press EDIT/LEARN again to exit the Learn mode.
• To exit the Learn mode halfway, press EDIT/LEARN again.
• If the Mode switch selection is changed when in the Learn mode,
the Learn mode is cancelled.
• If no operation is performed for more than one minute, the Learn
mode is cancelled.
• It takes about 2 seconds to finish code transmission. Do not interrupt
it halfway. Wait until the LED flashes again.
• You can reset all learned codes to the factory defaults. When not in
and
the Learn mode, press and hold TV , and then press
VOL + (RECEIVER section) at the same time.
62
En
Presetting manufacture codes
1 Slide the Mode switch to match the device to which you
want to preset the remote control signal.
2 Press EDIT/LEARN and 1 at the same time.
• The LED flashes.
3 Press 0 – 9 to enter the manufacture code. See page 63.
• Preset mode is finished once the LED no longer lights
up.
• To exit the Edit mode halfway, press EDIT/LEARN again.
• If the Mode switch selection is changed when in the Edit mode, the
Edit mode is cancelled.
• If no operation is performed for more than one minute, the Edit mode
is cancelled.
• When you enter a code not listed, the LED flashes quickly.
• If the table on page 63 does not include your desired manufacturer or
the remote control does not work, you can make the memory learn
its signal by the Learn mode.
• The initial mode is “000” (PIONEER).
Useful Remote Control Features
13
Manufacture codes
VCR
DVD/DVR
PIONEER1(CABLE)
PIONEER2(CABLE)
JERROLD1(CABLE)
JERROLD2(CABLE)
JERROLD3(CABLE)
JERROLD4(CABLE)
JERROLD5(CABLE)
JERROLD6(CABLE)
JERROLD7(CABLE)
JERROLD8(CABLE)
JERROLD9(CABLE)
JERROLD10(CABLE)
S.A.1(CABLE)
S.A.2(CABLE)
S.A.3(CABLE)
S.A.4(CABLE)
ZENITH1(CABLE)
ZENITH2(CABLE)
ZENITH3(CABLE)
PIONEER
FISHER
FISHER2
FISHER3
GOLDSTAR
HITACHI
HITACHI2
HITACHI3
MAGNAVOX2
MITSUBISHI
MITSUBISHI2
MITSUBISHI3
MITSUBISHI4
MITSUBISHI5
MITSUBISHI6
PANASONIC
PANASONIC2
PANASONIC3
RCA
RCA2
RCA3
SANYO
SANYO2
SANYO3
SHARP
SHARP2
SHARP3
SONY(BETA)
SONY(VHS)
SONY(8mm)
TOSHIBA
JVC
JVC2
JVC3
JVC4
JVC5
ZENITH
MITSUBISHI(J-3)
SHARP(J-2)
PANASONIC(J-3)
TOSHIBA(J-3)
GRANDIENTE
AKAI
PIONEER2
SANYO4
MATSUI
AIWA
ALBA81
BUSH
THOMSON
BAIRD
TELEFUNKEN
ALBA
PIONEER(DVD)
PANASONIC(DVD)
SAMSUNG(DVD)
SONY(DVD)
TOSHIBA(DVD)
JVC(DVD)
PIONEER(DVD-RECORDER)
PIONEER2(DVD-RECORDER)
PIONEER3(DVD-RECORDER)
PANASONIC(DVD-RECORDER)
PANASONIC2(DVD-RECORDER)
PANASONIC3(DVD-RECORDER)
PHILIPS(DVD-RECORDER)
SHARP(DVD-RECORDER)
SHARP2(DVD-RECORDER)
TOSHIBA(DVD-RECORDER)
TOSHIBA2(DVD-RECORDER)
PIONEER(SAT)
RCA1(SAT)
RCA2(SAT)
SONY(SAT)
PIONEER(LD)
KENWOOD(LD)
PANASONIC1(LD)
PANASONIC2(LD)
PHILIPS(LD)
RCA(LD)
SONY(MDP)
SONY(LD)
CABLE/SAT
053
054
055
056
057
058
059
060
061
062
063
064
065
066
067
068
069
070
071
072
073
074
075
076
077
078
079
080
081
082
083
084
085
086
087
088
089
090
091
092
093
094
095
096
097
098
099
100
101
102
103
104
VCR
Grundig1
Grundig2
Grundig3
SONY2
SONY3
SONY4
RCA4
PHILIPS
PHILIPS2
PHILIPS3
PHILIPS4
PHILIPS5
PHILIPS6
SAMSUNG
SAMSUNG2
SAMSUNG3
SAMSUNG4
SAMSUNG5
SAMSUNG6
MARANTZ
MARANTZ2
GE
GE2
GE3
YAMAHA
YAMAHA2
YAMAHA3
YAMAHA4
CURTIS_MATHIS
CURTIS_MATHIS2
CURTIS_MATHIS3
FUNAI
ADMIRAL
KENWOOD
KENWOOD2
KENWOOD3
NEC
NEC2
NEC3
NEC4
WARDS
WARDS2
WARDS3
WARDS4
MEMOREX
MEMOREX2
JC_PENNY
JC_PENNY2
JC_PENNY3
JC_PENNY4
JC_PENNY5
JC_PENNY6
DVD/DVR
English
000
001
002
003
004
005
006
007
008
009
010
011
012
013
014
015
016
017
018
019
020
021
022
023
024
025
026
027
028
029
030
031
032
033
034
035
036
037
038
039
040
041
042
043
044
045
046
047
048
049
050
051
052
CABLE/SAT
63
En
13
Useful Remote Control Features
Using the remote control unit to control
other devices
Mode switch
(with “TV”
selected)
Receiver control buttons
When a Pioneer receiver is connected to the display, the
receiver can be operated using buttons 1 to 3.
When a non-Pioneer receiver is connected to the display, the
signals for 1 to 3 must first be learned before operating. See
page 62.
1 RECEIVER
(STANDBY/ON)
Turns the receiver power on and off.
2 RECEIVER INPUT
Selects the input source connected to the receiver.
3 RECEIVER VOL +/–
Adjusts the receiver volume level. Press VOL + to
increase the volume and VOL – to decrease it.
• (RECEIVER)
MUTING
Allows the remote control unit to learn receiver’s mute signal. Use
this button when the mode switch is set to a position other than TV.
• The color-highlighted buttons on the remote control can learn the
control signal from another device’s remote control.
1
2
64
En
3
Useful Remote Control Features
13
Cable control buttons
English
Mode switch
(with “CBL/SAT”
selected)
When the Mode switch is set to CBL/SAT, the cable converter
connected to the display can be operated using 1 to 5.
Cable converters made by other manufacturers and not preset
can also be operated using the remote control unit if 1 to 5
have learned the functions. See page 62.
1 0–9
Press a button (or buttons) that corresponds to the
channel that you want to watch.
1
2 CH +/–
Press CH + or CH – to tune in a higher or lower channel.
4
5
2
3 SOURCE
Turns the cable converter power on and off.
4 CH ENTER *
Fix the selected channel with the direct channel selection
buttons.
5 CH RETURN *
Press to switch between the current channel and the
channel you were watching immediately before.
* Some manufacturers do not preset CH ENTER and
CH RETURN. Use these buttons to learn if necessary.
• CABLE and SAT cannot be selected at the same time.
• The color-highlighted buttons on the remote control can learn the
control signal from another device’s remote control.
3
65
En
13
Useful Remote Control Features
SAT control buttons
Mode switch
(with “CBL/SAT”
selected)
When the SAT is preset by the learning function of the remote
control, the remote control unit buttons will function as shown
below.
• When the Mode switch is set to CBL/SAT, satellite broadcast
tuners made by other manufacturers and not preset can also
be operated with the remote control unit if 1 to 8 have
learned the functions. See page 62.
1 0–9
1
Press a button (or buttons) that corresponds to the
channel that you wish to watch.
6
2 CH +/–
Press CH + or CH – to tune in a higher or lower channel.
3 ENTER,
7
Press to activate the selected function.
Press the button to select items on the SAT
GUIDE screen or SAT MENU screen.
4 SAT INFO
When this button is pressed, information on satellite
broadcasting will appear.
• Use this button to learn if necessary.
3
4
/ / /
ENTER:
/ / / :
2
8
5 SOURCE
Turns the Satellite broadcast tuner power on and off.
6 CH ENTER
Fix the selected channel with the direct channel selection
buttons.
• Use this button to learn if necessary.
5
7 SAT MENU
When this button is pressed, the satellite broadcasting
menu screen will appear.
8 SAT GUIDE
When this button is pressed, the satellite broadcasting
guide screen will appear.
• CABLE and SAT cannot be selected at the same time.
• The color-highlighted buttons on the remote control can learn the
control signal from another device’s remote control.
66
En
Useful Remote Control Features
13
VCR control buttons
English
Mode switch
(with “VCR”
selected)
When the VCR is preset by the learning function of the remote
control, the remote control unit buttons will function as follows
when the Mode switch of the remote control unit is set to
VCR.
• When the input selector button having the same number as
the input terminal connecting the VCR is pressed, the VCR
can be operated using 1 to 8.
• VCR made by other manufacturers and not preset can also
be operated using the remote control unit if 1 to 8 have
learned the functions. See page 62.
1 CH +/–
Press to select the channel of the TV tuner on the VCR.
2
(PLAY)
Selects playback.
1
3
(REW)
Rewinds the tape and allows picture search.
4 SOURCE
Turns the power of the VCR on and off.
5
(PAUSE/STILL)
Sets pauses and still pictures.
6
(FF)
Rapidly advances the tape and allows picture search.
7
2
3
4
5
(REC)
Starts recording.
6
7
8
8
(STOP)
Stop tape transport.
• The color-highlighted buttons on the remote control can learn the
control signal from another device’s remote control.
67
En
13
Useful Remote Control Features
1 CH +/– (DVD recorder only)
Press to change the channel of the tuner built in the DVD
recorder.
Mode switch
(with “DVD/
DVR” selected)
2 RETURN
When the DVD menu is in display, press to restore the
immediately previous screen.
3
(PLAY)
Selects playback.
4
(SCAN)/ (CHAPTER SEARCH)
Continue pressing to go backward.
Pressing quickly once takes you to the start of the chapter
currently playing. Each time you press it, you move back
to the start of the previous chapter.
5 SOURCE
Turns the power of the DVD player or DVD recorder on
and off.
1
6
2
7
8
(PAUSE/STILL)
Sets pauses and still pictures.
7 SAT/DVD MENU (DVD, DVD recorder)
When this button is pressed, the DVD menu will appear.
8 ENTER,
9
3
4
5
6
ENTER:
/ / / :
/ / /
(DVD, DVD recorder)
Press to activate the selected function.
Press the button to select items on the DVD
MENU screen.
9 DVD TOP MENU (DVD, DVD recorder)
10
11
12
When this button is pressed, the DVD top menu will
appear.
10
(SCAN)/ (CHAPTER SEARCH)
Continue pressing for fast forward.
Pressing quickly once takes you to the start of the next
chapter. Each time you press it, you move ahead to the
start of the next chapter.
11
(REC)
Starts recording.
12
(STOP)
Playback stops when pressing once.
With some DVD players or DVD recorders, pressing the
button twice may open the disc tray.
11, 12 REC STOP
Press and hold , and then press this button to stop
recording. This operation is true of only Pioneer DVD
recorders.
DVD/DVR control buttons
When the DVD/DVR is preset by the learning function of the
remote control, the remote control unit buttons will function as
follows when the Mode switch of the remote control unit is set
to DVD/DVR.
• When the input selector button having the same number as
the input terminal connecting a DVD player or DVD recorder
is pressed, these players can be operated using 1 to 12.
• DVD players or DVD recorders made by other manufacturers
and not preset can also be operated using the remote control
unit if 1 to 12 have learned the functions. See page 62.
68
En
• The DVD player or DVD recorder cannot be selected at the same
time.
• The color-highlighted buttons on the remote control can learn the
control signal from another device’s remote control.
Appendix
14
Troubleshooting
Possible Solution
• Make sure the Plasma Display and the Media Receiver are connected correctly. (See page 18.)
• Is the power cord disconnected? (See page 23.)
• Has the main power been turned on? (See page 24.)
• Check if you pressed TV on the remote control unit. (See page 24.)
If the indicator on the system lights up red, press TV .
English
Problem
• No power.
• Green and red rectangles appear on • Check if the system cable has been disconnected or almost disconnected? (See page 18.)
the screen alternately.
• The system cannot be operated.
• External influences such as lightning, static electricity, etc., may cause improper operation.
In this case, operate the system after first turning the power of the Plasma Display and the Media
Receiver, or unplugging the power cord and re-plugging it in after 1or 2 minutes.
• Remote control unit does not
operate.
• Is the Mode switch set correctly? Slide it to the TV setting position. (See page 14.)
• Are batteries inserted with polarity (+, –) aligned? (See page 20.)
• Are batteries worn out? (Replace with new batteries.) (See page 20.)
• Operate the remote control unit while pointing it toward the remote control sensor on the Plasma
Display. (See page 20.)
• Are you using it under strong or fluorescent lighting?
• Is a fluorescent light illuminated near the remote control sensor?
• No image and audio is presented.
• Check if the input source for video or PC has been unintentionally selected although you want to
watch a TV channel. (See page 25.)
• Check if you have activated the Parental Control function. (See page 33.)
Enter a password to temporarily cancel the Parental Control function. (See page 37.)
• No picture.
• Is connection to other components correct? (See pages 50 to 58.)
• Is a non-compatible PC signal being input? (See page 58.)
• Is picture adjustment correct? (See page 41.)
• Audio is output but no image is
presented.
• Check if you have selected “Picture Off ” for Energy Save. With this option selected, the screen is
deactivated; only audio is output. To restore the screen display, press any button other than
VOL +/– and MUTING. (See page 44.)
• Images are presented but no audio
is output.
• Check if you have selected the minimum volume. (See page 26.)
• Check if you have muted sound. (See page 26.)
• When using a video or PC input source, check that the audio terminal is also in connection.
(See pages 50 to 54 and 58.)
• Sound is reversed between the right • Check if the speaker cable connections have been reversed between the right and left or if the
speaker cable from either speaker has been disconnected. (See pages 12 and 18.)
and left.
• Sound is output from only a single • Has the balance been correctly adjusted? (See page 43.)
speaker.
• Picture is cut off.
• Is the image position correct? (See page 45.)
• Has the correct screen size been selected? (See page 46.)
• Strange color, light color, dark or
color misalignment.
• Adjust the picture tone. (See page 41.)
• Is the room too bright? The picture may look dark in a room that is too bright.
• Power is suddenly turned off.
• Is the sleep timer set? (See page 40.)
• Check the power control setting. (See page 44.)
• The system’s internal temperature has increased. Remove any objects blocking vent or clean.
(See pages 15 and 16.)
• Panel sounds / noises
• Panel generated sounds, examples: Fan motor noise, Electrical Circuit Humming / Glass Panel buzzing
are normal operation of a phosphor-based matrix display.
Code
SD04
Message
Powering off. Internal temperature too high.
Check temperature around PDP.
Check
Check if the ambient temperature of the Plasma Display is high.
SD05
Powering off. Internal protection circuits activated,
Is there a short in speaker cable?
Check the speaker cable connections between the Plasma Display
and the speakers.
SD11
Powering off. Internal temperature too high.
Check temperature around media receiver.
Check if the ambient temperature of the Media Receiver is high.
69
En
14
Appendix
The video program that you watch may be high definition (HD) or standard definition (SD). This Plasma Display is designed to scale
to each type of definition properly. If the video program’s definition type changes while a menu window is displayed on the screen
(for example: HD→SD or SD→HD), the menu size may temporarily shrink or enlarge until the scaling is completed. This may
happen, for example, when you switch between television and an external digital video recorder (D-VHS), or when your recorded
program switches between different definition types, while the on-screen menu is being shown.
If this happens, the menu will return to its normal size after two to three seconds. This action is normal, and does not indicate a
problem with your Plasma Display system.
70
En
Appendix
Copyright (c) 1998-2004 The OpenSSL Project. All rights reserved.
Redistribution and use in source and binary forms, with or without modification, are permitted provided that the following conditions
are met:
1. Redistributions of source code must retain the above copyright notice, this list of conditions and the following disclaimer.
2. Redistributions in binary form must reproduce the above copyright notice, this list of conditions and the following disclaimer in the
documentation and/or other materials provided with the distribution.
3. All advertising materials mentioning features or use of this software must display the following acknowledgment: “This product
includes software developed by the OpenSSL Project for use in the OpenSSL Toolkit. (http://www.openssl.org/)”
4. The names “OpenSSL Toolkit” and “OpenSSL Project” must not be used to endorse or promote products derived from this software
without prior written permission. For written permission, please contact [email protected].
5. Products derived from this software may not be called “OpenSSL” nor may “OpenSSL” appear in their names without prior written
permission of the OpenSSL Project.
6. Redistributions of any form whatsoever must retain the following acknowledgment: “This product includes software developed by
the OpenSSL Project for use in the OpenSSL Toolkit (http://www.openssl.org/)”
THIS SOFTWARE IS PROVIDED BY THE OpenSSL PROJECT “AS IS” AND ANY EXPRESSED OR IMPLIED WARRANTIES, INCLUDING,
BUT NOT LIMITED TO, THE IMPLIED WARRANTIES OF MERCHANTABILITY AND FITNESS FOR A PARTICULAR PURPOSE ARE
DISCLAIMED. IN NO EVENT SHALL THE OpenSSL PROJECT OR ITS CONTRIBUTORS BE LIABLE FOR ANY DIRECT, INDIRECT,
INCIDENTAL, SPECIAL, EXEMPLARY, OR CONSEQUENTIAL DAMAGES (INCLUDING, BUT NOT LIMITED TO, PROCUREMENT OF
SUBSTITUTE GOODS OR SERVICES; LOSS OF USE, DATA, OR PROFITS; OR BUSINESS INTERRUPTION) HOWEVER CAUSED AND
ON ANY THEORY OF LIABILITY, WHETHER IN CONTRACT, STRICT LIABILITY, OR TORT (INCLUDING NEGLIGENCE OR OTHERWISE)
ARISING IN ANY WAY OUT OF THE USE OF THIS SOFTWARE, EVEN IF ADVISED OF THE POSSIBILITY OF SUCH DAMAGE.
English
This product in part uses “OpenSSL” software.
To the extent the OpenSSL software is being used, the following notification applies:
14
This product includes cryptographic software written by Eric Young ([email protected]). This product includes software written by
Tim Hudson ([email protected]).
Original SSLeay License
Copyright (C) 1995-1998 Eric Young ([email protected])
All rights reserved.
This package is an SSL implementation written by Eric Young ([email protected]). The implementation was written so as to conform
with Netscapes SSL.
This library is free for commercial and non-commercial use as long as the following conditions are aheared to. The following conditions
apply to all code found in this distribution, be it the RC4, RSA, lhash, DES, etc., code; not just the SSL code. The SSL documentation
included with this distribution is covered by the same copyright terms except that the holder is Tim Hudson ([email protected]).
Copyright remains Eric Young’s, and as such any Copyright notices in the code are not to be removed. If this package is used in a
product, Eric Young should be given attribution as the author of the parts of the library used. This can be in the form of a textual
message at program startup or in documentation (online or textual) provided with the package.
Redistribution and use in source and binary forms, with or without modification, are permitted provided that the following conditions
are met:
1. Redistributions of source code must retain the copyright notice, this list of conditions and the following disclaimer.
2. Redistributions in binary form must reproduce the above copyright notice, this list of conditions and the following disclaimer in the
documentation and/or other materials provided with the distribution.
3. All advertising materials mentioning features or use of this software must display the following acknowledgement: “This product
includes cryptographic software written by Eric Young ([email protected])” The word ‘cryptographic’ can be left out if the rouines
from the library being used are not cryptographic related :-).
4. If you include any Windows specific code (or a derivative thereof) from the apps directory (application code) you must include an
acknowledgement: “This product includes software written by Tim Hudson ([email protected])”
THIS SOFTWARE IS PROVIDED BY ERIC YOUNG “AS IS” AND ANY EXPRESS OR IMPLIED WARRANTIES, INCLUDING, BUT NOT
LIMITED TO, THE IMPLIED WARRANTIES OF MERCHANTABILITY AND FITNESS FOR A PARTICULAR PURPOSE ARE DISCLAIMED. IN
NO EVENT SHALL THE AUTHOR OR CONTRIBUTORS BE LIABLE FOR ANY DIRECT, INDIRECT, INCIDENTAL, SPECIAL, EXEMPLARY,
OR CONSEQUENTIAL DAMAGES (INCLUDING, BUT NOT LIMITED TO, PROCUREMENT OF SUBSTITUTE GOODS OR SERVICES; LOSS
OF USE, DATA, OR PROFITS; OR BUSINESS INTERRUPTION) HOWEVER CAUSED AND ON ANY THEORY OF LIABILITY, WHETHER IN
CONTRACT, STRICT LIABILITY, OR TORT (INCLUDING NEGLIGENCE OR OTHERWISE) ARISING IN ANY WAY OUT OF THE USE OF THIS
SOFTWARE, EVEN IF ADVISED OF THE POSSIBILITY OF SUCH DAMAGE.
The licence and distribution terms for any publically available version or derivative of this code cannot be changed. i.e. this code
cannot simply be copied and put under another distribution licence [including the GNU Public Licence.]
71
En
14
Appendix
Linux Source Notice
The Pioneer Plasma Television integrated with the Media Receiver in part is powered by utilizes the Linux operation system. The
machine readable copy of the corresponding source code is available for the cost of distribution. To obtain a copy, please visit
http://www.pioneerelectronics.com/ for more information.
GNU General Public License
Version 2, June 1991
Copyright (C) 1989, 1991 Free Software Foundation, Inc.
59 Temple Place - Suite 330, Boston, MA 02111-1307, USA
Everyone is permitted to copy and distribute verbatim copies of this license document, but changing it is not allowed.
Preamble
The licenses for most software are designed to take away your freedom to share and change it. By contrast, the GNU General Public
License is intended to guarantee your freedom to share and change free software—to make sure the software is free for all its users.
This General Public License applies to most of the Free Software Foundation’s software and to any other program whose authors
commit to using it. (Some other Free Software Foundation software is covered by the GNU Library General Public License instead.) You
can apply it to your programs, too.
When we speak of free software, we are referring to freedom, not price. Our General Public Licenses are designed to make sure that
you have the freedom to distribute copies of free software (and charge for this service if you wish), that you receive source code or can
get it if you want it, that you can change the software or use pieces of it in new free programs; and that you know you can do these
things.
To protect your rights, we need to make restrictions that forbid anyone to deny you these rights or to ask you to surrender the rights.
These restrictions translate to certain responsibilities for you if you distribute copies of the software, or if you modify it.
For example, if you distribute copies of such a program, whether gratis or for a fee, you must give the recipients all the rights that you
have. You must make sure that they, too, receive or can get the source code. And you must show them these terms so they know their
rights.
We protect your rights with two steps: (1) copyright the software, and (2) offer you this license which gives you legal permission to copy,
distribute and/or modify the software.
Also, for each author’s protection and ours, we want to make certain that everyone understands that there is no warranty for this free
software. If the software is modified by someone else and passed on, we want its recipients to know that what they have is not the
original, so that any problems introduced by others will not reflect on the original authors’ reputations.
Finally, any free program is threatened constantly by software patents. We wish to avoid the danger that redistributors of a free program
will individually obtain patent licenses, in effect making the program proprietary. To prevent this, we have made it clear that any patent
must be licensed for everyone’s free use or not licensed at all.
The precise terms and conditions for copying, distribution and modification follow.
GNU General Public License
TERMS AND CONDITIONS FOR COPYING, DISTRIBUTION AND MODIFICATION
0. This License applies to any program or other work which contains a notice placed by the copyright holder saying it may be distributed
under the terms of this General Public License. The “Program”, below, refers to any such program or work, and a “work based on
the Program” means either the Program or any derivative work under copyright law: that is to say, a work containing the Program
or a portion of it, either verbatim or with modifications and/or translated into another language. (Hereinafter, translation is included
without limitation in the term “modification”.) Each licensee is addressed as “you”.
Activities other than copying, distribution and modification are not covered by this License; they are outside its scope. The act of
running the Program is not restricted, and the output from the Program is covered only if its contents constitute a work based on
the Program (independent of having been made by running the Program). Whether that is true depends on what the Program does.
1. You may copy and distribute verbatim copies of the Program’s source code as you receive it, in any medium, provided that you
conspicuously and appropriately publish on each copy an appropriate copyright notice and disclaimer of warranty; keep intact all
the notices that refer to this License and to the absence of any warranty; and give any other recipients of the Program a copy of this
License along with the Program.
You may charge a fee for the physical act of transferring a copy, and you may at your option offer warranty protection in exchange
for a fee.
2. You may modify your copy or copies of the Program or any portion of it, thus forming a work based on the Program, and copy and
distribute such modifications or work under the terms of Section 1 above, provided that you also meet all of these conditions:
a) You must cause the modified files to carry prominent notices stating that you changed the files and the date of any change.
b) You must cause any work that you distribute or publish, that in whole or in part contains or is derived from the Program or any
part thereof, to be licensed as a whole at no charge to all third parties under the terms of this License.
c) If the modified program normally reads commands interactively when run, you must cause it, when started running for such
interactive use in the most ordinary way, to print or display an announcement including an appropriate copyright notice and a
notice that there is no warranty (or else, saying that you provide a warranty) and that users may redistribute the program under
these conditions, and telling the user how to view a copy of this License.
72
En
Appendix
4.
5.
6.
7.
8.
English
3.
(Exception: if the Program itself is interactive but does not normally print such an announcement, your work based on the Program
is not required to print an announcement.)
These requirements apply to the modified work as a whole. If identifiable sections of that work are not derived from the Program,
and can be reasonably considered independent and separate works in themselves, then this License, and its terms, do not apply to
those sections when you distribute them as separate works. But when you distribute the same sections as part of a whole which is
a work based on the Program, the distribution of the whole must be on the terms of this License, whose permissions for other
licensees extend to the entire whole, and thus to each and every part regardless of who wrote it.
Thus, it is not the intent of this section to claim rights or contest your rights to work written entirely by you; rather, the intent is to
exercise the right to control the distribution of derivative or collective works based on the Program.
In addition, mere aggregation of another work not based on the Program with the Program (or with a work based on the Program)
on a volume of a storage or distribution medium does not bring the other work under the scope of this License.
You may copy and distribute the Program (or a work based on it, under Section 2) in object code or executable form under the terms
of Sections 1 and 2 above provided that you also do one of the following:
a) Accompany it with the complete corresponding machine-readable source code, which must be distributed under the terms of
Sections 1 and 2 above on a medium customarily used for software interchange; or,
b) Accompany it with a written offer, valid for at least three years, to give any third party, for a charge no more than your cost of
physically performing source distribution, a complete machine-readable copy of the corresponding source code, to be distributed
under the terms of Sections 1 and 2 above on a medium customarily used for software interchange; or,
c) Accompany it with the information you received as to the offer to distribute corresponding source code. (This alternative is
allowed only for noncommercial distribution and only if you received the program in object code or executable form with such
an offer, in accord with Subsection b above.)
The source code for a work means the preferred form of the work for making modifications to it. For an executable work, complete
source code means all the source code for all modules it contains, plus any associated interface definition files, plus the scripts
used to control compilation and installation of the executable. However, as a special exception, the source code distributed need
not include anything that is normally distributed (in either source or binary form) with the major components (compiler, kernel, and
so on) of the operating system on which the executable runs, unless that component itself accompanies the executable.
If distribution of executable or object code is made by offering access to copy from a designated place, then offering equivalent
access to copy the source code from the same place counts as distribution of the source code, even though third parties are not
compelled to copy the source along with the object code.
You may not copy, modify, sublicense, or distribute the Program except as expressly provided under this License. Any attempt
otherwise to copy, modify, sublicense or distribute the Program is void, and will automatically terminate your rights under this
License.
However, parties who have received copies, or rights, from you under this License will not have their licenses terminated so long as
such parties remain in full compliance.
You are not required to accept this License, since you have not signed it. However, nothing else grants you permission to modify or
distribute the Program or its derivative works. These actions are prohibited by law if you do not accept this License. Therefore, by
modifying or distributing the Program (or any work based on the Program), you indicate your acceptance of this License to do so,
and all its terms and conditions for copying, distributing or modifying the Program or works based on it.
Each time you redistribute the Program (or any work based on the Program), the recipient automatically receives a license from the
original licensor to copy, distribute or modify the Program subject to these terms and conditions. You may not impose any further
restrictions on the recipients’ exercise of the rights granted herein. You are not responsible for enforcing compliance by third
parties to this License.
If, as a consequence of a court judgment or allegation of patent infringement or for any other reason (not limited to patent issues),
conditions are imposed on you (whether by court order, agreement or otherwise) that contradict the conditions of this License, they
do not excuse you from the conditions of this License. If you cannot distribute so as to satisfy simultaneously your obligations
under this License and any other pertinent obligations, then as a consequence you may not distribute the Program at all. For
example, if a patent license would not permit royalty-free redistribution of the Program by all those who receive copies directly or
indirectly through you, then the only way you could satisfy both it and this License would be to refrain entirely from distribution of
the Program.
If any portion of this section is held invalid or unenforceable under any particular circumstance, the balance of the section is
intended to apply and the section as a whole is intended to apply in other circumstances.
It is not the purpose of this section to induce you to infringe any patents or other property right claims or to contest validity of any
such claims; this section has the sole purpose of protecting the integrity of the free software distribution system, which is implemented
by public license practices. Many people have made generous contributions to the wide range of software distributed through that
system in reliance on consistent application of that system; it is up to the author/donor to decide if he or she is willing to distribute
software through any other system and a licensee cannot impose that choice.
This section is intended to make thoroughly clear what is believed to be a consequence of the rest of this License.
If the distribution and/or use of the Program is restricted in certain countries either by patents or by copyrighted interfaces, the
original copyright holder who places the Program under this License may add an explicit geographical distribution limitation
excluding those countries, so that distribution is permitted only in or among countries not thus excluded. In such case, this
License incorporates the limitation as if written in the body of this License.
14
73
En
14
Appendix
9. The Free Software Foundation may publish revised and/or new versions of the General Public License from time to time. Such new
versions will be similar in spirit to the present version, but may differ in detail to address new problems or concerns.
Each version is given a distinguishing version number. If the Program specifies a version number of this License which applies to
it and “any later version”, you have the option of following the terms and conditions either of that version or of any later version
published by the Free Software Foundation. If the Program does not specify a version number of this License, you may choose any
version ever published by the Free Software Foundation.
10. If you wish to incorporate parts of the Program into other free programs whose distribution conditions are different, write to the
author to ask for permission. For software which is copyrighted by the Free Software Foundation, write to the Free Software Foundation;
we sometimes make exceptions for this. Our decision will be guided by the two goals of preserving the free status of all derivatives
of our free software and of promoting the sharing and reuse of software generally.
NO WARRANTY
11. BECAUSE THE PROGRAM IS LICENSED FREE OF CHARGE, THERE IS NO WARRANTY FOR THE PROGRAM, TO THE EXTENT
PERMITTED BY APPLICABLE LAW. EXCEPT WHEN OTHERWISE STATED IN WRITING THE COPYRIGHT HOLDERS AND/OR OTHER
PARTIES PROVIDE THE PROGRAM “AS IS” WITHOUT WARRANTY OF ANY KIND, EITHER EXPRESSED OR IMPLIED, INCLUDING,
BUT NOT LIMITED TO, THE IMPLIED WARRANTIES OF MERCHANTABILITY AND FITNESS FOR A PARTICULAR PURPOSE. THE
ENTIRE RISK AS TO THE QUALITY AND PERFORMANCE OF THE PROGRAM IS WITH YOU. SHOULD THE PROGRAM PROVE
DEFECTIVE, YOU ASSUME THE COST OF ALL NECESSARY SERVICING, REPAIR OR CORRECTION.
12. IN NO EVENT UNLESS REQUIRED BY APPLICABLE LAW OR AGREED TO IN WRITING WILL ANY COPYRIGHT HOLDER, OR ANY
OTHER PARTY WHO MAY MODIFY AND/OR REDISTRIBUTE THE PROGRAM AS PERMITTED ABOVE, BE LIABLE TO YOU FOR
DAMAGES, INCLUDING ANY GENERAL, SPECIAL, INCIDENTAL OR CONSEQUENTIAL DAMAGES ARISING OUT OF THE USE OR
INABILITY TO USE THE PROGRAM (INCLUDING BUT NOT LIMITED TO LOSS OF DATA OR DATA BEING RENDERED INACCURATE
OR LOSSES SUSTAINED BY YOU OR THIRD PARTIES OR A FAILURE OF THE PROGRAM TO OPERATE WITH ANY OTHER
PROGRAMS), EVEN IF SUCH HOLDER OR OTHER PARTY HAS BEEN ADVISED OF THE POSSIBILITY OF SUCH DAMAGES.
END OF TERMS AND CONDITIONS
How to Apply These Terms to Your New Programs
If you develop a new program, and you want it to be of the greatest possible use to the public, the best way to achieve this is to make
it free software which everyone can redistribute and change under these terms.
To do so, attach the following notices to the program. It is safest to attach them to the start of each source file to most effectively convey
the exclusion of warranty; and each file should have at least the “copyright” line and a pointer to where the full notice is found.
<one line to give the program’s name and an idea of what it does.>
Copyright (C) yyyy name of author
This program is free software; you can redistribute it and/or modify it under the terms of the GNU General Public License as published
by the Free Software Foundation; either version 2 of the License, or (at your option) any later version.
This program is distributed in the hope that it will be useful, but WITHOUT ANY WARRANTY; without even the implied warranty of
MERCHANTABILITY or FITNESS FOR A PARTICULAR PURPOSE. See the GNU General Public License for more details.
You should have received a copy of the GNU General Public License along with this program; if not, write to the Free Software Foundation,
Inc., 59 Temple Place - Suite 330, Boston, MA 02111-1307, USA.
Also add information on how to contact you by electronic and paper mail.
If the program is interactive, make it output a short notice like this when it starts in an interactive mode:
Gnomovision version 69, Copyright (C) year name of author
Gnomovision comes with ABSOLUTELY NO WARRANTY; for details type ‘show w’. This is free software, and you are welcome to
redistribute it under certain conditions; type ‘show c’ for details.
The hypothetical commands ‘show w’ and ‘show c’ should show the appropriate parts of the General Public License. Of course, the
commands you use may be called something other than ‘show w’ and ‘show c’; they could even be mouse-clicks or menu items—
whatever suits your program.
You should also get your employer (if you work as a programmer) or your school, if any, to sign a “copyright disclaimer” for the
program, if necessary. Here is a sample; alter the names:
Yoyodyne, Inc., hereby disclaims all copyright interest in the program ‘Gnomovision’ (which makes passes at compilers) written by
James Hacker.
signature of Ty Coon, 1 April 1989
Ty Coon, President of Vice
This General Public License does not permit incorporating your program into proprietary programs. If your program is a subroutine
library, you may consider it more useful to permit linking proprietary applications with the library. If this is what you want to do, use the
GNU Lesser General Public License instead of this License.
74
En
Appendix
14
GNU Lesser General Public License
English
Version 2.1, February 1999
Copyright (C) 1991, 1999 Free Software Foundation, Inc.
59 Temple Place, Suite 330, Boston, MA 02111-1307, USA
Everyone is permitted to copy and distribute verbatim copies of this license document, but changing it is not allowed.
[This is the first released version of the Lesser GPL. It also counts as the successor of the GNU Library Public License, version 2, hence
the version number 2.1.]
Preamble
The licenses for most software are designed to take away your freedom to share and change it. By contrast, the GNU General Public
Licenses are intended to guarantee your freedom to share and change free software—to make sure the software is free for all its users.
This license, the Lesser General Public License, applies to some specially designated software packages—typically libraries—of the
Free Software Foundation and other authors who decide to use it. You can use it too, but we suggest you first think carefully about
whether this license or the ordinary General Public License is the better strategy to use in any particular case, based on the explanations
below.
When we speak of free software, we are referring to freedom of use, not price. Our General Public Licenses are designed to make sure
that you have the freedom to distribute copies of free software (and charge for this service if you wish); that you receive source code or
can get it if you want it; that you can change the software and use pieces of it in new free programs; and that you are informed that you
can do these things.
To protect your rights, we need to make restrictions that forbid distributors to deny you these rights or to ask you to surrender these
rights. These restrictions translate to certain responsibilities for you if you distribute copies of the library or if you modify it.
For example, if you distribute copies of the library, whether gratis or for a fee, you must give the recipients all the rights that we gave
you. You must make sure that they, too, receive or can get the source code. If you link other code with the library, you must provide
complete object files to the recipients, so that they can relink them with the library after making changes to the library and recompiling
it. And you must show them these terms so they know their rights.
We protect your rights with a two-step method: (1) we copyright the library, and (2) we offer you this license, which gives you legal
permission to copy, distribute and/or modify the library.
To protect each distributor, we want to make it very clear that there is no warranty for the free library. Also, if the library is modified by
someone else and passed on, the recipients should know that what they have is not the original version, so that the original author’s
reputation will not be affected by problems that might be introduced by others.
Finally, software patents pose a constant threat to the existence of any free program. We wish to make sure that a company cannot
effectively restrict the users of a free program by obtaining a restrictive license from a patent holder.
Therefore, we insist that any patent license obtained for a version of the library must be consistent with the full freedom of use
specified in this license.
Most GNU software, including some libraries, is covered by the ordinary GNU General Public License. This license, the GNU Lesser
General Public License, applies to certain designated libraries, and is quite different from the ordinary General Public License. We use
this license for certain libraries in order to permit linking those libraries into non-free programs.
When a program is linked with a library, whether statically or using a shared library, the combination of the two is legally speaking a
combined work, a derivative of the original library. The ordinary General Public License therefore permits such linking only if the entire
combination fits its criteria of freedom. The Lesser General Public License permits more lax criteria for linking other code with the
library.
We call this license the “Lesser” General Public License because it does Less to protect the user’s freedom than the ordinary General
Public License. It also provides other free software developers Less of an advantage over competing non-free programs. These
disadvantages are the reason we use the ordinary General Public License for many libraries. However, the Lesser license provides
advantages in certain special circumstances.
For example, on rare occasions, there may be a special need to encourage the widest possible use of a certain library, so that it
becomes a de-facto standard. To achieve this, non-free programs must be allowed to use the library.
A more frequent case is that a free library does the same job as widely used non-free libraries. In this case, there is little to gain by
limiting the free library to free software only, so we use the Lesser General Public License.
In other cases, permission to use a particular library in non-free programs enables a greater number of people to use a large body of
free software. For example, permission to use the GNU C Library in non-free programs enables many more people to use the whole
GNU operating system, as well as its variant, the GNU/Linux operating system.
Although the Lesser General Public License is Less protective of the users’ freedom, it does ensure that the user of a program that is
linked with the Library has the freedom and the wherewithal to run that program using a modified version of the Library.
The precise terms and conditions for copying, distribution and modification follow. Pay close attention to the difference between a
“work based on the library” and a “work that uses the library”. The former contains code derived from the library, whereas the latter
must be combined with the library in order to run.
75
En
14
Appendix
GNU Lesser General Public License
76
En
TERMS AND CONDITIONS FOR COPYING, DISTRIBUTION AND MODIFICATION
0. This License Agreement applies to any software library or other program which contains a notice placed by the copyright holder or
other authorized party saying it may be distributed under the terms of this Lesser General Public License (also called “this License”).
Each licensee is addressed as “you”.
A “library” means a collection of software functions and/or data prepared so as to be conveniently linked with application programs
(which use some of those functions and data) to form executables.
The “Library”, below, refers to any such software library or work which has been distributed under these terms. A “work based on
the Library” means either the Library or any derivative work under copyright law: that is to say, a work containing the Library or a
portion of it, either verbatim or with modifications and/or translated straightforwardly into another language. (Hereinafter, translation
is included without limitation in the term “modification”.)
“Source code” for a work means the preferred form of the work for making modifications to it. For a library, complete source code
means all the source code for all modules it contains, plus any associated interface definition files, plus the scripts used to control
compilation and installation of the library.
Activities other than copying, distribution and modification are not covered by this License; they are outside its scope. The act of
running a program using the Library is not restricted, and output from such a program is covered only if its contents constitute a
work based on the Library (independent of the use of the Library in a tool for writing it). Whether that is true depends on what the
Library does and what the program that uses the Library does.
1. You may copy and distribute verbatim copies of the Library’s complete source code as you receive it, in any medium, provided that
you conspicuously and appropriately publish on each copy an appropriate copyright notice and disclaimer of warranty; keep intact
all the notices that refer to this License and to the absence of any warranty; and distribute a copy of this License along with the
Library.
You may charge a fee for the physical act of transferring a copy, and you may at your option offer warranty protection in exchange
for a fee.
2. You may modify your copy or copies of the Library or any portion of it, thus forming a work based on the Library, and copy and
distribute such modifications or work under the terms of Section 1 above, provided that you also meet all of these conditions:
a) The modified work must itself be a software library.
b) You must cause the files modified to carry prominent notices stating that you changed the files and the date of any change.
c) You must cause the whole of the work to be licensed at no charge to all third parties under the terms of this License.
d) If a facility in the modified Library refers to a function or a table of data to be supplied by an application program that uses the
facility, other than as an argument passed when the facility is invoked, then you must make a good faith effort to ensure that, in
the event an application does not supply such function or table, the facility still operates, and performs whatever part of its
purpose remains meaningful.
(For example, a function in a library to compute square roots has a purpose that is entirely well-defined independent of the application.
Therefore, Subsection 2d requires that any application-supplied function or table used by this function must be optional: if the
application does not supply it, the square root function must still compute square roots.) These requirements apply to the modified
work as a whole. If identifiable sections of that work are not derived from the Library, and can be reasonably considered independent
and separate works in themselves, then this License, and its terms, do not apply to those sections when you distribute them as
separate works. But when you distribute the same sections as part of a whole which is a work based on the Library, the distribution
of the whole must be on the terms of this License, whose permissions for other licensees extend to the entire whole, and thus to
each and every part regardless of who wrote it.
Thus, it is not the intent of this section to claim rights or contest your rights to work written entirely by you; rather, the intent is to
exercise the right to control the distribution of derivative or collective works based on the Library.
In addition, mere aggregation of another work not based on the Library with the Library (or with a work based on the Library) on a
volume of a storage or distribution medium does not bring the other work under the scope of this License.
3. You may opt to apply the terms of the ordinary GNU General Public License instead of this License to a given copy of the Library. To
do this, you must alter all the notices that refer to this License, so that they refer to the ordinary GNU General Public License,
version 2, instead of to this License. (If a newer version than version 2 of the ordinary GNU General Public License has appeared,
then you can specify that version instead if you wish.) Do not make any other change in these notices.
Once this change is made in a given copy, it is irreversible for that copy, so the ordinary GNU General Public License applies to all
subsequent copies and derivative works made from that copy. This option is useful when you wish to copy part of the code of the
Library into a program that is not a library.
4. You may copy and distribute the Library (or a portion or derivative of it, under Section 2) in object code or executable form under the
terms of Sections 1 and 2 above provided that you accompany it with the complete corresponding machine-readable source code,
which must be distributed under the terms of Sections 1 and 2 above on a medium customarily used for software interchange.
If distribution of object code is made by offering access to copy from a designated place, then offering equivalent access to copy
the source code from the same place satisfies the requirement to distribute the source code, even though third parties are not
compelled to copy the source along with the object code.
5. A program that contains no derivative of any portion of the Library, but is designed to work with the Library by being compiled or
linked with it, is called a “work that uses the Library”. Such a work, in isolation, is not a derivative work of the Library, and therefore
falls outside the scope of this License. However, linking a “work that uses the Library” with the Library creates an executable that is
a derivative of the Library (because it contains portions of the Library), rather than a “work that uses the library”. The executable is
therefore covered by this License. Section 6 states terms for distribution of such executables.
Appendix
English
When a “work that uses the Library” uses material from a header file that is part of the Library, the object code for the work may be
a derivative work of the Library even though the source code is not. Whether this is true is especially significant if the work can be
linked without the Library, or if the work is itself a library. The threshold for this to be true is not precisely defined by law.
If such an object file uses only numerical parameters, data structure layouts and accessors, and small macros and small inline
functions (ten lines or less in length), then the use of the object file is unrestricted, regardless of whether it is legally a derivative
work. (Executables containing this object code plus portions of the Library will still fall under Section 6.)
Otherwise, if the work is a derivative of the Library, you may distribute the object code for the work under the terms of Section 6. Any
executables containing that work also fall under Section 6, whether or not they are linked directly with the Library itself.
6. As an exception to the Sections above, you may also combine or link a “work that uses the Library” with the Library to produce a
work containing portions of the Library, and distribute that work under terms of your choice, provided that the terms permit
modification of the work for the customer’s own use and reverse engineering for debugging such modifications.
You must give prominent notice with each copy of the work that the Library is used in it and that the Library and its use are covered
by this License. You must supply a copy of this License. If the work during execution displays copyright notices, you must include
the copyright notice for the Library among them, as well as a reference directing the user to the copy of this License.
Also, you must do one of these things:
a) Accompany the work with the complete corresponding machine-readable source code for the Library including whatever changes
were used in the work (which must be distributed under Sections 1 and 2 above); and, if the work is an executable linked with
the Library, with the complete machine-readable “work that uses the Library”, as object code and/or source code, so that the
user can modify the Library and then relink to produce a modified executable containing the modified Library. (It is understood
that the user who changes the contents of definitions files in the Library will not necessarily be able to recompile the application
to use the modified definitions.)
b) Use a suitable shared library mechanism for linking with the Library. A suitable mechanism is one that (1) uses at run time a
copy of the library already present on the user’s computer system, rather than copying library functions into the executable,
and (2) will operate properly with a modified version of the library, if the user installs one, as long as the modified version is
interface-compatible with the version that the work was made with.
c) Accompany the work with a written offer, valid for at least three years, to give the same user the materials specified in Subsection
6a, above, for a charge no more than the cost of performing this distribution.
d) If distribution of the work is made by offering access to copy from a designated place, offer equivalent access to copy the above
specified materials from the same place.
e) Verify that the user has already received a copy of these materials or that you have already sent this user a copy.
For an executable, the required form of the “work that uses the Library” must include any data and utility programs needed for
reproducing the executable from it. However, as a special exception, the materials to be distributed need not include anything that
is normally distributed (in either source or binary form) with the major components (compiler, kernel, and so on) of the operating
system on which the executable runs, unless that component itself accompanies the executable.
It may happen that this requirement contradicts the license restrictions of other proprietary libraries that do not normally accompany
the operating system. Such a contradiction means you cannot use both them and the Library together in an executable that you
distribute.
7. You may place library facilities that are a work based on the Library side-by-side in a single library together with other library
facilities not covered by this License, and distribute such a combined library, provided that the separate distribution of the work
based on the Library and of the other library facilities is otherwise permitted, and provided that you do these two things:
a) Accompany the combined library with a copy of the same work based on the Library, uncombined with any other library
facilities. This must be distributed under the terms of the Sections above.
b) Give prominent notice with the combined library of the fact that part of it is a work based on the Library, and explaining where
to find the accompanying uncombined form of the same work.
8. You may not copy, modify, sublicense, link with, or distribute the Library except as expressly provided under this License. Any
attempt otherwise to copy, modify, sublicense, link with, or distribute the Library is void, and will automatically terminate your
rights under this License. However, parties who have received copies, or rights, from you under this License will not have their
licenses terminated so long as such parties remain in full compliance.
9. You are not required to accept this License, since you have not signed it. However, nothing else grants you permission to modify or
distribute the Library or its derivative works. These actions are prohibited by law if you do not accept this License. Therefore, by
modifying or distributing the Library (or any work based on the Library), you indicate your acceptance of this License to do so, and
all its terms and conditions for copying, distributing or modifying the Library or works based on it.
10. Each time you redistribute the Library (or any work based on the Library), the recipient automatically receives a license from the
original licensor to copy, distribute, link with or modify the Library subject to these terms and conditions. You may not impose any
further restrictions on the recipients’ exercise of the rights granted herein. You are not responsible for enforcing compliance by
third parties with this License.
11. If, as a consequence of a court judgment or allegation of patent infringement or for any other reason (not limited to patent issues),
conditions are imposed on you (whether by court order, agreement or otherwise) that contradict the conditions of this License, they
do not excuse you from the conditions of this License. If you cannot distribute so as to satisfy simultaneously your obligations
under this License and any other pertinent obligations, then as a consequence you may not distribute the Library at all.
For example, if a patent license would not permit royalty-free redistribution of the Library by all those who receive copies directly or
indirectly through you, then the only way you could satisfy both it and this License would be to refrain entirely from distribution of
the Library.
14
77
En
14
Appendix
If any portion of this section is held invalid or unenforceable under any particular circumstance, the balance of the section is
intended to apply, and the section as a whole is intended to apply in other circumstances.
It is not the purpose of this section to induce you to infringe any patents or other property right claims or to contest validity of any
such claims; this section has the sole purpose of protecting the integrity of the free software distribution system which is implemented
by public license practices. Many people have made generous contributions to the wide range of software distributed through that
system in reliance on consistent application of that system; it is up to the author/donor to decide if he or she is willing to distribute
software through any other system and a licensee cannot impose that choice.
This section is intended to make thoroughly clear what is believed to be a consequence of the rest of this License.
12. If the distribution and/or use of the Library is restricted in certain countries either by patents or by copyrighted interfaces, the
original copyright holder who places the Library under this License may add an explicit geographical distribution limitation excluding
those countries, so that distribution is permitted only in or among countries not thus excluded. In such case, this License incorporates
the limitation as if written in the body of this License.
13. The Free Software Foundation may publish revised and/or new versions of the Lesser General Public License from time to time.
Such new versions will be similar in spirit to the present version, but may differ in detail to address new problems or concerns.
Each version is given a distinguishing version number. If the Library specifies a version number of this License which applies to it
and “any later version”, you have the option of following the terms and conditions either of that version or of any later version
published by the Free Software Foundation. If the Library does not specify a license version number, you may choose any version
ever published by the Free Software Foundation.
14. If you wish to incorporate parts of the Library into other free programs whose distribution conditions are incompatible with these,
write to the author to ask for permission. For software which is copyrighted by the Free Software Foundation, write to the Free
Software Foundation; we sometimes make exceptions for this. Our decision will be guided by the two goals of preserving the free
status of all derivatives of our free software and of promoting the sharing and reuse of software generally.
NO WARRANTY
15. BECAUSE THE LIBRARY IS LICENSED FREE OF CHARGE, THERE IS NO WARRANTY FOR THE LIBRARY, TO THE EXTENT PERMITTED
BY APPLICABLE LAW. EXCEPT WHEN OTHERWISE STATED IN WRITING THE COPYRIGHT HOLDERS AND/OR OTHER PARTIES
PROVIDE THE LIBRARY “AS IS” WITHOUT WARRANTY OF ANY KIND, EITHER EXPRESSED OR IMPLIED, INCLUDING, BUT NOT
LIMITED TO, THE IMPLIED WARRANTIES OF MERCHANTABILITY AND FITNESS FOR A PARTICULAR PURPOSE. THE ENTIRE
RISK AS TO THE QUALITY AND PERFORMANCE OF THE LIBRARY IS WITH YOU. SHOULD THE LIBRARY PROVE DEFECTIVE, YOU
ASSUME THE COST OF ALL NECESSARY SERVICING, REPAIR OR CORRECTION.
16. IN NO EVENT UNLESS REQUIRED BY APPLICABLE LAW OR AGREED TO IN WRITING WILL ANY COPYRIGHT HOLDER, OR ANY
OTHER PARTY WHO MAY MODIFY AND/OR REDISTRIBUTE THE LIBRARY AS PERMITTED ABOVE, BE LIABLE TO YOU FOR
DAMAGES, INCLUDING ANY GENERAL, SPECIAL, INCIDENTAL OR CONSEQUENTIAL DAMAGES ARISING OUT OF THE USE OR
INABILITY TO USE THE LIBRARY (INCLUDING BUT NOT LIMITED TO LOSS OF DATA OR DATA BEING RENDERED INACCURATE
OR LOSSES SUSTAINED BY YOU OR THIRD PARTIES OR A FAILURE OF THE LIBRARY TO OPERATE WITH ANY OTHER SOFTWARE),
EVEN IF SUCH HOLDER OR OTHER PARTY HAS BEEN ADVISED OF THE POSSIBILITY OF SUCH DAMAGES.
END OF TERMS AND CONDITIONS
How to Apply These Terms to Your New Libraries
If you develop a new library, and you want it to be of the greatest possible use to the public, we recommend making it free software that
everyone can redistribute and change. You can do so by permitting redistribution under these terms (or, alternatively, under the terms
of the ordinary General Public License).
To apply these terms, attach the following notices to the library. It is safest to attach them to the start of each source file to most
effectively convey the exclusion of warranty; and each file should have at least the “copyright” line and a pointer to where the full notice
is found.
<one line to give the library’s name and an idea of what it does.>
Copyright (C) year name of author
This library is free software; you can redistribute it and/or modify it under the terms of the GNU Lesser General Public License as
published by the Free Software Foundation; either version 2.1 of the License, or (at your option) any later version.
This library is distributed in the hope that it will be useful, but WITHOUT ANY WARRANTY; without even the implied warranty of
MERCHANTABILITY or FITNESS FOR A PARTICULAR PURPOSE. See the GNU Lesser General Public License for more details.
You should have received a copy of the GNU Lesser General Public License along with this library; if not, write to the Free Software
Foundation, Inc., 59 Temple Place, Suite 330, Boston, MA 02111-1307, USA
Also add information on how to contact you by electronic and paper mail.
You should also get your employer (if you work as a programmer) or your school, if any, to sign a “copyright disclaimer” for the library,
if necessary. Here is a sample; alter the names:
Yoyodyne, Inc., hereby disclaims all copyright interest in the library ‘Frob’ (a library for tweaking knobs) written by James Random
Hacker.
78
En
signature of Ty Coon, 1 April 1990
Ty Coon, President of Vice
That’s all there is to it!
Appendix
14
Specifications
50"Plasma Display, Model: PRO-505PU
1280 × 768 pixels
43" Plasma Display, Model: PRO-435PU
1024 × 768 pixels
Audio Amplifier
13 W + 13 W (1 kHz, 10 %, 8 Ω)
13 W + 13 W (1 kHz, 10 %, 8 Ω)
Surround System
SRS/FOCUS/TruBass
SRS/FOCUS/TruBass
Power Requirement
120 V AC, 60 Hz, 363 W (0.2 W Standby)
120 V AC, 60 Hz, 298 W (0.2 W Standby)
Dimensions
1270 (W) × 737 (H) × 93 (D) mm
(50 (W) × 29 (H) × 3 11/16 (D) inches)
1120 (W) × 652 (H) × 93 (D) mm
(44 1/8 (W) × 25 11/16 (H) × 3 11/16 (D) inches)
Weight
32.8 kg (72.3 lbs.)
26.8 kg (59.1 lbs.)
Item
Reception System (Digital)
Media Receiver, Model: PRO-R05U
ATSC Digital TV system
Circuit type
Tuner
8VSB/64QAM/256QAM/QPSK demodulation
VHF/UHF
VHF 2–13ch, UHF 14–69ch
CATV
2–135ch
Audio format
Dolby Digital
Reception System (Analog)
American TV standard NTSC system
Circuit type
Tuner
Video signal detection PLL full synchronous detection, PLL digital synthesizer
system
VHF/UHF
VHF 2–13ch, UHF 14–69ch
CATV
ANTENNA/CABLE A IN: 1–135ch
Audio multiplex
Terminals
Rear
Front
English
Item
Number of Pixels
Cable: 1–125ch
BTSC system
ANTENNA/CABLE A IN 75 Ω UNBAL, F Type for DTV/VHF/UHF/CATV in
ANTENNA B
75 Ω UNBAL, F Type for VHF/UHF/CATV in
Loop out
i.LINK (TS)
S400 (2)
INPUT 1
COMPONENT VIDEO in, S-VIDEO in, VIDEO in, AUDIO in, HDMI in
INPUT 2
S-VIDEO in, VIDEO in, AUDIO in
INPUT 3
COMPONENT VIDEO in, AUDIO in, HDMI in
Monitor Out
S-VIDEO out, VIDEO out, AUDIO out
Digital Audio Output
Optical (1)
VCR Control Output
1
CONTROL IN
1
CONTROL OUT
1
Cable CARD
Point of Deployment
INPUT 4
COMPONENT VIDEO in, S-VIDEO in, VIDEO in, AUDIO in
PC
Analog RGB in, AUDIO in
OSD
English/French/Spanish
Power Requirement
120 V AC, 60 Hz, 43.3 W (31 W Standby)
Dimensions
420 (W) × 90 (H) × 295 (D) mm
(16 9/16 (W) × 3 9/16 (H) × 1110/16 (D) inches)
Weight
5.8 kg (12.8 lbs.)
• Design and specifications are subject to change without notice.
79
En
14
Appendix
Trademarks
• FOCUS, WOW, SRS and
symbol are trademarks of SRS Labs, Inc.
FOCUS and WOW technologies are incorporated under license from SRS Labs, Inc.
• Manufactured under license from Dolby Laboratories. “Dolby” and the double-D symbol are trademarks of Dolby Laboratories.
• HDMI, the HDMI logo and High-Definition Multimedia Interface are trademarks or registered trademarks of HDMI Licensing LLC.
• This product includes FontAvenue® fonts licensed by NEC Corporation. FontAvenue is a registered trademark of NEC Corporation.
• “i.LINK” and the “i.LINK” logo are trademarks.
• DDC is a registered trademark of Video Electronics Standards Association.
• CableCARD is a trademark of Cable Television Laboratories, Inc.
• The names of the companies or institutions are trademarks or registered trademarks of the respective companies or institutions.
Copyright protection
• This product incorporates copyright protection technology that is protected by U.S. patents and other intellectual property rights.
Use of this copyright protection technology must be authorized by Macrovision Corporation, and is intended for home and other
limited consumer uses only unless otherwise authorized by Macrovision. Reverse engineering or disassembly is prohibited.
Published by Pioneer Corporation.
Copyright © 2004 Pioneer Corporation.
All rights reserved.
80
En
Printed on recycled paper
Imprimé sur papier recyclé
Published by Pioneer Corporation.
Copyright © 2004 Pioneer Corporation.
All rights reserved.
PIONEER CORPORATION
4-1, Meguro 1-Chome, Meguro-ku, Tokyo 153-8654, Japan
PIONEER ELECTRONICS (USA) INC.
P.O. BOX 1540, Long Beach, California 90810-1540, U.S.A. TEL: (800) 421-1404
PIONEER ELECTRONICS OF CANADA, INC.
300 Allstate Parkway, Markham, Ontario L3R OP2, Canada TEL: 1-877-283-5901
PIONEER EUROPE NV
Haven 1087, Keetberglaan 1, B-9120 Melsele, Belgium TEL: 03/570.05.11
PIONEER ELECTRONICS ASIACENTRE PTE. LTD.
253 Alexandra Road, #04-01, Singapore 159936 TEL: 65-6472-7555
PIONEER ELECTRONICS AUSTRALIA PTY. LTD.
178-184 Boundary Road, Braeside, Victoria 3195, Australia, TEL: (03) 9586-6300
PIONEER ELECTRONICS DE MEXICO S.A. DE C.V.
Blvd.Manuel Avila Camacho 138 10 piso Col.Lomas de Chapultepec, Mexico,D.F. 11000 TEL: 55-9178-4270
<04H00001>
Printed in Japan / Imprimé au Japon <ARB1566-A>