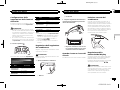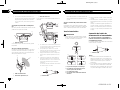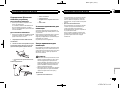
1
Black plate (1,1)
SPX-HUD01
English
Français
Italiano
NavGate HUD
Español
Deutsch
Installation and Quick Start Guide
Manuel d’installation et de démarrage rapide
Guida rapida all’avvio e di installazione
Guía de instalación e iniciación rápida
Installations- und Kurzanleitung
Installatie- en Snelstartgids
Руководство по установке и быстрому запуску
Nederlands
Русский
<CRD4765-A>1
Black plate (2,1)
Section
Precautions
Precautions
Preparation for installing the unit
When replacing the sun visor thickness
adjustment plate
11
Precautions
For the operation manual
2
Information for users on collection and
disposal of old equipment and used
batteries
2
Connection and installation
3
About this unit
4
Precautions for battery
4
If you experience problems
5
Installing Main Unit
After installation
16
Connecting the power cable to the cigarette
socket
16
Setting your iPhone or Android device
Connecting your iPhone or Android device
to the unit
17
Installing the navigation application
17
Starting the navigation application
17
Important safety information
To avoid battery exhaustion
6
If the screen is hard to see
6
Precautions for operation at high/low
temperatures
6
Notes on microSD memory cards
6
Notes on iPhone
6
Notes on Android devices
6
Copyrights
7
Software updates
7
Visit our website
7
Saved customer data
7
Notes on this unit
7
Display modes
When you finish with installation and
connection
Adjusting the display settings
18
– Position
18
– Zoom
18
– Rotation
19
– Aspect Ratio
19
– Geometric Correction
19
– White Balance
19
Parts supplied
Before connection
Precautions for connection
Connecting the power cable
Preventing noise
8
8
8
Precautions for installation
Before installing and securing unit
When securing the unit
9
Connections
Connection diagram
9
Seting the size of the cigarette plug
When replacing cigarette plug fuse
Installation position
Precautions for installing unit
Specified installation position
2
9
Before driving
Configuring the unit function
settings
20
Adjusting the angle of the combiner
20
When getting in and out of the
vehicle
20
Correct combiner position
20
Adjusting the display brightness
20
Important
! For your safety, be sure to ask your
dealer to install the unit to your vehicle, wire the cables, or change its installation location.
Installation, wiring, and disinstallation require special skills and experience. Incorrect installation, wiring, or disinstallation
of the unit, or using parts other than those
specified by the manufacturer may cause
an accident, injury, or malfunction. In this
case, Pioneer accepts no responsibility.
! To dealers
When you are finished with the installation
and wiring, proceed to set up the connection with the navigation unit and adjust
the display settings, etc.
When you are finished with all of the work,
hand over this manual to your customer.
For details on the functions and operation of
this unit, visit us at the following site:
http://www.pioneer.eu/navgatehud
Information for users on
collection and disposal of old
equipment and used batteries
(Symbol for equipment)
Thank you for purchasing this PIONEER
product
To ensure proper use, please read through this
manual before using this product. It is especially
important that you read and observe WARNINGs and CAUTIONs in this manual. Please
keep the manual in a safe and accessible place for
future reference.
(Symbol examples for batteries)
For the operation manual
This manual describes how to install and set up
this unit. Operation of this unit is explained in
the separate manual for the unit.
10
10
10
10
Engb
<CRD4765-A>2
Black plate (3,1)
Section
Precautions
For countries outside the
European Union:
!
!
!
!
!
If you wish to discard these items, please contact your local authorities or dealer and ask for
the correct method of disposal.
Connection and installation
!
WARNING
! Use this unit with a 12-volt battery and negative earthing only.
Do not use the unit for a 24-volt vehicle.
There is a risk of a fire or malfunction.
! Never install the unit and wire the cables to
places where it will impair the performance
of an airbag.
!
When installing the unit to a vehicle
equipped with airbags, ask the vehicle manufacturer for precautions for the installation
work. There is a risk of incorrect deployment
of airbags, resulting in a fatal accident.
Never install the unit to places where it will
obstruct the driver’s vision, interfere with
driving, or cause danger to the passengers.
There is a risk of a traffic accident and injury.
Never cut the insulation of the power cable
of this unit to share the power with other devices.
Exceeding the current capacity of the power
cable may result in a fire, electric shock, or
malfunction.
Never use the bolts and nuts of safety related
parts such as the steering, brake systems
and tank.
Using these may cause a brake failure, fire,
or traffic accident.
Do not install the unit to a sun visor whose
shape is not supported by the unit.
Installing the unit to a sun visor whose
shape is not supported by the unit may
cause an accident or malfunction.
Do not install the unit to a defective sun
visor.
Check if there are no defects on the sun visor
before installation. Installation to a defective
sun visor may cause the unit to fall, resulting
in an accident or malfunction.
Do not leave the unit in a place subject to direct sunlight.
Do not remove the combiner protection
sheet before the installation is completed.
The combiner may concentrate light into an
intense beam, causing smoke or fire.
For your safety, ask your dealer to install the
unit and wire the cables, or change the installation location.
!
!
!
!
!
!
!
Installation, wiring, and disinstallation of the
unit require special skills and experience. Incorrect installation, wiring, or disinstallation
of the unit may cause serious damage to the
vehicle.
Do not work in a place subject to direct sunlight.
Doing so may cause a burn injury or blindness.
Disconnect the negative terminal of the battery before installation.
Short circuiting the positive and negative terminals may cause electric shock or injury.
Check the location of the pipes, tank, electrical wiring, etc. before installation.
When installing the unit by drilling a hole in
the vehicle body, be careful not to interfere
with or contact the pipes, tank, electrical wiring, etc. Furthermore, protect the processed
parts from rusting or the penetration of
water.
Use the supplied parts and secure them
firmly.
Use of parts other than the supplied ones
may cause damage to other parts in the unit
or may not be able to firmly secure the unit.
If the unit comes loose, it may interfere with
driving, causing an accident and injury.
Install the supplied parts as specified.
If the supplied parts are not installed as
specified, the parts may come loose and
drop off, resulting in an accident or malfunction.
Use the supplied cables and connect them
securely.
Use the supplied cables and connect them
as specified. Use of cables other than the
supplied ones may cause a fire or malfunction.
Follow the instructions in this manual to connect and install the unit.
Failure to follow the instructions in this manual to connect and install the unit may cause
a fire or accident.
! Secure the unit to sun visor with a fall prevention belt.
Failure to do so may cause the unit to fall,
causing an accident and injury.
! Insulate an uninsulated part of the cable
with tape, etc.
A short-circuit may cause a fire, electric
shock, or malfunction.
! Wire the cables so that they do not get
caught on the vehicle body, screws, or moving parts such as a seat rail.
A disconnection or short-circuit may cause a
fire, electric shock, or malfunction.
! Wire and secure the cables so that they do
not interfere with driving.
Failure to do so may cause the cables to get
tangled around the steering wheel, gear
stick, brake pedal, etc., causing an accident.
! When you are finished with the installation
and wiring, check that the electric equipment works normally as it did before installing the unit.
Using the unit whilst other electric equipment does not work normally may cause a
fire, electric shock, or traffic accident.
! Store small parts such as screws out of the
reach of small children.
Should the parts be swallowed, consult a
doctor immediately.
English
These symbols on the products, packaging,
and/or accompanying documents mean that
used electrical and electronic products and
batteries should not be mixed with general
household waste.
For proper treatment, recovery and recycling of old products and used batteries,
please take them to applicable collection
points in accordance with your national
legislation.
By disposing of these products and batteries
correctly, you will help to save valuable resources and prevent any potential negative effects
on human health and the environment which
could otherwise arise from inappropriate waste
handling.
For more information about collection and recycling of old products and batteries, please contact your local municipality, your waste disposal
service or the point of sale where you purchased
the items.
These symbols are only valid in the European Union.
Precautions
CAUTION
! Never cut a cable part way along it.
If a fuse is connected to the cable, the protection circuit will not work, which may
cause a fire.
! When connecting cables, make sure that the
cables do not come into contact with hot
areas of the vehicle body.
There is a risk of a fire or electric shock.
! Do not wire cables using extension cords.
Doing so may cause the cable to overheat,
resulting in a fire or electric shock.
Engb
<CRD4765-A>3
3
Black plate (4,1)
Section
Precautions
! Do not install the unit in places subject to
conditions such as rain, water, condensation,
dust, and oily smoke.
Doing so may cause smoke, fire, or malfunction.
! When wiring, do not allow the cables to
come into contact with metal parts.
Allowing cables to come into contact with
metal parts may damage the cables, causing
a fire, electric shock, or malfunction.
About this unit
WARNING
! Do not operate the menus whilst driving. It
will divert your attention away from the safe
operation of your vehicle and may cause a
serious traffic accident. Always observe traffic conditions and pedestrians to ensure that
you drive safely.
! Do not stare at the displayed image whilst
driving.
Failure to keep your eyes on the road ahead
may cause an accident.
! Do not operate the sun visor whilst driving.
Doing so may cause a serious traffic accident. Park your vehicle in a safe location and
apply the hand brake before operating the
sun visor.
! Do not insert your hand or fingers or a foreign object into a media slot.
Doing so may cause an injury, electric
shock, fire, or malfunction.
! Do not allow this unit to come into contact
with liquids.
Doing so may cause smoke, fire, or electric
shock. Special attention is required in the
case of families with children.
4
Precautions
! If liquid or foreign matter should get inside
this unit, turn off the power immediately and
consult your dealer or the nearest authorised
PIONEER Service Station. Do not use the
unit in this condition because doing so may
result in fire, electric shock, or other failure.
! Do not leave the remote control, etc. lying
around.
When stopping the vehicle or turning a bend,
the remote control, etc. may roll toward your
feet and get under the brake pedal, interfering with driving and causing an accident.
! Do not affix film or a seal to the combiner.
Doing so may block the field of vision, causing an accident.
! Do not use the unit if there is an abnormality
or malfunction such as images not being
able to be displayed.
There is a risk of an unexpected accident,
fire, or electric shock.
! Do not allow children to hang on the unit or
apply force to it.
Doing so may cause an injury, vehicle deformation, or malfunction.
! When you hear thunder, do not touch the
unit.
There is a risk of an electric shock caused by
lightning.
! Do not disassemble or modify the unit.
There is a risk of an accident, fire, or electric
shock.
! Always obey the actual traffic regulations.
The unit contains traffic regulations data, but
some of the data may differ from the actual
traffic regulations due to changes to the traffic regulations. Even when using the route
maps or voice guidance of the navigation, always obey the local traffic regulations and
actual traffic signs when operating a vehicle.
Failure to do so may cause an accident or result in a violation of the road traffic laws.
! This unit disables operation of the unit whilst
the vehicle is in motion. Park the vehicle in a
safe place and apply a hand brake before operating the menus of this unit.
! Replace the fuse with a new one of the specified capacity (ampere).
Using a fuse exceeding the specified capacity may cause a fire or malfunction.
! Before using the unit at nighttime or in a
dark place such as in a tunnel, adjust the
brightness of the unit properly so that it will
not interfere with driving. Failure to do so
may cause an accident.
Should the battery be swallowed, consult a
doctor immediately.
! Install the battery according to the polarity
(positive and negative) specified in this manual.
If the battery polarity is not correct, there is a
risk of an injury or contamination of the environment due to the explosion of the battery
or leakage of the battery fluid.
! If the battery leakage occurs and the battery
fluid gets on your skin or clothes, wash it off
with clean water. If the battery fluid gets into
an eye, wash it out with clean water and consult a doctor immediately.
CAUTION
! Do not use the unit for any purpose other
than use in a vehicle.
Doing so may cause smoke, fire, electric
shock, or injury.
! Before driving, adjust the combiner angle
and display brightness, and check if screws
on the unit are not loose to prevent them
from interfering with driving.
Failure to do so may cause an accident.
! When operating the sun visor or buttons
whilst driving, pay sufficient attention to your
driving.
Failure to do so may cause an accident.
! When getting in and out of your vehicle, be
careful not to bang your head on the unit.
Failure to do so may cause an injury.
! Be careful not to let hands or fingers get
caught when you are closing the combiner
or adjusting the angle.
Failure to do so may cause an injury.
CAUTION
! Do not short-circuit, disassemble, or heat the
battery, or place it in fire or water.
Explosion of the battery or leakage of the battery fluid may cause a fire or injury.
! Do not charge a dry battery.
Explosion of the battery may cause an injury.
! Do not use a battery other than the specified
one.
Explosion of the battery or leakage of the battery fluid may cause an injury or contamination of the environment.
! Replace a used battery immediately with a
new one.
Leakage of the battery fluid may cause contamination of the environment.
! Do not store the remote control in high temperatures, high humidity, or direct sunlight.
Failure to do so may cause remote control
deformation, explosion of the battery, or leakage of the battery fluid.
Precautions for battery
WARNING
! Keep the battery out of the reach of small
children to prevent an accident from occurring.
Engb
<CRD4765-A>4
Black plate (5,1)
Section
Precautions
Important safety information
01
02
If you experience problems
! This unit is equipped with an interlock system that detects when the vehicle is moving
and disables operation of the unit whilst the
vehicle is in motion. Park the vehicle in a
safe place and apply a hand brake before operating this unit.
! If you experience tiredness or discomfort
whilst using this unit, stop use immediately
and take a long break to recover properly.
Continued use of the unit under such circumstances may have adverse effects on
your physical condition.
! If you are short-sighted or far-sighted, have
astigmatism or differing visual acuities between your left and right eyes, wear glasses,
etc. to properly correct visual acuity before
using this unit.
! Images displayed on the screen may be distorted momentarily when the displayed
image switches. This is not a malfunction.
! Images will not be displayed on the screen if
the GPS reception is lost.
! Images displayed on the screen may be distorted if an iPhone or Android device is
under heavy load.
! Positioning accuracy depends on the performance of GPS on an iPhone or Android
device connected to this unit.
! The direction along which a vehicle is travelling may not be displayed correctly if the
GPS accuracy is low.
! Firmly secure an iPhone or Android device
whilst driving. Do not let an iPhone or
Android device fall onto the floor, where it
may become jammed under the brake or accelerator pedal.
! Close the diffuser when not using the unit.
! When removing the unit from the sun visor
and storing it, be sure to close the diffuser
and combiner.
Do not leave the unit in places exposed to direct sunlight, such as on a dashboard. The
diffuser or combiner may concentrate light
into an intense beam, causing smoke or fire.
Engb
<CRD4765-A>5
English
WARNING
If you notice smoke, a strange noise or smell, or
any other abnormal signs from the unit, turn off
the power immediately and consult your dealer
or the nearest authorised PIONEER Service Station.
Using this unit in this condition may cause an
accident, fire, or electric shock.
! The unit does not work standalone. Connect
the unit with an iPhone or Android device on
which a navigation application is installed
before using it.
Read the safety precautions described in the
instruction manual of the product that is to
be connected to this unit.
! Do not operate this unit whilst driving. It will
divert your attention away from the safe operation of your vehicle and may cause a serious traffic accident. Always observe traffic
conditions and pedestrians to ensure that
you drive safely. Park your vehicle in a safe location and apply the hand brake before operating this unit.
! Do not operate the sun visor whilst driving.
Doing so may cause a serious traffic accident. Park your vehicle in a safe location and
apply the hand brake before operating the
sun visor.
! Do not operate an iPhone or Android device
whilst driving. Park your vehicle in a safe location and apply the hand brake before setting a route to your destination on an iPhone
or Android device.
! All functions available in the unit do not in
any way guarantee that your surroundings
are safe. When driving, be sure to check that
your surrounding is safe with your own eyes.
! The route information and voice guidance
provided by a navigation application are for
reference purposes only. Always obey the
local traffic regulations and actual traffic
signs when operating a vehicle. Failure to
comply could result in a violation of road traffic laws and cause a serious traffic accident
to occur. In addition, information relaying the
distance to a vehicle in front of your vehicle,
speed signs, and red light cameras displayed
by this unit is for reference purposes only.
Obey actual traffic signs and driving conditions.
5
Black plate (6,1)
Section
02
Important safety information
! The taillight of the vehicle in front may be reflected on the combiner.
! Pioneer accepts no responsibility for any
fluctuations in the value or appraisal of the
vehicle, etc.
To avoid battery exhaustion
! Be sure to keep the vehicle engine running
whilst using this unit. Using this unit with
the vehicle engine turned off can drain the
battery.
Do not allow the vehicle engine to idle for
longer than necessary whilst parked to minimize effects on the surrounding environment.
! If the unit does not turn off (the LED indicator
on the cigarette plug of the power cable remains lit) when the vehicle engine is turned
off, disconnect the power cable from the cigarette socket on the vehicle. Failure to do so
will drain the vehicle battery.
If the screen is hard to see
! This unit has a range of angles that the images on the screen can be clearly seen. Adjust the angle of the combiner (page 20) and
the display settings (page 18) when using
this unit for the first time to optimise the visibility and clarity of displayed images. You can
adjust the display brightness using the
/ button (page 20).
! The display brightness differs depending on
the viewing angle. Use the unit at the position where you can clearly see the displayed
image.
6
Precautions for operation at
high/low temperatures
! If the temperature is too high or too low for
the unit to operate properly, the display
brightness will be lowered or the projection
of images will be stopped automatically to
protect the unit parts. This is not a malfunction. Wait until the temperature returns to
the proper temperature for the unit to operate.
! This unit will not operate properly if the temperature is too high or too low. Operate the
unit within the specified operable temperature range.
For details, refer to the operation manual.
Notes on microSD memory
cards
! This unit supports microSD memory cards
and microSDHC memory cards. These types
of storage media are collectively referred to
as “SD memory card” in this guide.
! This unit does not support microSDXC memory cards.
! Pioneer does not guarantee the operation of
all of the types of SD memory cards compatible with this unit.
! Do not eject an SD memory card or change
the position of the ignition switch whilst the
inserted SD memory card is being accessed.
It may corrupt the data stored on the SD
memory card. Pioneer accepts no liability for
any damages arising in such cases.
! SD memory cards have a set lifespan. Even if
an SD memory card has been used properly,
data may not be able to be written to or deleted from the SD memory card correctly
once the card has reached the end of its useful life.
Important safety information
! Some SD memory cards may not be recognised by this unit even if the SD memory
cards can be recognised by a computer. Formatting the SD memory cards using a dedicated formatter may resolve the problem. SD
memory cards formatted using the standard
formatting function on a computer do not
comply with the SD standard. Problems such
as that those cards cannot be read or written
could occur. It is recommended that you use
a dedicated formatter to avoid such problems. All of the data stored on an SD memory card will be deleted when the card is
formatted. Back up any needed data beforehand as necessary. A dedicated formatter for
SD memory cards can be obtained from the
following site.
https://www.sdcard.org/home/
(Valid as of June 2012)
! Pioneer cannot guarantee repair of an SD
memory card with defects caused by the SD
memory card being formatted. In addition,
Pioneer accepts no liability for damages,
costs or expenses arising from data loss or
corruption occurring due to the SD memory
card being formatted. Read the instruction
manual for the formatter and follow the instructions given to format the SD memory
card that you plan to use, accepting responsibility yourself for any problems that may
occur.
Notes on iPhone
! For the iPhone models and iPhone software
versions supported by this product, refer to
the information on our website.
! The iPhone models compatible with this unit
are collectively referred to as “iPhone” in this
guide.
! Pioneer does not guarantee the operation of
all of the types of iPhone models compatible
with this unit.
! Pioneer accepts no liability for any data loss
that may occur with use of an iPhone with
this unit.
! Do not leave an iPhone in direct sunlight for
long periods of time. It may cause the
iPhone to malfunction.
! Do not leave an iPhone in high temperatures.
! For details on the iPhone, refer to the iPhone
manuals.
Notes on Android devices
! For the Android devices supported by this
product, refer to the information on our website.
! Compatibility with all Android devices is not
guaranteed.
! Certain uses of an Android device may not
be legal whilst driving in your jurisdiction, so
you must be aware of and obey any such restrictions.
If in doubt as to a particular function, only
perform it whilst the vehicle is parked.
No feature should be used unless it is safe to
do so under the driving conditions you are
experiencing.
! Pioneer accepts no liability for any data loss
that may occur with use of an Android device
with this unit.
! Do not leave an Android device in direct sunlight for long periods of time. It may cause
the device to malfunction.
! Do not leave an Android device in high temperatures.
! For details on Android devices, refer to the
Android device manuals.
Engb
<CRD4765-A>6
Black plate (7,1)
Section
Important safety information
Copyrights
! Settings registered to this unit may be altered or deleted automatically by accident,
due to unit malfunction, as part of the repair
process, or whilst other procedures are
being performed. Retain a list of important
contents. Pioneer accepts no liability for
damages or lost benefits arising from data
loss in such cases.
! Pioneer does not provide a service to recover
damaged or erased data.
02
! The screen display design is subject to
change without prior notice for product improvement purposes.
English
Copyrights to the data and programmes included with this product are the property of
Pioneer or of the third parties have granted
rights to Pioneer to the use of such data or programmes under copyright. You shall not copy,
modify or analyze any part or all of the data or
programmes of this product in any form.
Important safety information
Software updates
! An SD memory card with a capacity of at
least 2 GB is required for saving the software
update file.
! A microSD memory card containing the latest updated software version will be available
once a year for customers do not have Internet access.
Details will be posted on the website.
Visit our website
Visit us at the following site:
http://www.pioneer.co.uk
! Register your product. We will keep the details of your purchase on file to help you refer
to this information in the event of an insurance claim such as loss or theft.
! We offer the latest information about
PIONEER CORPORATION on our website.
Saved customer data
! In cases where unit repairs are needed, etc.,
Pioneer accepts no responsibility for software updates performed by the customer.
Notes on this unit
! The operating history of this unit is recorded
for performance improvement purposes. No
customer information is obtained during the
recording of this history. The recorded information can be shared with other facilities or
subcontractors specified by Pioneer for data
analysis only if permission from the customer is obtained in advance.
! Pioneer has tested and confirmed that projected images can be seen at a distance of
3 m from the front of the windscreen of the
vehicle. However, distances may appear different depending on the driver’s seating
height and seat position, the height and tilt
of the vehicle’s ceiling, and the amount of
ambient light.
! Pioneer does not guarantee that the product
conforms to the particular purpose of a specific user.
! Unit specifications and designs are subject
to change without prior notice for product
improvement purposes. Pioneer does not accept or even acknowledge customer requests
for product modification or exchange to accommodate specific customer needs for
products that match the specifications and
designs described herein.
! The screen images in this manual may differ
from those for the actual product.
Engb
<CRD4765-A>7
7
Black plate (8,1)
Section
03
Parts supplied
Before connection
04
Precautions for connection
Head-up display unit:
CAUTION
Power cable x 1
Main unit x 1
! Do not take accessory power from the CAN
Bus interface, etc. Be sure to connect to the
accessory power supply of the vehicle.
! Install the supplied parts as specified.
Use of parts other than the supplied ones
may cause a malfunction.
! Do not tie the aerials together, stack them, or
cross them over each other.
Noise received by the aerial and aerial cable
reduces reception sensitivity.
Connecting the power cable
Sun visor cushion x 1
Mounting bracket x 1
Double-sided tape x 1
HUD remote control:
! Firmly connect the power cable by inserting
it into the power connector on the unit. If the
connector cannot be inserted smoothly, the
orientation may not be correct. Check the orientation of the connector. Do not use force
to push it in. Doing so may cause a malfunction.
Sun visor thickness adjustment
plate (large) x 1
Main unit x 1
(A lithium ion battery is preinstalled. Remove
the insulation sheet before using the unit.)
Sun visor thickness adjustment
plate (small) x 1
Mounting screw x 6
Hexagonal spanner x 1
8
Preventing noise
! To prevent noise, place the following items as
far from an iPhone, an Android device, and
other cables and cords as possible.
— Film aerial and aerial cable
— FM/AM aerial and its aerial cable
— GPS aerial and its aerial cable
— Beacon receiver and its aerial cable
— Power cable
Place the aerials as far from each other as
possible.
Engb
<CRD4765-A>8
Black plate (9,1)
Section
Precautions for installation
Connections
05
06
! Secure the unit to sun visor with a fall prevention belt.
Failure to do so may cause the unit to fall,
causing an accident and injury.
! When installing the unit to a vehicle
equipped with airbags, never install the unit
on the cover of an airbag or in a place where
it will interfere with the deployment of an airbag. Doing so may prevent the airbag from
deploying normally, or the deployed airbag
may hit the unit, causing an accident and injury.
! Do not work in a place subject to direct sunlight. Doing so may cause a burn injury.
Furthermore, there is a risk of blindness
caused by exposure to sunlight reflected
from the combiner. If the combiner is exposed to direct sunlight, close the combiner.
! Do not leave the unit in a place subject to direct sunlight.
Do not remove the combiner protection
sheet before the installation is completed.
The combiner may concentrate light into an
intense beam, causing smoke or fire.
! Never install the unit to a vehicle equipped
with a sunroof or to a convertible. Sunlight
may be reflected by the combiner and concentrated into an intense beam.
! Do not use the sun visor on the side window
with this unit mounted on it.
CAUTION
Connection diagram
! When installing the unit to a vehicle
equipped with airbags, ask the vehicle manufacturer for precautions for the installation
work. There is a risk of incorrect deployment
of airbags, resulting in a fatal accident.
! A sun visor light and other optional accessories around the sun visor such as a card
holder and sun visor mirror may not be able
to be used after installing the unit. Check the
accessories in the vehicle beforehand.
! The installation of the unit may leave marks
on the surface of the sun visor.
! This unit is not supposed to be installed on
the passenger seat.
! Parts, dust, etc. may fall on you whilst you
are installing the unit. To prevent dust, etc.
from getting into an eye, do not look up at
the unit from directly below whilst installing
the unit.
! The diffuser and combiner of the unit are delicate parts. Do not touch them with bare
hands or cause a tool to come into contact
with them whilst installing the unit.
1
2
When securing the unit
! Recommended tightening torque for securing the unit with screws is from 0.36 N•m to
0.59 N•m.
! Before applying the double-sided tape to the
connection box of the power cable, thoroughly wipe off any dirt from the surface to
which the double-sided tape is to be applied.
4
3
6
5
Before installing and
securing unit
First connect the unit temporarily to check that
the unit works normally, and then install the
unit. If the unit does not work normally, check if
the connection is correct.
English
WARNING
1
2
3
4
5
6
7
iPhone or Android device
USB cable
Power cable
To the power connector
LED indicator
Plug size switch
To the cigarette socket
7
For iPhone users
! Use the cable (2) supplied with the iPhone.
Do not leave the cable in the vehicle. The
cable supplied with the iPhone is not designed for use in a vehicle.
For Android device users
! Use a USB-microUSB data communication
cable (2) of 1 m or less. A charge cable cannot be used.
Engb
<CRD4765-A>9
9
Black plate (10,1)
Section
06
Connections
Installation position
07
Notes
! The LED indicator on the cigarette plug lights
when the power is on, and turns off when the
unit is turned off.
If the LED indicator does not turn off when
the vehicle engine is turned off, disconnect
the power cable from the cigarette socket on
the vehicle. Failure to do so will drain the vehicle battery.
! For details on connecting an iPhone or
Android device, refer to Setting your iPhone
or Android device on page 17.
When replacing cigarette
plug fuse
Precautions for installing unit
1 Turn the plug counterclockwise to loosen
it.
! Use the supplied screws and install the unit
as specified. Use of screws other than the
supplied ones may cause damage to the
unit.
! Secure the unit to the sun visor firmly using
the supplied screws. Failure to do so may
cause the unit to fall during driving, hitting a
head and causing an injury.
! Read this manual fully and carefully, and install the unit correctly to abide by the safety
standards.
1
Seting the size of the
cigarette plug
Set the cigarette plug size to L (large) or S
(small) according to the size of the cigarette
socket on the vehicle.
1
1 Fuse (3 A)
2 Replace the fuse with a new one with
the same capacity.
WARNING
Specified installation position
CAUTION
Install the unit in the specified installation position to provide the driver with a safe field of vision and ensure the unit can perform its
required functions. Installing the unit in a position other than the specified one may not meet
the safety standards for road trucking vehicles,
and the vehicle may fail a safety inspection, for
example, due to a maintenance error.
1 Plug size switch
1
2
1 Main unit
2 Power cable
10
Engb
<CRD4765-A>10
Black plate (11,1)
Section
Preparation for installing the unit
1 Check the sun visor.
Check the thickness of the sun visor to install
the unit to.
The unit can be installed to sun visors that meet
the following specifications.
Sun Visor Thickness
Sun visor thickness adjustment plate
15 mm to 20 mm
Sun visor thickness adjustment plate (small)
20 mm to 26.5 mm
Sun visor thickness adjustment plate (medium)
26.5 mm to 33 mm
Sun visor thickness adjustment plate (large)
1
08
4 Align the screw holes on the sun visor
thickness adjustment plate with those on
the mounting bracket, and tighten the remaining screws that were removed at the
original positions.
2
3
English
CAUTION
Do not install the unit to an unstable or defective
sun visor. Doing so may cause the unit to fall, resulting in an accident or malfunction.
Preparation for installing the unit
T
When replacing the sun visor
thickness adjustment plate
A
Y
H
1 Pull the HUD lock lever, and slide it to the
lock-release position.
1
T: Thickness
15 mm to 33 mm
H: Height
140 mm to 240 mm
A: Distance between
support points
185 mm or more
Y: Distance to the
mirror, etc.
45 mm or more (recommended)
2 Check the sun visor thickness adjustment
plate to be used.
The size of the sun visor thickness adjustment
plate to be mounted to the mounting bracket differs depending on the sun visor thickness.
This unit comes with the sun visor thickness adjustment plate (medium) premounted.
Use the sun visor thickness adjustment plate of
the size matching the sun visor thickness.
1 Sun visor thickness adjustment plate
2 Longitudinal direction adjustment
screws
3 Longitudinal direction adjustment plate
3 Attach the longitudinal direction adjustment plate to the sun visor thickness adjustment plate to be used.
2
1 Lock-release position
2 HUD lock lever
2 Remove the eight screws including longitudinal direction adjustment screws (shown
in the illustration) on the mounting bracket,
and then remove the sun visor thickness adjustment plate (medium).
If the longitudinal direction adjustment screws
are removed, the longitudinal direction adjustment plate is removed from the sun visor thickness adjustment plate.
1
3
2
1 Sun visor thickness adjustment plate
2 Longitudinal direction adjustment
screws
3 Longitudinal direction adjustment plate
Engb
<CRD4765-A>11
11
Black plate (12,1)
Section
09
Installing Main Unit
Installing Main Unit
2 22 mm
3 24 mm
4 26 mm
1 Align the HUD lock lever to the lock-release position.
Pull the HUD lock lever, and slide it to the lockrelease position.
1
2
1 Lock-release position
2 HUD lock lever
! Do not hold the moving part on the mounting
bracket when operating the HUD lock lever. If
holding the moving part, the HUD lock lever
cannot be moved.
3 Adjust the mounting bracket thickness.
Align the lines on the mounting bracket to the
scale marks located at the left and right on the
sun visor thickness adjustment plate according
to the thickness of the sun visor, and then tighten three screws.
2
1
1
1
1 Mounting bracket
2 Sun visor thickness adjustment plate
! The approximate figures for the scale marks
on the sun visor thickness adjustment plate
(medium) are as follows (the illustration
shows the line on the mounting bracket is
aligned to the scale mark of 22 mm).
1
1 Moving part
2
3
2 Release the lock plates on the mounting
bracket.
Pull the lock plates on the mounting bracket to
the left and right to release the lock.
4
1 20 mm
12
4 Mount the mounting bracket to the sun
visor.
Push the sun visor up to the horizontal position.
Hold the left and right ends of lock plates on the
mounting bracket, and mount the mounting
bracket to the sun visor by pushing the mounting bracket all the way in.
! If the mounting bracket cannot be fully
pushed in, the mounting bracket thickness
needs to be increased. Remove the mounting
bracket from the sun visor, return to step 3
and adjust the scale position, and then
mount the mounting bracket to the sun visor
again.
! If the lock plates cannot be fully pushed in,
the mounting bracket thickness needs to be
increased. Remove the mounting bracket
from the sun visor, return to step 3 and adjust
the scale position, and then mount the
mounting bracket to the sun visor again.
7 Check that the mounting bracket is
mounted securely.
Push the sun visor back to the horizontal position.
Push the mounting bracket back and forth to
make sure that the mounting bracket is
mounted securely.
5 Push the sun visor down to the vertical
position.
6 Lock the mounting bracket.
Push in the lock plates from the left and right
firmly to lock the mounting bracket.
! If the mounting bracket can be removed from
the sun visor easily, the mounting bracket
thickness needs to be decreased. Remove the
mounting bracket from the sun visor, return
to step 3 and adjust the scale position, and
then mount the mounting bracket to the sun
visor again.
8 Remove the mounting bracket.
Push the sun visor down to the vertical position
and pull the lock plates to the left and right to release the lock.
Push the sun visor up to the horizontal position
and remove the mounting bracket from the sun
visor.
Engb
<CRD4765-A>12
Black plate (13,1)
Section
Installing Main Unit
10 Mount the mounting bracket of which
thickness was adjusted to the main unit.
Check that the diffuser and combiner of the
main unit are closed, and align the HUD lock
lever on the mounting bracket to the lock-release position.
Main unit:
2
2
1 Align the bosses with the groove.
2 Groove
Mounting bracket:
1
11 Loosen the four mounting screws that
were secured in step 10 one turn.
1 Lock-release position
2 HUD lock lever
15 Secure the unit to sun visor with a fall
prevention belt.
Pull the fall prevention belt forward from the
back of the sun visor that was pushed down to
the vertical position.
Secure the mounting bracket and main unit at
four places at the front and back using the supplied mounting screws.
Main unit front:
1
14 Push the sun visor down to the vertical
position.
12 Loosen the longitudinal direction adjustment screws on the unit one turn.
Main unit front:
2
! If the mounting bracket can be mounted to
the sun visor easily whilst the lock plates are
locked, the mounting bracket thickness is not
appropriate.
Remove the mounting bracket from the sun
visor, return to step 3 and adjust the scale position, and then mount the mounting bracket
to the sun visor again.
1
Hold the left and right ends of lock plates on the
mounting bracket, and mount the unit to the
sun visor by pushing the mounting bracket all
the way in.
1
1 Combiner
2 Diffuser
If the mounting bracket cannot be mounted to
the sun visor easily, the thickness is correct.
2 Align the bosses with the groove.
Main unit back:
09
English
9 Check if the adjusted thickness of the
mounting bracket is appropriate.
Push in the lock plates on the mounting bracket
from the left and right firmly to lock it.
Check that the mounting bracket cannot be
mounted to the sun visor easily whilst the lock
plates are locked.
Installing Main Unit
2
13 Mount the unit to the sun visor.
Pull the lock plates on the mounting bracket to
the left and right to release the lock.
Push the sun visor up to the horizontal position.
1 Groove
Engb
<CRD4765-A>13
13
Black plate (14,1)
Section
09
Installing Main Unit
Installing Main Unit
Pass the fall prevention belt through as shown
in the illustration.
Left
Right Left
Right
Tilt the sun visor vertically about 20 degrees and
firmly tighten the two mounting screws at the
back of the main unit that were loosened in step
11.
Pull the fall prevention belt downward and secure it as it is pulled downward.
1
17 Push the sun visor up to the horizontal
position.
! If the combiner protection sheet interferes
with the adjustment, remove the protection
sheet. Attach the combiner protection sheet
again after the adjustment is finished.
1 Align the unit in the travelling direction
18 Lock the main unit position.
Pull the HUD lock lever, and slide it to the lock
position.
20 Adjust the direction of the main unit.
Open the diffuser and combiner of the main
unit.
1
16 Lock the mounting bracket.
Push in the lock plates from the left and right
firmly to lock the mounting bracket.
1
1
2
1 Lock position
The main unit slides forward and the unit position is locked.
19 Adjust the tilt of the main unit.
Adjust the angle to level the main unit.
14
1 Diffuser
2 Combiner
Adjust the direction of the main unit to align the
diffuser and combiner in the travelling direction.
1 Adjust the combiner so that the diffuser
can be displayed in the centre of the
combiner.
! Be sure to adjust the main unit is to be
aligned in the travelling direction.
21 Unlock the main unit position.
Pull the HUD lock lever, and slide it to the lockrelease position.
Engb
<CRD4765-A>14
Black plate (15,1)
Section
Installing Main Unit
Installing Main Unit
1 Lock-release position
2
1
3
! Adjust the power cable so that it will not obstruct the driver’s vision.
! Route the cable so that it will not interfere
with the backward and forward movement of
the main unit when operating the HUD lock
lever.
4
1
The main unit slides backward and the unit position is unlocked.
22 Remove the unit from the sun visor.
Close the diffuser and combiner of the main
unit, and then push the sun visor down to the
vertical position.
Pull the lock plates on the mounting bracket to
the left and right to release the lock. Unlock the
fall prevention belt. Push the sun visor up to the
horizontal position, and then remove the mounting bracket from the sun visor.
! Be careful not to cause the unit to fall out.
23 Firmly tighten the mounting screws at
the front of the main unit.
Firmly tighten the two mounting screws at the
front of the main unit that were loosened in step
11 and the two longitudinal direction adjustment
screws that were loosened in step 12.
2
1 Vehicle’s ceiling
2 Sun visor
3 Gap between the vehicle’s ceiling and
sun visor
4 No gap between the vehicle’s ceiling
and sun visor
! When attaching a sun visor cushion, affix the
sun visor cushion to the sun visor cushion
holder, attach it to the fall prevention belt,
and then secure the fall prevention belt.
1 Sun visor cushion
2 Fall prevention belt
25 Connect the power cable to the unit.
Route the power cable by fixing the points with
clamps commercially available.
1
1
2
1 Power cable
1
3
1 Fall prevention belt
2 Sun visor cushion
3 Sun visor cushion holder
24 Mount the unit to the sun visor.
Perform the operation from steps 13 to 17 to
mount the unit to the sun visor.
English
1
! Align the HUD lock lever to the lock-release
position before mounting the unit to the sun
visor.
! If there is a gap between the vehicle’s ceiling
and sun visor when the sun visor is in the
horizontal position, attach the sun visor cushion to the fall prevention belt.
09
26 Route the power cable.
Route the power cable so that the cable will not
interfere with driving, and ensure the driver has
a safe field of vision.
1 Fix the cable with clamps commercially
available.
! Do not affix or mount the cable to the windscreen.
! Do not route the power cable at the foot of
the driver’s seat. There is a risk that the
power cable gets trapped under the brake
pedal and interferes with driving, resulting in
a serious accident.
27 Lock the main unit position.
Pull the HUD lock lever, and slide it to the lock
position.
Engb
<CRD4765-A>15
15
Black plate (16,1)
Section
09
Installing Main Unit
Installing Main Unit
1
29 Remove the combiner protection sheet.
Check that the power cable is connected and
routed correctly, and then remove the combiner
protection sheet.
After installation
1 Lock position
CAUTION
! Check if the unit is installed correctly. In the
following cases, return to step 1 and install
the unit correctly.
The main unit slides forward and the unit position is locked.
28 Secure the power cable.
Attach the double-sided tape to the connection
box of the power cable, and then attach the connection box to a location where the cable can be
secured firmly.
1
2
3
1 Power cable
2 Dashboard side etc.
3 Double-sided tape
! Never install the power cable in a location
where the cable cannot be secured due to vehicle vibration, etc.
! If the cable cannot be secured with the supplied double-sided tape, secure it firmly using
commercially available double-sided tape,
etc.
! Firmly secure an iPhone or Android device in
a holder commercially available.
! Insert the cigarette plug of the power cable
into the cigarette socket on the vehicle with
the LED indicator face-up so that the driver
can see it.
The LED indicator on the cigarette plug lights
green if the power is turned on.
1
Fix the cable with clamps commercially available.
! When removing the unit from the sun visor
and storing it, be sure to close the diffuser
and combiner.
Do not leave the unit in places exposed to direct sunlight, such as on a dashboard. The
diffuser or combiner may concentrate light
into an intense beam, causing smoke or fire.
Connecting the power cable
to the cigarette socket
% Firmly connect the cigarette plug of the
power cable by inserting it into the cigarette
socket on the vehicle.
The LED indicator on the cigarette plug lights
green if the power is turned on.
1
1
2
1 LED indicator
3
4
1 The lock plates are not fixed.
2 The unit is not secured with a fall prevention belt.
3 The unit is installed obliquely.
4 Position of the unit is installed reversed.
Notes
! Insert the cigarette plug of the power cable
into the cigarette socket on the vehicle with
the LED indicator face-up so that the driver
can see it.
! If the LED indicator does not turn off when
the vehicle engine is turned off, disconnect
the power cable from the cigarette socket on
the vehicle. Failure to do so will drain the vehicle battery.
! Close the diffuser when not using the unit.
1 LED indicator
For more details, refer to Connecting the
power cable to the cigarette socket on page 16.
16
Engb
<CRD4765-A>16
Black plate (17,1)
Section
Setting your iPhone or Android device
For iPhone users
! Use the cable supplied with the iPhone.
Do not leave the cable in the vehicle. The
cable supplied with the iPhone is not designed for use in a vehicle.
For Android device users
! Use a USB-microUSB data communication
cable of 1 m or less. A charge cable cannot
be used.
1 Connect the USB cable to your iPhone or
Android device.
2 Connect the other end of USB cable
firmly to the connection box of the power
cable.
1
4 USB cable
Installing the navigation
application
Install the navigation application to your iPhone
or Android device before utilising this unit.
You can download the navigation application
from iTunes App Store or Google Play.
For more details on navigation application, refer
to the following site.
http://www.pioneer.eu/navgatehud
10
If the application does not start automatically
when the Android device is connected to the
unit, tap the application in the popup that appears on the Android device.
If you select the check box and then select
the application in the popup, the popup will
not appear from the next time.
English
Connecting your iPhone or
Android device to the unit
Setting your iPhone or Android device
Starting the navigation
application
When you use the navigation application for the
first time, start the application yourself. The application will start automatically from the next
time the iPhone or Android device is connected
to the unit.
CAUTION
1 Connection box of the power cable
Connection overview:
1
2
3
4
! For utilising the navigation application, you
need to purchase the NavGate HUD Support
first. Purchase the NavGate HUD Support in
the application by following the instructions
on the screen.
! The internet connection is required to purchase the NavGate HUD Support.
Notes
! For iPhone users
If the application does not start automatically
when the iPhone is connected to the unit,
tap “Allow” in the popup that appears on the
iPhone.
! For Android device users
1 iPhone or Android device
2 To the cigarette socket
3 Connection box of the power cable
Engb
<CRD4765-A>17
17
Black plate (18,1)
Section
11
Display modes
When you finish with installation and connection
12
Five types of view are available for this unit: AR view (low speed mode and high speed mode), list view (low
speed mode and high speed mode), junction view, route overview, and clock view.
If the communication between the unit and the navigation application is established, either of the following
views appears.
Adjusting the display settings
When you finish with the installation and connection, turn on the unit (start the vehicle engine) and adjust the combiner angle so that the
image can be seen.
1 Press the a/b button to select a setting
item, and then press the d button.
List view
AR view
Low speed mode
Low speed mode
Press ◀.
High speed mode
High speed mode
Press ▶.
If a vehicle approaches a junction
If a vehicle approaches a junction
Note
The screen may not be able to be seen clearly
depending on the screen brightness and surrounding conditions. Adjust the screen brightness properly (refer to Adjusting the display
brightness on page 20), or move the vehicle to a
location where the display is more clearly visible,
and then operate the unit.
1
Press the
If the
button is pressed
when a destination is specified:
Description
Horizontal Position
Select to adjust the horizontal position of the displayed
image.
Vertical Position
Select to adjust the vertical
position of the displayed
image.
button.
2 Press the a/b button to display the grid
pattern in its entirety.
Ex.: When it is correctly adjusted
Junction view
Route overview
Setting item
Clock view
2 Press the a/b button to select Display
Settings, and then press the d button.
Ex.: When it is not correctly adjusted
If the
button is pressed
when a destination is not specified:
Zoom
3 Press the a/b button to select a setting
item, and then press the d button.
Adjust the size of the displayed image.
% Press the a/b button to display the grid
pattern in its entirety.
Notes
! The low speed mode of the AR view is displayed when a destination is not specified.
! For more details on the views, refer to the operation manual.
Position
Adjust the position of the displayed image.
18
Engb
<CRD4765-A>18
Black plate (19,1)
Section
When you finish with installation and connection
Rotation
% Press the a/b button to level the grid
pattern.
Ex.: When it is correctly adjusted
Setting item
Description
Trapezoidal Distortion
Select to correct the trapezoidal distortion.
Smile Distortion
Select to correct the smile
distortion.
12
2 Press the a/b button to adjust the
brightness.
Ex.: Adjusting the red colour
English
Adjust the rotation of the displayed image.
When you finish with installation and connection
2 Press the a/b button to make the grid
pattern rectangular.
Ex.: Adjusting the trapezoidal distortion
Ex.: When it is not correctly adjusted
White Balance
Aspect Ratio
Adjust the aspect ratio of the displayed image.
% Press the a/b button to make the grid
pattern rectangular.
Geometric Correction
Adjust the white balance of the displayed
image.
1 Press the a/b button to select a setting
item, and then press the d button.
Setting item
Description
Correct the distortion of the displayed image.
Red
Select to adjust the red
tones.
1 Press the a/b button to select a setting
item, and then press the d button.
Green
Select to adjust the green
tones.
Blue
Select to adjust the blue
tones.
Engb
<CRD4765-A>19
19
Black plate (20,1)
Section
13
Before driving
Before driving
Configuring the unit
function settings
Unit function settings can be configured from
the Settings screen.
CAUTION
! This unit disables operation of the unit whilst
the vehicle is in motion. Park the vehicle in a
safe place and apply a hand brake before operating this unit.
! If the vehicle starts moving whilst setting the
unit functions, the Settings screen will close
automatically.
% Press the
Notes
! Function Settings can only be set when the
communication with the navigation application has been established.
! Press the
button to close the Settings
screen.
! For details, refer to the operation manual.
2 Adjust the combiner angle so that the
whole diffuser can be reflected on the
combiner.
Adjusting the angle of the
combiner
Adjust the angle of the combiner to the seat position.
Hold onto the edges of the combiner when adjusting the angle.
1
The Settings screen appears.
Open the diffuser and combiner.
1
1 Adjust the combiner so that the diffuser
can be displayed in the centre of the
combiner.
When getting in and out of
the vehicle
1
Be careful not to bang your head on the unit.
2
20
Before use, be sure to check that the lower end
of the combiner is above your line of sight when
you sit in the seat and look straight forward in
the actual driving position. If the lower end of
the combiner is below your line of sight, do not
use the unit. Fold the combiner into the storage
position to ensure field of vision for driving.
CAUTION
button.
Menu
Correct combiner position
Description
Display Settings
Adjust the display settings
for projected images.
Function Settings
Set the function settings.
Language
Set the display language.
About
Confirm the unit software
version and legal notices.
Reset All Settings
Restore the default settings.
1 Diffuser
2 Combiner
Adjusting the display
brightness
The dimmer function on this unit adjusts the
display brightness automatically according to
the amount of ambient light.
The display brightness can be adjusted manually using the / button.
CAUTION
Before using the unit at nighttime or in a dark
place such as in a tunnel, adjust the brightness
of the unit properly so that it will not interfere
with driving. Failure to do so may cause an accident.
Engb
<CRD4765-A>20
Black plate (21,1)
Section
Before driving
% Press the
/
13
button.
English
Note
Changing the brightness may also cause the
display hue to change.
Engb
<CRD4765-A>21
21
Black plate (22,1)
Section
Précautions
Précautions
Précautions
Remarque sur le manuel de
fonctionnement
22
Information à destination des utilisateurs
sur la collecte et l’élimination des
équipements et batteries usagés
22
Connexion et installation
23
Quelques mots sur cet appareil
24
Précautions relatives à la batterie
25
Si vous rencontrez des problèmes
25
Consignes importantes de sécurité
Pour éviter l’épuisement de la
batterie
26
Si l’écran est difficile à consulter
26
Précautions d’utilisation à des températures
élevées/faibles
26
Remarques sur les cartes mémoire
SD
26
Remarques sur l’iPhone
26
Remarques sur les périphériques
Android
27
Droits d’auteur
27
Mises à jour logicielles
27
Visitez notre site Web
27
Données client enregistrées
27
Remarques sur cet appareil
27
Pièces fournies
Avant de procéder au raccordement
Précautions de raccordement
28
Connexion du câble d’alimentation
28
Prévention contre le bruit
28
Précautions d’installation
Avant d’installer et de fixer l’appareil
Lors de la fixation de l’appareil
29
29
Connexions
Schéma de connexion
30
Réglage de la taille de la fiche allumecigare
30
Lors du remplacement du fusible de la fiche
allume-cigare
30
22
Position d’installation
Précautions d’installation de
l’appareil
31
Position d’installation indiquée
31
Préparation à l’installation de l’appareil
Lors du remplacement de la plaque de
réglage d’épaisseur du pare-soleil
31
Installation de l’appareil principal
Après l’installation
37
Raccordement du câble d’alimentation à
l’allume-cigare
37
Réglage de votre iPhone ou
périphérique Android
Raccordement de votre iPhone ou
périphérique Android à l’appareil
Installation de l’application de
navigation
37
Démarrage de l’application de
navigation
37
37
Modes d’affichage
Lorsque l’installation et le raccordement
sont terminés
Ajustement des réglages d’affichage
39
– Position
39
– Zoom
39
– Rotation
39
– Aspect Ratio
39
– Correction géométrique
39
– Balance des blancs
39
Avant de conduire
Configuration des réglages de fonction de
l’appareil
40
Réglage de l’angle du multiplexeur
40
Lors de l’entrée et de la sortie du
véhicule
41
Position appropriée du multiplexeur
41
Réglage de la luminosité d’affichage
41
Important
! Pour votre sécurité, demandez à votre
revendeur d’installer l’appareil dans
votre véhicule, de brancher les câbles
ou de changer l’emplacement d’installation.
L’installation, le câblage et la désinstallation requièrent des compétences et une
expérience spécifiques. L’installation, le
câblage ou la désinstallation incorrect(e)
de l’appareil ou l’utilisation de pièces autres que celles spécifiées par le fabricant
peut provoquer un accident, des blessures
ou un dysfonctionnement. Dans ce cas de
figure, Pioneer décline toute responsabilité.
! À l’attention des revendeurs
Une fois l’installation et le câblage terminés, procédez à la configuration de la
connexion avec l’unité de navigation et
ajustez les réglages d’affichage, etc.
Une fois toutes les opérations terminées,
confiez ce mode d’emploi à votre client.
Nous vous remercions d’avoir acheté cet appareil PIONEER
Pour garantir une utilisation correcte, lisez bien
ce mode d’emploi avant d’utiliser cet appareil. Il
est particulièrement important que vous lisiez et
respectiez les indications ATTENTION et PRÉCAUTION de ce mode d’emploi. Conservez-le
dans un endroit sûr et facilement accessible pour
toute consultation ultérieure.
Pour plus de détails sur les fonctions et le fonctionnement de cet appareil, visitez notre site :
http://www.pioneer.eu/navgatehud
Information à destination des
utilisateurs sur la collecte et
l’élimination des équipements
et batteries usagés
(Marquage pour les équipements)
(Exemples de marquage pour les batteries)
Remarque sur le manuel de
fonctionnement
Ce manuel décrit comment installer et configurer cet appareil dans votre véhicule. Le fonctionnement de cet appareil est expliqué dans le
manuel séparé de l’appareil.
Fr
<CRD4765-A>22
Black plate (23,1)
Section
Précautions
!
!
!
!
Pour les pays n’appartenant pas à
l’Union Européenne :
Si vous souhaitez jeter ces articles, veuillez
contacter les autorités ou revendeurs locaux
pour connaître les méthodes d’élimination appropriées.
Connexion et installation
ATTENTION
! Utilisez cet appareil uniquement avec une
batterie de 12 V, avec pôle négatif à la masse.
N’utilisez pas l’appareil dans un véhicule 24
volts.
!
!
Ceci pourrait entraîner un risque d’incendie
ou de dysfonctionnement.
N’installez jamais l’appareil ni ne branchez
les câbles à un endroit où ils pourraient affecter la performance d’un airbag.
Lors de l’installation de l’appareil dans un véhicule équipé d’airbags, demandez au fabricant du véhicule les précautions à prendre
pendant l’installation. Ceci pourrait entraîner
un risque de déploiement incorrect des airbags, et dont un accident mortel.
N’installez jamais l’appareil à un endroit où il
obstrue la vision du conducteur, gêne sa
conduite ou peut être dangereux pour les
passagers.
Ceci pourrait entraîner un risque d’accident
de la circulation et des blessures.
Ne coupez jamais l’isolation du cordon d’alimentation de l’appareil pour raccorder d’autres appareils.
Un dépassement de la capacité de courant
du cordon d’alimentation peut provoquer un
incendie, un choc électrique ou un dysfonctionnement.
N’utilisez jamais les boulons et écrous des
pièces de sécurité comme la direction, le système de freinage et le réservoir.
Ceci pourrait provoquer une défaillance des
freins, un incendie ou un accident de la circulation.
N’installez pas l’appareil sur un pare-soleil
dont la forme n’est pas adaptée à l’appareil.
L’installation de l’appareil sur un pare-soleil
dont la forme n’est pas adaptée à l’appareil
peut provoquer un accident ou un dysfonctionnement.
N’installez pas l’appareil sur un pare-soleil
défectueux.
Avant l’installation, vérifiez que le pare-soleil
ne présente aucun défaut. L’installation sur
un pare-soleil défectueux pourrait provoquer
la chute de l’appareil, d’où un accident ou
un dysfonctionnement.
! N’exposez pas l’appareil à la lumière directe
du soleil.
Ne retirez le film protecteur du multiplexeur
qu’une fois l’installation terminée. Le multiplexeur peut concentrer la lumière dans un
faisceau intense et ainsi générer de la fumée
ou provoquer un incendie.
! Pour votre sécurité, demandez à votre revendeur d’installer l’appareil, de brancher les câbles ou de changer l’emplacement
d’installation.
L’installation, le câblage et la désinstallation
requièrent des compétences et une expérience spécifiques. L’installation, le câblage
ou la désinstallation incorrect(e) de l’appareil
peut endommager considérablement le véhicule.
! Ne procédez pas aux opérations dans un endroit exposé à la lumière directe du soleil.
Ceci pourrait provoquer des brûlures ou des
problèmes de vision.
! Déconnectez la borne négative de la batterie
avant l’installation.
Un court-circuit des bornes positive et négative peut provoquer un choc électrique ou
des blessures.
! Vérifiez l’emplacement des conduites, du réseau, câblage électrique, etc. avant l’installation.
Lors de l’installation de l’appareil en perçant
un trou dans la carrosserie du véhicule, veillez à ne pas interférer avec ou à entrer en
contact avec les conduites, le réservoir, le câblage électrique, etc. Protégez également les
pièces traitées contre la rouille ou la pénétration d’eau.
! Utilisez les pièces fournies et fixez-les fermement.
L’utilisation de pièces autres que celles fournies peut endommager les autres pièces
dans l’appareil et empêcher la fixation appropriée de l’appareil. Un relâchement de l’appareil peut affecter la conduite, et ainsi
provoquer un accident et des blessures.
! Installez les pièces fournies comme indiqué.
Si les pièces fournies ne sont pas installées
comme indiqué, elles peuvent se relâcher et
chuter, et ainsi provoquer un accident ou un
dysfonctionnement.
! Utilisez les câbles fournis et raccordez-les
fermement.
Utilisez les câbles fournis et raccordez-les
comme indiqué. L’utilisation de câbles autres
que ceux fournis peut provoquer un incendie
ou un dysfonctionnement.
! Suivez les instructions de ce manuel pour
raccorder et installer l’appareil.
Le non-respect des instructions de ce manuel pour raccorder et installer l’appareil
peut provoquer un incendie ou un accident.
! Fixez l’appareil au pare-soleil à l’aide d’une
sangle antichute.
Le non-respect de cette consigne peut provoquer une chute de l’appareil, d’où un risque
d’accident et de blessure.
! Isolez les parties non isolées du câble à
l’aide d’une bande, etc.
Un court-circuit peut provoquer un incendie,
un choc électrique ou un dysfonctionnement.
! Acheminez les câbles de sorte qu’ils ne
soient pas coincés dans la carrosserie du véhicule, des vis ou des pièces mobiles comme
une ceinture.
Un débranchement ou un court-circuit peut
provoquer un incendie, un choc électrique
ou un dysfonctionnement.
! Branchez et fixez les câbles de sorte qu’ils ne
gênent pas la conduite.
Le non-respect de cette consigne peut provoquer l’emmêlement des câbles autour du volant, du levier de vitesse, de la pédale de
frein, etc., et ainsi provoquer un accident.
! Une fois l’installation et le câblage terminés,
vérifiez que les équipements électriques
fonctionnent comme avant l’installation de
l’appareil.
Fr
<CRD4765-A>23
Français
Ces symboles qui figurent sur les produits,
les emballages et/ou les documents d’accompagnement signifient que les équipements électriques et électroniques et
batteries usagés ne doivent pas être jetés
avec les déchets ménagers et font l’objet
d’une collecte sélective.
Pour assurer l’enlèvement et le traitement
appropriés des produits et batteries usagés,
merci de les retourner dans les points de
collecte sélective habilités conformément à
la législation locale en vigueur.
En respectant les circuits de collecte sélective
mis en place pour ces produits, vous contribuerez à économiser des ressources précieuses et à
prévenir les impacts négatifs éventuels sur la
santé humaine et l’environnement qui pourraient résulter d’une mauvaise gestion des déchets.
Pour plus d’information sur la collecte et le traitement des produits et batteries usagés, veuillez
contacter votre municipalité, votre service de
gestion des déchets ou le point de vente chez
qui vous avez acheté ces produits.
Ces symboles ne sont valables que dans les
pays de l’Union Européenne.
Précautions
23
Black plate (24,1)
Section
Précautions
L’utilisation de l’appareil alors que les autres
équipements électriques ne fonctionnent
pas normalement peut provoquer un incendie, un choc électrique ou un accident de la
circulation.
! Rangez les petites pièces comme les vis hors
de portée des enfants.
En cas d’ingestion de pièces, consultez un
médecin immédiatement.
PRÉCAUTION
! Ne coupez jamais une partie de câble.
Si un fusible est raccordé au câble, le circuit
de protection ne fonctionnera pas et peut
provoquer un incendie.
! Lors du raccordement de câbles, vérifiez
qu’ils n’entrent pas en contact avec des
zones chaudes de la carrosserie du véhicule.
Ceci pourrait entraîner un risque d’incendie
ou de choc électrique.
! Ne raccordez pas des câbles à l’aide de rallonges.
Ceci pourrait entraîner une surchauffe du
câble et provoquer un incendie ou un choc
électrique.
! N’installez pas l’appareil dans des endroits
exposés à la pluie, l’eau, la condensation, la
poussière et la fumée par exemple.
Ceci pourrait provoquer de la fumée, un incendie ou un dysfonctionnement.
! Lors du câblage, veillez à ce que les câbles
n’entrent pas en contact avec des pièces métalliques.
Ce contact entre les câbles et des pièces métalliques peut endommager les câbles et provoquer un incendie, un choc électrique ou
un dysfonctionnement.
24
Précautions
Quelques mots sur cet appareil
ATTENTION
! N’utilisez pas les menus pendant la
conduite. Ceci détournerait votre attention
d’une utilisation en toute sécurité de votre véhicule et pourrait provoquer un accident
grave de la circulation. Observez toujours les
conditions de circulation et les piétons pour
une conduite en toute sécurité.
! Ne vous concentrez pas sur l’image affichée
pendant la conduite.
Gardez toujours les yeux rivés sur la route au
risque de provoquer un accident.
! Ne manipulez pas le pare-soleil pendant la
conduite. Ceci pourrait provoquer un accident grave de la circulation. Garez votre véhicule dans un lieu sûr et serrez le frein à main
avant de manipuler le pare-soleil.
! N’introduisez pas vos mains, doigts ou un
corps étranger dans un logement de support.
Ceci pourrait provoquer une blessure, un
choc électrique, un incendie ou un dysfonctionnement.
! Ne mettez pas cet appareil en contact avec
des liquides.
Ceci pourrait provoquer de la fumée, un incendie ou un choc électrique. Une attention
toute particulière s’adresse aux familles avec
des enfants.
! Si un liquide ou un corps étranger pénètre à
l’intérieur de cet appareil, coupez immédiatement l’alimentation et consultez votre revendeur ou le Centre d’Entretien agréé par
PIONEER le plus proche. N’utilisez pas l’appareil dans cette situation parce que cela
pourrait provoquer un incendie, une électrocution ou une autre panne.
! Ne posez pas la télécommande ou autre
objet.
Lors de l’arrêt du véhicule ou dans un virage,
la télécommande ou autre peut rouler sur
vos pieds et se loger sous la pédale de frein,
gênant ainsi la conduite et pouvant provoquer un accident.
! N’apposez pas de film ou de joint sur le multiplexeur.
Ceci pourrait obstruer le champ de vision et
provoquer un accident.
! N’utilisez pas l’appareil en cas d’anomalie
ou de dysfonctionnement comme l’impossibilité d’afficher des images.
Ceci peut provoquer un accident, un incendie ou un choc électrique.
! Ne laissez pas les enfants tenir l’appareil ou
forcer dessus.
Ceci pourrait provoquer une blessure, endommager le véhicule ou un dysfonctionnement.
! En cas d’orage, ne touchez pas l’appareil.
Un risque de choc électrique dû à la foudre
est possible.
! Ne démontez ni ne modifiez l’appareil.
Ceci peut provoquer un accident, un incendie ou un choc électrique.
! Respectez toujours les réglementations de la
circulation routière en vigueur.
L’appareil contient des données de réglementations de la circulation routière dont certaines peuvent être différentes des
réglementations en vigueur en raison de
changements de réglementations. Même
lors de l’utilisation des cartes routières ou du
guidage vocal, respectez toujours les réglementations de la circulation routière locale
et les panneaux de signalisation en vigueur
lors de la conduite du véhicule. Le non-respect de ces réglementations peut provoquer
un accident ou une infraction aux réglementations de la circulation routière.
! Cet appareil ne peut pas être utilisé lorsque
le véhicule est en mouvement. Garez le véhicule dans un lieu sûr et serrez le frein à main
avant d’utiliser les menus de cet appareil.
! Remplacez le fusible par un neuf de la capacité (ampères) spécifiée.
L’utilisation d’un fusible de capacité supérieure à la capacité spécifiée peut provoquer
un incendie ou un dysfonctionnement.
! Avant d’utiliser l’appareil de nuit ou dans un
endroit sombre comme un tunnel, réglez la
luminosité de l’appareil de manière appropriée afin qu’elle ne gêne pas la conduite. Le
non-respect de cette consigne peut provoquer un accident.
PRÉCAUTION
! N’utilisez pas l’appareil à toute autre fin
qu’une utilisation dans un véhicule.
Ceci pourrait provoquer de la fumée, un incendie, un choc électrique ou une blessure.
! Avant de conduire, réglez l’angle du multiplexeur et la luminosité d’affichage, puis vérifiez
si les vis de l’appareil ne sont pas desserrées
afin qu’il ne vous gêne pas pendant la
conduite.
Le non-respect de cette consigne peut provoquer un accident.
! Lors de la manipulation du pare-soleil ou de
boutons lors de la conduite, restez concentré
sur la conduite.
Le non-respect de cette consigne peut provoquer un accident.
! Lors de l’entrée et de la sortie du véhicule,
veillez à ne pas vous cogner la tête dans l’appareil.
Le non-respect de cette consigne peut provoquer une blessure.
! Veillez à ne pas vous coincer les mains ou
les doigts lors de la fermeture du multiplexeur ou du réglage de l’angle.
Le non-respect de cette consigne peut provoquer une blessure.
Fr
<CRD4765-A>24
Black plate (25,1)
Section
Précautions
Consignes importantes de sécurité
01
02
Précautions relatives à la
batterie
ATTENTION
PRÉCAUTION
! Ne pas mettre en court-circuit, démonter ou
chauffer la batterie, et ne la jetez pas au feu
ou dans l’eau.
Une explosion de la batterie ou une fuite du
liquide de la batterie peut provoquer un incendie ou une blessure.
! Ne chargez pas une batterie sèche.
Une explosion de la batterie peut provoquer
une blessure.
! N’utilisez pas une batterie différente de celle
indiquée.
Une explosion de la batterie ou une fuite du
liquide de la batterie peut provoquer une
blessure ou une pollution de l’environnement.
Si vous rencontrez des
problèmes
ATTENTION
Si vous remarquez de la fumée, un bruit étrange,
une odeur ou tout autre signe anormal venant
de l’appareil, coupez immédiatement l’alimentation électrique et consultez votre revendeur ou le
service après-vente PIONEER agréé le plus proche.
L’utilisation de cet appareil dans ces conditions
peut provoquer un accident, un incendie ou un
choc électrique.
! L’appareil ne fonctionne pas de manière autonome. Raccordez-le à un iPhone ou un périphérique Android sur lequel une
application de navigation est installée pour
pouvoir l’utiliser.
Lisez les consignes de sécurité décrites dans
le mode d’emploi du produit raccordé à cet
appareil.
! N’utilisez pas cet appareil pendant la
conduite. Ceci détournerait votre attention
d’une utilisation en toute sécurité de votre véhicule et pourrait provoquer un accident
grave de la circulation. Observez toujours les
conditions de circulation et les piétons pour
une conduite en toute sécurité. Garez votre
véhicule dans un lieu sûr et serrez le frein à
main avant d’utiliser cet appareil.
! Ne manipulez pas le pare-soleil pendant la
conduite. Ceci pourrait provoquer un accident grave de la circulation. Garez votre véhicule dans un lieu sûr et serrez le frein à main
avant de manipuler le pare-soleil.
! N’utilisez pas un iPhone ou périphérique
Android pendant la conduite. Garez votre véhicule dans un lieu sûr et serrez le frein à
main avant de définir votre itinéraire sur un
iPhone ou périphérique Android.
! Toutes les fonctions disponibles dans l’appareil ne garantissent en aucun cas que votre
environnement soit sûr. Lors de la conduite,
vérifiez de vos propres yeux que l’environnement est sûr.
! Les informations routières et le guidage
vocal proposés par une application de navigation sont donnés à titre de référence uniquement. Respectez toujours les
réglementations de la circulation routière et
les panneaux de signalisation en vigueur lors
de la conduite d’un véhicule. Leur non-respect pourrait entraîner une infraction aux réglementations de la circulation routière et
provoquer un accident grave. Les informations indiquant la distance entre votre véhi-
!
!
!
!
!
!
!
!
cule et le précédent, la limitation de vitesse
et les caméras des feux rouges fournies par
cet appareil sont également données à titre
de référence uniquement. Respectez les panneaux de signalisation en vigueur et observez
les conditions de circulation.
Cet appareil est équipé d’un système d’interverrouillage qui détecte lorsque le véhicule
est en mouvement et qui empêche l’utilisation de l’appareil lorsque le véhicule l’est effectivement. Garez le véhicule dans un lieu
sûr et serrez le frein à main avant d’utiliser
cet appareil.
Si l’utilisation de cet appareil vous semble fatigante ou inconfortable, arrêtez de l’utiliser
immédiatement et faites une longue pause
pour bien récupérer. Une utilisation prolongée de l’appareil dans ces conditions peut
nuire à votre condition physique.
Si vous êtes myope ou hypermétrope, astigmate ou avez une acuité visuelle différente
entre les deux yeux, portez des lunettes ou
autres pour corriger votre acuité visuelle de
manière appropriée afin d’utiliser cet appareil.
Les images affichées à l’écran peuvent être
temporairement déformées lors du changement d’image. Il ne s’agit pas d’un dysfonctionnement.
Les images ne s’affichent pas à l’écran
lorsque la réception GPS est perdue.
Les images affichées à l’écran peuvent être
déformées en cas de surcharge d’un iPhone
ou périphérique Android.
La précision de la localisation dépend des
performances GPS de l’iPhone ou du périphérique Android raccordé à l’appareil.
Le sens dans lequel le véhicule se déplace
peut ne pas s’afficher correctement si la précision GPS est faible.
Fr
<CRD4765-A>25
Français
! Conservez la batterie hors de la portée des
jeunes enfants pour éviter un accident.
Au cas où la pile serait avalée, consultez immédiatement un médecin.
! Installez la batterie en respectant la polarité
(bornes positive et négative) indiquée dans
ce manuel.
Si la polarité de la batterie est incorrecte,
ceci peut provoquer un risque de blessure ou
de pollution de l’environnement en raison de
l’explosion de la batterie ou d’une fuite du liquide de la batterie.
! En cas de fuite de batterie et si le liquide de
la batterie entre en contact avec la peau ou
des vêtements, rincez abondamment à l’eau
claire. Si du liquide de batterie entre en
contact avec les yeux, rincez abondamment
à l’eau claire et consultez un médecin immédiatement.
! Remplacez immédiatement une batterie usagée par une neuve.
Une fuite du liquide de la batterie peut provoquer une pollution de l’environnement.
! Ne rangez pas la télécommande dans des
endroits à températures élevées, à humidité
élevée ou en plein soleil.
Le non-respect de cette consigne peut provoquer une déformation de la télécommande,
une explosion de la batterie ou une fuite du
liquide de la batterie.
25
Black plate (26,1)
Section
Consignes importantes de sécurité
02
! Fixez fermement l’iPhone ou le périphérique
Android pendant la conduite. Ne le laissez
pas tomber sur le sol, où il risque de se retrouver coincé sous la pédale de frein ou d’accélérateur.
! Fermez l’afficheur lorsque vous n’utilisez pas
l’appareil.
! Lors du retrait de l’appareil du pare-soleil et
de son rangement, veillez à fermer l’afficheur
et le multiplexeur.
Ne laissez pas l’appareil dans des endroits
exposés à la lumière directe du soleil, sur le
tableau de bord par exemple. L’afficheur ou
le multiplexeur peut concentrer la lumière en
un faisceau intense, et ainsi provoquer de la
fumée ou un incendie.
! Le feu arrière du véhicule de devant peut être
reflété sur le multiplexeur.
! Pioneer décline toute responsabilité quant
aux variations de valeur ou de cote du véhicule, etc.
Pour éviter l’épuisement de
la batterie
! Assurez-vous de faire tourner le moteur lors
de l’utilisation de cet appareil. Utiliser cet appareil alors que le moteur est arrêté peut décharger la batterie.
Ne faites pas tourner le moteur du véhicule
au ralenti plus longtemps que nécessaire
lorsque vous êtes garé afin de réduire l’impact sur l’environnement.
! Si l’appareil ne s’éteint pas (l’indicateur DEL
de la fiche allume-cigare du câble d’alimentation reste allumé) alors que le moteur du
véhicule est arrêté, débranchez le câble d’alimentation de l’allume-cigare du véhicule. Le
non-respect de cette consigne décharge la
batterie.
26
Consignes importantes de sécurité
Si l’écran est difficile à
consulter
Remarques sur les cartes
mémoire SD
! Cet appareil offre divers angles afin de pouvoir consulter facilement les images affichées à l’écran. Réglez l’angle du
multiplexeur (la page 40) et les réglages d’affichage (la page 39) lors de la première utilisation de l’appareil afin d’optimiser la
visibilité et la netteté des images affichées.
Vous pouvez régler la luminosité d’affichage
à l’aide du bouton / (la page 41).
! La luminosité d’affichage varie en fonction
de l’angle de vision. Utilisez l’appareil dans
une position où vous pouvez clairement voir
l’image affichée.
! Cet appareil prend en charge les cartes mémoire microSD et microSDHC. Ces types de
supports de stockage sont collectivement appelés “carte mémoire SD” dans ce manuel.
! Cet appareil ne prend pas en charge les cartes mémoire microSDXC.
! Pioneer ne garantit pas l’utilisation de tous
les types de cartes mémoire SD compatibles
avec l’appareil.
! N’éjectez pas une carte mémoire SD ou ne
changez pas la position du contact lorsque
la carte mémoire SD insérée est en cours de
lecture. Ceci pourrait corrompre les données
enregistrées sur la carte mémoire SD.
Pioneer décline toute responsabilité quant
aux dommages résultant de tels cas de figure.
! La durée de vie des cartes mémoire SD est
prédéfinie. Même si une carte mémoire SD
est utilisée de manière appropriée, il est possible que des données ne puissent pas être
correctement enregistrées ou supprimées de
la carte mémoire SD lorsque celle-ci a atteint
sa durée de vie.
! Certaines cartes mémoire SD peuvent ne pas
être reconnues par l’appareil même si elles
le sont par un ordinateur. Le formatage d’une
carte mémoire SD à l’aide d’un programme
dédié peut permettre de résoudre ce problème. Une carte mémoire SD formatée à
l’aide de la fonction de formatage standard
d’un ordinateur n’est pas conforme à la
norme SD. Des problèmes tels qu’une carte
ne peut pas être lue ou écrite sont possibles.
Il est alors recommandé d’utiliser un programme de formatage dédié pour éviter ces
problèmes. Toutes les données enregistrées
sur une carte mémoire SD seront supprimées lors du formatage de la carte. Veillez à
Précautions d’utilisation à des
températures élevées/faibles
! Si la température est trop élevée ou trop
faible pour que l’appareil puisse fonctionner
correctement, la luminosité d’affichage est
réduite et la projection d’images s’arrête automatiquement pour préserver les pièces de
l’appareil. Il ne s’agit pas d’un dysfonctionnement. Patientez jusqu’à ce que la température redevienne appropriée pour permettre
l’utilisation de l’appareil.
! Cet appareil ne fonctionne pas correctement
si la température est trop élevée ou trop
faible. Utilisez-le dans la plage de températures de fonctionnement indiquée.
Pour plus de détails, reportez-vous au mode
d’emploi.
sauvegarder les données souhaitées avant
de formater. Un programme de formatage
dédié pour carte mémoire SD est disponible
sur le site suivant.
https://www.sdcard.org/home/
(Valide jusqu’en juin 2012)
! Pioneer ne garantit pas la réparation d’une
carte mémoire SD présentant des défauts
dus à son formatage. Pioneer décline également toute responsabilité quant aux dommages, coûts ou dépenses résultant de la perte
ou de la corruption de données en raison du
formatage de la carte mémoire SD. Lisez le
mode d’emploi du programme de formatage,
suivez les instructions relatives au formatage
de la carte mémoire SD que vous souhaitez
utiliser et acceptez l’entière responsabilité
vis-à-vis de tout problème pouvant survenir.
Remarques sur l’iPhone
! Pour connaître les modèles d’iPhone et les
versions logicielles de l’iPhone pris en
charge par ce produit, consultez les informations sur notre site Web.
! Les modèles d’iPhone compatibles avec l’appareil sont collectivement appelés “iPhone”
dans ce manuel.
! Pioneer ne garantit pas l’utilisation de tous
les types de modèles d’iPhone compatibles
avec l’appareil.
! Pioneer décline toute responsabilité quant à
la perte de données résultant de l’utilisation
d’un iPhone avec l’appareil.
! N’exposez pas un iPhone à la lumière directe
du soleil pendant une période prolongée.
Ceci pourrait provoquer un dysfonctionnement de l’iPhone.
! N’exposez pas un iPhone à des températures
élevées.
! Pour plus de détails sur l’iPhone, reportezvous aux manuels correspondants.
Fr
<CRD4765-A>26
Black plate (27,1)
Section
Consignes importantes de sécurité
Remarques sur les
périphériques Android
Droits d’auteur
Les droits d’auteur des données et programmes
fournis avec ce produit sont la propriété de
Pioneer ou des tiers auxquels Pioneer a accordé
des droits d’utilisation de telles données ou programmes sous droits d’auteur. Vous ne devez
pas copier, modifier ou analyser, sous quelque
forme que ce soit, tout ou partie des données ou
programmes de ce produit.
Mises à jour logicielles
Remarques sur cet appareil
! Une carte mémoire SD de 2 Go minimum est
nécessaire pour l’enregistrement du fichier
de mise à jour logicielle.
! Une carte mémoire microSD contenant la
dernière version logicielle à jour est mise à
disposition une fois par an pour les clients
n’ayant pas d’accès Internet.
D’autres détails seront fournis sur le site
Web.
! L’historique d’utilisation de cet appareil est
enregistré à des fins d’amélioration des performances. Aucune donnée client n’est accessible pendant l’enregistrement de
l’historique. Les informations enregistrées
peuvent être partagées avec d’autres sociétés ou sous-traitants désignés par Pioneer à
des fins d’analyse de données uniquement
et avec l’autorisation préalable du client.
! Pioneer a testé et vérifié que les images projetées sont visibles à une distance de 3 m de
l’avant du pare-brise du véhicule. Les distances peuvent toutefois varier en fonction de la
hauteur et de la position du siège conducteur, de la hauteur et de l’inclinaison du toit
du véhicule et de la lumière ambiante.
! Pioneer ne garantit pas que le produit est
conforme à l’usage particulier d’un utilisateur spécifique.
! Les caractéristiques et conceptions de l’appareil sont susceptibles d’être modifiées
sans préavis à des fins d’amélioration du produit. Pioneer n’accepte et ne reconnaît aucune demande client de modification ou
d’échange de produit afin de répondre à des
besoins de produits spécifiques par rapport
aux caractéristiques et conceptions décrites
dans ce manuel.
! Les captures d’écran dans ce manuel peuvent être différentes de celles du produit.
! La conception de l’affichage à l’écran est
susceptible d’être modifiée sans préavis à
des fins d’amélioration du produit.
Visitez notre site Web
Rendez-nous visite sur le site suivant :
http://www.pioneer.fr
! Enregistrez votre produit. Nous conserverons
les détails de votre achat dans nos fichiers
pour vous aider à faire référence à ces informations pour une déclaration d’assurance
en cas de perte ou de vol.
! Notre site Web fournit les informations les
plus récentes sur PIONEER CORPORATION.
Données client enregistrées
! Au cas où une réparation ou autre de l’appareil serait nécessaire, Pioneer décline toute
responsabilité quant aux mises à jour logicielles effectuées par le client.
! Les réglages enregistrés sur l’appareil peuvent être involontairement et automatiquement modifiés ou supprimés en raison d’un
dysfonctionnement de l’appareil, dans le
cadre d’une réparation, ou de l’exécution
d’autres procédures. Conservez une liste du
contenu important. Pioneer décline toute responsabilité quant aux dommages ou pertes
de profits résultant d’une perte de données
dans de tels cas de figure.
! Pioneer ne propose pas de service de récupération de données endommagées ou supprimées.
02
Français
! Pour connaître les périphériques Android
pris en charge par ce produit, consultez les
informations sur notre site Web.
! La compatibilité avec tous les périphériques
Android n’est pas garantie.
! Certaines utilisations d’un périphérique
Android pouvant ne pas être légales en
conduisant dans votre juridiction, vous devez
connaître de telles restrictions et les respecter.
En cas de doute sur une fonction donnée, ne
l’utilisez que lorsque le véhicule est garé.
Aucune fonctionnalité ne doit être utilisée
tant qu’il n’est pas sûr de le faire dans les
conditions de conduite rencontrées.
! Pioneer décline toute responsabilité quant à
la perte de données résultant de l’utilisation
d’un périphérique Android avec l’appareil.
! N’exposez pas un périphérique Android à la
lumière directe du soleil pendant une période prolongée. Ceci pourrait provoquer un
dysfonctionnement du périphérique.
! N’exposez pas un périphérique Android à
des températures élevées.
! Pour plus de détails sur les périphériques
Android, reportez-vous aux manuels du périphérique Android.
Consignes importantes de sécurité
Fr
<CRD4765-A>27
27
Black plate (28,1)
Section
Pièces fournies
03
Avant de procéder au raccordement
04
Précautions de raccordement
Affichage tête haute :
PRÉCAUTION
1 câble d’alimentation
1 appareil principal
1 amortisseur de pare-soleil
1 support de montage
1 bande adhésive à double face
Télécommande de l’affichage tête haute :
! N’utilisez pas l’alimentation accessoire depuis l’interface du bus CAN, etc. Veillez à
raccorder à l’alimentation électrique accessoire du véhicule.
! Installez les pièces fournies comme indiqué.
L’utilisation de pièces autres que celles fournies peut provoquer un dysfonctionnement.
— Récepteur de signaux de balise et son
câble d’antenne
— Câble d’alimentation
Éloignez le plus possible les antennes les
unes des autres.
! Ne fixez pas les antennes ensemble, ne les
empilez pas ni ne les entrecroisez.
Le bruit reçu par l’antenne et le câble d’antenne affecte la sensibilité de réception.
Connexion du câble
d’alimentation
! Raccordez fermement le câble d’alimentation en l’insérant dans le connecteur d’alimentation de l’appareil. Si l’insertion du
connecteur s’avère être difficile, l’orientation
peut ne pas être correcte. Vérifiez l’orientation du connecteur. Ne forcez pas son insertion. Ceci pourrait provoquer un
dysfonctionnement.
1 plaque de réglage d’épaisseur
du pare-soleil (grande)
1 appareil principal
1 plaque de réglage d’épaisseur
du pare-soleil (petite)
(Un bloc de batteries au lithium-ion est préinstallé. Retirez le film protecteur avant d’utiliser
l’appareil.)
6 vis de montage
Prévention contre le bruit
1 clé hexagonale
28
! Pour empêcher le bruit, éloignez le plus possible les éléments suivants d’un iPhone, périphérique Android et des autres câbles et
cordons.
— Antenne film et câble d’antenne
— Antenne FM/AM et son câble d’antenne
— Antenne GPS et son câble d’antenne
Fr
<CRD4765-A>28
Black plate (29,1)
Section
Précautions d’installation
ATTENTION
! N’exposez pas l’appareil à la lumière directe
du soleil.
Ne retirez le film protecteur du multiplexeur
qu’une fois l’installation terminée. Le multiplexeur peut concentrer la lumière dans un
faisceau intense et ainsi générer de la fumée
ou provoquer un incendie.
! N’installez jamais l’appareil dans un véhicule
équipé d’un toit vitré ou ouvrant. La lumière
du soleil peut être reflétée par le multiplexeur
et concentrée pour former un faisceau intense.
! N’utilisez pas le pare-soleil latéral sur lequel
cet appareil est installé.
PRÉCAUTION
! Lors de l’installation de l’appareil dans un véhicule équipé d’airbags, demandez au fabricant du véhicule les précautions à prendre
pendant l’installation. Ceci pourrait entraîner
un risque de déploiement incorrect des airbags, et dont un accident mortel.
! L’utilisation de la lumière d’un pare-soleil et
d’autres accessoires situés à proximité du
pare-soleil (un porte-carte et un miroir par
exemple) peut ne pas être possible après
l’installation de l’appareil. Vérifiez les accessoires du véhicule avant l’installation.
! L’installation de l’appareil peut laisser des
marques sur la surface du pare-soleil.
! Cet appareil n’est pas conçu pour être installé sur le siège passager.
! Des pièces, de la poussière, etc. peuvent
tomber sur vous pendant l’installation de
l’appareil. Pour empêcher la pénétration de
poussière, etc., dans l’œil, ne vous placez
pas directement en dessous de l’appareil
pendant son installation.
! L’afficheur et le multiplexeur de l’appareil
sont des pièces fragiles. Ne les touchez pas
les mains nues ni avec un outil pendant l’installation de l’appareil.
05
Lors de la fixation de l’appareil
! Un couple de serrage de 0,36 N•m à
0,59 N•m est recommandé pour la fixation
des vis de l’appareil.
! Avant d’appliquer la bande adhésive à
double face sur le boîtier de raccordement
du câble d’alimentation, retirez toute trace
de poussière sur la surface où la bande doit
être appliquée.
Français
! Fixez l’appareil au pare-soleil à l’aide d’une
sangle antichute.
Le non-respect de cette consigne peut provoquer une chute de l’appareil, d’où un risque
d’accident et de blessure.
! Lors de l’installation de l’appareil dans un véhicule équipé d’airbags, ne l’installez jamais
sur le couvercle d’un airbag ou dans un endroit où il pourrait affecter le déploiement
d’un airbag. Ceci pourrait empêcher l’airbag
de se déployer normalement, ou l’airbag déployé pourrait heurter l’appareil et ainsi provoquer un accident ou des blessures.
! Ne procédez pas aux opérations dans un endroit exposé à la lumière directe du soleil.
Ceci pourrait provoquer une brûlure.
Un risque de cécité est également possible,
dû à l’exposition à la lumière directe du soleil
reflétée par le multiplexeur. Fermez le multiplexeur s’il est exposé à la lumière directe du
soleil.
Précautions d’installation
Avant d’installer et de fixer
l’appareil
Raccordez tout d’abord l’appareil temporairement pour vérifier qu’il fonctionne normalement, puis installez-le. Si l’appareil ne
fonctionne pas normalement, vérifiez si le raccordement est correct.
Fr
<CRD4765-A>29
29
Black plate (30,1)
Section
Connexions
06
Connexions
Schéma de connexion
Remarques
! L’indicateur DEL de la fiche allume-cigare
s’allume lorsque l’appareil est sous tension
et s’éteint lorsque l’appareil est hors tension.
Si l’indicateur DEL ne s’éteint pas alors que
le moteur du véhicule est arrêté, débranchez
le câble d’alimentation de l’allume-cigare du
véhicule. Le non-respect de cette consigne
décharge la batterie du véhicule.
! Pour plus de détails sur la connexion d’un
iPhone ou périphérique Android, reportezvous à la page 37, Réglage de votre iPhone ou
périphérique Android.
1
2
Lors du remplacement du
fusible de la fiche allume-cigare
1 Tournez la fiche dans le sens inverse des
aiguilles d’une montre pour la desserrer.
1
4
Réglage de la taille de la
fiche allume-cigare
3
Réglez la taille de la fiche allume-cigare sur L
(grand) ou S (petit) en fonction de la taille de
l’allume-cigare du véhicule.
1 Fusible (3 A)
2 Remplacez le fusible par un neuf de capacité identique.
6
5
1
2
3
4
5
6
7
iPhone ou périphérique Android
Câble USB
Câble d’alimentation
Vers le connecteur d’alimentation
Indicateur DEL
Changement de taille de fiche
Vers l’allume-cigare
7
1
Pour les utilisateurs d’iPhone
! Utilisez le câble (2) fourni avec l’iPhone.
Ne laissez pas le câble dans le véhicule. Le
câble fourni avec l’iPhone n’est pas conçu
pour être utilisé dans un véhicule.
1 Changement de taille de fiche
Pour les utilisateurs d’un
périphérique Android
! Utilisez un câble (2) de communication de
données USB-microUSB de 1 m maximum.
Un câble de charge ne peut pas être utilisé.
30
Fr
<CRD4765-A>30
Black plate (31,1)
Section
Position d’installation
Préparation à l’installation de l’appareil
07
08
Précautions d’installation de
l’appareil
ATTENTION
PRÉCAUTION
N’installez pas l’appareil sur un pare-soleil instable ou défectueux. Ceci pourrait provoquer la
chute de l’appareil, d’où un accident ou un dysfonctionnement.
1 Inspectez le pare-soleil.
Vérifiez l’épaisseur du pare-soleil sur lequel installer l’appareil.
L’appareil peut être installé sur des pare-soleils
conformes aux spécifications suivantes.
PRÉCAUTION
1
2
Plaque de réglage d’épaisseur du pare-soleil
15 mm à 20 mm
Plaque de réglage d’épaisseur du pare-soleil (petite)
20 mm à 26,5 mm
Plaque de réglage d’épaisseur du pare-soleil
(moyenne)
26,5 mm à 33 mm
Plaque de réglage d’épaisseur du pare-soleil (grande)
T
Lors du remplacement de la
plaque de réglage
d’épaisseur du pare-soleil
A
Y
H
Position d’installation indiquée
Installez l’appareil dans la position d’installation
indiquée pour garantir un champ de vision sûr
pour le conducteur et garantir le bon fonctionnement de l’appareil. L’installation de l’appareil
dans une position autre que celle indiquée peut
constituer une infraction aux normes de sécurité
relatives aux véhicules, affectant ainsi la sécurité en raison, par exemple, d’une erreur de
maintenance.
Épaisseur du
pare-soleil
Français
! Utilisez les vis fournies et installez l’appareil
comme indiqué. L’utilisation de vis autres
que celles fournies peut endommager l’appareil.
! Fixez fermement l’appareil au pare-soleil à
l’aide des vis fournies. Le non-respect de
cette consigne peut provoquer une chute de
l’appareil sur votre tête pendant la conduite,
d’où un risque de blessure.
! Lisez entièrement et attentivement ce manuel, puis installez l’appareil de manière appropriée pour vous conformer aux normes de
sécurité.
1 Appareil principal
2 Câble d’alimentation
T: Épaisseur
15 mm à 33 mm
H : Hauteur
140 mm à 240 mm
A : Distance entre les
points de support
185 mm ou plus
Y: Distance du miroir,
etc.
45 mm ou plus (recommandé)
1 Tirez sur le levier de verrouillage de l’affichage tête haute et faites-le glisser en position de libération du verrou.
1
2
2 Vérifiez la plaque de réglage d’épaisseur
du pare-soleil à utiliser.
La taille de la plaque de réglage d’épaisseur du
pare-soleil à installer sur le support de montage
varie en fonction de l’épaisseur du pare-soleil.
Cet appareil est fourni avec la plaque de réglage
d’épaisseur du pare-soleil (moyenne) préinstallée.
Utilisez la plaque de réglage d’épaisseur du
pare-soleil de la taille correspondant à l’épaisseur du pare-soleil.
1 Position de libération du verrou
2 Levier de verrouillage de l’affichage tête
haute
2 Retirez les huit vis, y compris les vis de réglage de direction longitudinale, (illustrées)
du support de montage, puis retirez la
plaque de réglage d’épaisseur du pare-soleil
(moyenne).
Si les vis de réglage de direction longitudinale
sont retirées, la plaque de réglage de direction
longitudinale est retirée de la plaque de réglage
d’épaisseur du pare-soleil.
Fr
<CRD4765-A>31
31
Black plate (32,1)
Section
Préparation à l’installation de l’appareil
08
Installation de l’appareil principal
09
1
4 Alignez les orifices des vis de la plaque
de réglage d’épaisseur du pare-soleil avec
ceux du support de montage, puis serrez les
autres vis qui ont été retirées à leurs positions d’origine.
2
3
1 Alignez le levier de verrouillage de l’affichage tête haute en position de libération du
verrou.
Tirez sur le levier de verrouillage de l’affichage
tête haute et faites-le glisser en position de libération du verrou.
2 Libérez les plaques de verrouillage du
support de montage.
Tirez les plaques de verrouillage du support de
montage vers la gauche et la droite pour libérer
le verrou.
1
2
1 Plaque de réglage d’épaisseur du paresoleil
2 Vis de réglage de direction longitudinale
3 Plaque de réglage de direction longitudinale
3 Fixez la plaque de réglage de direction
longitudinale à la plaque de réglage d’épaisseur du pare-soleil à utiliser.
1 Position de libération du verrou
2 Levier de verrouillage de l’affichage tête
haute
! Ne tenez pas la pièce mobile du support de
montage lors de l’utilisation du levier de verrouillage de l’affichage tête haute. Le levier
de verrouillage de l’affichage tête haute ne
peut pas être déplacé si vous tenez la pièce
mobile.
3 Réglez l’épaisseur du support de montage.
Alignez les lignes du support de montage avec
les repères d’échelle situés à gauche et à droite
de la plaque de réglage d’épaisseur du pare-soleil en fonction de l’épaisseur du pare-soleil,
puis serrez trois vis.
2
1
1
1
1
3
2
1 Plaque de réglage d’épaisseur du paresoleil
2 Vis de réglage de direction longitudinale
3 Plaque de réglage de direction longitudinale
1 Pièce mobile
32
1 Support de montage
2 Plaque de réglage d’épaisseur du paresoleil
! Les dimensions approximatives des repères
d’échelle de la plaque de réglage d’épaisseur
du pare-soleil (moyenne) sont les suivantes
(l’illustration montre la ligne du support de
montage alignée avec le repère d’échelle de
22 mm).
Fr
<CRD4765-A>32
Black plate (33,1)
Section
Installation de l’appareil principal
1
2
3
6 Fixez le support de montage.
Appuyez fermement sur les plaques de verrouillage vers la gauche et la droite pour fixer le support de montage.
Installation de l’appareil principal
09
Relevez le pare-soleil en position horizontale,
puis retirez le support de montage du pare-soleil.
4
20 mm
22 mm
24 mm
26 mm
4 Installez le support de montage sur le
pare-soleil.
Relevez le pare-soleil en position horizontale.
Tenez les extrémités gauche et droite des plaques de verrouillage du support de montage,
puis installez le support de montage sur le paresoleil en l’engageant complètement.
! Si les plaques de verrouillage ne peuvent pas
être engagées complètement, l’épaisseur du
support de montage doit être augmentée. Retirez le support de montage du pare-soleil, revenez à l’étape 3 et réglez la position
d’échelle, puis réinstallez le support de montage sur le pare-soleil.
9 Vérifiez si l’épaisseur réglée du support
de montage est appropriée.
Appuyez fermement sur les plaques de verrouillage du support de montage de la gauche et de
la droite pour le verrouiller.
Vérifiez que le support de montage ne peut pas
être facilement installé sur le pare-soleil lorsque
les plaques de verrouillage sont verrouillées.
10 Installez le support de montage dont l’épaisseur a été réglée par rapport à l’appareil
principal.
Vérifiez que l’afficheur et le multiplexeur de l’appareil principal sont fermés, puis alignez le levier de verrouillage de l’affichage tête haute du
support de montage avec la position de libération du verrou.
Appareil principal :
Français
1
2
3
4
1
2
7 Vérifiez que le support de montage est
fermement fixé.
Ramenez le pare-soleil en position horizontale.
Déplacez le support de montage d’avant en arrière pour vérifier qu’il est fermement fixé.
1 Multiplexeur
2 Afficheur
Support de montage :
! Si le support de montage ne peut pas être engagé complètement, l’épaisseur du support
de montage doit être augmentée. Retirez le
support de montage du pare-soleil, revenez à
l’étape 3 et réglez la position d’échelle, puis
réinstallez le support de montage sur le paresoleil.
5 Abaissez le pare-soleil en position verticale.
1
Si le support de montage ne peut pas être facilement installé sur le pare-soleil, cela signifie que
l’épaisseur est appropriée.
! Si le support de montage peut être facilement
retiré du pare-soleil, l’épaisseur du support
de montage doit être réduite. Retirez le support de montage du pare-soleil, revenez à l’étape 3 et réglez la position d’échelle, puis
réinstallez le support de montage sur le paresoleil.
8 Retirez le support de montage.
Abaissez le pare-soleil en position verticale, puis
tirez les plaques de verrouillage vers la gauche
et la droite pour libérer le verrou.
! Si le support de montage peut être facilement
installé sur le pare-soleil alors que les plaques de verrouillage sont verrouillées, cela signifie que l’épaisseur n’est pas appropriée.
Retirez le support de montage du pare-soleil,
revenez à l’étape 3 et réglez la position d’échelle, puis réinstallez le support de montage
sur le pare-soleil.
2
1 Position de libération du verrou
2 Levier de verrouillage de l’affichage tête
haute
Fixez le support de montage et l’appareil principal aux quatre endroits à l’avant et à l’arrière à
l’aide des vis de montage fournies.
Avant de l’appareil principal :
Fr
<CRD4765-A>33
33
Black plate (34,1)
Section
Installation de l’appareil principal
09
1
Arrière de l’appareil principal :
1
15 Fixez l’appareil au pare-soleil à l’aide
d’une sangle antichute.
Avancez la sangle antichute depuis l’arrière du
pare-soleil abaissé en position verticale.
2
1 Fente
2 Alignez les bossages avec la fente.
2
13 Installez l’appareil sur le pare-soleil.
Tirez les plaques de verrouillage du support de
montage vers la gauche et la droite pour libérer
le verrou.
Relevez le pare-soleil en position horizontale.
Tenez les extrémités gauche et droite des plaques de verrouillage du support de montage,
puis installez l’appareil sur le pare-soleil en engageant complètement le support de montage.
1 Alignez les bossages avec la fente.
2 Fente
16 Fixez le support de montage.
Appuyez fermement sur les plaques de verrouillage vers la gauche et la droite pour fixer le support de montage.
Faites passer la sangle antichute comme indiqué dans l’illustration.
17 Relevez le pare-soleil en position horizontale.
Abaissez la sangle antichute et fixez-la.
11 Desserrez d’un tour les quatre vis de
montage qui ont été serrées à l’étape 10.
12 Desserrez d’un tour les vis de réglage de
direction longitudinale de l’appareil.
Avant de l’appareil principal :
Installation de l’appareil principal
18 Verrouillez la position de l’appareil principal.
Tirez sur le levier de verrouillage de l’affichage
tête haute et faites-le glisser en position de verrouillage.
1
14 Abaissez le pare-soleil en position verticale.
1 Position de verrouillage
L’appareil principal glisse vers l’avant et la position de l’appareil est verrouillée.
34
Fr
<CRD4765-A>34
Black plate (35,1)
Section
Installation de l’appareil principal
Installation de l’appareil principal
19 Réglez l’inclinaison de l’appareil principal.
Réglez l’angle afin de mettre l’appareil principal
de niveau.
24 Installez l’appareil sur le pare-soleil.
Procédez aux étapes 13 à 17 pour installer l’appareil sur le pare-soleil.
1
Droite Gauche
1
Droite
Inclinez le pare-soleil verticalement d’environ 20
degrés, puis serrez fermement les deux vis de
montage à l’arrière de l’appareil principal qui
ont été desserrées à l’étape 11.
! Si le film protecteur du multiplexeur gêne le
réglage, retirez-le. Remettez le film protecteur
en place une fois le réglage terminé.
1 Aligner l’appareil dans le sens de déplacement
1
1 Réglez le multiplexeur de sorte que l’afficheur puisse être affiché au centre du
multiplexeur.
! Veillez à régler l’appareil principal de sorte
qu’il soit aligné dans le sens de déplacement.
2
1 Afficheur
2 Multiplexeur
Réglez la direction de l’appareil principal afin
d’aligner l’afficheur et le multiplexeur dans le
sens de déplacement.
2
1
20 Réglez la direction de l’appareil principal.
Ouvrez l’afficheur et le multiplexeur de l’appareil
principal.
1
1 Position de libération du verrou
L’appareil principal glisse vers l’arrière et la position de l’appareil est déverrouillée.
! Alignez le levier de verrouillage de l’affichage
tête haute en position de libération du verrou
avant d’installer l’appareil sur le pare-soleil.
! S’il existe un espace entre le plafond du véhicule et le pare-soleil où ce dernier peut être
mis en position horizontale, fixez l’amortisseur de pare-soleil à la sangle antichute.
21 Déverrouillez la position de l’appareil
principal.
Tirez sur le levier de verrouillage de l’affichage
tête haute et faites-le glisser en position de libération du verrou.
22 Retirez l’appareil du pare-soleil.
Fermez l’afficheur et le multiplexeur de l’appareil
principal, puis abaissez le pare-soleil en position
verticale.
Déplacez les plaques de verrouillage du support
de montage vers la gauche et la droite pour libérer le verrou. Déverrouillez la sangle antichute.
Relevez le pare-soleil en position horizontale,
puis retirez le support de montage du pare-soleil.
! Veillez à ce que l’appareil ne tombe pas.
23 Fixez fermement les vis de montage à l’avant de l’appareil principal.
Fixez fermement les deux vis de montage à l’avant de l’appareil principal qui ont été desserrées à l’étape 11 et les deux vis de réglage de
direction longitudinale qui ont été desserrées à
l’étape 12.
3
4
Français
Gauche
09
1 Plafond du véhicule
2 Pare-soleil
3 Espace entre le plafond du véhicule et
le pare-soleil
4 Pas d’espace entre le plafond du véhicule et le pare-soleil
! Lors de la fixation d’un amortisseur de paresoleil, fixez-le au support d’amortisseur de
pare-soleil, fixez-le à la sangle antichute, puis
fixez la sangle antichute.
2
1
3
1 Sangle antichute
2 Amortisseur de pare-soleil
3 Support d’amortisseur de pare-soleil
Fr
<CRD4765-A>35
35
Black plate (36,1)
Section
Installation de l’appareil principal
09
Installation de l’appareil principal
! Positionnez le câble d’alimentation de sorte
qu’il n’obstrue pas le champ de vision du
conducteur.
! Acheminez le câble de sorte qu’il n’entrave
pas le mouvement vers l’arrière et l’avant de
l’appareil principal lors de l’utilisation du levier de verrouillage de l’affichage tête haute.
27 Verrouillez la position de l’appareil principal.
Tirez sur le levier de verrouillage de l’affichage
tête haute et faites-le glisser en position de verrouillage.
1
1
2
1 Amortisseur de pare-soleil
2 Sangle antichute
25 Raccordez le câble d’alimentation à l’appareil.
1 Position de verrouillage
Acheminez le câble d’alimentation en fixant le
point à l’aide d’un collier vendu dans le
commerce.
1
1
L’appareil principal glisse vers l’avant et la position de l’appareil est verrouillée.
28 Fixez le câble d’alimentation.
Appliquez la bande adhésive à double face au
boîtier de raccordement du câble d’alimentation, puis fixez le boîtier de raccordement à un
endroit où le câble peut être fermement fixé.
1
2
1 Câble d’alimentation
26 Acheminez le câble d’alimentation.
Acheminez le câble d’alimentation de sorte qu’il
ne gêne pas la conduite, puis vérifiez que le
champ de vision du conducteur est approprié.
36
1 Fixez le câble à l’aide d’un collier vendu
dans le commerce.
! Ne fixez pas et n’installez pas le câble sur le
pare-brise.
! N’acheminez pas le câble d’alimentation au
bas du siège du conducteur. Le câble d’alimentation pourrait être coincé sous la pédale
de frein et gêner la conduite, et ainsi provoquer un accident grave.
3
! N’installez jamais le câble d’alimentation à
un endroit où le câble ne peut pas être fixé en
raison des vibrations du véhicule, etc.
! Si le câble ne peut pas être fixé à l’aide de la
bande adhésive à double face fournie, fixez-le
fermement à l’aide d’une bande adhésive à
double face vendue dans le commerce ou
autre.
! Fixez fermement un iPhone ou un périphérique Android à un support vendu dans le
commerce.
! Insérez la fiche allume-cigare du câble d’alimentation dans l’allume-cigare du véhicule
avec l’indicateur DEL orienté vers le haut de
sorte que le conducteur puisse le voir.
L’indicateur DEL de la fiche allume-cigare
s’allume en vert lorsque l’appareil est sous
tension.
1
1 Câble d’alimentation
2 Côté du tableau de bord, etc.
3 Bande adhésive à double face
Fixez le câble à l’aide d’un collier vendu dans le
commerce.
1 Indicateur DEL
Fr
<CRD4765-A>36
Black plate (37,1)
Section
Installation de l’appareil principal
Réglage de votre iPhone ou périphérique Android
09
10
Pour en savoir plus, reportez-vous à la page
37, Raccordement du câble d’alimentation à
l’allume-cigare.
Après l’installation
PRÉCAUTION
! Vérifiez si l’appareil est installé de manière
appropriée. Dans les cas suivants, revenez à
l’étape 1 et installez l’appareil correctement.
Raccordement du câble
d’alimentation à l’allumecigare
% Raccordez fermement la fiche allume-cigare du câble d’alimentation en l’insérant
dans l’allume-cigare du véhicule.
L’indicateur DEL de la fiche allume-cigare s’allume en vert lorsque l’appareil est sous tension.
1
Raccordement de votre
iPhone ou périphérique
Android à l’appareil
Pour les utilisateurs d’iPhone
! Utilisez le câble fourni avec l’iPhone.
Ne laissez pas le câble dans le véhicule. Le
câble fourni avec l’iPhone n’est pas conçu
pour être utilisé dans un véhicule.
Pour les utilisateurs d’un
périphérique Android
! Utilisez un câble de communication de données USB-microUSB de 1 m maximum. Un
câble de charge ne peut pas être utilisé.
1 Raccordez le câble USB à votre iPhone ou
périphérique Android.
2 Raccordez fermement l’autre extrémité
du câble USB au boîtier de raccordement du
câble d’alimentation.
1
1
3
2
4
1 Les plaques de verrouillage ne sont pas
fixées.
2 L’appareil n’est pas fixé à l’aide d’une sangle antichute.
3 L’appareil n’est pas droit.
4 La position de l’appareil est inversée.
! Fermez l’afficheur lorsque vous n’utilisez pas
l’appareil.
1 Indicateur DEL
Remarques
! Insérez la fiche allume-cigare du câble d’alimentation dans l’allume-cigare du véhicule
avec l’indicateur DEL orienté vers le haut de
sorte que le conducteur puisse le voir.
! Si l’indicateur DEL ne s’éteint pas alors que
le moteur du véhicule est arrêté, débranchez
le câble d’alimentation de l’allume-cigare du
véhicule. Le non-respect de cette consigne
décharge la batterie du véhicule.
1 iPhone ou périphérique Android
2 Vers l’allume-cigare
3 Boîtier de raccordement du câble d’alimentation
4 Câble USB
Installation de l’application
de navigation
Installez l’application de navigation sur votre
iPhone ou périphérique Android avant d’utiliser
cet appareil.
Vous pouvez télécharger l’application de navigation depuis l’iTunes App Store ou Google Play.
Pour en savoir plus sur l’application de navigation, reportez-vous au site suivant.
http://www.pioneer.eu/navgatehud
Français
29 Retirez le film protecteur du multiplexeur.
Vérifiez que le câble d’alimentation est raccordé
et acheminé de manière appropriée, puis retirez
le film protecteur du multiplexeur.
! Lors du retrait de l’appareil du pare-soleil et
de son rangement, veillez à fermer l’afficheur
et le multiplexeur.
Ne laissez pas l’appareil dans des endroits
exposés à la lumière directe du soleil, sur le
tableau de bord par exemple. L’afficheur ou
le multiplexeur peut concentrer la lumière en
un faisceau intense, et ainsi provoquer de la
fumée ou un incendie.
Démarrage de l’application
de navigation
Lors de la première utilisation de l’application
de navigation, démarrez-la manuellement. L’application démarrera automatiquement lors du
prochain raccordement de l’iPhone ou du périphérique Android à l’appareil.
PRÉCAUTION
1 Boîtier de raccordement du câble d’alimentation
Vue d’ensemble de la connexion :
1
2
3
! Pour pouvoir utiliser l’application de navigation, vous devez tout d’abord acheter un support de l’affichage tête haute NavGate.
Achetez-le dans l’application en suivant les
instructions affichées à l’écran.
! Une connexion Internet est nécessaire pour
acheter un support de l’affichage tête haute
NavGate.
Remarques
! Pour les utilisateurs d’iPhone
4
Fr
<CRD4765-A>37
37
Black plate (38,1)
Section
Modes d’affichage
10
Si l’application ne démarre pas automatiquement lorsque l’iPhone est raccordé à l’appareil, tapotez sur “Allow” (Autoriser) dans la
fenêtre contextuelle qui s’affiche sur
l’iPhone.
! Pour les utilisateurs d’un périphérique
Android
Si l’application ne démarre pas automatiquement lorsque le périphérique Android est
raccordé à l’appareil, tapotez sur l’application dans la fenêtre contextuelle qui s’affiche
sur le périphérique Android.
Si vous cochez la case puis sélectionnez l’application dans la fenêtre contextuelle, cette
dernière ne s’affichera pas la prochaine fois.
Modes d’affichage
Cinq types de vues sont disponibles sur cet appareil : vue AR (mode faible vitesse et mode vitesse élevée), vue
de liste (mode faible vitesse et mode vitesse élevée), vue des croisements, vue d’ensemble de l’itinéraire et
vue de l’horloge.
Si la communication entre l’appareil et l’application de navigation est établie, l’une des vues suivantes s’affiche.
Vue de liste
Vue AR
Mode faible vitesse
Appuyez
sur ◀.
Mode faible vitesse
Mode vitesse élevée
Appuyez
sur ▶.
Mode vitesse élevée
Lorsqu’ un véhicule se rapproche
d’ un croisement
Lorsqu’ un véhicule se rapproche
d’ un croisement
Vue des croisements
Vue d’ ensemble de l’ itinéraire
Lorsque vous appuyez sur le bouton
et qu’ une destination est spécifiée :
Vue de l’ horloge
Lorsque vous appuyez sur le bouton
et qu’ aucune destination n’ est spécifiée :
Remarques
! Le mode faible vitesse de la vue AR est affiché lorsqu’aucune destination n’est spécifiée.
! Pour plus de détails sur les vues, reportezvous au manuel de fonctionnement.
38
Fr
<CRD4765-A>38
Black plate (39,1)
Section
Lorsque l’installation et le raccordement sont terminés
Ajustement des réglages
d’affichage
Position
Une fois l’installation et le raccordement terminés, mettez l’appareil sous tension (démarrez le
moteur du véhicule) et réglez l’angle du multiplexeur de sorte que l’image soit visible.
1 Appuyez sur le bouton a/b pour sélectionner un élément de réglage, puis appuyez
sur le bouton d.
1
Appuyez sur le bouton
% Appuyez sur le bouton a/b pour afficher
le modèle de grille entier.
1 Appuyez sur le bouton a/b pour sélectionner un élément de réglage, puis appuyez
sur le bouton d.
Rotation
Réglez la rotation de l’image affichée.
Élément de réglage
Description
Position horizontale
Sélectionnez cet élément
pour régler la position horizontale de l’image affichée.
Position verticale
Sélectionnez cet élément
pour régler la position verticale de l’image affichée.
.
% Appuyez sur le bouton a/b pour mettre
le modèle de grille de niveau.
Par ex. : Lorsqu’il est correctement réglé
Par ex. : Lorsqu’il n’est pas correctement
réglé
2 Appuyez sur le bouton a/b pour afficher
le modèle de grille entier.
Par ex. : Lorsqu’il est correctement réglé
Élément de réglage
Description
Correction trapézoïdale
Sélectionnez cet élément
pour corriger la distorsion
trapézoïdale.
Correction courbe
Sélectionnez cet élément
pour corriger la distorsion
en sourire.
2 Appuyez sur le bouton a/b pour rendre
le modèle de grille rectangulaire.
Par ex. : Réglage de la distorsion trapézoïdale
Aspect Ratio
2 Appuyez sur le bouton a/b pour sélectionner Paramètres d'affichage, puis appuyez sur le bouton d.
Réglez le rapport de format de l’image affichée.
Balance des blancs
Par ex. : Lorsqu’il n’est pas correctement
réglé
3 Appuyez sur le bouton a/b pour sélectionner un élément de réglage, puis appuyez
sur le bouton d.
12
Français
Remarque
L’écran peut ne pas être lu facilement en fonction de sa luminosité et des conditions environnementales. Réglez la luminosité de l’écran de
manière appropriée (reportez-vous à la page 41,
Réglage de la luminosité d’affichage), ou déplacez le véhicule où l’écran sera plus visible, puis
utilisez l’appareil.
Réglez la position de l’image affichée.
Lorsque l’installation et le raccordement sont terminés
% Appuyez sur le bouton a/b pour rendre
le modèle de grille rectangulaire.
Réglez la balance des blancs de l’image affichée.
1 Appuyez sur le bouton a/b pour sélectionner un élément de réglage, puis appuyez
sur le bouton d.
Zoom
Correction géométrique
Corrigez la distorsion de l’image affichée.
Réglez la taille de l’image affichée.
Fr
<CRD4765-A>39
39
Black plate (40,1)
Section
Lorsque l’installation et le raccordement sont terminés
12
Avant de conduire
13
Élément de réglage
Description
Rouge
Sélectionnez cet élément
pour régler les tons rouges.
Vert
Sélectionnez cet élément
pour régler les tons verts.
Bleu
Sélectionnez cet élément
pour régler les tons bleus.
2 Appuyez sur le bouton a/b pour régler
la luminosité.
Par ex. : Réglage de la couleur rouge
Configuration des réglages
de fonction de l’appareil
Les réglages de fonction de l’appareil peuvent
être configurés dans l’écran Réglages.
PRÉCAUTION
! Cet appareil ne peut pas être utilisé lorsque
le véhicule est en mouvement. Garez le véhicule dans un lieu sûr et serrez le frein à main
avant d’utiliser cet appareil.
! Si le véhicule se déplace pendant le réglage
des fonctions de l’appareil, l’écran Réglages
se ferme automatiquement.
% Appuyez sur le bouton
.
Menu
Description
Sur
Consultez la version logicielle de l’appareil et les
mentions légales.
Réinitialiser tous
les paramètres
Restaurez la configuration
par défaut.
Remarques
! Réglages des fonctions peut être défini uniquement lorsque la communication avec
l’application de navigation est établie.
! Appuyez sur le bouton
pour fermer l’écran Réglages.
! Pour plus de détails, reportez-vous au mode
d’emploi.
Réglage de l’angle du
multiplexeur
Réglez l’angle du multiplexeur par rapport au
siège.
PRÉCAUTION
L’écran Réglages apparaît.
Tenez les bords du multiplexeur lors du réglage
de l’angle.
1
Menu
Description
Paramètres d'affichage
Ajustez les réglages d’affichage des images projetées.
Réglages des
fonctions
Définissez les réglages de
fonction.
Langue
Définissez la langue d’affichage.
Ouvrez l’afficheur et le multiplexeur.
1
2
1 Afficheur
2 Multiplexeur
40
Fr
<CRD4765-A>40
Black plate (41,1)
Section
Avant de conduire
2 Réglez l’angle du multiplexeur de sorte
que l’afficheur entier puisse être reproduit
sur le multiplexeur.
Avant de conduire
Position appropriée du
multiplexeur
/
.
Français
Avant l’utilisation, vérifiez que l’extrémité inférieure du multiplexeur se trouve au-dessus de
votre champ de vision lorsque vous vous installez sur le siège et que vous regardez devant vous
en position de conduite. Si l’extrémité inférieure
du multiplexeur se trouve en dessous de votre
champ de vision, n’utilisez pas l’appareil. Repliez le multiplexeur en position de rangement
pour un champ de vision approprié à la
conduite.
% Appuyez sur le bouton
13
Remarque
Une modification de la luminosité peut également entraîner un changement de la teinte de
l’affichage.
1
1 Réglez le multiplexeur de sorte que l’afficheur puisse être affiché au centre du
multiplexeur.
Lors de l’entrée et de la
sortie du véhicule
Veillez à ne pas vous cogner la tête dans l’appareil.
Réglage de la luminosité
d’affichage
La fonction de commande d’intensité de cet appareil règle automatiquement la luminosité d’affichage en fonction de la luminosité ambiante.
La luminosité d’affichage peut être réglée manuellement à l’aide du bouton / .
PRÉCAUTION
Avant d’utiliser l’appareil de nuit ou dans un endroit sombre comme un tunnel, réglez la luminosité de l’appareil de manière appropriée afin
qu’elle ne gêne pas la conduite. Le non-respect
de cette consigne peut provoquer un accident.
Fr
<CRD4765-A>41
41
Black plate (42,1)
Sezione
Precauzioni
Precauzioni
Precauzioni
Per il manuale di funzionamento
42
Informazioni per gli utilizzatori finali sulla
raccolta e lo smaltimento di vecchi
dispositivi e batterie esauste
42
Collegamento e installazione
43
Informazioni sull’unità
44
Precauzioni per la batteria
45
In caso di problemi
45
Posizione di installazione
Precauzioni per l’installazione
dell’unità
51
Posizione di installazione specificata
Informazioni importanti per la sicurezza
Per evitare di scaricare la batteria
46
Se risulta difficile vedere le immagini su
schermo
46
Precauzioni per il funzionamento a
temperature alte/basse
46
Note sulle schede di memoria
microSD
46
Note sull’iPhone
46
Note sui dispositivi Android
47
Copyright
47
Aggiornamenti del software
47
Visita il nostro sito Web
47
Dati salvati dal cliente
47
Note su questa unità
47
Installazione dell’unità principale
Dopo l’installazione
57
Collegamento del cavo di alimentazione alla
presa dell’accendisigari
57
Preparazione per l’installazione
dell’unità
Sostituzione della piastra di regolazione
dello spessore parasole
51
Parti in dotazione
Prima del collegamento
Precauzioni per il collegamento
Collegamento del cavo di
alimentazione
48
Prevenzione dei disturbi
48
48
Precauzioni per l’installazione
Prima di installare e di fissare l’unità
Quando si deve montare saldamente
l’unità
49
Collegamenti
Schema di collegamento
50
Selezione delle dimensioni della presa
dell’accendisigari
50
Sostituzione del fusibile per la presa per
l’accendisigari
50
42
51
49
Impostazione dell’iPhone o del
dispositivo Android
Collegamento dell’iPhone o del dispositivo
Android all’unità
58
Installazione dell’applicazione di
navigazione
58
Avvio dell’applicazione di navigazione
58
Modalità di visualizzazione
Dopo aver completato l’installazione e il
collegamento
Regolazione delle impostazioni di
visualizzazione
59
– Posizione
59
– Zoom
60
– Rotazione
60
– Rapporto di aspetto
60
– Correzione geometrica
60
– Bilanciamento del bianco
60
Prima della guida
Configurazione delle impostazioni delle
funzioni dell’unità
61
Regolazione dell’angolazione del
combinatore
61
Quando si entra o si esce dal veicolo
61
Posizione corretta del combinatore
61
Regolazione della luminosità del
display
61
Importante
! Per motivi di sicurezza, accertarsi di rivolgersi al rivenditore per installare
l’unità nel veicolo, collegare i cavi o
modificare la posizione di installazione
dell’unità.
L’installazione, il cablaggio e la disinstallazione richiedono esperienza e competenze
specifiche. L’installazione, il cablaggio o la
disinstallazione dell’unità non corretti o
l’utilizzo di parti diverse da quelle specificate dal produttore potrebbero provocare
incidenti, lesioni personali o malfunzionamenti. In questi casi, Pioneer non si assume alcuna responsabilità.
! Per i rivenditori
Dopo aver completato l’installazione e il
cablaggio, procedere alla configurazione
della connessione dell’unità di navigazione, alla regolazione delle impostazioni di
visualizzazione, ecc.
Dopo aver completato tutte le operazioni,
consegnare questo manuale al cliente.
Grazie per aver acquistato questo prodotto
PIONEER
Leggere attentamente questo manuale prima di
utilizzare il prodotto, per assicurarne il corretto
utilizzo. È particolarmente importante leggere e
osservare le precauzioni contrassegnate da AVVERTENZA e ATTENZIONE contenute in
questo manuale. Conservare il manuale in un
luogo sicuro e accessibile, per consultazione futura.
Per il manuale di
funzionamento
Il presente manuale descrive come installare e
configurare questa unità. Il funzionamento di
questa unità viene illustrato nello specifico manuale a parte.
Per dettagli sul funzionamento e le funzioni specifiche di questa unità, visitare il seguente sito
web:
http://www.pioneer.eu/navgatehud
Informazioni per gli
utilizzatori finali sulla raccolta
e lo smaltimento di vecchi
dispositivi e batterie esauste
(Simbolo per il prodotto)
(Esempi di simboli per le batterie)
It
<CRD4765-A>42
Black plate (43,1)
Sezione
Precauzioni
Precauzioni
!
Per i paesi al di fuori dell’unione
Europea:
Se volete liberarvi questi oggetti, contattate le
vostre autorità locali o il punto vendita per il corretto metodo di smaltimento.
!
!
!
!
!
Collegamento e installazione
AVVERTENZA
! Utilizzare questa unità esclusivamente con
veicoli dotati di batteria da 12 volt e messa a
terra negativa.
Non utilizzare l’unità con veicoli dotati di batteria da 24 volt.
!
!
!
!
!
!
!
Non rimuovere la pellicola protettiva del
combinatore prima di aver completato l’installazione. Il combinatore potrebbe concentrare la luce in un fascio intenso, provocando
incendi o fumo.
Per motivi di sicurezza, rivolgersi al rivenditore per installare l’unità nel veicolo e collegare
i cavi o per modificare la posizione di installazione dell’unità.
L’installazione, il cablaggio e la disinstallazione dell’unità richiedono esperienza e competenze specifiche. L’installazione, il cablaggio
o la disinstallazione dell’unità non corretti
potrebbero provocare gravi danni al veicolo.
Non lavorare in luoghi soggetti alla luce solare diretta.
Altrimenti, potrebbero verificarsi ustioni o accecamenti.
Prima dell’installazione, scollegare il morsetto negativo della batteria.
Se si cortocircuitano i terminali positivo e negativo, potrebbero verificarsi scosse elettriche o lesioni personali.
Prima di procedere all’installazione, verificare la posizione dei tubi, del serbatoio, del cablaggio elettrico ecc.
Se per l’installazione dell’unità è necessario
praticare fori nella scocca del veicolo, fare attenzione a non interferire né entrare in contatto con i tubi, il serbatoio, il cablaggio
elettrico, ecc. Inoltre, proteggere le parti trapanate dalla ruggine o dalla penetrazione
dell’acqua.
Utilizzare le parti in dotazione e fissarle saldamente.
L’uso di parti diverse da quelle in dotazione
potrebbe provocare danni ad altri componenti dell’unità o risultare nell’installazione non
sicura della stessa. Se l’unità non è fissata
saldamente, potrebbe interferire con la
guida, provocando incidenti o lesioni personali.
Installare le parti in dotazione come specificato.
!
!
!
!
!
!
!
Se le parti in dotazione non vengono installate come specificato, esse potrebbero allentarsi e cadere, provocando incidenti o
malfunzionamenti.
Utilizzare i cavi in dotazione e collegarli in
modo sicuro.
Utilizzare i cavi in dotazione e collegarli
come specificato. L’uso di cavi diversi da
quelli in dotazione potrebbe provocare incendi o malfunzionamenti.
Per installare e collegare l’unità, attenersi
alle istruzioni contenute in questo manuale.
La mancata osservanza delle istruzioni contenute in questo manuale per installare e collegare l’unità potrebbe provocare incendi o
incidenti.
Assicurare l’unità al parasole con una cinghia anticaduta.
Altrimenti, l’unità potrebbe cadere, provocando incidenti o lesioni.
Isolare eventuali parti scoperte dei cavi con
nastro, ecc.
Un corto circuito potrebbe provocare incendi, scosse elettriche o malfunzionamenti.
Instradare i cavi in modo che non si impiglino nella scocca del veicolo, nelle viti o in
parti mobili, come i binari dei sedili.
Una disconnessione o un corto circuito potrebbero provocare incendi, scosse elettriche
o malfunzionamenti.
Instradare e fissare i cavi in modo che non
interferiscano con la guida.
Altrimenti, i cavi potrebbero attorcigliarsi al
volante, alla leva del cambio, al pedale del
freno ecc., provocando incidenti.
Dopo aver completato l’installazione e il cablaggio, controllare che i componenti e l’impianto elettrico funzionino regolarmente,
come prima dell’installazione dell’unità.
Se si utilizza l’unità quando altri componenti
elettrici non funzionano regolarmente, potrebbero verificarsi incendi, scosse elettriche
o incidenti stradali.
It
<CRD4765-A>43
Italiano
Questi simboli sui prodotti, confezioni, e/o
documenti allegati significano che vecchi
prodotti elettrici ed elettronici e batterie
esauste non devono essere mischiati ai rifiuti urbani indifferenziati.
Per l’appropriato trattamento, recupero e riciclaggio di vecchi prodotti e batterie esauste, fate riferimento ai punti di raccolta
autorizzati in conformità alla vostra legislazione nazionale.
Con il corretto smaltimento di questi prodotti e
delle batterie, aiuterai a salvaguardare preziose
risorse e prevenire i potenziali effetti negativi sull’ambiente e sulla salute umana che altrimenti
potrebbero sorgere da una inappropriata gestione dei rifiuti.
Per maggiori informazioni sulla raccolta e il riciclaggio di vecchi prodotti e batterie esauste,
contattate il vostro Comune, il Servizio di raccolta o il punto vendita dove avete acquistato l’articolo.
Questi simboli sono validi solo nell’Unione
Europea.
Altrimenti, potrebbero verificarsi incendi o
malfunzionamenti.
Non installare mai l’unità né instradare i cavi
in posizioni in cui potrebbero compromettere
le prestazioni degli airbag.
Quando si installa l’unità in un veicolo dotato
di airbag, richiedere al produttore del veicolo
le precauzioni da adottare per le operazioni
di installazione. Altrimenti, potrebbe verificarsi l’apertura non corretta degli airbag, con
conseguente pericolo di incidenti mortali.
Non installare mai l’unità in posizioni in cui
potrebbe ostruire la vista del conducente, interferire con la guida o provocare pericoli ai
passeggeri.
Altrimenti, potrebbero verificarsi incidenti
stradali e lesioni personali.
Non condividere mai l’alimentazione con
altri dispositivi tagliando l’isolante del cavo
di alimentazione dell’unità.
Se si supera la capacità di corrente del cavo
di alimentazione potrebbero verificarsi incendi, scosse elettriche o malfunzionamenti.
Non utilizzare mai bulloni e dadi di organi
che possono avere impatto sulla sicurezza
del veicolo, come lo sterzo, il sistema frenante e il serbatoio.
Altrimenti, potrebbero verificarsi guasti ai
freni, incendi o incidenti stradali.
Non installare l’unità su un parasole la cui
forma non è compatibile.
Se si installa l’unità su un parasole di forma
non compatibile, potrebbero verificarsi incidenti o malfunzionamenti.
Non installare l’unità su un parasole difettoso.
Prima dell’installazione, verificare che il parasole non presenti difetti. Se si installa l’unità
su un parasole difettoso, l’unità potrebbe cadere, provocando incidenti o malfunzionamenti.
Non lasciare l’unità in luoghi soggetti alla
luce solare diretta.
43
Black plate (44,1)
Sezione
Precauzioni
! Conservare le parti di piccole dimensioni,
come le viti, al di fuori della portata dei bambini.
Se vengono inghiottii componenti di piccole
dimensioni, rivolgersi immediatamente a un
medico.
ATTENZIONE
! Non tagliare mai i cavi longitudinalmente a
metà.
Se al cavo è collegato un fusibile, il circuito
di protezione non funzionerà, con il conseguente pericolo di incendio.
! Quando si collegano i cavi, accertarsi che
non entrino in contatto con superfici calde
della scocca del veicolo.
Altrimenti, potrebbero verificarsi incendi o
scosse elettriche.
! Non collegare i cavi utilizzando cavi di prolunga.
Altrimenti, il cavo potrebbe surriscaldarsi,
provocando incendi o scosse elettriche.
! Non installare l’unità in luoghi esposti a
pioggia, acqua, condensa, polvere o fumo
oleoso.
Altrimenti, potrebbero verificarsi incendi, formazione di fumo o malfunzionamenti.
! Quando si instradano i cavi, non fare entrare
in contatto i cavi con parti metalliche.
Se i cavi entrano in contatto con parti metalliche, esse potrebbero danneggiare i cavi,
provocando incendi, scosse elettriche o malfunzionamenti.
44
Precauzioni
Informazioni sull’unità
AVVERTENZA
! Non utilizzare i menu durante la guida, altrimenti l’attenzione del conducente potrebbe
essere distratta dalla guida sicura del veicolo, con pericolo di gravi incidenti stradali.
Prestare sempre attenzione alle condizioni
del traffico e ai pedoni per garantire la sicurezza della guida.
! Durante la guida, non fissare prolungatamente l’immagine visualizzata.
Se l’attenzione del conducente risulta distratta dalla strada, potrebbero verificarsi incidenti.
! Non utilizzare modificare la posizione del parasole durante la guida, altrimenti, potrebbero verificarsi gravi incidenti stradali.
Parcheggiare il veicolo in un luogo sicuro e
innestare il freno di stazionamento prima di
modificare la posizione del parasole.
! Non inserire mani dita o oggetti estranei
nello slot per schede.
Altrimenti, potrebbero verificarsi lesioni personali, scosse elettriche, incendi o malfunzionamenti.
! Non fare entrare l’unità in contatto con liquidi.
Altrimenti potrebbero verificarsi incendi, formazione di fumo o scosse elettriche. Particolare attenzione deve essere adottata quando
nel veicolo sono presenti bambini.
! Se all’interno di questa unità penetra del liquido o corpi estranei, scollegare immediatamente l’alimentazione e consultare
immediatamente il rivenditore o la più vicina
stazione assistenza PIONEER. Non utilizzare
questa unità in tali condizioni, perché possono verificarsi incendi o scosse elettriche o
altri guasti.
! Non lasciare il telecomando o altri accessori
non fissati.
Quando il veicolo frena o svolta in una curva,
il telecomando o gli altri accessori potrebbe
cadere sul pianale e incastrarsi sotto il pedale del freno, interferendo con la guida e provocando incidenti.
! Non applicare nastri o pellicole al combinatore.
Altrimenti, il campo visivo del conducente
potrebbe essere ostruito, con conseguente
pericolo di incidenti.
! Non utilizzare l’unità in caso di anomalie o
malfunzionamenti, ad esempio, se non è
possibile visualizzare le immagini.
Altrimenti, potrebbero verificarsi incidenti
imprevisti, formazione di fumo o scosse elettriche.
! Fare attenzione che i bambini non si aggrappino all’unità né applichino forza sulla stessa.
Altrimenti, potrebbero verificarsi lesioni personali, danni al veicolo o malfunzionamenti.
! In caso di temporali, non toccare l’unità.
Altrimenti potrebbero verificarsi scosse elettriche provocate dai lampi.
! Non smontare o modificare l’unità.
Altrimenti, potrebbero verificarsi incidenti, incendi o scosse elettriche.
! Rispettare sempre la normativa del codice
della strada in vigore.
L’unità contiene dati sulla normativa del codice della strada, ma alcuni di tali dati potrebbero risultare diversi dal codice della strada
applicabile a causa di modifiche alla normativa stradale. Anche quando si usano le
mappe dell’itinerario o la guida vocale alla
navigazione, durante la guida del veicolo, rispettare sempre la normativa del codice
della strada applicabile e la segnaletica stradale effettiva. Altrimenti, potrebbero verificarsi incidenti o violazioni della normativa del
codice della strada.
! La possibilità di utilizzare le funzioni di controllo dell’unità è disattivata quando il veicolo
è in movimento. Parcheggiare il veicolo in un
luogo sicuro e innestare il freno di stazionamento prima di utilizzare i menu dell’unità.
! Sostituire il fusibile con uno nuovo della stessa capacità (ampere).
Se si utilizza un fusibile che supera la capacità specificata potrebbero verificarsi incendi o
malfunzionamenti.
! Prima di utilizzare questa unità di notte o in
condizioni di scarsa luce come in un tunnel,
regolare correttamente la luminosità dell’unità, in modo che non interferisca con la
guida. Altrimenti, potrebbero verificarsi incidenti.
ATTENZIONE
! Non utilizzare l’unità per scopi diversi dall’utilizzo nel veicolo.
Altrimenti potrebbero verificarsi incendi, formazione di fumo, scosse elettriche o lesioni
personali.
! Prima di mettersi alla guida, regolare l’angolazione del combinatore e la luminosità del
display, inoltre verificare che le viti sull’unità
non siano allentate per evitare che interferiscano con la guida.
Altrimenti, potrebbero verificarsi incidenti.
! Quando si agisce sull’aletta parasole o sui
pulsanti durante la guida, prestare l’attenzione necessaria alla guida.
Altrimenti, potrebbero verificarsi incidenti.
! Quando si entra o si esce dal veicolo, prestare attenzione a non urtare l’unità con la
testa.
Altrimenti, potrebbero verificarsi lesioni personali.
! Fare attenzione che le mani o le dita non restino intrappolati quando si chiude il combinatore o si regola l’angolazione.
Altrimenti, potrebbero verificarsi lesioni personali.
It
<CRD4765-A>44
Black plate (45,1)
Sezione
Precauzioni
Informazioni importanti per la sicurezza
01
02
Precauzioni per la batteria
AVVERTENZA
ATTENZIONE
! Non cortocircuitare, disassemblare, riscaldare o collocare la batteria nel fuoco o nell’acqua.
L’esplosione della batteria o la perdita di liquidi dalla stessa potrebbero provocare incendi o lesioni personali.
! Non ricaricare una batteria esaurita.
L’esplosione della batteria potrebbe provocare lesioni personali.
! Non utilizzare batterie diverse da quelle specificate.
L’esplosione della batteria o la perdita di liquidi dalla stessa potrebbero provocare lesioni personali o contaminazioni ambientali.
! Sostituire immediatamente la batteria esaurita con una nuova unità.
La perdita di liquidi dalla batteria potrebbe
provocare contaminazioni ambientali.
In caso di problemi
AVVERTENZA
Se si riscontra fumo, rumori o odori insoliti o
altre anomalie dell’unità, scollegare immediatamente l’alimentazione e consultare il rivenditore
o il più vicino centro di assistenza PIONEER
autorizzato.
Se si usa questa unità in tali condizioni, potrebbero verificarsi incidenti, incendi o scosse elettriche.
! L’unità non funziona autonomamente. Prima
di utilizzarla, collegare l’unità a un iPhone o
a un dispositivo Android su cui è installata
un’applicazione di navigazione.
Leggere le precauzioni di sicurezza descritte
nel manuale di istruzioni del prodotto da collegare a questa unità.
! Non utilizzare le funzioni di controllo di questa unità durante la guida, altrimenti l’attenzione del conducente potrebbe essere
distratta dalla guida sicura del veicolo, con
pericolo di gravi incidenti stradali. Prestare
sempre attenzione alle condizioni del traffico
e ai pedoni per garantire la sicurezza della
guida. Parcheggiare il veicolo in un luogo sicuro e innestare il freno di stazionamento
prima di utilizzare le funzioni di controllo di
questa unità.
! Non utilizzare modificare la posizione del parasole durante la guida, altrimenti, potrebbero verificarsi gravi incidenti stradali.
Parcheggiare il veicolo in un luogo sicuro e
innestare il freno di stazionamento prima di
modificare la posizione del parasole.
! Non utilizzare le funzioni di controllo
dell’iPhone o del dispositivo Android durante
la guida. Parcheggiare il veicolo in un luogo
sicuro e innestare il freno di stazionamento
prima di impostare l’itinerario per la destinazione sull’iPhone o sul dispositivo Android.
! Tutte le funzioni disponibili nell’unità non garantiscono in alcun modo la sicurezza dell’area circostante il veicolo. Durante la guida,
accertarsi di controllare visivamente che
l’area circostante sia sicura.
! Le informazioni sull’itinerario e la guida vocale fornite dall’applicazione di navigazione devono essere utilizzate esclusivamente a
scopo di riferimento. Durante la guida del
veicolo, osservare sempre la normativa del
codice della strada applicabile e la segnaletica stradale effettiva. Altrimenti, potrebbero
verificarsi gravi incidenti stradali o violazioni
della normativa del codice della strada. Inol-
!
!
!
!
!
!
!
!
tre, le informazioni relative alla distanza dei
veicoli che precedono il proprio veicolo, i segnali con i limiti di velocità e le telecamere a
infrarossi visualizzate su questa unità devono
essere utilizzate esclusivamente a scopo di
riferimento. Osservare sempre la segnaletica
stradale effettiva e le condizioni di guida.
Questa unità è dotata di un sistema di interblocco che rileva quando il veicolo è in movimento e in tal caso disattiva le funzioni di
controllo dell’unità. Parcheggiare il veicolo in
un luogo sicuro e innestare il freno di stazionamento prima di utilizzare le funzioni di
controllo di questa unità.
Se si riscontra stanchezza o disagio durante
l’uso di questa unità, interrompere immediatamente l’uso e fare una lunga pausa per recuperare correttamente. L’uso continuato
dell’unità in tali circostanze potrebbe avere
effetti negativi sulle condizioni fisiche del
conducente.
Se si soffre di miopia, ipermetropia, astigmatismo o si ha sensibilità visiva diversa tra gli
occhi sinistro e destro, prima di utilizzare
questa unità indossare sempre gli occhiali o
gli altri apparati prescritti per correggere i difetti della vista.
Quando l’immagine visualizzata cambia,
l’immagine sullo schermo potrebbe risultare
momentaneamente distorta. Ciò non indica
un malfunzionamento.
Se si perde la ricezione GPS, le immagini
non verranno visualizzate sullo schermo.
Le immagini visualizzate sullo schermo porrebbero risultare distorte se l’iPhone o il dispositivo Android è sottoposto a un carico
pesante.
La precisione del posizionamento dipende
dalle prestazioni GPS dell’iPhone o del dispositivo Android collegato a questa unità.
Se la precisione del GPS è bassa, la direzione
lungo la quale il veicolo marcia potrebbe non
essere visualizzata correttamente.
It
<CRD4765-A>45
Italiano
! Mantenere la batteria al di fuori della portata
dei bambini per impedire che si verifichino
incidenti.
Se la batteria viene inghiottita, rivolgersi immediatamente a un medico.
! Installare la batteria osservando la polarità
(positiva e negativa) specificata in questo
manuale.
Se la polarità della batteria non è corretta,
potrebbero verificarsi lesioni personali o contaminazioni ambientali provocate dall’esplosione della batteria o dalla perdita di liquidi
dalla stessa.
! Se si verificano perdite dalla batteria e il liquido fuoriuscito entra a contatto con la pelle o
con gli indumenti, lavarli con acqua pulita.
Se il liquido fuoriuscito entra a contatto con
gli occhi, lavarli con acqua pulita e rivolgersi
immediatamente a un medico.
! Non conservare il telecomando in luoghi
soggetti a temperature o umidità elevate o in
una posizione esposta alla luce solare diretta.
Altrimenti, potrebbero verificarsi danni al telecomando, esplosione della batteria o perdita di liquidi dalla stessa.
45
Black plate (46,1)
Sezione
Informazioni importanti per la sicurezza
02
! Assicurare saldamente l’iPhone o il dispositivo Android durante la guida. Non lasciar cadere l’iPhone o il dispositivo Android sul
pianale della vettura, dove potrebbe incastrarsi sotto il pedale del freno o dell’acceleratore.
! Quando l’unità non viene utilizzata, chiudere
il diffusore.
! Quando si rimuove l’unità dal parasole per
conservarla, accertarsi di chiudere il diffusore e il combinatore.
Non lasciare l’unità in luoghi esposti alla
luce solare diretta, ad esempio, sul cruscotto. Il diffusore o il combinatore potrebbero
concentrare la luce in un fascio intenso, provocando incendi o fumo.
! Il combinatore potrebbe riflettere le luci dei
fari posteriori delle autovetture che precedono il proprio veicolo.
! Pioneer non accetta alcuna responsabilità
per eventuali variazioni del valore o della valutazione del veicolo, ecc.
Per evitare di scaricare la
batteria
! Accertarsi che il motore del veicolo sia acceso quando si utilizza questa unità. Se su usa
questa unità con il motore del veicolo spento,
la batteria potrebbe scaricarsi.
Per ridurre al minimo gli effetti sull’ambiente
circostante, non lasciare il veicolo parcheggiato con la marcia in folle per più del necessario.
! Se l’unità non si spegne (l’indicatore a LED
sulla spina dell’accendisigari del cavo di alimentazione rimane acceso) quando il motore del veicolo viene spento, scollegare il cavo
di alimentazione dalla presa dell’accendisigari del veicolo. Altrimenti, la batteria del veicolo potrebbe scaricarsi.
46
Informazioni importanti per la sicurezza
Se risulta difficile vedere le
immagini su schermo
Note sulle schede di
memoria microSD
! È possibile regolare l’angolazione di questa
unità su diverse posizioni, per garantire che
le immagini siano chiaramente visibili sullo
schermo. Quando si utilizza questa unità per
la prima volta, regolare l’angolazione del
combinatore (a pagina 61) e le impostazioni
di visualizzazione (a pagina 59) per ottimizzare la visibilità e la chiarezza delle immagini
visualizzate. È possibile regolare il livello
della luminosità utilizzando i pulsanti
/
(a pagina 61).
! La luminosità del display varia a seconda dell’angolazione visiva. Utilizzare l’unità in una
posizione in cui sia possibile vedere chiaramente le immagini visualizzate.
! Questa unità supporta schede di memoria
microSD e microSDHC. In questo manuale,
si fa riferimento in modo collettivo a questi
tipi di supporti di archiviazione con il termine
“schede di memoria SD”.
! Questo lettore non supporta schede di memoria microSDXC.
! Pioneer non garantisce il funzionamento di
tutti i tipi di schede di memoria SD compatibili con questa unità.
! Non espellere la scheda di memoria SD o
modificare la posizione dell’interruttore della
chiave di avviamento mentre è in corso la lettura dei dati contenuti nella scheda di memoria SD inserita. Altrimenti, i dati archiviati
sulla scheda di memoria SD potrebbero subire danni. Pioneer non accetta alcuna responsabilità per eventuali danni provocati in tali
casi.
! Le schede di memoria SD hanno una durata
operativa specifica. Anche se una scheda di
memoria SD viene usata nel modo corretto,
potrebbe non essere possibile scrivere o eliminare correttamente i dati dalla scheda di
memoria SD una volta che la scheda ha raggiunto la fine della durata operativa utile.
! Alcune schede di memoria SD potrebbero
non essere riconosciute da questa unità,
anche se vengono riconosciute da un computer. La formattazione delle schede di memoria SD utilizzando un programma di
formattazione dedicato potrebbe risolvere il
problema. Le schede di memoria SD formattate utilizzando la relativa funzione standard
di un computer non sono conformi con lo
standard SD. Con tali schede potrebbero verificarsi problemi come l’impossibilità di lettura o scrittura dei dati. Si consiglia di
utilizzare un programma di formattazione dedicato, per evitare tali problemi. Tutti i dati archiviati sulla scheda di memoria SD vengono
Precauzioni per il
funzionamento a
temperature alte/basse
! Se la temperatura è troppo alta o troppo
bassa perché l’unità possa funzionare correttamente, la luminosità del display viene ridotta o la proiezione delle immagini viene
interrotta automaticamente per proteggere i
componenti dell’unità. Ciò non indica un
malfunzionamento. Attendere che la temperatura torni entro i valori consentiti perché
l’unità riprenda a funzionare.
! Questa unità non funziona correttamente se
la temperatura è troppo alta o troppo bassa.
Utilizzare l’unità all’interno dell’intervallo di
temperature consentite specificato.
Per ulteriori dettagli, vedere il manuale d’istruzioni.
eliminati quando la scheda viene formattata.
Prima di procedere, eseguire il backup di
tutti i dati necessari. È possibile ottenere dal
sito riportato in basso un programma di formattazione dedicato per le schede di memoria SD.
https://www.sdcard.org/home/
(Valido al giugno 2012)
! Pioneer non copre in garanzia l’eventuale riparazione di una scheda di memoria SD con
difetti provocati dalla relativa formattazione.
Inoltre, Pioneer non accetta alcuna responsabilità per danni, costi o spese derivanti da
perdita o danneggiamento dei dati dovuti
alla formattazione di una scheda di memoria
SD. Leggere le istruzioni del programma di
formattazione e seguire le istruzioni riportate
per la formattazione della scheda di memoria
SD che si intende utilizzare, accettando la responsabilità per eventuali problemi che potrebbero verificarsi.
Note sull’iPhone
! Per i modelli di iPhone e le versioni del software iPhone compatibili con questo prodotto, vedere le informazioni sul nostro sito web.
! In questo manuale, si fa riferimento in modo
collettivo ai modelli di iPhone compatibili
con questa unità con il termine “iPhone”.
! Pioneer non garantisce il funzionamento di
tutti i tipi di modelli di iPhone compatibili
con questa unità.
! Pioneer non accetta alcuna responsabilità
per eventuali perdite di dati derivanti dall’uso
dell’iPhone con questa unità.
! Non lasciare l’iPhone esposto alla luce solare diretta per periodi di tempo prolungati. Altrimenti, l’iPhone potrebbe subire danni.
! Non lasciare l’iPhone esposto a temperature
elevate.
! Per dettagli sull’iPhone, vedere i relativi manuali.
It
<CRD4765-A>46
Black plate (47,1)
Sezione
Informazioni importanti per la sicurezza
Informazioni importanti per la sicurezza
Aggiornamenti del software
Note su questa unità
! Per i dispositivi Android compatibili con questo prodotto, vedere le informazioni sul nostro sito web.
! Non si garantisce la compatibilità con tutti i
dispositivi Android.
! L’uso di alcune funzioni del dispositivo
Android potrebbe non essere consentito durante la guida in determinate aree. Pertanto
è necessario conoscere e osservare tutte le
normative vigenti.
In caso di dubbi in merito a una funzione
specifica, utilizzarla solo quando il veicolo è
parcheggiato.
Evitare di utilizzare una qualsiasi funzione,
qualora possa comportare rischi nelle condizioni di guida correnti.
! Pioneer non accetta alcuna responsabilità
per eventuali perdite di dati derivanti dall’uso
del dispositivo Android con questa unità.
! Non lasciare il dispositivo Android esposto
alla luce solare diretta per periodi di tempo
prolungati. Altrimenti, il dispositivo potrebbe
subire danni.
! Non lasciare il dispositivo Android esposto a
temperature elevate.
! Per dettagli sui dispositivi Android, vedere i
relativi manuali.
! Per il salvataggio del file di aggiornamento
del software è necessaria una scheda di memoria SD con capacità di almeno 2 GB.
! Per i clienti che non dispongono di accesso
a internet, sarà resa disponibile una volta all’anno una scheda di memoria microSD contenente l’ultima versione aggiornata del
software.
I dettagli verranno pubblicati sul sito web.
! La cronologia di funzionamento di questa
unità viene registrata per scopi di miglioramento delle prestazioni. Durante la registrazione di tale cronologia non viene ottenuto
alcun dato relativo al cliente. Le informazioni
registrate potranno essere condivise, a scopo
di analisi dei dati, con altre strutture o subfornitori specificati da Pioneer, solo se il
cliente fornirà la preventiva autorizzazione.
! Pioneer ha verificato e confermato che le immagini proiettate possano essere visualizzate
a una distanza di 3 m dal parabrezza del veicolo. Tuttavia, le distanze potrebbero risultare
differenti a seconda dell’altezza e della posizione del sedile del conducente, dall’altezza
e dall’inclinazione del soffitto del veicolo e
dalla quantità di luce ambientale.
! Pioneer non garantisce che il prodotto sarà
conforme allo scopo particolare di un utente
specifico.
! Le specifiche e il design dell’unità sono soggetti a modifiche, a scopo di miglioramento
del prodotto, senza preavviso. Pioneer non
accetta né riconosce eventuali richieste da
parte di clienti di modifiche o variazioni del
prodotto, del quale sono qui descritti design
e specifiche, per rispondere a esigenze specifiche.
! Le immagini relative alle schermate contenute in questo manuale potrebbero essere diverse da quelle effettivamente visualizzate
col prodotto.
! Il design della visualizzazione delle schermate è soggetto a modifiche, a scopo di miglioramento del prodotto, senza preavviso.
Copyright
I diritti d’autore dei dati e dei programmi inclusi
in questo prodotto sono di proprietà di Pioneer o
di terze parti che hanno concesso a Pioneer
l’uso di tali dati o programmi, in conformità alla
normativa sul copyright. È vietata, in qualsiasi
forma, la copia, la modifica o l’analisi parziale o
totale dei dati o dei programmi contenuti in questo prodotto.
Visita il nostro sito Web
Visita il seguente sito Web:
http://www.pioneer.it
! Sarà possibile registrare il prodotto. Pioneer
conserverà i dettagli dell’acquisto per agevolare il riferimento a tali informazioni nel caso
di una richiesta di risarcimento assicurativa,
come in caso di furto o smarrimento.
! Sul nostro sito Web sono disponibili le informazioni più recenti su PIONEER
CORPORATION.
Dati salvati dal cliente
! In casi come la riparazione dell’unità, ecc.,
Pioneer non accetta alcuna responsabilità
per gli aggiornamenti del software eseguiti
dal cliente.
! Le impostazioni registrate in questa unità potrebbero essere modificate o alterate automaticamente a causa di imprevisti,
malfunzionamenti, come parte dell’intervento di riparazione o mentre vengono eseguite
altre procedure. Si consiglia di conservare
un elenco delle impostazioni importanti.
Pioneer non accetta alcuna responsabilità
per danni o perdite di vantaggi derivanti da
perdite di dati verificatesi in tali casi.
! Pioneer non fornisce servizi di recupero di
dati danneggiati o cancellati.
Italiano
Note sui dispositivi Android
02
It
<CRD4765-A>47
47
Black plate (48,1)
Sezione
Parti in dotazione
03
Prima del collegamento
04
Precauzioni per il collegamento
Unità head-up display:
ATTENZIONE
Cavo di alimentazione x 1
Unità principale x 1
Cuscinetto per il parasole x 1
Staffa di montaggio x 1
Nastro a doppio lato x 1
Telecomando HUD:
Piastra di regolazione spessore
parasole (grande) x 1
! Non erogare l’alimentazione accessoria dall’interfaccia del bus CAN, ecc. Accertarsi di
collegare l’alimentazione accessoria del veicolo.
! Installare le parti in dotazione come specificato.
L’uso di parti diverse da quelle in dotazione
potrebbe provocare malfunzionamenti.
— Antenna FM/AM e relativo cavo dell’antenna
— Antenna GPS e relativo cavo dell’antenna
— Ricevitore di segnale radiofaro e relativo
cavo dell’antenna
— Cavo di alimentazione
Posizionare le antenne quanto più lontano
possibile le une dalle altre.
! Non legare le antenne insieme, né sovrapporle o incrociarle.
Il disturbi ricevuti dall’antenna e dal cavo dell’antenna riducono la sensibilità della ricezione.
Collegamento del cavo di
alimentazione
! Collegare saldamente il cavo di alimentazione inserendolo nel connettore di alimentazione dell’unità. Se non è possibile inserire il
connettore agevolmente, l’orientamento potrebbe non essere corretto. Verificare l’orientamento del connettore. Non applicare forza
per inserirlo. Altrimenti, potrebbero verificarsi malfunzionamenti.
Unità principale x 1
Piastra di regolazione spessore
parasole (piccola) x 1
(Nel telecomando è preinstallato un pacco batterie agli ioni di litio. Prima di utilizzare l’unità, rimuovere la pellicola isolante.)
Viti di montaggio x 6
Prevenzione dei disturbi
Chiavino esagonale x 1
48
! Per prevenire eventuali disturbi, posizionare i
componenti elencati di seguito quanto più
lontano possibile dall’iPhone, dal dispositivo
Android e dagli altri cavi e fili.
— Antenna video e relativo cavo dell’antenna
It
<CRD4765-A>48
Black plate (49,1)
Sezione
Precauzioni per l’installazione
AVVERTENZA
! Non lasciare l’unità in luoghi soggetti alla
luce solare diretta.
Non rimuovere la pellicola protettiva del
combinatore prima di aver completato l’installazione. Il combinatore potrebbe concentrare la luce in un fascio intenso, provocando
incendi o fumo.
! Non installare mai l’unità in un veicolo decappottabile o dotato di tetto apribile. La luce
solare potrebbe essere riflessa dal combinatore e concentrata in un fascio intenso.
! Non spostare il parasole sul finestrino laterale con l’unità installata sul parasole.
ATTENZIONE
! Quando si installa l’unità in un veicolo dotato
di airbag, richiedere al produttore del veicolo
le precauzioni da adottare per le operazioni
di installazione. Altrimenti, potrebbe verificarsi l’apertura non corretta degli airbag, con
conseguente pericolo di incidenti mortali.
! Dopo aver installato l’unità potrebbe non essere possibile utilizzare alcuni accessori del
parasole, come lo specchietto di cortesia, la
relativa luce o la tasca. Prima di procedere
all’installazione, controllare la posizione
degli accessori nel veicolo.
! L’installazione dell’unità potrebbe lasciare
segni sulla superficie del parasole.
! Non è prevista l’installazione di questa unità
in corrispondenza del sedile del passeggero.
! Durante l’installazione dell’unità, sull’installatore potrebbero cadere piccoli componenti,
polvere, ecc. Per impedire che piccoli oggetti
o polvere, ecc. cadano negli occhi dell’installatore, non guardare l’unità direttamente dal
di sotto della stessa, durante l’installazione.
! Il combinatore e il diffusore dell’unità sono
componenti delicati. Non toccarli a mani
nude né fare entrare in contatto alcun attrezzo con essi durante l’installazione dell’unità.
05
Quando si deve montare
saldamente l’unità
! La coppia raccomandata di serraggio per
montare saldamente l’unità con le viti è fra
0,36 N•m e 0,59 N•m.
! Prima di applicare il nastro a doppio lato alla
scatola di collegamento del cavo di alimentazione, pulire con cura l’eventuale polvere
dalla superficie sulla quale deve essere applicato il nastro a doppio lato.
Italiano
! Assicurare l’unità al parasole con una cinghia anticaduta.
Altrimenti, l’unità potrebbe cadere, provocando incidenti o lesioni.
! Quando si installa l’unità in un veicolo dotato
di airbag, non installarla mai sulla copertura
di un airbag o in un luogo dove potrebbe interferire con l’apertura degli airbag. Altrimenti, potrebbe risultare impossibile la normale
apertura degli airbag oppure l’airbag aperto
potrebbe colpire l’unità, provocando incidenti o lesioni.
! Non lavorare in luoghi soggetti alla luce solare diretta. Altrimenti, potrebbero verificarsi
ustioni.
Inoltre, potrebbero verificarsi accecamenti
provocati dall’esposizione alla luce solare riflessa dal combinatore. Se il combinatore è
esposto alla luce solare diretta, chiuderlo.
Precauzioni per l’installazione
Prima di installare e di
fissare l’unità
Collegare prima provvisoriamente l’unità per verificare che funzioni regolarmente, quindi procedere all’installazione dell’unità. Se l’unità non
funziona regolarmente, verificare che il collegamento sia stato effettuato in modo corretto.
It
<CRD4765-A>49
49
Black plate (50,1)
Sezione
Collegamenti
06
Collegamenti
Schema di collegamento
Note
! L’indicatore a LED sulla spina dell’accendisigari si accende quando l’alimentazione viene
collegata e si spegne quando l’unità viene
spenta.
Se l’indicatore a LED non si spegne quando
il motore del veicolo viene spento, scollegare
il cavo di alimentazione dalla presa dell’accendisigari del veicolo. Altrimenti, la batteria
del veicolo potrebbe scaricarsi.
! Per dettagli sul collegamento dell’iPhone o
del dispositivo Android, vedere Impostazione
dell’iPhone o del dispositivo Android a pagina
58.
1
2
4
Selezione delle dimensioni
della presa dell’accendisigari
3
Selezionare le dimensioni della presa dell’accendisigari su L (grande) o S (piccola), in base alle
dimensioni della presa dell’accendisigari presente sul veicolo.
Sostituzione del fusibile per
la presa per l’accendisigari
1 Ruotare la spina in senso antiorario per
allentarla.
1
1 Fusibile (3 A)
2 Sostituire il fusibile con uno nuovo della
stessa capacità.
6
5
7
1
1
2
3
4
5
6
7
iPhone o dispositivo Android
Cavo USB
Cavo di alimentazione
Al connettore di alimentazione
Indicatore a LED
Selettore delle dimensioni della presa
Alla presa dell’accendisigari
Per gli utenti iPhone
! Utilizzare il cavo (2) in dotazione con
l’iPhone.
Non lasciare il cavo nel veicolo. Il cavo in dotazione con l’iPhone non è progettato per
l’uso in un veicolo.
1 Selettore delle dimensioni della presa
Per gli utenti di dispositivi
Android
! Utilizzare un cavo (2) di comunicazione dati
USB-microUSB da 1 m o meno. Non è possibile utilizzare un cavo di ricarica.
50
It
<CRD4765-A>50
Black plate (51,1)
Sezione
Posizione di installazione
Preparazione per l’installazione dell’unità
07
08
Precauzioni per
l’installazione dell’unità
ATTENZIONE
AVVERTENZA
1
2
1 Controllare il parasole.
Controllare lo spessore del parasole sul quale
deve essere installata l’unità.
È possibile installare l’unità su alette parasole
conformi alle specifiche riportate di seguito.
1 Unità principale
2 Cavo di alimentazione
Piastra di regolazione spessore parasole (piccola)
Da 20 mm a
26,5 mm
Piastra di regolazione spessore parasole (media)
Da 26,5 mm a
33 mm
Piastra di regolazione spessore parasole (grande)
Sostituzione della piastra di
regolazione dello spessore
parasole
Y
H
Installare l’unità nella posizione di installazione
specificata per offrire al conducente un campo
visivo sicuro e assicurarsi che l’unità possa svolgere correttamente tutte le funzioni necessarie.
L’installazione dell’unità in una posizione diversa
da quella specificata potrebbe non essere conforme agli standard di sicurezza per i veicoli da
autotrasporto, il veicolo potrebbe quindi non essere in grado di superare eventuali ispezioni di
sicurezza, ad esempio, a causa di interventi di
manutenzione errati.
Da 15 mm a 20 mm
T
A
Posizione di installazione
specificata
ATTENZIONE
Piastra di regolazione
spessore parasole
T: Spessore
Da 15 mm a 33 mm
H: Altezza
Da 140 mm a 240 mm
A: Distanza tra i punti
di sostegno
Almeno 185 mm
Y: Distanza dallo
specchietto, ecc.
Almeno 45 mm (valore
consigliato)
2 Determinare quale piastra di regolazione
dello spessore parasole utilizzare.
Le dimensioni della piastra di regolazione dello
spessore parasole da installare sulla staffa di
montaggio variano a seconda dello spessore del
parasole.
L’unità viene fornita con la piastra di regolazione
dello spessore parasole (media) preinstallata.
Utilizzare la piastra di regolazione dello spessore
parasole delle dimensioni adattate allo spessore
del parasole.
Italiano
! Utilizzare le viti in dotazione e installare l’unità come specificato. L’uso di viti diverse da
quelle in dotazione potrebbe provocare danni
all’unità.
! Fissare saldamente l’unità al parasole utilizzando le viti in dotazione. In caso contrario,
l’unità potrebbe cadere durante la guida, colpendo il conducente e provocando lesioni.
! Leggere con attenzione l’intero manuale,
quindi installare l’unità correttamente, in
conformità agli standard di sicurezza.
Non installare l’unità su un parasole instabile o
difettoso. Altrimenti, l’unità potrebbe cadere,
provocando incidenti o malfunzionamenti.
Spessore del parasole
1 Tirare la leva di blocco dell’HUD e farla
scorrere in posizione di rilascio del blocco.
1
2
1 Posizione di rilascio del blocco
2 Leva di blocco dell’HUD
2 Rimuovere le otto viti, incluse le viti di regolazione della direzione longitudinale (mostrate nell’illustrazione) sulla staffa di
montaggio, quindi rimuovere la piastra di regolazione dello spessore parasole (media).
Quando si rimuovono le viti di regolazione della
direzione longitudinale, la piastra di regolazione
della direzione longitudinale si distacca dalla
piastra di regolazione dello spessore parasole.
It
<CRD4765-A>51
51
Black plate (52,1)
Sezione
Preparazione per l’installazione dell’unità
08
Installazione dell’unità principale
09
1
4 Allineare i fori delle viti sulla piastra di regolazione dello spessore parasole con quelli
della staffa di montaggio, quindi serrare
nelle posizioni originali le viti rimanenti precedentemente rimosse.
2
3
1 Allineare la leva di blocco dell’HUD in posizione di rilascio del blocco.
Tirare la leva di blocco dell’HUD e farla scorrere
in posizione di rilascio del blocco.
1
2
1 Piastra di regolazione spessore parasole
2 Viti di regolazione della direzione longitudinale
3 Piastra di regolazione della direzione longitudinale
1 Posizione di rilascio del blocco
2 Leva di blocco dell’HUD
! Quando si aziona la leva di blocco dell’HUD,
non afferrare la parte mobile della staffa di
montaggio. Se si afferra la parte mobile, non
sarà possibile muovere la leva di blocco dell’HUD.
3 Regolare lo spessore della piastra di montaggio.
Allineare le linee sulla staffa di montaggio ai
segni di scala situati a sinistra e a destra della
piastra di regolazione dello spessore parasole in
base allo spessore del parasole, quindi serrare
tre viti.
2
3 Applicare la piastra di regolazione della
direzione longitudinale alla piastra di regolazione dello spessore parasole da utilizzare.
1
1
1
1
3
2
1 Piastra di regolazione spessore parasole
2 Viti di regolazione della direzione longitudinale
3 Piastra di regolazione della direzione longitudinale
52
1 Staffa di montaggio
2 Piastra di regolazione spessore parasole
! Di seguito vengono riportati i valori approssimativi per i segni di scala sulla piastra di regolazione dello spessore parasole (media).
L’illustrazione si riferisce a un esempio con la
linea sulla staffa di montaggio allineata al
segno di scala di 22 mm.
1 Parte mobile
2 Rilasciare le piastre di blocco sulla staffa
di montaggio.
Tirare a destra e a sinistra le piastre di blocco
sulla staffa di montaggio per rilasciare il blocco.
1
2
3
4
It
<CRD4765-A>52
Black plate (53,1)
Sezione
Installazione dell’unità principale
1
2
3
4
Installazione dell’unità principale
09
20 mm
22 mm
24 mm
26 mm
4 Fissare la staffa di montaggio al parasole.
Spingere in alto il parasole, in posizione orizzontale.
Afferrare le estremità destra e sinistra delle piastre di blocco sulla staffa di montaggio, quindi
installare la staffa di montaggio sul parasole
spingendola a fondo.
5 Spingere in basso il parasole, in posizione
verticale.
6 Bloccare la staffa di montaggio.
Spingere le piastre di blocco da sinistra e da destra in modo che blocchino la staffa di montaggio.
9 Verificare che lo spessore regolato per la
staffa di montaggio sia appropriato.
Spingere le piastre di blocco da sinistra e da destra in modo che blocchino la staffa di montaggio.
Verificare che non sia possibile installare facilmente la staffa di montaggio sul parasole mentre le piastre di blocco sono bloccate.
7 Verificare che la staffa di montaggio sia
installata in modo sicuro.
Spingere nuovamente il parasole in posizione
orizzontale.
Spingere avanti e indietro la staffa di montaggio
per accertarsi che sia installata in modo sicuro.
10 Fissare l’unità principale alla staffa di
montaggio, dopo averne regolato il corretto
spessore.
Verificare che il combinatore il diffusore dell’unità principale siano in posizione chiusa, quindi
allineare la leva di blocco dell’HUD sulla staffa
di montaggio alla posizione di rilascio del blocco.
Unità principale:
Italiano
! Se non è possibile spingere a fondo la staffa
di montaggio, sarà necessario aumentare lo
spessore della staffa di montaggio. Rimuovere la staffa di montaggio dal parasole, tornare
al passaggio 3 e regolare la posizione sulla
scala, quindi reinstallare la staffa di montaggio sul parasole.
! Se non è possibile spingere a fondo le piastre
di blocco, sarà necessario aumentare lo spessore della staffa di montaggio. Rimuovere la
staffa di montaggio dal parasole, tornare al
passaggio 3 e regolare la posizione sulla
scala, quindi reinstallare la staffa di montaggio sul parasole.
1
2
1 Combinatore
2 Diffusore
Se non risulta possibile installare facilmente la
staffa di montaggio sul parasole, lo spessore è
corretto.
! Se risulta facile rimuovere la staffa di montaggio dal parasole, è necessario ridurre lo
spessore della staffa di montaggio. Rimuovere la staffa di montaggio dal parasole, tornare
al passaggio 3 e regolare la posizione sulla
scala, quindi reinstallare la staffa di montaggio sul parasole.
8 Rimuovere la staffa di montaggio.
Spingere il parasole in basso, in posizione verticale e tirare le piastre di blocco a sinistra e a destra per rilasciare il blocco.
Spingere in alto il parasole, in posizione orizzontale e rimuovere la staffa di montaggio dal parasole.
! Se invece risulta possibile installare facilmente la staffa di montaggio sul parasole mentre
le piastre di blocco sono bloccate, lo spessore della staffa di montaggio non è corretto.
Rimuovere la staffa di montaggio dal parasole, tornare al passaggio 3 e regolare la posizione sulla scala, quindi reinstallare la staffa
di montaggio sul parasole.
Staffa di montaggio:
1
2
1 Posizione di rilascio del blocco
2 Leva di blocco dell’HUD
Fissare la staffa di montaggio e l’unità principale
nei quattro punti indicati sulle posizioni anteriore e posteriore, utilizzando le viti di montaggio in
dotazione.
It
<CRD4765-A>53
53
Black plate (54,1)
Sezione
Installazione dell’unità principale
09
Unità principale, posizione anteriore:
1
2
12 Allentare di un giro le viti di regolazione
della direzione longitudinale sull’unità.
Unità principale, posizione anteriore:
1
2
14 Spingere in basso il parasole, in posizione
verticale.
15 Assicurare l’unità al parasole con una cinghia anticaduta.
Tirare la cinghia anticaduta in avanti dalla parte
posteriore del parasole, spinto in basso in posizione verticale.
1 Fessure
2 Allineare i mozzi alle fessure.
Unità principale, posizione posteriore:
Installazione dell’unità principale
13 Installare l’unità sul parasole.
Tirare a destra e a sinistra le piastre di blocco
sulla staffa di montaggio per rilasciare il blocco.
Spingere in alto il parasole, in posizione orizzontale.
Afferrare le estremità destra e sinistra delle piastre di blocco sulla staffa di montaggio, quindi
installare l’unità sul parasole spingendo la staffa
di montaggio a fondo.
16 Bloccare la staffa di montaggio.
Spingere le piastre di blocco da sinistra e da destra in modo che blocchino la staffa di montaggio.
Far passare la cinghia anticaduta attraverso la
fessura, come mostrato nell’illustrazione.
1 Allineare i mozzi alle fessure.
2 Fessure
17 Spingere in alto il parasole, in posizione
orizzontale.
11 Allentare di un giro le quattro viti di
montaggio, precedentemente serrate nel
passaggio 10.
Tirare la cinghia anticaduta verso il basso e fissarla mentre viene tirata in basso.
54
It
<CRD4765-A>54
Black plate (55,1)
Sezione
Installazione dell’unità principale
18 Bloccare la posizione dell’unità principale.
Tirare la leva di blocco dell’HUD e farla scorrere
in posizione di blocco.
Installazione dell’unità principale
20 Regolare la direzione dell’unità principale.
Aprire il diffusore e il combinatore dell’unità
principale.
1
1
1 Regolare il combinatore in modo che l’intera schermata del diffusore possa essere
visualizzata al centro del combinatore.
! Assicurarsi di regolare l’unità principale in
modo che sia allineata in avanti.
1
1 Posizione di blocco
19 Regolare l’inclinazione dell’unità principale.
Regolare l’angolazione in modo che l’unità principale sia livellata.
2
1 Diffusore
2 Combinatore
Regolare la direzione dell’unità principale in
modo che il diffusore e il combinatore siano allineati in avanti.
21 Sbloccare la posizione dell’unità principale.
Tirare la leva di blocco dell’HUD e farla scorrere
in posizione di rilascio del blocco.
24 Installare l’unità sul parasole.
Eseguire le operazioni riportate nei passaggi da
13 a 17 per installare l’unità sul parasole.
1
Sinistra
Destra Sinistra
Destra
Inclinare il parasole di circa 20 gradi e serrare
saldamente le due viti di montaggio sulla parte
posteriore dell’unità principale, precedentemente allentate nel passaggio 11.
! Se la pellicola protettiva del combinatore interferisce con la regolazione, rimuovere la
pellicola. Dopo aver completato la regolazione, riapplicare la pellicola protettiva del combinatore.
1 Posizione di rilascio del blocco
1
L’unità principale scorre in indietro e la posizione dell’unità viene sbloccata.
22 Rimuovere l’unità dal parasole.
Chiudere il diffusore e il combinatore dell’unità
principale, quindi spingere il parasole in basso,
in posizione verticale.
Tirare a destra e a sinistra le piastre di blocco
sulla staffa di montaggio per rilasciare il blocco.
Sbloccare la cinghia anticaduta. Spingere in
alto il parasole, in posizione orizzontale e quindi
rimuovere la staffa di montaggio dal parasole.
! Fare attenzione a non far cadere l’unità.
1 Allineare l’unità in avanti
23 Serrare saldamente le viti di montaggio
sulla parte anteriore dell’unità principale.
Serrare saldamente le due viti di montaggio
sulla parte anteriore dell’unità principale, precedentemente allentate nel passaggio 11 e le due
viti di regolazione della direzione longitudinale,
precedentemente allentate nel passaggio 12.
Italiano
L’unità principale scorre in avanti e la posizione
dell’unità viene bloccata.
09
! Prima di montare l’unità sul parasole, allineare la leva di blocco dell’HUD alla posizione di
rilascio del blocco.
! Se, con il parasole in posizione orizzontale, vi
è spazio tra il soffitto del veicolo e il parasole,
applicare il il cuscinetto per il parasole alla
cinghia anticaduta.
1
2
3
4
1 Soffitto del veicolo
2 Parasole
3 Spazio tra il soffitto del veicolo e il parasole
4 Nessuno spazio tra il soffitto del veicolo e il parasole
It
<CRD4765-A>55
55
Black plate (56,1)
Sezione
Installazione dell’unità principale
09
! Se è necessario montare il cuscinetto per il
parasole, fissare il cuscinetto per il parasole
all’apposito supporto, montarlo sulla cinghia
anticaduta, quindi assicurare la cinghia anticaduta.
Installazione dell’unità principale
25 Collegare il cavo di alimentazione all’unità.
1
Instradare il cavo di alimentazione fissandolo ai
punti indicati con morsetti disponibili in commercio.
2
28 Assicurare il cavo di alimentazione.
Fissare il nastro a doppio lato alla scatola di collegamento del cavo di alimentazione, quindi fissare la scatola di collegamento in una posizione
in cui sia possibile assicurare saldamente il
cavo.
1
2
1
1
3
1 Cinghia anticaduta
2 Cuscinetto per il parasole
3 Supporto per il cuscinetto parasole
1 Cavo di alimentazione
26 Instradare il cavo di alimentazione.
Instradare il cavo di alimentazione in modo che
non interferisca con la guida e assicurarsi che il
conducente abbia un campo visivo sicuro.
1
2
1 Cuscinetto per il parasole
2 Cinghia anticaduta
! Posizionare il cavo di alimentazione in modo
che non ostruisca la visuale del conducente.
! Instradare il cavo in modo che non interferisca con i movimenti in avanti e in indietro
dell’unità quando si agisce sulla leva di blocco dell’HUD.
1 Fissare il cavo con morsetti disponibili in
commercio.
! Non fissare o installare il cavo sul parabrezza.
! Non instradare il cavo di alimentazione ai
piedi del sedile del conducente. Altrimenti, il
cavo di alimentazione potrebbe impigliarsi
sotto il pedale del freno e interferire con la
guida, con conseguente pericolo di gravi incidenti.
3
1 Cavo di alimentazione
2 Superficie cruscotto, ecc.
3 Nastro a doppio lato
Fissare il cavo con morsetti disponibili in commercio.
27 Bloccare la posizione dell’unità principale.
Tirare la leva di blocco dell’HUD e farla scorrere
in posizione di blocco.
1
1 Posizione di blocco
L’unità principale scorre in avanti e la posizione
dell’unità viene bloccata.
56
It
<CRD4765-A>56
Black plate (57,1)
Sezione
Installazione dell’unità principale
Dopo l’installazione
ATTENZIONE
! Verificare se l’unità è installata correttamente. Nei casi descritti di seguito, tornare al
passaggio 1 e installare correttamente l’unità.
1
3
29 Rimuovere la pellicola protettiva del combinatore.
Verificare che il cavo di alimentazione sia collegato e instradato correttamente, quindi rimuovere la pellicola protettiva del combinatore.
Collegamento del cavo di
alimentazione alla presa
dell’accendisigari
% Collegare saldamente la spina dell’accendisigari del cavo di alimentazione inserendola nella presa dell’accendisigari del veicolo.
L’indicatore a LED sulla spina dell’accendisigari
si accende in verde quando l’alimentazione
viene collegata.
1
2
1
1 Indicatore a LED
Per ulteriori informazioni, vedere Collegamento del cavo di alimentazione alla presa dell’accendisigari a pagina 57.
09
Italiano
! Non installare mai il cavo di alimentazione in
una posizione in cui non sia possibile fissare
il cavo, a causa di vibrazioni del veicolo, ecc.
! Se non è possibile fissare il cavo con il nastro
a doppio lato in dotazione, assicurarlo saldamente utilizzando nastro a doppio lato disponibile in commercio, ecc.
! Fissare saldamente l’iPhone o il dispositivo
Android su un supporto disponibile in commercio.
! Inserire la spina dell’accendisigari del cavo di
alimentazione nella presa dell’accendisigari
del veicolo con l’indicatore a LED rivolto
verso l’alto, in modo che sia visibile dal conducente.
L’indicatore a LED sulla spina dell’accendisigari si accende in verde quando l’alimentazione viene collegata.
Installazione dell’unità principale
4
1 Le piastre di blocco non sono fissate.
2 L’unità non è assicurata con una cinghia
anticaduta.
3 L’unità è installata in posizione obliqua.
4 L’unità è installata in posizione invertita.
1 Indicatore a LED
Note
! Inserire la spina dell’accendisigari del cavo
di alimentazione nella presa dell’accendisigari del veicolo con l’indicatore a LED rivolto
verso l’alto, in modo che sia visibile dal conducente.
! Se l’indicatore a LED non si spegne quando
il motore del veicolo viene spento, scollegare
il cavo di alimentazione dalla presa dell’accendisigari del veicolo. Altrimenti, la batteria
del veicolo potrebbe scaricarsi.
! Quando l’unità non viene utilizzata, chiudere
il diffusore.
! Quando si rimuove l’unità dal parasole per
conservarla, accertarsi di chiudere il diffusore e il combinatore.
Non lasciare l’unità in luoghi esposti alla
luce solare diretta, ad esempio, sul cruscotto. Il diffusore o il combinatore potrebbero
concentrare la luce in un fascio intenso, provocando incendi o fumo.
It
<CRD4765-A>57
57
Black plate (58,1)
Sezione
Impostazione dell’iPhone o del dispositivo Android
10
Collegamento dell’iPhone o del
dispositivo Android all’unità
Per gli utenti iPhone
! Utilizzare il cavo in dotazione con l’iPhone.
Non lasciare il cavo nel veicolo. Il cavo in dotazione con l’iPhone non è progettato per
l’uso in un veicolo.
Per gli utenti di dispositivi
Android
! Utilizzare un cavo di comunicazione dati
USB-microUSB da 1 m o meno. Non è possibile utilizzare un cavo di ricarica.
1 Collegare il cavo USB all’iPhone o al dispositivo Android utilizzato.
2 Collegare saldamente l’altra estremità
del cavo USB alla scatola di collegamento del
cavo di alimentazione.
1
2 Alla presa dell’accendisigari
3 Scatola di collegamento del cavo di alimentazione
4 Cavo USB
Installazione dell’applicazione
di navigazione
Installare l’applicazione di navigazione
nell’iPhone o nel dispositivo Android prima di
utilizzare questa unità.
È possibile scaricare l’applicazione di navigazione dall’App Store di iTunes o da Google Play.
Per ulteriori dettagli sull’applicazione di navigazione, vedere il seguente sito web.
http://www.pioneer.eu/navgatehud
Impostazione dell’iPhone o del dispositivo Android
Se l’applicazione non si avvia automaticamente quando il dispositivo Android viene
collegato all’unità, toccare l’applicazione
nella finestra popup visualizzata sul dispositivo Android.
Se si seleziona la casella di controllo e quindi
l’applicazione nella finestra popup, la finestra popup non verrà visualizzata al successivo avvio.
Avvio dell’applicazione di
navigazione
Quando si usa l’applicazione di navigazione per
la prima volta, avviare l’applicazione manualmente. L’applicazione verrà avviata automaticamente dal successivo collegamento dell’iPhone
o del dispositivo Android all’unità.
ATTENZIONE
1 Scatola di collegamento del cavo di alimentazione
Schema del collegamento:
1
2
3
4
1 iPhone o dispositivo Android
58
! Per utilizzare l’applicazione di navigazione, è
necessario acquistare preventivamente il
supporto all’HUD NavGate. Acquistare il supporto all’HUD NavGate nell’applicazione seguendo le istruzioni visualizzate su schermo.
! Per acquistare il supporto all’HUD NavGate,
è necessaria una connessione internet.
Note
! Per gli utenti iPhone
Se l’applicazione non si avvia automaticamente quando l’iPhone viene collegato all’unità, toccare “Consenti” nella finestra popup
visualizzata sull’iPhone.
! Per gli utenti di dispositivi Android
It
<CRD4765-A>58
Black plate (59,1)
Sezione
Modalità di visualizzazione
Dopo aver completato l’installazione e il collegamento
11
12
Per questa unità sono disponibili cinque tipi di viste: Vista AR (modalità a bassa velocità e modalità ad alta velocità), vista Elenco (modalità a bassa velocità e modalità ad alta velocità), vista Incrocio, Panoramica dell’itinerario e vista Orologio.
Se viene stabilita la comunicazione tra l’unità e l’applicazione di navigazione, viene visualizzata una delle
viste riportate in basso.
Vista Elenco
Vista AR
Modalità a bassa velocità
Regolazione delle
impostazioni di visualizzazione
Dopo aver completato l’installazione e il collegamento, accendere l’unità (avviare il motore del
veicolo) e regolare l’angolazione del combinatore in modo che sia possibile visualizzare le immagini.
Modalità a bassa velocità
Premere ◀.
Modalità ad alta velocità
Modalità ad alta velocità
Se il veicolo si avvicina a un incrocio
Se il veicolo si avvicina a un incrocio
Nota
A seconda della luminosità dello schermo e
delle condizioni circostanti, potrebbe non essere
possibile visualizzare correttamente le immagini
sullo schermo. Regolare correttamente la luminosità dello schermo (vedere Regolazione della
luminosità del display a pagina 61) o spostare il
veicolo in una posizione in cui il display sia più
facilmente visibile, quindi azionare l’unità.
1
Premere il pulsante
Posizione
Regolare la posizione delle immagini visualizzate.
1 Premere il pulsante a/b per selezionare
la voce di impostazione, quindi premere il
pulsante d.
Italiano
Premere ▶.
3 Premere il pulsante a/b per selezionare
la voce di impostazione, quindi premere il
pulsante d.
.
Vista Incrocio
Voce di impostazione
Panoramica dell'itinerario
Se si preme il pulsante
quando è
stata specificata una destinazione:
Posizione orizzontale
Selezionare per regolare la
posizione orizzontale delle
immagini visualizzate.
Posizione verticale
Selezionare per regolare la
posizione verticale delle immagini visualizzate.
Vista Orologio
Se si preme il pulsante
quando non
è stata specificata una destinazione:
2 Premere il pulsante a/b per selezionare
Impostazioni di visualizzazione e quindi premere il pulsante d.
Descrizione
2 Premere il pulsante a/b per visualizzare
lo schema della griglia integrale.
Es.: Quando la regolazione è stata eseguita
correttamente
Note
! La modalità a bassa velocità della vista AR
viene visualizzata quando non è stata specificata una destinazione.
! Per ulteriori dettagli sulle viste, vedere il manuale di funzionamento.
It
<CRD4765-A>59
59
Black plate (60,1)
Sezione
Dopo aver completato l’installazione e il collegamento
12
Es.: Quando la regolazione non è stata eseguita correttamente
Dopo aver completato l’installazione e il collegamento
Rapporto di aspetto
Bilanciamento del bianco
Regolare il rapporto d’aspetto delle immagini visualizzate.
Regolare il bilanciamento del bianco delle immagini visualizzate.
% Premere il pulsante a/b per rendere lo
schema della griglia rettangolare.
1 Premere il pulsante a/b per selezionare
la voce di impostazione, quindi premere il
pulsante d.
Zoom
Regolare le dimensioni delle immagini visualizzate.
% Premere il pulsante a/b per visualizzare
lo schema della griglia integrale.
Correzione geometrica
Correggere la distorsione delle immagini visualizzate.
Voce di impostazione
1 Premere il pulsante a/b per selezionare
la voce di impostazione, quindi premere il
pulsante d.
Rosso
Selezionare per regolare i
toni rossi.
Verde
Selezionare per regolare i
toni verdi.
Blu
Selezionare per regolare i
toni blu.
Rotazione
Regolare la rotazione delle immagini visualizzate.
% Premere il pulsante a/b per livellare lo
schema della griglia.
Es.: Quando la regolazione è stata eseguita
correttamente
Es.: Quando la regolazione non è stata eseguita correttamente
60
Voce di impostazione
Descrizione
Distorsione del
trapezio
Selezionare per regolare la
distorsione trapezoidale.
Distorsione a barile
Selezionare per regolare la
distorsione curvilineare.
Descrizione
2 Premere il pulsante a/b per regolare la
luminosità.
Es.: Regolazione del colore rosso
2 Premere il pulsante a/b per rendere lo
schema della griglia rettangolare.
Es.: Regolazione della distorsione trapezoidale
It
<CRD4765-A>60
Black plate (61,1)
Sezione
Prima della guida
Configurazione delle
impostazioni delle funzioni
dell’unità
È possibile configurare le impostazioni delle funzioni dell’unità dalla schermata Impostazioni.
ATTENZIONE
% Premere il pulsante
Menu
Descrizione
Lingua
Imposta la lingua di visualizzazione.
Approposito di
Visualizza la versione software dell’unità e le note legali.
Reset di tutte le
impostazioni
Ripristina le impostazioni
predefinite.
Regolazione dell’angolazione
del combinatore
Regolare l’angolazione del combinatore in base
alla posizione del sedile.
ATTENZIONE
Quando si regola l’angolazione, afferrare il combinatore per i bordi.
1
Menu
Aprire il combinatore e il diffusore.
Regolare le impostazioni di
visualizzazione per le immagini proiettate.
Impostazioni
delle funzioni
Configura le impostazioni
per le funzioni.
Posizione corretta del
combinatore
Prima dell’uso, accertarsi di verificare che l’estremità inferiore del combinatore si trovi al di
sopra del campo visivo del conducente mentre e
seduto e guarda diritto davanti a se, nella posizione di guida effettiva. Se l’estremità inferiore
del combinatore risulta al di sotto del campo visivo, non utilizzare l’unità. Ripiegare il combinatore in posizione chiusa per assicurare il
corretto campo visivo durante la guida.
1
1 Regolare il combinatore in modo che l’intera schermata del diffusore possa essere
visualizzata al centro del combinatore.
Quando si entra o si esce dal
veicolo
Fare attenzione a non urtare l’unità con la testa.
Regolazione della
luminosità del display
La funzione di varialuce su questa unità regola
automaticamente la luminosità del display in
base alla quantità di luce ambientale.
È possibile regolare manualmente la luminosità
del display utilizzando il pulsante / .
ATTENZIONE
Descrizione
Impostazioni di
visualizzazione
2 Regolare l’angolazione del combinatore
in modo che l’intero diffusore possa essere
riflesso dal combinatore.
Note
! È possibile configurare Impostazioni delle
funzioni solo dopo aver stabilito la comunicazione con l’applicazione di navigazione.
! Premere il pulsante
per chiudere la
schermata Impostazioni.
! Per ulteriori dettagli, vedere il manuale d’istruzioni.
.
Viene visualizzata la schermata Impostazioni.
2 Combinatore
13
Italiano
! La possibilità di utilizzare le funzioni di controllo dell’unità è disattivata quando il veicolo
è in movimento. Parcheggiare il veicolo in un
luogo sicuro e innestare il freno di stazionamento prima di utilizzare le funzioni di controllo di questa unità.
! Se il veicolo inizia a muoversi durante l’impostazione delle funzioni dell’unità, la schermata Impostazioni si chiude automaticamente.
Prima della guida
Prima di utilizzare questa unità di notte o in condizioni di scarsa luce come in un tunnel, regolare correttamente la luminosità dell’unità, in
modo che non interferisca con la guida. Altrimenti, potrebbero verificarsi incidenti.
1
2
1 Diffusore
It
<CRD4765-A>61
61
Black plate (62,1)
Sezione
Prima della guida
13
% Premere il pulsante
/
.
Nota
Se si modifica la luminosità, anche la tonalità
del display potrebbe cambiare.
62
It
<CRD4765-A>62
Black plate (63,1)
Italiano
It
<CRD4765-A>63
63
Black plate (64,1)
Sección
Precauciones
Precauciones
Precauciones
Sobre el manual de operación
64
Información para los usuarios en la
recogida y tratamiento de los equipos al
final de su vida y de las pilas y baterías
usadas.
64
Conexión e instalación
65
Acerca de esta unidad
66
Precauciones de batería
66
En caso de problemas con el
dispositivo
67
Información importante de seguridad
Para evitar la descarga de la batería
68
Si es difícil ver la pantalla
68
Precauciones sobre el funcionamiento a
altas/bajas temperaturas
68
Nota sobre las tarjetas de memoria
microSD
68
Notas sobre el iPhone
68
Notas sobre los dispositivos Android
68
Derechos de propiedad intelectual
69
Actualizaciones de software
69
Visite nuestro sitio Web
69
Datos guardados del cliente
69
Notas sobre esta unidad
69
Piezas suministradas
Antes de realizar la conexión
Precauciones para la conexión
70
Conexión del cable de alimentación
Prevención de ruido
70
70
Precauciones para la instalación
Antes de instalar y fijar la unidad
71
Al fijar la unidad
71
Conexiones
Diagrama de conexión
71
Establecer el tamaño del conector del
encendedor
72
Cuando sustituya el fusible del conector del
encendedor
72
64
Posición de instalación
Precauciones para instalar la unidad
Posición de instalación especificada
72
72
Preparación para instalar la unidad
Al sustituir la placa de ajuste de grosor del
parasol
73
Instalación de la unidad principal
Tras la instalación
78
Conexión del cable de alimentación al
encendedor
78
Configuración del iPhone o dispositivo
Android
Conexión del iPhone o dispositivo Android a
la unidad
79
Instalación de la aplicación de
navegación
79
Activación de la aplicación de
navegación
79
Modos de visualización
Cuando termine la instalación y la
conexión
Configuración de ajustes de pantalla
– Posición
80
– Zoom
80
– Rotación
81
– Relación de aspecto
81
– Corrección Geométrica
81
– Balance de blancos
81
80
Antes de conducir
Configuración de los ajustes de funciones
de la unidad
82
Ajuste del ángulo del combinador
82
Al entrar y salir del coche
82
Posición correcta del combinador
82
Ajustes de brillo de pantalla
82
Importante
! Por su seguridad, pídale a su proveedor que instale la unidad en su vehículo, realice el cableado o cambie su
lugar de instalación.
La instalación, cableado y desinstalación
requieren capacidades y conocimientos
especiales. Una instalación, cableado o
desinstalación incorrectos de la unidad o
la utilización de piezas que no sean las especificadas por el fabricante podrían provocar un accidente, lesiones o anomalías.
En este caso, Pioneer no asume ninguna
responsabilidad.
! A los proveedores
Cuando termine la instalación y el cableado, realice la conexión con la unidad de
navegación y realice los ajustes de pantalla, etc.
Cuando haya terminado por completo, entréguele este manual al cliente.
Gracias por haber adquirido este producto
PIONEER
Lea con detenimiento este manual antes de utilizar el producto por primera vez para que pueda
darle el mejor uso posible. Es muy importante
que lea y cumpla con la información que aparece bajo los mensajes de ADVERTENCIA y
PRECAUCIÓN de este manual. Una vez leído,
guarde el manual en un lugar seguro y a mano
para poder consultarlo en el futuro.
Para más información sobre las funciones y funcionamiento de esta unidad, visite nuestra página web:
http://www.pioneer.eu/navgatehud
Información para los usuarios
en la recogida y tratamiento de
los equipos al final de su vida y
de las pilas y baterías usadas.
(Símbolo para equipos)
(Símbolo para pilas y baterías)
Sobre el manual de operación
En este manual se explica cómo instalar y configurar esta unidad. El funcionamiento de la
misma se explica en el manual de la unidad,
que se entrega por separado.
Es
<CRD4765-A>64
Black plate (65,1)
Sección
Precauciones
Para países fuera de la Unión
europea:
Si desea eliminar estos artículos, por favor contactar con las autoridades locales o el distribuidor y pida por el método correcto de
tratamiento.
Conexión e instalación
ADVERTENCIA
! Utilice esta unidad solamente con una batería de 12 voltios y puesta a tierra negativa.
No utilice la unidad para un vehículo de 24
voltios.
De lo contrario, podría producirse un incendio o un fallo de funcionamiento.
! No instale nunca la unidad ni realice el cableado en lugares donde pueda afectar al
funcionamiento del airbag.
Si instala la unidad en un vehículo equipado
con airbags, pregúntele al fabricante qué
precauciones debe tener para la instalación,
ya que los airbags podrían no abrirse por
completo y provocar un accidente mortal.
! No instale nunca la unidad en lugares donde
pudiera obstruir la visión del conductor, interferir con la conducción o suponer un peligro
para los pasajeros.
Podría provocar un accidente de tráfico o lesiones.
! No corte nunca el aislamiento del cable de
alimentación de la unidad para compartir la
alimentación con otros dispositivos.
Si se supera la capacidad nominal del cable
se podrían producir descargas eléctricas, incendio o anomalías.
! No utilice nunca tornillos y tuercas de piezas
de seguridad como el volante, el sistema de
frenos y el depósito.
Podría provocar un accidente de tráfico, incendio o un fallo de frenos.
! No instale la unidad en un parasol cuya
forma no sea compatible con la unidad.
Si lo hiciera, podría provocar un accidente o
anomalías.
! No instale la unidad en un parasol defectuoso.
Antes de realizar la instalación, compruebe
que no haya defectos en el parasol. Si instala
la unidad en un parasol defectuoso, la unidad podría caer, provocando un accidente o
anomalías.
! No deje la unidad en un lugar expuesto a la
luz solar directa.
No retire la lámina de protección del combinador antes de terminar la instalación. El
combinador podría concentrar la luz en un
rayo intenso, provocando humo o fuego.
! Por su seguridad, pídale a su proveedor que
instale la unidad y realice el cableado o cambie su lugar de instalación.
La instalación, cableado y desinstalación requieren capacidades y conocimientos especiales. Una instalación, cableado o
desinstalación incorrectos de la unidad podrían causar graves daños al vehículo.
! No deje la unidad en un lugar expuesto a la
luz solar directa.
Podría provocar quemaduras o ceguera.
! Desconecte el terminal negativo de la batería
antes de la instalación.
Si se ponen en contacto las terminales positiva y negativa, se puede producir un cortocircuito, lo que daría lugar a descargas
eléctricas o lesiones.
! Antes de la instalación, compruebe la ubicación de conductos, depósitos, cableado eléctrico, etc.
Si instala la unidad taladrando un orificio en
el cuerpo del vehículo, tenga cuidado de no
interferir con conductos, depósitos, cableado
eléctrico, etc. Además, proteja las piezas tratadas del óxido o la entrada de agua.
! Utilice las piezas que se suministran y fíjelas
firmemente.
Si utiliza otras piezas diferentes podrían dañarse otras piezas de la unidad o tal vez no
pueda fijarlas firmemente a la unidad. Si la
unidad se afloja, podría interferir con la conducción, provocando un accidente y lesiones.
! Instale las piezas que se entregan según se
indica.
Si no sigue las instrucciones dadas, las piezas podrían aflojarse y caer, provocando un
accidente o anomalías.
! Utilice los cables que se suministran y conéctelos de manera segura.
Para conectarlos, siga las indicaciones. Si
utiliza cables diferentes a los que se suministran, podría provocar un incendio o anomalías.
! Siga las instrucciones de este manual para
conectar e instalar la unidad.
Si no sigue las instrucciones de este manual
para conectar instalar la unidad, podría provocar un incendio o accidente.
! Fije la unidad a un parasol con una cinta que
evite su caída.
Si no, la unidad podría caer y provocar un accidente y lesiones.
! Aísle cualquier parte sin aislamiento del
cable con cinta, etc.
Un cortocircuito podría provocar un incendio, descargas eléctricas o anomalías.
! Realice el cableado de manera que los cables no queden atrapados en el cuerpo del
vehículo, tornillos o piezas móviles como el
riel del asiento.
Una desconexión o cortocircuito podría provocar un incendio, descargas eléctricas o
anomalías.
! Realice el cableado y fije los cables de manera que no interfieran con la conducción.
Si no, los cables podrían enrollarse con el volante, palanca de cambios, pedal del freno,
etc., lo que podría provocar un accidente.
! Cuando haya terminado con la instalación y
el cableado, compruebe que el equipo eléctrico funciona normalmente tal y como lo
hacía antes instalar la unidad.
Si utiliza la unidad con equipo eléctrico que
no funciona correctamente podría producirse un incendio, descargas eléctricas o un accidente de tráfico.
! Guarde las piezas pequeñas, como los tornillos, fuera del alcance de los niños pequeños.
Si se tragaran piezas, consulte al médico inmediatamente.
Español
Estos símbolos en los productos, embalaje,
y/o en los documentos que los acompañan
significa que los productos eléctricos y electrónicos al final de su vida, las pilas y baterías no deben mezclarse con los residuos
generales de su hogar.
Para el tratamiento adecuado, recuperación
y reciclado de los productos viejos y las
pilas usadas, por favor deposítelos en los
puntos de recogida de acuerdo con su legislación nacional.
Mediante el tratamiento correctamente de estos
productos y pilas, ayudará a preservar los recursos y prevenir cualquier efecto negativo en la
salud humana y el medio- ambiente que podría
surgir por una inadecuada manipulación de los
desperdicios.
Para más información sobre recogida y reciclado de los productos viejos, pilas y baterías, por
favor contacte con su municipio, sobre localización de los puntos limpios o diríjase al punto de
venta donde compró los productos.
Estos símbolos sólo son válidos en la Unión
Europea.
Precauciones
PRECAUCIÓN
! No corte nunca un trozo de cable a lo largo
del mismo.
Es
<CRD4765-A>65
65
Black plate (66,1)
Sección
Precauciones
!
!
!
!
Si hay un fusible conectado al cable, el circuito de protección no funcionará, lo que
provocará un incendio.
Al conectar los cables, asegúrese de que
estos no entren en contacto con zonas calientes del cuerpo del vehículo.
Podría producirse un incendio o descargas
eléctricas.
No realice el cableado con cordones de extensión.
Si lo hiciera, el cable podría sobrecalentarse,
provocando un incendio o descargas eléctricas.
No instale la unidad en lugares expuestos a
condiciones como lluvia, agua, condensación, polvo y humo de aceite.
Si lo hace, podría producirse humo, fuego o
anomalías.
Al realizar el cableado, no permita que los
cables entren en contacto con piezas metálicas.
Si lo hicieran, los cables podrían dañarse,
provocando un incendio, descargas eléctricas o anomalías.
Acerca de esta unidad
ADVERTENCIA
! No maneje los menús mientras conduce, ya
que desviará su atención de la conducción
segura del vehículo y podría causar un accidente de tráfico grave. Esté siempre atento a
las condiciones del tráfico y a los peatones
para garantizar una conducción segura.
! No mire fijamente a la imagen mientras conduce.
Si no mantiene la vista en la carretera podría
provocar un accidente.
! No maneje el parasol mientras conduce, ya
que podría provocar un accidente de tráfico
grave. Aparque el vehículo en un lugar seguro y ponga el freno de mano antes de manejar el parasol.
66
Precauciones
! No introduzca la mano, dedos o un cuerpo
extraño en la ranura.
Si lo hace, podría provocar lesiones, descargas eléctricas, incendio o anomalías.
! No permita que la unidad entre en contacto
con líquidos.
Podría provocar humo, incendio o descargas
eléctricas. Las familias con niños deben
prestar especial atención.
! En caso de que se introduzcan elementos extraños o líquido en esta unidad, apáguela de
inmediato y consulte a su concesionario o al
servicio técnico oficial de PIONEER más próximo a su domicilio. No utilice la unidad en
este estado, ya que se puede producir un incendio, una descarga eléctrica u otros fallos.
! No deje el mando a distancia, etc. fuera de
su sitio.
Al parar el vehículo o dar una curva, el
mando a distancia, etc. podrían caer a sus
pies y quedar atrapados bajo el pedal del
freno, interfiriendo con la conducción y provocando un accidente.
! No coloque una película o un sello en el
combinador.
Podría obstruir el campo de visión y causar
un accidente.
! No utilice la unidad si hay anomalías o averías, como imágenes que no se visualizaran
correctamente.
Podría producirse un accidente inesperado,
incendio o descargas eléctricas.
! No deje que los niños se cuelguen de la unidad o apliquen fuerza en ella.
Podrían provocar lesiones, deformación del
vehículo o anomalías.
! Cuando oiga tronar, no toque la unidad.
Podrían producirse descargas eléctricas a
causa de los rayos.
! No desmonte o modifique la unidad.
Podría producirse un accidente, incendio o
descargas eléctricas.
! Obedezca siempre la normativa de tráfico vigente.
La unidad contiene información reguladora
de tráfico, pero esta podría diferir de la normativa vigente debido a cambios. Aunque
utilice mapas de rutas o guías de voz de navegación, cumpla siempre la normativa de
tráfico local y las señales de tráfico mientras
conduce. Si no, podría provocar un accidente o infringir la normativa de tráfico.
! Esta unidad desactiva el funcionamiento de
la unidad mientras el vehículo está en movimiento. Aparque el vehículo en un lugar seguro y ponga el freno de mano antes de
manejar los menús de la unidad.
! Sustituya el fusible con uno nuevo de la
misma capacidad (amperios).
Si utiliza un fusible cuya capacidad supere la
especificada, podrían producirse un incendio
o anomalías.
! Antes de utilizar la unidad por la noche o en
un lugar oscuro, como en un túnel, ajuste el
brillo de la unidad para que no interfiera con
la conducción. Si no, podría provocar un accidente.
PRECAUCIÓN
! No utilice la unidad con ninguna finalidad
que no sea la de su uso en un vehículo.
Si lo hace, podría provocar lesiones, descargas eléctricas, fuego o humo.
! Antes de conducir, ajuste el ángulo del combinador y el brillo de la pantalla y compruebe
que los tornillos de la unidad no estén flojos,
para evitar que interfieran con la conducción.
Si no, podría provocar un accidente.
! Si utiliza el parasol o los botones mientras
conduce, preste especial atención a la conducción.
Si no, podría provocar un accidente.
! Al entrar y salir del coche, tenga cuidado de
no golpear la cabeza con la unidad.
Podría lesionarse.
! Tenga cuidado de no pillarse las manos o
dedos mientras cierra el combinador o ajusta el ángulo.
Podría lesionarse.
Precauciones de batería
ADVERTENCIA
! Mantenga la batería fuera del alcance de los
niños pequeños para evitar accidentes.
En caso de ingestión accidental de ésta, consulte a un médico de inmediato.
! Instale la batería según la polaridad (positiva
y negativa) que se especifica en este manual.
Si la polaridad de la batería no es correcta,
podría lesionarse o contaminar el medioambiente debido a la explosión de la batería o
fugas del fluido de la misma.
! Si se produjeran fugas de batería y el fluido
entrara en contacto con la piel o ropa, lávelo
con agua limpia. Si el fluido de la batería le
entrara en los ojos, lávelos con agua limpia y
consulte de inmediato a un médico.
PRECAUCIÓN
! No cortocircuite, desmonte o caliente la batería, ni la coloque en el fuego o agua.
Una explosión de la batería o fugas del fluido
de la misma podrían provocar un incendio o
lesiones.
! No cargue una batería seca.
La explosión de la batería podría provocar lesiones.
! No utilice una batería diferente a la especificada.
Una explosión de la batería o fugas del fluido
de la misma podrían provocar lesiones o
contaminar el medioambiente.
Es
<CRD4765-A>66
Black plate (67,1)
Sección
Precauciones
Información importante de seguridad
01
02
! Sustituya inmediatamente una batería utilizada por una nueva.
Las fugas del fluido de la batería podrían
contaminar el medioambiente.
! No guarde el mando a distancia a altas temperaturas, mucha humedad o a la luz solar
directa.
Si lo hace, podría deformarse el mando a distancia, explotar la batería o producirse fugas
del fluido de la batería.
En caso de problemas con el
dispositivo
ADVERTENCIA
! Esta unidad cuenta con un sistema de navegación que detecta cuándo el vehículo está
en movimiento y desactiva el funcionamiento
de la unidad. Aparque el vehículo en un
lugar seguro y ponga el freno de mano antes
de manejar la unidad.
! Si experimenta cansancio o malestar mientras utiliza la unidad, deje de utilizarla de inmediato y descanse lo suficiente hasta que
se haya recuperado. Un uso continuado de
la unidad en dichas circunstancias podría
tener efectos adversos en su condición física.
! Si tiene miopía, hipermetropía, astigmatismo
o diferencias visuales entre su ojo izquierdo y
derecho, utilice gafas, etc. para corregirlo
antes de utilizar la unidad.
! Las imágenes que se muestran en pantalla
podrían distorsionarse temporalmente al
cambiar la imagen. No se trata de ninguna
anomalía.
! En la pantalla no se visualizará ninguna imagen si se pierde la recepción GPS.
! Las imágenes que se visualizan en pantalla
podrían distorsionarse si el iPhone o dispositivo Android están sometidos a mucha
carga.
! La precisión de posicionamiento depende
del rendimiento del GPS en el iPhone o dispositivo Android conectado a la unidad.
! Si la precisión del GPS es baja, la dirección
de desplazamiento del vehículo podría no visualizarse correctamente.
! Asegure firmemente el iPhone o dispositivo
Android mientras conduce. No deje que caigan al suelo, donde podrían quedar atrapados bajo el freno o el acelerador.
! Cierre el difusor cuando no esté utilizando la
unidad.
Es
<CRD4765-A>67
Español
Si detectara humo, ruidos u olores extraños o
cualquier otra señal anómala de la unidad, apáguela inmediatamente y consulte a su proveedor
o el centro de servicio Pioneer autorizado más
cercano.
Si utiliza la unidad en estas condiciones, podría
provocar un incendio o accidente o descargas
eléctricas.
! La unidad no funciona de manera independiente. Antes de utilizarla, debe conectarla a
un iPhone o dispositivo Android en el que
haya instalado una aplicación de navegación.
Lea las precauciones de seguridad que se
describen en el manual de instrucciones del
producto que va a conectar a esta unidad.
! No maneje la unidad mientras conduce, ya
que desviaría su atención de la conducción
segura del vehículo y podría causar un accidente de tráfico grave. Esté siempre atento a
las condiciones del tráfico y a los peatones
para garantizar una conducción segura.
Aparque el vehículo en un lugar seguro y
ponga el freno de mano antes de manejar la
unidad.
! No maneje el parasol mientras conduce, ya
que podría provocar un accidente de tráfico
grave. Aparque el vehículo en un lugar seguro y ponga el freno de mano antes de manejar el parasol.
! No utilice el iPhone o dispositivo Android
mientras conduce. Aparque el vehículo en
un lugar seguro y ponga el freno de mano
antes de establecer la ruta a su destino en
un iPhone o dispositivo Android.
! Ninguna de las funciones disponibles en la
unidad garantiza en modo alguno que el entorno sea seguro. Al conducir, compruebe
con sus propios ojos que el entorno sea seguro.
! La información de ruta y la guía de voz de la
aplicación de navegación son solo de referencia. Obedezca siempre la normativa de
tráfico vigente y las señales de tráfico cuando conduzca. Si no, podría provocar un grave
accidente o infringir la normativa de tráfico.
Además, la información relativa a la distancia con el vehículo por delante del suyo, las
señales de velocidad y las cámaras que
muestra esta unidad son solo de referencia.
Obedezca siempre las señales y las condiciones de tráfico.
67
Black plate (68,1)
Sección
Información importante de seguridad
02
! Cuando quite la unidad del parasol y la guarde, asegúrese de cerrar el difusor y el combinador.
No deje la unidad de lugares expuestos a la
luz solar directa, como en el salpicadero. El
difusor o el combinador podrían concentrar
la luz en un rayo intenso, provocando humo
o fuego.
! Las luces traseras del vehículo por delante
del suyo podrían reflejarse en el combinador.
! Pioneer no asume ninguna responsabilidad
sobre cualquier cambio en el valor o tasación del vehículo, etc.
Para evitar la descarga de la
batería
! Asegúrese de que el motor del vehículo esté
en funcionamiento cuando utilice la unidad.
Si utiliza este producto sin arrancar el motor,
podría agotarse la batería.
No permita que el motor del vehículo mantenga el ralentí por más tiempo del necesario
mientras esté aparcado, con el fin de minimizar los efectos en el entorno.
! Si la unidad no se apaga (el indicador LED
en el encendedor del cable de alimentación
permanece encendido) cuando se apaga el
motor del coche, desconecte el cable de alimentación del encendedor del vehículo. Si
no, podría descargarse la batería del coche.
Si es difícil ver la pantalla
! La pantalla de esta unidad se puede ver claramente desde una serie de ángulos. Ajuste
el ángulo del combinador (la página 82) y los
ajustes de pantalla (la página 80) cuando utilice la unidad por primera vez para optimizar
la visibilidad y claridad de las imágenes visualizadas. Puede ajustar el brillo de la pantalla utilizando los botones /
(la página
82).
68
! El brillo de la pantalla varía dependiendo del
ángulo de visión. Utilice la unidad en una posición desde la que pueda ver claramente la
imagen de pantalla.
Precauciones sobre el
funcionamiento a altas/
bajas temperaturas
! Si la temperatura es demasiado alta o baja
para que la unidad funcione correctamente,
el brillo de la pantalla disminuirá o la proyección imágenes parará automáticamente para
proteger las partes de la unidad. No se trata
de ninguna anomalía. Espere hasta que se
vuelva alcanzar la temperatura correcta para
que la unidad funcione.
! La unidad no funcionará correctamente si la
temperatura es demasiado alta o demasiado
baja. Utilice la unidad dentro del rango especificado de temperaturas.
Si desea más información, consulte el manual de instrucciones.
Nota sobre las tarjetas de
memoria microSD
! Esta unidad es compatible con las tarjetas
de memoria microSD o microSDHC. Estos
tipos de dispositivos de almacenamiento se
denominan de forma conjunta como “tarjeta
de memoria SD”.
! Esta unidad no es compatible con las tarjetas de memoria microSDXC.
! Pioneer no garantiza el funcionamiento de
todos los tipos de tarjetas de memoria SD
compatibles con esta unidad.
Información importante de seguridad
! No expulse una tarjeta de memoria SD ni
cambie la posición del interruptor de encendido mientras está accediendo a la tarjeta de
memoria SD que se encuentran dentro de la
unidad. Se podrían dañar los datos almacenados en la misma. Pioneer no se hace responsable de ningún daño derivado de dichos
casos.
! Las tarjetas de memoria SD tienen una determinada vida útil. Aunque se haya utilizado
correctamente una tarjeta de memoria SD
tal vez no pueda escribir o eliminar datos de
la tarjeta una vez que esta haya alcanzado el
final de su vida útil.
! Esta unidad podría no reconocer algunas tarjetas de memoria SD, incluso si estas han
sido reconocidas en un ordenador. El problema se puede resolver formateando la tarjeta
de memoria SD con un formatizador específico. Las tarjetas de memoria SD formateadas utilizando la función de formatear
estándar de un ordenador no cumplen con el
estándar de SD y tal vez no pueda leer o escribir en dichas tarjetas. Se recomienda que
utilice un informatizador específico para
evitar estos problemas. Al formatear una tarjeta, se borrarán todos los datos grabados en
ella; siempre que sea necesario, realice de
antemano una copia de seguridad de los
datos. En la siguiente página web puede obtener un formatizador específico para tarjetas de memoria SD:
https://www.sdcard.org/home/
(válida a partir de junio de 2012).
! Pioneer no puede garantizar la reparación de
una tarjeta de memoria SD con defectos derivados del formateado de la misma. Además, Pioneer no se hace responsable de
daños, costes o gastos derivados de la pérdida o daño de datos que se produzcan duran-
te el formateado de una tarjeta de memoria
SD. Lea el manual de instrucciones del formatizador y siga las instrucciones dadas
para formatear la tarjeta de memoria SD que
prevé utilizar, haciéndose responsable de
cualquier problema que pueda ocurrir.
Notas sobre el iPhone
! Para los modelos de iPhone y versiones de
software iPhone compatibles con este producto, consulte la información que figura en
nuestra página web.
! Los modelos de iPhone compatibles con
esta unidad se denominan de forma conjunta en esta guía como “iPhone”.
! Pioneer no garantiza el funcionamiento de
todos los tipos de modelos de iPhone compatibles con esta unidad.
! Pionner no se hace responsable de ninguna
pérdida de datos que pueda derivar del uso
de un iPhone con esta unidad.
! No deje el iPhone expuesto a la luz solar directa durante un largo periodo de tiempo, ya
que puede provocar el funcionamiento incorrecto del mismo.
! No deje el iPhone a altas temperaturas.
! Para más información sobre el iPhone, consulte los manuales del mismo.
Notas sobre los dispositivos
Android
! Para los dispositivos Android compatibles
con este producto, consulte la información
que figura en nuestra página web.
! No se garantiza la compatibilidad con todos
los dispositivos Android.
Es
<CRD4765-A>68
Black plate (69,1)
Sección
Información importante de seguridad
Derechos de propiedad
intelectual
Los derechos de propiedad intelectual de los
datos y programas incluidos con este producto
son propiedad de Pioneer o terceras partes le
han otorgado los derechos a Pioneer para utilizarlos. No tendrá derecho a copiar, modificar o
analizar parte o todos los datos o programas de
este producto de forma alguna.
Actualizaciones de software
! Para grabar el archivo de actualización de
software necesita una tarjeta de memoria SD
con una capacidad de al menos 2 GB.
! Una vez al año estará disponible una tarjeta
de memoria microSD con la última versión
de actualización de software para aquellos
clientes que no tengan acceso a Internet.
En la página web encontrará más información.
Visite nuestro sitio Web
Visítenos en la siguiente dirección:
http://www.pioneer.es
! Registre su producto. Los datos de su compra permanecerán archivados para que
pueda consultar esta información en caso de
reclamar a la compañía de seguros por pérdida o robo.
! En nuestro sitio Web ofrecemos la información más reciente acerca de PIONEER
CORPORATION.
Datos guardados del cliente
! Cuando la unidad necesite reparación, etc.
Pioneer no se hace responsable de las actualizaciones de software realizadas por el cliente.
! Los ajustes realizados en esta unidad podrían alterarse o eliminarse automáticamente de manera accidental por una anomalía
de la unidad, como parte del proceso de reparación, o mientras se están realizando
otros procesos. Guarde una lista de los contenidos importantes. Pioneer no se hace responsable de los daños o pérdidas derivados
de la pérdida de datos en dichos casos.
! Pioneer no ofrece ningún servicio para recuperar datos dañados o eliminados.
02
Notas sobre esta unidad
! El historial de funcionamiento de esta unidad queda registrado con fines de mejora
del rendimiento. En este proceso no se obtiene ninguna información del cliente. Solo si
se dispone de antemano del permiso del
cliente podría compartirse la información registrada con otros centros o subcontratistas
especificados por Pioneer para el análisis de
datos.
! Pionner ha probado y comprobado que las
imágenes proyectadas se pueden ver una
distancia de 3 m del parabrisas. Sin embargo, las distancias podrían variar dependiendo de la altura y la posición del asiento del
conductor, la altura y la inclinación del techo
del vehículo y la cantidad de luz ambiental.
! Pioneer no garantiza que el producto se ajuste a los fines particulares de un usuario específico.
! Las especificaciones y el diseño de la unidad
podrían cambiar sin previo aviso con el fin
de mejorar el producto. Pioneer no acepta ni
agradece solicitudes de los clientes para la
modificación o cambio del producto con el
fin de ajustarse a necesidades específicas
del cliente para aquellos productos cuyas especificaciones y diseños aquí descritos.
! Las imágenes de pantalla de este manual podrían diferir de las del producto real.
! El diseño de la pantalla podría cambiar sin
previo aviso con el fin de mejorar el producto.
Español
! Determinados usos de un dispositivo
Android podrían ser ilegales mientras conduce en su zona geográfica, por lo que debe
estar al tanto de la normativa y obedecer dichas restricciones.
Si tiene algún tipo de duda en lo que respecta a una función determinada, realícela únicamente con el vehículo estacionado.
No deberá utilizar ninguna función que no
sea segura en las condiciones de conducción que esté experimentando.
! Pioneer no se hace responsable de ninguna
pérdida de datos que pueda derivar del uso
de un dispositivo Android con esta unidad.
! No deje el dispositivo Android expuesto a la
luz solar directa durante un largo periodo de
tiempo, ya que puede provocar el funcionamiento incorrecto del mismo.
! No deje el dispositivo Android a altas temperaturas.
! Para más información sobre los dispositivos
Android, consulte sus respectivos manuales.
Información importante de seguridad
Es
<CRD4765-A>69
69
Black plate (70,1)
Sección
Piezas suministradas
03
Antes de realizar la conexión
04
Precauciones para la conexión
Monitor frontal:
PRECAUCIÓN
Cable de alimentación x 1
Unidad princial x 1
Amortiguador de parasol x 1
Soporte x 1
Cinta de doble cara x 1
Mando a distancia del monitor frontal:
! No tome alimentación adicional de la interfaz bus CAN, etc. Asegúrese de conectarse
al suministro eléctrico del vehículo.
! Instale las piezas que se entregan según se
indica.
Si se utilizan piezas diferentes a las suministradas podrían producirse anomalías.
Coloque las antenas lo más separadas entre
sí que sea posible.
! No ate las antenas, ni las apile o cruce entre
sí.
El ruido proveniente de la antena y del cable
de la antena reduce la sensibilidad de recepción.
Conexión del cable de
alimentación
! Conecte firmemente el cable de alimentación introduciéndolo en el conector de alimentación de la unidad. Si no puede
introducir fácilmente el conector, la orientación podría no ser la correcta. Compruebe
la orientación del conector. No lo introduzca
a la fuerza, ya que podría causar anomalías.
Placa de ajuste del grosor del
parasol (grande) x 1
Unidad princial x 1
Placa de ajuste del grosor del
parasol (pequeña) x 1
Tornillo de soporte x 6
Llave Allen x 1
70
(Cuenta con una batería de litio preinstalada.
Antes utilizar la unidad, retire la lámina aislante.)
Prevención de ruido
! Para evitar ruido, coloque los siguientes elementos lo más lejos posible del iPhone, dispositivo Android y otros cables y cuerdas.
— Antena de películas y cable de antena
— Antena de radio FM/AM y su cable de antena
— Antena de GPS y su cable de antena
— Receptor de baliza y su cable de antena
— Cable de alimentación
Es
<CRD4765-A>70
Black plate (71,1)
Sección
Precauciones para la instalación
Conexiones
05
06
ADVERTENCIA
! Fije la unidad a un parasol con una cinta que
evite su caída.
Si no, la unidad podría caer y provocar un accidente y lesiones.
! Si instala la unidad en un vehículo equipado
con airbags, no instale la unidad sobre la cubierta de los mismos o en un lugar donde
pueda interferir con su apertura. Si el airbag
no pudiera abrirse normalmente o si al hacerlo golpea la unidad, podría producirse un
accidente y lesiones.
! No trabaje en un lugar expuesto a la luz solar
directa, ya que podría quemarse.
Además, hay riesgo de ceguera causado por
la exposición a la luz solar reflejada en el
combinador. Si el combinador está expuesto
a la luz solar directa, ciérrelo.
Diagrama de conexión
! Si instala la unidad en un vehículo equipado
con airbags, pregúntele al fabricante qué
precauciones debe tener para la instalación,
ya que los airbags podrían no abrirse por
completo y provocar un accidente mortal.
! Una vez instalada la unidad, tal vez no pueda
utilizar la luz del parasol y otros accesorios
opcionales situados a su alrededor, como el
portatarjetas y el espejo. Compruebe de antemano los accesorios.
! La instalación de la unidad podría dejar marcas en la superficie del parasol.
! Esta unidad no se debe instalar en el asiento
del pasajero.
! Mientras instala la unidad, podrían caerle de
piezas, polvo, etc. Para evitar que le entren
en los ojos, no mire directamente a la unidad
mientras la está instalando.
! El difusor y el combinador de la unidad son
piezas delicadas. No las toque con las
manos sin guantes ni con una herramienta
mientras instala la unidad.
1
2
4
3
Español
! No deje la unidad en un lugar expuesto a la
luz solar directa.
No retire la lámina de protección del combinador antes de terminar la instalación. El
combinador podría concentrar la luz en un
rayo intenso, provocando humo o fuego.
! No instale nunca la unidad en un vehículo
con techo corredizo o en un coche descapotable. La luz del sol podría reflejarse en el
combinador, concentrándose en un rayo intenso.
! No utilice el parasol en la ventana lateral con
esta unidad montada en él.
PRECAUCIÓN
6
Antes de instalar y fijar la
unidad
Primero, conecte la unidad temporalmente para
comprobar que funciona y luego instálela. Si la
unidad no funcionara correctamente, compruebe la conexión.
Al fijar la unidad
! El par de apriete recomendado para fijar la
unidad con tornillos es de 0,36 N•m a
0,59 N•m.
! Antes de colocar la cinta de doble cara a la
caja de conexión del cable de alimentación,
limpie profundamente cualquier suciedad de
la superficie donde vaya a colocar la cinta.
5
1
2
3
4
5
6
7
iPhone o dispositivo Android
Cable USB
Cable de alimentación
Al conector de alimentación
Indicador LED
Interruptor de tamaño del conector
Al encendedor
7
Para usuarios de iPhone
! Utilice el cable (2) que se suministra con el
iPhone.
No deje el cable en el vehículo, ya que el
cable que se suministra con el iPhone no ha
sido diseñado para su uso en un vehículo.
Para usuarios de dispositivos
Android
! Utilice un cable (2) de comunicación de
datos USB-micro USB de 1 m o menos. No
utilice un cable de carga.
Es
<CRD4765-A>71
71
Black plate (72,1)
Sección
Conexiones
06
Posición de instalación
07
Notas
! El indicador LED del encendedor se enciende al activar la unidad y se apaga al desactivarla.
Si el indicador LED no se apaga al apagar el
motor del vehículo, desconecte el cable de
alimentación del encendedor del vehículo. Si
no, podría descargarse la batería del coche.
! Para más información sobre cómo conectar
un iPhone o dispositivo Android, consulte
Configuración del iPhone o dispositivo
Android en la página 79.
Cuando sustituya el fusible
del conector del encendedor
1 Gire el conector hacia la izquierda para
aflojarlo.
1
Establecer el tamaño del
conector del encendedor
Establezca el tamaño del conector del encendedor en L (grande) o S (pequeño) según el tamaño del enchufe en el vehículo.
1
1 Fusible (3 A)
2 Sustituya el fusible con uno nuevo de la
misma capacidad.
Precauciones para instalar la
unidad
2 Cable de alimentación
ADVERTENCIA
! Utilice los tornillos que se suministran e instale la unidad según se indica. Si se utilizan
tornillos diferentes la unidad podría dañarse.
! Asegure firmamente la unidad al parasol con
los tornillos que se suministran. Si no, la unidad podría caer durante la conducción, golpeándole la cabeza y provocando lesiones.
! Lea este manual detenidamente e instale la
unidad correctamente para cumplir con los
estándares de seguridad.
Posición de instalación
especificada
PRECAUCIÓN
Instale la unidad en la posición de instalación
especificada para que el conductor pueda tener
un campo de visión seguro y la unidad pueda
realizar las funciones necesarias; si no, podría
no cumplir con los estándares de seguridad de
vehículos de transporte y el vehículo podría no
superar la inspección de seguridad debido a,
por ejemplo, un error de mantenimiento.
1 Interruptor de tamaño del conector
1
2
1 Unidad principal
72
Es
<CRD4765-A>72
Black plate (73,1)
Sección
Preparación para instalar la unidad
PRECAUCIÓN
No instale la unidad en un parasol inestable o
defectuoso; si lo hace, la unidad podría caer,
provocando un accidente o anomalías.
1 Compruebe el parasol.
Compruebe el grosor del parasol en el que
desea instalar la unidad.
La unidad se puede instalar en parasoles que
cumplan las siguientes especificaciones:
Grosor del parasol
Preparación para instalar la unidad
Placa de ajuste de grosor
del parasol
De 15 mm a 20 mm
Placa de ajuste de grosor
del parasol (pequeña)
De 20 mm a
26,5 mm
Placa de ajuste de grosor
del parasol (mediana)
De 26,5 mm a
33 mm
Placa de ajuste de grosor
del parasol (grande)
1
08
2
3
T
Al sustituir la placa de
ajuste de grosor del parasol
A
Y
H
1 Tire de la palanca de bloqueo del monitor
frontal y deslícela a la posición abierta.
1
De 15 mm a 33 mm
H: Altura
De 140 mm a 240 mm
A: Distancia entre
puntos de apoyo
185 mm o más
Y: Distancia al espejo,
etc.
45 mm o más (recomendada)
2 Compruebe la placa de ajuste del grosor
del parasol que va a utilizar.
El tamaño de la placa de ajuste de grosor del parasol que se debe montar en el soporte varía dependiendo del grosor del parasol.
Esta unidad se entrega con una placa de ajuste
del grosor del parasol (mediana) premontada.
Utilice la placa de ajuste del tamaño correspondiente con el grosor de su parasol.
3 Fije la placa de ajuste de dirección longitudinal a la placa de ajuste de grosor del parasol que vaya a utilizar.
Español
T: Grosor
1 Placa de ajuste de grosor del parasol
2 Tornillos de ajuste de dirección longitudinal
3 Placa de ajuste de dirección longitudinal
2
1 Posición abierta
2 Palanca de bloqueo del monitor frontal
2 Retire los ocho tornillos, incluidos los tornillos de ajuste de dirección longitudinal (ver
imagen), de soporte de montaje y a continuación retire la placa de ajuste de grosor
del parasol (mediana).
Al retirar los tornillos ajuste de dirección longitudinal se quita también la placa de ajuste de dirección longitudinal de la placa de ajuste de
grosor del parasol.
1
3
2
1 Placa de ajuste de grosor del parasol
2 Tornillos de ajuste de dirección longitudinal
3 Placa de ajuste de dirección longitudinal
4 Alinee los orificios de la placa de grosor
del parasol que va a utilizar con los del soporte y apriete los restantes tornillos previamente retirados en su posición original.
Es
<CRD4765-A>73
73
Black plate (74,1)
Sección
Instalación de la unidad principal
09
Instalación de la unidad principal
3 24 mm
4 26 mm
1 Alinee la palanca de bloqueo del monitor
frontal en la posición abierta.
Tire de la palanca de bloqueo del monitor frontal
y deslícela a la posición abierta.
4 Monte el soporte en el parasol.
Tire del parasol hacia arriba hasta que esté horizontal.
Sujete los extremos izquierdo y derecho de las
placas de bloqueo del soporte y móntelo en el
parasol empujándolo hasta el fondo.
1
2
1 Posición abierta
2 Palanca de bloqueo del monitor frontal
! Al manipular la palanca de bloqueo del monitor frontal, no sujete la pieza móvil del soporte de montaje. Si lo hiciera, la palanca de
bloqueo del monitor frontal no se podría
mover.
3 Ajuste el grosor del soporte.
Alinee las líneas del soporte con las marcas de
escala situadas a la izquierda y la derecha de la
placa de ajuste de grosor del parasol en función
del grosor del mismo y apriete los tres tornillos.
2
1
1
! Si no puede empujar por completo el soporte
hacia dentro, entonces debe aumentar el grosor del mismo. Retire el soporte del parasol,
vuelva al paso 3 y ajuste la posición de escala; luego, monte nuevamente el soporte en el
parasol.
5 Tire del parasol hacia abajo hasta que
esté vertical.
1
1 Soporte
2 Placa de ajuste de grosor del parasol
! Las medidas aproximadas de las marcas de
escala situadas en la placa de ajuste de grosor del parasol (mediana) son las siguientes
(en la imagen se muestra la línea de soporte
alineada con la marca de escala de 22 mm).
1
6 Bloquee el soporte.
Para ello, empuje las placas de bloqueo hacia
dentro.
! Si no puede empujar por completo las placas
de bloqueo hacia dentro, entonces debe aumentar el grosor del soporte. Retire el soporte
del parasol, vuelva al paso 3 y ajuste la posición de escala; luego, monte nuevamente el
soporte en el parasol.
7 Compruebe que el soporte esté bien
montado.
Tire del parasol nuevamente hacia arriba hasta
que esté horizontal.
Empuje el soporte hacia adelante y hacia atrás
para comprobar que esté bien sujeto.
! Si puede retirar fácilmente el soporte del parasol, entonces necesita disminuir el grosor
delsoporte. Retire el soporte del parasol, vuelva al paso 3 y ajuste la posición de escala;
luego, monte nuevamente el soporte en el parasol.
8 Retire el soporte.
Baje el parasol a la posición vertical y tire de las
placas de bloqueo hacia fuera para desbloquearlo.
Tire del parasol hacia arriba hasta que esté horizontal y retire el soporte del parasol.
2
3
1 Pieza móvil
2 Suelte las placas de bloqueo del soporte.
Tire de las placas de bloqueo del soporte hacia
fuera para desbloquearlo.
74
4
1 20 mm
2 22 mm
Es
<CRD4765-A>74
Black plate (75,1)
Sección
Instalación de la unidad principal
9 Compruebe si el grosor ajustado del soporte es el adecuado.
Empuje las placas de bloqueo hacia dentro para
bloquear el soporte.
Compruebe que el soporte no se puede montar
en el parasol fácilmente mientras las placas
están bloqueadas.
Instalación de la unidad principal
Unidad principal:
Parte posterior de la unidad principal:
1
1
2
2
09
Sujete los extremos izquierdo y derecho de las
placas de bloqueo del soporte y monte la unidad
en el parasol empujando el soporte hasta el
fondo.
1 Combinador
2 Difusor
Soporte:
1
1 Alinee las guías con la ranura.
2 Ranura
2
! Si el soporte se puede montar en el parasol
fácilmente con las placas bloqueadas, el grosor del soporte no es correcto.
Retire el soporte del parasol, vuelva al paso 3
y ajuste la posición de escala; luego, monte
nuevamente el soporte en el parasol.
10 Monte el soporte cuyo grosor se ajustó a
la unidad principal.
Compruebe que el difusor y el combinador de la
unidad principal están cerrados y alinee la palanca de bloqueo del monitor frontal a la posición abierta.
1 Posición abierta
2 Palanca de bloqueo del monitor frontal
Fije el soporte y la unidad principal en cuatro
puntos delante y detrás utilizando los tornillos
de montaje que se suministran.
Parte frontal de la unidad principal:
1
11 Afloje una vuelta los cuatro tornillos que
apretó en el paso 10.
12 Afloje una vuelta los tornillos de ajuste
de dirección longitudinal de la unidad.
Parte frontal de la unidad principal:
2
1 Ranura
2 Alinee las guías con la ranura.
14 Tire del parasol hacia abajo hasta que
esté vertical.
Español
Si el soporte no se puede montar en el parasol
fácilmente, el grosor es correcto.
15 Fije la unidad al parasol con una cinta
que evite su caída.
Tire de la cinta hacia delante desde la parte de
atrás del parasol, que ha de estar en posición
vertical.
13 Monte la unidad en el parasol.
Tire de las placas de bloqueo del soporte hacia
fuera para desbloquearlo.
Tire del parasol hacia arriba hasta que esté horizontal.
Es
<CRD4765-A>75
75
Black plate (76,1)
Sección
Instalación de la unidad principal
09
Instalación de la unidad principal
Haga atravesar la cinta tal y como se muestra
en la imagen.
Izquierda
Derecha Izquierda
Derecha
Incline el parasol verticalmente unos 20º y apriete firmemente los dos tornillos de montaje en la
parte posterior de la unidad principal que aflojó
en el paso 11.
Tire de la cinta hacia abajo y fíjela mientras tira
de ella hacia abajo.
1
17 Tire del parasol hacia arriba hasta que
esté horizontal.
! Si la lámina de protección del combinador le
molesta durante el ajuste, retírela. Vuelva a
colocarla una vez terminado el ajuste.
18 Bloquee la posición de la unidad principal.
Tire de la palanca de bloqueo del monitor frontal
y deslícela a la posición cerrada.
20 Ajuste la dirección de la unidad principal.
Abra el difusor y el combinador de la unidad
principal.
1
16 Bloquee el soporte.
Para ello, empuje las placas de bloqueo hacia
dentro.
1
1
2
1 Posición cerrada
La unidad principal cae hacia delante y queda
bloqueada.
19 Ajuste la inclinación de la unidad principal.
Ajuste el ángulo para nivelar la unidad principal.
76
1 Alinee la unidad en la dirección del desplazamiento
1 Difusor
2 Combinador
Ajuste la dirección de la unidad principal para
alinear el combinador y el difusor en la dirección de desplazamiento.
1 Ajuste el combinador de manera que el
difusor se pueda visualizar en el centro
del combinador.
! Asegúrese de ajustar la unidad principal para
que esté alineada en la dirección de desplazamiento.
21 Desbloquee la posición de la unidad principal.
Tire de la palanca de bloqueo del monitor frontal
y deslícela a la posición abierta.
Es
<CRD4765-A>76
Black plate (77,1)
Sección
Instalación de la unidad principal
Instalación de la unidad principal
09
24 Monte la unidad en el parasol.
Realice los pasos 13 a 17 para montar la unidad
en el parasol.
1
1 Posición abierta
La unidad principal cae hacia atrás y queda desbloqueada.
! Alinee la palanca de bloqueo del monitor
frontal a la posición abierta antes de montar
la unidad en el parasol.
! Si hubiera un hueco entre el techo del vehículo y el parasol cuando este está en posición horizontal, coloque el amortiguador del
parasol en la cinta de prevención de caída.
2
1
! Tenga cuidado de no dejar que la unidad
caiga.
23 Apriete firmemente los tornillos de montaje en la parte delantera de la unidad principal.
Apriete firmemente los dos tornillos de montaje
de la parte frontal de la unidad principal que
aflojó en el paso 11 y los dos tornillos de ajuste
de dirección longitudinal que aflojó en el paso
12.
3
4
2
1 Amortiguador del parasol
2 Cinta de prevención de caída
1 Techo del vehículo
2 Parasol
3 Hueco entre el techo del vehículo y el
parasol
4 Sin hueco entre el techo del vehículo
y el parasol
! Al colocar el amortiguador del parasol, fíjelo
al soporte correspondiente, sujételo a la cinta
de prevención de caída y luego fije la cinta.
2
1
3
! Ajuste el cable de alimentación de manera
que no obstruya la visión del conductor.
! Coloque el cable de manera que no interfiera
con el movimiento hacia delante y hacia
atrás de la unidad principal cuando se maneje la palanca de bloqueo del monitor frontal.
25 Conecte el cable de alimentación a la unidad.
1
Español
22 Retire la unidad del parasol.
Cierre el combinador y el difusor de la unidad
principal y coloque el parasol en posición vertical.
Tire de las placas de bloqueo del soporte hacia
fuera para desbloquearlo. Desbloquee la cinta
de prevención de caída. Coloque el parasol en
posición horizontal y retire el soporte del parasol.
1
Coloque el cable de alimentación fijando el
punto con una abrazadera disponible en el mercado.
1 Cable de alimentación
26 Enrute el cable de alimentación.
Enrute el cable de alimentación de manera que
no interfiera con la conducción y compruebe
que el conductor tiene un campo de visión seguro.
1
1 Cinta de prevención de caída
2 Amortiguador del parasol
3 Soporte del amortiguador del parasol
1 Fije el cable con la abrazadera disponible
en el mercado.
! No fije o monte el cable al parabrisas.
Es
<CRD4765-A>77
77
Black plate (78,1)
Sección
Instalación de la unidad principal
09
! No coloque el cable de alimentación a los
pies del asiento del conductor. Podría quedar
atrapado bajo el pedal del freno e interferir
con la conducción, provocando un grave accidente.
Instalación de la unidad principal
3 Cinta de doble cara
Fije el cable con la abrazadera disponible en el
mercado.
Para más información, consulte Conexión del
cable de alimentación al encendedor en la página 78.
29 Retire la lámina de protección del combinador.
Compruebe que el cable de alimentación está
conectado y enrutado correctamente y después
retire la lámina de protección del combinador.
27 Bloquee la posición de la unidad principal.
Tire de la palanca de bloqueo del monitor frontal
y deslícela a la posición cerrada.
Tras la instalación
1
PRECAUCIÓN
! Compruebe que la unidad está bien instalada. En los siguientes casos, vuelva el paso 1
e instale la unidad correctamente.
1 Posición cerrada
La unidad principal cae hacia delante y queda
bloqueada.
28 Fije el cable de alimentación.
Coloque la cinta de doble cara en la caja de conexión del cable de alimentación y luego coloque la caja de conexión en un punto donde el
cable pueda estar bien sujeto.
1
2
3
1 Cable de alimentación
2 Lateral del salpicadero, etc.
78
! No instale nunca el cable de alimentación en
un lugar donde el cable no pueda asegurarse
por vibración del vehículo, etc.
! Si no puede fijar el cable con la cinta de
doble cara que se suministra, hágalo utilizando otra disponible en el mercado, etc.
! Asegure firmemente el iPhone o dispositivo
Android en un soporte disponible en el mercado.
! Introduzca el conector del encendedor del
cable de alimentación en el enchufe del encendedor del vehículo, con el indicador LED
hacia arriba de manera que el conductor
pueda verlo.
El indicador LED del encendedor se enciende
en verde al activar la unidad.
1
! Cierre el difusor cuando no esté utilizando la
unidad.
! Cuando quite la unidad del parasol y la guarde, asegúrese de cerrar el difusor y el combinador.
No deje la unidad de lugares expuestos a la
luz solar directa, como en el salpicadero. El
difusor o el combinador podrían concentrar
la luz en un rayo intenso, provocando humo
o fuego.
Conexión del cable de
alimentación al encendedor
% Conecte firmemente el encendedor al
cable de alimentación introduciéndolo en el
encendedor del vehículo.
El indicador LED del encendedor se enciende en
verde al activar la unidad.
1
1
2
3
4
1 Las placas de bloqueo no están fijas.
2 La unidad no está asegurada con una
cinta de prevención de caídas.
3 La unidad está torcida.
4 La posición de la unidad está instalada
del revés.
1 Indicador LED
Notas
! Introduzca el conector del encendedor del
cable de alimentación en el enchufe del encendedor del vehículo, con el indicador LED
hacia arriba de manera que el conductor
pueda verlo.
! Si el indicador LED no se apaga al apagar el
motor del vehículo, desconecte el cable de
alimentación del encendedor del vehículo. Si
no, podría descargarse la batería del coche.
1 Indicador LED
Es
<CRD4765-A>78
Black plate (79,1)
Sección
Configuración del iPhone o dispositivo Android
Conexión del iPhone o
dispositivo Android a la unidad
Para usuarios de iPhone
! Utilice el cable que se suministra con el
iPhone.
No deje el cable en el vehículo, ya que el
cable que se suministra con el iPhone no ha
sido diseñado para su uso en un vehículo.
1 iPhone o dispositivo Android
2 Al encendedor
3 Caja de conexión del cable de alimentación
4 Cable USB
Instalación de la aplicación
de navegación
2 Conecte el otro extremo del cable USB firmemente a la caja de conexión del cable de
alimentación.
Activación de la aplicación
de navegación
! Utilice un cable de comunicación de datos
USB-micro USB de 1 m o menos. No utilice
un cable de carga.
10
Si aplicación no se inicia automáticamente
al conectar un iPhone a la unidad, pulse
“Allow” (“Permitir”) en la ventana emergente
que aparece en el iPhone.
! Para usuarios de dispositivos Android
Si la aplicación no se inicia automáticamente al conectar el dispositivo Android a la unidad, pulse la aplicación en la ventana
emergente que aparece en el dispositivo
Android.
Si selecciona la casilla de verificación y después la aplicación en la ventana emergente,
esta no volverá a aparecer.
Español
1 Conecte el cable USB a su iPhone o dispositivo Android.
Instale la aplicación de navegación en su
iPhone o dispositivo Android antes utilizar esta
unidad.
Puede descargar la aplicación de navegación en
iTunes App Store o Google Play.
Para más información acerca de la aplicación
de navegación, consulte la siguiente página
web.
http://www.pioneer.eu/navgatehud
Para usuarios de dispositivos
Android
Configuración del iPhone o dispositivo Android
Cuando utilice la aplicación de navegación por
primera vez, debe iniciarla usted mismo. La siguiente vez que conecte el iPhone o dispositivo
Android a la unidad, la aplicación se iniciará
automáticamente.
1
PRECAUCIÓN
1 Caja de conexión del cable de alimentación
Vista de conexión:
1
2
3
! Para utilizar la aplicación de navegación necesita comprar primero la ayuda técnica del
monitor frontal de NavGate. Cómprela en la
aplicación siguiendo las instrucciones que
aparecerán en pantalla.
! Para ello, necesita disponer de conexión a Internet.
Notas
! Para usuarios de iPhone
4
Es
<CRD4765-A>79
79
Black plate (80,1)
Sección
Modos de visualización
11
Cuando termine la instalación y la conexión
12
En esta unidad hay disponibles cinco tipos de modos de visualización: AR (baja velocidad y alta velocidad),
lista (baja velocidad y alta velocidad), de cruce, ruta y reloj.
Si se establece la comunicación entre la unidad y la aplicación de navegación, aparecerá uno de los siguientes modos de visualización.
Modo de visualización de lista
Modo de visualización AR
Modo de baja velocidad
Configuración de ajustes de
pantalla
Posición
Cuando termine la instalación y la conexión, enciende la unidad (arranque el motor) y ajuste el
ángulo del combinador de manera que pueda
ver la imagen.
1 Pulse el botón a/b para seleccionar un
elemento de ajuste y a continuación pulsa el
botón d.
Ajuste la posición de la imagen visualizada.
Modo de baja velocidad
Pulse ◀.
Modo de alta velocidad
Modo de alta velocidad
Pulse ▶.
Si un vehículo se acerca a un cruce
Si un vehículo se acerca a un cruce
Nota
La pantalla podría no verse claramente dependiendo del brillo de la pantalla y del entorno.
Ajuste el brillo de la pantalla (consulte Ajustes
de brillo de pantalla en la página 82) o mueva el
vehículo a un lugar donde la pantalla sea más
visible; luego, utilice la unidad.
1
Pulse el botón
.
Modo de visualización de cruce
Elemento de
ajuste
Descripción
Posición horizontal
Seleccione para ajustar la
posición horizontal de la
imagen visualizada.
Posición vertical
Seleccione para ajustar la
posición vertical de la imagen visualizada.
2 Pulse el botón a/b para visualizar el patrón de red en su totalidad.
Ejemplo: cuando está bien ajustado
Modo de visualización de ruta
Modo de visualización de reloj
Si se pulsa el botón
cuando hay un
destino especificado:
Si se pulsa el botón
cuando no hay
un destino especificado:
2 Pulse el botón a/b para seleccionar Configuración de pantalla y a continuación pulse
el botón d.
Ejemplo: cuando no está bien ajustado
Notas
! Cuando no se especifica ningún destino se
muestra el modo de visualización de baja velocidad de AR.
! Para más información acerca de los modos
de visualización, consulte el manual de operación.
80
3 Pulse el botón a/b para seleccionar un
elemento de ajuste y a continuación pulsa el
botón d.
Zoom
Ajuste el tamaño de la imagen visualizada.
Es
<CRD4765-A>80
Black plate (81,1)
Sección
Cuando termine la instalación y la conexión
% Pulse el botón a/b para visualizar el patrón de red en su totalidad.
Cuando termine la instalación y la conexión
1 Pulse el botón a/b para seleccionar un
elemento de ajuste y a continuación pulsa el
botón d.
Elemento de
ajuste
Ajuste el giro de la imagen visualizada.
% Pulse el botón a/b para nivelar el patrón
de red.
Ejemplo: cuando está bien ajustado
Elemento de
ajuste
Descripción
Distorsión trapezoidal
Seleccione para corregir la
distorsión trapezoidal.
Distorsión sonrisa
Seleccione para corregir la
distorsión curvilínea.
Seleccione para ajustar los
tonos rojos.
Verde
Seleccione para ajustar los
tonos verdes.
Azul
Seleccione para ajustar los
tonos azules.
Relación de aspecto
Balance de blancos
Ajuste la relación de aspecto de la imagen visualizada.
Ajuste el balance de blancos de la imagen visualizada.
% Pulse el botón a/b para hacer rectangular el patrón de red.
1 Pulse el botón a/b para seleccionar un
elemento de ajuste y a continuación pulsa el
botón d.
2 Pulse el botón a/b para ajustar el brillo.
Ejemplo: ajuste del color rojo
Español
Ejemplo: cuando no está bien ajustado
2 Pulse el botón a/b para hacer rectangular el patrón de red.
Ejemplo: ajuste de la distorsión trapezoidal
Descripción
Rojo
Rotación
12
Corrección Geométrica
Corrija la distorsión de la imagen visualizada.
Es
<CRD4765-A>81
81
Black plate (82,1)
Sección
Antes de conducir
13
Antes de conducir
Configuración de los ajustes
de funciones de la unidad
Los ajustes de funciones de la unidad se pueden
configurar desde la pantalla Configuración.
PRECAUCIÓN
! Esta unidad desactiva el funcionamiento de
la unidad mientras el vehículo está en movimiento. Aparque el vehículo en un lugar seguro y ponga el freno de mano antes de
utilizar la unidad.
! Si el vehículo comienza moverse mientras
está ajustando las funciones de la unidad, la
pantalla Configuración se cerrará automáticamente.
% Pulse el botón
Menú
Descripción
Acerca de
Confirme la versión del software de la unidad y los avisos legales.
Reiniciar todos
los Ajustes
Restablezca los ajustes predeterminados.
2 Ajuste el ángulo del combinador de manera que todo el difusor se refleje en el combinador.
Antes utilizarlo, asegúrese de comprobar que la
parte inferior del combinador se encuentra por
encima de su línea de vista cuando se siente y
mire hacia adelante en la posición de conducción. Si la parte inferior del combinador se encuentra por debajo de su línea de vista, no
utilice la unidad. Pliegue el combinador en posición de guardado para garantizar el campo de
visión para conducir.
Notas
! Configuración de la función solo se puede
establecer cuando se ha establecido la comunicación con la aplicación de navegación.
! Pulse el botón
para cerrar la pantalla
Configuración.
! Si desea más información, consulte el manual de instrucciones.
1
.
Ajuste del ángulo del
combinador
Ajuste el ángulo del combinador a la posición
del asiento.
1 Ajuste el combinador de manera que el
difusor se pueda visualizar en el centro
del combinador.
Al entrar y salir del coche
PRECAUCIÓN
Aparecerá la pantalla Configuración.
Cuando ajuste el ángulo, sujete los extremos del
combinador.
1
82
Posición correcta del
combinador
Menú
Descripción
Configuración de
pantalla
Realice los ajustes de pantalla para las imágenes proyectadas.
Configuración de
la función
Realice los ajustes de funciones.
Idioma
Establezca el idioma del visualización.
Abra el difusor y el combinador.
Tenga cuidado de no golpear la cabeza con la
unidad.
Ajustes de brillo de pantalla
La función de atenuación de esta unidad ajusta
automáticamente el brillo de la pantalla según
la cantidad de luz ambiental.
El brillo de la pantalla se puede ajustar manualmente utilizando el botón
/ .
PRECAUCIÓN
Antes de utilizar la unidad por la noche o en un
lugar oscuro, como en un túnel, ajuste el brillo
de la unidad para que no interfiera con la conducción. Si no, podría provocar un accidente.
1
2
1 Difusor
2 Combinador
Es
<CRD4765-A>82
Black plate (83,1)
Sección
Antes de conducir
% Pulse el botón
/
13
.
Nota
Si se cambia el brillo también puede cambiar el
color de la pantalla.
Español
Es
<CRD4765-A>83
83
Black plate (84,1)
Abschnitt
Vorsichtsmaßregeln
Vorsichtsmaßregeln
Vorsichtsmaßregeln
Zur Bedienungsanleitung
84
Informationen für Anwender zur Sammlung
und Entsorgung von Altgeräten und
gebrauchten Batterien
84
Anschluss und Installation
85
Zu diesem Gerät
86
Vorsichtshinweise zum
Batteriegebrauch
87
Im Problemfall
87
Wichtige Sicherheitshinweise
So vermeiden Sie eine
Batterieentleerung
88
Bei schwer erkennbarem Bildschirm
88
Vorsichtshinweise für den Betrieb bei
hohen/niedrigen Temperaturen
88
Hinweise zu microSD-Speicherkarten
88
Hinweise zum iPhone
88
Hinweise zu Android-Geräten
89
Urheberrechte
89
Software-Aktualisierungen
89
Unsere Website
89
Gespeicherte Kundendaten
89
Hinweise zu diesem Gerät
89
Mitgelieferte Teile
Vor dem Anschluss
Vorsichtshinweise zum Anschluss
Anschluss des Stromkabels
90
Verhindern von Rauschen
90
90
Vorsichtsmaßnahmen zur Installation
Vor der Installation und Befestigung des
Geräts
91
Befestigen des Geräts
91
Anschlüsse
Anschlussschema
92
Einstellen der Größe des
Zigarettensteckers
92
Beim Austauschen der Sicherung des
Zigarettensteckers
92
84
Installationsposition
Vorsichtshinweise zur Installation des
Geräts
93
Angegebene Installationsposition
93
Vorbereiten der Geräteinstallation
Austauschen der Justierplatte für die
Sonnenblendenstärke
93
Installieren der Haupteinheit
Nach der Installation
99
Anschließen des Stromkabels an den
Zigarettenanzünder
99
Einstellen Ihres iPhones oder AndroidGeräts
Anschließen Ihres iPhones oder AndroidGeräts an das Gerät
100
Installieren der
Navigationsapplikation
100
Starten der Navigationsapplikation
100
Anzeigemodi
Nach Abschluss der Installation und der
Verbindungsherstellung
Anpassen der
Bildschirmeinstellungen
101
– Position
101
– Zoom
102
– Rotation
102
– Aspektverhältnis
102
– Geometrische Korrektur
102
– Weißabgleich
102
Vor der Fahrt
Konfigurieren der
Gerätefunktionseinstellungen
103
Anpassen des Combiner-Winkels
103
Einsteigen in und Aussteigen aus dem
Fahrzeug
103
Korrigieren der Combiner-Position
103
Anpassen der Bildschirmhelligkeit
103
Wichtig
! Beauftragen Sie zu Ihrer eigenen Sicherheit Ihren Händler mit der Installation des Geräts in Ihrem Fahrzeug
sowie mit der Verdrahtung der Kabel
oder der Änderung der Installationsposition.
Installation, Verdrahtung und Deinstallation erfordern besondere Fähigkeiten und
Erfahrung. Eine nicht ordnungsgemäße Installation, Verdrahtung oder Deinstallation
des Geräts oder eine Verwendung von Teilen, die nicht vom Hersteller angegeben
wurden, könnten zu Unfällen, Verletzungen oder Fehlfunktionen führen. In diesem
Fall übernimmt Pioneer keine Gewährleistung.
! Für Händler
Fahren Sie nach dem Abschluss der Installation und Verdrahtung mit dem Einrichten der Verbindung zum Navigationsgerät
und dem Anpassen der Anzeigeeinstellungen fort usw.
Wenn alle diese Arbeiten beendet sind,
übergeben Sie diese Anleitung an den
Kunden.
Zur Bedienungsanleitung
Diese Anleitung erläutert, wie das Gerät eingebaut und eingerichtet wird. Die Bedienung des
Geräts ist in der separaten Bedienungsanleitung
beschrieben.
Besuchen Sie für Details zu den Funktionen und
Bedienvorgängen des Geräts folgende Website:
http://www.pioneer.eu/navgatehud
Informationen für Anwender
zur Sammlung und
Entsorgung von Altgeräten
und gebrauchten Batterien
(Symbol für Geräte)
Vielen Dank, dass Sie sich für dieses
PIONEER-Produkt entschieden haben
Bitte lesen Sie diese Anleitung vor der Verwendung dieses Produkts zur Gewährleistung seiner
ordnungsgemäßen Verwendung durch. Lesen
und befolgen Sie dabei insbesondere die Hinweise WARNUNG und VORSICHT. Bewahren
Sie die Anleitung zur zukünftigen Bezugnahme sicher und griffbereit auf.
(Symbolbeispiele für Batterien)
De
<CRD4765-A>84
Black plate (85,1)
Abschnitt
Vorsichtsmaßregeln
!
!
!
!
Für Länder außerhalb der
Europäischen Union:
Wenn Sie diese Gegenstände entsorgen wollen,
wenden Sie sich bitte an Ihre lokalen Behörden
oder Händler und fragen Sie dort nach der korrekten Entsorungsweise.
Anschluss und Installation
!
Verwenden Sie das Gerät nicht mit einem 24V-Fahrzeug.
Dies könnte zu einem Brand oder einer Fehlfunktion führen.
Installieren Sie das Gerät und verlegen Sie
die Kabel niemals an einem Ort, der die Leistungsfähigkeit des Airbags beeinträchtigt.
Wenn das Gerät in einem mit Airbags ausgestatteten Fahrzeug installiert wird, erfragen
Sie Vorsichtsmaßnahmen bezüglich der Installationsarbeiten beim Fahrzeughersteller.
Es besteht die Gefahr einer fehlerhaften Airbagauslösung, was zu einem tödlichen Unfall führen könnte.
Installieren Sie das Gerät niemals an Orten,
an denen es die Sicht des Fahrers blockiert,
die Fahrt beeinträchtigt oder eine Gefahr für
die Passagiere darstellt.
Dies könnte zu einem Verkehrsunfall und
Verletzungen führen.
Lösen Sie niemals die Isolierung des Stromkabels dieses Geräts, um die Stromversorgung mit anderen Geräten zu teilen.
Wenn die Stromkapazität des Stromkabels
überschritten wird, könnte dies zu einem
Brand, Stromschlag oder einer Fehlfunktion
führen.
Verwenden Sie niemals Schrauben und Muttern von sicherheitsrelevanten Komponenten
wie der Lenkung, dem Bremssystem und
Tank.
Eine Verwendung dieser Teile könnte zum
Ausfallen der Bremse, zu einem Brand oder
Verkehrsunfall führen.
Installieren Sie das Gerät nicht an einer Sonnenblende, deren Form nicht von diesem
Gerät unterstützt wird.
Die Installation des Geräts an einer Sonnenblende, deren Form nicht vom Gerät unterstützt wird, kann zu einem Verkehrsunfall
oder einer Fehlfunktion führen.
! Installieren Sie das Gerät nicht an einer defekten Sonnenblende.
Vergewissern Sie sich vor der Installation,
dass an der Sonnenblende keine Defekte vorliegen. Die Installation an einer defekten
Sonnenblende könnte zum Herunterfallen
des Geräts führen und in einem Unfall oder
einer Fehlfunktion resultieren.
! Setzen Sie das Gerät keinem Ort mit direktem Sonnenlicht aus.
Entfernen Sie die Schutzfolie des Combiners
erst nach Abschluss der Installation. Der
Combiner könnte einfallendes Licht zu
einem intensiven Lichtstrahl bündeln und
Rauch oder Brand verursachen.
! Beauftragen Sie zu Ihrer eigenen Sicherheit
Ihren Händler mit der Installation des Geräts
sowie mit der Verdrahtung der Kabel oder
der Änderung der Installationsposition.
Installation, Verdrahtung und Deinstallation
des Geräts erfordern besondere Fähigkeiten
und Erfahrung. Eine nicht ordnungsgemäße
Installation, Verdrahtung und Deinstallation
des Geräts kann zu schwerwiegenden Beschädigungen am Fahrzeug führen.
! Führen Sie die Arbeiten nicht an einem Ort
mit direktem Sonnenlicht aus.
Dies könnte zu Verbrennungen oder Erblindung führen.
! Trennen Sie die Verbindung zur negativen
Anschlussklemme der Fahrzeugbatterie,
bevor Sie das Gerät installieren.
Das Kurzschließen der positiven und negativen Anschlüsse könnte zu einem Stromschlag oder Verletzungen führen.
! Überprüfen Sie vor der Installation die Lage
der Leitungen, des Tanks, der Elektroleitungen usw.
!
!
!
!
!
WARNUNG
! Verwenden Sie dieses Gerät ausschließlich
mit einer 12-V-Batterie und negativer Erdung.
!
Wenn bei der Installation des Geräts Löcher
in die Fahrzeugkarosserie gebohrt werden
müssen, achten Sie unbedingt darauf, dass
die Leitungen, der Tank, die Elektroleitungen
usw. nicht berührt oder gestört werden.
Zudem müssen die bearbeiteten Komponenten vor Korrosion oder dem Eindringen von
Wasser geschützt werden.
Verwenden Sie die mitgelieferten Teile und
befestigen Sie sie sicher.
Wenn andere als die mitgelieferten Teile verwendet werden, könnte dies zur Beschädigung von Gerätekomponenten führen oder
eine sichere Befestigung verhindern. Sollte
sich das Gerät lösen, kann dies die Fahrt beeinträchtigen und zu einem Unfall und Verletzungen führen.
Installieren Sie die mitgelieferten Teile wie
angegeben.
Wenn die mitgelieferten Teile nicht wie angegeben installiert werden, könnten sich Teile
lösen und herabfallen, was zu einem Unfall
oder Fehlfunktion führen könnte.
Verwenden Sie die mitgelieferten Kabel und
schließen Sie sie sicher an.
Verwenden Sie die mitgelieferten Kabel und
verbinden Sie sie wie angegeben. Wenn andere als die mitgelieferten Kabel verwendet
werden, könnte dies zu einem Brand oder
einer Fehlfunktion führen.
Folgen Sie den Anweisungen in diesem
Handbuch für den Anschluss und die Installation des Geräts.
Ein Nichtbeachten der Anweisungen in diesem Handbuch bezüglich Anschluss und Installation des Geräts könnte zu einem Brand
oder Unfall führen.
Sichern Sie das Gerät an der Sonnenblende
mit einem Absturzsicherungsband.
Anderenfalls könnte das Gerät herunter fallen und einen Unfall und Verletzungen verursachen.
Isolieren Sie einen nicht-isolierten Kabelabschnitt mit Klebeband usw.
De
<CRD4765-A>85
Deutsch
Diese Symbole auf den Produkten, der Verpackung und/oder Begleitdokumenten bedeuten, dass gebrauchte elektrische und
elektronische Produkte und Batterien nicht
über den Haushaltsmüll entsorgt werden
dürfen.
Zur richtigen Handhabung, Rückgewinnung
und Wiederverwertung von Altprodukten
und gebrauchten Batterien bringen Sie
diese bitte zu den gemäß der nationalen Gesetzgebung dafür zuständigen Sammelstellen.
Mit der korrekten Entsorgung dieser Produkte
und Batterien helfen Sie dabei, wertvolle Ressourcen zu schonen und vermeiden mögliche
negative Auswirkungen auf die Gesundheit und
die Umwelt, die durch eine unsachgemäße Behandlung des Abfalls entstehen könnten.
Weitere Informationen zur Sammlung und Wiederverwertung von Altprodukten und Batterien
erhalten Sie von Ihrer örtlichen Gemeindeverwaltung, Ihrem Müllentsorger oder dem Verkaufsort, an dem Sie die Waren erworben haben.
Diese Symbole gelten ausschließlich in der
Europäischen Union.
Vorsichtsmaßregeln
85
Black plate (86,1)
Abschnitt
Vorsichtsmaßregeln
!
!
!
!
Ein Kurzschluss könnte zu einem Brand,
Stromschlag oder einer Fehlfunktion führen.
Verlegen Sie die Kabel so, dass sie sich nicht
an der Fahrzeugkarosserie, Schrauben oder
beweglichen Komponenten wie den Sitzschienen verfangen.
Eine Kabeltrennung oder ein Kurzschluss
könnte zu einem Brand, Stromschlag oder
einer Fehlfunktion führen.
Verlegen und sichern Sie die Kabel so, dass
sie die Fahrt nicht beeinträchtigen.
Anderenfalls könnten sich Kabel am Lenkrad, dem Schalthebel, Bremspedal usw. verfangen und zu einem Unfall führen.
Wenn die Installations- und Verdrahtungsarbeiten abgeschlossen sind, überprüfen Sie,
dass die elektronischen Geräte problemfrei
wie vor der Installation des Geräts funktionieren.
Wenn das Gerät verwendet wird, obwohl die
anderen elektronischen Geräte nicht ordnungsgemäß funktionieren, könnte dies zu
einem Brand, Stromschlag oder Verkehrsunfall führen.
Bewahren Sie kleine Teile wie Schrauben außerhalb der Reichweite von Kleinkindern auf.
Sollten Teile verschluckt werden, wenden Sie
sich sofort an einen Arzt.
VORSICHT
! Trennen Sie ein Kabel niemals fern von seinen Enden.
Wenn eine Sicherung an ein Kabel angeschlossen ist, funktioniert die Sicherheitsschaltung nicht, was zu einem Brand führen
könnte.
! Achten Sie beim Anschließen von Kabeln darauf, dass diese nicht mit heißen Stellen an
der Fahrzeugkarosserie in Kontakt gelangen.
Dies könnte zu einem Brand oder Stromschlag führen.
! Verdrahten Sie keine Kabel mithilfe von Verlängerungskabeln.
86
Vorsichtsmaßregeln
Anderenfalls könnte dies zur Überhitzung
des Kabels führen und einen Brand oder
Stromschlag verursachen.
! Installieren Sie das Gerät nicht an Orten, an
denen es Regen, Wasser, Kondensation,
Staub und ölhaltigen Dämpfen ausgesetzt
ist.
Anderenfalls könnte dies zu Rauch, Brand
oder Fehlfunktionen führen.
! Achten Sie beim Verdrahten der Kabel darauf, dass sie nicht mit Metallteilen in Berührung kommen.
Wenn Kabel mit Metallteilen in Kontakt gelangen, könnte dies zur Beschädigung der
Kabel führen und einen Brand, Stromschlag
oder eine Fehlfunktion verursachen.
Zu diesem Gerät
WARNUNG
! Bedienen Sie die Menüs nicht während der
Fahrt. Dies lenkt Ihre Aufmerksamkeit vom
sicheren Betrieb Ihres Fahrzeugs ab und
könnte zu einem schwerwiegenden Verkehrsunfall führen. Achten Sie immer auf den
Straßenverkehr und Fußgänger, um eine sichere Fahrt zu gewährleisten.
! Starren Sie während der Fahrt nicht auf das
angezeigte Bild.
Wenn Sie den Blick für längere Zeit von der
Straße nehmen, könnte dies zu einem Unfall
führen.
! Bedienen Sie die Sonnenblende nicht während der Fahrt. Anderenfalls könnte dies zu
einem schwerwiegenden Verkehrsunfall führen. Parken Sie das Fahrzeug an einem sicheren Ort und ziehen Sie die Handbremse
an, bevor Sie die Sonnenblende bedienen.
! Stecken Sie weder Ihre Hand noch Finger
oder Fremdkörper in den Medienschacht.
Anderenfalls könnte dies zu einer Verletzungen, einem Stromschlag, Feuer oder einer
Fehlfunktion führen.
! Dieses Gerät darf nicht mit Flüssigkeiten in
Kontakt geraten.
Anderenfalls könnte dies zu Rauch, Feuer
oder einem Stromschlag führen. Besondere
Vorsicht ist im Fall von Familien mit Kindern
geboten.
! Wenn Feuchtigkeit oder Fremdkörper ins Innere des Geräts gelangen, schalten Sie umgehend das Gerät aus und wenden Sie sich
an Ihren Händler oder an eine PIONEERKundendienststelle in Ihrer Nähe. Vermeiden
Sie eine Verwendung des Geräts in diesem
Zustand, da dies zu Brand, Stromschlag oder
anderen Störungen führen kann.
! Lassen Sie die Fernbedienung usw. nicht frei
liegen.
Beim Anhalten des Fahrzeugs oder um die
Kurve Fahren könnte die Fernbedienung usw.
im Fußbereich unter das Bremspedal rollen,
die Fahrt beeinträchtigen und einen Unfall
verursachen.
! Bringen Sie keinen Film oder eine Versiegelung auf dem Combiner auf.
Dies könnte das Blickfeld blockieren und zu
einem Unfall führen.
! Verwenden Sie das Gerät nicht bei Unregelmäßigkeiten oder Fehlfunktionen wie zum
Beispiel wenn keine Bilder angezeigt werden.
Dies stellt ein Unfall-, Feuer- oder Stromschlagrisiko dar.
! Kinder dürfen sich nicht an das Gerät hängen oder darauf Kraft anwenden.
Anderenfalls könnte dies zu einer Verletzung,
einer Verformung des Fahrzeugs oder einer
Fehlfunktion führen.
! Berühren Sie das Gerät nicht während eines
Gewitters.
Anderenfalls besteht eine Stromschlaggefahr aufgrund eines Blitzeinschlags.
! Bauen Sie das Gerät nicht auseinander oder
modifizieren Sie das Gerät nicht.
Anderenfalls besteht eine Unfall-, Brandoder Stromschlaggefahr.
! Beachten Sie immer die tatsächlichen Verkehrsregeln.
Das Gerät enthält Daten zu den Verkehrsregeln, doch einige dieser Daten können sich
aufgrund von Änderungen der Verkehrsregeln von den tatsächlich auf der Straße angezeigten unterscheiden. Beachten Sie
selbst bei Verwendung der Straßenkarten
oder der Sprachführung des Navigationssystems die örtlichen Verkehrsregeln und tatsächlichen Verkehrsschilder bei der
Bedienung des Fahrzeugs. Anderenfalls
könnte dies zu einem Unfall oder zur Missachtung der Straßenverkehrsregeln führen.
! Während sich das Fahrzeug bewegt, unterbricht das Gerät die Gerätebedienung. Parken Sie das Fahrzeug an einem sicheren Ort
und ziehen Sie die Handbremse an, bevor
Sie die Menüs des Geräts bedienen.
! Tauschen Sie die Sicherung mit einer neuen
mit der gleichen angegebenen Kapazität
(Ampere) aus.
Die Verwendung einer Sicherung, die die angegebene Kapazität übersteigt, könnte zu
einem Feuer oder einer Fehlfunktion führen.
! Bevor Sie das Gerät bei Nacht oder an einem
dunklen Ort wie in einem Tunnel verwenden,
passen Sie die Helligkeit des Geräts so an,
dass es die Fahrt nicht beeinträchtigt. Anderenfalls könnte dies zu einem Unfall führen.
VORSICHT
! Verwenden Sie das Gerät ausschließlich zum
Gebrauch in einem Fahrzeug.
Anderenfalls könnte dies zu Rauch, Feuer,
Stromschlag oder Verletzungen führen.
! Passen Sie vor der Fahrt den Winkel des
Combiner und die Displayhelligkeit an und
überprüfen Sie, ob die Schrauben des Geräts
lose sind und die Fahrt beeinträchtigen könnten.
Anderenfalls könnte dies zu einem Unfall
führen.
De
<CRD4765-A>86
Black plate (87,1)
Abschnitt
Vorsichtsmaßregeln
Wichtige Sicherheitshinweise
01
02
! Achten Sie beim Bedienen der Sonnenblende oder der Tasten während der Fahrt auf Ihr
Fahrverhalten.
Anderenfalls könnte dies zu einem Unfall
führen.
! Achten Sie beim Ein- oder Aussteigen in/aus
dem Fahrzeug darauf, nicht Ihren Kopf anzustoßen.
Anderenfalls kann dies zu Verletzungen führen.
! Achten Sie beim Schließen des Combiners
oder Anpassen des Winkels darauf, keine
Hände oder Finger einzuklemmen.
Anderenfalls kann dies zu Verletzungen führen.
Vorsichtshinweise zum
Batteriegebrauch
WARNUNG
! Schließen Sie die Batterie nicht kurz, bauen
Sie sie nicht auseinander, erhitzen Sie sie
nicht oder werfen Sie sie nicht in Feuer oder
Wasser.
Eine Explosion der Batterie oder ein Auslaufen der Batterieflüssigkeit kann zu einem
Brand oder Verletzungen führen.
! Laden Sie keine Trockenzellen auf.
Eine Explosion der Batterie kann zu einer Verletzung führen.
! Verwenden Sie nur die angegebene Batterie.
Eine Explosion der Batterie oder ein Auslaufen der Batterieflüssigkeit kann zu Verletzungen oder Umweltverschmutzungen führen.
! Ersetzen Sie eine verbrauchte Batterie sofort
mit einer neuen.
Ein Auslaufen der Batterieflüssigkeit kann zu
Umweltverschmutzungen führen.
! Bewahren Sie die Fernbedienung nicht bei
hohen Temperaturen, Luftfeuchtigkeit oder
direktem Sonnenlicht auf.
Anderenfalls kann dies zu einer Verformung
der Fernbedienung, Explosion der Batterie
oder Auslaufen der Batterieflüssigkeit führen.
Im Problemfall
WARNUNG
Sollten Sie Rauch, ungewöhnliche Geräusche
oder Gerüche oder andere ungewöhnliche Anzeichen des Geräts bemerken, schalten Sie es
sofort aus und wenden Sie sich an Ihren Händler oder die nächstgelegene PIONEER-ServiceStation.
Der Gebrauch des Geräts in diesem Zustand
kann zu einem Unfall, Feuer oder Stromschlägen führen.
! Bei diesem Gerät handelt es sich nicht um
ein eigenständiges Gerät. Verbinden Sie das
Gerät mit einem iPhone oder Android-Gerät,
auf dem vor dem Gebrauch eine Navigationsapplikation zu installieren ist.
Lesen Sie die in der Bedienungsanleitung
des anzuschließenden Produkts erläuterten
Sicherheitshinweise.
! Bedienen Sie dieses Gerät nicht während der
Fahrt. Dies lenkt Ihre Aufmerksamkeit vom
sicheren Betrieb Ihres Fahrzeugs ab und
könnte zu einem schwerwiegenden Verkehrsunfall führen. Achten Sie immer auf den
Straßenverkehr und Fußgänger, um eine sichere Fahrt zu gewährleisten. Parken Sie das
Fahrzeug an einem sicheren Ort und ziehen
Sie die Handbremse an, bevor Sie dieses
Gerät bedienen.
! Bedienen Sie die Sonnenblende nicht während der Fahrt. Anderenfalls könnte dies zu
einem schwerwiegenden Verkehrsunfall führen. Parken Sie das Fahrzeug an einem sicheren Ort und ziehen Sie die Handbremse
an, bevor Sie die Sonnenblende bedienen.
! Bedienen Sie kein iPhone oder AndroidGerät während der Fahrt. Parken Sie das
Fahrzeug an einem sicheren Ort und ziehen
Sie die Handbremse an, bevor Sie auf Ihrem
iPhone oder Android-Gerät eine Route zu
Ihrem Zielort einstellen.
! Alle in diesem Gerät verfügbaren Funktionen
garantieren jedoch nicht, dass Ihre Umgebung sicher ist. Achten Sie bei der Fahrt
immer selbst auf die tatsächlichen Verkehrssituationen usw.
! Die von einer Navigationsapplikation bereit
gestellten Streckeninformationen und die
Sprachführung dienen nur zu Referenzzwecken. Beachten Sie bei der Bedienung des
Fahrzeugs immer die örtlichen Verkehrsregeln und tatsächlichen Verkehrsschilder. Ein
Nichtbeachten könnte zum Verletzen der
Straßenverkehrsregeln und zu schwerwiegenden Verkehrsunfällen führen. Darüber hi-
!
!
!
!
!
!
!
naus dienen Informationen bezüglich des
Abstands zum vorderen Fahrzeug, Geschwindigkeitsschilder und Rotlichtkameras, die
von diesem Gerät angezeigt werden, nur zu
Referenzzwecken. Beachten Sie die tatsächlichen Verkehrsschilder und Verkehrssituationen.
Dieses Gerät ist mit einem Sperrsystem ausgestattet und erkennt Bewegungen des Fahrzeugs. Während sich das Fahrzeug bewegt,
wird die Gerätebedienung unterbrochen. Parken Sie das Fahrzeug an einem sicheren Ort
und ziehen Sie die Handbremse an, bevor
Sie dieses Gerät bedienen.
Wenn Sie während des Gebrauchs des Geräts Müdigkeit oder Unbehagen bemerken,
verwenden Sie das Gerät nicht länger und
legen Sie eine längere Pause ein, bis Sie sich
vollständig erholt haben. Wenn das Gerät
unter diesen Umständen weiterhin verwendet wird, könnte dies negative Auswirkungen
auf Ihre Gesundheit haben.
Wenn Sie kurz- oder weitsichtig sind, unter
Astigmatismus oder verschiedenen Sehschärfen zwischen Ihrem linken und rechten
Auge leiden, tragen Sie bei der Verwendung
dieses Geräts eine Sehhilfe usw.
Beim Wechseln zwischen den angezeigten
Bildern auf dem Bildschirm werden diese
eventuell vorübergehend verzerrt angezeigt.
Dies ist keine Fehlfunktion.
Wenn der GPS-Empfang unterbrochen wird,
werden keine Bilder auf dem Bildschirm angezeigt.
Wenn das iPhone oder Android-Gerät unter
hoher Belastung steht, können auf dem Bildschirm angezeigte Bilder eventuell verzerrt
sein.
Die Genauigkeit der Positionsbestimmung
hängt von der GPS-Leistung auf dem mit
dem Gerät verbundenen iPhone oder
Android-Gerät ab.
De
<CRD4765-A>87
Deutsch
! Um Unfälle zu vermeiden, halten Sie die Batterie außerhalb der Reichweite von kleinen
Kindern.
Sollte eine Batterie verschluckt werden, ist
unverzüglich ein Arzt aufzusuchen.
! Legen Sie die Batterie entsprechend der in
dieser Anleitung erläuterten Polarität (positiv
und negativ) ein.
Wenn die Polarität der Batterie nicht korrekt
ist, besteht aufgrund einer Explosion der Batterie oder eines Auslaufens der Batterieflüssigkeit ein Verletzungsrisiko oder die Gefahr
einer Umweltverschmutzung.
! Sollte Batterieflüssigkeit auslaufen und auf
Ihre Haut oder Kleidung gelangen, spülen
Sie sie mit sauberen Wasser ab. Sollte Batterieflüssigkeit in Ihre Augen gelangen, spülen
Sie sie mit sauberen Wasser aus und wenden Sie sich sofort an einen Arzt.
VORSICHT
87
Black plate (88,1)
Abschnitt
Wichtige Sicherheitshinweise
02
! Wenn die GPS-Genauigkeit sehr gering ist,
kann die Fahrtrichtung des Fahrzeugs eventuell nicht korrekt angezeigt werden.
! Befestigen Sie ein iPhone oder AndroidGerät während der Fahrt sicher. Das iPhone
oder Android-Gerät darf nicht auf den Boden
fallen, wo es eventuell unter dem Bremsoder Gaspedal eingeklemmt werden könnte.
! Schließen Sie die Streuscheibe bei Nichtgebrauch.
! Schließen Sie unbedingt die Streuscheibe
und den Combiner, wenn das Gerät von der
Sonnenblende abgenommen und aufbewahrt wird.
Lassen Sie das Gerät nicht an einem Ort, an
dem es direktem Sonnenlicht ausgesetzt ist,
wie auf dem Armaturenbrett. Die Streuscheibe oder der Combiner könnte das Licht zu
einem intensiven Lichtstrahl bündeln und
dadurch Rauch oder einen Brand verursachen.
! Das Rücklicht des vor Ihnen fahrenden Fahrzeugs kann eventuell auf dem Combiner reflektiert werden.
! Pioneer übernimmt keine Verantwortung für
Fluktuationen im Wert oder Ansehen des
Fahrzeugs usw.
So vermeiden Sie eine
Batterieentleerung
! Achten Sie darauf, beim Betrieb dieses Geräts den Fahrzeugmotor laufen zu lassen.
Wenn das Gerät bei ausgeschaltetem Fahrzeugmotor verwendet wird, kann dies zum
Entladen der Batterie führen.
Wenn das Fahrzeug geparkt ist, lassen Sie
den Motor nicht länger als nötig im Leerlauf,
um eine Beeinträchtigung der Umgebung zu
vermeiden.
88
! Wenn sich das Gerät nicht ausschaltet (die
LED-Anzeige am Zigarettenstecker des
Stromkabels leuchtet weiterhin), wenn der
Fahrzeugmotor ausgeschaltet ist, dann trennen Sie das Stromkabel vom Zigarettenanzünder des Fahrzeugs. Anderenfalls führt
dies zum Entladen der Fahrzeugbatterie.
Bei schwer erkennbarem
Bildschirm
! Dieses Gerät verfügt über einen breiten Winkelbereich, bei dem das Bild klar auf dem
Bildschirm zu erkennen ist. Passen Sie den
Winkel des Combiners (Seite 103) und die
Anzeigeeinstellungen (Seite 101) ein, wenn
Sie das Gerät zum ersten Mal in Betrieb nehmen, um die Sichtbarkeit und Klarheit der
angezeigten Bilder zu optimieren. Sie können die Anzeigehelligkeit mit der /
-Taste anpassen (Seite 103).
! Die Anzeigehelligkeit variiert mit dem Betrachtungswinkel. Verwenden Sie das Gerät
in einer Position, in der das angezeigte Bild
klar zu erkennen ist.
Vorsichtshinweise für den
Betrieb bei hohen/niedrigen
Temperaturen
! Wenn die Temperatur für den ordnungsgemäßen Betrieb des Geräts zu hoch oder zu
niedrig ist, wird die Anzeige abgedunkelt
oder stoppt ganz, um die Gerätekomponenten zu schützen. Dies ist keine Fehlfunktion.
Warten Sie, bis die Temperatur in den geeigneten Betriebsbereich zurückkehrt.
! Wenn die Temperatur zu hoch oder zu niedrig ist, funktioniert das Gerät nicht ordnungsgemäß. Verwenden Sie das Gerät innerhalb
des angegebenen Betriebstemperaturbereichs.
Wichtige Sicherheitshinweise
Details finden Sie in der Bedienungsanleitung.
Hinweise zu microSDSpeicherkarten
! Dieses Gerät unterstützt microSD- und
microSDHC-Speicherkarten. In dieser Anleitung werden diese Speicherkartentypen zusammenfassend als „SD-Speicherkarte“
bezeichnet.
! Dieses Gerät unterstützt keine microSDXCSpeicherkarten.
! Pioneer garantiert nicht den Betrieb mit allen
Typen von SD-Speicherkarten, die mit diesem
Gerät kompatibel sind.
! Werfen Sie eine SD-Speicherkarte nicht aus
oder drehen Sie den Zündschalter in eine andere Position, während die eingelegte SDSpeicherkarte gelesen wird. Dies könnte zur
Beschädigung der auf der SD-Speicherkarte
befindlichen Daten führen. Pioneer übernimmt in solchen Fällen keine Verantwortung für jegliche Beschädigungen.
! SD-Speicherkarten verfügen über eine festgelegte Gebrauchsdauer. Sobald die SD-Speicherkarte das Ende ihrer Gebrauchsdauer
erreicht hat, können Daten eventuell selbst
bei korrektem Gebrauch nicht mehr auf die
SD-Speicherkarte geschrieben oder davon
gelöscht werden.
! Einige SD-Speicherkarten werden eventuell
nicht von diesem Gerät erkannt, selbst wenn
diese von einem Computer erkannt worden
sind. Das Problem kann eventuell durch das
Formatieren der SD-Speicherkarten mit
einem geeigneten Formatierungsprogramm
behoben werden. SD-Speicherkarten, die mit
einer standardmäßigen Formatierungsfunktion auf dem Computer formatiert wurden,
entsprechen nicht dem SD-Standard. Diese
Karten können ggf. nicht gelesen oder beschrieben werden usw. Verwenden Sie zur
Vermeidung solcher Probleme ein entsprechendes Formatierungsprogramm. Beim Formatieren der SD-Speicherkarte werden alle
darauf gespeicherten Daten unwiederbringlich gelöscht. Fertigen Sie vorab von allen
notwendigen Daten Sicherheitskopien an.
Ein geeignetes Formatierungsprogramm für
SD-Speicherkarten ist von der folgenden
Website erhältlich:
https://www.sdcard.org/home/
(Gültig vom Stand Juni 2012)
! Pioneer übernimmt keine Garantie für Reparaturen einer SD-Speicherkarte mit Defekten
aufgrund der Formatierung der SD-Speicherkarte. Darüber hinaus übernimmt Pioneer
keine Verantwortung für Schäden, Kosten
oder Ausgaben, die aufgrund eines Datenverlustes oder einer Datenbeschädigung durch
Formatieren der SD-Speicherkarte entstanden sind. Lesen Sie die Bedienungsanleitung
für das Formatierungsprogramm und folgen
Sie den für das Formatieren der SD-Speicherkarte erläuterten Anweisungen. Sie sind
selbst für jegliche auftretenden Probleme
verantwortlich.
Hinweise zum iPhone
! Einzelheiten zu den von diesem Produkt unterstützten iPhone-Modellen und iPhoneSoftwareversionen finden Sie auf unserer
Website.
! Die mit diesem Gerät kompatiblen iPhoneModelle werden in dieser Anleitung zusammenfassend als „iPhone“ bezeichnet.
! Pioneer garantiert nicht den Betrieb mit allen
iPhone-Modellen, die mit diesem Gerät kompatibel sind.
! Pioneer übernimmt keine Verantwortung für
jeglichen Datenverlust aufgrund der Verwendung eines iPhones mit diesem Gerät.
De
<CRD4765-A>88
Black plate (89,1)
Abschnitt
Wichtige Sicherheitshinweise
! Setzen Sie ein iPhone nicht längere Zeit direktem Sonnenlicht aus. Dies kann zur Fehlfunktion des iPhones führen.
! Lassen Sie ein iPhone keinen hohen Temperaturen ausgesetzt.
! Einzelheiten zum iPhone finden Sie in seiner
Bedienungsanleitung.
Hinweise zu Android-Geräten
Urheberrechte zu den mit diesem Produkt mitgelieferten Daten und Programmen sind das Eigentum von Pioneer oder dritten Parteien, die
Pioneer Verwendungsrechte an diesen Daten
oder Programmen gemäß des Urheberrechts
eingeräumt haben. Sie dürfen keine Daten oder
Programme dieses Produkts teilweise oder vollständig in irgendeiner Form kopieren, verändern
oder analysieren.
! In diesem Gerät registrierte Einstellungen
werden eventuell automatisch aufgrund
eines Unfalls, einer Gerätestörung, als Teil
des Reparaturvorgangs oder aufgrund anderer Vorgänge verändert oder gelöscht. Bewahren Sie eine Liste der importierten
Inhalte auf. Pioneer übernimmt keine Verantwortung für Schäden oder Verluste aufgrund
eines Datenverlustes in solchen Fällen.
! Pioneer bietet keinen Service zur Wiederherstellung beschädigter oder gelöschter Daten.
Software-Aktualisierungen
Hinweise zu diesem Gerät
! Zum Speichern der Software-Aktualisierungsdatei ist eine SD-Speicherkarte mit
einer Kapazität von mindestens 2 GB erforderlich.
! Für Kunden ohne Internetzugang ist eine
microSD-Speicherkarte mit der neuesten
Softwareversion ein Mal pro Jahr erhältlich.
Details werden auf der Website mitgeteilt.
! Zu Zwecken der Leistungsverbesserung speichert dieses Gerät den Betriebsverlauf. Während der Protokollierung des Verlaufs werden
jedoch keine Kundendaten abgefragt. Die
aufgezeichneten Informationen können mit
anderen von Pioneer festgelegten Einrichtungen oder Vertragspartnern zur Datenanalyse
geteilt werden, jedoch nur, wenn der Kunde
vorab seine Zustimmung gegeben hat.
! Pioneer hat getestet und bestätigt, dass projizierte Bilder bei einer Entfernung von 3 m zur
Vorderseite der Windschutzscheibe des Fahrzeugs zu erkennen sind. Je nach Höhe des
Fahrersitzes und der Sitzposition, der Höhe
und Neigung der Fahrzeugdecke und der Intensität des Umgebungslichts können sich
die Entfernungen unterscheiden.
! Pioneer garantiert nicht, dass das Produkt
den gesonderten Anforderungen eines spezifischen Benutzers entspricht.
! Die Spezifikationen und Designs des Geräts
unterliegen Änderungen ohne Vorankündigung zum Zwecke der Produktverbesserung.
Anfragen von Kunden bezüglich speziellen
Modifikationen von Produkten oder deren
Austausch, die den hier beschriebenen Spezifikationen und Designs entsprechen, werden von Pioneer weder entgegen genommen
noch akzeptiert.
Urheberrechte
Unsere Website
Besuchen Sie uns auf folgender Website:
http://www.pioneer.de
! Registrieren Sie Ihr Produkt. Wir speichern
die Detaildaten Ihres Produktkaufs in einer
Datei, sodass wir Ihnen diese Informationen
bei Verlust oder Diebstahl des Produkts jederzeit für Ihre Versicherung bereitstellen
können.
! Auf unserer Website finden Sie die jeweils
neuesten Informationen der PIONEER
CORPORATION.
Gespeicherte Kundendaten
! Im Fall notwendiger Reparaturarbeiten am
Gerät usw. übernimmt Pioneer keine Verantwortung für Software-Aktualisierungen, die
vom Kunden durchgeführt wurden.
02
! Die Bildschirmabbildungen in dieser Anleitung unterscheiden sich von denen des tatsächlichen Produkts.
! Das Design der Bildschirmabbildungen des
Geräts unterliegt Änderungen ohne Vorankündigung zum Zwecke der Produktverbesserung.
Deutsch
! Einzelheiten zu den von diesem Produkt unterstützten Android-Geräten finden Sie auf
unserer Website.
! Es kann keine Kompatibilität mit allen
Android-Geräten gewährleistet werden.
! Bestimmte Verwendungen eines Android-Geräts sind in Ihrer Gerichtsbarkeit am Steuer
möglicherweise untersagt. Sie müssen sich
solcher Beschränkungen bewusst sein und
sie beachten.
Sollten Sie sich hinsichtlich einer bestimmten Funktion nicht sicher sein, führen Sie
diese nur bei geparktem Fahrzeug aus.
Funktionen dürfen nur genutzt werden, wenn
ihre Ausführung in der aktuellen Straßenverkehrssituation sicher ist.
! Pioneer übernimmt keine Verantwortung für
jeglichen Datenverlust aufgrund der Verwendung eines Android-Geräts mit diesem Gerät.
! Setzen Sie ein Android-Gerät nicht längere
Zeit direktem Sonnenlicht aus. Dies kann zur
Fehlfunktion des Geräts führen.
! Lassen Sie ein Android-Gerät keinen hohen
Temperaturen ausgesetzt.
! Einzelheiten zum Android-Gerät finden Sie in
seiner Bedienungsanleitung.
Wichtige Sicherheitshinweise
De
<CRD4765-A>89
89
Black plate (90,1)
Abschnitt
Mitgelieferte Teile
03
Vor dem Anschluss
04
Vorsichtshinweise zum
Anschluss
Head-up-Display (HUD):
VORSICHT
Stromkabel x 1
Hauptgerät x 1
Sonnenblendenkissen x 1
Montagehalterung x 1
Doppelseitiges Klebeband x 1
HUD-Fernbedienung:
Justierplatte für die Sonnenblendenstärke (groß) x 1
! Beziehen Sie keine zusätzliche Stromversorgung von der CAN-Bus-Schnittstelle usw.
Stellen Sie ausschließlich ein Gerätestromversorgung über das Fahrzeug her.
! Installieren Sie die mitgelieferten Teile wie
angegeben.
Wenn andere als die mitgelieferten Teile verwendet werden, könnte dies zu einer Fehlfunktion führen.
— GPS-Antenne und ihr Antennenkabel
— Bakenempfänger und ihr Antennenkabel
— Stromkabel
Platzieren Sie die Antennen so entfernt voneinander wie möglich.
! Binden Sie die Antennen nicht zusammen,
stapeln oder kreuzen Sie sie nicht übereinander.
Von der Antenne und dem Antennenkabel
empfangenes Rauschen reduziert die Empfangsempfindlichkeit.
Anschluss des Stromkabels
! Verbinden Sie das Stromkabel, indem Sie es
fest an den Stromanschluss des Geräts anschließen. Wenn sich der Stecker nicht leicht
anstecken lässt, ist eventuell die Ausrichtung
falsch. Überprüfen Sie die Ausrichtung des
Steckers. Stecken Sie ihn nicht mit Gewalt
an. Dies könnte zu einer Fehlfunktion führen.
Hauptgerät x 1
Justierplatte für die Sonnenblendenstärke (klein) x 1
(Ein Lithium-Ionen-Akkupack ist vorinstalliert.
Entfernen Sie das Isolierungsblatt vor dem Gebrauch der Einheit.)
Montageschrauben x 6
Verhindern von Rauschen
Sechskantschlüssel x 1
90
! Um Rauschen zu verhindern, sollten die folgenden Elemente so fern wie möglich vom
iPhone, Android-Gerät und anderen Kabeln
platziert werden.
— Filmantenne und Antennenkabel
— UKW/MW-Radioantenne und ihr Antennenkabel
De
<CRD4765-A>90
Black plate (91,1)
Abschnitt
Vorsichtsmaßnahmen zur Installation
WARNUNG
! Sichern Sie das Gerät an der Sonnenblende
mit einem Absturzsicherungsband.
Anderenfalls könnte das Gerät herunter fallen und einen Unfall und Verletzungen verursachen.
! Wenn das Gerät in einem mit Airbags ausgestatteten Fahrzeug installiert wird, installieren Sie das Gerät niemals auf der
Airbagabdeckung oder an einer Stelle, die
das Auslösen des Airbags beeinträchtigen
könnte. Anderenfalls könnte der Airbag eventuell nicht normal auslösen bzw. das Gerät
während des Auslösens treffen und zu einem
Unfall und Verletzungen führen.
! Führen Sie die Arbeiten nicht an einem Ort
mit direktem Sonnenlicht aus. Dies könnte
zu Verbrennungen führen.
Zudem besteht Erblindungsgefahr aufgrund
des vom Combiner reflektierten Sonnenlichts. Wenn der Combiner direktem Sonnenlicht ausgesetzt ist, schließen Sie ihn.
VORSICHT
! Wenn das Gerät in einem mit Airbags ausgestatteten Fahrzeug installiert wird, erfragen
Sie Vorsichtsmaßnahmen bezüglich der Installationsarbeiten beim Fahrzeughersteller.
Es besteht die Gefahr einer fehlerhaften Airbagauslösung, was zu einem tödlichen Unfall führen könnte.
! Eine Sonnenblendenleuchte und anderes optionales Zubehör an der Sonnenblende, wie
eine Kartenhalterung oder ein Spiegel, können nach der Installation des Geräts möglicherweise nicht mehr verwendet werden.
Überprüfen Sie vorab die Zubehörteile des
Fahrzeugs.
! Die Installation des Geräts kann eventuell
Markierungen an der Oberfläche der Sonnenblende hinterlassen.
! Dieses Gerät ist nicht für eine Installation auf
der Beifahrerseite vorgesehen.
! Während der Installation des Geräts könnten
Teile, Staub usw. auf Sie herabfallen. Um zu
verhindern, dass Staub usw. in Ihre Augen
gelangt, schauen Sie während der Installation nicht direkt von unten in Richtung
Gerät.
! Bei der Streuscheibe und dem Combiner
handelt es sich um empfindliche Teile. Berühren Sie sie bei der Installation des Geräts
nicht mit bloßen Händen oder Werkzeugen.
05
Vor der Installation und
Befestigung des Geräts
Schließen Sie das Gerät zunächst vorübergehend an, um seinen einwandfreien Betrieb zu
überprüfen, und installieren Sie es anschließend. Sollte das Gerät nicht ordnungsgemäß
funktionieren, überprüfen Sie die Anschlüsse
auf ihre Richtigkeit.
Befestigen des Geräts
! Das empfohlene Anzugsdrehmoment beim
Befestigen der Einheit mit Schrauben liegt
zwischen 0,36 N•m und 0,59 N•m.
! Bevor Sie das doppelseitige Klebeband an
der Anschlussbox des Stromkabels befestigen, wischen Sie zuerst sorgfältig jeglichen
Schmutz von dem Oberflächenbereich ab,
an dem das Klebeband angebracht werden
soll.
Deutsch
! Setzen Sie das Gerät keinem Ort mit direktem Sonnenlicht aus.
Entfernen Sie die Schutzfolie des Combiners
erst nach Abschluss der Installation. Der
Combiner könnte einfallendes Licht zu
einem intensiven Lichtstrahl bündeln und
Rauch oder Brand verursachen.
! Installieren Sie das Gerät niemals in einem
Fahrzeug mit Schiebedach oder in einem
Cabrio. Das Licht könnte vom Combiner reflektiert werden und in einem intensiven
Lichtstrahl gebündelt werden.
! Verwenden Sie bei installiertem Gerät nicht
die Sonnenblende am Seitenfenster.
Vorsichtsmaßnahmen zur Installation
De
<CRD4765-A>91
91
Black plate (92,1)
Abschnitt
Anschlüsse
06
Anschlüsse
Für Androidgeräte-Anwender
Anschlussschema
! Verwenden Sie ein USB-microUSB-Datenkommunikationskabel (2) von 1 m oder weniger. Es kann kein Ladekabel verwendet
werden.
1
2
Hinweise
! Die LED-Anzeige am Zigarettenstecker leuchtet bei eingeschaltetem Gerät und erlischt,
wenn das Gerät ausgeschaltet wird.
Wenn die LED-Anzeige beim Ausschalten
des Fahrzeugmotors nicht erlischt, trennen
Sie das Stromkabel vom Zigarettenanzünder
am Fahrzeug. Anderenfalls führt dies zum
Entladen der Fahrzeugbatterie.
! Einzelheiten zum Anschluss eines iPhones
oder Android-Geräts siehe Einstellen Ihres
iPhones oder Android-Geräts auf Seite 100.
4
3
Beim Austauschen der
Sicherung des
Zigarettensteckers
1 Drehen Sie den Stecker entgegen dem
Uhrzeigersinn, um ihn zu lösen.
1
1 Sicherung (3 A)
Einstellen der Größe des
Zigarettensteckers
Wählen Sie für die Größe des Zigarettenstecker
L (groß) oder S (klein) entsprechend der Größe
des Zigarettenanzünders Ihres Fahrzeugs.
6
5
2 Ersetzen Sie die Sicherung mit einer
neuen Sicherung mit gleicher Kapazität.
7
1
1
2
3
4
5
6
7
92
iPhone oder Android-Gerät
USB-Kabel
Stromkabel
Zum Stromanschluss
LED-Anzeige
Schalter für die Steckergröße
An den Zigarettenanzünder
Für iPhone-Benutzer
! Verwenden Sie das mit dem iPhone mitgelieferte Kabel (2).
Lassen Sie das Kabel nicht im Fahrzeug liegen. Das mit dem iPhone mitgelieferte Kabel
ist nicht für einen Gebrauch in einem Fahrzeug vorgesehen.
1 Schalter für die Steckergröße
De
<CRD4765-A>92
Black plate (93,1)
Abschnitt
Installationsposition
Vorbereiten der Geräteinstallation
07
08
Vorsichtshinweise zur
Installation des Geräts
VORSICHT
WARNUNG
! Verwenden Sie die mitgelieferten Schrauben
und installieren Sie das Gerät wie angegeben. Wenn andere als die mitgelieferten
Schrauben verwendet werden, könnte dies
zu einer Beschädigung des Geräts führen.
! Befestigen Sie das Gerät sicher mit den mitgelieferten Schrauben an der Sonnenblende.
Anderenfalls könnte das Gerät während der
Fahrt herunterfallen, einen Kopf treffen und
Verletzungen verursachen.
! Lesen Sie diese Anleitung vollständig und
sorgfältig und installieren Sie das Gerät
unter Beachtung aller Sicherheitsstandards.
1
2
Installieren Sie das Gerät nicht an einer instabilen oder defekten Sonnenblende. Anderenfalls
könnte das Gerät herunterfallen und zu einem
Unfall oder einer Fehlfunktion führen.
1 Überprüfen Sie die Sonnenblende.
Überprüfen Sie die Stärke der Sonnenblende, an
der das Gerät installiert werden soll.
Das Gerät kann an Sonnenblenden installiert
werden, die die folgenden Spezifikationen erfüllen.
1 Hauptgerät
2 Stromkabel
T
A
Stärke der Sonnenblende
Justierplatte für die Sonnenblendenstärke
15 mm bis 20 mm
Justierplatte für die Sonnenblendenstärke (klein)
20 mm bis
26,5 mm
Justierplatte für die Sonnenblendenstärke (mittel)
26,5 mm bis
33 mm
Justierplatte für die Sonnenblendenstärke (groß)
Austauschen der Justierplatte
für die Sonnenblendenstärke
1 Ziehen Sie am HUD-Verriegelungshebel
und schieben Sie ihn in die entsperrte Position.
Y
H
Angegebene Installationsposition
VORSICHT
T: Stärke
15 mm bis 33 mm
H: Höhe
140 mm bis 240 mm
A: Abstand zwischen
den Auflagepunkten
185 mm oder mehr
Y: Abstand zum Spiegel usw.
45 mm oder mehr (empfohlen)
2 Überprüfen Sie die zu verwendende Justierplatte für die Sonnenblendenstärke.
Die Größe der Justierplatte für die Sonnenblendenstärke, die an der Montagehalterung zu befestigen ist, hängt von der Stärke der
Sonnenblende ab.
Das Gerät wird mit angebrachter Justierplatte
für die Sonnenblendenstärke (mittel) ausgeliefert.
Verwenden Sie eine Justierplatte für die Sonnenblendenstärke passend zur Stärke der Sonnenblende.
2
1 Entsperrposition
2 HUD-Verriegelungshebel
2 Entfernen Sie die acht Schrauben an der
Montagehalterung, einschließlich der Einstellschrauben für die Längsrichtung (in der
Abbildung dargestellt) und nehmen Sie dann
die Justierplatte für die Sonnenblendenstärke (mittel) ab.
Wenn die Einstellschrauben für die Längsrichtung entfernt werden, löst sich die Justierplatte
für die Längsrichtung von der Justierplatte für
die Sonnenblendenstärke.
De
<CRD4765-A>93
Deutsch
Installieren Sie das Gerät an der angegebenen
Installationsposition, um den Fahrer ein sicheres
Blickfeld zu ermöglichen und sicherzustellen,
dass das Gerät den vollen Funktionsumfang erreicht. Wenn das Gerät an einer anderen als der
angegebenen Position installiert wird, entspricht
es u. U. nicht den Anforderungen für Straßenfahrzeuge und könnte Sicherheitsprüfungen
nicht bestehen, zum Beispiel aufgrund eines
Wartungsfehlers.
1
93
Black plate (94,1)
Abschnitt
Vorbereiten der Geräteinstallation
08
Installieren der Haupteinheit
09
1
4 Richten Sie die Schraubenlöcher an der
Justierplatte für die Sonnenblende mit
denen der Montagehalterung aus und ziehen Sie die zuvor entfernten restlichen
Schrauben an der ursprünglichen Position
wieder fest.
2
3
1 Verschieben Sie den HUD-Verrieglungshebel in die entsperrte Position.
Ziehen Sie am HUD-Verriegelungshebel und
schieben Sie ihn in die entsperrte Position.
2 Lösen Sie die Sicherungsplatten an der
Montagehalterung.
Ziehen Sie die Sicherungsplatten an der Montagehalterung nach links und rechts, um die Verriegelung zu lösen.
1
2
1 Justierplatte für die Sonnenblendenstärke
2 Einstellschrauben für die Längsrichtung
3 Justierplatte für die Längsrichtung
3 Befestigen Sie die Justierplatte für die
Längsrichtung an der zu verwendenden Justierplatte für die Sonnenblendenstärke.
1 Entsperrposition
2 HUD-Verriegelungshebel
! Halten Sie beim Bedienen des HUD-Verriegelungshebels nicht die beweglichen Teile der
Montagehalterung fest. Wenn die beweglichen Teile festgehalten werden, kann der
HUD-Verriegelungshebel nicht bewegt werden.
3 Passen Sie die Stärke der Montagehalterung an.
Richten Sie die Linien an der Montagehalterung
an der rechten und linken Skalenmarkierung
der Justierplatte für die Sonnenblendenstärke
entsprechend der Stärke der Sonnenblende aus,
und ziehen Sie dann die drei Schrauben fest an.
2
1
1
3
1
2
1 Justierplatte für die Sonnenblendenstärke
2 Einstellschrauben für die Längsrichtung
3 Justierplatte für die Längsrichtung
94
1
1 Bewegliche Teile
1 Montagehalterung
2 Justierplatte für die Sonnenblendenstärke
! Die ungefähren Angaben für die Skalenmarkierung an der Justierplatte für die Sonnenblendenstärke (mittel) sind wie folgt (die
Abbildung zeigt die Linie an der Montagehalterung ausgerichtet an der Skalenmarkerierung für 22 mm):
De
<CRD4765-A>94
Black plate (95,1)
Abschnitt
Installieren der Haupteinheit
1
2
Installieren der Haupteinheit
09
5 Drücken Sie die Sonnenblende nach
unten in die vertikale Position.
3
4
1
2
3
4
20 mm
22 mm
24 mm
26 mm
4 Befestigen Sie die Montagehalterung an
der Sonnenblende.
Drücken Sie die Sonnenblende nach oben in die
horizontale Position.
Halten Sie die linke und rechte Kante der Sicherungsplatten der Montagehalterung und befestigen Sie die Montagehalterung an der
Sonnenblende, indem Sie die Montagehalterung
ganz hinein drücken.
! Wenn die Sicherungsplatten nicht vollständig
hineingedrückt werden können, muss die
Stärke der Montagehalterung erhöht werden.
Nehmen Sie die Montagehalterung von der
Sonnenblende ab und kehren Sie zu Schritt 3
zurück, um die Skalenposition anzupassen.
Befestigen Sie die Montagehalterung anschließend erneut an der Sonnenblende.
7 Überprüfen Sie die Montagehalterung
auf ihren festen Sitz.
Drücken Sie die Sonnenblende zurück in die horizontale Position.
Drücken Sie die Montagehalterung nach hinten
und nach vorn, um zu überprüfen, dass sie sicher befestigt ist.
8 Entfernen Sie die Montagehalterung.
Drücken Sie die Sonnenblende nach unten in
die vertikale Position und ziehen Sie die Sicherungsplatten nach links und rechts, um die Verriegelung zu lösen.
Drücken Sie die Sonnenblende nach oben in die
horizontale Position und nehmen Sie die Montagehalterung von der Sonnenblende ab.
Wenn sich die Montagehalterung nicht leicht an
der Sonnenblende befestigen lässt, dann ist die
Stärke richtig.
! Wenn sich die Montagehalterung leicht an
der Sonnenblende befestigen lässt, während
die Sicherungsplatten verriegelt sind, dann
ist die Stärke der Montagehalterung nicht
richtig.
Nehmen Sie die Montagehalterung von der
Sonnenblende ab und kehren Sie zu Schritt 3
zurück, um die Skalenposition anzupassen.
Befestigen Sie die Montagehalterung anschließend erneut an der Sonnenblende.
Deutsch
! Wenn die Montagehalterung nicht vollständig hineingedrückt werden kann, muss die
Stärke der Montagehalterung erhöht werden.
Nehmen Sie die Montagehalterung von der
Sonnenblende ab und kehren Sie zu Schritt 3
zurück, um die Skalenposition anzupassen.
Befestigen Sie die Montagehalterung anschließend erneut an der Sonnenblende.
6 Verriegeln Sie die Montagehalterung.
Drücken Sie fest von links und rechts auf die Sicherungsplatten, um die Montagehalterung zu
verriegeln.
! Wenn sich die Montagehalterung leicht von
der Sonnenblende lösen lässt, muss die Stärke der Montagehalterung reduziert werden.
Nehmen Sie die Montagehalterung von der
Sonnenblende ab und kehren Sie zu Schritt 3
zurück, um die Skalenposition anzupassen.
Befestigen Sie die Montagehalterung anschließend erneut an der Sonnenblende.
9 Überprüfen Sie, ob die angepasste Stärke
der Montagehalterung nun richtig ist.
Drücken Sie fest von links und rechts auf die Sicherungsplatten, um die Montagehalterung zu
verriegeln.
Überprüfen Sie, dass sich die Montagehalterung
nicht leicht an der Sonnenblende befestigen
lässt, während die Sicherungsplatten verriegelt
sind.
10 Montieren Sie die Montagehalterung,
deren Stärke an das Hauptgerät angepasst
wurde.
Überprüfen Sie, dass die Streuscheibe und der
Combiner des Hauptgeräts geschlossen sind,
und setzen Sie den HUD-Verriegelungshebel an
der Montagehalterung dann in die Entsperrposition.
De
<CRD4765-A>95
95
Black plate (96,1)
Abschnitt
Installieren der Haupteinheit
09
Hauptgerät:
Installieren der Haupteinheit
Rückseite des Hauptgeräts:
1
1
2
2
Drücken Sie die Sonnenblende nach oben in die
horizontale Position.
Halten Sie die linke und rechte Kante der Sicherungsplatten der Montagehalterung und befestigen Sie das Gerät an der Sonnenblende, indem
Sie die Montagehalterung ganz hinein drücken.
1 Combiner
2 Streuscheibe
Montagehalterung:
Führen Sie das Absturzsicherungsband wie in
der Abbildung dargestellt durch die Ösen.
1
1 Richten Sie die Nocken und die Aussparungen einander aus.
2 Aussparung
2
1 Entsperrposition
2 HUD-Verriegelungshebel
Sichern Sie die Montagehalterung und das
Hauptgerät an vier Stellen an der Vorder- und
Rückseite mit den mitgelieferten Montageschrauben.
Vorderseite des Hauptgeräts:
1
11 Lösen Sie die vier Montageschrauben, die
in Schritt 10 angezogen wurden, um eine
Drehung.
14 Drücken Sie die Sonnenblende nach
unten in die vertikale Position.
12 Lösen Sie die Einstellschrauben für die
Längsrichtung am Gerät um eine Drehung.
Vorderseite des Hauptgeräts:
Ziehen Sie das Absturzsicherungsband nach
unten und befestigen Sie es dabei.
2
15 Sichern Sie das Gerät an der Sonnenblende mit einem Absturzsicherungsband.
Ziehen Sie das Absturzsicherungsband von der
Rückseite der Sonnenblende nach vorn, während die Sonnenblende nach unten in die vertikale Position gedrückt wurde.
1 Aussparung
2 Richten Sie die Nocken und die Aussparungen einander aus.
96
13 Befestigen Sie das Gerät an der Sonnenblende.
Ziehen Sie die Sicherungsplatten an der Montagehalterung nach links und rechts, um die Verriegelung zu lösen.
De
<CRD4765-A>96
Black plate (97,1)
Abschnitt
Installieren der Haupteinheit
16 Verriegeln Sie die Montagehalterung.
Drücken Sie fest von links und rechts auf die Sicherungsplatten, um die Montagehalterung zu
verriegeln.
Installieren der Haupteinheit
19 Passen Sie die Neigung des Hauptgeräts
an.
Passen Sie den Winkel des Hauptgeräts so an,
dass es gerade ausgerichtet ist.
09
Passen Sie die Richtung des Hauptgeräts so an,
dass die Streuscheibe und der Combiner in
Fahrtrichtung zeigen.
1
Links
Rechts Links
1 Entsperrposition
Rechts
Das Hauptgerät schiebt sich nach hinten und
die Geräteposition ist entsperrt.
Neigen Sie die Sonnenblende um etwa 20 Grad
in vertikale Richtung und ziehen Sie die zwei
Montageschrauben an der Geräterückseite, die
im Schritt 11 gelöst wurden, fest.
1
17 Drücken Sie die Sonnenblende nach oben
in die horizontale Position.
! Wenn die Schutzfolie des Combiners bei der
Anpassung stört, entfernen Sie sie. Bringen
Sie die Schutzfolie nach abgeschlossener Anpassung wieder am Combiner an.
20 Passen Sie die Richtung des Hauptgeräts
an.
Öffnen Sie die Streuscheibe und den Combiner
des Hauptgeräts.
1
1
1 Passen Sie den Combiner so an, dass die
Streuscheibe auf die Mitte des Combiners projiziert wird.
! Passen Sie das Hauptgerät unbedingt so an,
dass es in Fahrtrichtung zeigt.
1
2
1 Gesperrte Position
Das Hauptgerät schiebt sich nach vorn und die
Geräteposition ist gesperrt.
1 Streuscheibe
2 Combiner
! Achten Sie darauf, dass das Gerät dabei nicht
herausfällt.
23 Ziehen Sie die Montageschrauben an der
Vorderseite des Geräts fest an.
Ziehen Sie die zwei Montageschrauben an der
Gerätevorderseite fest, die im Schritt 11 gelöst
wurden sowie die zwei Einstellschrauben für die
Längsrichtung, die in Schritt 12 gelöst wurden.
Deutsch
18 Verriegeln Sie die Position des Hauptgeräts.
Ziehen Sie am HUD-Verriegelungshebel und
schieben Sie ihn in die gesperrte Position.
1 Gerät in Fahrtrichtung ausrichten
22 Entfernen Sie das Gerät von der Sonnenblende.
Schließen Sie die Streuscheibe und den Combiner des Hauptgeräts und drücken Sie die Sonnenblende dann nach unten in die vertikale
Position.
Ziehen Sie die Sicherungsplatten an der Montagehalterung nach links und rechts, um die Verriegelung zu lösen. Lösen Sie das
Absturzsicherungsband. Drücken Sie die Sonnenblende nach oben in die horizontale Position
und nehmen Sie dann die Montagehalterung
von der Sonnenblende ab.
21 Entriegeln Sie die Position des Hauptgeräts.
Ziehen Sie am HUD-Verriegelungshebel und
schieben Sie ihn in die entsperrte Position.
De
<CRD4765-A>97
97
Black plate (98,1)
Abschnitt
Installieren der Haupteinheit
09
Installieren der Haupteinheit
2
26 Verlegen Sie das Stromkabel.
Verlegen Sie das Stromkabel so, dass das Kabel
nicht die Fahrt und das Sichtfeld des Fahrers beeinträchtigt.
1
3
1 Absturzsicherungsband
2 Sonnenblendenkissen
3 Sonnenblendenkissenhalterung
24 Befestigen Sie das Gerät an der Sonnenblende.
Befestigen Sie das Gerät anhand der Schritte 13
bis 17 an der Sonnenblende.
! Verschieben Sie den HUD-Verrieglungshebel
in die entsperrte Position, bevor das Gerät an
der Sonnenblende befestigt wird.
! Wenn sich ein Spalt zwischen der Fahrzeugdecke und der Sonnenblende in horizontaler
Position befindet, dann befestigen Sie das
Sonnenblendenkissen am Absturzsicherungsband.
1
2
3
1
! Passen Sie das Stromkabel so an, dass es die
Sicht des Fahrers nicht behindert.
! Verlegen Sie das Kabel so, dass es die nach
vorn und hinten Bewegung des Hauptgeräts
bei der Bedienung des HUD-Verriegelungshebels nicht stört.
2
4
1 Fahrzeugdecke
2 Sonnenblende
3 Spalt zwischen Fahrzeugdecke und
Sonnenblende
4 Kein Spalt zwischen Fahrzeugdecke
und Sonnenblende
! Wenn ein Sonnenblendenkissen angebracht
wird, muss das Sonnenblendenkissen an der
Sonnenblendenkissenhalterung befestigt
und dann am Absturzsicherungsband angebracht werden. Anschließend ist das Absturzsicherungsband zu sichern.
98
1
27 Verriegeln Sie die Position des Hauptgeräts.
Ziehen Sie am HUD-Verriegelungshebel und
schieben Sie ihn in die gesperrte Position.
1
1 Gesperrte Position
Das Hauptgerät schiebt sich nach vorn und die
Geräteposition ist gesperrt.
1 Sonnenblendenkissen
2 Absturzsicherungsband
25 Schließen Sie das Stromkabel am Gerät
an.
1 Fixieren Sie das Kabel mit handelsüblichen Kabelklemmen.
! Befestigen Sie das Kabel nicht an der Windschutzscheibe.
! Verlegen Sie das Stromkabel nicht am Fuße
des Fahrersitzes. Dort besteht die Gefahr,
dass das Stromkabel unter dem Bremspedal
eingeklemmt wird und die Fahrt beeinträchtigt, was einen schwerwiegenden Unfall verursachen könnte.
Fixieren Sie beim Verlegen des Stromkabels einige Stellen mit handelsüblichen Kabelklemmen.
28 Sichern Sie das Stromkabel.
Befestigen Sie doppelseitiges Klebeband an der
Anschlussbox des Stromkabels und kleben Sie
die Anschlussbox dann an eine Stelle, an der
das Kabel sicher befestigt werden kann.
1
1 Stromkabel
De
<CRD4765-A>98
Black plate (99,1)
Abschnitt
Installieren der Haupteinheit
1
2
3
1 Stromkabel
2 Seitliches Armaturenbrett usw.
3 Doppelseitiges Klebeband
Fixieren Sie das Kabel mit handelsüblichen Kabelklemmen.
Installieren der Haupteinheit
! Befestigen Sie ein iPhone oder Android-Gerät
sicher in einer handelsüblichen Halterung.
! Stecken Sie den Zigarettenstecker des Stromkabels in den Zigarettenanschluss des Fahrzeugs mit nach oben zeigender LED-Anzeige,
damit der Fahrer sie sehen kann.
Wenn das Gerät eingeschaltet ist, leuchtet
die LED-Anzeige am Zigarettenstecker in
grün.
Nach der Installation
VORSICHT
! Überprüfen Sie, ob das Gerät ordnungsgemäß installiert wurde. Kehren Sie in den folgenden Fällen zu Schritt 1 zurück und
installieren Sie das Gerät auf richtige Weise.
1
! Schließen Sie unbedingt die Streuscheibe
und den Combiner, wenn das Gerät von der
Sonnenblende abgenommen und aufbewahrt wird.
Lassen Sie das Gerät nicht an einem Ort, an
dem es direktem Sonnenlicht ausgesetzt ist,
wie auf dem Armaturenbrett. Die Streuscheibe oder der Combiner könnte das Licht zu
einem intensiven Lichtstrahl bündeln und
dadurch Rauch oder einen Brand verursachen.
Anschließen des Stromkabels
an den Zigarettenanzünder
1 LED-Anzeige
Einzelheiten siehe Anschließen des Stromkabels an den Zigarettenanzünder auf Seite 99.
29 Entfernen Sie die Schutzfolie vom Combiner.
Überprüfen Sie, dass das Stromkabel ordnungsgemäß angeschlossen und verlegt ist und entfernen Sie dann die Schutzfolie vom Combiner.
1
2
3
4
! Schließen Sie die Streuscheibe bei Nichtgebrauch.
% Verbinden Sie den Zigarettenstecker des
Stromkabels, indem Sie ihn fest in den Zigarettenanzünder des Fahrzeugs stecken.
Wenn das Gerät eingeschaltet ist, leuchtet die
LED-Anzeige am Zigarettenstecker in grün.
1
1 LED-Anzeige
Hinweise
! Stecken Sie den Zigarettenstecker des
Stromkabels in den Zigarettenanschluss des
Fahrzeugs mit nach oben zeigender LED-Anzeige, damit der Fahrer sie sehen kann.
! Wenn die LED-Anzeige beim Ausschalten
des Fahrzeugmotors nicht erlischt, trennen
Sie das Stromkabel vom Zigarettenanzünder
am Fahrzeug. Anderenfalls führt dies zum
Entladen der Fahrzeugbatterie.
De
<CRD4765-A>99
Deutsch
1 Die Sicherungsplatten sind nicht fixiert.
2 Das Gerät ist nicht mit einem Absturzsicherungsband gesichert.
3 Das Gerät ist schräg installiert.
4 Das Gerät wurde auf umgekehrte Weise
installiert.
! Installieren Sie das Stromkabel niemals an
einer Stelle, an der das Kabel aufgrund der
Vibration des Fahrzeugs usw. nicht befestigt
werden kann.
! Wenn das Kabel nicht mit dem mitgelieferten
doppelseitigen Klebeband befestigt werden
kann, sichern Sie es mit handelsüblichen Klebeband usw.
09
99
Black plate (100,1)
Abschnitt
Einstellen Ihres iPhones oder Android-Geräts
10
Anschließen Ihres iPhones oder
Android-Geräts an das Gerät
2 An den Zigarettenanzünder
3 Anschlussbox des Stromkabels
4 USB-Kabel
Für iPhone-Benutzer
! Verwenden Sie das mit dem iPhone mitgelieferte Kabel.
Lassen Sie das Kabel nicht im Fahrzeug liegen. Das mit dem iPhone mitgelieferte Kabel
ist nicht für einen Gebrauch in einem Fahrzeug vorgesehen.
Für Androidgeräte-Anwender
! Verwenden Sie ein USB-microUSB-Datenkommunikationskabel von 1 m oder weniger.
Es kann kein Ladekabel verwendet werden.
1 Schließen Sie das USB-Kabel an Ihr
iPhone oder Android-Gerät an.
2 Verbinden Sie das andere Ende des USBKabels fest mit der Anschlussbox des Stromkabels.
1
Installieren der Navigationsapplikation
Installieren Sie vor der Verwendung des Geräts
die Navigationsapplikation auf Ihrem iPhone
oder Android-Gerät.
Sie können die Navigationsapplikation vom
iTunes App Store oder Google Play herunterladen.
Einzelheiten zur Navigationsapplikation finden
Sie auf folgender Website.
http://www.pioneer.eu/navgatehud
Einstellen Ihres iPhones oder Android-Geräts
! Für Androidgeräte-Anwender
Wenn die Applikation nach dem Anschließen
des Android-Geräts am Gerät nicht automatisch startet, tippen Sie im auf dem AndroidGerät angezeigten Popup-Fenster auf die Applikation.
Wenn Sie das Kontrollkästchen markieren
und dann die Applikation im Popup-Fenster
auswählen, wird das Popup-Fenster ab dem
nächsten Mal nicht mehr angezeigt.
Starten der Navigationsapplikation
Wenn Sie die Navigationsapplikation zum ersten
Mal verwenden, starten Sie sie selbst. Wenn das
iPhone oder Android-Gerät das nächste Mal an
das Gerät angeschlossen wird, startet die Applikation automatisch.
VORSICHT
1 Anschlussbox des Stromkabels
Anschlussübersicht:
1
2
3
4
1 iPhone oder Android-Gerät
100
! Um die Navigationsapplikation verwenden zu
können, müssen Sie zuerst den „NavGate
HUD Support“ erwerben. Kaufen Sie den
„NavGate HUD Support“ in der Applikation,
indem Sie den Anweisungen auf dem Bildschirm folgen.
! Für den Erwerb des „NavGate HUD Support“
ist eine Internetverbindung erforderlich.
Hinweise
! Für iPhone-Benutzer
Wenn die Applikation nach dem Anschließen
des iPhones am Gerät nicht automatisch
startet, tippen Sie im auf dem iPhone angezeigten Popup-Fenster auf „Zulassen“.
De
<CRD4765-A>100
Black plate (101,1)
Abschnitt
Anzeigemodi
Nach Abschluss der Installation und der Verbindungsherstellung
11
12
Dieses Gerät ist mit fünf verschiedenen Anzeigemodi ausgestattet: AR-Ansicht (langsamer und schneller
Modus), Listen-Ansicht (langsamer und schneller Modus), Kreuzungs-Ansicht, Streckenübersicht und UhrAnsicht.
Wenn eine Kommunikation zwischen dem Gerät und der Navigationsapplikation hergestellt wurde, wird eine
der beiden folgenden Ansichten angezeigt.
Listen-Ansicht
AR-Ansicht
Langsamer Modus
Drücken Sie
auf ◀.
Schneller Modus
Schneller Modus
Wenn sich ein Fahrzeug einer Kreuzung
nähert
3 Drücken Sie die a/b-Taste, um einen Einstellpunkt auszuwählen und drücken Sie
dann die d-Taste.
Schalten Sie das Gerät (durch Starten des Motors) nach Abschluss der Installation und Verbindungsherstellung ein und passen Sie den
Winkel des Combiners so an, dass das Bild zu
erkennen ist.
Langsamer Modus
Drücken Sie
auf ▶.
Wenn sich ein Fahrzeug einer Kreuzung
nähert
Anpassen der Bildschirmeinstellungen
Hinweis
Der Bildschirm kann je nach Bildschirmhelligkeit und den Umgebungsbedingungen nicht
deutlich zu erkennen sein. Passen Sie die Bildschirmhelligkeit an (siehe Anpassen der Bildschirmhelligkeit auf Seite 103) oder fahren Sie
das Fahrzeug an einen Ort, wo die Anzeige klar
zu erkennen ist und bedienen Sie dann das
Gerät.
1
Drücken Sie die
Position
Passen Sie die Position des angezeigten Bilds
an.
1 Drücken Sie die a/b-Taste, um einen Einstellpunkt auszuwählen und drücken Sie
dann die d-Taste.
-Taste.
Kreuzungs-Ansicht
Uhr-Ansicht
Wenn die
-Taste bei keinem
ausgewählten Fahrtziel gedrückt wird:
2 Drücken Sie die a/b-Taste, um Displayeinstellungen auszuwählen und drücken Sie
dann die d-Taste.
Beschreibung
Horizontale Position
Wählen Sie diese Option,
um die horizontale Position
des angezeigten Bilds anzupassen.
Vertikale Position
Wählen Sie diese Option,
um die vertikale Position des
angezeigten Bilds anzupassen.
Deutsch
Streckenübersicht
Wenn die
-Taste bei ausgewähltem
Fahrtziel gedrückt wird:
Einstellpunkt
2 Drücken Sie auf die a/b-Taste, um das
gesamte Gittermuster einzublenden.
Beispiel: Bei korrekter Anpassung
Hinweise
! Wenn kein Fahrtziel festgelegt wurde, wird
die langsame AR-Ansicht verwendet.
! Weitere Einzelheiten zu den Ansichten finden Sie in der Bedienungsanleitung.
De
<CRD4765-A>101
101
Black plate (102,1)
Abschnitt
Nach Abschluss der Installation und der Verbindungsherstellung
12
Beispiel: Bei nicht korrekter Anpassung
Zoom
Passen Sie die Größe des angezeigten Bilds an.
% Drücken Sie auf die a/b-Taste, um das
gesamte Gittermuster einzublenden.
% Drücken Sie die a/b-Taste, um das Gittermuster in eine viereckige Form zu bringen.
Korrigieren Sie die Verzerrung des angezeigten
Bilds.
Rotation
Passen Sie die Ausrichtung des angezeigten
Bilds an.
Einstellpunkt
Beispiel: Bei nicht korrekter Anpassung
1 Drücken Sie die a/b-Taste, um einen Einstellpunkt auszuwählen und drücken Sie
dann die d-Taste.
Geometrische Korrektur
1 Drücken Sie die a/b-Taste, um einen Einstellpunkt auszuwählen und drücken Sie
dann die d-Taste.
% Drücken Sie die a/b-Taste, um das Gittermuster gerade auszurichten.
Beispiel: Bei korrekter Anpassung
Nach Abschluss der Installation und der Verbindungsherstellung
Beschreibung
Trapezverzerrung
Wählen Sie diese Option,
um die Trapezverzerrung zu
korrigieren.
Bogenverzerrung
Wählen Sie diese Option,
um die Lächelverzerrung zu
korrigieren.
Einstellpunkt
Beschreibung
Rot
Wählen Sie diese Option
zum Anpassen der Rottöne.
Grün
Wählen Sie diese Option
zum Anpassen der Grüntöne.
Blau
Wählen Sie diese Option
zum Anpassen der Blautöne.
2 Drücken Sie die a/b-Taste, um die Helligkeit anzupassen.
Beispiel: Anpassung der roten Farben
2 Drücken Sie die a/b-Taste, um das Gittermuster in eine viereckige Form zu bringen.
Beispiel: Anpassung der Trapezverzerrung
Aspektverhältnis
Passen Sie das Bildseitenverhältnis des angezeigten Bilds an.
Weißabgleich
Passen Sie den Weißabgleich des angezeigten
Bilds an.
102
De
<CRD4765-A>102
Black plate (103,1)
Abschnitt
Vor der Fahrt
Vor der Fahrt
Konfigurieren der Gerätefunktionseinstellungen
Die Gerätefunktionseinstellungen können über
den Einstellungen-Bildschirm konfiguriert werden.
Menü
Beschreibung
über
Bestätigen der Gerätesoftwareversion und rechtliche
Hinweise.
Alle Einstellungen zurücksetzen
Wiederherstellen der Standardeinstellungen.
2 Passen Sie den Combiner-Winkel so an,
dass die gesamte Streuscheibe auf den Combiner projiziert wird.
% Drücken Sie die
-Taste.
Hinweise
! Funktionseinstellungen kann nur eingestellt werden, wenn eine Verbindung mit der
Navigationsapplikation hergestellt wurde.
! Drücken Sie die
-Taste, um den Einstellungen-Bildschirm zu schließen.
! Details finden Sie in der Bedienungsanleitung.
Anpassen des CombinerWinkels
Passen Sie den Combiner-Winkel an die Sitzposition an.
Der Einstellungen-Bildschirm erscheint.
1 Öffnen Sie die Streuscheibe und den
Combiner.
Menü
1
1 Passen Sie den Combiner so an, dass die
Streuscheibe auf die Mitte des Combiners projiziert wird.
Einsteigen in und Aussteigen
aus dem Fahrzeug
Achten Sie darauf, dass Sie sich nicht den Kopf
am Hauptgerät stoßen.
Anpassen der Bildschirmhelligkeit
Die Dimmerfunktion dieses Geräts passt die
Helligkeit automatisch an die Umgebungshelligkeit an.
Die Bildschirmhelligkeit kann manuell mit der
/ -Taste angepasst werden.
Deutsch
VORSICHT
Halten Sie den Combiner beim Anpassen des
Winkels am Rand fest.
Korrigieren der CombinerPosition
Überprüfen Sie vor dem Gebrauch, dass sich
der untere Rand des Combiners über Ihrer Sichtlinie befindet, während Sie im Sitz sitzen und in
der tatsächlichen Fahrtposition gerade nach
vorn schauen. Verwenden Sie das Gerät nicht,
wenn sich der untere Rand unterhalb Ihrer
Sichtlinie befindet. Klappen Sie den Combiner
in die geschlossene Position für ein freies Sichtfeld bei der Fahrt.
VORSICHT
! Während sich das Fahrzeug bewegt, unterbricht das Gerät die Gerätebedienung. Parken Sie das Fahrzeug an einem sicheren Ort
und ziehen Sie die Handbremse an, bevor
Sie dieses Gerät bedienen.
! Wenn das Fahrzeug während der Einstellung
der Gerätefunktion bewegt wird, schließt sich
der Einstellungen-Bildschirm automatisch.
13
Beschreibung
Displayeinstellungen
Anpassen der Anzeigeeinstellungen für die projizierten Bilder.
Funktionseinstellungen
Einstellen der Funktionseinstellungen.
Sprache
Einstellen der Anzeigesprache.
VORSICHT
1
2
Bevor Sie das Gerät bei Nacht oder an einem
dunklen Ort wie in einem Tunnel verwenden,
passen Sie die Helligkeit des Geräts so an, dass
es die Fahrt nicht beeinträchtigt. Anderenfalls
könnte dies zu einem Unfall führen.
1 Streuscheibe
2 Combiner
De
<CRD4765-A>103
103
Black plate (104,1)
Abschnitt
Vor der Fahrt
13
% Drücken Sie die
/
-Taste.
Hinweis
Durch das Ändern der Helligkeit kann sich
zudem der Farbton der Anzeige ändern.
104
De
<CRD4765-A>104
Black plate (105,1)
Deutsch
De
<CRD4765-A>105
105
Black plate (106,1)
Hoofdstuk
Voorzorgsmaatregelen
Voorzorgsmaatregelen
Voor de bedieningshandleiding
106
Gebruikersinformatie voor het verzamelen
en verwijderen van oude producten en
batterijen
106
Aansluiten en installeren
107
Informatie over dit toestel
108
Voorzorgsmaatregelen voor
batterijen
108
Bij problemen
109
Belangrijke veiligheidsvoorschriften
Voorkomen dat de accu leegloopt
110
Als het scherm moeilijk zichtbaar is
110
Voorzorgsmaatregelen voor gebruik bij een
hoge/lage temperatuur
110
Opmerking over microSDgeheugenkaarten
110
Opmerkingen voor de iPhone
110
Opmerkingen over Androidapparaten
110
Auteursrechten
111
Nieuwe softwareversies
111
Bezoek onze website
111
Opgeslagen gegevens
111
Opmerkingen over dit toestel
111
Meegeleverde onderdelen
Vóór aansluiting
Voorzorgsmaatregelen voor
aansluiting
112
De elektriciteitskabel aansluiten
Ruis voorkomen
112
112
Voorzorgsmaatregelen voor installatie
Vóór de installatie en bevestiging van het
toestel
113
Het toestel bevestigen
113
Verbindingen
Aansluitschema
113
Formaat van de stekker voor de
sigarettenaansteker instellen
106
114
Voorzorgsmaatregelen
De zekering van de stekker voor de
sigarettenaansteker vervangen
De weergavehelderheid aanpassen
125
114
Installatiepositie
Voorzorgsmaatregelen voor installatie van
het toestel
114
Gespecificeerde installatiepositie
114
Voorbereiding voor installatie van het
toestel
Afstelplaat voor dikte van zonneklep
vervangen
115
Installatie van het hoofdtoestel
Na de installatie
120
Sluit de stroomkabel aan op de aansluiting
voor de sigarettenaansteker
121
Uw iPhone of Android-apparaat
instellen
Uw iPhone of Android-apparaat op het
toestel aansluiten
121
Installeren van de
navigatietoepassing
121
Starten van de navigatietoepassing
121
Weergavestanden
Wanneer de installatie en aansluiting
voltooid zijn
De weergave-instellingen
aanpassen
123
– Positie
123
– Zoom
123
– Rotatie
123
– Aspect Ratio
123
– Geometrische Correctie
123
– Witbalans
123
Vóór het rijden
De functie-instellingen configureren
124
De hoek van de combiner
aanpassen
124
In en uit het voertuig stappen
125
Correcte positie van de combiner
125
Belangrijk
! Voor uw veiligheid en die van andere
personen moet u de installatie, bekabeling en eventuele verplaatsing van
het toestel in het voertuig laten uitvoeren door uw dealer.
Voor de installatie, bekabeling en verwijdering is speciale technische kennis vereist.
Onjuiste installatie, bekabeling of verwijdering van het toestel en gebruik van nietgoedgekeurde onderdelen kunnen een ongeval, letsel of storingen veroorzaken.
Pioneer kan niet aansprakelijk worden gesteld in zulke gevallen.
! Kennisgeving voor dealers
Stel de verbinding met het navigatietoestel
in en pas de weergave-instellingen aan
nadat u de installatie en bekabeling voltooit.
Overhandig deze handleiding aan de klant
wanneer u klaar bent.
Hartelijk dank voor uw keuze voor dit
Pioneer-product
Lees deze handleiding voordat u het product in
gebruik neemt zodat u het goed leert gebruiken.
Lees vooral de gedeelten die met WAARSCHUWING en LET OP gemarkeerd zijn aandachtig.
Bewaar deze handleiding na het lezen op een veilige, voor de hand liggende plaats zodat u hem indien nodig altijd kunt raadplegen.
Ga naar de volgende website voor details over de
functies en de bediening van dit toestel:
http://www.pioneer.eu/navgatehud
Gebruikersinformatie voor het
verzamelen en verwijderen van
oude producten en batterijen
(Symbool voor toestellen)
(Symbolen voor batterijen)
Voor de bedieningshandleiding
In deze handleiding wordt de inbouw van het
toestel beschreven. De bediening van het toestel
wordt beschreven in een afzonderlijke handleiding.
Nl
<CRD4765-A>106
Black plate (107,1)
Hoofdstuk
Voorzorgsmaatregelen
De symbolen op producten, verpakkingen
en/of bijbehorende documenten geven aan
dat de gebruikte elektronische producten
en batterijen niet met het gewone huishoudelijk afval kunnen worden samengevoegd.
Er bestaat een speciaal wettelijk voorgeschreven verzamelsysteem voor de juiste
behandling, het opnieuw bruikbaar maken
en de recyclage van gebruikte producten en
batterijen.
Door een correcte verzamelhandeling zorgt u ervoor dat het verwijderde product en/of batterij
op de juiste wijze wordt behandeld, opnieuw
bruikbaar wordt gemaakt, wordt gerecycleerd en
het niet schadelijk is voor de gezondheid en het
milieu.
Voor verdere informatie betreffende de juiste behandling, het opnieuw bruikbaar maken en de
recyclage van gebruikte producten en batterijen
kunt u contact opnemen met de plaatselijke
overheid of een verkooppunt.
Deze symbolen zijn enkel geldig in de landen van de Europese Unie.
Voor landen buiten de Europese
Unie:
Indien u zich in een ander dan bovengenoemde
landen bevindt kunt u contact opnemen met de
plaatselijke overheid voor meer informatie over
de juiste verwijdering van het product.
Voorzorgsmaatregelen
!
!
!
!
!
WAARSCHUWING
! Gebruik dit toestel uitsluitend met een accu
van 12 volt en negatieve aarding.
Gebruik dit toestel niet voor een voertuig met
24 volt.
Er bestaat een risico op brand of storing.
! Installeer het toestel niet en leg geen kabels
op plaatsen waar het de werking van een airbag kan hinderen.
!
! Voor uw veiligheid en die van andere personen moet u de installatie, bekabeling en
eventuele verplaatsing van het toestel in het
voertuig laten uitvoeren door uw dealer.
Voor de installatie, bekabeling en verwijdering van het toestel is speciale technische
kennis vereist. Door onjuiste installatie, bekabeling of verwijdering van het toestel kan het
voertuig ernstig beschadigd worden.
! Werk niet in direct zonlicht.
Daardoor kunt u brandwonden oplopen of
blind worden.
! Koppel de negatieve aansluiting van de accu
los voordat u het toestel installeert.
Kortsluiting van de positieve en negatieve
aansluitpunten kan een elektrische schok of
letsel veroorzaken.
! Controleer de locatie van leidingen, de tank,
elektrische draden e.d. voordat u met de installatie begint.
Let op dat u niet in contact komt met leidingen, de tank, elektrische draden e.d. als u
voor de installatie in het voertuig moet boren.
Bescherm alle onderdelen tegen roest en
binnendringen van water.
! Gebruik alleen de meegeleverde onderdelen
en zet ze stevig vast.
Door gebruik van andere dan de meegeleverde onderdelen kan het toestel beschadigd
of niet goed bevestigd worden. Als het toestel
loskomt, kan het hinderlijk zijn voor het rijden en de oorzaak worden van een ongeval
en letsel.
! Installeer de meegeleverde onderdelen zoals
voorgeschreven.
Als de meegeleverde onderdelen niet zoals
voorgeschreven worden geïnstalleerd, kunnen onderdelen loskomen en vallen, met mogelijk een ongeval of storing tot gevolg.
! Gebruik de meegeleverde kabels en sluit ze
goed aan.
!
!
!
!
!
!
!
Gebruik de meegeleverde kabels en sluit ze
aan zoals voorgeschreven. Gebruik van andere kabels dan de meegeleverde kan brand
of een storing veroorzaken.
Volg de instructies in deze handleiding voor
de aansluiting en installatie van het toestel.
Als u de instructies in deze handleiding niet
volgt tijdens de installatie en aansluiting, kan
het toestel brand of een ongeval veroorzaken.
Zet het toestel aan de zonneklep vast met
een valbeveiligingsriem.
Als u dat niet doet, kan het toestel vallen met
mogelijk een ongeval en letsel tot gevolg.
Isoleer blootliggende delen van de kabel met
tape e.d.
Door kortsluiting kan brand, een elektrische
schok of storing ontstaan.
Leg de kabels zo dat ze niet verstrikt kunnen
raken in onderdelen van het voertuig, schroeven en bewegende onderdelen zoals de stoelrails.
Door ontkoppeling of kortsluiting kan brand,
een elektrische schok of storing ontstaan.
Leg en bevestig de kabels zo dat ze niet kunnen storen tijdens het rijden.
Als u dat niet doet, kunnen er kabels verstrikt
raken rond het stuurwiel, de schakelhendel,
het rempedaal e.d. en mogelijk een ongeval
veroorzaken.
Controleer na de installatie en bekabeling of
alle elektrische apparatuur correct werkt
zoals vóór de installatie.
Als het toestel wordt gebruikt wanneer andere elektrische apparaten niet normaal werken, kan er brand of een elektrische schok
optreden of een verkeersongeval gebeuren.
Bewaar kleine onderdelen zoals schroeven
buiten bereik van kleine kinderen.
Roep onmiddellijk de hulp van een arts in als
een onderdeel per ongeluk wordt ingeslikt.
Nederlands
Aansluiten en installeren
Als het toestel wordt geïnstalleerd in een
voertuig met airbags, informeer dan bij de fabrikant van het voertuig naar voorzorgsmaatregelen voor de installatie. Er bestaat risico
op een dodelijk ongeval als de airbags gehinderd worden.
Installeer het toestel niet op plaatsen waar
het hinderlijk is voor het zicht van de bestuurder, stoort tijdens het rijden, of gevaarlijk is
voor de inzittenden.
Er bestaat risico op een verkeersongeval en
letsel.
Verwijder nooit de isolatie van de voedingskabel van het toestel om andere apparaten van
stroom te voorzien.
Als de capaciteit van de stroomkabel wordt
overschreden, kan er brand, een elektrische
schok of storing ontstaan.
Gebruik nooit de moeren en bouten van veiligheidsonderdelen zoals het stuurwiel, het
remsysteem en de tank.
Bij gebruik daarvan kan de rem defect raken,
brand optreden of een verkeersongeval ontstaan.
Installeer het toestel niet op een zonneklep
met een vorm die niet ondersteund wordt
door het toestel.
Installatie van het toestel op een zonneklep
met een vorm die niet geschikt is voor het
toestel, kan leiden tot een ongeval of storing.
Installeer het toestel niet op een defecte zonneklep.
Controleer dat de zonneklep niet beschadigd
is voor u het toestel installeert. Installatie op
een defecte zonneklep kan ervoor zorgen dat
het toestel valt, wat kan leiden tot een ongeval of een storing.
Laat het toestel niet achter in direct zonlicht.
Verwijder de beschermfolie van de combiner
niet voordat de installatie voltooid is. De combiner kan licht geconcentreerd bundelen en
rook of brand veroorzaken.
LET OP
! Snijd nooit ergens in een kabel.
Nl
<CRD4765-A>107
107
Black plate (108,1)
Hoofdstuk
Voorzorgsmaatregelen
!
!
!
!
Als een zekering is verbonden met de kabel,
werkt het beveiligingscircuit niet en kan er
brand ontstaan.
Let er bij het aansluiten van de kabels op dat
ze niet in aanraking kunnen komen met hete
gebieden van het voertuig.
Er bestaat een risico op brand of een elektrische schok.
Gebruik geen verlengsnoer bij het aanleggen
van de kabels.
Daardoor kunnen kabels oververhitten, met
mogelijk brand of een elektrische schok tot
gevolg.
Installeer het toestel niet op plaatsen waar
regen, water, condensatie, stof en oliedampen kunnen voorkomen.
Daardoor kan rook, brand of een storing ontstaan.
Let er bij de bekabeling op dat de kabels niet
in aanraking komen met metalen onderdelen.
Als de kabels in aanraking komen met metalen onderdelen, kunnen de kabels beschadigd worden met mogelijk brand, een
elektrische schok of storing tot gevolg.
Informatie over dit toestel
WAARSCHUWING
! Bedien geen menu’s tijdens het rijden. Daardoor wordt u afgeleid en kunt u het voertuig
niet meer veilig besturen en mogelijk een
zwaar ongeval veroorzaken. Let altijd op het
verkeer en voetgangers en rij veilig.
! Kijk niet naar het weergegeven beeld tijdens
het rijden.
Als u niet op de weg let, kunt u een ongeval
veroorzaken.
! Bedien de zonneklep niet tijdens het rijden.
Daardoor kunt u een zwaar ongeval veroorzaken. Als u de zonneklep wilt gebruiken, moet
u eerst het voertuig op een veilige plaats parkeren en de handrem aantrekken.
108
Voorzorgsmaatregelen
! Steek niet uw hand, uw vinger of een vreemd
voorwerp in de mediasleuf.
Daardoor kunt u een ongeval, elektrische
schok, brand of storing veroorzaken.
! Zorg dat er geen vloeistof op of in het apparaat kan komen.
Dat kan rookvorming, brand of een elektrische schok veroorzaken. Let bijzonder op bij
kleine kinderen.
! Als er vloeibare stoffen of materialen van buiten in het toestel komen, moet u onmiddellijk
het toestel uitschakelen en uw dealer of het
dichtstbijzijnde Pioneer-servicecentrum raadplegen. Gebruik het toestel niet langer omdat
er een verhoogd risico bestaat op brand,
elektrische schok en andere storingen.
! Laat de afstandsbediening en andere onderdelen niet losliggen.
Als het voertuig stopt of een bocht maakt,
kunnen losliggende voorwerpen naar voren
rollen en het rempedaal blokkeren, en gevaarlijke situaties en een ongeval veroorzaken.
! Bevestig geen folie of afdichting op de combiner.
Daardoor kan het gezichtsveld worden belemmerd en een ongeval ontstaan.
! Gebruik het toestel niet als het niet normaal
functioneert of storingen vertoont, bijvoorbeeld als er geen beeld verschijnt.
In dat geval bestaat er risico op een onvoorzienbaar ongeval, brand of een elektrische
schok.
! Laat kinderen niet aan het toestel hangen of
er kracht op uitoefenen.
De kinderen kunnen letsel oplopen, het voertuig kan vervormd raken of er kan storing optreden.
! Raak het toestel niet aan bij onweer.
Er bestaat risico op een elektrische schok
door blikseminslag.
! Haal het toestel niet uit elkaar en wijzig het
niet.
Er bestaat risico op een ongeval, brand of
een elektrische schok.
! Volg altijd de verkeersregels.
Het toestel bevat gegevens over verkeersregels, maar de werkelijke verkeersregels en
-situaties kunnen door wijzigingen verschillend zijn. Ook als u de routekaarten of stembegeleiding gebruikt, moet u altijd de
plaatselijke verkeersregels en -borden volgen.
Als u dat niet doet, kunt u een ongeval veroorzaken of verkeersregels overtreden.
! Het toestel kan niet worden bediend wanneer
het voertuig rijdt. Als u de menu’s wilt bedienen, moet u eerst het voertuig op een veilige
plaats parkeren en de handrem aantrekken.
! Let op dat een nieuwe zekering bij vervanging de voorgeschreven capaciteit (ampère)
heeft.
Door gebruik van een zekering met een hogere waarde kan brand of storing ontstaan.
! Voordat u het toestel ’s nachts of op een donkere plaats (zoals in een tunnel) gebruikt,
moet u de helderheid ervan aanpassen zodat
u niet wordt gehinderd bij het rijden. Als u
dat niet doet, kunt u een ongeval veroorzaken.
LET OP
! Gebruik het toestel niet voor andere doeleinden dan zoals voorgeschreven in een voertuig.
Anders kunt u rookvorming, brand, een elektrische schok of verwondingen veroorzaken
of oplopen.
! Stel de hoek van de combiner en de weergavehelderheid af voordat u gaat rijden, en controleer of er geen schroeven loszitten zodat u
bij het rijden niet wordt gehinderd.
Als u dat niet doet, kunt u een ongeval veroorzaken.
! Let voortdurend op de weg wanneer u tijdens
het rijden het zonnescherm of knoppen bedient.
Als u dat niet doet, kunt u een ongeval veroorzaken.
! Let op dat u bij het in- en uitstappen niet met
uw hoofd tegen het toestel stoot.
Daardoor kunt u een verwonding oplopen.
! Let op dat er geen handen en vingers klem
raken wanneer u de combiner sluit of de
hoek ervan afstelt.
Daardoor kunt u een verwonding veroorzaken.
Voorzorgsmaatregelen voor
batterijen
WAARSCHUWING
! Bewaar batterijen buiten bereik van kleine
kinderen om ongevallen te voorkomen.
Roep onmiddellijk de hulp van een arts in als
de batterij per ongeluk wordt ingeslikt.
! Installeer de batterij in de juiste richting (positieve en negatieve zijde) zoals in de handleiding wordt aangegeven.
Als de batterij verkeerd om wordt geplaatst,
bestaat er risico op letsel of vervuiling omdat
de batterij kan exploderen of lekken.
! Als de batterij lekt en er batterijvloeistof op
uw huid of kleding terechtkomt, moet u de
betreffende plek met zuiver water spoelen.
Als er batterijvloeistof in uw oog terechtkomt,
spoelt u uw oog met zuiver water en raadpleegt u onmiddellijk een arts.
LET OP
! Sluit geen kortsluiting met de batterij, haal
hem niet uit elkaar, verwarm hem niet en leg
hem niet in vuur of water.
De batterij kan exploderen en lekkende batterijvloeistof kan brand en verwondingen veroorzaken.
Nl
<CRD4765-A>108
Black plate (109,1)
Hoofdstuk
Voorzorgsmaatregelen
Belangrijke veiligheidsvoorschriften
01
02
! Laat een droge batterij niet op.
De batterij kan exploderen en iemand verwonden.
! Gebruik alleen batterijen van het voorgeschreven type.
De batterij kan exploderen of lekken en iemand verwonden of het milieu vervuilen.
! Vervang een lege batterij onmiddellijk door
een nieuwe.
Lekkende batterijvloeistof kan het milieu vervuilen.
! Bewaar de afstandsbediening niet bij hoge
temperatuur, hoge vochtigheid of in direct
zonlicht.
Als u dat wel doet, kan de afstandsbediening
vervormen of kan de batterij exploderen of
gaan lekken.
Bij problemen
WAARSCHUWING
Als u rook, een vreemd geluid, een vreemde
geur of andere ongebruikelijke signalen van het
toestel waarneemt, moet u onmiddellijk de voeding uitschakelen en uw dealer of het dichtstbijzijnde Servicestation van PIONEER raadplegen.
Als u het toestel zo blijft gebruiken, kan een ongeval, brand of een elektrische schok ontstaan.
! Het toestel detecteert wanneer het voertuig
rijdt en de bediening wordt dan automatisch
uitgeschakeld. Parkeer het voertuig op een
veilige plaats en trek de handrem aan voordat u het toestel bedient.
! Als u moe wordt of ongemak ervaart tijdens
het gebruik van het toestel, moet u het gebruik onmiddellijk stoppen en een lange
pauze nemen om volledig te herstellen. Als u
het toestel in dat geval toch blijft gebruiken,
kunt u onwel worden.
! Als u ver- of bijziend bent, astigmatisch bent
of verschillend zicht hebt tussen uw linkeren rechteroog, moet u een bril e.d. dragen
om uw gezichtssterkte te corrigeren wanneer
u dit toestel gebruikt.
! Het weergegeven beeld op het scherm kan
tijdelijk vervormd zijn wanneer het beeld
wordt overgeschakeld. Dit is geen storing.
! Er wordt geen beeld weergegeven wanneer
de GPS-verbinding is verbroken.
! Het beeld op het scherm kan vervormd zijn
wanneer de iPhone of het Android-apparaat
zwaar belast wordt.
! De nauwkeurigheid van de positiebepaling is
afhankelijk van de prestaties van het gps-systeem op de iPhone of het Android-apparaat
dat op dit toestel is aangesloten.
! De richting waarin het voertuig rijdt, wordt
wellicht niet correct aangegeven als het
GPS-systeem niet nauwkeurig werkt.
! Zorg dat de iPhone of het Android-apparaat
stevig is bevestigd voordat u gaat rijden. Zorg
dat het aangesloten apparaat niet op de
grond valt omdat het dan onder het rem- of
gaspedaal kan terechtkomen.
! Sluit de diffuser wanneer u het toestel niet
gebruikt.
Nl
<CRD4765-A>109
Nederlands
! Het toestel werkt niet zelfstandig. Het toestel
moet vóór gebruik worden verbonden met
een iPhone of Android-apparaat met een navigatietoepassing.
Lees de veiligheidsinstructies in de handleiding van het product dat op dit toestel wordt
aangesloten.
! Bedien het toestel niet tijdens het rijden.
Daardoor wordt u afgeleid en kunt u het voertuig niet meer veilig besturen en mogelijk
een zwaar ongeval veroorzaken. Let altijd op
het verkeer en voetgangers en rij veilig. Voordat u het toestel bedient, moet u het voertuig
op een veilige plaats parkeren en de handrem aantrekken.
! Bedien de zonneklep niet tijdens het rijden.
Daardoor kunt u een zwaar ongeval veroorzaken. Als u de zonneklep wilt gebruiken, moet
u eerst het voertuig op een veilige plaats parkeren en de handrem aantrekken.
! Bedien een iPhone of Android-apparaat niet
tijdens het rijden. Parkeer het voertuig op
een veilige plaats en trek de handrem aan
voordat u een route instelt op een iPhone of
Android-apparaat.
! De functies van het toestel garanderen op
geen enkele wijze dat de omgeving veilig is.
Let tijdens het rijden altijd goed zelf op de
veiligheid van en rondom het voertuig.
! De route-informatie en de stembegeleiding
van de navigatietoepassing dienen alleen als
referentie. Volg altijd de plaatselijke verkeersregels en -borden. Als u dat niet doet, kunt u
verkeersregels overtreden en een zwaar ongeval veroorzaken. Ook informatie van dit
toestel over de afstand tot een voertuig voor
u, snelheidsaanduidingen en verkeerscamera’s dient uitsluitend ter referentie. Volg altijd
de plaatselijke regels en rijd veilig naargelang de verkeerssituatie.
109
Black plate (110,1)
Hoofdstuk
Belangrijke veiligheidsvoorschriften
02
! Sluit de diffuser en de combiner wanneer u
het toestel van de zonneklep verwijdert en opbergt.
Laat het toestel niet achter op een plek in direct zonlicht, zoals op het dashboard. De diffuser of de combiner kunnen het licht
geconcentreerd bundelen en rook of brand
veroorzaken.
! Het achterlicht van het voertuig voor u kan
weerspiegeld worden op de combiner.
! Pioneer kan niet verantwoordelijkheid worden gesteld worden waardeveranderingen
van het voertuig, e.d.
Voorkomen dat de accu
leegloopt
! Zorg dat de motor van het voertuig draait
wanneer u het toestel gebruikt. Als u het toestel gebruikt zonder dat de motor draait, kan
de accu leeglopen.
Laat de motor niet langer lopen dan strikt
noodzakelijk is wanneer het voertuig geparkeerd is om het milieu te ontzien.
! Als het toestel niet wordt uitgeschakeld (de
LED-indicator op de stekker voor de sigarettenaansteker van de stroomkabel blijft branden) wanneer de motor van het voertuig
wordt uitgeschakeld, koppelt u de stroomkabel los van de aansluiting voor de sigarettenaansteker op het voertuig. Als u dit niet
doet, kan de voertuigaccu leeglopen.
Als het scherm moeilijk
zichtbaar is
! Het beeld op het scherm is zichtbaar onder
een brede hoek. Pas de hoek van de combiner (bladzijde 124) en de weergave-instellingen (bladzijde 123) aan wanneer u het toestel
voor het eerst gebruikt voor een optimale
zichtbaarheid en scherpte van het beeld. U
past de helderheid van het scherm aan met
de knop /
(bladzijde 125).
! De weergavehelderheid verschilt naargelang
de kijkhoek. Gebruik het toestel in een positie
waarin het beeld duidelijk zichtbaar is.
Voorzorgsmaatregelen voor
gebruik bij een hoge/lage
temperatuur
! Als de temperatuur te hoog of te laag wordt,
neemt de weergavehelderheid af of wordt de
projectie automatisch gestopt om het systeem tegen beschadiging te beschermen. Dit
is geen storing. Het systeem hervat zijn werking wanneer de temperatuur weer in een veilig bereik komt.
! Het toestel werkt wellicht niet correct bij een
te hoge of te lage temperatuur. Gebruik het
toestel binnen het opgegeven temperatuurbereik.
Raadpleeg de bedieningshandleiding voor
meer informatie.
Opmerking over microSDgeheugenkaarten
! Dit toestel is geschikt voor microSD- en
microSDHC-geheugenkaarten. Deze typen
geheugenkaarten worden in deze handleiding gezamenlijk aangeduid als “SD-geheugenkaart”.
110
Belangrijke veiligheidsvoorschriften
! Het toestel is niet geschikt voor microSDXCgeheugenkaarten.
! Pioneer garandeert niet dat alle typen SD-geheugenkaarten op dit toestel kunnen worden
gebruikt.
! Verwijder de SD-geheugenkaart niet en wijzig
de stand van de contactschakelaar niet terwijl de SD-geheugenkaart gebruikt wordt.
Daardoor kunnen gegevens erop beschadigd
raken. Pioneer kan niet aansprakelijk worden
gesteld voor schade in zulke gevallen.
! SD-geheugenkaarten hebben een beperkte
levensduur. Als de kaart het einde van zijn levensduur heeft bereikt, kunnen ook bij correct gebruik geen gegevens meer op de kaart
geschreven of verwijderd worden.
! Sommige SD-geheugenkaarten worden wellicht niet door het toestel herkend, ook niet
als de kaart op een computer wel wordt herkend. Het probleem kan worden opgelost
door de kaart te formatteren met een speciaal formatteerprogramma. SD-geheugenkaarten die zijn geformatteerd met de
standaard formatteerfunctie van een computer voldoen niet aan de SD-standaard. Zulke
kaarten kunnen mogelijk niet worden beschreven of gelezen. Gebruik een speciaal
formatteerprogramma om zulke problemen
te voorkomen. Bij het formatteren worden
alle gegevens op de SD-geheugenkaart gewist. Maak daarom op voorhand een kopie
van gegevens die u niet wilt verliezen. U kunt
een speciaal formatteerprogramma voor SDgeheugenkaarten verkrijgen op de volgende
website.
https://www.sdcard.org/home/
(informatie geldig in juni 2012)
! Pioneer kan niet garanderen dat een SD-geheugenkaart met een beschadiging door het
formatteren, kan worden gerepareerd.
Pioneer kan ook niet aansprakelijk worden
gesteld voor schade, kosten of uitgaven door
gegevensverlies of beschadiging door het for-
matteren van een SD-geheugenkaart. Lees
de handleiding van het formatteerprogramma en volg de instructies als u de SD-geheugenkaart wilt formatteren. U bent zelf
verantwoordelijk voor problemen die kunnen
optreden.
Opmerkingen voor de iPhone
! Raadpleeg onze website voor informatie over
de iPhone-modellen en de iPhone-softwareversies die worden ondersteund door dit product.
! iPhone-modellen die compatibel zijn met dit
toestel, worden in deze handleiding gezamenlijk aangeduid als “iPhone”.
! Pioneer garandeert niet dat alle compatibele
typen iPhone met dit toestel kunnen worden
gebruikt.
! Pioneer kan niet aansprakelijk worden gesteld voor mogelijk gegevensverlies door gebruik van een iPhone met dit toestel.
! Laat de iPhone niet gedurende langere tijd in
direct zonlicht liggen. Daardoor kan de
iPhone storingen vertonen.
! Stel de iPhone niet bloot aan hoge temperaturen.
! Raadpleeg de handleiding van de iPhone
voor details over het gebruik ervan.
Opmerkingen over Androidapparaten
! Raadpleeg onze website voor informatie over
de Android-apparaten die worden ondersteund door dit product.
! Compatibiliteit met alle Android-apparaten
wordt niet gegarandeerd.
Nl
<CRD4765-A>110
Black plate (111,1)
Hoofdstuk
Belangrijke veiligheidsvoorschriften
! Het gebruik van bepaalde functies van een
Android-apparaat tijdens het rijden is in uw
land mogelijk niet toegestaan, dus zorg dat u
op de hoogte bent en houd u aan de wettelijke voorschriften.
Indien u twijfelt of het gebruik van een bepaalde functie is toegestaan, moet u de functie alleen gebruiken terwijl het voertuig
geparkeerd is.
Gebruik geen enkele functie tenzij het veilig
is om deze te gebruiken onder de heersende
omstandigheden.
! Pioneer kan niet aansprakelijk worden gesteld voor mogelijk gegevensverlies door gebruik van een Android-apparaat met dit
toestel.
! Laat de Android-apparaat niet gedurende
langere tijd in direct zonlicht liggen. Daardoor kan het apparaat storingen vertonen.
! Stel het Android-apparaat niet bloot aan
hoge temperaturen.
! Raadpleeg de handleiding van het Androidapparaat voor details over het gebruik ervan.
Auteursrechten
Nieuwe softwareversies
Bezoek onze website
Hier vindt u onze site:
http://www.pioneer.nl
! Registreer uw product. Wij bewaren de gegevens van het product dat u hebt aangeschaft
zodat u deze eenvoudig kunt opvragen als u
die nodig mocht hebben voor de verzekering,
bijvoorbeeld na verlies of diefstal.
! Op onze website vindt u de laatste informatie
over PIONEER CORPORATION.
Opgeslagen gegevens
! Pioneer kan niet aansprakelijk worden gesteld als de klant de software moet bijwerken
na of vanwege reparaties e.d.
! Instellingen op dit toestel kunnen automatisch of per ongeluk, door storing, worden gewijzigd of verwijderd tijdens een reparatie of
andere procedure. Bewaar een lijst van belangrijke informatie. Pioneer kan niet aansprakelijk worden gesteld voor schade of
verlies door gegevensverlies in zulke gevallen.
! Pioneer levert geen diensten voor het herstellen van beschadigde of gewiste gegevens.
02
Opmerkingen over dit toestel
! De gebruiksgeschiedenis van het toestel
wordt geregistreerd voor het optimaliseren
van de prestaties. Daarbij wordt geen persoonlijke informatie vastgelegd. De geregistreerde informatie kan voor
gegevensanalyse worden gedeeld met andere afdelingen of onderaannemers van
Pioneer, maar alleen als de klant op voorhand toestemming geeft.
! Pioneer heeft door testen bevestigd dat het
geprojecteerde beeld zichtbaar is op een afstand van 3 m van de voorzijde van de voorruit. De afstand kan echter verschillend
lijken afhankelijk van de zithoogte en -positie
van de bestuurder, de hoogte en hoek van
het plafond van het voertuig, en het omgevingslicht.
! Pioneer garandeert niet dat het product voldoet aan de bepaalde doelstellingen van een
bepaalde gebruiker.
! De specificaties en het ontwerp van het toestel kunnen zonder voorafgaande kennisgeving worden gewijzigd voor
productverbeteringen. Pioneer accepteert en
erkent geen verzoeken van klanten voor wijziging of ruil van een product om te voldoen
aan bepaalde behoeften of verwachtingen
overeenkomstig de specificaties en het ontwerp in deze handleiding.
! De schermafbeeldingen in deze handleiding
kunnen verschillen van het werkelijke product.
! Het schermontwerp kan zonder voorafgaande kennisgeving worden gewijzigd voor
productverbeteringen.
Nederlands
De auteursrechten op de gegevens en programma’s van dit product zijn het eigendom van
Pioneer en van derden die Pioneer het recht
hebben gegeven op het gebruik van die gegevens of programma’s onder auteursrecht. U
mag de gegevens en programma’s van dit product op geen enkele wijze geheel of gedeeltelijk
kopiëren, wijzigen of analyseren.
! Klanten zonder internettoegang kunnen eenmaal jaarlijks een microSD-geheugenkaart
ontvangen met de meest recente bijgewerkte
softwareversie.
Details hierover wordt op de website gepubliceerd.
Belangrijke veiligheidsvoorschriften
! Voor het opslaan van het bestand met bijgewerkte software hebt u een SD-geheugenkaart nodig met een capaciteit van ten
minste 2 GB.
Nl
<CRD4765-A>111
111
Black plate (112,1)
Hoofdstuk
Meegeleverde onderdelen
03
Vóór aansluiting
04
Voorzorgsmaatregelen voor
aansluiting
Head-up display:
LET OP
Stroomkabel x 1
Hoofdtoestel x 1
Kussen voor zonneklep x 1
Bevestigingsklem x 1
Dubbelzijdig plakband x 1
HUD-afstandsbediening:
! Neem geen stroom voor accessoires van de
CAN-businterface e.d. Maak aansluiting op
de daarvoor bedoelde accessoirevoeding van
het voertuig.
! Installeer de meegeleverde onderdelen zoals
voorgeschreven.
Gebruik van andere dan de meegeleverde onderdelen kan storing veroorzaken.
Plaats de antennes zo ver mogelijk uit elkaar.
! Bind antennes niet samen, stapel ze niet en
laat ze niet kruisen.
Ruis op de antenne en de antennekabel vermindert de ontvangstgevoeligheid.
De elektriciteitskabel
aansluiten
! Sluit de stroomkabel stevig aan door deze in
de aansluiting op het toestel te plaatsen. Als
de stekker niet goed in de aansluiting past,
zit deze misschien in de verkeerde richting.
Controleer de richting van de stekker. Duw
deze er niet in. Als u dat doet, kan er een storing optreden.
Afstelplaat voor dikte van zonneklep (groot) x 1
Hoofdtoestel x 1
Afstelplaat voor dikte van zonneklep (klein) x 1
Montageschroef x 6
Zeskantsleutel x 1
112
(Een lithium-ionbatterij is voorgeïnstalleerd. Verwijder de isolatiefolie voordat u het toestel gebruikt.)
Ruis voorkomen
! Plaats de volgende onderdelen zo ver mogelijk uit de buurt van een iPhone, een Androidapparaat en andere kabels en draden om
ruis te voorkomen.
— Filmantenne en antennekabel
— FM/AM-antenne en antennedraad
— GPS-antenne en antennekabel
— Bakenontvanger en antennekabel
— Voedingskabel
Nl
<CRD4765-A>112
Black plate (113,1)
Hoofdstuk
Voorzorgsmaatregelen voor installatie
Verbindingen
05
06
WAARSCHUWING
! Zet het toestel aan de zonneklep vast met
een valbeveiligingsriem.
Als u dat niet doet, kan het toestel vallen met
mogelijk een ongeval en letsel tot gevolg.
! Als het voertuig airbags heeft, installeer het
toestel dan nooit op het deksel van een airbag of een andere plaats waar het de werking
van een airbag kan belemmeren. Daardoor
kan de airbag niet correct werken of het toestel raken met mogelijk een ongeval of letsel
tot gevolg.
! Werk niet in direct zonlicht. Daardoor kunt u
brandwonden oplopen.
Er bestaat ook een risico op verblinding als
zonlicht door de combiner in uw richting
wordt weerkaatst. Sluit de combiner als hij
zich in direct zonlicht bevindt.
! Na installatie van het toestel kunnen een
lampje op de zonneklep en optionele accessoires op en rondom de zonneklep (zoals een
kaarthouder en een spiegel) wellicht niet
meer worden gebruikt. Controleer op voorhand welke accessoires aanwezig zijn in het
voertuig.
! De installatie van het toestel kan markeringen op het oppervlak van de zonneklep achterlaten.
! Het toestel is niet bestemd voor installatie op
de passagierszetel.
! Tijdens de installatie kunnen er deeltjes of
stof e.d. op u vallen. Kijk tijdens de installatie
onder het toestel niet recht omhoog om te
voorkomen dat er iets in uw oog valt.
! De diffuser en de combiner zijn gevoelige onderdelen. Raak ze niet aan met blote handen
en ook niet met gereedschap tijdens de installatie.
Aansluitschema
1
2
4
3
Vóór de installatie en
bevestiging van het toestel
LET OP
! Als het toestel wordt geïnstalleerd in een
voertuig met airbags, informeer dan bij de fabrikant van het voertuig naar voorzorgsmaatregelen voor de installatie. Er bestaat risico
op een dodelijk ongeval als de airbags gehinderd worden.
6
5
7
Het toestel bevestigen
! Het toestel moet worden bevestigd met
schroeven met een aanbevolen aandraaimoment van 0,36 N•m tot 0,59 N•m.
! Voordat u het dubbelzijdige plakband gebruikt op de aansluitdoos van de stroomkabel, moet u het oppervlak waarop u het wilt
plakken grondig schoonvegen.
1
2
3
4
5
6
7
iPhone of Android-apparaat
USB-kabel
Stroomkabel
Naar stroomaansluiting
LED-indicator
Schakelaar stekkerformaat
Naar aansluiting van sigarettenaansteker
Voor gebruikers van een iPhone
! Gebruik de kabel (2) die bij de iPhone geleverd werd.
Laat de kabel niet in het voertuig achter. De
kabel die bij de iPhone geleverd werd, is niet
bedoeld voor gebruik in een voertuig.
Nederlands
! Laat het toestel niet achter in direct zonlicht.
Verwijder de beschermfolie van de combiner
niet voordat de installatie voltooid is. De combiner kan licht geconcentreerd bundelen en
rook of brand veroorzaken.
! Installeer het toestel nooit op een voertuig
met een zonnedak of op een cabriolet. Het
zonlicht kan door de combiner weerkaatst en
geconcentreerd gebundeld worden.
! Gebruik de zonneklep niet op het zijvenster
als dit toestel erop bevestigd is.
Sluit het toestel eerst tijdelijk aan om te controleren of het correct werkt, en installeer het pas
daarna. Controleer of de aansluiting correct is
als het toestel niet normaal werkt.
Voor Android
! Gebruik een USB-microUSB-communicatiekabel (2) van 1 m of minder. Een oplaadkabel kan niet worden gebruikt.
Nl
<CRD4765-A>113
113
Black plate (114,1)
Hoofdstuk
Verbindingen
06
Installatiepositie
07
Opmerkingen
! De LED-indicator op de stekker voor de sigarettenaansteker gaat branden als de stroom
wordt ingeschakeld en gaat uit als het toestel
wordt uitgeschakeld.
Als de LED-indicator niet uit gaat wanneer de
motor van het voertuig wordt uitgeschakeld,
koppelt u de stroomkabel los van de aansluiting voor de sigarettenaansteker op het voertuig. Als u dit niet doet, kan de voertuigaccu
leeglopen.
! Raadpleeg Uw iPhone of Android-apparaat instellen op bladzijde 121 voor details over hoe
u een iPhone of een Android-apparaat moet
aansluiten.
Formaat van de stekker voor de
sigarettenaansteker instellen
Stel het formaat van de stekker van de sigarettenaansteker in op L (groot) of S (klein) naargelang het formaat van de stekker van de
sigarettenaansteker op het voertuig.
1
De zekering van de stekker
voor de sigarettenaansteker
vervangen
Voorzorgsmaatregelen voor
installatie van het toestel
1 Draai de stekker los tegen de wijzers van
de klok in.
! Gebruik de meegeleverde schroeven en installeer het toestel zoals voorgeschreven. Gebruik van andere schroeven dan de
meegeleverde kan schade veroorzaken aan
het toestel.
! Zet het toestel stevig vast op de zonneklep
met de meegeleverde schroeven. Als u dat
niet doet, kan het toestel tijdens het rijden
vallen, iemand raken en verwonden.
! Lees deze handleiding volledig en aandachtig, en installeer het toestel correct en overeenkomstig de veiligheidsnormen.
1
1 Zekering (3 A)
2 Vervang de zekering door een nieuwe
met dezelfde capaciteit.
WAARSCHUWING
1
2
1 Hoofdtoestel
2 Stroomkabel
Gespecificeerde
installatiepositie
LET OP
Installeer het toestel op de voorgeschreven installatiepositie zodat de bestuurder een veilig
zicht heeft en het apparaat correct kan werken.
Door installatie op een andere dan de voorgeschreven positie voldoet het mogelijk niet aan
de veiligheidsnormen voor wegvoertuigen, en
kan het voertuig afgekeurd worden bij een veiligheidskeuring op grond van bijvoorbeeld een onderhoudsfout.
1 Schakelaar stekkerformaat
114
Nl
<CRD4765-A>114
Black plate (115,1)
Hoofdstuk
Voorbereiding voor installatie van het toestel
LET OP
Installeer het toestel niet op een onstabiele of
beschadigde zonneklep. Daardoor kan het toestel vallen met mogelijk een ongeval of storing
tot gevolg.
1 Controleer de zonneklep.
Controleer de dikte van de zonneklep waarop u
het toestel wilt installeren.
De zonneklep moet aan de volgende voorwaarden voldoen voor installatie van het toestel.
Voorbereiding voor installatie van het toestel
Dikte van de zonneklep
Afstelplaat voor dikte van
zonneklep
15 mm bij 20 mm
Afstelplaat voor dikte van
zonneklep (klein)
20 mm bij 26,5 mm
Afstelplaat voor dikte van
zonneklep (medium)
26,5 mm bij 33 mm
Afstelplaat voor dikte van
zonneklep (groot)
Afstelplaat voor dikte van
zonneklep vervangen
T
A
Y
H
1 Trek aan de HUD-vergrendelingshendel
en schuif de hendel naar de geopende positie.
1
T: Dikte
15 mm bij 33 mm
H: Hoogte
140 mm bij 240 mm
A: Afstand tussen de
steunpunten
185 mm of meer
Y: Afstand tot de spiegel e.d.
45 mm of meer (aanbevolen)
2
3
1 Afstelplaat voor dikte van zonneklep
2 Afstelschroeven in lengterichting
3 Afstelplaat in lengterichting
3 Bevestig de afstelplaat in lengterichting
aan de afstelplaat voor de dikte van de zonneklep die u wilt gebruiken.
2
1
1 Geopende positie
2 Vergrendelingshendel van HUD
2 Verwijder de acht schroeven, inclusief de
afstelschroeven in de lengterichting (zie de
illustratie) op de bevestigingsklem, en verwijder vervolgens de afstelplaat voor dikte
van de zonneklep (medium).
Als de afstelschroeven in de lengterichting zijn
verwijderd, wordt de afstelplaat in de lengterichting verwijderd van de afstelplaat voor dikte van
de zonneklep.
3
2
Nederlands
2 Controleer de afstelplaat voor de dikte
van de zonneklep die u wilt gebruiken.
De grootte van de afstelplaat voor de dikte van
de zonneklep die wordt gemonteerd op de bevestigingsklem is afhankelijk van de dikte van de
zonneklep.
Het toestel wordt geleverd met een afstelplaat
voor de dikte van de zonneklep (medium) erop
gemonteerd.
Gebruik een afstelplaat voor de dikte van de zonneklep met een grootte die geschikt is voor de
dikte van de zonneklep.
1
08
1 Afstelplaat voor dikte van zonneklep
2 Afstelschroeven in lengterichting
3 Afstelplaat in lengterichting
4 Breng de schroefgaten van de afstelplaat
voor de dikte van de zonneklep op een lijn
met die van de bevestigingsklem, en zet de
resterende schroeven die u hebt verwijderd
weer vast op dezelfde posities.
Nl
<CRD4765-A>115
115
Black plate (116,1)
Hoofdstuk
Installatie van het hoofdtoestel
09
Installatie van het hoofdtoestel
1
2
3
4
1 Breng de HUD-vergrendelingshendel
naar de geopende positie.
Trek aan de HUD-vergrendelingshendel en
schuif de hendel naar de geopende positie.
1
2
1 Geopende positie
2 Vergrendelingshendel van HUD
! Houd het bewegende gedeelte van de bevestigingsklem niet vast wanneer u de HUD-vergrendelingshendel bedient. Als u het
bewegende gedeelte vasthoudt, kan de HUDvergrendelingshendel niet bewegen.
3 Pas de dikte van de bevestigingsklem
aan.
Breng de lijnen op de bevestigingsklem op een
lijn met de schaalmarkeringen links en rechts
op de afstelplaat voor de dikte van de zonneklep
naargelang de dikte van de zonneklep en draai
de drie schroeven vast.
2
1
1
1
1 Bevestigingsklem
2 Afstelplaat voor dikte van zonneklep
! De waarden bij benadering voor de schaalmarkeringen op de afstelplaat voor de dikte
van de zonneklep (medium) zijn als volgt (de
illustratie toont de lijn op de bevestigingsklem op een lijn met de schaalmarkering van
22 mm).
1 Bewegend gedeelte
2 Maak de vergrendelingsplaten op de bevestigingsklem los.
Trek de vergrendelplaten op de bevestigingsklem
naar links en naar rechts om ze te ontgrendelen.
116
1
2
3
4
20 mm
22 mm
24 mm
26 mm
4 Plaats de bevestigingsklem op de zonneklep.
Duw de zonneklep omhoog in zijn horizontale
positie.
Houd de linker en rechter uiteinden van de vergrendelplaten op de bevestigingsklem vast, en
plaats de bevestigingsklem op de zonneklep
door hem er helemaal op te duwen.
! Als de bevestigingsklem niet helemaal naar
binnen kan worden geduwd, moet u de bevestigingsklem wijder instellen. Verwijder de
bevestigingsklem van de zonneklep, ga terug
naar stap 3 en pas de schaalpositie aan. Zet
de bevestigingsklem vervolgens opnieuw op
de zonneklep.
5 Duw de zonneklep naar beneden in zijn
verticale positie.
6 Vergrendel de bevestigingsklem.
Duw de vergrendelplaten links en rechts naar
binnen om de bevestigingsklem stevig vast te
zetten.
! Als de vergrendelplaten niet helemaal naar
binnen kunnen worden geduwd, moet u de
bevestigingsklem wijder instellen. Verwijder
de bevestigingsklem van de zonneklep, ga
terug naar stap 3, en pas de schaalpositie
aan. Zet de bevestigingsklem vervolgens opnieuw op de zonneklep.
7 Controleer of de bevestigingsklem stevig
op zijn plaats zit.
Duw de zonneklep terug in zijn horizontale positie.
Duw de bevestigingsklem heen en weer en controleer of hij stevig op zijn plaats zit.
! Als de bevestigingsklem gemakkelijk loskomt
van de zonneklep, moet u de bevestigingsklem smaller instellen. Verwijder de bevestigingsklem van de zonneklep, ga terug naar
stap 3, en pas de schaalpositie aan. Zet de bevestigingsklem vervolgens opnieuw op de
zonneklep.
8 Verwijder de bevestigingsklem.
Duw de zonneklep omlaag in zijn verticale positie, en trek de vergrendelplaten naar links en
rechts om ze te ontgrendelen.
Duw de zonneklep omhoog in zijn horizontale
positie, en verwijder de bevestigingsklem van de
zonneklep.
Nl
<CRD4765-A>116
Black plate (117,1)
Hoofdstuk
Installatie van het hoofdtoestel
Installatie van het hoofdtoestel
Voorzijde van hoofdtoestel:
1
9 Controleer of de bevestigingsklem na de
aanpassing de juiste dikte heeft.
Duw de vergrendelplaten op de bevestigingsklem links en rechts naar binnen om ze stevig
vast te zetten.
Vergewis u ervan dat de bevestigingsklem niet
gemakkelijk op de zonneklep kan worden gezet
wanneer de vergrendelplaten al in de vergrendelde positie staan.
10 Plaats de bevestigingsklem met de juiste
dikte voor het hoofdtoestel.
Controleer of de diffuser en de combiner van het
hoofdtoestel gesloten zijn, en plaats de HUD-vergrendelingshendel op de bevestigingsklem in de
geopende positie.
Hoofdtoestel:
2
1
2
2
1 Combiner
2 Diffuser
Bevestigingsklem:
13 Plaats het toestel op de zonneklep.
Trek de vergrendelplaten op de bevestigingsklem
naar links en naar rechts om ze te ontgrendelen.
Duw de zonneklep omhoog in zijn horizontale
positie.
Houd de linker en rechter uiteinden van de vergrendelplaten op de bevestigingsklem vast, en
plaats het toestel op de zonneklep door de bevestigingsklem er helemaal op te duwen.
1
De dikte is correct als de bevestigingsklem niet
gemakkelijk op de zonneklep kan worden bevestigd.
2
1 Geopende positie
2 Vergrendelingshendel van HUD
Zet de bevestigingsklem en het hoofdtoestel op
vier plaatsen vooraan en achteraan vast met de
meegeleverde montageschroeven.
1 Breng de nokjes op een lijn met de groef.
2 Groef
Nederlands
! Als de bevestigingsklem gemakkelijk op de
zonneklep kan worden geplaatst wanneer de
vergrendelplaten in de vergrendelde positie
staan, dan heeft de bevestigingsklem niet de
juiste dikte.
Verwijder de bevestigingsklem van de zonneklep, keer terug naar stap 3, en pas de schaalpositie aan. Plaats vervolgens de
bevestigingsklem opnieuw op de zonneklep.
12 Draai de afstelschroeven in de lengterichting op het toestel één slag los.
Voorzijde van hoofdtoestel:
1 Groef
2 Breng de nokjes op een lijn met de groef.
Achterzijde van hoofdtoestel:
1
09
11 Draai de vier montageschroeven die u in
stap 10 hebt vastgezet, één slag los.
Nl
<CRD4765-A>117
117
Black plate (118,1)
Hoofdstuk
Installatie van het hoofdtoestel
09
14 Duw de zonneklep naar beneden in zijn
verticale positie.
Installatie van het hoofdtoestel
18 Vergrendel het hoofdtoestel op zijn positie.
Trek aan de HUD-vergrendelingshendel en
schuif de hendel naar de vergrendelde positie.
1
1
2
15 Zet het toestel op de zonneklep vast met
een valbeveiligingsriem.
Duw de zonneklep omlaag in zijn verticale positie en trek de valbeveiligingsriem van achter de
zonneklep naar voren.
1 Diffuser
2 Combiner
1 Vergrendelde positie
16 Vergrendel de bevestigingsklem.
Duw de vergrendelplaten links en rechts naar
binnen om de bevestigingsklem stevig vast te
zetten.
Het hoofdtoestel schuift naar voren en het toestel wordt op zijn plaats vergrendeld.
Pas de richting van het hoofdtoestel zo aan dat
de diffuser en de combiner op één lijn komen in
de rijrichting.
19 Pas de helling van het hoofdtoestel aan.
Pas de hoek aan en zet het hoofdtoestel vlak.
Links
Rechts Links
Rechts
1
Kantel de zonneklep ongeveer 20 graden verticaal, en draai de twee montageschroeven aan
de achterkant van het hoofdtoestel die u in stap
11 had losgedraaid, stevig aan.
Leid de valbeveiligingsriem zoals in de illustratie
wordt getoond.
17 Duw de zonneklep omhoog in zijn horizontale positie.
! Als de beschermfolie van de combiner hinderlijk is bij de afstelling, mag u de beschermfolie verwijderen. Breng de
beschermfolie opnieuw aan nadat de afstelling is voltooid.
Trek de valbeveiligingsriem naar beneden aan
en zet hem dan vast.
118
20 Pas de richting van het hoofdtoestel aan.
Open de diffuser en de combiner van het hoofdtoestel.
1 Het toestel afstellen in de rijrichting
1
Nl
<CRD4765-A>118
Black plate (119,1)
Hoofdstuk
Installatie van het hoofdtoestel
Installatie van het hoofdtoestel
1 Pas de combiner zo aan dat de diffuser in
het midden van de combiner wordt weergegeven.
! Controleer of het hoofdtoestel correct in de
rijrichting is gepositioneerd.
2
09
26 Leg de stroomkabel op zijn plaats.
Leid de stroomkabel zo dat hij niet kan storen bij
het rijden, en controleer of de bestuurder veilig
en vrij zicht heeft.
1
3
21 Ontgrendel het hoofdtoestel op zijn positie.
Trek aan de HUD-vergrendelingshendel en
schuif de hendel naar de geopende positie.
1 Valbeveiligingsriem
2 Kussen voor zonneklep
3 Houder voor kussen voor zonneklep
24 Plaats het toestel op de zonneklep.
Voer stappen 13 t/m 17 uit om het toestel op de
zonneklep te bevestigen.
1
1 Geopende positie
Het hoofdtoestel schuift naar achteren en het
toestel wordt op zijn plaats ontgrendeld.
! Let op dat u het toestel niet laat vallen.
23 Draai de montageschroeven aan de voorzijde van het hoofdtoestel stevig vast.
Draai de twee montageschroeven aan de voorzijde van het hoofdtoestel die u in stap 11 had
losgedraaid en de twee afstelschroeven in de
lengterichting die u in stap 12 had losgedraaid,
stevig vast.
1
2
3
4
1
! Leid de stroomkabel zo dat hij het zicht van
de bestuurder niet kan hinderen.
! Leid de kabel zo dat hij niet kan storen bij de
vooruit- en achteruitbeweging van het hoofdtoestel wanneer de vergrendelingshendel van
de HUD wordt bediend.
2
1 Kussen voor zonneklep
2 Valbeveiligingsriem
25 Sluit de stroomkabel aan op het toestel.
1 Plafond voertuig
2 Zonneklep
3 Opening tussen plafond voertuig en
zonneklep
4 Geen opening tussen plafond voertuig
en zonneklep
! Als u een kussen voor de zonneklep aanbrengt, bevestig het kussen dan in de kussenhouder van de zonneklep, bevestig hem aan
de valbeveiligingsriem, en zet vervolgens de
kabel vast.
1
Zet de stroomkabel overal waar nodig vast met
in de handel verkrijgbare klemmen.
Nederlands
22 Verwijder het toestel van de zonneklep.
Sluit de diffuser en de combiner van het hoofdtoestel, en duw vervolgens de zonneklep naar
beneden in zijn verticale positie.
Trek de vergrendelplaten op de bevestigingsklem
naar links en naar rechts om de vergrendeling
los te zetten. Ontgrendel de valbeveiligingsriem.
Duw de zonneklep omhoog in zijn horizontale
positie, en verwijder vervolgens de bevestigingsklem van de zonneklep.
! Breng de HUD-vergrendelingshendel naar de
geopende positie voor u het toestel op de zonneklep monteert.
! Als er een opening is tussen het plafond van
het voertuig en de zonneklep wanneer de zonneklep horizontaal staat, bevestigt u het kussen voor de zonneklep aan de
valbeveiligingsriem.
1
1 Stroomkabel
Nl
<CRD4765-A>119
119
Black plate (120,1)
Hoofdstuk
Installatie van het hoofdtoestel
09
1 Zet de kabel vast met in de handel verkrijgbare klemmen.
! Bevestig of monteer de kabel niet op de voorruit.
! Leid de stroomkabel niet onderlangs de stoel
van de bestuurder. Er bestaat een risico dat
de stroomkabel komt vast te zitten onder het
rempedaal en het rijden belemmert met een
zwaar ongeluk tot gevolg.
27 Vergrendel het hoofdtoestel op zijn positie.
Trek aan de HUD-vergrendelingshendel en
schuif de hendel naar de vergrendelde positie.
1
Installatie van het hoofdtoestel
1
2
3
Na de installatie
LET OP
! Controleer of het toestel correct is geïnstalleerd. In de volgende gevallen moet u terugkeren naar stap 1 en het toestel correct
installeren.
1
1 Stroomkabel
2 Dashboard e.d.
3 Dubbelzijdig plakband
Zet de kabel vast met in de handel verkrijgbare
klemmen.
1 LED-indicator
Zie Sluit de stroomkabel aan op de aansluiting
voor de sigarettenaansteker op bladzijde 121,
voor details.
29 Verwijder de beschermfolie van de combiner.
Controleer of de stroomkabel correct is aangesloten en aangelegd. Verwijder pas daarna de
beschermfolie van de combiner.
1 Vergrendelde positie
Het hoofdtoestel schuift naar voren en het toestel wordt op zijn plaats vergrendeld.
28 Zet de stroomkabel vast.
Plak het dubbelzijdige plakband op de aansluitdoos van de stroomkabel, en zet de aansluitdoos
vast op een plaats waar de kabel stevig kan worden vastgezet.
! Installeer de stroomkabel nooit op een plaats
waar de kabel niet kan worden vastgezet door
trillingen e.d. van het voertuig.
! Als de kabel niet kan worden vastgezet met
het meegeleverde dubbelzijdige plakband, zet
hem dan stevig vast met in de handel verkrijgbaar dubbelzijdig plakband e.d.
120
! Bevestig een iPhone of een Android-apparaat
stevig in een in de handel verkrijgbare houder.
! Plaats de stekker voor de sigarettenaansteker
van de stroomkabel in de aansluiting voor de
sigarettenaansteker van het voertuig met de
LED-indicator omhoog gericht zodat de bestuurder deze kan zien.
De LED-indicator op de stekker voor sigarettenaansteker wordt groen als de stroom wordt
ingeschakeld.
1
2
3
4
1 De vergrendelplaten zitten niet vast op
hun plaats.
2 Het toestel is niet vastgezet met een valbeveiligingsriem.
3 Het toestel is schuin geïnstalleerd.
4 Het toestel is achterstevoren geïnstalleerd.
! Sluit de diffuser wanneer u het toestel niet
gebruikt.
! Sluit de diffuser en de combiner wanneer u
het toestel van de zonneklep verwijdert en opbergt.
Laat het toestel niet achter op een plek in direct zonlicht, zoals op het dashboard. De diffuser of de combiner kunnen het licht
geconcentreerd bundelen en rook of brand
veroorzaken.
Nl
<CRD4765-A>120
Black plate (121,1)
Hoofdstuk
Installatie van het hoofdtoestel
Uw iPhone of Android-apparaat instellen
09
10
Sluit de stroomkabel aan op
de aansluiting voor de
sigarettenaansteker
Uw iPhone of Android-apparaat
op het toestel aansluiten
% Sluit de stekker voor de sigarettenaansteker van de stroomkabel stevig aan door
deze in de aansluiting voor de sigarettenaansteker te plaatsen.
De LED-indicator op de stekker voor sigarettenaansteker wordt groen als de stroom wordt ingeschakeld.
! Gebruik de kabel die bij de iPhone geleverd
werd.
Laat de kabel niet in het voertuig achter. De
kabel die bij de iPhone geleverd werd, is niet
bedoeld voor gebruik in een voertuig.
1
Voor gebruikers van een iPhone
Voor Android
! Gebruik een USB-microUSB-communicatiekabel van 1 m of minder. Een oplaadkabel
kan niet worden gebruikt.
1 Sluit de USB-kabel aan op uw iPhone of
Android-apparaat.
1 LED-indicator
Opmerkingen
! Plaats de stekker voor de sigarettenaansteker
van de stroomkabel in de aansluiting voor de
sigarettenaansteker van het voertuig met de
LED-indicator omhoog gericht zodat de bestuurder deze kan zien.
! Als de LED-indicator niet uit gaat wanneer de
motor van het voertuig wordt uitgeschakeld,
koppelt u de stroomkabel los van de aansluiting voor de sigarettenaansteker op het voertuig. Als u dit niet doet, kan de voertuigaccu
leeglopen.
2 Sluit het andere uiteinde van de USBkabel stevig aan op de aansluitdoos van de
stroomkabel.
1
3 Aansluitdoos van stroomkabel
4 USB-kabel
Installeren van de
navigatietoepassing
Installeer de navigatietoepassing op uw iPhone
of Android-apparaat voordat u het toestel gebruikt.
U kunt de navigatietoepassing downloaden van
de iTunes App Store of Google Play.
Raadpleeg de volgende website voor meer informatie over de navigatietoepassing.
http://www.pioneer.eu/navgatehud
Starten van de
navigatietoepassing
Wanneer u de navigatietoepassing voor het
eerst gebruikt, moet u de toepassing zelf starten.
Vanaf de volgende keer wordt de toepassing automatisch gestart wanneer u de iPhone of
Android-apparaat op het toestel aansluit.
LET OP
1 Aansluitdoos van stroomkabel
Overzicht aansluiting:
2
3
4
Opmerkingen
! Voor gebruikers van een iPhone
Als de toepassing niet automatisch wordt gestart wanneer u de iPhone op het toestel aansluit, moet u “Toestaan” aantippen in het
pop-upvenster dat op de iPhone verschijnt.
! Voor Android
Nederlands
1
! Om de navigatietoepassing te gebruiken,
moet u eerst de NavGate HUD Support aanschaffen. Volg de instructies op het scherm
in de toepassing om de NavGate HUD Support aan te schaffen.
! Om de NavGate HUD Support aan te schaffen is een internetverbinding nodig.
1 iPhone of Android-apparaat
2 Naar aansluiting van sigarettenaansteker
Nl
<CRD4765-A>121
121
Black plate (122,1)
Hoofdstuk
Weergavestanden
10
Als de toepassing niet automatisch wordt gestart wanneer u het Android-apparaat op het
toestel aansluit, moet u tikken op het pop-upvenster dat op het Android-apparaat verschijnt.
Markeer het selectievakje en selecteer de toepassing in het pop-upvenster als u wilt dat
het pop-upvenster in het vervolg niet meer
wordt weergegeven.
Weergavestanden
Het toestel beschikt over vijf weergaven: AR-weergave (lagesnelheidsmodus en hogesnelheidsmodus), lijstweergave (lagesnelheidsmodus en hogesnelheidsmodus), kruispuntweergave, route-overzicht en klokweergave.
Wanneer er communicatie is tussen het toestel en de navigatietoepassing, verschijnt een van de volgende
weergaven.
Lijstweergave
AR-weergave
Lagesnelheidsmodus
Lagesnelheidsmodus
Druk op ◀.
Hogesnelheidsmodus
Hogesnelheidsmodus
Druk op ▶.
Als een voertuig een kruispunt nadert
Als een voertuig een kruispunt nadert
Kruispuntweergave
Route-overzicht
Klokweergave
Als u op de
toets drukt wanneer een
bestemming is ingesteld:
Als u op de
toets drukt wanneer er
geen bestemming is ingesteld:
Opmerkingen
! De lagesnelheidsmodus van de AR-weergave
wordt getoond als er geen bestemming is ingesteld.
! Raadpleeg de bedieningshandleiding voor
meer informatie over de weergaven.
122
Nl
<CRD4765-A>122
Black plate (123,1)
Hoofdstuk
Wanneer de installatie en aansluiting voltooid zijn
De weergave-instellingen
aanpassen
Na de installatie en aansluiting moet u het toestel aanzetten (start de motor van het voertuig)
en de hoek van de combiner zo afstellen dat het
beeld zichtbaar is.
Opmerking
Het scherm is mogelijk niet duidelijk zichtbaar
afhankelijk van de verlichtingssterkte en omgevingsfactoren. Stel de verlichtingssterkte naar
wens in (raadpleeg De weergavehelderheid aanpassen op bladzijde 125) of verplaats het voertuig naar een plaats waar de weergave
duidelijker is, en bedien het toestel dan.
1
Druk op de
Positie
Hiermee past u de positie aan van het weergegeven beeld.
Wanneer de installatie en aansluiting voltooid zijn
% Druk op de a/b toets om het rasterpatroon helemaal weer te geven.
12
1 Druk op de a/b toets en selecteer de gewenste instelling. Druk vervolgens op de d
toets.
1 Druk op de a/b toets en selecteer de gewenste instelling. Druk vervolgens op de d
toets.
Rotatie
Hiermee past u de rotatie aan van het weergegeven beeld.
Instelling
Beschrijving
Horizontale Posititie
De horizontale positie aanpassen van het weergegeven
beeld.
Verticale Positie
De verticale positie aanpassen van het weergegeven
beeld.
toets.
% Druk op de a/b toets om het rasterpatroon in de gewenste stand te zetten.
Voorbeeld: Correct afgesteld
Instelling
Beschrijving
Trapezoidale vervorming
De keystonevervorming (trapezevormig beeld) corrigeren.
Cylindrische vervorming
De boogvervorming corrigeren.
Voorbeeld: Niet correct afgesteld
2 Druk op de a/b toets om het rasterpatroon rechthoekig te maken.
Voorbeeld: de keystonevervorming aanpassen
Aspect Ratio
Witbalans
Hiermee past u de beeldverhouding aan van het
weergegeven beeld.
Hiermee past u de witbalans aan van het weergegeven beeld.
% Druk op de a/b toets om het rasterpatroon rechthoekig te maken.
1 Druk op de a/b toets en selecteer de gewenste instelling. Druk vervolgens op de d
toets.
2 Druk op de a/b toets om het rasterpatroon helemaal weer te geven.
Voorbeeld: Correct afgesteld
2 Druk op de a/b toets en selecteer
Scherm-instellingen. Druk vervolgens op de
d toets.
Voorbeeld: Niet correct afgesteld
Nederlands
3 Druk op de a/b toets en selecteer de gewenste instelling. Druk vervolgens op de d
toets.
Zoom
Hiermee past u de grootte aan van het weergegeven beeld.
Geometrische Correctie
Hiermee corrigeert u de vervorming van het
weergegeven beeld.
Nl
<CRD4765-A>123
123
Black plate (124,1)
Hoofdstuk
Wanneer de installatie en aansluiting voltooid zijn
12
Vóór het rijden
13
Instelling
Beschrijving
Rood
De rode tinten aanpassen.
Groen
De groene tinten aanpassen.
Blauw
De blauwe tinten aanpassen.
2 Druk op de a/b toets om de helderheid
aan te passen.
Voorbeeld: de rode tonen aanpassen
De functie-instellingen
configureren
De functie-instellingen worden geconfigureerd
in het Instellingen scherm.
Menu
Beschrijving
Over
De softwareversie en wettelijke informatie weergeven.
Reset alle instellingen
De fabrieksinstellingen herstellen.
LET OP
! Het toestel kan niet worden bediend wanneer
het voertuig rijdt. Als u de het toestel wilt bedienen, moet u eerst het voertuig op een veilige plaats parkeren en de handrem
aantrekken.
! Als het voertuig gaat rijden terwijl u een
functie instelt, wordt het Instellingen
scherm automatisch gesloten.
% Druk op de
toets.
Opmerkingen
! Functie-instellingen kan alleen worden ingesteld wanneer er een communicatieverbinding is met de navigatietoepassing.
toets om het Instellingen
! Druk op de
scherm te sluiten.
! Raadpleeg de bedieningshandleiding voor
meer informatie.
De hoek van de combiner
aanpassen
Pas de hoek van de combiner aan uw zitpositie
aan.
LET OP
Het scherm Instellingen verschijnt.
Houd de combiner bij de randen vast als u de
hoek aanpast.
1
Menu
124
Open de diffuser en de combiner.
Beschrijving
Scherm-instellingen
De weergave-instellingen
aanpassen van geprojecteerd beeld.
Functie-instellingen
De functie-instellingen instellen.
Taal
De schermtaal instellen.
1
2
1 Diffuser
2 Combiner
Nl
<CRD4765-A>124
Black plate (125,1)
Hoofdstuk
Vóór het rijden
2 Pas de hoek van de combiner zo aan dat
de hele diffuser op de combiner kan worden
gereflecteerd.
Vóór het rijden
Correcte positie van de
combiner
Controleer vóór gebruik of de onderzijde van de
combiner zich boven uw gezichtslijn bevindt
wanneer u zit en recht vooruit kijkt in de rijhouding. Gebruik het toestel niet als de onderzijde
van de combiner lager is dan uw gezichtslijn.
Vouw in dat geval de combiner weg in de ingeklapte positie om te zorgen dat u vrij en veilig
zicht hebt tijdens het rijden.
% Druk op de
/
13
toets.
Opmerking
Als u de helderheid wijzigt, kan de weergavetint
ook veranderen.
1
1 Pas de combiner zo aan dat de diffuser in
het midden van de combiner wordt weergegeven.
In en uit het voertuig stappen
Let op dat u uw hoofd niet stoot.
De weergavehelderheid
aanpassen
Nederlands
De dimmerfunctie van het toestel past de weergavehelderheid automatisch aan het omgevingslicht aan.
U kunt de weergavehelderheid handmatig aanpassen met de / toets.
LET OP
Voordat u het toestel ’s nachts of op een donkere
plaats (zoals in een tunnel) gebruikt, moet u de
helderheid ervan aanpassen zodat u niet wordt
gehinderd bij het rijden. Als u dat niet doet, kunt
u een ongeval veroorzaken.
Nl
<CRD4765-A>125
125
Black plate (126,1)
Оглавление
Меры предосторожности
О руководстве по эксплуатации
127
Информация для пользователей по
сбору и утилизации бывшего в
эксплуатации оборудования и
отработавших элементов
питания
127
Установка и подключение
127
Сведения об этом устройстве
129
Меры предосторожности при
использовании батареек
129
При возникновении проблем
130
Важные сведения о безопасности
Во избежание разрядки аккумуляторной
батареи
131
Если дисплей плохо видно
131
Меры предосторожности при
эксплуатации при высоких/низких
температурах
131
О картах памяти microSD
131
Об iPhone
131
Об устройствах Android
132
Авторские права
132
Обновления программного
обеспечения
132
Посетите наш сайт
132
Сохраненные пользовательские
данные
132
Об этом устройстве
132
Перечень поставляемых в комплекте
деталей
Перед подключением
Меры предосторожности при
подключении
133
Подключение шнура питания
133
Предотвращение помех
133
Меры предосторожности при
установке
Перед установкой и закреплением
блока
134
При фиксации устройства
134
126
Оглавление
Соединения
Схема подключения
135
Выбор размера штекера для
подключения к прикуривателю
Замена плавкого предохранителя
прикуривателя
135
135
Положение установки
Меры предосторожности при установке
блока
136
Требуемое положение установки
136
Регулировка угла оптического
экрана
146
При посадке и выходе из
автомобиля
146
Правильное положение проекционного
дисплея
146
Регулировка яркости дисплея
146
Серийный номер
147
Подготовка к установке блока
При замене пластины регулировки
толщины солнцезащитного
козырька
136
Установка основного блока
После установки
142
Подключение кабеля питания к
прикуривателю
142
Настройка iPhone или Android
Подключение iPhone или Android к
устройству
143
Установка приложения для
навигации
143
Запуск приложения для
навигации
143
Режимы отображения
После завершения установки и
подключения
Регулировка параметров
дисплея
144
– Положение
144
– Увеличение
144
– Вращение
145
– Формат
145
– Геометрическая коррекция
– Баланс белого
145
145
Перед вождением
Настройка параметров функций
устройства
146
Ru
<CRD4765-A>126
Black plate (127,1)
Раздел
Меры предосторожности
Важно
! Для вашей собственной безопасности обязательно обратитесь к дилеру для установки данного блока в
автомобиль, прокладки кабелей или
изменения места установки.
Установка, прокладка кабелей и демонтаж требуют специальных навыков и
опыта. Неправильная установка, прокладка кабелей или демонтаж блока, а
также использование деталей, отличных от указанных производителем,
могут привести к несчастному случаю,
травме или неисправности. Компания
Pioneer не несет ответственности за
такие случаи.
! Дилерам
После завершения установки и прокладки кабелей перейдите к настройке
подключения к навигационному блоку,
регулировке настроек отображения и
т.п.
После завершения всех работ передайте настоящее руководство клиенту.
Благодарим Вас за покупку этого изделия
компании PIONEER
Для обеспечения правильности эксплуатации внимательно прочитайте данное руководство перед началом использования
изделия. Особенно важно, чтобы Вы прочли
и соблюдали инструкции, помеченные в данном руководстве заголовками ПРЕДУПРЕЖДЕНИЕ и ВНИМАНИЕ. Держите данное
руководство под рукой для обращения к
нему в будущем.
Меры предосторожности
О руководстве по
эксплуатации
В данном руководстве описан процесс установки и настройки данного блока. Инструкции по эксплуатации блока представлены в
отдельном руководстве к блоку.
Подробную информацию о функциях и управлении устройством можно получить на
нашем сайте:
http://www.pioneer.eu/navgatehud
Информация для
пользователей по сбору и
утилизации бывшего в
эксплуатации оборудования
и отработавших элементов
питания
(Обозначение для оборудования)
(Обозначения для элементов питания)
Данные обозначения утверждены только
для Европейского Союза.
Для стран, которые не входят в
состав Европейского Союза:
Если Вы желаете утилизировать данные изделия, обратитесь в соответствующие местные учреждения или к дилерам для
получения информации о правильных способах утилизации.
Дату изготовления оборудования можно
определить по серийному номеру, который
содержит информацию о месяце и годе производства.
Установка и подключение
ПРЕДУПРЕЖДЕНИЕ
! Используйте данную систему только с 12вольтным аккумулятором и заземлением
отрицательного полюса.
Не используйте данный блок в автомобилях с напряжением бортовой сети 24 В.
Существует опасность возгорания или неисправности.
! Не устанавливайте данный блок в местах,
где он может мешать срабатыванию подушки безопасности.
Русский
Эти обозначения на продукции, упаковке,
и/или сопроводительных документах означают, что бывшая в эксплуатации электротехническая и электронная продукция
и отработанные элементы питания не
должны выбрасываться вместе с обычным бытовым мусором.
Для того чтобы данная бывшая в употреблении продукция и отработанные элементы питания были соответствующим
образом обработаны, утилизированы и
переработаны, пожалуйста, передайте их
в соответствующий пункт сбора использованных электронных изделий в соответствии с местным законодательством.
Утилизируя данные устройства и элементы
питания правильно, Вы помогаете сохранить
ценные ресурсы и предотвратить возможные
негативные последствия для здоровья
людей и окружающей среды, которые могут
возникнуть в результате несоответствующего удаления отходов.
Для получения дополнительной информации
о правильных способах сбора и утилизации
отработавшего оборудования и использованных элементов питания обращайтесь в соответствующие местные органы
самоуправления, в центры утилизации отходов или по месту покупки данного изделия.
Ru
<CRD4765-A>127
127
Black plate (128,1)
Раздел
Меры предосторожности
!
!
!
!
128
При установке данного блока в автомобиле, оборудованном подушками безопасности, обратитесь к изготовителю
автомобиля для получения информации
о мерах предосторожности при проведении монтажных работ. Существует опасность неправильного срабатывания
подушек безопасности, что может привести к несчастным случаям со смертельным исходом.
Не устанавливайте данный блок в местах,
где он может затруднять обзор водителю,
препятствовать управлению автомобилем или представлять опасность для пассажиров.
Существует опасность дорожно-транспортных происшествий и травм.
Не удаляйте изоляцию с кабеля питания
данного блока с целью подключения питания других устройств.
Превышение предельно допустимого
тока для шнура питания может привести к
возгоранию, поражению электрическим
током или неисправности.
Не используйте болты и гайки деталей и
узлов, связанных с обеспечением безопасности, например, рулевого управления, тормозной системы и топливного
бака.
Их использование может привести к отказу тормозов, возгоранию или дорожнотранспортному происшествию.
Не устанавливайте данный блок на солнцезащитный козырек, форма которого не
поддерживается данным блоком.
Установка данного блока на солнцезащитный козырек, форма которого не поддерживается данным блоком, может
привести к несчастному случаю или неисправности.
Меры предосторожности
! Не устанавливайте данный блок на дефектный солнцезащитный козырек.
Перед установкой убедитесь в отсутствии
дефектов солнцезащитного козырька. Установка на дефектном козырьке может
привести к падению устройства, что, в
свою очередь, может стать причиной несчастного случая или неисправности.
! Не оставляйте данный блок в местах,
подверженных воздействию прямых солнечных лучей.
Не удаляйте защитный лист проекционного дисплея до завершения установки.
Проекционный дисплей может концентрировать свет в пучок высокой интенсивности, что приведет к образованию дыма
или возгоранию.
! Для вашей собственной безопасности обратитесь к дилеру для установки данного
блока, прокладки кабелей или изменения
места установки.
Установка, прокладка кабелей и демонтаж блока требуют специальных навыков
и опыта. Неправильная установка, прокладка кабелей или демонтаж данного
блока может привести к серьезным повреждениям автомобиля.
! Не работайте в местах, подверженных
воздействию прямых солнечных лучей.
Это может привести к ожогам или потере
зрения.
! Перед установкой отсоедините отрицательную клемму аккумулятора.
Короткое замыкание положительной и отрицательной клеммы может приводить к
поражению электрическим током или
травме.
! Перед установкой проверьте расположение трубопроводов, бака, электропроводки и других компонентов.
!
!
!
!
При установке данного блока путем сверления отверстия в кузове автомобиля,
будьте осторожны, чтобы не повредить и
избежать контакта с трубопроводами,
баком, электропроводкой и другими компонентами. Более того, обеспечьте защиту обрабатываемых деталей от коррозии
и попадания воды.
Используйте поставляемые детали и
обеспечивайте их надежное крепление.
Использование деталей, отличающихся
от поставляемых, может привести к повреждению других деталей блока или невозможности надежного закрепления
блока. Если крепление блока ослабнет,
блок может препятствовать управлению
автомобилем и привести к несчастному
случаю и травме.
Устанавливайте поставляемые детали в
соответствии с указаниями.
В случае неправильной установки поставляемых деталей их крепление может ослабнуть, и детали могут упасть и
привести к несчастному случаю или неисправности.
Используйте поставляемые кабели и надежно их соединяйте.
Используйте поставляемые кабели и соединяйте их в соответствии с указаниями.
Использование кабелей, отличных от поставляемых, может привести к возгоранию или неисправности.
При подключении и установке данного
блока следуйте указаниям, приведенным
в настоящем руководстве.
Несоблюдение указаний настоящего руководства при подключении и установке
блока может привести к возгоранию или
несчастному случаю.
! Прикрепите данный блок к солнцезащитному козырьку с помощью ремня для
предотвращения падения.
Несоблюдение этого указания может привести к падению блока, что в свою очередь может стать причиной несчастного
случая и травмы.
! Выполните изоляцию неизолированных
частей кабеля с помощью изоляционной
ленты или других подходящих материалов.
Короткое замыкание может привести к
возгоранию, поражению электрическим
током или неисправности.
! Прокладывайте кабели таким образом,
чтобы они не цеплялись за детали кузова
автомобиля, винты и такие подвижные
узлы, как направляющие сидений.
Обрыв или короткое замыкание может
привести к возгоранию, поражению электрическим током или неисправности.
! Прокладывайте и закрепляйте кабели
таким образом, чтобы они не препятствовали управлению автомобилем.
Несоблюдение этого указания может привести запутыванию кабелей вокруг рулевого колеса, рычага переключения
передач, педали тормоза, что в свою очередь может стать причиной несчастного
случая.
! После завершения установки и прокладки
кабелей убедитесь, что электрическое
оборудование функционирует нормально,
как и до установки блока.
Использование данного блока, когда другие оборудование не работает нормально, может привести к возгоранию,
поражению электрическим током или дорожно-транспортному происшествию.
! Храните мелкие детали, такие как винты,
в недоступном для детей месте.
При проглатывании немедленно обратитесь за медицинской помощью.
Ru
<CRD4765-A>128
Black plate (129,1)
Раздел
Меры предосторожности
ВНИМАНИЕ
! Не обрезайте кабель.
Если к кабелю подключен плавкий предохранитель, защитная цепь работать не
будет, что может привести к возгоранию.
! При подключении кабелей убедитесь, что
кабели не касаются горячих частей кузова
автомобиля.
Существует опасность возгорания или поражения электрическим током.
! Не прокладывайте кабели с использованием удлинительных шнуров.
Это может привести к перегреву кабеля,
что в свою очередь может привести к возгоранию или поражению электрическим
током.
! Не устанавливайте данный блок в местах,
подверженных влиянию дождя, воды, конденсата, пыли и паров масла.
Это может привести к образованию дыма,
возгоранию или неисправности.
! При прокладке кабелей не допускайте
контакта кабелей с металлическими деталями.
Контакт кабелей с металлическими деталями может привести к повреждению кабелей, что в свою очередь может
привести к возгоранию, поражению электрическим током или неисправности.
Сведения об этом устройстве
ПРЕДУПРЕЖДЕНИЕ
! Не смотрите на изображение во время
движения.
Если вы не будете следить за дорожной
ситуацией, то можете стать причиной
ДТП.
! Не регулируйте положение солнцезащитного козырька во время движения. Это
может стать причиной серьезного ДТП.
Припаркуйте автомобиль в безопасном
месте и задействуйте стояночный тормоз,
прежде чем регулировать положение козырька.
! Не вставляйте пальцы или посторонние
предметы в слот для загрузки носителя
информации.
Это может стать причиной травмы, поражения электрическим током, возгорания
или неисправности.
! Не допускайте попадания жидкости на устройство.
Это может стать причиной задымления,
возгорания или поражения электрическим
током. Особенно внимательными следует
быть семьям с детьми.
! При попадании жидкостей или посторонних предметов внутрь данного устройства
немедленно отключите питание и свяжитесь с дилером или с ближайшим сервисным пунктом PIONEER. Запрещается
использовать устройство в таком состоянии, поскольку это может привести к пожару, поражению электрическим током
или стать причиной иных неполадок.
! Не оставляйте пульт ДУ и т.п. без присмотра.
При торможении или повороте пульт ДУ
может упасть вам под ноги и попасть под
педаль тормоза, что может помешать маневру и стать причиной ДТП.
! Не прикрепляйте пленку или наклейки на
оптический экран.
Это может загородить обзор и стать причиной ДТП.
! Не используйте устройство в случае нештатной работы или неполадки, например, при отсутствии изображения.
Существует риск ДТП, возгорания или поражения электрическим током.
! Не позволяйте детям тянуть устройство
вниз или применять к нему силу.
Это может стать причиной травмы, деформации салона или неисправности.
! Во время грозы не прикасайтесь к устройству.
Существует риск поражения электрическим током при ударе молнии.
! Не разбирайте и не вносите изменения в
конструкцию устройства.
Существует риск ДТП, возгорания или поражения электрическим током.
! Всегда соблюдайте правила дорожного
движения.
Устройство содержит информацию о правилах дорожного движения, но иногда
они могут не совпадать с новейшими действующими правилами. Даже Даже при
использовании карт и голосовых подсказок навигатора всегда соблюдайте местные правила дорожного движения и
учитывайте фактические дорожные знаки
во время движения. В противном случае
возможно ДТП или нарушение законодательства.
! Данное устройство автоматически отключает возможность пользоваться интерфейсом во время движения. Припаркуйте
автомобиль в безопасном месте и задействуйте стояночный тормоз, прежде чем
пользоваться меню этого устройства.
! При замене предохранителя используйте
новый предохранитель указанного номинала (ампер).
Использование предохранителя более
высокого номинала может стать причиной
возгорания или неисправности.
! Прежде чем использовать устройство в
ночное время или в условиях пониженной
видимости, например, в туннеле, отрегулируйте яркость таким образом, чтобы устройство не мешало вождению. В
противном случае возможно ДТП.
ВНИМАНИЕ
! Используйте устройство только в автомобиле.
Использование с любыми другими целями может стать причиной задымления,
возгорания, поражения электрическим
током или травмы.
! Перед началом движения отрегулируйте
угол оптического экрана и яркость дисплея, а также убедитесь, что винты креплений достаточно затянуты, чтобы не
мешать движению.
В противном случае возможно ДТП.
! При использовании солнцезащитного козырька или кнопок во время движения
будьте особенно внимательны.
В противном случае возможно ДТП.
! При посадке и высадке из машины будьте
осторожны, не ударьтесь головой об устройство.
В противном случае возможна травма.
! Следите за тем, чтобы пальцы не попали
в сочленения при закрытии оптического
экрана или регулировке угла.
В противном случае возможна травма.
Меры предосторожности
при использовании батареек
ПРЕДУПРЕЖДЕНИЕ
! Во избежание несчастного случая храните батарейки в недоступном для детей
месте.
При проглатывании батарейки немедленно обратитесь к врачу.
Ru
<CRD4765-A>129
Русский
! Не пользуйтесь меню во время движения.
Это отвлекает от безопасного управления
автомобилем и может стать причиной
серьезного ДТП. Всегда следите за ситуацией на дороге и пешеходами, чтобы
обеспечить безопасность дорожного движения.
Меры предосторожности
129
Black plate (130,1)
Раздел
Меры предосторожности
01
Важные сведения о безопасности
02
! При установке батарейки соблюдайте полярность (плюс и минус), указанную в
данном руководстве.
Если полярность не соблюдена, существует риск травмы и загрязнения окружающей среды в результате взрыва или
утечки электролита.
! В случае утечки электролита, если электролит попал на кожу или на одежду, промойте это место чистой водой. При
попадании в глаза промойте чистой водой
и немедленно обратитесь за медицинской помощью.
ВНИМАНИЕ
! Не замыкайте, не разбирайте и не нагревайте батарейку, а также не помещайте
ее в огонь и в воду.
Взрыв или утечка электролита могут
стать причиной возгорания или травмы.
! Не заряжайте батарейку сухого типа.
Батарейка может взорваться и стать причиной травмы.
! Используйте только батарейки указанного
типа.
Взрыв или утечка электролита могут
стать причиной травмы или загрязнения
окружающей среды.
! Как можно скорее заменяйте разрядившуюся батарейку.
Утечка электролита может стать причиной
загрязнения окружающей среды.
! Не храните пульт ДУ в условиях высоких
температур, высокой влажности или на
прямом солнечном свету.
В противном случае возможна деформация пульта, взрыв батарейки или утечка
электролита.
130
При возникновении проблем
ПРЕДУПРЕЖДЕНИЕ
Если вы заметили дым, необычный звук или
запах или любой другой необычный симптом, немедленно выключите питание устройство и свяжитесь с дилерским центром или
авторизованным сервисным центром
PIONEER.
Продолжение эксплуатации в таких условиях
может стать причиной ДТП, возгорания или
поражения электрическим током.
! Данный блок не предназначен для автономной работы. Перед использованием
блока подключите его к устройству iPhone
или Android с установленным навигационным приложением.
Ознакомьтесь с мерами предосторожности в руководстве к изделию, которое подключается к данному устройству.
! Не пользуйтесь устройством во время
движения. Это отвлекает от безопасного
управления автомобилем и может стать
причиной серьезного ДТП. Всегда следите за ситуацией на дороге и пешеходами,
чтобы обеспечить безопасность дорожного движения. Перед тем как пользоваться
этим устройством, припаркуйте автомобиль в безопасном месте и задействуйте
стояночный тормоз.
! Не регулируйте положение солнцезащитного козырька во время движения. Это
может стать причиной серьезного ДТП.
Припаркуйте автомобиль в безопасном
месте и задействуйте стояночный тормоз,
прежде чем регулировать положение козырька.
! Не используйте iPhone или Android во
время движения. Прежде чем обозначить
маршрут на iPhone или Android, припаркуйте автомобиль в безопасном месте и
задействуйте стояночный тормоз.
! Все функции, предусмотренные в данном
блоке, никоим образом не гарантируют
безопасность. При управлении автомобилем самостоятельно убедитесь, что автомобиль находится в безопасных
условиях.
! Информация о маршруте и голосовые
подсказки, предлагаемые приложением
навигационной системы, носят ориентировочный характер. Всегда соблюдайте
правила дорожного движения и учитывайте фактические дорожные знаки. Несоблюдение может стать причиной
нарушения законодательства и серьезно-
!
!
!
!
!
!
!
!
го ДТП. Кроме того, информация о дистанции между вашим и впереди
стоящим автомобилем, знаках ограничения скорости и радарах также носят
ориентировочный характер. Следуйте
фактическим дорожным знакам и учитывайте реальную дорожную ситуацию.
Данное устройство оснащено системой
блокировки, которая определяет, когда
автомобиль движется, и блокирует интерфейс во время движения. Припаркуйте
автомобиль в безопасном месте и задействуйте стояночный тормоз, прежде чем
пользоваться меню этого устройства.
Если во время использования устройства
вы почувствовали усталость или дискомфорт, немедленно прекратите использование и сделайте длинный перерыв,
чтобы полностью восстановить силы.
Если продолжить пользоваться устройством в таких условиях, это может оказать негативное воздействие на ваше
физическое состояние.
Если вы страдаете близорукостью или
дальнозоркостью, астигматизмом или
разной остротой зрения глаз, то при использовании этого устройства пользуйтесь очками и т.п, чтобы скомпенсировать
дефекты зрения.
Изображение на дисплее может кратковременно искажаться при переключении
на другое изображение. Это не является
неисправностью.
Изображение на дисплее будет отсутствовать, если сигнал GPS не принимается.
Изображение на дисплее может искажаться, если на iPhone или Android лежит
тяжелый предмет.
Точность определения положения зависит от GPS либо от iPhone или Android,
подключенного к данному устройству.
Направление, в котором движется автомобиль, может отображаться некорректно, если точность GPS низкая.
Ru
<CRD4765-A>130
Black plate (131,1)
Раздел
Важные сведения о безопасности
! Во время движения iPhone или Android
должен быть надежно закреплен. Не допускайте падения iPhone или Android на
пол, где он может застрять под педалью
тормоза или газа.
! Закройте диффузный экран, если устройство не используется.
! При снятии блока с солнцезащитного козырька и хранении блока закрывайте
диффузный экран и проекционный дисплей.
Не оставляйте данный блок в местах,
подверженных воздействию прямых солнечных лучей, например, на приборной
панели. Оптический экран или диффузный экран могут концентрировать свет в
пучок высокой интенсивности, что приведет к образованию дыма или возгоранию.
! Задние габаритные огни транспортного
средства, находящегося впереди, могут
отражаться на оптическом экране.
! Компания Pioneer не несет ответственности за колебание стоимости или оценочной стоимости автомобиля и т.п.
Во избежание разрядки
аккумуляторной батареи
Если дисплей плохо видно
! Это устройство обеспечивает разные
углы обзора, позволяющие четко видеть
изображение на дисплее. При первом использовании устройства отрегулируйте
угол наклона оптического экрана (стр.
146) и настройки дисплея (стр. 144),
чтобы обеспечить оптимальную видимость и четкость изображения. Яркость
дисплея можно отрегулировать кнопкой
/
(стр. 146).
! Яркость дисплея может быть разной в зависимости от угла обзора. Расположите
устройство таким образом, чтобы вам хорошо было видно изображение.
Меры предосторожности при
эксплуатации при высоких/
низких температурах
! Если температура слишком высокая или
слишком низкая для нормальной работы
устройства, яркость дисплея будет уменьшена либо проецирование изображения
будет автоматически остановлено, чтобы
защитить внутренние компоненты устройства. Это не является неисправностью.
Подождите, пока значение температуры
не станет достаточным для нормальной
работы устройства.
! Данное устройство не может нормально
работать при слишком высокой или слишком низкой температуре. Используйте
устройство в пределах указанного диапазона рабочих температур.
Подробнее см. в Руководстве по эксплуатации.
О картах памяти microSD
! Данное устройство поддерживает использование карт памяти microSD и
microSDHC. Устройства хранения этого
типа в данном руководстве называются
единым термином “карта памяти SD”.
! Карты памяти microSDXC не поддерживаются.
! Компания Pioneer не гарантирует совместимость всех карт памяти SD с этим устройством.
! Не извлекайте карту памяти SD и не изменяйте положение ключа зажигания во
время считывания данных со вставленной карты памяти SD. Это может повредить данные, содержащиеся на карте
памяти SD. Компания Pioneer не несет ответственности за любой ущерб в результате таких действий.
! Карты памяти SD имеют определенный
срок эксплуатации. Даже если карта памяти SD использовалась надлежащим
образом, при достижении конца срока эксплуатации запись данных может быть
невозможна, либо данные могут быть самопроизвольно удалены с карты памяти
SD.
! Некоторые карты памяти могут не распознаваться данным устройством, даже если
они распознаются компьютером. Эту проблему можно решить форматированием
карты памяти SD с помощью соответствующего программного обеспечения.
Форматирование карт памяти SD с по-
02
мощью стандартной функции форматировании на компьютере не соответствует
стандарту SD. В этом случае возможны
проблемы, например, карту невозможно
считать или записать на нее данные. Во
избежание этого рекомендуется использовать указанное программное обеспечение. В процессе форматирования все
данные с карты памяти SD удаляются.
При необходимости предварительно создайте резервную копию данных. Программное обеспечение для
форматирования карт памяти SD можно
скачать на сайте
https://www.sdcard.org/home/
(по состоянию на июнь 2012).
! Компания Pioneer не гарантирует возможность восстановления карт памяти SD с
дефектами, вызванными форматированием. Кроме того, компания Pioneer не
несет ответственности за ущерб, затраты
или убытки в результате потери или повреждения данных в результате форматирования карты памяти SD. Прочтите
руководство к программе форматирования и следуйте указаниям при форматировании карты памяти SD, которую вы
планируете использовать. При этом вы
несете ответственность за проблемы, которые могут возникнуть при форматировании.
Об iPhone
! Информацию о моделях и программном
обеспечении iPhone, поддерживаемых
данным устройством, см. на нашем
сайте.
! Все модели iPhone, совместимые с данным устройством, в этом руководстве называются единым термином “iPhone”.
Ru
<CRD4765-A>131
Русский
! Во время использования устройства двигатель автомобиля должен работать. Использование устройства при
незапущенном двигателе может привести
к разрядке аккумуляторной батареи.
Не допускайте, чтобы двигатель работал
на холостом ходу в течение длительного
времени во время стоянки. Это поможет
сократить вредное воздействие на окружающую среду.
! Если устройство не выключается (светодиодный индикатор на штекере для подключения к прикуривателю кабеля
питания не гаснет), когда выключено зажигание автомобиля, отсоедините кабель
питания от прикуривателя. В противном
случае возможно разряжение аккумулятора.
Важные сведения о безопасности
131
Black plate (132,1)
Раздел
Важные сведения о безопасности
02
! Компания Pioneer не гарантирует совместимость всех моделей iPhone с этим устройством.
! Компания Pioneer не несет ответственности за потерю данных в результате использования iPhone с данным
устройством.
! Не оставляйте iPhone на прямом солнечном свету в течение длительного времени. Это может вызвать неисправности в
работе iPhone.
! Не допускайте воздействия на iPhone высоких температур.
! Подробную информацию о работе iPhone
см. в руководствах к iPhone.
Об устройствах Android
! Информацию об устройствах Android,
поддерживаемых данным устройством,
см. на нашем сайте.
! Совместимость со всеми устройствами
Android не гарантируется.
! Определенные способы использования
Android могут быть незаконными во
время вождения автомобиля в вашей
местности, поэтому вы должны знать и
соблюдать любые подобные ограничения.
Если вы не уверены в использовании
определенной функции, выполняйте ее
только тогда, когда ваш автомобиль припаркован.
Любые функции можно использовать,
только если это безопасно в условиях вождения на данный момент.
! Компания Pioneer не несет ответственности за потерю данных в результате использования Android с данным
устройством.
! Не оставляйте Android на прямом солнечном свету в течение длительного времени. Это может вызвать неисправности в
его работе.
! Не допускайте воздействия на Android
высоких температур.
! Подробнее об устройствах Android см. в
руководстве по эксплуатации к устройству
Android.
http://www.pioneer-rus.ru
! Зарегистрируйте приобретенное изделие.
Мы сохраним сведения о Вашей покупке,
что поможет Вам ссылаться на эту информацию в случае страхового требования по причине потери или кражи.
! Самую свежую информацию о PIONEER
CORPORATION можно получить на
нашем веб-сайте.
Авторские права
Сохраненные
пользовательские данные
Авторские права на данные и программное
обеспечение, входящие в комплект поставки
данного изделия, являются собственностью
компании Pioneer или сторонних компаний,
передавших компании Pioneer права на использование таких данных и программного
обеспечения. В любой форме запрещается
копирование, изменение и анализ элементов
или всего объема таких данных или программного обеспечения, поставляемых с
данным изделием.
Обновления программного
обеспечения
! Для сохранения файла обновления ПО
требуется карта памяти SD емкостью не
менее 2 Гб.
! Покупателям, не имеющих подключения к
Интернету, раз в год будет предоставляться карта памяти microSD с последней обновленной версией программного
обеспечения.
Подробную информацию можно получить
на сайте.
Посетите наш сайт
Посетите наш сайт:
132
Важные сведения о безопасности
! В случае необходимости ремонта и т.п.
компания Pioneer не несет ответственности за обновления ПО, установленные
самим пользователем.
! Зарегистрированные настройки устройства могут быть автоматически изменены
или удалены случайно, в результате неисправности, в процессе ремонта или в
процессе выполнения других действий.
Сохраняйте список важных данных. Компания Pioneer не несет ответственности
за ущерб или неполученную прибыль, полученные в результате потери данных в
таких случаях.
! Компания Pioneer не предоставляет услуг
по восстановлению поврежденных или
удаленных данных.
! Согласно испытаниям, проведенным компанией Pioneer, проецируемое изображение видно с расстояния 3 м от лобового
стекла автомобиля. Однако расстояние
может оказаться другим в зависимости от
высоты и положения сиденья водителя,
высоты и наклона крыши автомобиля и
степени естественной освещенности.
! Компания Pioneer не гарантирует, что изделие отвечает определенным задачам
конкретного пользователя.
! Технические характеристики и конструкция могут быть изменены без предварительного уведомления с целью
усовершенствования работы изделия.
Компания Pioneer не допускает и не принимает запросы пользователей на изменение в конструкции изделия или на его
обмен с целью соответствия конкретным
целям пользователя, если изделие соответствует указанным здесь техническим
характеристикам и особенностям конструкции.
! Снимки экрана в данном руководстве
могут отличаться от фактических.
! Конструкция дисплея может быть изменена без предварительного уведомления с
целью усовершенствования.
Об этом устройстве
! Журнал операций с данным устройством
сохраняется с целью улучшения эксплуатационных характеристик. Во время записи журнала информация о владельце не
получается. Записанная информация
может передаваться другим компаниям и
субподрядчикам, указанным компанией
Pioneer, для анализа данных, если предварительно получено разрешение владельца.
Ru
<CRD4765-A>132
Black plate (133,1)
Раздел
Перечень поставляемых в комплекте деталей
Перед подключением
03
04
Меры предосторожности
при подключении
Блок проекционной индикации:
ВНИМАНИЕ
Кабель питания x 1
Основной блок x 1
Подушка солнцезащитного козырька x 1
Монтажный кронштейн x 1
Двусторонняя лента x 1
Пульт дистанционного управления блока
проекционной индикации:
Пластина регулировки толщины солнцезащитного козырька
(большая) x 1
! Не используйте в качестве источника питания шину CAN и т.п. Подключайте блок
к сети питания автомобиля.
! Устанавливайте поставляемые детали в
соответствии с указаниями.
Использование деталей, отличных от поставляемых, может привести к возгоранию или неисправности.
— приемник сигналов радиомаяка и кабель антенны;
— Шнур питания
Размещайте антенны как можно дальше
друг от друга.
! Не закрепляйте антенны вместе, не кладите их друг на друга и не скрещивайте.
Помехи, создаваемые антенной и кабелем антенны, снижают чувствительность.
Подключение шнура питания
! Плотно вставьте штекер кабеля питания в
разъем питания устройства. Если штекер
вставляется плохо, возможно, требуется
перевернуть его. Проверьте ориентацию
штекера. Не вставляйте его с усилием.
Это может стать причиной неисправности.
Основной блок x 1
Пластина регулировки толщины солнцезащитного козырька
(малая) x 1
Крепежный винт x 6
Предотвращение помех
! Чтобы предотвратить генерацию помех,
размещайте следующие устройства как
можно дальше от устройства iPhone,
Android, кабелей и шнуров.
— пленочную антенну и кабель антенны;
— антенну диапазона FM/AM и кабель
антенны;
— GPS-антенну и кабель антенны;
Русский
Шестигранный ключ x 1
(В пульте установлен литий-ионный аккумулятор. Перед использованием блока удалите
изоляционную полоску.)
Ru
<CRD4765-A>133
133
Black plate (134,1)
Раздел
Меры предосторожности при установке
05
ПРЕДУПРЕЖДЕНИЕ
! Прикрепите данный блок к солнцезащитному козырьку с помощью ремня для
предотвращения падения.
Несоблюдение этого указания может привести к падению блока, что в свою очередь может стать причиной несчастного
случая и травмы.
! При установке данного блока в автомобиле, оборудованном подушками безопасности, не устанавливайте блок на крышку
подушки безопасности или в месте, где
он будет мешать срабатыванию подушки
безопасности. Это может предотвратить
нормальное срабатывание подушки безопасности или к тому, что подушка безопасности при срабатывании может
ударить блок и стать причиной несчастного случая и травмы.
! Не работайте в местах, подверженных
воздействию прямых солнечных лучей.
Это может привести к ожогам.
Более того, существует опасность потери
зрения вследствие воздействия солнечного света, отраженного от проекционного
дисплея. Если на проекционный дисплей
попадают прямые солнечные лучи, закройте проекционный дисплей.
! Не оставляйте данный блок в местах,
подверженных воздействию прямых солнечных лучей.
134
Не удаляйте защитный лист проекционного дисплея до завершения установки.
Проекционный дисплей может концентрировать свет в пучок высокой интенсивности, что приведет к образованию дыма
или возгоранию.
! Не устанавливайте данный блок в автомобиле, оборудованном люком. Солнечный свет может отражаться от
оптического экрана и концентрироваться
в пучок высокой интенсивности.
! Если на солнцезащитном козырьке установлено данное устройство, не отворачивайте козырек к боковому стеклу.
ВНИМАНИЕ
! При установке данного блока в автомобиле, оборудованном подушками безопасности, обратитесь к изготовителю
автомобиля для получения информации
о мерах предосторожности при проведении монтажных работ. Существует опасность неправильного срабатывания
подушек безопасности, что может привести к несчастным случаям со смертельным исходом.
! После установки блока подсветку в солнцезащитном козырьке и другие дополнительные аксессуары, находящиеся возле
солнцезащитного козырька, например,
держатель для карточки зеркало на солнцезащитном козырьке, возможно, не
удастся использовать. Заранее проверьте
аксессуары в автомобиле.
! От установки устройства могут остаться
следы на солнцезащитном козырьке.
! Данный блок не предназначен для установки на пассажирском сидении.
Меры предосторожности при установке
! Во время установки блока на вас могут
падать детали, пыль и т.п. Для предотвращения попадания пыли и других объектов
в глаза при установке блока не смотрите
вверх, находясь непосредственно под
блоком.
! Диффузный экран и оптический экран
требуют осторожного обращения. Не касайтесь их руками и не допускайте, чтобы
их касались инструменты при установке
устройства.
Перед установкой и
закреплением блока
Сначала временно закрепите блок, чтобы
убедиться в его нормальной работе, а затем
установите окончательно. Если блок не
функционирует нормально, проверьте правильность подключения.
При фиксации устройства
! Рекомендуемый момент затяжки при фиксации устройства с помощью винтов ─ от
0,36 Н•м до 0,59 Н•м.
! Перед приклеиванием двусторонней
ленты на соединительную коробку с кабеля питания тщательно удалите пыль с поверхности, на которую будет
приклеиваться двусторонняя клейкая
лента.
Ru
<CRD4765-A>134
Black plate (135,1)
Раздел
Соединения
Соединения
Схема подключения
06
Примечания
! Светодиодный индикатор на штекере
горит, когда питание включено, и гаснет,
когда устройство выключено.
Если устройство не выключается, когда
выключено зажигание автомобиля, отсоедините кабель питания от прикуривателя.
В противном случае возможно разряжение аккумулятора автомобиля.
! Подробнее о подключении iPhone или
Android см. в разделе Настройка iPhone
или Android на стр. 143.
1
2
4
Замена плавкого
предохранителя
прикуривателя
1 Поверните штекер против часовой
стрелки, чтобы отвернуть его.
1
Выбор размера штекера
для подключения к
прикуривателю
3
Установите для штекера размер L (большой)
или S (маленький) в зависимости от размера
прикуривателя в автомобиле.
1 Плавкий предохранитель (3 A)
2 Замените плавкий предохранитель
новым с таким же номиналом.
6
5
iPhone или Android
Кабель USB
Кабель питания
К разъему питания
Светодиодный индикатор
Переключатель размера штекера
К прикуривателю
1
Для пользователей iPhone
! Используйте кабель (2), входящий в комплект поставки iPhone.
не оставляйте кабель в автомобиле. Кабель, входящий в комплект поставки
iPhone, не предназначен для использования в автомобиле.
1 Переключатель размера штекера
Русский
1
2
3
4
5
6
7
7
Для пользователей Android
! Используйте кабель (2) связи USB-microUSB сечением не более 1 м. Кабель
для зарядки использовать нельзя.
Ru
<CRD4765-A>135
135
Black plate (136,1)
Раздел
Положение установки
07
Подготовка к установке блока
08
Меры предосторожности
при установке блока
ВНИМАНИЕ
ПРЕДУПРЕЖДЕНИЕ
! Используйте поставляемые винты и устанавливайте блок в соответствии с указаниями. Использование винтов, отличных
от поставляемых, может привести к повреждению блока.
! Прочно прикрепите блок к солнцезащитному козырьку с помощью поставляемых
винтов. Несоблюдение этого указания
может привести к падению блока во
время езды, и блок может ударить по голове и привести к травме.
! Внимательно и в полном объеме прочтите настоящее руководство и установите
данный блок с учетом требований стандартов безопасности.
1
2
1 Основной блок
2 Кабель питания
Не устанавливайте данный блок на плохо закрепленный или дефектный солнцезащитный козырек. Это может привести к падению
блока, что в свою очередь может стать причиной несчастного случая и неисправности.
1 Проверьте солнцезащитный козырек.
Проверьте толщину солнцезащитного козырька, на который будет устанавливаться
блок.
Блок можно устанавливать на солнцезащитные козырьки, соответствующие указанным
ниже требованиям.
T
Y
H
ВНИМАНИЕ
136
Толщина солнцезащитного козырька
Пластина регулировки
толщины солнцезащитного козырька
от 15 мм до 20 мм
Пластина регулировки
толщины солнцезащитного козырька (малая)
от 20 мм до
26,5 мм
Пластина регулировки
толщины солнцезащитного козырька (средняя)
от 26,5 мм до
33 мм
Пластина регулировки
толщины солнцезащитного козырька (большая)
A
Требуемое положение
установки
Установите данный блок в требуемом положении, чтобы не затруднять обзор водителю
и гарантировать возможность выполнения
блоком функций, для которых он предназначен. Установка блока в положении, отличном
от указанного, может нарушать требования
стандартов безопасности для дорожных
транспортных средств, и автомобиль может
не пройти проверку соблюдения требований
техники безопасности, например, вследствие ошибки технического обслуживания.
Данный блок поставляется с установленной
пластиной регулировки толщины солнцезащитного козырька (средней толщины).
Используйте пластину регулировки толщины
солнцезащитного козырька, соответствующую толщине солнцезащитного козырька.
T: Толщина
от 15 мм до 33 мм
H: Высота
от 140 мм до 240 мм
A: Расстояние
между опорными
точками
не менее 185 мм
Y: Расстояние до
зеркала и т.п.
не менее 45 мм (рекомендуется)
2 Проверьте пластину регулировки толщины солнцезащитного козырька, которая будет использоваться.
Размер пластины регулировки толщины
солнцезащитного козырька, которая будет
устанавливаться на монтажный кронштейн,
зависит от толщины солнцезащитного козырька.
При замене пластины
регулировки толщины
солнцезащитного козырька
1 Потяните на себя рычаг блокировки
проекционного дисплея и сдвиньте его в
положение разблокирования.
1
2
1 Положение снятия фиксации
2 Рычаг фиксации блока проекционной
индикации
Ru
<CRD4765-A>136
Black plate (137,1)
Раздел
Подготовка к установке блока
Установка основного блока
08
09
2 Снимите восемь винтов, включая
винты регулировки в продольном направлении (см. рисунок), на монтажном
кронштейне, а затем снимите пластину
регулировки толщины солнцезащитного
козырька (средней толщины).
Если сняты винты регулировки в продольном направлении, с пластины регулировки
толщины солнцезащитного козырька будет
снята пластина регулировки в продольном
направлении.
1
3 Закрепите пластину регулировки в
продольном направлении на пластине регулировки толщины солнцезащитного козырька, которая будет использоваться.
1 Переместите рычаг блокировки проекционного дисплея в положение снятия
фиксации.
Потяните на себя рычаг блокировки проекционного дисплея и сдвиньте его в положение разблокирования.
2 Разблокируйте фиксирующие пластины на монтажном кронштейне.
Потяните фиксирующие пластины на монтажном кронштейне влево и вправо, чтобы
освободить фиксатор.
1
1
2
2
3
1 Пластина регулировки толщины солнцезащитного козырька
2 Винты регулировки в продольном направлении
3 Пластина регулировки в продольном
направлении
3
2
1 Пластина регулировки толщины солнцезащитного козырька
2 Винты регулировки в продольном направлении
3 Пластина регулировки в продольном
направлении
1 Положение снятия фиксации
2 Рычаг фиксации блока проекционной
индикации
! Не держитесь за подвижную часть монтажного кронштейна при перемещении
рычага фиксации проекционного дисплея.
В этом случае рычаг фиксации невозможно переместить.
4 Совместите отверстия в пластине регулировки толщины солнцезащитного козырька, которая будет использоваться, с
соответствующими отверстиями на монтажном кронштейне и затяните винты в
местах, где они были установлены.
3 Отрегулируйте толщину монтажного
кронштейна.
Совместите линии на монтажном кронштейне с масштабными метками, расположенными слева и справа от пластины регулировки
толщины солнцезащитного козырька, в соответствии с толщиной козырька, а затем затяните три винта.
2
1
1
1
Ru
<CRD4765-A>137
Русский
1 Подвижная часть
1 Монтажный кронштейн
2 Пластина регулировки толщины солнцезащитного козырька
! Приблизительные значения масштабных
меток на пластине регулировки толщины
солнцезащитного козырька (среднего размера) указаны ниже (на рисунке метка на
монтажном кронштейне совпадает с масштабной меткой, соответствующей 22 мм).
137
Black plate (138,1)
Раздел
Установка основного блока
09
1
Установка основного блока
5
Откройте козырек вниз вертикально.
2
3
4
1
2
3
4
20 мм
22 мм
24 мм
26 мм
4 Установите монтажный кронштейн на
солнцезащитный козырек.
Поднимите солнцезащитный козырек в горизонтальное положение.
Удерживайте левый и правый торцы фиксирующих пластин на монтажном кронштейне
и установите монтажный кронштейн на солнцезащитный козырек путем перемещения
монтажного кронштейна до упора.
! Если монтажный кронштейн не удается
задвинуть полностью, толщину монтажного кронштейна необходимо увеличить.
Снимите монтажный кронштейн с солнцезащитного козырька, вернитесь к шагу 3,
отрегулируйте положение масштаба, а
затем повторно установите монтажный
кронштейн на солнцезащитный козырек.
138
6 Зафиксируйте монтажный кронштейн.
Надавите на фиксирующие пластины слева
и справа, чтобы надежно зафиксировать
монтажный кронштейн.
! Если фиксирующие пластины не удается
задвинуть полностью, толщину монтажного кронштейна необходимо увеличить.
Снимите монтажный кронштейн с солнцезащитного козырька, вернитесь к шагу 3,
отрегулируйте положение масштаба, а
затем повторно установите монтажный
кронштейн на солнцезащитный козырек.
7 Убедитесь, что монтажный кронштейн
надежно закреплен.
Верните солнцезащитный козырек в горизонтальное положение.
Потяните монтажный кронштейн в разные
стороны, чтобы убедиться, что монтажный
кронштейн надежно закреплен.
! Если монтажный кронштейн можно легко
снять с солнцезащитного козырька, толщину монтажного кронштейна необходимо
уменьшить. Снимите монтажный кронштейн с солнцезащитного козырька, вернитесь к шагу 3, отрегулируйте положение
масштаба, а затем повторно установите
монтажный кронштейн на солнцезащитный козырек.
8 Снимите монтажный кронштейн.
Опустите солнцезащитный козырек в вертикальное положение и потяните фиксирующие пластины влево и вправо, чтобы
освободить фиксатор.
Поднимите солнцезащитный козырек в горизонтальное положение и снимите монтажный кронштейн с солнцезащитного
козырька.
9 Проверьте, правильно ли отрегулирована толщина монтажного кронштейна.
Надавите на фиксирующие пластины на
монтажном кронштейне слева и справа,
чтобы надежно зафиксировать кронштейн.
Убедитесь, что монтажный кронштейн нельзя легко установить на солнцезащитный
козырек, когда фиксирующие пластины находятся в положении фиксации.
Если монтажный кронштейн нельзя установить на солнцезащитный козырек, толщина
выбрана правильно.
! Если монтажный кронштейн можно легко
установить на солнцезащитный козырек,
когда фиксирующие пластины находятся
в положении фиксации, толщина монтажного кронштейна выбрана неправильно.
Снимите монтажный кронштейн с солнцезащитного козырька, вернитесь к шагу 3,
отрегулируйте положение масштаба, а
затем повторно установите монтажный
кронштейн на солнцезащитный козырек.
10 Установите монтажный кронштейн с
отрегулированной толщиной на основной
блок.
Убедитесь, что диффузный экран и оптический экран основного блока закрыты, и переведите рычаг фиксации проекционного
дисплея на монтажном кронштейне в положение снятия фиксации.
Ru
<CRD4765-A>138
Black plate (139,1)
Раздел
Установка основного блока
Основной блок:
Установка основного блока
Задняя часть основного блока:
1
1
2
2
09
Поднимите солнцезащитный козырек в горизонтальное положение.
Удерживайте левый и правый торцы фиксирующих пластин на монтажном кронштейне
и установите блок на солнцезащитный козырек путем перемещения монтажного кронштейна до упора.
1 Оптический экран
2 Диффузный экран
Монтажный кронштейн:
Пропустите ремень для предотвращения падения, как показано на иллюстрации.
1
1 Совместите выступы с пазом.
2 Паз
2
1 Положение снятия фиксации
2 Рычаг фиксации блока проекционной
индикации
Прикрепите монтажный кронштейн к основному блоку в четырех точках спереди и
сзади с помощью поставляемых винтов.
Передняя часть основного блока:
1
11 Отверните четыре крепежных винта,
которые были затянуты на шаге 10, на
один оборот.
14 Откройте козырек вниз вертикально.
12 Отверните винты регулировки в продольном направлении на один оборот.
Передняя часть основного блока:
Потяните ремень для предотвращения падения вниз и закрепите, натягивая вниз.
2
15 Прикрепите данный блок к солнцезащитному козырьку с помощью ремня для
предотвращения падения.
Протяните ремень для предотвращения падения с тыльной стороны солнцезащитного
козырька, опущенного в вертикальное положение.
13 Установите блок на солнцезащитный
козырек.
Потяните фиксирующие пластины на монтажном кронштейне влево и вправо, чтобы
освободить фиксатор.
Русский
1 Паз
2 Совместите выступы с пазом.
Ru
<CRD4765-A>139
139
Black plate (140,1)
Раздел
Установка основного блока
09
16 Зафиксируйте монтажный кронштейн.
Надавите на фиксирующие пластины слева
и справа, чтобы надежно зафиксировать
монтажный кронштейн.
Установка основного блока
19 Отрегулируйте наклон основного
блока.
Отрегулируйте угол, чтобы выровнять основной блок.
Левая
сторона
Правая Левая
сторона сторона
2 Оптический экран
Отрегулируйте направление основного
блока так, чтобы диффузный экран и оптический экран были установлены по направлению движения.
Правая
сторона
Наклоните солнцезащитный козырек вертикально примерно на 20 градусов и прочно затяните два крепежных винта на задней
стороне основного блока, которые были отвернуты на шаге 11.
1
1
! Если защитный лист проекционный дисплей мешает выполнять регулировку, снимите его. После завершения регулировки
установите защитный лист проекционного
дисплея на его место.
20 Отрегулируйте направление основного блока.
Откройте диффузный экран и оптический
экран основного блока.
1
1 Положение фиксации
Основной блок переместиться вперед, и положение блока зафиксируется.
140
1 Отрегулируйте устройство по направлению движения
2
1 Диффузный экран
22 Снимите блок с солнцезащитного козырька.
Закройте диффузный экран и оптический
экран основного блока, а затем опустите
солнцезащитный козырек в вертикальное положение.
Потяните фиксирующие пластины на монтажном кронштейне влево и вправо, чтобы
освободить фиксатор. Освободите ремень
для предотвращения падения. Поднимите
солнцезащитный козырек в горизонтальное
положение, а затем снимите монтажный
кронштейн с солнцезащитного козырька.
! Будьте осторожны, не допустите падения
блока.
1
1
1 Положение снятия фиксации
Основной блок переместиться назад, и положение блока расфиксируется.
17 Поднимите солнцезащитный козырек
в горизонтальное положение.
18 Зафиксируйте положение основного
блока.
Потяните на себя рычаг блокировки проекционного дисплея и сдвиньте его в положение блокировки.
21 Снимите фиксацию положения основного блока.
Потяните на себя рычаг блокировки проекционного дисплея и сдвиньте его в положение разблокирования.
1 Отрегулируйте оптический экран таким
образом, чтобы диффузный экран отображался в центре оптического экрана.
! Обязательно отрегулируйте направление
основного блока по направлению движения.
23 Прочно затяните крепежные винты на
передней стороне основного блока.
Туго затяните два монтажных винта на передней стороне основного блока, которые
были отвернуты на шаге 11, и два винта регулировки в продольном направлении, отвернутых на шаге 12.
Ru
<CRD4765-A>140
Black plate (141,1)
Раздел
Установка основного блока
Установка основного блока
! При установке подушки солнцезащитного
козырька закрепите ее на держателе подушки солнцезащитного козырька, прикрепите к ремню для предотвращения
падения, а затем закрепите ремень для
предотвращения падения.
09
25 Подключите кабель питания к блоку.
1
2
24 Установите блок на солнцезащитный
козырек.
Выполните операции, описанные в шагах от
13 до 17, чтобы установить блок на солнцезащитный козырек.
! Перед установкой устройства на солнцезащитный козырек переместите рычаг
блокировки проекционного дисплея в положение снятия фиксации.
! Если между солнцезащитным козырьком,
находящимся в горизонтальном положении, и потолком автомобиля имеется
зазор, установите подушку солнцезащитного козырька на ремень для предотвращения падения.
1
2
3
1 Кабель питания
1
3
1 Ремень для предотвращения падения
2 Подушка солнцезащитного козырька
3 Держатель подушки солнцезащитного козырька
26 Проложите кабель питания.
Проложите кабель питания таким образом,
чтобы он не препятствовал управлению автомобилем, и убедитесь, что он не загораживает обзор водителю.
4
1
2
1 Подушка солнцезащитного козырька
2 Ремень для предотвращения падения
1
1 Закрепите кабель имеющимися в продаже зажимами.
! Не прикрепляйте и не прокладывайте кабель по ветровому стеклу.
! Не прокладывайте кабель питания у основания сиденья водителя. Существует
опасность попадания кабеля питания под
педаль тормоза, что будет препятствовать
вождению и может привести к серьезным
несчастным случаям.
27 Зафиксируйте положение основного
блока.
Потяните на себя рычаг блокировки проекционного дисплея и сдвиньте его в положение блокировки.
Ru
<CRD4765-A>141
Русский
1 Потолок автомобиля
2 Солнцезащитный козырек
3 Зазор между солнцезащитным козырьком и потолком автомобиля
4 Зазор между солнцезащитным козырьком и потолком автомобиля отсутствует
! Отрегулируйте положение кабеля питания
таким образом, чтобы он не загораживал
обзор водителю.
! Проложите кабель таким образом, чтобы
он не мешал перемещению основного
блока назад и вперед при перемещении
рычага фиксации блока проекционной индикации.
Проложите кабель питания, закрепляя его в
основных точках зажимами, имеющимися в
продаже.
141
Black plate (142,1)
Раздел
Установка основного блока
09
Установка основного блока
29 Снимите защитный лист проекционного дисплея.
Убедитесь, что кабель питания подключен и
проложен правильно, а затем снимите защитную пленку оптического экрана.
1
После установки
1 Положение фиксации
ВНИМАНИЕ
! Убедитесь, что блок установлен правильно. В перечисленных ниже случаях вернитесь к шагу 1 и установите блок
правильно.
Основной блок переместиться вперед, и положение блока зафиксируется.
28 Зафиксируйте кабель питания.
Приклейте двустороннюю ленту к соединительной коробке кабеля питания, а затем
прикрепите соединительную коробку в
месте, в котором кабель будет надежно закреплен.
1
2
3
1 Кабель питания
2 Боковая поверхность приборной панели и т.п.
3 Двусторонняя лента
! Не устанавливайте кабель питания в
месте, где его нельзя закрепить из-за вибраций автомобиля или по другим причинам.
! Если кабель не удается закрепить поставляемой двусторонней лентой, надежно
закрепите его имеющейся в продаже двусторонней лентой или другими аналогичными материалами.
! Надежно закрепите iPhone или Android в
держателе (приобретается отдельно).
! Вставляйте штекер кабеля питания в прикуриватель автомобиля светодиодным индикатором вверх, чтобы он был виден
водителю.
При включении питания светодиодный индикатор на штекере загорится зеленым.
1
Закрепите кабель имеющимися в продаже
зажимами.
1 Светодиодный индикатор
олее подробная информация приведена
на Подключение кабеля питания к прикуривателю на стр. 142.
142
! При снятии блока с солнцезащитного козырька и хранении блока закрывайте
диффузный экран и проекционный дисплей.
Не оставляйте данный блок в местах,
подверженных воздействию прямых солнечных лучей, например, на приборной
панели. Оптический экран или диффузный экран могут концентрировать свет в
пучок высокой интенсивности, что приведет к образованию дыма или возгоранию.
Подключение кабеля
питания к прикуривателю
% Плотно вставьте штекер кабеля питания в прикуриватель в автомобиле.
При включении питания светодиодный индикатор на штекере загорится зеленым.
1
1
2
1 Светодиодный индикатор
3
4
1 Фиксирующие пластины не зафиксированы.
2 Блок не закреплен ремнем для предотвращения падения.
3 Блок установлен под углом.
4 Блок установлен на противоположной
кромке солнцезащитного козырька.
Примечания
! Вставляйте штекер кабеля питания в прикуриватель автомобиля светодиодным
индикатором вверх, чтобы он был виден
водителю.
! Если устройство не выключается, когда
выключено зажигание автомобиля, отсоедините кабель питания от прикуривателя.
В противном случае возможно разряжение аккумулятора автомобиля.
! Закройте диффузный экран, если устройство не используется.
Ru
<CRD4765-A>142
Black plate (143,1)
Раздел
Настройка iPhone или Android
Подключение iPhone или
Android к устройству
Для пользователей iPhone
! Используйте кабель, входящий в комплект поставки iPhone.
не оставляйте кабель в автомобиле. Кабель, входящий в комплект поставки
iPhone, не предназначен для использования в автомобиле.
Для пользователей Android
! Используйте кабель связи USB-microUSB
сечением не более 1 м. Кабель для зарядки использовать нельзя.
1 Подсоедините кабель USB к iPhone
или Android.
2 Плотно вставьте штекер USB на противоположном конце кабеля в разъем соединительной коробки кабеля питания.
1
Настройка iPhone или Android
1 iPhone или Android
2 К прикуривателю
3 Соединительная коробка кабеля питания
4 Кабель USB
Установка приложения для
навигации
Установите приложение для навигации на
iPhone или Android до начала работы с этим
устройством.
Приложение для навигации можно загрузить
через iTunes App Store или Google Play.
Подробную информацию о приложении для
навигации см. на сайте
http://www.pioneer.eu/navgatehud
10
Если приложение не запускается автоматически при подключении к устройству
iPhone, нажмите “Разрешить” во всплывающем окне, которое появится на экране
iPhone.
! Для пользователей Android
Если приложение не запускается автоматически при подключении Android к устройству, выберите приложение во
всплывающем окне, которое открывается
на устройствах Android.
Если установить флажок и выбрать приложение во всплывающем окне, при следующем подключении окно не будет
появляться.
Запуск приложения для
навигации
При первом использовании приложения для
навигации запустите его самостоятельно. В
следующий раз приложение запустится автоматически, если к устройству подключен
iPhone или Android.
ВНИМАНИЕ
1 Соединительная коробка кабеля питания
Схема подключения:
1
2
4
Русский
3
! Чтобы пользоваться приложением, необходимо сначала приобрести пакет технической поддержки для проекционного
дисплея NavGate. Приобретите пакет технической поддержки для проекционного
дисплея NavGate в самом приложении,
следуя указаниям на экране.
! Для покупки пакета технической поддержки для проекционного дисплея NavGate
требуется подключение к Интернету.
Примечания
! Для пользователей iPhone
Ru
<CRD4765-A>143
143
Black plate (144,1)
Раздел
Режимы отображения
11
После завершения установки и подключения
12
На этом устройстве можно выбрать один из пяти режимов просмотра: режим объемного изображения
(низкоскоростной и высокоскоростной), режим списка (низкоскоростной и высокоскоростной), режим
информации о перекрестках, режим обзора маршрута и режим часов.
После установки соединения между данным блоком и навигационным приложением появится один
из показанных ниже экранов.
Режим списка
Режим объемного изображения
Низкоскоростной
Низкоскоростной
Нажмите ◀.
Высокоскоростной
Высокоскоростной
Нажмите ▶.
Если автомобиль приближается к
перекрестку
Если автомобиль приближается к
перекрестку
Регулировка параметров
дисплея
Положение
После завершения установки и подключения
включите блок (запустите двигатель автомобиля) и отрегулируйте угол проекционного
дисплея таким образом, чтобы было видно
изображение.
1 Кнопками a/b выберите нужный параметр и нажмите кнопку d.
Примечание
Экран, возможно, не будет хорошо виден в
зависимости от яркости экрана и условий окружающей среды. Необходимым образом отрегулируйте яркость экрана (см.
Регулировка яркости дисплея на стр. 146)
или переместите автомобиль в место, в котором экран лучше виден, а затем работайте с
блоком.
1
Нажмите кнопку
Обзор маршрута
, когда указан пункт
Примечания
! Низкоскоростной режим объемного изображения включается, когда не задан
пункт назначения.
! Более подробная информация о режимах
отображения приведена в руководстве по
эксплуатации.
144
Параметр
Описание
Горизонтальное
положение
Выберите для регулировки
положения изображения
по горизонтали.
Вертикальное
положение
Выберите для регулировки
положения изображения
по вертикали.
.
Режим информации о перекрестках
Если кнопка
назначения:
Регулировка положения изображения.
2 Нажимайте кнопки a/b, чтобы увидеть
сетку целиком.
Пример: настройка выполнена правильно
Режим часов
Если кнопка
, когда не указан
пункт назначения:
2 Кнопками a/b выберите Параметры
дисплея и нажмите кнопку d.
3 Кнопками a/b выберите нужный параметр и нажмите кнопку d.
Пример: настройка выполнена неправильно
Увеличение
Регулировка размера изображения.
Ru
<CRD4765-A>144
Black plate (145,1)
Раздел
После завершения установки и подключения
% Нажимайте кнопки a/b, чтобы увидеть
сетку целиком.
Вращение
Регулировка поворота изображения.
% Нажимайте кнопки a/b, чтобы выровнять сетку.
Пример: настройка выполнена правильно
Пример: настройка выполнена неправильно
Формат
Регулировка соотношения сторон изображения.
% Нажимайте кнопки a/b, чтобы сделать
сетку прямоугольной.
1 Кнопками a/b выберите нужный параметр и нажмите кнопку d.
Параметр
Описание
Трапецеидальное искажение
Выберите для коррекции
трапецеидального искажения.
Дуговое искажение
Выберите для коррекции
перспективного искажения.
После завершения установки и подключения
Параметр
12
Описание
Красный
Выберите для регулировки
оттенков красного.
Зеленый
Выберите для регулировки
оттенков зеленого.
Синий
Выберите для регулировки
оттенков синего.
2 Для настройки яркости нажимайте
кнопки a/b.
Пример: регулировка оттенков красного
2 Нажимайте кнопки a/b, чтобы сделать
сетку прямоугольной.
Пример: коррекция трапецеидального искажения
Баланс белого
Регулировка баланса белого изображения.
1 Кнопками a/b выберите нужный параметр и нажмите кнопку d.
Русский
Геометрическая коррекция
Коррекция искажений изображения.
Ru
<CRD4765-A>145
145
Black plate (146,1)
Раздел
Перед вождением
13
Настройка параметров
функций устройства
Параметры функций устройства можно настроить с помощью экрана Настройки.
ВНИМАНИЕ
! Данное устройство автоматически блокирует интерфейс во время движения автомобиля. Прежде чем пользоваться
устройством, припаркуйте автомобиль в
безопасном месте и задействуйте стояночный тормоз.
! Если автомобиль начинает движение во
время настройки параметров, экран Настройки автоматически закроется.
% Нажмите кнопку
Перед вождением
Меню
Описание
Информация
Проверьте версию программного обеспечения
блока и прочтите юридические примечания.
Сброс всех настроек
Восстановите настройки
по умолчанию.
2 Оптический экран
2 Отрегулируйте угол оптического экрана таким образом, чтобы на нем отражался весь диффузный экран.
Примечания
! Параметры Функция настройки можно
настроить, только если установлена
связь с приложением для навигации.
! Нажмите кнопку , чтобы закрыть экран
Настройки.
! Подробнее см. в Руководстве по эксплуатации.
Отрегулируйте угол оптического экрана относительно сиденья.
1
1 Отрегулируйте оптический экран таким
образом, чтобы диффузный экран отображался в центре оптического экрана.
ВНИМАНИЕ
Откроется экран Настройки.
146
Перед использованием обязательно убедитесь, что нижняя кромка проекционного дисплея находится выше поля зрения, когда
водитель находится в сидении и смотрит
прямо по направлению движения. Если нижняя кромка проекционного дисплея находится ниже поля зрения, не используйте данный
блок. Сложите проекционный дисплей в положение хранения, чтобы гарантировать
нормальной обзор во время вождения.
.
Регулировка угла
оптического экрана
Меню
Правильное положение
проекционного дисплея
При регулировке держитесь за края оптического экрана.
При посадке и выходе из
автомобиля
1 Откройте диффузный экран и оптический экран.
Будьте осторожны, не ударьтесь головой о
блок.
Описание
Параметры дисплея
Отрегулируйте настройки
отображения проецируемых изображений.
Функция настройки
Установите функциональные настройки.
Язык
Установите язык отображения.
Регулировка яркости дисплея
Функция регулятора яркости автоматически
регулирует яркость экрана блока в соответствии с яркостью окружающего освещения.
Яркость отображения можно регулировать
вручную с помощью кнопки / .
ВНИМАНИЕ
1
2
Прежде чем использовать устройство в ночное время или в условиях пониженной видимости, например, в туннеле, отрегулируйте
яркость таким образом, чтобы устройство не
мешало вождению. В противном случае возможно ДТП.
1 Диффузный экран
Ru
<CRD4765-A>146
Black plate (147,1)
Раздел
Перед вождением
% Нажмите кнопку
/
Перед вождением
13
! Данное устройство произведено в Китае.
.
Примечание
Изменение яркости может также изменить
цветовой тон дисплея.
Серийный номер
На этом рисунке показана информация о месяце и годе изготовления устройства.
12 цифр
10 цифр
2 цифры
P1
P2
Дата изготовления оборудования
P1 - Год изготовления
Год
2001 2002
Символ
A
B
Год
Символ
2011
K
2012
L
P2 - Месяц изготовления
Месяц
1
2
3
Символ
A
B
C
2003
C
2004
D
2005
E
2006
F
2007
G
2008
H
2009
I
2010
J
2013
M
2014
N
2015
O
2016
P
2017
Q
2018
R
2019
S
2020
T
4
D
5
E
6
F
7
G
8
H
9
I
10
J
11
K
12
L
Русский
Примечание:
В соответствии со статьей 5 закона Российской Федерации «О защите прав потребителей» и постановлением правительства Российской Федерации № 720 от 16.06.97 компания Pioneer Europe NV
оговаривает следующий срок службы изделий, официально поставляемых на российский рынок.
Автомобильная электроника: 6 лет
Прочие изделия (наушники, микрофоны и т.п.): 5 лет
Ru
<CRD4765-A>147
147
Black plate (148,1)
PIONEER CORPORATION
1-1, Shin-ogura, Saiwai-ku, Kawasaki-shi,
Kanagawa 212-0031, JAPAN
Корпорация Пайонир
1-1, Син-Огура, Сайвай-ку, г. Кавасаки,
префектура Канагава,
212-0031, Япония
Импортер ООО “ПИОНЕР РУС”
125040, Россия, г. Москва, ул. Правды, д.26
Тел.: +7(495) 956-89-01
PIONEER ELECTRONICS (USA) INC.
P.O. Box 1540, Long Beach, California 90801-1540, U.S.A.
TEL: (800) 421-1404
PIONEER EUROPE NV
Haven 1087, Keetberglaan 1, B-9120 Melsele, Belgium/Belgique
TEL: (0) 3/570.05.11
PIONEER ELECTRONICS ASIACENTRE PTE. LTD.
253 Alexandra Road, #04-01, Singapore 159936
TEL: 65-6472-7555
PIONEER ELECTRONICS AUSTRALIA PTY. LTD.
5 Arco Lane, Heatherton, Victoria, 3202 Australia
TEL: (03) 9586-6300
PIONEER ELECTRONICS OF CANADA, INC.
340 Ferrier Street, Unit 2, Markham, Ontario L3R 2Z5, Canada
TEL: 1-877-283-5901
TEL: 905-479-4411
PIONEER ELECTRONICS DE MEXICO, S.A. de C.V.
Blvd.Manuel Avila Camacho 138 10 piso
Col.Lomas de Chapultepec, Mexico, D.F. 11000
TEL: 55-9178-4270
先鋒股份有限公司
台北市內湖區瑞光路407號8樓
電話: 886-(0)2-2657-3588
先鋒電子(香港)有限公司
香港九龍長沙灣道909號5樓
電話: 852-2848-6488
ã 2013 PIONEER CORPORATION. All rights reserved.
ã 2013 PIONEER CORPORATION. Tous droits de reproduction et de traduction réservés.
ã PIONEER CORPORATION, 2013. Все права защищены.
<KOKZ13H>
<CRD4765-A> EW
<CRD4765-A>148