1
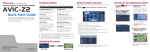
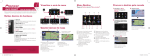
Hardware buttons
HDD AV NAVIGATION HEAD UNIT
1
AVIC-HD3II
Quick Start Guide
This guide is intended to guide you through the basic
functions of this navigation system. For details, please
refer to the operation manual and hardware manual
provided with the product.
2
3
4
5
1 OPEN CLOSE button
Press to access the disc loading
slot. Press and hold to set the
tilt of the LCD panel.
2 V button
Press to enter PICTURE
ADJUSTMENT mode.
3 VOL (2/8) button
You can adjust the volume of
the audio source.
4 AV button
Press to switch the screen to
the audio operation screen. If
you press the AV button again,
the audio source switches.
5 MENU button
Press to display a navigation
menu.
Press and hold to display
“Phone Menu” when a Pioneer
Bluetooth unit (sold separately)
is connected.
Search function overview
6
7
8
9
6 MAP button
Press to view the navigation
map screen or to switch
between view modes.
7 TRK (4/6) button
Press when the built-in DVD
drive source is selected to skip
a track or a chapter. Press and
hold to fast forward/fast reverse
a track or a chapter.
8 P.LIST (2/8) button
Switches preset channels during radio operation.
9 TA/NEWS button
Press to turn the traffic
announcement function on or
off. Press and hold to turn the
NEWS function on or off.
MAN-HD3II-QSG-EN.indd 1-4
Printed in Belgium
<CRB2635-A> EW
MAN-HD3II-QSG-EN
AV screen
1
2
3
4
Searching for destinations by address
1 Press the
button
and then touch Address
Search.
2 Touch
a country.
and then select
You can get another route with
Multiple Route. You may then
choose your preferred route.
3 Input the street name.
6 Touch OK to select your
route. Navigation starts.
5
6
7
7 Begin driving in accordance
8
1
2
3
4
5
6
7
8
Search by address
Calculate a route to the home address
Calculate a route to your favourite destination
Search for POIs in the database
Select a registered destination from the address book
Select a previously routed destination
Search for a destination by postal code
Search for POIs in your vicinity
Search result list for POI search
Switching screens
Published by Pioneer Corporation.
Copyright © 2008 by Pioneer Corporation.
All rights reserved. <KSKNX> <08A00000>
This navigation system has multiple methods for entering your destination.
Press the
button to display the navigation menu.
with navigation guidance.
4 Select the street name
5 Input the house number
This navigation system gives
you route guidance both visually
and by voice.
from the list.
After narrowing down your
destination, the house
number input screen will
appear.
and touch OK.
orts the POIs in the order
S
of distance.
Navigation map
POI (Points of Interests) are restaurants, hotels, petrol stations
and other categories in your navigation system.
The route calculation is carried out and the route confirmation screen appears.
31/01/2008 12:30:59
Basic operation on the map screen
1
2
Mute the navigation voice
Touch
.
Short-cut Menu
Touch .
Zoom in or zoom out
Touch
or .
3
4
Scrolling the map
Touch where you would like to scroll to on the map screen.
1 Next street
2 Distance to the next guidance point
3 Distance to your destination
4 Estimated time of arrival (in default)
Setting guidance and phone volume
Traffic information on the map
Traffic conditions can be overlaid on the map when there is traffic
information transmitted by FM radio service through the Radio
Data System (RDS-TMC).
1 Traffic event
Stationary traffic
Slow and
queuing traffic
1
Closed/blocked
roads
Other events
(e.g., accident)
Changing the AV source
4
3
1Search for songs by album,
artist, genre or your favourite playlist.
1 2Touch and hold this key to
memorise that song in the
2
“My Mix” playlist.
3Information about the current song
4“Group” playing now
You can control your iPod with Dock connector via the touch screen
when your iPod is connected to this navigation system via a Pioneer
INTERFACE ADAPTER for iPod (sold separately).
Touch to display the search
categories.
2 Touch the desired AV source.
Hands-free phoning
If you use a mobile phone featuring Bluetooth® wireless technology and the Bluetooth unit (sold separately), you can perform handsfree phoning.
Registering your phone
1 Turn on the Bluetooth
function on your mobile
phone.
2 Press and hold the
button to display “Phone
menu”.
Making a phone call
Press and hold the
ton to display “Phone
menu”.
1
2
6
7
3
4
but-
5
3 Touch the keys in the following order.
Phone settings
➔ Registration ➔ Navi
4 Touch the device name for
your phone.
5 Enter the password
(default: “1111”) on your
mobile phone.
“Registration successful” will
appear on the screen when the
connection is complete.
1 Input the number directly.
2, 3, 5, 6
Select a contact from the list.
4 Transfer phone book entries
from your phone.
7 Modify your phone
preferences.
When you receive an incoming call…
1
1The AV source for the rear display switches in the following
order.
“MIRROR” (Same as front) – “DVD” (DVD drive) – “AV”
(AV input)
MAN-HD3II-QSG-EN.indd 5-8
First, play the CD you want to record. The CD will automatically be
recorded onto the built-in hard disk drive (in the default setting). The
recording is performed four times faster than playing the CD. After
the recording is complete, you can play the music from your music
library.
Operation of your Apple iPod®
1 Touch the source icon.
Press or touch in the following order.
button ➔ Settings tab ➔ Volume
“Phone Ringtone” and “Phone Voice” are effective for handsfree phoning.
Operation of Music Library
1 Accept the call
2 Reject the call
1
2
31/01/2008 12:31:06