1
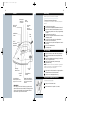
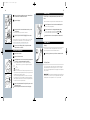
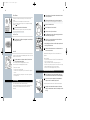
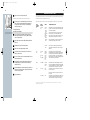
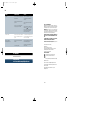
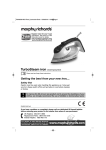
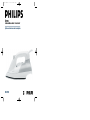
HI478/IRON.FA
1/13/00 2:35 PM
Page 1
iron
removable water reservoir
Optinox stainless steel soleplate
HI478
HI478/IRON.FA
1/13/00 2:35 PM
Page 2
IMPORTANT SAFEGUARDS
When using your iron, especially when children are
present, basic safety precautions should always be
followed, including the following:
Read all instructions before using.
1. Always disconnect iron from electrical outlet when
filling removable water reservoir with water or
emptying and when not in use. Be careful to avoid
spilling water over the iron when filling reservoir.
2. Do not place or store iron where it can fall or be
pulled into a tub or sink.
3. To protect against a risk of electrical shock, do not
immerse the iron in water or other liquids.
4. Close supervision is necessary for any appliance
being used by or near children or invalids. Do not
leave iron unattended while connected or on an
ironing board. Always position iron carefully to
prevent it from falling off or being knocked off ironing
board, or if cord is pulled. When not in ironing
position,always stand iron on heel rest.
5. Use this appliance only for its intended use as described
in this manual. Do not use attachments not
recommended by Philips Electronics North America
Corporation.
6. Do not operate this appliance if it has a damaged
cord or plug, if it is not working properly, if it has been
dropped or damaged, or dropped into water.To avoid
the risk of electric shock, do not disassemble the iron;
return the iron to the retail location where it was
purchased for examination and repair. Incorrect
reassembly can cause a risk of electric shock when the
iron is used.
7. Do not allow cord to touch hot surfaces. Let the
iron cool completely before putting away. Loop cord
around cord wrap when storing.
8. When not in use, the Temperature Control should
always be turned to Min position. Never yank cord to
disconnect from outlet; instead, grasp plug and pull
to disconnect.
9. Do not use outdoors or operate where oxygen is
being administered or in the presence of explosive
and/or flammable fumes.
10. Burns can occur from hot metal parts, hot water or
steam. Use caution when you turn a steam iron upside
down--there may be hot water in the internal reservoir.
11. The iron may be cleaned by wiping with a damp
cloth. Always unplug cord from outlet and allow
iron to cool before cleaning.
12. This appliance is intended for household use ONLY;
it is not for commercial use or industrial use.
13. For any service issues contact the retail location
where product was purchased.
14. IRON MAY BE USED ONLY WITH
ALTERNATING CURRENT (AC). NEVER
PLUG IRON INTO A DIRECT CURRENT
(DC) OUTLET.
HI478/IRON.FA
1/13/00 2:35 PM
Page 4
SPECIAL INSTRUCTIONS
1. To avoid a circuit overload, do not operate another
high wattage appliance on the same circuit.
2. If an extension cord is absolutely necessary, a 10-ampere
cord should be used. Cords rated for less amperage
may overheat. Care should be taken to arrange the
cord so that it cannot be pulled or tripped over.
SAVE THESE
INSTRUCTIONS
SPECIAL POLARIZED
PLUG INSTRUCTIONS
This Philips Iron has a polarized plug for an added safety
feature.
• Plug will fit into polarized outlet only one way.
• If plug does not properly fit outlet at first, reverse it.
• If plug still does not fit, contact a qualified electrician.
DO NOT ATTEMPT TO
DEFEAT THIS SAFETY
FEATURE
Table of Contents
Features
2
Before Using
3
For Dry Ironing
3
Filling the Removable
Water Reservoir
3-4
Setting the Temperature
4
Steam Ironing
5
Other Features
5-6
Self-Cleaning
6-7
Maintenance and Storage
7-8
Temperature and Fabric Guide
9
Problems
10
For Assistance
10
Warranty
Back Cover
HI478/IRON.FA
1/13/00 2:35 PM
Page 6
2
3
Features
Before Using
Remove any sticker or protective foil from soleplate
Dual Language
Temperature
Control Dial
Red Auto-Off
Pilot Light
To ensure maximum steam performance,
Amber
Pilot Light
•Clean any left over residue from the Steam Vents by following this
procedure:
Removable
Water
Reservoir
Release Buttons
Variable Steam
Control
1
2
3
4
5
Fabric
Guide
6
Shot Of
Steam Button
7
Spray Button
8
9
Turn Steam Control to position 0.
Fill iron (see section Filling the Removable Water Reservoir).
Plug cord into electrical outlet. Set Temperature Control to
maximum setting and allow iron to heat up for approximately
2 minutes.
Turn Steam Control to position 3-4.
Hold iron over ironing board and allow to steam for 1 minute,
dislodging any residue.
Iron over an old cotton towel (or other disposable nonsynthetic cloth) for several minutes.
Turn Steam Control to position 0 and Temperature Control to
Min setting.
Let iron cool. Clean Steam Vents.
Iron is ready to use.
For
9 Dry
Iron isIroning
ready for use.
1
2
Full Length
Button Groove
Self Clean
Button
Plug cord into 120V AC outlet. Amber Pilot Light will glow.
Always dry iron with Steam Control set at position 0 (Dry
Setting).
3 Be sure removable water reservoir is empty if you will be dry
ironing for long periods of time.
4 Preheat iron for approximately 2 minutes at proper
temperature setting.
NOTE: Iron must be on heel rest to preheat. If left to preheat with
soleplate in down position, iron will automatically shut off after 30
seconds before reaching desired temperature.
Anti-Calc
Filter
5
Removable Water
Reservoir
• Drip Stop System
Polished Optinox Soleplate
Automatically shuts off water
supply if iron is to cool to steam.
with Special 39-Vent Bell Pattern
ensures optimal and even steam
distribution
IMPORTANT:
When using your iron for the first time, you may notice a white
deposit coming from the iron as it heats up.This is simply a residue
left over from the final buffing of the iron soleplate. Follow the
steps in “Before Using” to remove this residue.
6
W
Begin ironing. When finished, stand iron in upright position on
heel rest. Remove cord from electrical outlet.
Allow iron to cool completely before storing.
Filling the Removable Water Reservoir
Do not immerse the iron in water.
1
Unplug cord from electrical outlet.
2
Set the Steam Control to position 0 (= no steam).
HI478/IRON.FA
1/13/00 2:35 PM
Page 8
4
5
Steam Ironing
3
4
Press and hold the removable water reservoir release buttons
and remove the removable water reservoir.
Bell Vent Pattern on soleplate steams and presses twice in one
action.
Open the filling cap.
Make sure that there is enough water in the removable water reservoir.
1 Set the Temperature Control to the recommended position.
See section 'Setting the temperature.'
5
Pour tap water into the removable water reservoir up to the
maximum level.
Do not fill the reservoir beyond the MAX indication.
6
Wipe off any excess water before plugging iron into outlet.
If the tap water in your area is very hard, we advise you to mix it with
an equal portion of distilled water, or to use distilled water only.
Do not use vinegar, starch or chemically descaled water.
7
2 Set the Steam Control to the appropriate steam position.
- 1-2 for moderate steam (temperature settings
to
)
- 3-4 for maximum steam (temperature settings
to MAX)
Press to close the filling cap (click!) and put the removable
water reservoir onto the iron.
Setting the temperature
1
Put the iron on its heel.
2
Plug cord in electrical outlet.
Other features
Spraying
To remove stubborn creases at any temperature, make sure that
there is enough water in the removable water reservoir.
1
Press the spray button a couple of times to moisten the fabric.
3
-
-
Set the Temperature Control to the required ironing temperature
by turning it to the appropriate temperature indicator.
Check the garment label for the required ironing temperature:
Synthetic fabrics (e.g. acrylic, viscose, polyamide, polyester)
Silk
Wool
Cotton, linen
If you do not know what kind of fabric(s) the garment is made of, try
to determine the right ironing temperature by ironing a part that will
be invisible when you wear the garment.
Silk, woolen and synthetic materials: iron the reverse side of the fabric
to prevent shiny spots.To prevent stains, avoid using the spray function.
Start ironing the ar ticles that require the lowest ironing temperature
first, such as those made of synthetic fibers.
Steaming will start as soon as the set temperature has been reached.
4
Start ironing when the Amber Pilot Light has first gone out and
then comes on again.
The Amber Pilot Light will come on from time to time during ironing.
Drip Stop System
The Drip Stop System continuously monitors soleplate temperature
and automatically shuts off water supply if iron is too cool to steam.
Drip Stop System virtually eliminates water dripping from soleplate and
onto your fabric.
IMPORTANT: The iron will automatically stop steaming at insufficient
temperatures.This is due to the Drip Stop System’s valve closing when
the temperature of the soleplate is too cool to produce steam.
HI478/IRON.FA
1/13/00 2:35 PM
Page 10
6
7
Shot of Steam
This function can also be used when you hold the iron in vertical
position.
A powerful "shot" of steam helps remove stubborn creases.
The Shot-of-Steam function can only be used at temperature settings
between
and MAX.
1
Always unplug cord from electrical outlet and set the Steam
Control to position 0.
2 Fill the removable water reservoir to the maximum level.
Do not use vinegar or other descaling agents to self clean your iron.
3
Plug cord in electrical outlet.
1 Press and release the Shot-of-Steam button.
Wait for a while before using the button again to avoid spluttering.
Never direct the steam towards people.
4
Set the Temperature Control to MAX.
5
Allow iron to heat up for two minutes.
Anti-Calc Filter
6
Turn Temperature Control to Min and unplug iron when the
Amber Pilot Light has gone out.
7
Hold the iron over the sink, press and hold the self-clean
button and gently shake the iron.
◗
The built-in Anti-Calc Filter reduces deposit of scale and helps
prolong life of the iron.
4
Steam and boiling water will come out of the soleplate. Impurities and
scale (if any) will be flushed out.
8
Release the self-clean button as soon as all the water in the
reservoir has drained out.
Auto-off
An electronic safety device will automatically switch off the iron if it has
not been moved for a while.
◗
To indicate that the iron has been switched off, the Red AutoOff Pilot Light will start blinking.
In a horizontal position, this will happen after 30 seconds.
In a vertical position, this will happen after 8 minutes.
To heat up the iron again:
- Pick up the iron or move it slightly.
- The Red Auto-Off Pilot Light will go out.The Amber Pilot Light will
come on.
- When the Amber Pilot Light has gone out and comes on again, the
iron is ready for use.
Repeat the self-cleaning process if the iron still contains a lot of
impurities.
After self-cleaning
- Plug in the iron and reheat for 2 minutes.This will enable interior of
the iron to dry before storing.
- Unplug the iron when the Amber Pilot Light has gone out.
- Move the hot iron gently over a piece of used cloth to remove any
water stains that may have formed on the soleplate.
- Let the iron cool down completely before you store it.
Maintenance and Storage
1
Set the Temperature Control to Min position. Unplug cord
from electrical outlet and let the iron cool down completely.
2
Wipe scale and any other deposits off the soleplate with a
damp cloth and a non-abrasive (liquid) cleaner.
sELFSelf-Cleaning
The self-clean function removes scale and impurities.
Use the self-clean function once ever y two weeks. If the water in your
area is very hard, the self-clean function should be used more
frequently.
Keep the soleplate smooth: avoid hard contact with metal objects.
3
Regularly rinse the removable water reservoir with water.
Empty the removable water reservoir after cleaning or before
storing.
HI478/IRON.FA
1/13/00 2:35 PM
Page 12
8
9
Temperature and Fabric Guide
4
Loop cord around cord wrap when storing.
Always store the iron standing on its heel in a safe dry place.
5
To clean body of iron, use mild detergent and soft cloth only.
Never use harsh household cleansers, abrasive cleansers or
scouring pads to clean iron housing – scratching/fading of
housing colors may occur.
Follow garment label instructions for best ironing results.Test iron temperature setting on an inside
or small hidden section of garment before ironing.
Fabric guide located on the heel rest of iron gives temperature settings for most common fabrics.
TEMP
CONTROL
SETTING
Min
To clean and maintain
polished Optinox soleplate
1
STEAM
SETTING
FABRIC
0= Dry Iron
Only
Acetates
Acrylics
Acrilan*
Creslan*
Orlon*
Sheer Synth
Suede
Ultrasuede
Nylons
Antron*
Caprolan*
Qiana*
Turn Temperature Control to section marked Min.Start at the beginning of Min section and slowly increase temperature setting as needed to reach proper temperature.
Triacetates
Arnel*
When pressing some triacetates,a higher heat setting may be
required.Slowly increase temperature as needed to reach proper
temperature.
Metallics
Polyesters
Dacron*
Fortrel*
Kodel*
Trevira*
Rayon
Silk
Turn Temperature Control to section marked LO/MED (•).
Start at the beginning of the LO/MED section for lightweight 100%
synthetic permanent press fabrics.Some heavier polyester fabrics
may require steam at positions 1 (LO) or 2 (MED) setting.Some
durable silk fabrics may require a higher heat setting.Slowly increase
setting as needed to reach proper temperature.
On a soft cloth, make a thin paste of abrasive household
cleaner and water. Gently rub surface of soleplate to remove
starch or residue build-up.
2
Fill iron with water (see Section Filling the Removable Water
Reservoir).
3
Set Temperature Control to maximum setting.
4
Allow iron to heat up approximately 2 minutes.
5
Turn Steam Control to position 4 (MAX) and allow iron to
steam for a few minutes.
6
Iron over old cotton cloth to remove paste/cleanser from iron
bottom and steam vents.
7
Turn Temperature Control to Min position and allow to cool
completely. Unplug cord from electrical oulet and empty
removable reservoir.
8
Should soleplate become scratched, most minor scratches can
be removed using fine steel wool. After buffing, follow steps 26 before ironing on garments.
9
Wipe soleplate clean.
Lo (•)
Med
0= Dry Iron
Only
Pos.1= (LO)
or
Pos. 2= (MED)
IRONING INSTRUCTIONS
Iron delicate fabrics on wrong side to a void shining or glazing.If
moisture is necessary, use a press cloth and MED setting.
When pressing suede, use brown paper as press cloth and to cover
ironing board.This will help prevent suede from rubbing off.
When pressing Ultrasuede* use a press cloth and press lightly on
wrong side. Brush fabric lightly to remove press marks.
Med (••)
Pos. 2= (MED)
Perm Press
Polyester
Cotton
Turn Temperature Control to section marked MED (••).Turn Steam
Control to Position 2 (MED). Most permanent press blends containing
cotton require this setting.Test iron on inside seam or small hidden section of garment. If shine or color change occurs, use a press cloth.
Hi (•••)
Pos. 3= (HI)
Wool
Cotton
Turn Temperature Control to section marked HI (•••). Turn Steam
Control to Position 3 (HI).
When ironing wool,always use a press cloth and moisture. Never
press wool dry.
Pos. 4= (MAX)
Linen
Turn Temperature Control to maximum setting. Turn Steam Control
to position 4 (MAX).Lightly dampen fabric for thorough pressing.
Iron dark colored fabrics on the wrong side to avoid shining.
Ironing velvet or any other nap/sensitive fabric is not recommended. Be sure to check manufacturers label for care instructions.
*Trademarks of fiber manufacturers.
HI478/IRON.FA
1/13/00 2:35 PM
Page 14
10
Problem
Possible cause(s)
Solution
No steam
Not enough water in the removable
water reservoir.
Fill the removable water reservoir
(see Filling the removable water
reservoir).
The steam control has been set to
position 0.
The iron is not hot enough and/or
Drip Stop System is activated.
Set to steam position (see Steam
ironing).
Set the temperature control to the
steam area (
to MAX). Put the
iron on its heel and wait until the
Amber Pilot Light has gone out
before you start ironing.
No Shot of Steam
The Shot of Steam function has been
used too often within a very short
period.
Put the iron in horizontal position and
wait for a while before using the Shot
of Steam function again.
The iron is plugged in
but the soleplate is cold.
The Auto-Off function has been
activated.
Move the iron slightly and the iron
will start heating up again.
Connection problem.
Check the cord, the plug and the
electrical outlet.
FULL ONE YEAR WARRANTY
Philips Electronics North America Corporation warrants each new
Philips product, model HI478 (except cord), against defects in materials
or workmanship for a period of one year from the date of purchase.
IMPORTANT: This warranty does not cover damage resulting
from accident,misuse or abuse, lack of reasonable care, the affixing
of any attachment not provided with the product or loss of parts or
subjecting the product to any but the specified voltage.*
PHILIPS ELECTRONICS NORTH AMERICA CORPORATION
WILL NOT PAY FOR UNAUTHORIZED SERVICE OF ANY
TYPE.
NO RESPONSIBILITY IS ASSUMED FOR ANY SPECIAL,
INCIDENTAL OR CONSEQUENTIAL DAMAGES.
In order to address warranty issues,simply take or ship the product
back to the retail location where it was purchased.
* Read enclosed instructions carefull y.
Manufactured for:
Norelco Consumer Products Company
A Division of Philips Electronics North America Corporation
1010 Washington Blvd.,Stamford,CT 06912-0015
For Assistance call 1-800-243-7884
For assistance
MADE IN SINGAPORE.
This symbol on the product’s nameplate means
it is listed by Underwriters’ Laboratories,Inc.
For assistance call toll free:
1-800-243-7884
or visit our website: www.philipsonline.com.
PHILIPSand Philips Shield are Registered Trademarks of Koninklijke
Philips Electronics N.V.
Optinox is a Trademark of Koninklijke Philips Electronics N.V.
Drip Stop is a Registered Trademark of Philips Electronics North
America Corporation.
© 2000 Philips Electronics North America Corporation.
All Rights Reserved.
HI478