1
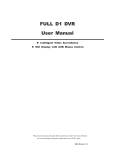
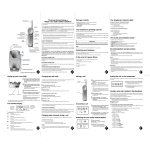
Thank you for purchasing this Philips Elegance 55 answering
machine. With this user-friendly unit you can enjoy the
advantage of quality performance in your communication
lifestyle.
SETTING THE CLOCK OF YOUR
ELEGANCE 55
Steps to install the battery:
RECORDING YOUR MEMO MESSAGE
1.
To listen to the clock settings, press once the CLOCK BUTTON (adjust
the Volume Slider to your desirable volume level).
Reminder : If your clock is not set properly (day, hour and minute),
the Screen Display will show “CL”. Otherwise, “CL” will
not be displayed.
9.
2.
Steps to set your clock’s day, hour and minute :
10.
3.
If you want to stop the settings below, just press once the PLAY/
. The clock will revert to its previous settings.
STOP BUTTON
1. Press and hold the CLOCK BUTTON until a voice announces
a day, then release the CLOCK BUTTON.
2. Press either the FORWARD
or REWIND BUTTON
to choose the day you wanted to set.
3. When the day you wanted to set is announced, press once
the CLOCK BUTTON.
4. Continue to press either the FORWARD
or REWIND
BUTTON
to choose the hour you wanted to set.
5. When the hour you wanted to set is announced, press once
the CLOCK BUTTON.
6. Continue to press either the FORWARD
or REWIND
BUTTON
to choose the minute you wanted to set.
7. When the minute you wanted to set is announced, press once
the CLOCK BUTTON.
MEMO
OGM
1. Turn your Elegance 55 over.
2. After locating the battery compartment, open the compartment
cover by unscrewing the adjacent screw with a screwdriver.
3. Place a 9 Volt 6LR61 battery into the compartment by following
the positive/negative polarity arrangement as indicated inside.
4. Replace the cover and screw in the screw until the cover is
completely closed.
4.
6.
5.
7.
8.
•
MEMO
FEATURES OF YOUR ELEGANCE 55
11.
TURNING YOUR ELEGANCE 55 ON/OFF
MEMO
OGM
•
MEMO
1. Press and hold the MEMO BUTTON
until a long beep is
heard, then release the MEMO BUTTON .
2. Record your memo message towards the Microphone (at a
distance between 5 to 8 centimetres). You have about 60
seconds to record.
3. After you finish, press once the PLAY/STOP BUTTON
.
Results :
• The Answer On/Off Indicator will flash.
• The Screen Display will show the total number of messages recorded.
MEMO
If you want to turn on your machine and record messages,
press once the ON/OFF BUTTON
. The Answer On/Off
Indicator will light up.
If you want to turn off your machine and do not wish to record
messages, press once the ON/OFF BUTTON
again. The
Answer On/Off Indicator will extinguish.
RECORDING THE INCOMING MESSAGES
Once your Elegance 55 is ON, it will pick up the incoming call
after 4 rings if there is no new message in the machine, or 2
rings if there are new messages.
2 WAYS TO LISTEN TO YOUR RECORDED
MEMO MESSAGES
OGM
MEMO
After installing the battery, plug in the telephone plug and power
adaptor as shown in the diagram below.
OGM
1.
2.
3.
4.
5.
6.
Volume Slider
Screen Display
Play/Stop button
Forward/OGM button
Answer On/Off Indicator
On/Off button
7. Clock button
8. Microphone
9. Rewind/Memo button
10. Erase button
11. Speaker
MEMO
1
WHAT YOU SEE ON THE SCREEN
DISPLAY AND ITS MEANING
3
Your Elegance 55 has a pre-recorded outgoing message: “Hello, we
cannot take your call at the moment. Please leave your message after
the tone.” You can listen to this pre-recorded outgoing message by
pressing once the OGM BUTTON . You can also listen to any recorded
outgoing message by pressing once the OGM BUTTON
.
“Lo” there is no battery,
not installed properly,
or battery low.
“ES” all messages are
erased.
“CL” the clock is not set or
it is not set properly.
“SA” all erased messages
are restored.
“Fu” the memory is full; should
erase some messages to
allow message recording.
“oo” there is/are new
memo(s).
OGM
OGM
until a long beep is
1. Press and hold the OGM BUTTON
heard, then release the OGM BUTTON
.
2. Record your own outgoing message towards the Microphone
(at a distance between 5 to 8 centimetres). You have about 60
seconds to record.
3. After you finish, press once the PLAY/STOP BUTTON
.
Result : Your own outgoing message will be played automatically. If you
want to stop it, just press once the PLAY/STOP BUTTON
.
OGM
INSTALLING BATTERY INTO YOUR ELEGANCE 55
Wall Mounting
74mm
Important:
•
It is strongly recommended that battery be installed. The battery
acts as back up to prevent any loss of recorded messages when the
main power supply fails.
If there is no battery installed, not installed properly, or battery low,
the Screen Display will show “Lo”.
Before opening the battery compartment, make sure that the telephone
plug and power adaptor are disconnected from Elegance 55.
2
55 eleg. (UK) P. 1 a – V3
Steps to erase your own outgoing message and restore
the pre-recorded one:
1. Press once the OGM BUTTON to play your own outgoing message.
2. While your outgoing message is playing, press once the ERASE
BUTTON
.
Result : The pre-recorded outgoing message will be played
automatically and your own is already erased from
6
memory.
OGM
Results:
• The Screen Display will show a count from 1 to 15.
• A short beep will be heard.
• The Answer On/Off Indicator will light up.
Elegance 55 is now ready to answer calls for you.
4
55 eleg. (UK) P. 1 b – V3
9
SELECTIVELY ERASING YOUR MEMO
MESSAGES
LISTENING TO YOUR MESSAGES
Notes :
• Adjust the Volume Slider to your desirable volume level.
• The Screen Display will show the message number that you are
listening to.
• If you have set your clock, the voice will announce the day and time
after each message received.
MEMO
or
MEMO
Steps to record your own outgoing message:
“Sc” to change the remote
control security code.
•
7
OGM
OGM
•
MEMO
5
RECORDING YOUR OWN OUTGOING MESSAGE
Table-top support
Adjust the Volume Slider to your desirable volume level.
• Press once the MEMO BUTTON
. After listening, the
Answer On/Off Indicator still will continue flashing.
• Press once the PLAY/STOP BUTTON
. After listening, the
Answer On/Off Indicator will stop flashing and light up steadily;
the Screen Display will show the total number of messages
recorded.
1. Press once either the MEMO
or PLAY/STOP BUTTON
to play your memo message.
2. While your memo message is playing, press once the ERASE
BUTTON
.
Result : The next memo message, if any, will be played automatically.
Repeat step 2 if you also want to erase the memo message.
ERASING ALL YOUR MEMO MESSAGES
Reminder :
• This will also erase all your recorded messages. If you want to
maintain some of your recorded messages, it is recommended that
you selectively erase your memo messages.
• For the instructions to erase all your recorded messages, see
ERASING ALL YOUR RECORDED MESSAGES in later
sections.
When listening to your new messages
Your Elegance 55 will inform you that you have new messages by a
flashing Answer On/Off Indicator. To listen to your new messages, press
. If you want to stop listening, just
once the PLAY/STOP BUTTON
press once again the same button.
Notes :
• If your memory have both old and new messages, pressing once the
PLAY/STOP BUTTON
will only play the new messages.
• After all new messages are played, the Answer On/Off Indicator will
stop flashing, and the Screen Display will show the total number of
recorded messages.
When listening to your old messages
•
If you want to listen again to old messages, just press once the
PLAY/STOP BUTTON
. To stop listening, press once the
same button again.
You can also press once either the FORWARD
or
REWIND BUTTON
if you want to skip or repeat the
message.
OGM
•
MEMO
8
10
55 eleg. (UK) P. 1 C – V3
WHAT HAPPEN WHEN MEMORY IS FULL?
•
•
The Screen Display will show “Fu”.
When your phone rings, Elegance 55 will answer “Memory
full, please call later.”
• The outgoing message will not play and the machine will not
record any messages.
Reminder : It is time for you to erase some of your recorded messages.
Follow the sections below.
CHANGING YOUR REMOTE CONTROL
SECURITY CODE
SAFETY INFORMATION
Your Elegance 55 comes with a factory default security code of
159, which can be changed to any 3-digit combination ranging
from 000 to 999. This security code is for your use to remotely
access and control your answering machine from another phone.
Note : You can stop changing the security code anytime by pressing
once the PLAY/STOP BUTTON
. It will restore to its previous
setting.
MEMO
:
OGM
or
MEMO
:
OGM
or
MEMO
:
OGM
or
11
ERASING ALL YOUR RECORDED MESSAGES
13
until a long beep is
1. Press and hold the ON/OFF BUTTON
heard. The Screen Display will show “Sc”.
2. Release the ON/OFF BUTTON
. The Screen Display will
show the previous security code in sequence, then will stop at
the first digit of the security code for you to change.
3. Press either the FORWARD
or REWIND BUTTON
to choose the first digit for your new security code. Press
once the ON/OFF BUTTON
to confirm your choice. The
Screen Display will automatically show the second digit of the
security code.
4. Press either the FORWARD
or REWIND BUTTON
to choose the second digit for your new security code. Press
once the ON/OFF BUTTON
to confirm your choice. The
Screen Display will automatically show the last digit of the
security code.
5. Press either the FORWARD
or REWIND BUTTON
to choose the last digit for your new security code. Press
once the ON/OFF BUTTON
to confirm your choice.
Note : If Elegance 55 has no battery installed or has battery low
status, occurrence of power failure will result to all the recorded
messages and your changed remote control security code to
be lost from memory. In this case, the factory default security
code of 159 will be restored automatically after resumption of
power supply.
Reminder : For the instructions to remotely access and control your
Elegance 55 from another phone, please refer to the
Remote Control Reference Card enclosed.
MEMO
OGM
Press and hold the ERASE BUTTON
until a long beep is heard,
then release the ERASE BUTTON
. The Screen Display will
show “ES”, followed by “0”, which means no messages.
MEMO
OGM
RESTORING ALL ERASED MESSAGES
Notes :
• This can only apply to all erased messages and not to selectively
erased messages.
• Erased messages can only be restored provided that no new message
is recorded immediately after the erase.
Press and hold the ERASE BUTTON
until a long beep is heard,
then release the ERASE BUTTON
. The Screen Display will
show “SA”, followed by the pre-erased total number of recorded
messages.
12
55 eleg. (UK) P. 2 a – V3
The only way to cut off the power supply to the telephone /
answering machine is to disconnect the power supply block from
the mains outlet. Be sure that the mains outlet is located near the
telephone device and is easily accessible.
The CE mark on the product certifies its compliance with all
applicable technical regulations, as of the date of authorization,
concerning user safety and electromagnetic interference according
to directives 73/23/EEC, 89/336/EEC and 93/68/EEC.
Always follow basic safety precautions when using this product to
reduce the risk of injury, fire, or electric shock.
SELECTIVELY ERASING YOUR RECORDED
MESSAGES
1. Press once the PLAY/STOP BUTTON
to play your
recorded messages.
2. While your message is playing, press once the ERASE
.
BUTTON
Result : The next message, if any, will be played automatically. Repeat
step 2 if you also want to erase the message.
CONNECTION INSTRUCTIONS:
MEMO
OGM
1. Read and understand all instructions in the user’s
manual. Observe all markings in the product.
2. During thunderstorms, avoid using telephones except
cordless models. There may be a slight chance of electric
shock from lightning.
3. Do not use a telephone in the vicinity of a gas leak. If
you suspect a gas leak, report it immediately, but use a
telephone away from the area where gas is leaking. If this
product is a cordless model, make sure the base is also away
from the area.
4. Do not use this product near water, or when you are
wet. For example, do not use it in a wet basement or shower,
or next to a swimming pool, bathtub, kitchen sink, or laundry
tub. Do not use liquids or aerosol sprays for cleaning. If the
product comes in contact with any liquids, unplug any
line or power cord immediately. Do not plug the product 15
back in until it has dried thoroughly.
5. Install this product in a protected location where no
one can trip over any line or power cord. Protect cords from
damage or abrasion.
6. If this product does not operate normally, read the
instruction in the user’s manual. Do not open this
product! Opening the product or reassembling it incorrectly
may expose you to hazardous voltages or other risks.
7. If this product has user replaceable batteries, replace
batteries only as described in your user’s manual. Do
not burn or puncture batteries – they contain caustic chemicals.
8. If this product has a three-prong (grounding) plug or a
polarized plug with one wide prong, it may not fit in nonpolarized outlets. Do not defect the purpose of these plugs. If
they do not fit in your outlet, the outlet should be replaced by
an electrician.
CAUTION: Use only the power adapter provided with this
product. To obtain a replacement, call Philips Consumer
Communications.
ELECTRICAL CONNECTION:
The answering machine, Philips Elegance 55 (TD9368), is designed
for connection to the analogue public switched telephone network
(PSTN) only.
CONNECTION CONFIGURATION:
The answering machine, Philips Elegance 55 (TD9368), can be
used as a single device and/or as part of a configuration with other
pre- or post- connected type-approved terminal equipment.
NEW INSTALLATION OR REPLACEMENT OF THE BATTERY:
CAUTION: Disconnect the telephone line plug from the
wall socket before opening the battery compartment
door. Unscrew the compartment door and connect a new 9 volts
battery to the polarized battery tap. Replace and fasten the battery
compartment door before reconnecting the telephone line plug.
Do not install or replace any telephone device during
thunderstorms!
RINGER EQUIVALENCE NUMBER (REN):
Your Elegance 55 (TD9368) has a Ringer Equivalence Number
(REN) of 1.0. To determine the maximum number of telephones
that can be connected to your line, add together the individual
RENs of the apparatus you wish to connect. If this total exceeds
four, one or all of your telephones may not ring correctly.
17
This product may be used legally in the country where the
appropriate authority has given its specific authorization. This
authorization appears on a label on the base station.
In the interest of improving our products and services, Philips
reserves the right to alter the specifications without prior notice.
55 eleg. (UK) P. 2 b – V3
Dear Customer,
Thank you for purchasing this Philips product which has been designed and manufactured to
the highest quality standards.
If, unfortunately, something should go wrong with this product Philips guarantees free of
charge labour and replacement parts irrespective of the country where it is repaired during a
period of 12 months from date of purchase. This international Philips guarantee complements
the existing national guarantee obligations to you of dealers and Philips in the country of
purchase and does not affect your statutory rights as a customer.
The Philips guarantee may not apply if :
• the documents have been altered in any way or made illegible ;
• the model or production number on the product has been altered, deleted, removed or
made illegible ;
• repairs or product modifications and alterations have been executed by unauthorised service
organisations or persons ;
• damage is caused by accidents including but not limited to lightning, water or fire, misuse
or neglect.
Please note that the product is not defective under this guarantee in the case where modifications
become necessary in order for the product to comply with local or national technical standards
which apply in countries for which the product was not originally designed and/or manufactured.
Therefore always check whether a product can be used in a specific country.
In the event you require service whilst in another country a dealer address can be given to
you by the Philips Consumer Help Desk in that country.
In order to avoid unnecessary inconvenience, we advise you to read the operating instructions
carefully before contacting your dealer.
In case your Philips product is not working correctly or is defective, please contact:
The voltages used on this network are classified as TRT-3
(telecommunications network voltage as defined in standard
EN 60-950).
16
Your international guarantee
The Philips guarantee applies provided the product is handled properly for its intended use, in
accordance with its operating instructions and upon presentation of the original invoice or
cash receipt, indicating the date of purchase, dealer’s name and model and production number
of the product.
Mains power supply 220-240 volts, single-phase AC, except
for installations with the IT diagram as defined in standard
EN 60-950. Important! The voltage of the network is
classified as hazardous according to the criteria of standard
EN 60-950.
TELEPHONE CONNECTION:
14
UK
18
PHILIPS CONSUMER COMUNICATIONS
PO BOX 1056
Kingston & Surbiton
Surrey
KT1 6YN
Phone : 0645 282828
55 eleg. (UK) P. 2 C – V3