1
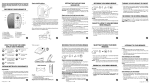
Thank you for purchasing a
Philips Icana 5250 cordless telephone
telescopic antenna
Your Icana 5250 cordless telephone incorporates advanced Philips cordless technology for even greater simplicity
and user-friendliness.
Your Icana 5250 is fitted with a multi-channel radio system, which allows you to avoid any interference during
calls using the D2NS system (Dual Dynamic Noise Suppressor) to elimimate hiss.
earpiece
When you make or you receive a call, your telephone searches for a free channel. This operation takes 5 sec "max".
This instruction manual will help you to discover your product’s features and get to know its wide range of functions.
Package contents
Your telephone’s indicator lights
•
•
•
•
•
THE BASE STATION HAS 1 GREEN INDICATOR LIGHT:
1 cordless handset equipped with a telescopic antenna and a battery.
1 base station.
1 power supply block which provides the base with electrical power.
1 telephone cable.
1 user’s manual.
•
•
•
THE HANDSET HAS 1 GREEN INDICATOR LIGHT:
Your telephone’s operating capacity
•
•
Your telephone works from a battery located inside the handset.
This product may be used legally in the country where the appropriate authority has given its specific
authorisation. This authorisation appears on a label at the back of the base station.
direct memory
key
manual channel skip key
In the interest of improving our products and services. Philips reserves the right to alter the specifications
contained in this document at any time without prior notice.
talk key
phonebook
key
phoneline indicator light
•
•
•
Battery charging starts as soon as you place the handset on its base. A completely discharged handset will take
about 24 hours to charge.
With a fully charged new battery, your handset will be able to operate for about 8 hours on-line and about 8 days
on stand-by (in other words when not communicating).
To recharge your telephone, the base must be connected to a power supply. Only use the mains adaptor supplied
with your phone.
SAFETY INFORMATION:
Helpful hint
The only way to cut off the power supply to the telephone is to disconnect the power supply block from the mains
outlet. Be sure that the mains outlet is located near the telephone and is easily accessible.
dialling
keypad
telephone cable
To ensure maximum handset charge, replace the handset on the base station regularly.
Important! This telephone must be used in conjunction with a remote-powered main telephone (not requiring electrical
current).
redial key
mains power supply cable
microphone
recall (for use with Network
services or attached to a PABX)
and programming key
on the product certifies its compliance with all applicable technical regulations, as of the date of
The mark
authorisation, concerning user safety and electromagnetic interference according to directives 73/23/EEC, 89/336/
EEC and 93/68/EEC.
THIS EQUIPMENT IS NOT DESIGNED FOR MAKING EMERGENCY
TELEPHONE CALLS WHEN THE POWER FAILS. ALTERNATIVE
ARRANGEMENTS SHOULD BE MADE FOR ACCESS TO EMERGENCY
SERVICES.
Note:
Mains power supply 230 volts, single-phase AC, except for installations with the IT diagram as defined in standard
EN 60-950. Important ! The voltage of the network is classified as hazardous according to the criteria of standard
EN 60-950.
TELEPHONE CONNECTION:
The voltages used on this network are classified as TNV-3 (telecommunications network voltages), defined in
standard EN 60-950.
Copyright © Philips 1998 - All rights reserved.
Setting up your Icana 5250
1
2
3
4
Mains power supply
Telephone line
Connect the power supply cable to the larger
of the sockets on the base station and then
to the power outlet.
The indicator light on the base station lights up. Your
telephone is now correctly connected.
Fraudulent use of your telephone line by another cordless phone is unlikely as the base station assigns the handset
one of a possible 65,535 identification codes.
In the event of a power failure
•
•
In the event of a power failure, your Icana 5250 cordless telephone will lose:
•
•
•
•
the Redial memory.
any unconfirmed number in course of memorisation.
But will save:
•
•
key.
Press the
Your handset emits 3 beeps to confirm. The telephone is now ready to dial in "pulse" mode.
telescopic
antenna
Do not get the handset wet.
Do not open the telephone, as this could expose you to high voltages. Contact the customer support service for
any repairs.
Avoid all contact between the battery and any conducting materials (keys, paper clips, rings, bracelets, etc.).
Avoid all contact between the charge terminals (base or handset) and any conducting materials (keys, paper
clips, rings, bracelets, etc).
Before cleaning your telephone, disconnect the power supply cable and the telephone cable. Use a cloth or
chamois leather moistened with a light soapy water solution, then wipe off with a dry cloth. This will ensure that
your telephone stays looking as good as new.
Never spray the phone with cleaning products or solvents.
We recommend periodical cleaning the charge terminals on the base and the handset with a dry, lint-free cloth.
4
Saving a number in the direct memory
1
key.
Talk key
Pick up the handset and fully extend the
antenna.
NOTE! The handset battery must be charged.
key on the handset.
Press the
The search for a free channel starts.
The base station and handset indicator lights flash.
With your Icana 5250, you can memorise a number that you regularly dial. This function allows you to dial it
automatically.
The direct memory function is only available if the base station is powered by the mains supply and if the handset
battery is charged.
To ensure correct operation, stay close to the base station during the programming phase.
on the handset.
1
Press the direct memory key
The phone indicator light flashes.
2
Dial the number to be memorised (maximum of 23 digits).
If this number contains an area or other code, insert a pause after the code by pressing
on the handset.
If you insert a wrong number, you will have to start the procedure again.
3
Dial the number you want.
4
key on the
To hang up, press the
handset, or just replace the handset on the
base station.
To set the dial mode from "pulse" to "tone":
1
Your telephone is now ready to make or receive calls in “Tone
dialling” mode.
To charge the battery completely, leave the
handset on its base station for 24 hours.
Take care not to install the base close to electrical appliances (heater, TV, domestic appliance, etc.) or
metal supports (doors/windows, partitions, etc.), which could impair the quality of communication and restrict
the range of your phone.
Do not install the base in a humid room or close to a strong source of heat.
3
As soon as the link is established, the handset indicator
light stops flashing and remains lit. The indicator light on
the base station continues flashing and you will hear the
dial tone.
Fully extend the base station antenna.
Place the handset on its base station and
leave it to charge for at least 15 minutes.
•
•
Pick up the handset and press ®.
The indicator light on handset starts flashing.
3
unique ringing tone, if a call is incoming.
short beep, when you press a key.
long beep, when the radio link between the base station and the handset has been lost.
beep, when replacing the handset on the base station.
beeps, to confirm any programming changes you have made to your telephone.
beeps, to tell you that your handset needs to be recharged on its base station.
MAINTENANCE
the numbers in your phonebook.
2
Press the
•
•
This code means that only your handset is authorised to use your line for making calls.
To set the dial mode from "tone" to "pulse":
2
a
1
1
1
3
5
INSTALLATION
Making a call
Your telephone has two possible dial modes: "tone" or "pulse". The factory setting for your telephone is "tone". If you
are not connected to an electronic central exchange, you need to use "pulse".
1
•
•
•
•
•
•
Protecting your telephone
2
Changing the dial mode
On the top side of the base station, connect
the telephone cable to the smaller of the
sockets and then to the telephone socket in
the wall.
Your telephone makes the following sounds:
Recommendations and precautions
Your Icana 5250 has a Ringer Equivalence Number (REN) of 1.0 To determine the maximum number of telephone
that can be connected to your line, add together the individual RENs of all the apparatus you wish to connect. If this
total exceeds 4, one or all of your telephones may not ring correctly.
1
The sounds your telephone makes
You can place your handset on the base station with the keypad face up or face down.
RINGER EQUIVALENCE NUMBER (REN):
phoneline / power indicator light
•
Lit when the handset is on-line.
Flashes in the following cases:
– when receiving a call.
– while establishing a radio link for an outgoing call.
– during a programming phase.
Unlit in all other cases.
SAFETY
ELECTRICAL CONNECTION:
base station antenna
Lit when the base station is powered up by the mains adaptor.
Flashes in the following cases:
– during a call (line busy).
Unlit when the base station is not powered up.
Pick up the handset and press ®.
The indicator light on handset starts flashing.
2
Press the
3
Press the
key.
Your handset emits 3 beeps to confirm. The telephone is now ready to dial in "tone" mode.
•
3
Press the
key.
This key now corresponds to the telephone number you just dialled.
The phone indicator light goes out and the handset emits the 3 confirmation beeps.
key.
If you do not hear the 3 confirmation beeps, the number you just dialled has not been
saved. Start the procedure again from step 1 .
Answering a call
When your telephone line is connected to an electronic exchange, the "tone" mode provides faster dialling and
access to special telephone network services.
1
To answer: pick up the handset, fully extend
the antenna, and press the
key.
Loop Disconnect Signalling:
Although this equipment can use either loop disconnect or DTMF signalling (Tone dialling), only the performance of
the DTMF signalling (Tone dialling) is subject to regulatory requirements for correct operation.
2
Calling the number associated with the
direct memory key
1
Extend the handset antenna, press the TALK key
dial tone.
2
Press the
key on the handset.
The telephone number is dialled automatically.
on the handset and wait for the
To hang up: press the
key again, or just
replace the handset on the base station.
It is therefore strongly recommended that this equipment is set to use DTMF signalling (Tone dialling) for access to
public or private emergency services. DTMF signalling (Tone dialling) also provides faster call set up.
Redialling the last number dialled (Redial)
5
6
1
Pick up the handset.
2
Press the
key on the handset.
Wait for the tone.
3
Press the
key on the handset.
The last number dialled (maximum of 23 digits)
is automatically redialled.
7
8
Saving a number in the phonebook
Changing the handset battery
Troubleshooting your Icana 5250
With your Icana 5250, you can enter 9 numbers in the phonebook memories. This function means that you can
automatically dial the numbers you use most often.
Contact your local Philips dealer to obtain a new battery.
The following table lists situations you may encounter when using your Philips Icana 5250 cordless telephone and
how they might be corrected.
To ensure correct operation, stay close to the base station during the programming phase.
1
2
1
Press the
key on the handset.
The indicator light flashes.
Dial the number to be memorised (maximum of 23 digits).
If this number contains an “area code”, insert a pause after this “area code” by pressing the
handset.
key on the
2
Carefully disconnect and remove the battery.
3
Insert the new battery: place the bottom of
the battery against the compartment catches,
then push the battery down into position.
Connect the battery.
If you insert a wrong number, you will have to start the procedure again.
4
3
Press the
4
Press a key between
and
.
This digit is now associated with the telephone number you have just dialled.
The indicator light is switched off and the handset emits 3 confirmation beeps.
key again.
5
If your handset does not emit the 3 confirmation beeps, the phone number you have just
stored has not been saved: start the procedure again from step 1 .
On the back of the handset, lift the battery
compartment cover using the opening at the
top of the cover.
Replace the battery compartment cover: hook
the cover into the slot of the handset, then
push down to close.
Replace the handset on the base station to
charge the new battery.
Maximum capacity will be reached in about 24 hours
charging.
Problem
Likely cause
The indicator light on the
base station does not
light up.
The base station is not connected
properly.
•
The charge indicator
sound on the handset is
not heard.
•
The charging contacts are not
touching.
•
Lift up the handset then put it
back on the base station.
•
There is dirt on the charging
contacts.
•
Clean the charging contacts with a
clean cloth or pencil eraser.
Press the
2
Press the
3
Press the desired digit (from
to
The phone number is automatically dialled.
When your battery is not charged enough to ensure correct operation, the handset emits 5 warning beeps. In this
case, place the handset on the base station to recharge the battery.
key on the handset.
) associated to the phone number you want to dial.
Your rechargeable batteries contains cadmium.
Check your local regulations for special disposal
instructions.
Changing radio channels during a call
Multichannel cordless telephone
The handset hasn’t been put
down properly .
Press the
key and replace
the handset on the base station.
There is no dialling tone.
•
The base station is not connected
properly to the telephone line.
•
Check the connections.
•
The handset battery is
discharged.
•
Place the handset on the base
station and wait for at least 15
minutes.
•
You are too far from the base
station.
•
Move closer to the base station.
Note:
key on the handset and wait for the dial tone.
USER MANUAL
Check the connections.
The line indicator light on
the handset remains lit
even when a call is not in
progress.
Calling a number in the phonebook
1
Solution
The handset remains at
least 15 minutes on base
station and there is no
dialling tone.
There is interference
during calls.
During a call, if the radio link is poor, you can change radio channels and possibly improve sound quality.
Worn out battery.
Contact your Philips dealer to get a
new battery.
•
You are too far from the base
station.
•
Move closer to the base station.
•
You are near other electric
devices.
•
Move the base station away
from electronic appliances and
key.
press the
•
The base station and handset
antennas are not extended
enough .
•
Fully extend the base station
and handset antennas.
•
The base station is near metal
surfaces of electrical apparatus.
•
Move the base station from
electronic appliances.
•
You have gone over the
operating range or the handset
battery is discharged.
•
Go near the base station or
check the telephone’s range or
charge the handset battery.
5250
To change radio channels during a call:
Press the
key on the handset.
– If a new channel is found, the call will continue on this channel.
The call was cut off
suddenly or there is
interference and hissing.
– If another channel is not found, the call will continue on the initial channel.
Notes:
•
•
If you are too far from the base station when the radio channel changes, the call will be cut off.
When the radio channel changes during a call, your correspondent will hear a short succession of beeps.
10
9
Glossary
11
Your Philips guarantee
D2NS
Your telephone is fitted with D2NS, which is derived from professional systems. It provides high quality listening by
eliminating the effects of hiss and interference that usually occur with cordless telephones.
Dear Customer,
Thank you for purchasing this Philips product which has been designed and manufactured to the highest quality
standards.
Multichannel
A system that chooses a free radio channel automatically to offer perfect sound quality by preventing any form of
interference with neighboring sets. Several cordless telephones may be in use in the same building. This often
creates communications problems as a result of radio link congestion. Your Philips telephone is fitted with a
multichannel system which automatically searches for a free channel, thereby avoiding any inconvenience. You can
key.
even change channels during your call using the
If unfortunately, something should go wrong with this product, Philips guarantees free of charge labour and replacement
parts irrespective of the country where it is repaired during a period of 12 months from date of purchase. This
international Philips guarantee complements the existing national guarantee obligations to you of dealers and Philips
in the country of purchase and does not affect your statutory rights as a consumer.
This Philips guarantee applies provided the product is handled properly for its intended use, in accordance with the
operating instructions and upon presentation of the original invoice or cash receipt indicating the date of purchase,
dealer's name and model and production number of the product.
Tone
The Philips guarantee may not apply if:
When your telephone line connected to an electronic exchange, the "tone" mode provides faster dialing and access
to network services.
• the documents have been altered in any way or made illegible;
• the model or production number on the product has been altered, deleted, removed or made illegible;
• repairs or product modifications and alterations have been executed by unauthorised service organisations or
persons;
• damage is caused by accidents including but not limited to lightning, water or fire, misuse or negligence.
Please note that the product is not defective under this guarantee in the case where modifications become necessary
in order for the product to comply with local or national technical standards which apply in countries for which the
product was not originally designed and/or manufactured. Therefore always check whether a product can be used
in a specific country.
Should you have any questions, please contact:
Philips Consumer Communications
P O Box 1056
Kingston & Surbiton
Surrey
KT1 6YN
Phone: 0870 900 9070
12
Type and serial number
13
14
4311 256 10392
UK