1
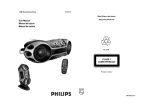
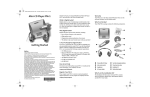
CD Soundmachine
AZ2538
User Manual
Manuel d'utilisation
Manual del usario
RTAN
PO
Return
your Warranty
Registration Card
within 10 days
1-800-531-0039
or visit us on the web at www.philips.com
EE
E
S
CALL US BEFORE YOU CONSIDER
RETURNING THE PRODUCT!
Meet Philips at the Internet
http://www.philips.com
IM
Philips representatives are ready to help you
with any questions about your new product.
Knoxville, Tennessee 37914-1810, U.S.A.
T!
Need help? Call us!
PHILIPS CONSUMER ELECTRONICS
NORTH AMERICA
WH
Y INS
ID
W
AZ 2538
CLASS 1
LASER PRODUCT
Return your Product Registration Card today
to get the very most from your purchase.
Registering your model with PHILIPS makes you eligible for all of the valuable benefits listed below, so
don't miss out. Complete and return your Product Registration Card at once to ensure:
*Proof of
Purchase
IMPORTANT SAFETY INSTRUCTIONS
1.
2.
3.
4.
5.
Read these instructions.
Heed all warnings.
Follow all instructions.
Do not use this apparatus near
water.
*Product Safety *Additional
Benefits of
Notification
Product
Ownership
6. Clean only with dry cloth.
7. Do not block any ventilation
Returning the enclosed card
By registering your product, you'll
Registering your product
8. Do not install near any heat sources
guarantees that your date of
receive notification - directly from
guarantees that you'll receive
purchase will be on file, so no
the manufacturer - in the rare
all of the privileges to which
additional paperwork will be
case of a product recall or safety
you're entitled, including special
required from you to obtain
defect.
money-saving offers.
warranty service.
Know these
safetysymbols
CAUTION
RISK OF ELECTRIC SHOCK
DO NOT OPEN
CAUTION: TO REDUCE THE RISK OF ELECTRIC SHOCK, DO NOT
REMOVE COVER (OR BACK). NO USER-SERVICEABLE PARTS
INSIDE. REFER SERVICING TO QUALIFIED SERVICE PERSONNEL.
This “bolt of lightning” indicates
uninsulated material within your
unit may cause an electrical
shock. For the safety of everyone in your
household, please do not remove
product covering.
The “exclamation point” calls
attention to features for which
you should read the enclosed
literature closely to prevent operating
and maintenance problems.
For Customer Use
Enter below the Serial No. which is
located on the rear of the cabinet.
Retain this information for future
reference.
openings. Install in accordance with
the manufacturer´s instructions.
Serial No. ______________________
WARNING: To reduce the risk of fire
or electric shock, this apparatus should
not be exposed to rain or moisture, and
objects filled with liquids, such as vases,
should not be placed on this apparatus.
CAUTION: To prevent electric shock,
match wide blade of plug to wide slot,
fully insert.
ATTENTION: Pour éviter les choc
électriques, introduire la lame la plus
large de la fiche dans la borne
correspondante de la prise et pousser
jusqu’au fond.
storms or when unused for long periods of
time.
14. Refer all servicing to qualified service
personnel. Servicing is required when the
apparatus has been damaged in any way,
such as power-supply cord or plug is
damaged, liquid has been spilled or objects
have fallen into the apparatus, the apparatus
has been exposed to rain or moisture, does
not operate normally, or has been dropped.
9. Do not defeat the
safety purpose of the
polarized or
AC Polarized
Plug
grounding-type plug.
A polarized plug has two blades with one
wider than the other. A grounding type plug
has two blades and a third grounding prong.
The wide blade or the third prong are
provided for your safety. If the provided plug
does not fit into your outlet, consult an
electrician for replacement of the obsolete
outlet.
walked on or pinched, particularly at plugs,
convenience receptacles, and the point
where they exit from the apparatus.
11.Only use attachments/accessories
specified by the manufacturer.
Use only with the cart, stand,
tripod, bracket, or table specified
by the manufacturer or sold with
the apparatus. When a cart is
used, use caution when moving
the cart/apparatus combination
to avoid injury from tip-over.
13. Unplug this apparatus during lightning
such as radiators, heat registers, stoves, or
other apparatus (including amplifiers) that
produce heat.
10. Protect the power cord from being
Model No. ______________________
12.
Keep these instructions.
15.Battery usage CAUTION – To
prevent battery leakage which may result in
bodily injury, property damage, or damage
to the unit:
●
Install all batteries correctly, + and - as
marked on the unit.
●
Do not mix batteries (old and new or
carbon and alkaline, etc.).
●
Remove batteries when the unit is not used
for a long time.
16.Apparatus shall not be exposed to
dripping or splashing.
17.Do not place any sources of danger
on the apparatus (e.g. liquid filled
objects, lighted candles).
18.This product may contain lead and mercury.
Disposal of these materials may be regulated
due to environmental considerations.
For disposal or recycling information,
please contact your local authorities
or the Electronic Industries Alliance :
www.eiae.org.
EL 6475-E005: 04/01
Class II equipment symbol
This symbol indicates that the unit has a double insulation system.
1
HEAVY !
Take
care!of your CD Soundmachine.
HEAVY
Grip both handles when you carry or
Take
lift
the care
set. of your CD
Soundmachine.Grip
both
LOURD !
handles
when
youSoundmachine
carry or CD.
Soin
de prise
de votre
lift the set.
Saisissez
les deux poignées quand vous
portez ou déplacez l'appareil.
7
6
5
2
7
3
8
4
9
5
0
8
4
3
9
0
2
1
!
1
@
3
Tun
e
r
US
B
4
2
3
5
4
5
MA
X
AL
BU
7
M/P
RE
SE
T
6
#
$
&
^
%
6
X
A
B
8 x D-cells - R20 - UM1
D
2 x AAA
C
1
USB
2
English
CONTROL
SUPPLIED ACCESSORIES
– remote control
– USB cable
– video cable
– CD-ROM (USB PC LINK installers)
– AC power cord
– Stand
TOP AND FRONT PANEL (See 1)
1 LCD Display – shows the status of the set
2 [dB]: – display to indicate bass power.
3 STANDBY ON y – switches the set on/ off.
4 VOLUME – adjusts volume level or equalizer level
5 Source selector – selects sound source
for functions: CD/ FM / AM / USB PC LINK /
GAME AUX.
0 IR SENSOR – infrared sensor for remote control
! GAMESOUND – select sound effects: BLAST/
PUNCH/ SPEED/ NORMAL in GAME AUX mode
EQUALIZER – selects bass, mid and treble
frequencies.
PROG
MP3-CD/audio-CD: – programs tracks and
reviews the programmed songs;
FM / AM : – programs preset radio stations.
MODE – selects different CD play modes: e.g.
REPEAT or SHUFFLE order.
MAX SOUND – activates or deactivate the
optimal mix of various sound features.
@ USB – connect the supplied USB cable here to the
USB port of your computer.
BACK PANEL (See 1)
6 p – 3.5 mm stereo headphone jack.
# Telescopic antenna – improves FM reception
Helpful Hints:
The speakers will be muted when headphones are
connected to the set.
$ Battery compartment – for 8 batteries, type
R-20, UM-1 or D-cells
7 OPEN•CLOSE – press to open/ close CD door
^ VIDEO OUT – connects to the VIDEO IN jack on
a TV or VCR for viewing or recording.
8 AUDIO ( IN Left / Right) – keeps audio plug in
place.
% AC MAINS – inlet for power cord
& HANDLE
VIDEO (IN) – keeps video plug in place
POWER SUPPLY
REMOTE CONTROL (See 1)
1 CD – selects CD sound source
TUNER – selects tuner source / wavebands
USB – selects USB PC LINK
AUX – selects GAME AUX
2 y – switches the set to standby / on if set
operating on AC power. (Switches set off only if
battery powered)
3 REPEAT – -repeat all tracks in USB PC LINK source
or selects repeat modes in CD source;
SHUFFLE – selects shuffle modes in CD/USB PC LINK
source;
MUTE – interrupts/ resumes sound.
4 VOL 4, 3 – adjusts volume or equalizer level.
5 ¡ , ™ – selects previous/ next tracks in a
MP3-CD/audio CD/USB PC LINK playlist;
9 – stops CD playback;
– erases a CD program.
2; – starts or pauses CD playback
5 / 6 – searches backwards/ forwards within a
MP3-CD/audio CD track.
– searches radio stations.
6 EQUALIZER – selects bass, mid and treble
frequencies
MAX – selects special bass enhancement on/ off
GAMESOUND – selects sound effects: BLAST/
PUNCH/ SPEED/ NORMAL in game mode
-,
-,
9 ALBUM/PRESET
+
MP3-CD only : – selects previous/next albums.;
FM/AM : selects previous/next preset stations.
SEARCH ∞ , §
MP3-CD/audio-CD: – skips and searches tracks
backward/forward.
USB PC LINK -skips to the beginning of a
previous/ later track.
FM/AM : - searches radio stations.
2; – starts or pauses CD playback
9 – stop CD playback;
– erases a CD program
CONTROL
Optional stand for vertical mounting (See D)
With the optional stand, you are allowed to mount the
set vertically. It helps you arrange your available
space more flexibly.
1. Put the stand on a horizontal, vibration-free and
stable surface.
2. Take the set by handle, with the AC MAINS at the
lower side.
3. Align the handle on the other side with the space
in the middle of the stand.
4. Mount the set upright and firmly onto the stand.
5. Fasten the bolt on the stand by pressing it and by
rotating it clockwise.
7 ALBUM/PRESET
+,
MP3-CD only : – selects previous/ next albums.
Tuner : – selects previous/next preset station.
POWER SUPPLY
Whenever convenient, use the power supply to
conserve battery life. Make sure you remove the
power cord from the set and wall jack before inserting
batteries.
BATTERIES
Using batteries (not included)
Main set (See A)
• Insert 8 batteries, type R-20, UM-1 or D-cells,
(preferably alkaline) with the correct polarity.
Remote control (See B)
• Insert 2 batteries, type AAA, R03 or UM4
(preferably alkaline).
Helpful Hints:
•Incorrect use of batteries can cause electrolyte
leakage and will corrode the compartment or
cause the batteries to burst.
• Do not mix battery types: e.g. alkaline with carbon
zinc. Only use batteries of the same type for the
set.
• When inserting new batteries, do not try to mix old
batteries with the new ones.
• Batteries contain chemical substances, so
they should be disposed of properly.
USING AC POWER
1. Check if the AC power supply, as shown on the
type plate located on the bottom of the set,
corresponds to your local power supply. If it does
not, consult your dealer or service center.
2. If your set is equipped with a voltage selector,
adjust the selector so that it matches with the
local power supply.
3. Connect the power cord to the wall jack and the
set is now ready for use.
Helpful Hints:
– To disconnect the power supply, unplug the set
from the wall jack.
– Disconnect the power supply to protect your set
during heavy thunderstorms.
POWER-SAVING AUTOMATIC STANDBY
As a power-saving feature, the system automatically
switches to standby 15 minutes after MP3-CD/CD has
reached the end and no control is operated.
The type plate is located on the bottom of
the set.
BASIC FUNCTIONS
SWITCHING ON AND OFF
1. Press STANDBY ON y on the set to switch on (or
press y on the remote control).
2. Press the Source selector once or more to select
your desired function: CD, FM, AM, USB PC
LINK, GAME AUX.
3. Press STANDBY ON y on the set to switch off.
(or press y on the remote control to switch the
set to standby mode)
Helpful Hints:
– The tone, sound settings, tuner presets and the
volume level (up to a maximum volume level of
VOL 20 ) will be retained in the set's memory.
ADJUSTING VOLUME AND SOUND (See 2)
• Adjust the volume with the VOLUME control.
= Display shows the volume level
and a
number from 0-32.
MAX SOUND
To enhance the bass response: press MAX SOUND
once or more to switch on / off.
= MAX SOUND-key backlight lights up when
MAX SOUND is turned on.
Helpful Hints:
– MAX SOUND can be used when you play FM, AM,
CD, USB PC LINK and GAME AUX source.
– Some discs might be recorded in high modulation,
which causes a distortion at high volume. If this
occurs, deactivate MAX SOUND or reduce the
volume.
DIGITAL TUNER
EQUALIZER
1. To adjust the bass, mid and treble frequencies
press EQUALIZER once or more;
2. Rotate VOLUME within 3 seconds to adjust each
level.
=Display briefly shows
, or
,
level (-5 to +5) or
.
Tuning to stations (See 3)
1. Press STANDBY ON y to on, then press Source
selector once or more to select FM/AM (or press
TUNER once or more on the remote control).
= Display: shows
briefly followed by
waveband, frequency, and preset station
number if already stored.
Helpful Hints:
– EQUALIZER can be used during FM, AM, CD,
USB PC LINK and GAME AUX source.
– To prevent sound interference the bass control
options operate exclusively. You cannot combine the
bass from EQUALIZER with MAX SOUND.
2. Tuning to stations: you can tune to your
stations manually or by automatic search tuning:
Press down on ∞ or § ( 5 or 6 on the remote
control) and release button when the frequency in
the display starts running.
= The radio automatically tunes to a station of
sufficient reception. Display shows
during automatic tuning.
GAMESOUND
To adjust the game sound, press GAMESOUND once
or more to select your option.
=Display briefly shows
,
,
or
.
Helpful Hints:
– GAMESOUND is only available when you play in
GAME AUX source.
How to MUTE the sound
1. Press MUTE on the remote control to interrupt
sound reproduction instantly.
= Playback continues without sound and the
display flashes
.
2. To reactivate sound reproduction you can:
– press MUTE again;
– adjust the volume controls;
– change to another source.
3. Repeat step 2 if necessary until you find the
desired station.
• To tune to a weak station, press ∞ or § briefly
and repeatedly until you have found optimal
reception.
Helpful Hints:
To improve radio reception:
– For FM, extend, incline and turn the telescopic
antenna. Reduce its length if the signal is too
strong.
– For AM, the set uses a built-in antenna. Direct this
antenna by turning the whole set.
Programming tuner stations:
You can store up to a total of 30 radio stations in the
memory, manually or automatically (Autostore).
Autostore
Automatic programming will start from preset 1 or a
chosen preset number. The set will only program stations which are not in the memory already.
1. Press ALBUM/PRESET /+ once or more to
select the preset number where programming
should start.
-
The set complies with the FCC-Rules, Part 15 and with 21 CFR 1040.10.
Operation is subject to the following two conditions:
1. This device may not cause harmful interference, and
2. This device must accept any interference received, including interference that may cause undesired operation.
Helpful Hints:
– If no tuner preset number is selected, default is
preset 1 and all your presets will be erased.
ABOUT MP3
2. Press PROG for 4 seconds or more to activate
auto store programming.
= Display:
is shown and available
stations are programmed in order of waveband
FM, followed by AM.
3. The first preset station will then be played after all
stations are stored automatically.
Manual programming
1. Tune to your desired station (see Tuning to
stations).
2. Press PROG to activate programming.
= Display: program flashes.
-
3. Press ALBUM/PRESET /+ once or more to
allocate a number from 1 to 30 to this stations.
4. Press PROG again to confirm.
= Display: shows the preset number, waveband
and the frequency of the preset station.
About MP3
The music compression technology MP3 (MPEG Audio
Layer 3) reduces the digital data of an audio CD
significantly while maintaining CD-like sound quality.
How to get music files
Either download legal music files from the internet to
your computer hard disc or create them from your own
audio CDs. For this, insert an audio CD into your
computer´s CD-ROM drive and convert the music
using an appropriate encoder software. To achieve a
good sound quality, a bit rate of 128 kbps or higher is
recommended for MP3 music files.
How to make a CD-ROM with MP3 files
Use your computer´s CD burner to record (“burn”) the
music files from your hard disc on a CD-ROM.
Helpful Hints:
– For details on using MP3 encoder and writing software, please refer to the operating instructions of
the software.
– Make sure that the file names of the MP3 files end
with .mp3.
– Total number of music files and albums: around 350
(with a typical file name length of 20 characters)
– The number of music files that can be played
depends on the length of the file names. With short
file names more files will be supported.
MP3-CD/CD PLAYER
MP3-CD/CD PLAYER
IMPORTANT !
This set does not play/support the following file
formats:
– Word documents .doc or MP3 files with extension
.dlf.
– Playlist files (e.g. .m3u, .pls of WMA, AAC,
Winamp, Sonic, RealJukebox, Ms Mediaplayer 7.0,
MusicMatch).
– Recordings created on PacketWriting and Package
Writing.
Playing a CD
This CD player plays Audio Discs including CD-R(W)s
and MP3 CD-ROMs. Do not try to play a CD-I, CDV,
VCD, DVD or computer CD.
1. Press STANDBY ON y once or more to on,
2. Select CD source.
3. Press OPEN•CLOSE to open the CD door.
=
is displayed when the CD door is
open.
4. Insert a CD with the printed side facing up and press
down on OPEN•CLOSE to close the CD door.
=Display shows
and later, the total
track/album number and total playback time.
5. Press 2; to start playback.
=Display shows : current track/album number and
elapsed playing time
Helpful Hints:
– Depending on the track type, CD or MP3 will
appear on the display during playback.
– Album number is only shown for MP3 files.
To pause playback
• Press 2;.
= the elapsed playing time flashes.
• Press 2; again to resume play.
To stop playback
• Press 9.
= Display shows :the total track/album number
and total playback time
Helpful Hints:
The MP3-CD/audio CD playback will also stop when:
– the CD door is opened
– the CD has reached the end
– you select an other sound source.
Selecting a different track
During playback
• Press SEARCH ∞ or § (¡ or ™ on the remote
control) once or repeatedly until the desired track
number appears in the display.
During stop or pause
• Press 2; to start playback after your desired
track is selected.
Helpful Hints:
– To find a MP3 track, you can first press
ALBUM/PRESET + to select the desired album.
-/
Searching for a passage within a track
1. During playback, press and hold SEARCH ∞ or
§.(5 or 6 on the remote control).
2. When you recognize the passage you want,
release ∞ or § (5 or 6 on the remote
control).
=Normal playback continues from this position.
Different playing modes: SHUFFLE and REPEAT
(See 4 - 7)
You can select and change the various play modes
before or during playback. The play modes can also be
combined with PROGRAM.
shuffle - tracks of the entire CD/ program are played
in random order
repeat all shuffle - repeats the entire CD/ program
continuously in random order
repeat all - repeats the entire CD/ program
repeat - plays the current track continuously
To select a playing mode
• Press MODE once or more.(SHUFFLE / REPEAT
on the remote control).
• Press 2; to start playback if in the stop position.
To return to normal playback
• press MODE repeatedly until the various modes
are no longer displayed.
Helpful Hints:
– When you press 9, the selected playing mode is
also cancelled.
Programming track numbers
You can store up to 20 tracks to play in a program. A
single track may be stored more than once in the program.
1. Press 9 to stop playback
2. Press SEARCH ∞ or § on the set to select your
desired track number (¡ , ™ on the remote control)
Helpful Hints:
– To find a MP3 track, you can press ALBUM/PRESET
+ to select the desired album.
3. Press PROG
GAMESOUND
Clearing a program
You can erase the contents of the memory by:
• Press 9 :
– Once, if in the stop position;
– Twice, during playback.
• Press STANDBY ON y;
• Select another sound source;
• open the CD door
=
displayed briefly, and program
disappears.
-/
=Display shows: program and the selected track
number.
and the number of tracks
stored appear briefly.
4. Repeat steps 2-3 to select and store all desired
tracks.
5. To start playback of your disc program, press 2; .
Helpful Hints:
– During normal playback, you can press PROG to
add a current track to your program list.
–
appears if you press PROG and
there is no track selected.
–
PLAYING WITH GAMESOUND (See 8):
1. Press Source selector once or more on the set to
select the GAME AUX function (AUX on the
remote control)
= Display scrolls :
2. Connect your console to the cinches on the top of
the set AUDIO ( IN Left / Right) and VIDEO (IN).
3. Press GAMESOUND once or more to select your
game sound option.
,
= Display briefly shows
,
or
.
appears if you try to store more than 20
tracks.
Reviewing the program
• In the stop position, press and hold down PROG
for a while until the display shows all your stored
track numbers in sequence.
Helpful Hints:
– Display shows : NO PROG if there is no track
programmed.
Connecting other equipment to your system
Use the supplied video cable to connect the VIDEO
OUT terminal on the back of the set to VIDEO IN on
a TV or VCR for viewing or recording.
USB PC LINK
USB PC LINK
Quick Setup Guide
PC system requirements
– USB port with Windows 98 SE / ME/ 2000/ XP
– Intel Pentium MMXX200 or higher
– CD-ROM drive
Installing MusicMatch software
USB PC LINK installer disc 7.1 (for Windows
98SE/ME/2000/XP) :
1. Use the supplied USB cable to connect the set to the
USB port on your computer. (See C)
2. Press Source selector (USB on the remote control)
once or more to select USB PC LINK.
3. Turn on your PC then insert the supplied USB PC LINK
installer disc in the PC's CD-ROM drive. This
application software can also be downloaded from
http://www.audio.philips.com.
IMPORTANT!
Please use this customized MusicMatch
software for your USB PC Link application.
Remember to un-install all other MusicMatch
jukebox software first from your PC system (if
available).
4. The installation guide will appear automatically. If it
does not, go to the CD-ROM drive in Windows
Explorer and double click on the USB PC LINK.exe.
Then perform the following steps:
– Select your desired language from the list.
– Select & install installer driver.
– Select & install installer MusicMatch jukebox.
For Windows 98 SE only
– While installing the installer driver, insert
Windows 98 SE setup disc as prompted by your PC.
– After the installer driver is successfully installed,
eject the Windows SE setup disc and restart your
computer as prompted.
– Insert the supplied USB PC LINK installer disc again.
– Proceed to the installation of installer
MusicMatch jukebox and others.
5. Launch MUSICMATCH JUKEBOX and create
your own playlist of favorite songs by dragging and
dropping the music track from anywhere on your PC
into the playlist window.
Helpful Hints:
-- If you encounter any problem using the USB PC LINK,
please refer to the FAQ (Frequently Asked Questions)
stored in your USB PC LINK installer disc or visit
www.audio.philips.com for the latest FAQ updates .
After setup, refer to "Connecting to USB PC Link"
for details on the USB PC LINK operations.
Enable digital CD audio output
Before playing CDs on your PC’s CD-ROM drive, it is
necessary to configure your PC’s hardware as follows
1. For Windows ME/2000/XP
Enter the system control panel menu and select :
‘Sounds and Multimedia’, ‘Hardware’ tab, CDROM drive, ‘Properties’ button, ‘Properties’ tab.
For Windows 98SE
Enter the system control menu and select :
‘Multimedia’, ‘CD Music’ tab.
2. Check the Enable digital CD audio for this CDROM device setting option is selected (enabled).
Connecting to USB PC Link (See 9)
The USB PC LINK allows you to playback your music collection from the PC via the powerful amplifier and speakers of this set.
IMPORTANT!
Make sure the MusicMatch software has been
installed.
USB PC LINK
MAINTENANCE & SAFETY
2. Press Source selector (USB on the remote control) once or more to select USB PC LINK .
MAINTENANCE & SAFETY (See 0)
CD player and disc handling
• If the CD player cannot read CDs correctly, use a
cleaning CD to clean the lens before taking the set
to repair.
• The lens of the CD player should never be touched!
• Sudden changes in the surrounding temperature
can cause condensation on the lens of your CD
player. Playing a CD is then not possible. Do not
attempt to clean the lens but leave the set in a
warm environment until the moisture evaporates.
• Always close the CD door to avoid dust on the lens.
• To clean the CD, wipe in a straight line from the
centre towards the edge using a soft, lint-free
cloth. Do not use cleaning agents as they may
damage the disc.
• Never write on a CD or attach any stickers to it.
Safety Information
• Don’t expose the set, batteries, or CDs to humidity,
rain, sand or excessive heat.
• To clean the set with a dry cloth. Don’t use any
cleaning agents containing alcohol, ammonia,
benzene or abrasives as these may harm the set.
• Place the set on a hard and flat surface so that the
system does not tilt. Make sure there is good
ventilation to prevent the set overheating.
• The mechanical parts of the set contain selflubricating bearings and must not be oiled or
lubricated.
• Apparatus shall not be exposed to dripping or
splashing.
• Do not place any sources of danger on the apparatus (e.g. liquid filled objects, lighted candles)
3. If correctly connected your PC will automatically
launch MUSICMATCH JUKEBOX.
] If the audio streaming is detected, the current
track name scrolls .
] If
scrolls for a while, check
the connection between your PC and set.
4. If necessary, press ∞ or § until the desired track
name scrolls (or press ¡ or ™ on the remote control to select/highlight your desired track in the
playlist window of PC).
] It takes a few seconds to skip to your desired
track.
] The track time appears and the track name
scrolls once.
] Playback starts from the current
track automatically. The elapsed playing time
appears and the track name scrolls once.
Helpful Hints:
– The display only supports English characters in
uppercase.
5. During playback,
– Press SHUFFLE on the remote control to play all
available tracks in the playlist in random order.
– Press REPEAT on the remote control to repeat
playback all the tracks in the playlist.
6. To cancel play modes/ stop playback, press 9 or
select another sound sources.
1. Turn on your set and computer .
] Check your PC volume is suitably adjusted and
not set to minimum / mute.
CAUTION
Use of controls or adjustments or performance of procedures other than herein
may result in hazardous radiation exposure or other unsafe operation.
Environmental information
We have done our best to reduce the packaging and make it easy to separate into 3 materials:cardboard,
expandable polystyrene, polyethylene.
Your set consists of materials which can be recycled if disassembled by a specialized company. Please
observe the local regulations regarding the disposal of packaging, exhausted batteries and old equipment.
TROUBLESHOOTING
If a fault occurs, first check the points listed below before taking the set for repair. If you are
unable to remedy a problem by following these hints, consult your dealer or service centre.
WARNING: Do not open the set as there is a risk of electric shock! Under no
circumstances should you try to repair the set yourself, as this will invalidate the
warranty.
No sound /power
–
•
–
•
–
•
–
•
–
•
Volume not adjusted
Adjust the VOLUME
Power Cord not securely connected
Connect the AC power cord properly
Batteries flat / incorrectly inserted
Insert (fresh) batteries correctly
Headphones connected to the set
Disconnect headphones
Electrostatic discharge/interference
Unplug the set. If batteries inserted, remove batteries
from the battery compartment. Press and hold
STANDBY ON y for 10 seconds, then re-plug /
replace battery supply, and try activating the set
again.
– CD contains non-audio files
• Press SEARCH ∞ or §. once or more to skip to
a CD audio track, instead of the data file
Poor sound quality in GAME AUX mode
• Adjust the volume on the set or on your game
console
Severe radio hum or noise
– Electrical interference: set too close to TV, VCR or
computer
• Move the set to increase the distance
Remote control does not function properly
–
•
–
•
Batteries flat/ incorrectly inserted
Insert (fresh) batteries correctly
Distance/ angle between the set too large
Reduce the distance/ angle
Poor radio reception
– Weak radio signal
• FM / AM: Adjust the FM / AM telescopic aerial
indication
– CD-R(W) is blank/ not finalized
• Use a finalized CD-R(W)
indication
–
•
–
•
–
•
No CD inserted
Inserted a suitable disc
CD badly scratched or dirty
Replace/ clean CD, see Maintenance
Laser lens steamed up
Wait until lens has cleared
The CD skips tracks
– CD damaged or dirty
• Replace or clean CD
– shuffle or program is active
• Switch off shuffle / program
Sound skips during MP3 playback
– MP3 file made at compression level exceeding
320kbps
• Use a lower compression level to record CD
tracks into MP3 format
– Disc damaged or dirty
• Replace or clean disc
Cannot find desired MP3 title
– Wrong file extension used and/ or file name
with unsuitable text characters used
• Make sure the file names are typed in English
text characters an that the MP3 files end with
.mp3
is displayed in USB PC LINK
mode for more than 10 sconds
– Check the connection between your PC and the set. If
necessary, please refer to the chapter Connecting to
USB PC Link for the initial setup required.
• Make sure the connected PC is turned on and the
MusicMatch software is working.
IMPORTANT :
Modifications not authorized by the manufacturer may void users authority to operate this device.
Note : This equipment has been tested and found to comply with the limits for a
Class B digital device, pursuant to part 15 of the FCC Rules. These limits are
designed to provide reasonable protection against harmful interference in a
residential installation. This equipment generates, uses, and can radiate radio
frequency energy and, if not installed and used in accordance with the instruction
manual, may cause harmful interference to radio communications. However, there is
no guarantee that interference will not occur in a particular installation. If this equipment does cause harmful interference to radio or television reception, which can be
determined by turning the equipment off and on, the user is encouraged to try to correct the interference by one or more of the following measures :
– Relocate the receiving antenna.
– Increase the separation between the equipment and receiver.
– Connect the equipment into an outlet on a circuit different from that to
which the receiver is connected.
– Consult the dealer or an experienced radio/TV technician for help.
Canada
English
This digital apparatus does not exceed the
Class B limits for radio noise emissions from
digital apparatus as set out in the Radio
Interference Regulations of the Canadian
Department of Communications.
Français
Cet appareil numérique n'émet pas de bruits
radioélectriques dépassant les limites
applicables aux appareils numériques de
Classe B prescrites dans le Règlement sur le
Brouillage Radioélectrique édicté par le Ministère des Communications du Canada.
Philips
AZ2538