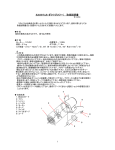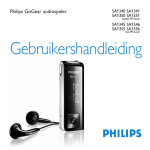
1
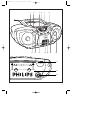
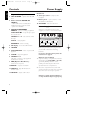
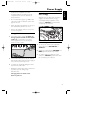
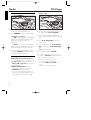
AZ1080/00A
03/13/02 10:06
CD Soundmachine
1080
AZ 1081
AZ
Page 1
Audio
AZ1080/00A
03/13/02 10:06
Page 2
Important notes for users in the U.K.
English
Mains plug
This apparatus is fitted with an approved
moulded 13 Amp plug.To change a fuse in this
type of plug proceed as follows:
1
Remove fuse cover and fuse.
2
Fix new fuse which should be a BS1362 5 Amp,
A.S.T.A. or BSI approved type.
3
Refit the fuse cover.
If the fitted plug is not suitable for your socket
outlets, it should be cut off and an appropriate
plug fitted in its place. If the mains plug contains
a fuse, this should have a value of 5 Amp. If a
plug without a fuse is used, the fuse at the
distribution board should not be greater than 5
Amp.
Note:The severed plug must be disposed to avoid
a possible shock hazard should it be inserted into
a 13 Amp socket elsewhere.
How to connect a plug
The wires in the mains lead are coloured with
the following code: blue = neutral (N), brown =
live (L).
•
As these colours may not correspond with the
colour markings identifying the terminals in your
plug, proceed as follows:
• Connect the blue wire to the terminal
marked N or coloured black.
• Connect the brown wire to the terminal
marked L or coloured red.
• Do not connect either wire to the earth
terminal in the plug, marked E (or e) or
coloured green (or green and yellow).
Before replacing the plug cover, make certain
that the cord grip is clamped over the sheath of
the lead - not simply over the two wires.
Copyright in the U.K.
Recording and playback of material may require
consent. See Copyright Act 1956 and The
Performer’s Protection Acts 1958 to 1972.
2
Norge
Typeskilt finnes på apparatens underside.
Observer: Nettbryteren er sekundert
innkoplet. Den innebygde netdelen er
derfor ikke frakoplet nettet så lenge
apparatet er tilsluttet nettkontakten.
For å redusere faren for brann eller elektrisk
støt; skal apparatet ikke utsettes for regn eller
fuktighet.
Italia
DICHIARAZIONE DI CONFORMITA’
Si dichiara che l’apparecchio AZ 1080, AZ 1081
Philips risponde alle prescrizioni dell’art. 2
comma 1 del D. M. 28 Agosto 1995 n. 548.
Fatto a Eindhoven
Philips Consumer Electronics
Philips, Glaslaan 2,
5616 JB Eindhoven,The Netherlands
Page 3
1
2
3 4 1
5
AZU1N0DM8A0CHINE
IBLE
LE CO M PAT
TO
WRITAB
OPE N
C D SO
CD RE
LI F T
TUNING
T O O PE N
CD
MW
FM
TAP F
OF
E
PA U S
STOP
SEARC
N
• OPE
H
SEAR
CH
P L AY
VOL
UM
E
REPEAT
CK
CD TRA
ST
O
P
SHUFFLE
RE
L IF T
R
SEA CH
AT
PE
T
S BOOS
IC BAS
AM
DY
03/13/02 10:06
Y/ PAUSE
P LA
AZ1080/00A
N
DBB
X
E
REFL
BASS YSTEM
RS
SPEAKE
6 7
8
9 0 !
@
#
$
A C M AI N S ~
%
3
AZ1080/00A
03/13/02 10:06
Page 4
Caution
English
CAUTION: Use of controls or adjustments or performance of procedures other than
herein may result in hazardous radiation exposure or other unsafe operation.
This product complies with the radio interference requirements of the European Union.
ATTENTION: L’utilisation des commandes ou réglages ou le non-respect des procédures
ci-incluses peuvent se traduire par une exposition dangereuse à l’irradiation.
Ce matériel satisfait aux impératifs de brouillage radio de la Communauté Européenne.
ATENCIÓN: El uso de mandos o ajustes o la ejecucción de métodos que no sean los
aquí descritos puede ocasionar peligro de exposición a radiación.
Este aparato satisface las normas relativas a la interferencia radioeléctrica de la
Comunidad Europea.
ACHTUNG: Der Gebrauch von Bedienelemente oder Einstellungen bzw.
Verfahrensausführungen die hier nicht ausdrücklich erwähnt worden sind, kann eine
gefährliche Strahlendosierung oder andere unsichere Operationen zur Folge haben.
Dieses Produkt entspricht den Funkentstörvorschriften der Europäischen Union.
LET OP: Het gebruik van de toetsen en regelingen of het toepassen van de
aanwijzingen anders dan hier beschreven, kan leiden tot blootstelling aan gevaarlijke
straling of tot onveilige werking.
Dit apparaat voldoet aan de radio-ontstoringseisen van de Europese Unie.
ATTENZIONE: L'uso dei comandi o regolazioni o prestazioni delle procedure oltre a
quelle descritte nel presente potrebbero causare esposizione a radiazioni pericolose
o altre operazioni rischiose.
Questo prodotto è conforme ai requisiti delle interferenze radio della Unione Europea.
AVISO:A utilização de comandos ou ajustes ou a execução de procedimentos de
forma diferente daquela aqui indicada poderá resultar numa exposição perigosa a
radiações ou noutra operação arriscada.
Este produto obedece aos requisitos referentes a interferência de rádio estabelecidos
pela União Europeia.
ADVARSEL:Anvendelse af andre betjeningsanordninger eller justeringer eller
udførelse af andre procedurer end de heri angivne, kan medføre udsættelse for farlig
stråling eller andre risici.
Dette apparat overholder EU's krav vedrørende radiostøj.
VARNING: Om du använder knapparna på annat än här angivet sätt eller utför
andra justeringar eller förfaranden än de här angivna kan du utsättas för skadlig
strålning eller andra risker.
Denna apparat uppfyller EU:s krav beträffande radiostörningar.
MUISTUTUS: Muiden kuin tässä kuvattujen säätimien tai säätöjen tai
toimenpiteiden käyttö voi aiheuttaa vaarallisen altistuksen säteilylle tai muun
turvallisuutta vaarantavan seurauksen.
Tämä tuote on Euroopan unionin radiohäiriöitä koskevien vaatimusten mukainen.
OO: O
, ! " #
, $ !
$ "" $ "
% #.
T
( ! ! ! )(! )! ! ! !
"
$!.
4
AZ1080/00A
03/13/02 10:06
Page 5
Français
Français_______________14
Suomi ________________78
Español
Español _______________22
_____________86
Deutsch
Deutsch_______________30
Nederlands
Nederlands____________38
Italiano
Italiano _______________46
Português
Português _____________54
Dansk
Dansk ________________62
Suomi
Svenska _______________70
English
English _________________6
Svenska
Index
5
AZ1080/00B
03/13/02 10:09
Page 95
English
Svenska
Meet Philips at the Internet
http://www.philips.com
Español
Suomi
Français
Deutsch
Nederlands
Italiano
AZ 1080
AZ 1081
Português
CLASS 1
LASER PRODUCT
3140 115 2936.1
Dansk
Printed in China
AZ1080/00A
03/13/02 10:06
Page 6
Controls
English
Top and front panels
1 LIFT TO OPEN – opens/ closes the CD
door
2 Source selector: CD, MW, FM,
TAPE/OFF
– selects CD source of sound, tuner
waveband or tape source of sound
– power on/ off switch
3 CASSETTE RECORDER:
PAUSE ; – pauses recording or playback
Power Supply
Back Panel
13 Telescopic aerial – to improve FM
reception
14 Battery door – open to insert 6 x 1.5V
R14/UM2/ C-cell batteries
15 AC MAINS – inlet for mains lead
Power Supply
Whenever convenient, use the power
supply if you want to conserve battery life.
STOP•OPEN 9/ – stops the tape; opens
the cassette door
A C M AI N S ~
SEARCH 5 or 6 – fast rewinds / winds
the tape
PLAY 1 – starts playback
6 x 1.5V R14/ UM2/ C CELL
RECORD 0 – starts recording
4 CD display – shows the CD functions
5 TUNING
6 PLAY•PAUSE 2; – starts or pauses CD
playback
7 STOP 9 – stops CD playback
8 SEARCH ∞ , §
CD: skips or searches a passage/track
backwards or forward
9 DBB (Dynamic Bass Boost) –
enhances bass response
10 REPEAT – repeats a track/CD
11 SHUFFLE – plays all CD tracks in
random order
Make sure you remove the plug from the
set and wall socket before inserting
batteries.
For users in the U.K.: please follow the
instructions on page 2.
Batteries (not included)
1 Open the battery compartment and insert
six batteries, type R-14, UM-2 or C-cells,
(preferably alkaline) with the correct
polarity as indicated by the "+" and "–"
symbols inside the compartment.
2 Close the compartment door, and make
sure the batteries are firmly and correctly in
place.The set is now ready to operate.
12 VOLUME – adjusts volume level
Batteries contain chemical substances,
so they should be disposed of properly.
6
AZ1080/00A
03/13/02 10:06
Page 7
Incorrect use of batteries can cause
electrolyte leakage and will corrode the
compartment or cause the batteries to
burst.Therefore:
Switching power on/off:
Save energy
Whether you are using mains or battery
supply, to avoid unnecessary energy
consumption always adjust the source
selector to TAPE/OFF and check if the
cassette keys are released.
• When inserting new batteries, do not try to
mix old batteries with the new ones.
AZU1N0DM8A0CHINE
C D SO
CD RE
WRITAB
IBLE
LE CO MPAT
TO
• Remove the batteries if the set is not to be
used for a long time.
OPE N
• Do not mix battery types: e.g. alkaline with
carbon zinc. Only use batteries of the same
type for the set.
LI F T
TUNING
L IF T
T O O PE N
CD
MW
FM
TAP F
OF
E
PA U S
STOP
N
• OPE
SEARC
H
SEAR
VOL
UM
E
SHUFFLE
RE
Y/ PAUSE
P LA
ST
O
P
Using AC Mains
R
SEA CH
AT
PE
DY
S BOOS
IC BAS
AM
N
T
1 Check if the mains voltage, as shown on
the type plate located on the bottom
of the set, corresponds to your local
mains supply. If it does not, consult your
dealer or service centre.
P L AY
CH
REPEAT
CK
CD TRA
A
English
Power Supply
DBB
General operation
~
1 To select your sound source adjust the
source selector to CD, MW, FM or
TAPE/OFF.
2 Adjust the sound with the VOLUME and
DBB (Dynamic Bass Boost) controls.
3 To switch off the set, adjust the source
selector to TAPE/OFF position and check
the cassette keys are released.
2 Connect the mains lead to the AC MAINS
inlet and the wall socket.The mains supply is
now connected and ready for use.
3 To switch off completely, unplug the mains
lead from the wall socket.
• Unplug the mains lead from the wall socket
to protect your set during heavy
thunderstorms.
The type plate is located on the
bottom of the set.
7
AZ1080/00A
03/13/02 10:06
Page 8
Radio
CD-Player
English
Radio reception
Playing a CD
AZU1N0DM8A0CHINE
CD RE
IBLE
LE CO MPAT
TO
WRITAB
LI F T
OPE N
TUNING
TO
CD R
AT IB L E
BLE COMP
EWRITA
OPE N
C D SO
AZU1N0DM8A0CHINE
C D SO
LI F T
TUNING
L IF T
L IF T
T O O PE N
CD
MW
FM
TAP F
OF
E
PA U S
STOP
N
• OPE
SEARC
H
SEAR
CH
T O O PE N
CD
MW
FM
TAP F
OF
P L AY
E
PA U S
STOP
•
OPEN
SEARC
H
SEAR
VOL
UM
E
VOL
UM
E
REPEAT
RE
DY
SHUFFLE
R
SEA CH
N
AT
PE
S BOOS
IC BAS
AM
N
DBB
T
S BOOS
IC BAS
AM
T
R
SEA CH
ST
O
RE
P
SHUFFLE
AT
PE
DY
REPEAT
CK
CD TRA
ST
O
P
Y/ PAUSE
P LA
CK
CD TRA
Y/ PAUSE
P LA
P L AY
CH
DBB
1 Adjust the source selector to MW or FM
to select your desired waveband.
2 Turn TUNING to tune to a radio station.
To improve reception
– For FM, pull out the telescopic aerial. Incline
and turn the aerial. Reduce its length if the
signal is too strong (very close to a
transmitter).
– For MW the set is provided with a built-in
aerial so the telescopic aerial is not needed.
Direct the aerial by turning the whole set.
3 To switch off the radio, adjust the source
selector to TAPE/OFF position and check
the cassette keys are released.
CD Player
Display indication for CD functions:
– --: flashes when CD source just selected
– In stop mode: total track number
– During CD playback: 2 and current
track number
REPEAT/ REPEAT ALL: when the
respective repeat mode is activated
– SHUFFLE when shuffle active
– Er: no disc/ error in CD operation or
with the CD/ CD-(R) is blank or the disc
is not finalised (see Troubleshooting)
8
1 Adjust the source selector to CD.
2 To open the CD door, lift the CD door at
the edge marked LIFT TO OPEN.
3 Insert a CD or CD-(R) with the printed
side facing up and press the CD door gently
close.
4 Press PLAY•PAUSE 2; on the set to
start playback.
5 To pause playback press PLAY•PAUSE
2;.To resume, press PLAY•PAUSE 2;
again.
➜ 2 flashes during pause
6 To stop CD play, press STOP 9.
7 To switch off the set, adjust the source
selector to TAPE/OFF position and check
the cassette keys are released.
Note: CD play will also stop when:
– you open the CD compartment;
– you select MW, FM or TAPE sound
source;
– the CD has reached to the end.
AZ1080/00A
03/13/02 10:06
Page 9
Selecting a different track
During playback you can use the
SEARCH buttons to select a particular
track.
AZU1N0DM8A0CHINE
C D SO
OPE N
LI F T
TUNING
T O O PE N
CD
MW
FM
TAP F
OF
E
PA U S
N
• OPE
STOP
SEARC
H
SEAR
CH
VOL
UM
E
REPEAT
CK
CD TRA
AZUNDMACHINE
C D SO
CD RE
ST
O
P
WRITAB
IBLE
LE CO MPAT
LI F T
SHUFFLE
RE
Y/ PAUSE
P LA
P L AY
REPEAT – plays the current track
continuously
REPEAT ALL – plays the entire CD
continuously
OPE N
L IFT
Play modes
REPEAT can be selected or changed
during playback in the following sequence:
TO
W
TO
CD RE
CO M PATIB LE
RITABLE
R
SEA CH
T
DY
TUNING
AT
PE
S BOOS
IC BAS
AM
N
English
CD-Player
DBB
L IF T
T O O PE N
CD
MW
FM
TAP F
OF
E
PA U S
STOP
N
• OPE
SEARC
H
SEAR
VOL
UM
E
REPEAT
ST
O
P
SHUFFLE
RE
Y/ PAUSE
P LA
CK
CD TRA
R
SEA CH
AT
PE
DY
S BOOS
IC BAS
AM
N
T
• If you have selected a track number in the
stop or pause position, press
PLAY•PAUSE 2; to start playback.
P L AY
CH
DBB
• Press SEARCH § once briefly for the
next track, or press repeatedly until the
desired track number appears in the display.
1 During playback, press REPEAT once or
more until the desired REPEAT mode is
shown.
• Press SEARCH ∞ once briefly to return
to the beginning of a current track.
• You can use SEARCH ∞ or § to skip
tracks during the repeat modes.
• Press SEARCH ∞ more than once briefly
for a previous track.
• The REPEAT play options can be
combined and used with shuffle: e.g.
REPEAT ALL SHUFFLE– repeats the
entire CD in random order.
Finding a passage within a track
1 During playback, press and hold down
SEARCH ∞ or §.
• The CD is played at high speed and low
volume.
2 When you recognize the passage you want
release the SEARCH button.
➜ Normal playback resumes.
Note:When searching within a final track and
you reach the end of the last track, the CD
goes to stop mode.
2 To return to normal playback press
REPEAT until the REPEAT modes are no
longer shown.
• You can also press STOP 9 to quit the
play mode.
3 During playback, press SHUFFLE once.
• All tracks are played in random order.
9
AZ1080/00A
03/13/02 10:06
Page 10
Cassette Recorder
English
CASSETTE RECORDER
General information on
recording
Cassette playback
• Recording is permissible insofar as copyright
or other rights of third parties are not
infringed.
AZU1N0DM8A0CHINE
IBLE
LE CO MPAT
TO
WRITAB
OPE N
C D SO
CD RE
LI F T
TUNING
CD
MW
FM
TAP F
OF
E
PA U S
STOP
N
• OPE
SEARC
H
SEAR
VOL
UM
E
REPEAT
CK
CD TRA
ST
O
P
SHUFFLE
RE
Y/ PAUSE
P LA
P L AY
CH
R
SEA CH
AT
PE
T
DY
S BOOS
IC BAS
AM
N
DBB
1 Adjust the source selector to TAPE/OFF.
2 Press STOP•OPEN 9/ to open the
cassette door and insert a recorded
cassette.
3 Close the cassette door.
4 Press PLAY 1 to start playback.
5 To pause playback press PAUSE ;.To
resume, press the key again.
6 By pressing SEARCH 5 or 6, fast
winding of the tape is possible in both
directions.To stop fast winding, press
STOP•OPEN 9/.
7 To stop the tape, press STOP•OPEN 9/.
• The keys are automatically released at the
end of the tape, and the set is switched off,
except if PAUSE ; has been activated.
• This deck is not suited for recording on
CHROME (IEC II) or METAL (IEC IV) type
cassettes. For recording, use only NORMAL
type cassettes (IEC type I) on which the
tabs have not been broken.
• The best recording level is set automatically.
Altering the VOLUME and DBB controls
will not affect the recording in progress.
• At the very beginning and end of the tape,
no recording will take place during the
7 seconds when the leader tape passes the
recorder heads.
• To protect a tape from accidental erasure,
have the tape in front of you and break out
the left tab. Recording on this side is no
longer possible.To record over this side
again, cover the tabs with a piece of
adhesive tape.
Synchro Start CD recording
AZU1N0DM8A0CHINE
C D SO
CD RE
WRITAB
IBLE
LE CO MPAT
OPE N
T O O PE N
TO
L IF T
LI F T
TUNING
L IF T
T O O PE N
CD
MW
FM
TAP F
OF
E
PA U S
STOP
N
• OPE
H
SEARC
SEAR
VOL
UM
E
REPEAT
CK
CD TRA
ST
O
P
SHUFFLE
RE
Y/ PAUSE
P LA
P L AY
CH
R
SEA CH
AT
PE
T
DY
S BOOS
IC BAS
AM
N
DBB
1 Select CD source.
2 Insert a CD.
3 Press STOP•OPEN 9/ to open the
cassette door. Insert a blank tape.
10
AZ1080/00A
03/13/02 10:06
Page 11
4 Close the cassette door.
5 Press RECORD 0 to start recording.
• Playing of the CD starts automatically. It is
not necessary to start the CD player
separately.
Recording from the Radio
1 Adjust the source selector to MW or FM to
select your desired waveband.
2 Tune to the desired radio station (see
Radio reception).
6 For brief interruptions press PAUSE ;.To
resume recording, press PAUSE ; again.
3 Press STOP•OPEN 9/ to open the
cassette door. Insert a blank tape.
7 To stop recording, press STOP•OPEN 9/.
➜ The CD player goes to pause mode.
Press PLAY•PAUSE 2; to resume CD
playback, or press STOP 9 to stop CD
play.
4 Close the cassette door.
Selecting and recording a particular
passage
• During CD playback, press and hold down
the SEARCH buttons ∞ or § on the set
to find your passage.
7 To stop recording,
press STOP•OPEN 9/ .
• Press PLAY•PAUSE 2; to put the CD
player on pause at the selected passage.
➜ Recording will begin from this exact
point in the track when you press
RECORD 0.
Note: If you press RECORD 0 during
playback, recording starts automatically from
the beginning of the current track.
5 Press RECORD 0 to start recording.
6 For brief interruptions, press PAUSE ;.To
resume recording, press PAUSE ; again.
Environmental information
All unnecessary packaging material has
been omitted.The packaging can be
easily separated into three materials:
cardboard, polystyrene and plastic.
Your set consists of materials which can
be recycled if disassembled by a
specialized company. Please observe the
local regulations regarding the disposal
of packing materials, exhausted
batteries and old equipment.
11
English
Recording
AZ1080/00A
03/13/02 10:06
Page 12
Maintenance
English
Precautions &
General Maintenance
• Place the set on a hard and flat surface so
that the system does not tilt.
• Do not expose the set, batteries, CDs or
cassettes to humidity, rain, sand or excessive
heat caused by heating equipment or direct
sunlight.
• Do not cover the set. Adequate ventilation
with a minimum gap of 6 inches between
the ventilation holes and surrounding
surfaces is necessary to prevent heat buildup.
• The mechanical parts of the set contain
self-lubricating bearings and must not be
oiled or lubricated.
• To clean the set, use a soft, slightly
dampened chamois leather. Do not use any
cleaning agents containing alcohol,
ammonia, benzene or abrasives as these
may harm the housing.
Tape deck maintenance
To ensure quality recording and playback of
the tape deck, clean parts A, B and C
shown in the diagram below, after approx.
50 hours of operation, or on average once
a month. Use a cotton bud slightly
moistened with alcohol or a special head
cleaning fluid to clean the deck.
C
B
A
2 Press PLAY 1 and clean the rubber
pressure roller C.
3 Press PAUSE ; and clean the magnetic
heads A, and also the capstan B .
4 After cleaning, press STOP•OPEN 9/.
– Cleaning of the heads can also be done by
playing a cleaning cassette through once.
CD player and CD handling
• The lens of the CD player should never be
touched!
• Sudden changes in the surrounding
temperature can cause condensation to
form and the lens of your CD player to
cloud over. Playing a CD is then not
possible. Do not attempt to clean the lens
but leave the set in a warm environment
until the moisture evaporates.
• Use only Digital Audio CDs.
• Always close the CD door to keep the CD
compartment dust-free.To clean, dust the
compartment with a soft dry cloth.
• To take a CD out of its box, press the
centre spindle while lifting the CD. Always
pick up the CD by the edge and replace
the CD back in its box after use to avoid
scratching and dust.
• To clean the CD, wipe in a straight line from
the centre towards the edge using a soft,
lint-free cloth. Do not use cleaning agents as
they may damage the disc.
• Never write on a CD or attach any stickers
to it.
1 Open the cassette door by pressing
STOP•OPEN 9/.
12
AZ1080/00A
03/13/02 10:06
Page 13
If a fault occurs, first check the points listed below before taking the set for repair. Do
not open the set as there is a risk of electric shock.
If you are unable to remedy a problem by following these hints, consult your dealer or
service centre.
WARNING: Under no circumstances should you try to repair the set yourself, as this
will invalidate the guarantee.
Problem
Solution
No sound
– Adjust the VOLUME
No power
– Mains lead not securely connected.
Connect AC mains lead properly
– Batteries exhausted /incorrectly inserted.
Insert (fresh) batteries correctly
Display does not function
properly/ No reaction to
operation of any of the
controls
– Electrostatic discharge
Switch off and unplug the set. Reconnect after a few
seconds.
Er indication
– No CD inserted, insert a CD
– CD badly scratched/ dirty.
Replace/ clean CD (see maintenance)
– CD-R(W) is blank or the disc is not finalized.
Use a finalized CD-R(W)
– Laser lens steamed up.
Wait until lens has cleared/acclimatized
CD playback does not work
– CD badly scratched/ dirty.
Replace/ clean CD (see maintenance)
The CD skips tracks
– CD damaged or dirty. Replace or clean CD.
– Shuffle is active. Quit shuffle mode
Poor cassette sound quality
– Dust and dirt on the heads, etc.
Clean deck parts, see maintenance.
– Use of incompatible cassette types (METAL or
CHROME). Only use NORMAL (IEC I) for recording
Recording does not work
– Cassette tab(s) may be broken. Apply a piece of
adhesive tape over the missing tab space.
13
English
Troubleshooting