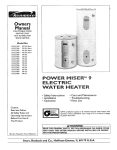
1
MZ-6(E)00/cover1-4
11/8/02 11:27 AM
Page 1
OPERATING MANUAL
PENTAX Corporation 2-36-9, Maeno-cho, Itabashi-ku, Tokyo 174-8639, JAPAN
(http://www.pentax.co.jp)
PENTAX EUROPE GmbH (European Headquarters) Julius-Vosseler-Strasse, 104, 22527
Hamburg, GERMANY
This operating manual is printed on recycled paper.
The CE marking assures that
this product complies with
the requirements of the EC
directive for safety.
Copyright © PENTAX Corporation 2002
57209
03-200210 Printed in Japan
OPERATING MANUAL
(HQ - http://www.pentaxeurope.com Germany - http://www.pentax.de)
Pentax House, Heron drive, Langley, Slough, Berks SL3 8PN,
U.K.(http://www.pentax.co.uk)
Pentax France S.A.S. 12/14, rue Jean Poulmarch, 95106 Argenteuil Cedex, FRANCE
Pentax Benelux B.V.
(for Netherlands) Spinveld 25, 4815 HR Breda, NETHERLANDS
(http://www.pentax.nl)
(for Belgium & Luxembourg) Weiveldlaan 3-5, 1930 Zaventem, BELGIUM
(http://www.pentax.be)
Pentax (Schweiz) AG Widenholzstrasse 1 Postfach 367 8305 Dietlikon, SWITZERLAND
(http://www.pentax.ch)
Pentax Scandinavia AB P.O. Box 650, 75127 Uppsala, SWEDEN (http://www.pentax.se)
PENTAX U.S.A., INC. 35 Inverness Drive East, Englewood, Colorado 80112, U.S.A.
(http://www.pentax.com)
Pentax Canada Inc.
3131 Universal Drive, Mississauga, Ontario L4X 2E5, CANADA
(http://www.pentaxcanada.ca)
Pentax U.K. Limited
ZX-L(E)00/cover1-4
11/8/02 11:27 AM
Page 1
OPERATING MANUAL
PENTAX Corporation 2-36-9, Maeno-cho, Itabashi-ku, Tokyo 174-8639, JAPAN
(http://www.pentax.co.jp)
PENTAX EUROPE GmbH (European Headquarters) Julius-Vosseler-Strasse, 104, 22527
Hamburg, GERMANY
This operating manual is printed on recycled paper.
Copyright © PENTAX Corporation 2002
57210
03-200210 Printed in Japan
OPERATING MANUAL
(HQ - http://www.pentaxeurope.com Germany - http://www.pentax.de)
Pentax House, Heron drive, Langley, Slough, Berks SL3 8PN,
U.K.(http://www.pentax.co.uk)
Pentax France S.A.S. 12/14, rue Jean Poulmarch, 95106 Argenteuil Cedex, FRANCE
Pentax Benelux B.V.
(for Netherlands) Spinveld 25, 4815 HR Breda, NETHERLANDS
(http://www.pentax.nl)
(for Belgium & Luxembourg) Weiveldlaan 3-5, 1930 Zaventem, BELGIUM
(http://www.pentax.be)
Pentax (Schweiz) AG Widenholzstrasse 1 Postfach 367 8305 Dietlikon, SWITZERLAND
(http://www.pentax.ch)
Pentax Scandinavia AB P.O. Box 650, 75127 Uppsala, SWEDEN (http://www.pentax.se)
PENTAX U.S.A., INC. 35 Inverness Drive East, Englewood, Colorado 80112, U.S.A.
(http://www.pentax.com)
Pentax Canada Inc.
3131 Universal Drive, Mississauga, Ontario L4X 2E5, CANADA
(http://www.pentaxcanada.ca)
Pentax U.K. Limited
MZ-6(E)00/cover2-3
11/8/02 11:53 AM
Page 2
WELCOME
Thank you very much for purchasing the Pentax SLR
camera. Please read this manual before using the
camera in order to get the most out of all the features
and functions. Keep this manual safe, as it can be a
valuable tool in helping you to understand all the camera’s capabilities.
MZ-6(E)01/001-010
11/8/02 11:49 AM
Page 1
FOR SAFE USE OF YOUR CAMERA
Although we have carefully designed this camera for safe operation,
please be sure to follow precautions given on this page.
WARNING
This mark indicates precautions that, if
not followed, could result in serious injury
to the operator.
CAUTION
This mark indicates precautions that, if
not followed, could result in minor or
medium injury to the operator or damage
to the equipment.
This mark indicates prohibited matters.
This mark indicates that caution should be
taken.
WARNING
The electronic circuits inside the camera contain high voltage working
parts. Never attempt to disassemble the camera yourself.
Never touch internal parts of the camera if they become exposed from
dropping the camera or for some other reason, as there is danger of an
electric shock.
Wrapping the strap around your neck is dangerous. Make sure that small
children do not get the strap caught around their neck.
Do not look directly at the sun through the camera, as viewing the sun
may damage your eyes, and/or parts of the camera (e.g: shutter blades,
etc.)
Be sure to store batteries out of the reach of children. Seek medical
assistance immediately if accidentally swallowed.
CAUTION
Do not use the flash near anyone’s eyes, as it may hurt them. Be particularly careful with the flash around infants.
Never try to disassemble, short or recharge the battery. Also, do not dispose of the battery in fire, as it may explode.
Remove the batteries from the camera immediately if they become hot or
begin to smoke. Be careful not to burn yourself during removal.
1
MZ-6(E)01/001-010
11/8/02 11:49 AM
Page 2
PRECAUTIONS FOR YOUR CAMERA
Your Pentax camera is a high-precision mechanism. Handle it with great care.
Precautions when taking pictures
• Do not use the camera where it may come in contact with rain, water, or any
other liquid, because the camera is not weather, water, or liquid resistant.
Should the camera get wet from rain, splashing water, or any other liquid
wipe it off immediately with a dry soft cloth.
• Do not drop the camera or allow it to hit solid objects. If the camera suffers a
shock or impact, take it to a Pentax service center for inspection.
• Be careful not to subject the camera to strong vibrations, shock or pressure.
Use a cushion to protect the camera when carrying it in a motorcycle, car,
boat, etc.
• Condensation on the interior or exterior of the camera may be extremely
harmful to the camera mechanism as it may cause rust. Furthermore, if the
camera is taken from warm temperature to a subfreezing one or vice versa,
the formation of crystals may cause damage. In such a case, put the camera
into a case or plastic bag so that any changes in temperature difference is
minimized. Do not remove it from the bag until temperature has stabilized.
• Regular size color prints may cut off what appears on the extreme edges of
the film frame. Compose your picture with a margin of safety at the edges.
• When a macro or telephoto lens is attached to the camera, the top part of
the viewfinder may look dark due to the lens blocking the mirror. However,
this does not affect the picture taken.
Precautions for storage
• Avoid leaving the camera for extended periods in places where the humidity
and temperature are very high, such as in a car.
• Do not store the camera in a closet with moth balls or in an area where
chemicals are handled. Store it in a place with good dry air circulation to prevent the growth of fungus.
Precautions for proper care
• Never touch the shutter curtain or mirror with your finger or any other object.
• Use a blower and lens brush to remove dust accumulated on the lens or
viewfinder.
• Never use solvents such as paint thinner, alcohol or benzene to clean the
camera.
• Electrical problems may often be caused by water, dirt or dust at points of
electrical contact. Also check for battery leakage, traces of dirt or grease, or
corrosion due to salinity or gas. If you cannot correct the problems, have your
camera inspected at a Pentax service center. Repairs of this nature are not
covered under the terms of the warranty and charges may be assessed.
2
Other precautions
• The temperature range at which this camera functions properly is 50°C to 10°C (122°F to 14°F).
• A camera which has been submerged in water usually cannot be repaired. If
such an accident should occur, it is advisable to contact a Pentax Service
Center immediately.
• To maintain optimum performance, it is recommended that the camera be
inspected every one or two years. If the camera has not been used for an
extended period, or is being prepared for an important photographic session,
it is recommended that you have the camera inspected or test shoot with it.
• Repairs deemed necessary due to usage of this product in an industrial or
commercial application may not be covered under the terms of the Pentax
warranty.
• The PENTAX warranty provides only for the repair of defects in materials or
workmanship. Damage of any kind cannot be repaired at no charge under
the terms of the warranty. If the difficulty is caused as a direct result of the
product being used in conditions as outlined in the "Precautions for Your
Camera" section or any other operation contrary to the instructions outlined
in this manual, charges will be assessed and a repair quotation will be provided.
PRECAUTIONS FOR BATTERY USAGE
• Use two 3V lithium batteries (CR-2 type).
• Misuse of the battery can cause hazards such as leakage, overheating,
explosion, etc. The battery should be inserted with the "+" and "-" sides facing correctly.
• Battery performance may be temporarily hindered in low temperatures, but
will recover in normal temperatures.
• Keep a spare battery on hand for replacement convenience when shooting
outdoors or while traveling.
• If the built-in flash is used continuously, the battery may become warm, but it
does not mean that the battery is faulty; it is one of the battery's characteristics.
• Replace the batteries at the same time. Do not mix battery brands, type or
an old battery with a new one. It may cause explosion or overheating.
3
MZ-6(E)01/001-010
11/8/02 11:49 AM
Page 4
CONTENTS
FOR SAFE USE OF YOUR CAMERA .......................... 1
PRECAUTIONS FOR YOUR CAMERA ........................ 2
PRECAUTIONS FOR BATTERY USAGE ..................... 3
NAMES OF WORKING PARTS .................................... 8
USING THIS OPERATING MANUAL .......................... 10
SET UP .................................................................11
THINGS TO DO ................................................................11
BEFORE TAKING PICTURES .................................... 12
STEP 1 Attaching the Strap ............................... 12
STEP 2 Loading the Batteries ........................... 13
STEP 3 Attaching a Lens .................................. 14
STEP 4 Imprinting the date or time
(OPTIONAL).......................................... 16
STEP 5 Adjusting the viewfinder's
diopter . ................................................. 17
STEP 6 Film loading .......................................... 18
4
BASIC ...................................................................21
BASIC OPERATIONS ......................................................21
QUICK AND EASY SHOOTING ................................. 22
POWER ON/OFF ....................................................22
QUICK AND EASY SHOOTING..............................24
TAKING A PICTURE ...............................................27
BUILT-IN FLASH-SMART FLASH .................................30
USING THE BUILT-IN FLASH .................................30
SETTING THE RED-EYE REDUCTION MODE .....33
UNLOADING FILM........................................................34
REWINDING THE FILM ..........................................34
SETTING THE FILM SPEED(ISO)
MANUALLY..............................................................36
REPLACING THE BATTERIES.....................................38
REPLACING THE CAMERA
BATTERIES .............................................................38
REPLACE BATTERY FOR DATA BACK FJ
(OPTIONAL) ............................................................40
ADJUSTING THE DATA BACK
(OPTIONAL) ............................................................42
5
MZ-6(E)01/001-010
11/8/02 11:49 AM
Page 6
EFFECT OF APERTURE AND SHUTTER SPEED....83
6
STEP UP ..............................................................45
FLASH PHOTOGRAPHY .................................................85
ADVANCED OPERATIONS..............................................45
USING THE BUILT-IN FLASH ......................................86
SETTING THE FLASH MODE ................................86
ADVANCED TECHNIQUES WITH THE BUILT-IN
FLASH .....................................................................88
POP-UP THE BUILT-IN FLASH MANUALLY ...........92
USING EXTERNAL FLASH ........................................95
FLASH FUNCTIONS...............................................95
USING P-TTL AUTO FLASH MODE.......................96
USING HIGH-SPEED SYNC WITH
THE AF360FGZ ......................................................97
WIRELESS FLASH (AF360FGZ ONLY)................100
USING BOTH THE BUILT-IN FLASH AND
EXTERNAL FLASH...............................................101
USING CONTRAST-CONTROL-SYNC
FLASH MODE .......................................................103
USING SLOW-SPEED SYNC ...............................105
PRECAUTIONS FOR USING FLASH...................107
CAMERA OPERATIONS ............................................ 46
CONSECUTIVE-FRAME DRIVE.............................46
MULTIPLE EXPOSURES ON A SINGLE FRAME..47
SELF-TIMER MODE ...............................................49
REMOTE CONTROL SHOOTING (OPTIONAL).....50
AUTO BRACKETING ..............................................53
USING THE PICTURE MODE ......................................56
STANDARD OPERATION MODE............................57
PORTRAIT PROGRAM MODE ...............................58
LANDSCAPE PROGRAM MODE ...........................59
CLOSE-UP PROGRAM MODE...............................60
ACTION PROGRAM MODE....................................61
NIGHT-SCENE PROGRAM MODE.........................62
SELECTING AN EXPOSURE MODE...........................63
USING THE APERTURE-PRIORITY AE MODE ....63
USING THE SHUTTER-PRIORITY AE MODE .......65
USING THE METERED MANUAL MODE ..............67
USING THE BULB EXPOSURE MODE..................70
ABOUT EXPOSURE COMPENSATION .................71
AE LOCK FUNCTION .............................................73
MULTI(6)-SEGMENT METERING ................................74
CANCEL THE AUDIBLE PCV SIGNAL ........................74
ABOUT FOCUSING......................................................75
USING AUTOFOCUS..............................................75
MANUAL FOCUSING..............................................78
SPOT AF MODE .....................................................80
USING FOCUS LOCK.............................................80
PREVIEWING THE DEPTH OF FIELD...................82
APPENDIX......................................................................109
PENTAX FUNCTIONS ................................................110
BASIC SETTING OF PENTAX FUNCTIONS........111
SETTING A PENTAX FUNCTION.........................113
CAMERA FUNCTIONS AVAILABLE WITH
VARIOUS LENSES ...............................................117
ACCESSORIES (OPTIONAL) ...............................119
PROGRAM DIAGRAMS........................................122
TROUBLE SHOOTING .........................................125
SPECIFICATIONS TABLE .....................................128
WARRANTY POLICY............................................132
7
MZ-6(E)01/001-010
11/8/02 11:49 AM
Page 8
NAMES OF WORKING PARTS
Built-in flash
Main switch
Self-timer lamp
Remote control receiver
Shutter release
button
Cable release
socket
Strap lug
Exposure
compensation
button
Select switch
Drive mode button
LCD panel
Focus mode switch
Preview button
Flash mode button
Hot shoe
Mirror
Lens mount index
AF coupler
Lens unlock button
AE lock button
Lens information contacts
Mode dial
AF mode switch
Strap lug
Film information window
Back cover
Diopter adjustment lever
Flash pop-up button
Battery chamber cover
Battery cover retainer screw
Back cover
release lever
Mid-roll rewind button
8
Tripod socket
9
MZ-6(E)01/001-010
11/8/02 11:49 AM
Page 10
USING THIS OPERATING MANUAL
This operating manual consists of the following sections.
◆Things to Check
This section is before "Things to Do," and it explains cautions for
using the camera and accessories, as well as the names of working parts.
◆Things to Do
Explains the procedures to be followed before you use the camera
for the first time.
It also explains how to load and rewind the film.
◆Basic Operations
• Explains the easiest way to take pictures with the camera set to
single-frame mode, programmed AE mode, multi-segment
metering mode, and AF mode.
• Using the Built-in Flash: Explains how to use the built-in flash.
◆Advanced Operations
The camera's features are explained in detail.
• Picture-taking Techniques: Consecutive-frame mode, multiexposure mode, self-timer mode, auto bracketing
• Setting the Exposure: Auto Picture mode, Shutter-Priority AE,
Aperture-Priority AE, metered manual exposure, bulb exposure,
exposure compensation
• Focusing: Auto focus mode, manual focusing
◆Flash Photography
• Tips: Tips on using flash in backlit conditions and at night, flash
exposure settings, and effective flash range.
• Using a Pentax-Dedicated External Flash: Explains the operation for dedicated external flash units and high-speed sync and
wireless mode features with the AF360FGZ.
10
MZ-6(E)02 B/011-020
11/8/02 11:55 AM
Page 11
SET UP
THINGS TO DO
BEFORE TAKING PICTURES ................... 12
Step
Step
Step
Step
1
2
3
4
Attaching the Strap .............................
Loading the Batteries .........................
Attaching a Lens ................................
Imprinting the date or time
(OPTIONAL)........................................
Step 5 Adjusting the viewfinder's diopter .......
Step 6 Film loading ........................................
12
13
14
16
17
18
11
MZ-6(E)02 B/011-020
11/8/02 11:55 AM
Page 12
BEFORE TAKING PICTURES
Things to do before using the camera for the first time.
1
Attaching the Strap
Pass the end of the strap
through the strap lug from
underneath, then pass the strap
through the clasp from underneath.
1
2
Memo
The strap’s clasp can be used to rewind
the film in mid-roll or to alter the date or
time. Position the clasp away from the
camera body.
2
Follow the same procedure to
attach the other end of the strap
to the other strap lug.
Memo
Using the strap pocket
The strap also has a pocket which can
store the viewfinder cap, hot shoe cover
or any other small accessory as illustrated.
12
3
Loading the Batteries
THINGS TO DO
Step 1
Step 2
SET UP
BEFORE TAKING PICTURES
As shown in the illustration,
open the battery chamber cover
by turning it with a coin.
As shown in the illustration, load
the two lithium CR2 batteries or
equivalent into the battery chamber with the batteries’ positive
(+) contacts pointing up.
Push in the battery chamber
cover firmly and use a coin to
turn the cover clockwise to
close.
Memo About the Batteries
• Be sure to use two lithium CR2 batteries.
• When taking the camera to unfamiliar
areas or when using in cold environments, take a spare set of batteries.
• See "Replacing the Batteries" to
replace the batteries and read the cautions regarding the batteries. (
p.38)
13
MZ-6(E)02 B/011-020
11/8/02 11:55 AM
Page 14
BEFORE TAKING PICTURES
As shown in the illustration, remove the front lens cap.
Remove the body mount cap and rear lens cap.
Memo
The body mount cap protects the inside of the camera from dust and
scratches upon factory shipment. For long-term camera storage, the
optional accessory “Body Mount Cap K” is also available.
2
3
THINGS TO DO
1
Attaching a Lens
SET UP
Step 3
Memo Handling the Lens
• To detach the lens, hold down the lens unlock button and turn the lens
counterclockwise.
Align the red dots on the lens and camera while attaching
the lens to the camera, then turn the lens clockwise until
it clicks in place.
• We assume no responsibility nor liability for damages resulting from the
use of lenses made by other manufacturers.
• Use a soft, dry cloth to keep the electrical contacts on the body mount
and lens mount clean. Dirt or corrosion on the contacts can cause
problems with the electrical system.
Memo
• After attaching the lens, try and turn the lens counterclockwise to make
sure it is locked in place.
14
15
MZ-6(E)02 B/011-020
11/8/02 11:55 AM
Page 16
BEFORE TAKING PICTURES
Imprinting the date or time
Press the DATE button on the
DATA BACK FJ to set the desired
imprinting format.
Each time you press the DATE button, the display will change in the
following sequence:
* The sample display below indicates
November 1, 2001, 2:10 PM.
YY indicates the year’s last two digits,
MM is the month, DD is the day, hh is
the hour, and mm is the minute.
[YY MM DD]→[01 11 1]
[DD hh mm]...[ 1 14:10]
[-- -- --]...Blank
[MM DD YY]...[11 1 01]
[DD MM YY]→[ 1 11 01]
Step 5
THINGS TO DO
NOTE
• To set the correct date and time, see
ADJUSTING THE DATA BACK on page
42.
• If the imprinting looks too light or if the
Data back’s display looks light or shows
nothing, replace the Data back’s battery. (
p.40)
• The date or time of the first frame will
be imprinted in the multi-exposure
mode.
(OPTIONAL)
If you have purchased your camera as the Date model
Version, or if you have purchased the Data Back FJ
separately, read this section.
Imprint the date or time within the picture.
1
SET UP
Step 4
Adjusting the viewfinder’s diopter
Adjust the viewfinder’s diopter to suit your eye’s
vision.
1
Look through the viewfinder and
point the camera to a well-lit
scene. Then move the diopter
adjustment lever left or right
until the autofocus frame in the
finder looks sharp.
Memo
The diopter can be adjusted from -2.0 to
+1.0m-1 (per meter).
Memo
The date or time is imprinted on the lower
right corner of the picture. If this part of
the picture is light-colored (white, yellow,
etc.), the imprinted date or time may be
difficult to distinguish.
16
17
MZ-6(E)02 B/011-020
11/8/02 11:55 AM
Page 18
BEFORE TAKING PICTURES
Film loading
2
Place the film cartridge in the
film chamber as shown in the
illustration.
THINGS TO DO
Automatic film speed setting
This camera is designed to use DX-coded films with
ISO ratings from 25 to 5000.
SET UP
Step 6
Memo
We suggest that you first operate the camera with no film loaded to
become familiar with its operations.
NOTE
• When DX-coded film is used, the correct film speed is automatically set
for the camera. If you use a non-DX coded film, you can set the film
speed manually. (
p.36)
1
To open the back cover, slide the
back cover release lever in the
direction of the arrow.
Memo
Remove the protective sheet
• Before loading film for the first time
after purchase, open the back cover
and remove the protective sheet.
• Be careful not to touch the shutter curtains with the protective sheet.
• Always load and unload film in the
shade or by using your body to shade
the camera.
18
3
As shown in the illustration, pull
the film leader out only far
enough to reach the take -up
spool.
★Important★
The shutter curtains are fine-precision
material. Do not touch them with your
fingers or any other object while loading
film.
NOTE
• The DX information pins in the film
chamber are used to read film speed.
Keep them clean and free from scratches. To remove smudges, wipe them
gently with a soft, dry cloth.
DX information pins
Shutter curtains
19
MZ-6(E)02 B/011-020
4
11/8/02 11:55 AM
Page 20
Film retainer
Align the film leader with the
film leader end mark and make
sure that the film leader is positioned under the film retainer as
shown in the illustration.
Memo
• If the end of the film leader is extremely
bent, straighten it or cut off the bent
portion.
• If you have pulled out too much film,
push it back into the cartridge to
reduce the slack.
5
6
Film leader end mark
Close the back cover.
Turn the main switch to [ON].
The film will advance to frame 1 automatically, and the LCD panel will display the
exposure counter 1 and film status information.
Memo Incorrect film loading
If the film is not loaded
properly, the LCD panel
will display . Open
the back cover and
load the film again.
Film status
information
Exposure counter
20
MZ-6(E)03 C/021-044
11/8/02 11:57 AM
Page 21
BASIC
BASIC OPERATIONS
QUICK AND EASY SHOOTING ................ 22
POWER ON/OFF ......................................22
QUICK AND EASY SHOOTING ...............24
TAKING A PICTURE .................................27
BUILT-IN FLASH-SMART FLASH ................30
USING THE BUILT-IN FLASH ...................30
SETTING THE RED-EYE REDUCTION
MODE........................................................33
UNLOADING FILM.......................................34
REWINDING THE FILM ............................34
SETTING THE FILM SPEED(ISO)
MANUALLY................................................36
REPLACING THE BATTERIES....................38
REPLACING THE CAMERA
BATTERIES...............................................38
REPLACING THE DATA BACK FJ
BATTERY (OPTIONAL).............................40
ADJUSTING THE DATA BACK
(OPTIONAL)..............................................42
21
MZ-6(E)03 C/021-044
11/8/02 11:57 AM
Page 22
QUICK AND EASY SHOOTING
QUICK AND EASY SHOOTING
Memo About the LCD Panel
The LCD panel displays the following indications:
POWER ON/OFF
BASIC
1
Turn on the camera.
2
Turn off the camera.
qAfter you finish taking pictures, turn
the main switch to OFF.
Memo
Be sure to turn the main switch to OFF to
prevent accidental drain on the batteries.
: Flash status information
p.30
: Red-eye reduction flash indication
: Automatic flash information
p.87
: Manual-set film speed
p.36
: Shutter speed
: Battery exhaustion warning
p.38
: Remote control release
p.50
: Consecutive shooting
p.46
: Audible PCV signal
p.74
: Self-timer
p.49
: Multiple-exposure shooting
p.47
: Aperture value
: Exposure compensation
p.71
: Film status information
p.20
: Exposure counter
p.20
and exposure compensation value
: Wireless flash mode
p.99, 100
: High-speed sync mode
p.97, 98
BASIC OPERATIONS
qTurn the main switch to ON.
p.33, 87
p.72
NOTE
Under the dim light condition, the LCD panel will be illuminated
automatically.
22
23
MZ-6(E)03 C/021-044
11/8/02 11:57 AM
Page 24
QUICK AND EASY SHOOTING
QUICK AND EASY SHOOTING
NOTE
1
qSet the mode dial to the [AUTO PICT]
position.
wTurn the aperture ring to the [A]
position while holding down the
aperture-A lock button on the lens.
BASIC OPERATIONS
To load the batteries and film or to attach
the lens, see “Things to Do.” (
p.11)
Set the Auto Picture Mode.
BASIC
For quick and easy shooting, set your camera for singleframe shooting, Auto picture, multi-segment metering, and
autofocus.
2
Set the single-frame drive mode.
qSet the main switch to [ON] position.
wPress the drive mode button until
[ ] appears on the LCD panel.
One picture is taken each time the
shutter release button is pressed.
eThe lens aperture ring can be
released from the [A] position in the
same manner.
rThe selected picture mode appears
in the viewfinder and the mode dial.
Memo
Memo
The drive mode can also be set to consecutive-frame mode (
p.46), selftimer (
p.49), remote control release
mode, auto bracketing or multiple-exposure mode (
p.47).
24
This Auto picture mode allows you to
take pictures by simply pressing the
shutter rlease button. The camera automatically selects the proper exposure.
25
MZ-6(E)03 C/021-044
11/8/02 11:57 AM
Page 26
QUICK AND EASY SHOOTING
Memo
TAKING A PICTURE
• In the Auto picture mode, the camera automatically selects one of 5
picture modes according to the requirement of the scene.
• The Auto picture mode operates only when an FA or F lens is attached.
• See page 56, 63 for any other exposure mode.
• The AE lock function or exposure compensation function cannot use
while the Auto picture mode is being used.
3 points focus frame
qSet the AF mode switch to [ [ ] ].
BASIC OPERATIONS
1
Set the AF mode switch to
[ Wide [ ] ]
BASIC
3
NOTE
To load the film and batteries or to attach a lens, see “Things to Do.”
(
p.11).
Frame the subject
qLook through the viewfinder and
frame the subject.
Autofocus works with the 3 points-AF
frame [[ ]] in the viewfinder. Cover the
subject with the AF frame [[ ]].
Memo
• The subject will be focused properly
even if the main subject is off the center of the viewfinder.
• See page 80 for details of Spot AF.
4
Set autofocus
qSet the focus mode switch to the
down position at [AF].
When you press the shutter release
button halfway down, the lens automatically focuses. The picture cannot be
taken unless focus is achieved. The
focus will remain locked as long as the
shutter release button is held in the
halfway down position.
Memo
• See page 78 for the manual focus.
26
Memo Holding the camera
• Hold the camera firmly, with your left hand supporting the camera and
lens as shown in the illustrations.
• To reduce camera shake, support your body or the camera on a solid
object - a table, tree, or a wall for instance.
• Although there are individual differences among photographers, in general the shutter speed for a hand held camera is the inverse of the focal
length. For example, 1/60 of second when focal length is 50mm, and
1/125 of second when it is 100mm. A tripod should be used for shutter
speeds slower than this.
• When using a telephoto lens, a tripod that is heavier than the total
weight of the camera and lens is recommended to avoid camera shake.
27
MZ-6(E)03 C/021-044
11/8/02 11:57 AM
Page 28
QUICK AND EASY SHOOTING
Memo
Using a Zoom Lens
Memo
Viewfinder Displays
◆ Using the Manual Zoom Lens
To photograph a wider area, turn the
zoom ring to the left. To magnify the subject, turn the zoom ring to the right.
qLightly depress the shutter release
button halfway down with your finger.
The exposure information (shutter
speed, aperture, flash status) will be
displayed in the viewfinder.
BASIC OPERATIONS
Taking the picture
BASIC
2
p.27
:3-points AF frame
:Shutter speed
:Aperture value
p.57
:Standard Mode
p.58
:Portrait Operation Mode
p.59
:Landscape Program Mode
p.60
:Close-up Program Mode
p.61
:Action Program Mode
p.62
:Night-scene Program Mode
p.30
:Flash status information
p.76
:In-focus indicator
p.73
:AE lock
p.68, 72
:Bar graph
:Spot AF frame
p.80
Memo
• See page 75 for autofocus.
• The indicator in the viewfinder turns to orange color when you
take a picture in low light to warn you of possible camera shake.
wCheck the exposure information in
the viewfinder and press the shutter
release button completely.
28
29
MZ-6(E)03 C/021-044
11/8/02 11:57 AM
Page 30
BUILT-IN FLASH - SMART FLASH
BUILT-IN FLASH - SMART FLASH
The basic procedure for using the built-in flash is explained
below.
Memo
• When using the built-in flash, do not attach a hood to the lens. The
hood will obstruct a part of the flash light.
• As a rule of thumb the distance for using the built-in flash (which varies
with the lens used) is within about four meters (using ISO 400 film).
• The built-in flash does not retract automatically.
1
BASIC OPERATIONS
USING THE BUILT-IN FLASH
BASIC
Memo
To set the built-in flash’s flash mode or when using an external flash unit,
refer to “Using external flash” on page 95.
Memo
• The built-in flash does not retract automatically.
• The auto pop-up flash mode can only be set when the Auto picture
mode or one of 5 picture modes is set.
p.24, 56
• When the Flash pop-up button is pressed after the flash has popped
up, the [
] on the LCD panel goes out and the camera enters the
Auto pop-up mode in which the built-in flash fires at all times.
Memo
• The shutter cannot be release while the built-in flash is being charged.
• If the built-in flash is used continuously, the batteries will get warm, but
it does not mean that the batteries are faulty.
• The built-in flash pops up not only when using the camera in a dark
location, but also when there is back light.
• Note the built-in flash pops up even when the subject is far away or
beyond the maximum flash effective range. See page 86 for the flash
effective distance.
Auto pop-up flash function
qPress the flash mode button until
[
] appears on the LCD panel.
wThe built-in flash automatically pops
up when pressing the shutter
release button halfway down in the
following conditions.
1. Low light situation
2. backlit situation
Memo
When the built-in flash is fully charged,
[ ] appears in the viewfinder and on
the LCD panel.
eFocus the subject and take a picture.
30
31
MZ-6(E)03 C/021-044
11/8/02 11:57 AM
Page 32
BUILT-IN FLASH - SMART FLASH
Memo
Red-eye reduction mode: To make the eye’s iris smaller,
a low-output flash fires right before the picture is taken.
This is to reduce the chances of red eye from occurring in
the subject’s eyes.
Retracting the built-in flash
Setting the red-eye reduction mode
qAfter using the built-in flash, push
down the flash head to lock it in the
closed position.
qPress the flash mode button until
[
] or [
] appears on the
LCD panel.
If [
] is selected, press the Flash
pop-up button to activate the built-in
flash on.
Memo
AF illuminator
When the shutter release button is pressed halfway down where it is
hard for autofocus to work, such as in a dark place, the built-in flash
discharges continuously to provide illumination, making it easy for the
autofocus to work.
BASIC OPERATIONS
2
SETTING THE RED-EYE REDUCTION MODE
BASIC
When [ ] blinks
When using an F or FA lens not suited for flash photography, [ ] will
blink in the viewfinder and on the LCD panel when the flash is ready
and the shutter release button is pressed halfway down. Taking a picture with this warning may cause vignetting in the picture corners or
semicircular vignetting at the bottom of the picture.
See F and FA Lens Compatibility Table
p.90
Refer to page 86 for Flash mode display.
• In the case of using an AF spot beam of an external flash unit such as
the AF360FGZ or AF500FTZ, the AF illuminator of the built-in flash
does not operate.
• The AF illuminator does not operate when the exposure mode is set to
the Action Program Mode [ ] and the focus mode switch is set to MF.
• Since the external flash unit will end up discharging if the AF illuminator
is operated when using the slave function of the AF360FGZ,
AF500FTZ set the focus mode switch to the MF position when using
the sleeve function.
• The AF illuminator may not operate if the batteries become worn down.
• Although varying according to the conditions at the time, the effective
distance of the AF illuminator is roughly 1 to 5 meters.
32
33
MZ-6(E)03 C/021-044
11/8/02 11:57 AM
Page 34
UNLOADING FILM
UNLOADING FILM
wBefore opening the back cover,
check that [ ] is blinking.
Film rewind (auto/manual), setting the ISO for non-DXcoded film are covered here.
BASIC
REWINDING THE FILM
◆ Automatic film rewinding
Memo
34
◆ Rewinding a film in mid-roll
BASIC OPERATIONS
Memo
• Always unload film in the shade or by using your body to avoid direct
sunshine.
• Never open the back cover until the whole film roll is completely rewound.
If you wish to unload the film before exposing all the frames, use this
function.
Memo
• At the end of the film rewind, you can also leave the film leader outside
the cartridge. (
p.116)
qTurn the main switch to ON.
The shutter may be released a frame or more after the specified number
of frames have been used as indicated on the film cartridge. However,
those extra frames may be lost in processing. When you take important
pictures, rewind the film when the film reaches the number of frames indicated on the film cartridge.
wUse the strap clasp’s rod to press
the mid-roll rewind button.
when the film is fully rewourd, [ ]
blinks and the exposure counter disappears from the LCD panel.
qThe film automatically rewinds at the
end of the roll.
During rewinding, [ ] blinks on the
LCD panel, indicating that the film is
being rewound.
When the film is fully rewound, [ ]
blinks and the exposure counter disappears from the LCD panel.
Avoid using anything other than the strap
clasp’s rod to press the mid-roll rewind
button. If you have to use some other
instrument such as a ballpoint pen, be
sure to press the button gently without
excessive force.
Memo
eBefore opening the back cover,
check that [ ] is blinking on the
LCD panel.
35
MZ-6(E)03 C/021-044
11/8/02 11:57 AM
Page 36
UNLOADING FILM
SETTING THE FILM SPEED (ISO) MANUALLY
eAfter setting the ISO speed, set the
mode dial to any position other than
[ ISO].
BASIC OPERATIONS
1
BASIC
The camera automatically reads the film speed from the
film’s DX code. However, the film speed setting can be
changed. If you use a non-DX coded film, set the film
speed manually.
Load the film.
qLoad the non-DX-coded film.
2
Setting the ISO speed
qSet the mode dial to [ISO].
wMove the select switch to set the ISO
speed.
Memo
• The ISO speed can be set from ISO 6
to 6400 in 1/3-EV increments.
• [ISO] is displayed when the film speed
is set manually for the DX-coded film.
36
37
MZ-6(E)03 C/021-044
11/8/02 11:57 AM
Page 38
QUICK
REPLACING
AND EASY
THE BATTERIES
SHOOTING
REPLACING THE BATTERIES
REPLACING THE CAMERA BATTERIES
When the batteries are exhausted, the
LCD panel will display the low battery
warning .
Keep a set of new lithium CR2 batteries
handy. Even while the low battery warning
is displayed, as long as the shutter works,
a proper exposure will be obtained.
◆ When the batteries
must be replaced
When the low battery warning blinks,
the information display in the viewfinder
will be off and the shutter will not work.
Replace the lithium CR2 batteries with
new ones. (
p.13)
BASIC OPERATIONS
◆ When the batteries are
exhausted
BASIC
When the camera’s lithium CR2 batteries are exhausted,
replace with a new set.
Memo
• Replace the two batteries at the same time. Do not mix battery type,
brands or old battery with new one. It may cause explosion or overheating.
• When the batteries are replaced, the following settings will take effect.
All other settings will remain unchanged.
Auto pop-up flash ......................................................On
Drive mode ................................................................Single frame
Audible PCV signal....................................................On
• If the camera has not been used for a long time, the LCD panel may
still display the low battery warning even with a new set of batteries.
In this situation, turn on the camera and press the shutter release button halfway down. When the low battery warning turns off, you can
continue using the camera.
Memo Battery Life (using 24-exposure film rolls )
The number of 24-exposure film rolls that can be taken with a new set of
batteries is indicated below.
General existing light photography
Flash photography
(using flash 50% of the times)
Flash photography
(using flash 100% of the times)
Bulb exposure time
Number of film rolls
at 20°C/68°F
about 120 rolls
Number of film rolls
at -10°C/14°F
about 30 rolls
about 20rolls
about 15 rolls
about 12 rolls
about 5 rolls
about 8 hours
about 2 hours
• CR2 batteries were used under Pentax testing conditions. Actual battery life and performance may vary drastically depending on usage of
autofocus, built-in flash and external conditions such as temperature
and freshness of the battery.
38
39
MZ-6(E)03 C/021-044
11/8/02 11:57 AM
Page 40
REPLACING THE BATTERIES
eRemove the old battery.
REPLACE BATTERY FOR DATA BACK FJ (OPTIONAL)
1
2
BASIC OPERATIONS
Memo
• Replace the battery when the data information on a picture or the LCD
panel becomes weak or invisible. The battery will last for approximately
3 years. The data back uses one 3V lithium battery, type CR2025.
• After replacing the battery, set the correct date and time. (
p.42)
BASIC
If you have purchased your camera as the Date model
Version, read this section.
If the date/time display or imprinting looks faint,
replace the lithium CR2025 battery.
Install a new battery.
qInstall a new battery with the + side
facing up.
Remove the battery.
qEnsure that a film is not loaded, then
open the back cover.
wReinstall the battery chamber cover,
and tighten the battery chamber fixing screw.
wLoosen the battery cover fixing
screw (located near the upper left
side of the pressure plate ) with a
Phillips head screwdriver and then
remove the battery chamber cover.
40
41
MZ-6(E)03 C/021-044
11/8/02 11:57 AM
Page 42
REPLACING THE BATTERIES
ADJUSTING THE DATA BACK FJ
(OPTIONAL)
Memo
qPress the [SELECT] button to make the hour, minute or second
( : ) you want to change blink.
Memo
The digits blink in the following order.
Hour → Minute → : → Hour
BASIC OPERATIONS
Use the strap clasp’s rod to press the buttons. Do not press the buttons
with an object having a sharp tip.
Adjusting the hour/minute.
BASIC
If you have purchased your camera as the Date model
Version, or if you have purchased the Data Back FJ
separately, read this section.
2
wChange the data ( hour or minute ) with the [ADJUST] button.
Memo
The digit increases by one each time the [ADJUST] button is depressed.
Holding the button for about 2 to 3 seconds will change the digits continuously.
1
eTo change the second ( : ), press the [SELECT] button until “ : “
will blink, and then press the [ADJUST] button in sync with a time
signal to set the second to zero.
Adjusting the year/month/day.
qPress the [SELECT] button to make the year, month or day you
want to change blink.
Memo
The digits blink in the following order.
Year- Month - Day
wChange the date with the [ADJUST] button.
Memo
The digit increases by one each time the [ADJUST] button is pressed.
Holding the button for about 2 to 3 seconds will change the digits continuously.
ePress the [SELECT] button to stop the digit from blinking, after
you have changed the date. The adjusted date has been entered.
42
rPress the [SELECT] button to stop the adjusted hour/minute from
blinking.
Memo Operational precautions
• To select or cancel the date imprinting or to select the format, see
“Imprinting the Date and Time” on page 16.
• If the imprinting looks too light or if the Data back’s display looks light
or shows nothing, replace the Data back’s battery. (
p.40)
• The working temperature for data printing is 0°C - 50°C (32°F - 122°F).
• Imprinted data may appear too light under the low temperature.
• Use DX-coded films with ISO rating from 25 - 1600.
• If high-speed film with an ISO rating of 1000 or faster is used, the
imprinted characters may blur.
• If film with ISO rating of 50 or slower is used, the printed characters
may be dark or dim.
• If you release the shutter while the blinking data is being corrected, the
data cannot be imprinted.
43
MZ-6(E)03 C/021-044
44
11/8/02 11:57 AM
Page 44
MZ-6(E)04 D1/045-073
11/8/02 12:00 PM
Page 45
STEP UP
ADVANCED OPERATIONS
CAMERA OPERATION ..................................................... 46
CONSECUTIVE-FRAME DRIVE ......................................46
MULTIPLE EXPOSURES ON A SINGLE FRAME ...........47
SELF-TIMER MODE.........................................................49
REMOTE CONTROL SHOOTING (OPTIONAL) ..............50
AUTO BRACKETING........................................................53
USING THE PICTURE MODE ...........................................56
STANDARD OPERATION MODE .....................................57
PORTRAIT PROGRAM MODE ........................................58
LANDSCAPE PROGRAM MODE.....................................59
CLOSE-UP PROGRAM MODE ........................................60
ACTION PROGRAM MODE .............................................61
NIGHT-SCENE PROGRAM MODE ..................................62
SELECTING AN EXPOSURE MODE ................................63
USING THE APERTURE-PRIORITY AE MODE .................63
USING THE SHUTTER-PRIORITY AE MODE ...................65
USING THE METERED MANUAL MODE ............................67
USING THE BULB EXPOSURE MODE ...............................70
ABOUT EXPOSURE COMPENSATION...........................71
AE LOCK FUNCTION ......................................................73
MULTI(6)-SEGMENT METERING......................................74
CANCEL THE AUDIBLE PCV SIGNAL..............................74
ABOUT FOCUSING ...........................................................75
USING AUTOFOCUS .......................................................75
MANUAL FOCUSING .......................................................78
SPOT AF MODE...............................................................80
USING FOCUS LOCK ......................................................80
PREVIEWING THE DEPTH OF FIELD..............................82
EFFECT OF APERTURE AND SHUTTER SPEED...........83
45
MZ-6(E)04 D1/045-073
11/8/02 12:00 PM
Page 46
CAMERA OPERATION
CAMERA OPERATION
Shooting consecutive frames
qDepress the shutter release button halfway down to focus the subject.
wDepress and hold down the shutter release button completely.
eTo stop taking consecutive pictures, take your finger off the shutter release button.
Memo
The shutter cannot be released while the built-in flash is being charged.
MULTIPLE EXPOSURES ON A SINGLE FRAME
ADVANCED OPERATIONS
CONSECUTIVE-FRAME DRIVE
2
STEP UP
Besides single-frame drive mode, the camera can be set
as follows:
• Consecutive-frame drive mode: Pictures can be taken
consecutively while holding down the shutter release button.
p.46
• Multi-exposure mode: Expose the same frame multiple
times.
p.47
• Self-timer mode: A picture will be taken with a 12-second delay.
p.49
• Wireless remote control: The wireless remote control
allows you to trip the shutter at a distance.
p.50
• Auto bracketing: Three pictures are taken consecutively
as follows: Correctly exposed, underexposed, and overexposed.
p.53
Picture can be exposed on the same frame multiple times.
For example, you first take a picture of a dark background,
then use flash to photograph someone on the same frame.
+
=
Keep the shutter release button pressed to take pictures
continuously.
1
Setting the consecutive-frame
drive mode
qTurn the main switch to [ON].
wPress the drive mode button until
[
] appears on the LCD panel.
46
47
MZ-6(E)04 D1/045-073
11/8/02 12:00 PM
Page 48
CAMERA OPERATION
1
SELF-TIMER MODE
Setting the multi-exposure mode
q Turn the main switch to ON.
wPress the drive mode button until [
appears on the LCD panel.
After you pressing the shutter release button, the picture
will be taken about 12 sec. later. Use the self-timer when
you want to be in the picture.
]
The frame counter will blink.
qTurn the main switch to ON.
Using the multi-exposure mode
wPress the drive mode button until [
appears on the LCD panel.
] on the
w Take the second picture.
The frame counter stops blinking
and film is advanced to next frame
then return to single frame drive
mode [ ].
]
ADVANCED OPERATIONS
q Take the first picture.
The frame counter and [
LCD panel blink.
Setting the self-timer mode
STEP UP
2
1
Memo
Preventing stray light from entering the eyepiece
Underexposure may occur if light enters the viewfinder during self-timer
operation on auto picture mode and 6 picture modes. If you intend to
move away from the viewfinder, attach the supplied finder cap or use
AE lock function (
p.73).
Memo
To exposed the third shot or more,
press the drive button until [
]
appears after repeating step 1.
Memo
The multi-exposure mode remains in
effect even after the main switch is
turned [OFF]. To cancel the multi-exposure mode, remove the batteries once
and load again.
Detaching Eyecup
2
Attaching the finder cap
Using the self-timer mode
qDepress the shutter release button
halfway down to focus the subject.
48
49
MZ-6(E)04 D1/045-073
11/8/02 12:00 PM
Page 50
CAMERA OPERATION
wDepress the shutter release button
completely.
The shutter will be released about 12
seconds after the shutter release button is depressed. The audible PCV signal is heard and the rate increases for
the last two seconds.
e The self-timer lamp starts blinking
slowly.
Cancelling the self-timer mode
STEP UP
3
w Press the drive mode button until
[
] appears on the LCD panel.
ADVANCED OPERATIONS
qPress the drive mode button to
another setting.
The self-timer mode is cancelled.
Memo
The stop the self-timer operation after it
has been activated, press the drive
mode button again.
r Aim the remote control transmitter
towards the remote control receiver
on the camera, and then press the
shutter release button on the
remote control.
Memo
The audible PCV signal can be stopped
(
p.74).
REMOTE CONTROL SHOOTING
(OPTIONAL)
If you have purchased the optional wireless remote
control, read this section.
The shutter will be released 3 seconds after the remote
control's shutter release button is pressed.
qAttach the camera to a tripod.
50
t The self-timer lamp blinks rapidly
for 3 seconds and then the shutter
is released.
y When the picture is taken, the
self-timer lamp lights for approx.
2 seconds and return to blink slowly.
51
MZ-6(E)04 D1/045-073
11/8/02 12:00 PM
Page 52
CAMERA OPERATION
NOTE
The operating distance of the wireless
remote control is approx. 5m from in front
of the camera.
AUTO BRACKETING
When you press the shutter release button, three consecutive frames will be taken at different exposures. The first
frame is exposed with no compensation. The second frame
is underexposed, and the third frame is overexposed.
The initial bracketing amount is ±1/2EV step.
STEP UP
Memo
Memo
• To cancel the remote control mode, press the drive mode button until
[
] disappears from LCD panel.
• To stop the remote control operation after it has been activated, press
the drive button or turn the main switch off.
• Adjust the focus by pressing the shutter release button on the camera
halfway down or manually and then press the remote control’s release
button.
• The remote control may not work in a backlit situation.
• The remote control does not work while the flash is being charged.
• When the remote control mode is left and is unused for 5 minutes, the
single drive mode will be automatically set.
Exposure
with no compensation
Memo Battery life on the Remote Control
About 30,000 commands can be issued using the Remote Control. If
the battery is exhausted, please have it replaced at your local Pentax
Service center ( there is a charge for this service).
-1/2 EV underexposure
ADVANCED OPERATIONS
Auto bracketing amount can be set to ±1/3, ±2/3, ±1EV step with pentax
Function. (
p.113).
+1/2 EV overexposure
Memo
• If the exposure compensation amount is small, the effect will not be so
noticeable with print film.
1
Setting the auto bracketing
mode
qTurn the main switch to [ON].
wPress the drive mode button until
[ ] appears on the LCD panel.
52
53
MZ-6(E)04 D1/045-073
11/8/02 12:00 PM
Page 54
CAMERA OPERATION
2
Using the auto bracketing mode
qPress the shutter release button
halfway down to focus the subject.
The bar graph is displayed in the
viewfinder and the current exposure
compensation amount blinks.
Memo
ADVANCED OPERATIONS
wHold down the shutter release button.
In the viewfinder, the bar graph indicates the correct exposure for the first
frame. For the second frame, it indicates the minus side for underexposure. For the third frame, it indicates
the plus side for overexposure.
Memo
Only the amount of light of the flash can be changed continuously by
using the auto bracketing mode following completion of charging of the
built-in flash or external flash unit (TTL and P-TTL Auto only). However, in
the case of an external flash unit, if three consecutive frames are taken
while depressing the camera shutter button, the second and third frames
may be taken prior to completion of charging. Always make sure to check
completion of charging for each frame.
STEP UP
• The focus is locked at the first picture
and remains locked until all pictures are
taken.
●Taking pictures of overexposure only
[±1/2] step (EV) ......Set the exposure compensation to [+1/2].
1st frame=+1/2EV, 2nd frame=±0EV, 3rd frame=+1EV
● Taking pictures of underexposure only
[±1/2] step (EV) ......Set the exposure compensation to [-1/2].
1st frame=-1/2EV, 2nd frame=-1EV, 3rd frame=±0EV
Memo
If you let go of the shutter release button during auto bracketing, the auto
bracketing exposure setting will remain
effective for about 20 sec. After that,
the auto bracketing exposure for the
first bracketed frame will take effect.
Memo Taking pictures underexposed or overexposed only
You can use the auto bracketing mode for only underexposure or overexposure shots by combining the operation with exposure compensation.
(
p.71)
54
55
MZ-6(E)04 D1/045-073
11/8/02 12:01 PM
Page 56
USING THE PICTURE MODE
USING THE PICTURE MODE
STANDARD OPERATION MODE
The camera incorporates the Auto Picture Mode function.
In this mode, the camera automatically selects the one of 5
picture modes depending on the camera-to-subject distance and the image magnification. You can also select
your desired Picture Mode manually. The picture mode has
a total of 6 modes as follows. See details for each mode on
page 57 to 62.
1
Set the mode dial to [
[
].
ADVANCED OPERATIONS
2
Set the lens aperture ring to [A].
STEP UP
1
For take a picture easily, use the
Green Operation Mode. You simply
depress the shutter release button.
The camera selects the best combination of aperture and shutter
speed setting.
] on the mode dial lights up.
Set the mode dial to the desired
exposure mode.
Standard Operation
Mode
Portrait Program
Mode
Landscape Program
Mode
Night-scene Program
Mode
Action Program
Mode
Close-up Program
Mode
NOTE
2
When the shutter release button
is depressed halfway, the shutter
speed and aperture setting are
displayed in the viewfinder and
on the LCD panel.
[
] is also displayed in the viewfinder.
Exposure Warning
If the subject is too bright or too dark, the
shutter speed and aperture setting in the
viewfinder will blink. If the subject is too
bright, use ND filter or select a darker
subject. Use a flash if the subject is too
dark.
56
57
MZ-6(E)04 D1/045-073
11/8/02 12:01 PM
Page 58
USING THE PICTURE MODE
PORTRAIT PROGRAM MODE
LANDSCAPE PROGRAM MODE
This mode is ideal for landscape
photography and scenic snapshots.
This mode is suitable for taking portrait photography.
Set the mode dial to [
2
].
When the shutter release button
is depressed halfway down, the
shutter speed and aperture settings are displayed in the
viewfinder and on the LCD
panel.
[
] is also displayed in the viewfinder.
Memo
In this mode, the telephoto lens produces a portrait in crisp focus against
the out-of-focus background, while the
wide angle lens enables you to shoot
group photography or snapshots in
sharp and clear focus with the extended depth-of-field.
58
1
Set the mode dial to [
[
] on the mode dial lights up.
2
].
] on the mode dial lights up.
ADVANCED OPERATIONS
[
STEP UP
1
When the shutter release button
is depressed halfway down, the
shutter speed and aperture settings are displayed in the
viewfinder and on the LCD
panel.
[
] is also displayed in the viewfinder.
Memo
When a photo of a landscape is taken
in this mode, the resulting photograph
will be in focus for the entire landscape,
including objects close up and those in
the distance.
59
MZ-6(E)04 D1/045-073
11/8/02 12:01 PM
Page 60
USING THE PICTURE MODE
CLOSE-UP PROGRAM MODE
ACTION PROGRAM MODE
This mode is convenient when taking close-up photos of flowers and
so forth.
[
2
].
2
When the shutter release button
is depressed halfway down, the
shutter speed and aperture settings are displayed in the
viewfinder and on the LCD
panel.
] is also displayed in the viewfinder.
Memo
This mode favors smaller apertures to
maximize the depth of field, ensuring
sharp focus of a close-up subject.
Set the mode dial to [
[
] on the mode dial lights up.
[
60
1
].
ADVANCED OPERATIONS
Set the mode dial to [
STEP UP
1
This mode selects a faster shutter
speed to capture a moving subject.
] on the mode dial lights up.
When the shutter release button
is depressed halfway down, the
shutter speed and aperture settings are displayed in the
viewfinder and on the LCD panel.
[
] is also displayed in the viewfiner.
Memo
This mode freezes the action and prevent blurred images. This mode is
especially convenient for active photography. It is also suitable for portraits
with blurred background.
This mode focuses the subject continuously when the shutter release button
is depressed halfway down, and the
shutter can be released even when the
subject is in focus or out of focus.
61
MZ-6(E)04 D1/045-073
11/8/02 12:01 PM
Page 62
SELECTING AN EXPOSURE MODE
NIGHT-SCENE PROGRAM MODE
SELECTING AN EXPOSURE MODE
The exposure mode varies on the selection of the camera's
mode dial and lens aperture ring setting as shown on the table
below.
This mode is useful when taking a
portrait photograph with a night
scene in the background.
Set the mode dial to [
[
3
AV
M
Aperture-Priority Metered-Manual
AE
Aperture-Priority Metered-Manual
AE
When the desired aperture is selected, an appropriate
shutter speed is automatically set by the camera for a
proper exposure. This mode is ideal for shooting landscapes with increased depth of field, or a portrait against a
blurred background.
Set the auto pop-up flash on.
[
TV
Shutter-Priority
AE
Aperture-Priority
AE
USING THE APERTURE-PRIORITY AE MODE
] on the mode dial lights up.
When the shutter release button
is depressed halfway down, the
shutter speed and aperture settings are displayed in the
viewfinder and on the LCD
panel.
Picture Mode
AE
Aperture-Priority
AE
1
ADVANCED OPERATIONS
2
].
AUTO PICT
Auto Picture
AE
Aperture-Priority
AE
STEP UP
1
Mode dial
Lens aperture
Lens
set to A position
aperture Lens aperture
set to other than A
Set the lens aperture ring to [A]
while pressing the aperture -Alock botton.
] is also displayed in the viewfinder.
Memo
It is possible to photograph subjects
and background in a balanced way by
using the flash to properly expose the
foreground subject and a slow-speed to
expose the low light background. The
shutter speed automatically changes in
the range of 1/100 to 1 second.
2
Set the mode dial to [Av]
NOTE
62
• Use of a tripod is recommended.
• The Standard Operation Mode is automatically set when the built-in flash is
not in use.
63
MZ-6(E)04 D1/045-073
11/8/02 12:01 PM
Page 64
SELECTING AN EXPOSURE MODE
3
Memo
• The bar underneath the aperture value
indicates that you can change the aperture setting by the select switch.
• The Aperture-Priority AE Mode can
also set when the lens aperture ring is
set to desired f-stop other than [ A ].
Set the mode dial to either [ AUTO PICT ],
[
], [ ],[ ], [ ], [
] or [
].
• The approximate aperture indication
appears in the viewfinder. It may not
the same indication as you select the
lens aperture.
• The approximate aperture indication
appears only an FA or F lens is
attached.
64
ADVANCED OPERATIONS
When the shutter release button
is depressed halfway down, the
shutter speed and aperture
value will be displayed in the
viewfinder and on the LCD
panel.
STEP UP
4
NOTE Exposure Warning
If the subject is too bright or too dark,
the selected shutter speed will blink in
the viewfinder and on the LCD panel as
a warning as shown. When the subject
is too bright, choose a smaller aperture, if available; when it is too dark,
choose a larger aperture, if available.
When the shutter speed indication
stops blinking, you can take the picture.
If both shutter and aperture blink, it
means that the exposure is out of
metering range, unable to obtain a correct exposure even if the aperture is
adjusted. Select a darker subject if it is
too bright, or use a flash if it is too
dark.
Select the desired aperture value
by moving the select switch.
USING THE SHUTTER-PRIORITY AE MODE
When the desired shutter speed is selected, the appropriate aperture is automatically set by the camera for a proper exposure according to the brightness of the subject. This
mode is suitable for freezing the action with a fast shutter
speed or capturing a flowing dynamic image with a slow
shutter speed.
1
Set the lens aperture ring to [A]
while pressing the aperture -Alock botton.
65
MZ-6(E)04 D1/045-073
11/8/02 12:01 PM
Page 66
SELECTING AN EXPOSURE MODE
2
When the shutter release button
is depressed halfway down, the
shutter speed and aperture
value will be displayed in the
viewfinder and on the LCD
panel.
Memo
The bar underneath the shutter speed indicates that you can change the shutter
speed setting.
66
ADVANCED OPERATIONS
4
Select the desired shutter speed
by moving the select switch.
STEP UP
3
NOTE Exposure Warning
If the subject is too bright or too dark,
the selected aperture value will blink in
the viewfinder and on the LCD panel as
warning as shown. When the subject is
too bright, choose a faster shutter
speed. If it is too dark, choose a slower
shutter speed. When the shutter speed
indication stops blinking, you can take
the picture. If both selected shutter
speed and aperture blink, it means that
the exposure is out of metering range,
unable to obtain a correct exposure
even if the shutter speed is adjusted.
Select a darker subject if the subject is
too bright. Use a flash if it is too dark.
Set the mode dial to [Tv].
USING THE METERED MANUAL MODE
The manual exposure mode is a convenient exposure mode
for taking pictures using the same shutter speed and aperture
setting combination, or taking creatively under or overexposured photographs.
1
Set the lens aperture ring to [A]
while pressing the aperture -Alock button.
67
MZ-6(E)04 D1/045-073
11/8/02 12:01 PM
Page 68
SELECTING AN EXPOSURE MODE
2
6
Move the select switch to
change the shutter speed.
5
68
Move the select switch to
change the aperture while holding the exposure compensation
button.
The dot displayed in the center
of the bar graph indicates the
correct exposure.
Moving one dot on the bar graph
indicates 0.5 step (0.5EV).
ADVANCED OPERATIONS
7
4
When the shutter release button
is depressed halfway down, the
shutter speed and aperture value
will be displayed in the viewfinder and on the LCD panel.
STEP UP
3
Set the mode dial to [M].
When under or over exposure is
set beyond + 2 or - 2 steps (2EV),
[ ] or [ ] indicator will blink.
Memo
• The bar underneath the shutter speed
indicates that you can change the shutter speed. With the exposure compensation button pressed, the bar appears
underneath the aperture that indicates
you can change the aperture value.
• The AE lock and exposure compensation do not work in the Metered Manual
Mode.
• The metered manual mode can be used
even if the aperture ring is not set to “A”.
Turn the lens aperture ring to select the
desired aperture ring. Since the indication of aperture value inside the
viewfinder only serves as a general reference, it may differ from the set aperture value.
69
MZ-6(E)04 D1/045-073
11/8/02 12:01 PM
Page 70
SELECTING AN EXPOSURE MODE
• When lenses other than an F or FA lens
is used, no approximate aperture indication will appear in the viewfinder.
• The indicator in the viewfinder turns to
orange when the shutter speed changes
to a slower shutter speed which causes
camera shake.
NOTE
This mode is useful for the long exposures required for
shooting night scenes and fireworks. The shutter remains
open as long as the shutter release button is held down.
qWith the Metered-Manual Mode set,
move the select lever to change the
shutter speed until [ Bu ] appears in
the viewfinder and on the LCD panel.
70
• Up to approx. 8 hours of time exposure
are possible with new lithium batteries
at ambient temperatures.
• With the remote control shooting mode
set, the shutter remains open as long
as the remote control's shutter release
button held down.
• The indicator in the viewfinder turns to
orange color.
ADVANCED OPERATIONS
USING THE BULB EXPOSURE MODE
Memo
STEP UP
Exposure Warning
If the subject is too bright or too dark,
both shutter speed, aperture setting
and [ ]/[ ]will blink in the viewfinder
as a warning as shown. It means that
the exposure is out of metering range,
unable to obtain a correct exposure
even if the aperture is adjusted. Select
a darker subject or use a flash if it is
too dark.
wWhen using this mode, use a steady
tripod to prevent camera shake and
attach the optional “Cable Switch
CS-205” after opening the release
socket cap.
ABOUT EXPOSURE COMPENSATION
The exposure compensation allows you to deliberately
overexposure (brighten) or underexposure(darken) a subject, or compensate for difficult lighting conditions which
may fool the camera's built-in exposure meter.
Memo
• Exposure compensation does not work in the Metered manual mode
and Bulb Exposure Mode.
71
MZ-6(E)04 D1/045-073
11/8/02 12:01 PM
Page 72
SELECTING AN EXPOSURE MODE
1
Setting the exposure compensation amount
AE LOCK FUNCTION
1
Setting AE Lock
ADVANCED OPERATIONS
[ ] is displayed on the LCD panel.
The bar graph which indicates the compensation value and [ ] appear in the
viewfinder.
STEP UP
You can lock the exposure setting before you take the picture. If the subject is too small for a proper exposure setting to be obtained, you can zoom in on the subject to
obtain a proper exposure setting. Then you can lock the
exposure setting and recompose the shot before taking the
picture.
qWhile holding down the exposure
compensation button, move the
select switch to set the desired compensation value on the LCD panel.
qPosition the area to be measured in
the viewfinder metering area and
press the AE Lock button [ AE-L ].
w[
wThe exposure compensation can
also be confirmed in the viewfinder.
When the dot is displayed to the [ ]
side, it indicates overexposure and
when the dot is displayed to the [ ]
side, it indicates underexposure.
Moving one dot on the bar graph indicates 0.5 step (0.5EV).
Memo
When under or over exposure is set
beyond +2 or -2 steps, [ ] or [ ]
indicator will blink.
Memo
] is displayed in the viewfinder.
Memo
• The current exposure setting will be
locked for about 20 sec.
• If the shutter release button or AE Lock
button is pressed while the AE Lock
timer is operating, the memorized
meter reading will remain even if the
finger is released from the button.
• When the AE lock button is depressed,
the audible PCV signal is heard. This
PCV signal can be turned off. See page
74.
• The auto pop-up built-in flash function
does not work while the AE Lock is
used.
• The exposure compensation range is -3EV to +3EV in 0.5EV.
• Exposure compesation does not work in the metered manual mode
and Bulb exposure mode.
• The exposure compensation cannot be canceled even if the power is
turned OFF or any other exposure mode is set.
72
73
MZ-6(E)04 D2/074-084
11/8/02 12:04 PM
Page 74
ABOUT FOCUSING
MULTI(6)-SEGMENT METERING
ABOUT FOCUSING
This mode automatically measures light in six different
zones, enabling proper exposure value in a wide variety of
normal and adverse lighting conditions.
The autofocus modes, and manual focus mode are
explained here.
USING AUTOFOCUS
Memo
When a lens other than an A, F or FA
lens is attached, the center-weighted
metering mode is automatically set .
You can change the audible PCV signal on or off when the
self-timer, remote control, AE Lock function is in use or when
the focus is in-focus.
Set the mode dial to [
]
1
ADVANCED OPERATIONS
When the autofocus function or the viewfinder’s focus indicator [
] cannot be used for focus confirmation for the following reasons, focus on the
subject in the manual focus mode with the aid of the matte field in the
viewfinder as you would with a non-AF SLR camera. (
p.79)
• The focus indicator [
] is blinking. (The subject is difficult to autofocus.)
p.76
• The maximum aperture of the lens in use is smaller than f/5.6.
• A bellows 100mm f/4 lens, Shift 28mm f/3.5 (shifted) lens, or Reflex
lens is in use.
• An old type screw-mount lens fitted with an optional “Mount Adapter K”
is in use.
CANCEL THE AUDIBLE PCV SIGNAL
1
STEP UP
Memo
Using the autofocus mode (AF)
qSet the focus mode switch to [AF].
2
Move the select switch to display [ON] or [--] on the
LCD panel.
Memo
The shutter cannot be released when the mode dial is set to [
74
]
75
MZ-6(E)04 D2/074-084
11/8/02 12:04 PM
Page 76
ABOUT FOCUSING
2
Taking a picture
qFocus on the subject with the 3
point AF frame [ [ ] ].
When the shutter release button is
depressed halfway down, the lens
automatically focuses.
Focus indicator
rTake a picture. Gently depress the
shutter release button.
Memo
• As this camera incorporates the 3- point autofocus system, the subject
will be focused properly even if the subject is slightly off.
• The audible PCV signal can be turned off.
p.74
Memo
The focus indicator [ ] blinks when the camera is not able to obtain
proper focus for one of the following reasons.
qThe subject is too close. Adjust the camera-to-subject distance.
wThe subject is difficult to autofocus. See “HARD-TO-AUTOFOCUS
SUBJECTS” on
page 77.
76
ADVANCED OPERATIONS
eWhen the subject is in focus, the
focus indicator [
] lights up and
an audible PCV beeping signal is
emitted.
STEP UP
wWhen the shutter relase button is
depressed halfway down, the shutter
speed, aperture setting and selected
picture mode are displayed in the
viewfinder and the LCD panel.
Memo HARD-TO-AUTOFOCUS SUBJECTS
The autofocus system is highly precise, but not perfect. Depending on the
brightness, contrast, shape, and size of your subject, the autofocus system may not operate. In this situation, use the focus -lock technique
(
p.80) or set the focus mode switch to [MF] and use the manual focus
mode to focus the lens on the subject with the aid of the matte field in the
viewfinder (
p.79).
Subjects which may fool the autofocus system include:
• Extremely low-contrast subjects such as a white wall in the autofocus
frame.
• Subjects which don’t reflect much light in the autofocus frame.
• Subjects with complex or detailed patterns.
• Subjects which are moving too fast.
• Multiple subjects in the foreground and background of the autofocus
frame.
• Subjects positioned against reflected light or strong backlight or with
extremely bright backgrounds.
Memo
■ Notes on accessories
The following conditions do not allow autofocusing or manual focusing
with the focus indicator in the viewfinder. Use the manual focus mode to
focus on the subject with the aid of the matte field surrounding the
autofocus frame.
p.79
• When using Stereo Adapter.
• When using Extension Tubes or an Auto Bellows for close-up photography.
• When using an ordinary polarizing filter; the half mirror incorporated
into the autofocus system reduces the effectiveness of the autofocus
function when used in combination with an ordinary polarizing filter.
Use a CIRCULAR POLARIZING FILTER for proper autofocus operation.
■ Note on the SMC Pentax SOFT 85mm/f2.8lens
When shooting at a distance closer than approx.1.5m(4.9ft), set the lens
to a manual f-stop setting between f/2.8 and f/4.5. A smaller aperture
(f/5.6 to f/32) may cause the autofocus system and the viewfinder’s focus
indicator to malfunction. To remedy this problem, temporarily set the lens
to f/4.5. After focusing on the subject, lock focus, and set the lens to the
required f-stop.
77
MZ-6(E)04 D2/074-084
11/8/02 12:04 PM
Page 78
ABOUT FOCUSING
2
qFrame the subject, then press the
shutter release button halfway down.
wTurn the focusing ring on the lens
until the subject is in focus.
When focus is achieved, the focus indicator [
] lights and the audible PCV
signal beeps.
eCheck that the focus indicator [
]
is lit, then press the shutter release
button completely.
◆ Using the focus indicator [
ADVANCED OPERATIONS
MANUAL FOCUSING
When you focus manually, you can either look at the focus
indicator [ ] or the viewfinder’s matte field to check if the
subject is in focus.
Focusing
STEP UP
Memo Using the snap-in focus function
When the subject comes to the point where the lens was pre-focused, the
shutter is automatically released.
qUse a non-autofocus lens.
wSet the focus mode switch to [AF].
eFocus at the point where you wish to capture the subject.
rUsing optional cable switch, keep the trigger button pressed so that the
autofocus and metering systems stay active.
The shutter will be released automatically when the subject comes into
focus at the point selected.
◆ Using the viewfinder’s matte screen.
1
Setting manual focus (MF)
qSet the focus mode switch to [MF].
]
Memo
If the maximum aperture of the attached lens is f/5.6 or larger (f/1.2 f/5.6), you can use the focus indicator [
] as a guide to achieve focus.
With slower lenses, adjust a focus on the matte screen in the viewfinder.
1
Setting manual focus (MF)
qSet the focus mode switch to [MF].
2
Focus the subject
qFrame the subject, then turn the
focusing ring on the lens until the
subject is in focus.
Focus until the subject looks sharp in
the viewfinder.
wCheck that the subject is in sharp
focus, then depress the shutter
release button completely.
78
79
MZ-6(E)04 D2/074-084
11/8/02 12:04 PM
Page 80
ABOUT FOCUSING
SPOT AF MODE
1
qSet the focus mode switch to [AF].
Select the Spot AF Mode to critically focus on a specific
spot of the subject which is in the Spot AF autofocus
frame.
Using the Spot AF Mode
qSet the AF mode switch to [ [ ] ].
Memo
If the subject is not covered with the AF
frame, the camera cannot automatically
focus on the subject. In this situation,
use the focus lock technique.
USING FOCUS LOCK
If the subject is not covered by any of the focus points, the
camera cannot automatically focus the subject. In this situation, you can aim the focus point on the subject, use
focus lock, then recompose the picture.
Using focus lock
The desired framing
qFrame the subject. If the subject you
want to focus is not on any of the
focus is not on the AF frame, you
can use focus lock.
Figure to the right shows the person is
not focused and the background is
focused instead.
ADVANCED OPERATIONS
wFocus on the subject with the spot
AF frame and press the shutter
release button halfway down, the
lens automatically focuses.
2
STEP UP
1
Setting the autofocus mode
wAim the center of the viewfinder over
the subject, then press the shutter
release button halfway down.
While the focus indicator [
] is lit, the
focus will be locked (focus lock).
Memo
• You can lock the focus by pressing the
shutter release button halfway down
• Rotating the zooming ring in focus lock
mode may cause the subject out of
focus.
Aim the center of the
viewfinder over the subject,
then press the shutter
release button halfway.
eRe-compose the picture while pressing the shutter release button
halfway down.
rCheck that the focus indicator [
]
is lit in the viewfinder, then press the
shutter release button completely.
The person is focused.
80
81
MZ-6(E)04 D2/074-084
11/8/02 12:04 PM
Page 82
ABOUT FOCUSING
PREVIEWING THE DEPTH OF FIELD
Before taking a picture, you can check the depth of field in
the viewfinder.
1
Focusing the subject.
qAdjust focus to the subject.
qWhile looking through the viewfinder, press the preview button.
You can check the focused area in the
viewfinder.
Memo
• The depth of field can be previewed in
any exposure mode.
• The focus range display in the viewfinder may differ slightly from the actual
picture.
82
◆ Effect of Shutter Speed
The shutter speed determines the film
exposure time, or the length of time that
light is allowed to strike the film. If the
subject is moving, the image will be
blurred when a slow shutter speed is
used. It is possible to enhance the effect
of motion, (The movement of a wave or
waterfall) by intentionally using a slower
speed. Choosing a faster shutter speed
will allow the image of a moving subject
to be frozen. A faster shutter speed also
helps prevent camera shake.
◆ Effect of Aperture
The aperture increases or reduces the
amount of reflected light from an object
which passes through the lens, controlling
how much light strikes the film. If the aperture is opened up to increase the amount
of light, objects in front of and behind an infocus subject will not be focused. That is,
the range of focus (depth of field) becomes
small. If the aperture is closed down to
reduce the amount of light, the depth of
field increases. For instance, if you shoot a
person against a landscape with the aperture open, the landscape in front of and
behind the person will be blurred, making
the person appear to rise out of the landscape. By contrast, closing down the aperture increases the in-focus range.
ADVANCED OPERATIONS
Previewing the depth of field
A correct exposure is established by a combination of shutter
speed and aperture setting according to the subject brightness. There are many correct combinations of shutter speed
and aperture for a particular subject brightness. Different
shutter speed and aperture settings produce different effects.
STEP UP
2
EFFECT OF APERTURE AND SHUTTER SPEED
faster shutter speed
slower shutter speed
closed down aperture
open aperture
83
MZ-6(E)04 D2/074-084
84
11/8/02 12:04 PM
Page 84
MZ-6(E)05 E1/085-094
11/8/02 12:06 PM
Page 85
STEP UP
FLASH PHOTOGRAPHY
USING THE BUILT-IN FLASH .....................86
SETTING THE FLASH MODE ..................86
ADVANCED TECHNIQUES WITH THE
BUILT-IN FLASH........................................88
POP-UP THE BUILT-IN FLASH
MANUALLY................................................92
USING EXTERNAL FLASH ........................95
FLASH FUNCTIONS.................................95
USING P-TTL AUTO FLASH MODE ........96
USING HIGH-SPEED SYNC MODE ........97
WIRELESS FLASH .................................100
USING BOTH THE BUILT-IN FLASH AND
EXTERNAL FLASH.................................101
USING CONTRAST-CONTROL-SYNC
FLASH MODE.........................................103
USING SLOW-SPEED SYNC .................105
PRECAUTIONS FOR USING FLASH.....107
85
MZ-6(E)05 E1/085-094
11/8/02 12:06 PM
Page 86
USING THE BUILT-IN FLASH
USING THE BUILT-IN FLASH
This section explains how to set the built-in flash modes
and notes concerning the built-in flash.
Memo Flash mode display
The flash fires in accordance with the flash mode indicated on the LCD
panel.
Icon displayed Flash mode
SETTING THE FLASH MODE
Flash ON
Press the flash mode button until the desired flash mode
appears on the LCD panel.
Flash ON + Red-eye reduction
When the flash is fired in the flash ON
mode, red-eye reduction takes
effect.*1
Auto pop-up
Auto Pop-up + Red eye reduction
When the flash is fired in the
auto-pop up flash mode, red-eye
reduction takes effect. *1, *2
Wireless
+HS
86
FLASH PHOTOGRAPHY
The flash mode will be displayed on the LCD panel as shown
below.
If the Auto Picture Mode or Picture
Mode is set, the flash pops up
automatically when necessary.
STEP UP
+
• Auto pop-up flash [
] can only be selected in the Auto Picture
Mode and Picture Mode.
Flash status
Flash fires when you press the
shutter release button.
Set when using a dedicated
wireless flash.
p.100
Wireless + High-speed sync
Set when using high-speed sync with
a dedicated wireless flash.
p.99
*1: If red-eye reduction is used while the AF360FGZ, etc. is set as a
slave unit, the preflash for red-eye reduction will trigger the slave unit
to fire. When using a slave unit, do not use red-eye reduction.
*2: The auto pop-up mode will work in any mode except Auto Picture
Mode or Picture Mode. (
p.86).
87
MZ-6(E)05 E1/085-094
11/8/02 12:06 PM
Page 88
USING THE BUILT-IN FLASH
Memo
Reducing Red Eye
Red eye occurs in flash pictures when the flash reflects off the eye’s retina. Although red eye cannot be totally prevented, it can be reduced by the
following methods:
• Take the picture in a well-lit place.
• When using a zoom lens, use the wide-angle end and a close distance.
• If you are using an external flash unit, keep it apart from the camera
lens as far as possible.
ADVANCED TECHNIQUES WITH THE BUILT-IN FLASH
Calculate the effective flash range as follows:
For far distances Guide No. ÷ Current aperture
For near distances Far distance result ÷ 5*1
*1: This formula using “5” as the divider applies only to the built-in flash.
Memo
The flash cannot be used at distances shorter than 0.7 m. Doing so will
result in irregular or obstructed flash coverage and flash overexposure.
88
Guide No.
ISO25
5.5
ISO50
7.8
ISO100
11
ISO200
15.6
ISO400
22
With ISO 100 film and an f/2.8 aperture, calculate the
effective flash range as follows:
For far distances
Guide No. 11 ÷ f/2.8 = approx. 3.9 m
For near distances 3.9÷5 = approx. 0.8
The effective flash range is therefore approx. 0.9 m - 4.3 m.
FLASH PHOTOGRAPHY
◆ Calculating the flash effective distance according to the
camera-to-subject distance.
ISO Film Speed
STEP UP
This section explains how to calculate the built-in flash’s
effective range and the compatibility with F and FA lenses.
The Guide No. will be as follows depending on the ISO film
speed.
Calculating the flash aperture from the effective flash
range
Use the effective flash range to calculate the flash aperture as follows:
Memo
Guide No. ÷ flash range = Flash aperture
If the result is a number (such as 3) that is not a lens aperture value, set
it to the next smaller aperture value (2.8).
89
MZ-6(E)05 E1/085-094
11/8/02 12:06 PM
Page 90
USING THE BUILT-IN FLASH
◆ F and FA Lens Compatibility with the Built-in Flash
The compatibility of F and FA lenses with the built-in flash
is explained here.
Compatibility
FA Zoom 70-200mm f/4-5.6
★
Memo
FA Zoom 80-200mm f/2.8 ED (IF)
If an F or FA lens incompatible with the built-in flash is used, depressing the
shutter release button halfway down when the flash is ready will have the
[ ] blink on the LCD panel and in the viewfinder as a warning. (
p.32)
If you take a flash picture with an incompatible lens, the corners of the
picture may look dark or there may be a dark, semi-circular area on the
lower part of the picture
F and FA Lens Compatibility with the Built-in Flash
Lens name
Compatibility
FA Zoom 100-300mm f/4.7-5.8
★
FA Zoom 250-600mm f/5.6ED(IF)
FA 20mm f/2.8
★
FA 24mm f/2 AL(IF)
FA 28mm f/2.8
FA 31mm f/1.8 AL Limited
FA 43mm f/1.9 Limited
FA 50mm f/1.4,f/1.7
FA 77mm f/1.8 Limited
Vignetting may occur if the focal length
is 24-28mm.
FA 85mm f/1.4 (IF)
Vignetting may occur if the focal length
is less than 35 mm or the camera-tosubject distance is closer than 1 m with
the focal length of 40 mm.
FA 200mm f/2.8 ED (IF)
★
FA Zoom 28-70mm f/2.8AL
★
FA 135mm f/2.8 (IF)
★
★
FA 300mm f/2.8 ED (IF)
★
FA 300mm f/4.5 ED (IF)
★
FA 400mm f/5.6 ED (IF)
FA Zoom 28-70mm f/4AL
FA Zoom 28-90mm f3.5-5.6
★
FA 600mm f/4 ED (IF)
Vignetting will not occur even if [ ]
blinks on LCD panel and in the viewfinder as a warning.
FA Zoom 28-105mm
f/3.2-4.5 AL (IF)
FA Zoom 28-200mm
f/3.8-5.6AL (IF)
F or FA Zoom 100-300mm f/4.5-5.6
FA 35mm f/2AL
Vignetting will occur at focal length
between 20-24mm.
FA Zoom 24-90mm
f/3.5-4.5AL (IF)
FA Zoom 80-320mm f/4.5-5.6
FLASH PHOTOGRAPHY
F Zoom 17-28mm f/3.5-4.5
FA Zoom 20-35mm f/4AL
F or FA Zoom 80-200mm f/4.7-5.6
STEP UP
= Compatible
= Vignetting will occur under the usage conditions
= Incompatible because of vignetting
90
Lens name
F or FA Zoom 35-80mm f/4-5.6
FA Macro 50mm f/2.8
FA Macro 100mm f/2.8
FA Macro 100mm f/3.5
★
FA Macro 200mm f/4.0 ED (IF)
FA Soft 28mm f/2.8
Vignetting may occur if the focal length
is 28 mm or the camera-to-subject distance is closer than 1 m with the focal
length of 35 mm.
FA Soft 85mm f/2.8
91
MZ-6(E)05 E1/085-094
11/8/02 12:06 PM
Page 92
USING THE BUILT-IN FLASH
POP-UP THE BUILT-IN FLASH MANUALLY
1
Focus the subject and take a
picture.
Memo
• The flash is always discharged even if
the subject is not required flash light.
• The shutter cannot be released until
the flash is fully charged.
• If the built in flash is used continuously,
the battery may become warm, but it
does not mean the battery is faulty; it is
one of the battery's characteristics.
• When the built-in flash is used, using a
lens hood is NOT recommended as it
may obstruct the path of the light coming from the flash, causing vignetting in
the picture corners.
• With the built-in flash popped-up, an
external flash cannot be attached to the
hot shoe. If you would like to use an
external flash together with the built-in
flash, see the flash connections on
page 102.
• If the flash pop-up button is pressed
while the flash is popped up, the camera enters the Flash ON mode in which
the built-in flash discharges at all times.
FLASH PHOTOGRAPHY
3
The built-in flash starts charging
automatically. When it is fully
charged, [ ] appears on the
LCD panel.
After using the flash, retract the
built-in flash by pressing it down
into the camera body.
STEP UP
2
Push the flash pop-up button to
activate the flash.
[
] disappears from the LCD
panel.
4
Memo
Flash recommended
information
The flash-recommended indicator [ ]
on the LCD panel blinks and the indicator in the viewfinder turns to orange
color when you attempt to photograph
a subject in low light to warn you the
camera shake.
92
93
MZ-6(E)05 E1/085-094
11/8/02 12:06 PM
Memo
• In the Shutter-Priority AE Mode and
Metered-Manual Mode, the flash-recommended indicator blinks only when
attempting to photograph a subject in a
backlit situation.
• The indicator in the viewfinder turns to
green when the flash is fully charged.
NOTE
Inappropriate lens warning
when the built-in flash is
used
When using an inappropriate F- or FAlens, [ ] will blink in the viewfinder and
on the LCD panel when the shutter
release button is depressed halfway
down. For more details on COMPATIBILITY OF F AND FA LENSES WITH THE
BUILT-IN FLASH, see page 90, 91.
Memo
• Taking a picture while this warning is
displayed may cause vignetting in the
picture corners or semi-circular
vignetting at the bottom of the picture.
• When lenses other than an F or FA are
used, this warning will not appear.
94
Page 94
MZ-6(E)05 E2/095-108
11/8/02 12:09 PM
Page 95
USING EXTERNAL FLASH
USING EXTERNAL FLASH
When the built-in flash cannot provide enough illumination,
use a Pentax-dedicated. With an external flash unit, TTL
auto wireless flash and high-speed sync photograph can
be taken with AF360FGZ.
FLASH FUNCTIONS
TYPE A TYPE B TYPE C TYPE D TYPE E TYPE F
*1
FLASH PHOTOGRAPHY
Camera Functions
Red-eye reduction
STEP UP
The features available with the built-in flash or a dedicated,
external flash are described below.
Check which type your external flash unit is and see which
functions it has.
Automatic firing of the flash
When the flash is ready,
the camera switches to the flash
sync speed automatically.
Auto Picture Mode, Picture Mode
or Shutter-priority AE mode,
the aperture is set automatically.
Flash confirmation in the viewfinder
TTL auto flash
*2
*4
p.97
P-TTL auto flash
p.96
Slow-speed sync
p.105
*2
*3
*
5
AF illuminator
Trailing shutter curtain sync flash*6
*7
Contrast-control-sync flash mode*8
Multiple-burst flash, slave flash
*9
High-speed sync
Wireless flash
95
MZ-6(E)05 E2/095-108
11/8/02 12:09 PM
Page 96
USING EXTERNAL FLASH
TYPE
TYPE
TYPE
TYPE
TYPE
TYPE
A: Built-in flash
B: AF360FGZ
C: AF500FTZ, AF330FTZ
D: AF400FTZ, AF240FT
E: AF400T, AF280T, AF220T, AF200T, AF080C, AF140C, AF201SA
F: AF200S, AF160, AF140
Set the flash unit to P-TTL auto
mode
qAttach the flash unit to hot shoe.
wTurn on the flash unit's power switch.
eSet the flash mode switch to P-TTL
auto.
Memo
• With the AF360FGZ, the flash mode is always set to P-TTL auto;
with any other flash unit, it is set to TTL auto.
• For instructions on how to operate the flash unit, refer to the flash
unit's operating manual.
Taking a flash picture
FLASH PHOTOGRAPHY
3
STEP UP
*1: Available with the AF280T and AF400T, only when the flash confirmation indicator in the viewfinder is off and TTL auto is set.
*2: With Type E flash units (except AF201SA), use the MS (Manual Sync)
or M (Manual) mode. With Type F flash units, use Aperture-Priority AE,
manual, or bulb. Picture mode and Shutter-Priority AE cannot be used
because the aperture changes.
*3: With the AF201SA, TTL auto cannot be used.
*4: With Pentax A, F and FA lenses, P-TTL auto flash can be used.
*5: With Pentax A, F and FA lenses.
*6: The shutter speed will be 1/60 sec. or slower.
*7: With Type B or C, and D flash units, trailing shutter curtain sync flash
is possible.
*8: The shutter speed will be 1/60 sec. or slower.
*9: Exception of AF330FTZ.
2
qCheck that the flash is ready.
wFocus the subject and take the picture.
USING P-TTL AUTO FLASH MODE
The optimum flash amount is fired to match the subject
brightness.
P-TTL auto flash, which pre-fires the flash using the sixsegment metering, allows more precise control.
P-TTL is available with external wireless flash.
Memo
P-TTL auto flash is only available in combination with the AF360FGZ.
1
Attaching the flash unit
qRemove the hot shoe cover FK from
the camera.
Memo
• When the flash is ready (fully charged), the [ ] will light in the
viewfinder when the shutter release button is depressed halfway down.
• An external flash can also be made to automatically fire. Note that
the flash will not fire against an lighter subject especially during daytime sync shooting.
USING HIGH-SPEED SYNC WITH THE AF360FGZ
With the AF360FGZ, you can use a flash sync speed faster
than 1/125 sec. High-speed sync mode can also be used
while the flash unit is attached to the camera or in a wireless configuration.
With high-speed sync.
Memo
Store the hot shoe cover in the strap's
pocket.
p.12
96
97
MZ-6(E)05 E2/095-108
11/8/02 12:09 PM
Page 98
USING EXTERNAL FLASH
◆ Using High-speed sync Flash on the Camera
1
Attaching the flash unit
◆ Using Wireless high-speed sync flash
1
qRemove the Hot Shoe Cover FK from
the camera.
Positioning the flash
qPlace the flash unit at the desired location.
wSet the flash unit’s power switch to [WIRELESS].
eSet the flash unit’s sync mode switch to HS (high-speed sync).
Memo
rSet the wireless mode switch to S (Slave).
Store the Hot Shoe Cover in the strap’s
pocket.
p.12
Memo
wAttach the flash unit to hot shoe.
2
FLASH PHOTOGRAPHY
2
STEP UP
• For instructions on how to operate the flash unit, refer to the flash
unit's operating manual.
• For wireless Flash, refer to page 100.
Set the camera to the HS mode.
Set the flash unit to the HS mode.
qPress the flash pop-up button to enable the built-in flash to be
used.
qSet the flash unit’s sync mode switch to HS (high-speed sync).
w press the flash mode button until [
] is displayed.
Memo
For instructions on how to operate the flash unit, refer to the flash unit’s
operating manual.
3
Taking a picture.
qCheck that the flash is ready.
wFocus the subject and take the picture.
eCheck that both the built-in flash and external flash unit are ready.
rFocus the subject and take the picture.
Memo
• When the flash is ready (fully charged), the [ ] will light in the
viewfinder when the shutter release button is depressed halfway down.
• The high-speed sync is only available when the shutter speed is faster
than 1/125 sec.
• The high-speed sync flash mode does not work in the Auto Picture
Mode and Picture Mode.
98
Memo
• When the built-in flash is ready (fully charged), the [ ] will light in the
viewfinder when the shutter release button is depressed halfway down.
• The high-speed sync is only available when the shutter speed is faster
than 1/125 sec.
99
MZ-6(E)05 E2/095-108
11/8/02 12:09 PM
Page 100
USING EXTERNAL FLASH
WIRELESS FLASH (AF360FGZ ONLY)
With the AF360FGZ, you can fire a flash without having a
cord connection between the camera and flash unit. The
high-speed sync mode can also be used with wireless
flash.
p.99
1
Positioning the flash
qPlace the flash unit at the desired location.
eSet the wireless mode switch to S (Slave).
Memo
2
Wireless Flash Control (P-TTL flash mode)
Set the camera to the wireless mode.
qPress the flash pop-up button to enable the built-in flash to be
used.
wPress the flash mode button until [
] is displayed.
Memo
Channel Control
For wireless control, channel (e.g. CH1) for the AF360FGZ must be set
on the camera. Attach the AF360FGZ to the camera, turning on the
camera and depressing the shutter release button halfway down.
FLASH PHOTOGRAPHY
For instructions on how to operate the flash unit, refer to the flash unit's
operating manual.
Memo
When the AF360FGZ is used for wireless flash, the following process is
executed between the built-in flash and AF360FGZ before the flash is
fired.
Depress the shutter release button completely.
qThe built-in flash fires a pre-flash (the camera's flash mode is transmitted).
wThe external flash unit fires a pre-flash (the subject's lighting condition
is checked).
eThe built-in flash fires a pre-flash (the required flash output is transmitted to the external flash).
* If HS (high-speed sync) has also been set, the built-in flash will fire
another pre-flash to transmit the flash duration time.
rThe AF360FGZ Flash unit fires the flash.
STEP UP
wSet the flash unit’s power switch to [WIRELESS].
Memo
When the built-in flash is ready (fully charged), the [ ] will light in the
viewfinder when the shutter release button is depressed halfway down.
USING BOTH THE BUILT-IN FLASH AND EXTERNAL FLASH
eCheck that both the built-in flash and external flash unit are ready.
rFocus the subject and take the picture.
100
To use both the built-in flash and dedicated external flash
simultaneously, follow the procedure below.
To use both the built-in flash and a dedicated external flash
simultaneously, the following accessories (sold separately)
are required.
Hot Shoe Adapter FG, Off-Camera Shoe Adapter F,
Extension Cord F5P
101
MZ-6(E)05 E2/095-108
11/8/02 12:09 PM
Page 102
USING EXTERNAL FLASH
1
USING CONTRAST-CONTROL-SYNC FLASH MODE
Attaching the flash unit
qRemove the Hot Shoe Cover Fk from
the camera.
Using the dedicated external flash in combination with the
built-in flash allows twin flash photography (contrast-controlsynch flash photography). This is based on the difference
between the amount of light discharged from two units.
Memo
Store the hot shoe cover in the strap’s
pocket.
p.12
wAttach the Hot Shoe Adapter FG to the camera.
Memo
eConnect the Extension Cord F5P to the Hot Shoe Adapter FG.
Contrast-control-sync flash is possible with the combination of following
flash units: AF360FGZ, AF330FTZ, AF500FTZ, and the built-in flash.
rAttach the Off-Camera Shoe Adapter F to a tripod.
◆ Using the built-in flash and a dedicated
external flash.
yAttaching a Flash Unit to the Off-Camera Shoe Adapter F.
uPress the flash pop-up button.
The AF500FTZ can be connected directly to Extension Cord F5P without requiring Off-Camera Shoe Adapter F.
etExtension Cord F5P
wHot Shoe
Adapter FG
1
Positioning the flash unit
qPlace the flash unit apart from the camera.
Memo
Do not use accessories (such a hot shoe grip) having a different number of contacts. It may cause the TTL auto flash to function improperly.
rOff-Camera Shoe Adapter F
FLASH PHOTOGRAPHY
Memo
STEP UP
tConnect the Extension Cord F5P to the Off-Camera Shoe Adapter F.
wSet the flash unit's sync mode to Contrast-control-sync.
Memo
For instructions on how to set the sync mode, refer to the flash unit's
operating manual.
rOff-Camera
Shoe Adapter F
• Using multiple external flashes
wHot Shoe Adapter F
2
Taking a picture
qPress the flash pop-up button to enable the built-in flash to be
used.
rOff-Camera
Shoe Adapter F
102
wCheck that the flash is ready.
eFocus the subject and take the picture.
103
MZ-6(E)05 E2/095-108
11/8/02 12:09 PM
Page 104
USING EXTERNAL FLASH
Memo
USING SLOW-SPEED SYNC
• Between the built-in flash and external flash, the flash ratio will be
1: 2 respectively (summed up when the external flashes are more
than one).
• When the contrast-control-sync flash mode is used, the maximum
flash sync speed will be 1/60 sec.
When you photograph someone in front of a sunset or
dark background, using slow-speed sync flash will result in
the proper exposure of both the subject and background.
Slow-speed sync can be set with the built-in flash or with
any dedicated external flash unit.
◆ Using Multiple External Flash Units (with
no built-in flash)
1
Memo
With slow-speed sync, a slow shutter speed is used. Use a tripod to
prevent camera shake.
Setting the flash units
◆ Using Metered Manual Mode
Memo
1
qIf you will use the built-in flash, press the flash pop-up button.
wSet the required flash units’ sync mode to Contrast-Control-Sync
Flash mode.
Memo
If you will use an external flash, turn on the power.
Memo
Output ratio of the flash is 2 for contrast-control-sync mode to 1 for the
other flash mode.
For instructions on how to set the contrast-control-sync mode, refer to
the flash unit’s operating manual.
2
Taking a picture
qCheck that all of flash units are ready.
wFocus the subject and take the picture.
Setting the flash unit
2
Setting the Metered Manual Mode
qTurn the lens aperture ring to set the aperture value.
wSet the shutter speed.
FLASH PHOTOGRAPHY
If a hot shoe grip is used, would cause the TTL metering to function
improperly. For instructions for connection, see
p.102
STEP UP
qSet up the external flash units apart from the camera.
p.67
Memo
Check that the flash is ready and that the flash exposure setting is
correct.
eFocus the subject and take the picture.
Memo
External multiple sync flashes
Note the following when you use two or more flashes in sync.
● Use the flashes in the following combinations referring to the
“Flash functions” (
p.95).
• Combine the same type (Type B to F) of flashes.
• If you use different type combination of flashes, combine Type C
and Type D or Type E and Type F.
● Any type of combinations of the built-in flashes can be used.
104
105
MZ-6(E)05 E2/095-108
11/8/02 12:09 PM
Page 106
USING EXTERNAL FLASH
◆ Using Shutter-Priority AE
1
Setting the Shutter-Priority AE Mode
refer to page 65
2
Setting the Flash unit
Memo
qIf you will use the built-in flash, press the flash pop-up button.
Memo
3
106
Focus the subject and take the picture.
◆ Using the built-in flash and a dedicated
external flash
• If you use the built-in flash and a Pentax-dedicated external flash simultaneously and set the external flash to trailing shutter curtain sync, the built-in flash will also be set
to trailing shutter curtain sync.
• Before taking the picture, make sure both the built-in flash
and external flash are ready (fully charged).
◆ Using a non-Pentax flash unit
• Using a non-Pentax flash unit may cause a malfunction.
Pentax-dedicated flash units are recommended.
• When using studio type flash with the camera, note the
polarity of the flash contacts. Some studio type flash units
may have reversed polarity which will not work with the
camera. For details, consult the manufacturer of the flash.
• When using studio type flash, set a flash sync speed one
stop slower than the camera's normal sync speed. This is
to prevent a partial flash exposure (part of the picture
looks dark).
FLASH PHOTOGRAPHY
If you will use an external flash, turn on the power.
Cautions for using flash are explained below.
STEP UP
Do not turn on the power of the built-in flash or external flash before
setting step 1 above. Otherwise, the background may not be exposed
properly.
PRECAUTIONS FOR USING FLASH
107
MZ-6(E)05 E2/095-108
108
11/8/02 12:09 PM
Page 108
MZ-6(E)06 F1/109-118
11/8/02 12:11 PM
Page 109
APPENDIX
PENTAX FUNCTIONS ...............................110
BASIC SETTING OF PENTAX
FUNCTIONS ...........................................111
SETTING A PENTAX FUNCTIONS ........113
CAMERA FUNCTIONS AVAILABLE WITH
VARIOUS LENSES ....................................117
ACCESSORIES (OPTIONAL)....................119
PROGRAM DIAGRAMS ............................122
TROUBLE SHOOTING ..............................125
SPECIFICATIONS TABLE..........................128
WARRANTY POLICY ...................................132
109
MZ-6(E)06 F1/109-118
11/8/02 12:11 PM
Page 110
PENTAX FUNCTIONS
PENTAX FUNCTIONS
BASIC SETTING OF PENTAX FUNCTIONS
The camera provides 11 Pentax Functions so you can set
the camera according to your shooting preferences.
[F1]
Selection of range of auto bracketing correction value
[F2]
Selection of re-set to single frame after auto bracketing
exposure
p.113
[F3]
Selection of shutter release delay time with the remote
controller
p.114
Selection of whether or not auto focusing is used during
remote control photography
p.114
[F5]
Selection of the metering method with AE lock
p.114
[F6]
Selection of whether or not AE lock is used when the
subject is in focus.
p.115
Selection of autofocus method in the action
program mode
p.115
[F8]
Selection of illumination method of the LCD panel
p.115
[F9]
Selection of Mode dial illumination pattern when power
switch is turned ON
p.116
[F10]
Selection of the state of the end of film when rewinding
p.116
[F11]
Selection of the built-in flash in the wireless flash mode
p.116
[F4]
110
1
Display Pentax Function No.
qTurn the mode dial to PF.
wMove the select switch to display the
Pentax Function No. You wish to set.
The Pentax Function No. will be displayed on the LCD panel
Example:
Selection of Remote
controller operation
time.
APPENDIX
[F7]
p.113
Follow the procedure below to set a Pentax Function.
Pentax Function No.
111
MZ-6(E)06 F1/109-118
11/8/02 12:11 PM
Page 112
PENTAX FUNCTIONS
2
SETTING A PENTAX FUNCTION
Display the setting No.
qPress the AE lock button and display the setting No.
The setting No. will be displayed on the
LCD panel.
The settings for each Pentax Function are explained below.
To display the Pentax Function No. and setting No.. see
Basic Setting of Pentax Functions.
p.111
q Set the mode dial to PF
Memo
The LCD panel shows that Pentax
Function No. F3
The setting number on the panel shows
function no. F3 (the setting number for
the operating time of the remote controller is set to “2”).
e Setting No. : Select with the AE lock
button.
Memo
Resetting the Pentax
Functions to the Default
Settings
qSet the mode dial to [PF].
w Hold down the AE lock button for 2
sec. or longer. [PF] and [CL] will be
displayed on the LCD panel, and all
the Pentax Functions will be reset to
default setting.
eSet the mode dial to [AUTO PICT].
112
◆ [F1] Selection of range of auto bracketing
correction value
This is used to select the range of the correction value
when using the auto bracketing function.
● Pentax Function No. [F1]
● Setting No.
[1]…1/2 step (EV)
[2]…1/3 step (EV)
[3]…2/3 step (EV)
[4]…1 step (EV)
APPENDIX
Setting No.
wTurn the mode dial to “AUTO PICT”.
w Pentax Function No. :Select with the
select swich.
◆ [F2] Selection of re-set to single frame after
auto bracketing exposure.
This is used to select whether the camera automatically
returns to single frame shooting after auto bracketing
exposure.
● Pentax Function No. [F2]
● Setting No.
[1]…Returns to single frame
shooting
[2]…Remains in auto bracketing
113
MZ-6(E)06 F1/109-118
11/8/02 12:11 PM
Page 114
PENTAX FUNCTIONS
◆ [F3] Selection of shutter release delay time
with the remote controller
This is used to select the delay time when taking pictures
using the remote controller.
● Pentax Function No. [F3]
● Setting No.
[1]…picture taken after 3 seconds
[2]…picture taken immediately
◆ [F4] Selection of whether or not auto focusing is used during remote control photography
◆ [F5] Selection of exposure metering mode
during AE Lock
This is used to select either spot metering or multi-segment
metering mode during the AE Lock.
●Pentax Function No. [F5]
● Setting No.
[1]…Spot metering
[2]…Multi-segment metering
114
This is used to select whether or not AE lock is used when
a subject is focused with shutter release button is
depressed halfway down.
● Pentax Function No. [F6]
● Setting No.
[1]. .AE lock not used
[2]. .AE lock used
◆ [F7] Selection of autofocus method in the
Action Program Mode
This is used to select whether focusing be made continuously or focus be locked when a subject is focused in the
Action Program mode except auto pictures.
●Pentax Function No. [F7]
● Setting No.
[1]…Continuous focusing
[2]…Focus lock
APPENDIX
This is used to select whether or not auto focusing is used
when taking a picture using the remote controller.
●Pentax Function No. [F4]
● Setting No.
[1]..Auto focusing not used
[2]..Auto focusing used
◆ [F6] Selection of whether or not AE lock is
used when the subject is focused
◆ [F8] Selection of illumination method of
LCD panel
This is used to select the timing at which the panel lighting
is illuminated during display.
● Pentax Function No. [F8]
● Setting No.
[1]...Illuminated automatically
when shutter button is
depressed halfway down
when the subject being photographed is dark
[2]...Illuminated when the electronic
preview button is pressed
[3]...Not illuminated
115
MZ-6(E)06 F1/109-118
11/8/02 12:11 PM
Page 116
PENTAX FUNCTIONS
◆ [F9] Selection of mode dial illumination
pattern when power is turned on
This is used to select the illumination pattern of the mode
dial when the power is turned on.
● Pentax Function No. [F9]
● Setting No.
[1]...Pattern A (regular illumination)
[2]...Pattern B (irregular illumination)
[3]...Not illuminated
■ CAMERA FUNCTIONS AVAILABLE WITH VARIOUS LENSES
FUNCTION
Lens
[Mount type]
Autofocus (Lens only)
(Lens with AF Adapter 1.7X)
Manual focus (with FI)*2
(with Matte field)
3 - points AF
Auto Picture, Picture
◆ [F10] Selection of the state of the end of the
film when rewinding film
◆ [F11] Selection of how built-in flash be fired
in wireless mode
This is used to select whether the flash unit be fired in
master mode or controlled mode.
●Pentax Function No. [F11]
● Setting No.
[1]…Fire in master mode (built-in
flash unit is fired)
[2]…Controlled fire (built-in flash
unit is not fired)
116
F lens
[KAF2]
A lens
[KA]
M lens
[K]
S lens
[Screw]
K
K
✕
✕
✕
✕
–
–
K*1
K*1
K*3
K*3
K*3
K*3
✕
K
K
K
K
K
K
K
✕
✕
✕
K*4
K*4
K*5
✕
✕
K
K
K
K
K
K*4
K*4
K
✕
✕
Metered Manual
K
K
K
K
K
Multi(6)-segment metering
K
K
K*6
✕*7
✕*7
Approx. f-stop indication
K
K
✕
✕
✕
Aperture-Priority AE
Shutter-Priority AE
APPENDIX
This is used to select whether or not the leader on the end
of the film is to be wound up when the film has been
rewound.
● Pentax Function No. [F10]
● Setting No.
[1]...Film completely rolled up
[2]...End left unwound
p.35
FA lens
[KAF/KAF2]
NOTE
*1. Lenses with a maximum aperture of f/2.8 or larger. (See AF Adapter
operating manual.)
*2. Manual focusing using the focus indicator (FI) (
)in the viewfinder.
*3. Lenses with a maximum aperture of f/5.6 or larger.
*4. Exception of Pentax-FA Soft 85mm f/2.8 and FA-soft 28mm f/2.8.
*5. Standard operation mode only.
*6. With A50mmf/1.2, the center-weighted metering or Spot metering is
used instead of the multi-(6) segment metering mode.
*7. Multi(6)-segment metering, if selected, will be switched to centerweighted metering.
117
MZ-6(E)06 F1/109-118
118
11/8/02 12:11 PM
Page 118
MZ-6(E)06 F2/119-133
11/8/02 12:13 PM
Page 119
ACCESSORIES (OPTIONAL)
ACCESSORIES (OPTIONAL)
A number of dedicated accessories are available for this
camera.
■ AA-BATTERY PACK FG
Battery grip powered by size-AA batteries and dedicated to the MZ-6/ZX-L.
Memo
Battery Life (Using 24-exposure film rolls)
The number of 24-exposure film rolls that can be taken with a
new set of alkaline batteries is indicated below.
APPENDIX
General existing light photography
Flash photography
(using flash 50% of the times)
Flash photography
(using flash 100% of the times)
Bulb exposure time
Number of film rolls
at 20˚C/68˚F
about 180 rolls
about 35 rolls
about 20 rolls
about 18 hours
■ CABLE SWITCHES
Cable Switch CS-205
length: 0.5 m
119
MZ-6(E)06 F2/119-133
11/8/02 12:13 PM
Page 120
ACCESSORIES (OPTIONAL)
■ FLASH ACCESSORIES
AF360FGZ
Magnifier FB
TTL auto flash unit with Guide No.
36. Features include slave-sync
flash, multiple-flash, and leading/trailing curtain-sync flash. High-speed
sync and wireless flash can be used.
Magnifies the image at the center of the viewfinder.
AF500FTZ
A TTL Auto Zoom flash with a built-in AF spotbeam and large
guide number of 50 in meters (ISO 100). It features the slave
sync flash function, multiple flash burst, contrast-control-sync
flash, leading/trailing -curtain-sync flash mode.
A TTL Auto flash with a guide number of 22 in meters (ISO 100).
AF201SA
An auto flash (not TTL) with the guide number of 20 in meters
(ISO 100).
AF140C
TTL macro flash unit with the guide number of 14 in meters (ISO
100).
Off–Camera Shoe Clip CL-10
Enables the AF360FGZ to be used as a wireless flash.
Hot Shoe Adapter F, Extension Cord F5P and OffCamera-Shoe Adapter
The adapters and cord which allow the external flash to be used
off the camera, while maintaining full electric coupling to the camera.
Refconverter A
Right angle finder which attaches to the grooves on both sides of
the viewfinder. The viewfinder magnification is able to switch from
1X to 2X.
Memo
While attached, it may obstruct the opening/closing of the camera back.
First detach the Refconverter A before opening/closing the camera back.
AF Adapter 1.7X
An adapter for autofocus photography using a non-autofocus lens
with a maximum aperture of f/2.8 or larger.
Filters
Skylight, Cloudy, UV, Y2, O2, R2 and Circular Polarizing Filter are
available in sizes of 49mm, 52mm, 67mm and 77mm.
APPENDIX
AF220T
120
■ VIEWFINDER, LENS AND CLOSE-UP ACCESSORIES
Memo
• Since the camera’s autofocus mechanism uses a semi-transparent
mirror, using a non-circular polarizing filter may throw off the autofocusing and exposure metering precision. When using autofocus, a circular
polarizing filter is recommended instead. This will also maintain exposure metering precision.
• When you attach/detach Adapter K (for the 645 lens) to the camera,
the adapter’s screw should not contact the camera body. If necessary,
change the screw’s position.
• The hot shoe cover attached to the hot shoe unit is used exclusively
with the MZ-6/ZX-6 and MZ-7/ZS-7. The use of other hot shoe covers
will prevent operation of the auto pop-up function of the flash.
Auto Extension Tube K
A set of three tubes. A close-up accessory placed between camera and lens. Supports automatic aperture and metering with
maximum aperture.
121
MZ-6(E)06 F2/119-133
11/8/02 12:13 PM
Page 122
PROGRAM DIAGRAMS
PROGRAM DIAGRAMS
rClose-up Program Mode
qStandard Operation Mode
Night-scene Program Mode without Flash
8
10
12
14
16
18
20
22
24
[EV]
[FNo.]
With FA 28-90mm f3.5-5.6
64
6
8
10
12
14
16
18
20
22
24
[EV]
[FNo.]
45
45
32
4
32
4
22
22
16
2
16
2
11
11
8
0
8
0
5.6
5.6
4
-2
4
-2
2.8
2.8
2
-4
2
-4
1.4
1/sec
30s 15s 8s
4s
2s
1s
2
4
8
15
30
1.4
60 125 250 500 1000 2000 4000
1/sec
30s 15s 8s
4s
2s
1s
2
4
8
15
30
60 125 250 500 1000 2000 4000
[ISO100]
[ISO100]
10
12
14
16
18
tAction Program Mode
20
22
24
[EV]
[FNo.]
With FA 28-90mm f3.5-5.6
64
6
8
10
12
14
16
18
20
22
24
[EV]
[FNo.]
64
6
45
45
32
4
32
4
22
22
16
2
16
2
11
11
8
0
8
0
5.6
5.6
4
-2
4
-2
2.8
2.8
2
-4
2
-4
1.4
1/sec
30s 15s 8s
4s
2s
1s
2
4
8
15
30
With FA 28-90mm f3.5-5.6
APPENDIX
wPortrait Program Mode
8
With FA 28-90mm f3.5-5.6
64
6
1.4
60 125 250 500 1000 2000 4000
1/sec
[ISO100]
30s 15s 8s
4s
2s
1s
2
4
8
15
30
60 125 250 500 1000 2000 4000
[ISO100]
eLandscape Program Mode
8
10
12
14
16
18
20
22
24
[EV]
[FNo.]
With FA 28-90mm f3.5-5.6
64
6
45
32
4
22
16
2
11
8
0
5.6
4
-2
2.8
2
-4
1.4
1/sec
122
30s 15s 8s
4s
2s
1s
2
4
8
15
30
60 125 250 500 1000 2000 4000
[ISO100]
123
MZ-6(E)06 F2/119-133
11/8/02 12:13 PM
Page 124
TROUBLE SHOOTING
TROUBLE SHOOTING
Before requesting service, please check the following points.
◆ Nothing is displayed on the LCD panel.
Check 1:
Countermeasure
Check 2:
Countermeasure
Check 3:
Countermeasure
Power is OFF.
Turn the main switch to ON (
22).
Batteries are not inserted or inserted backwards.
Check the insertion direction of the batteries and insert
the batteries correctly (
13).
The batteries are exhausted.
Replace the batteries with new ones (
13, 38).
◆ Shutter does not trip.
Check 2:
Countermeasure
Check 3:
Countermeasure
Check 4:
Countermeasure
Check 5:
Countermeasure
Power is OFF.
Turn the main switch to ON (
22).
Batteries are not inserted or are inserted backwards.
Check the insertion direction of the batteries and insert the
batteries correctly (
13).
The “Battery Warning” is blinking.
Replace the batteries with new ones (
13, 38).
The mode dial is set to the [PF] [
] or [ ISO ] position.
Set the mode dial to a position other than the [
] position, [PF] position or [ISO] position.
The built-in flash is charging.
Wait until charging is finished (
31).
APPENDIX
Check 1:
Countermeasure
◆ Subject is out of focus.
Check 1:
Countermeasure
Check 2:
124
The subject to be focused on is not inside the AF
frame.
Cover the subject you wish to photograph within the AF
frame before shooting (
27).
The picture-taking distance is too close.
125
MZ-6(E)06 F2/119-133
11/8/02 12:13 PM
Page 126
TROUBLE SHOOTING
Countermeasure
Check 3:
Countermeasure
Check 4:
Countermeasure
Move away from the subject to be photographed (
76).
The subject is not suited for autofocus (
77).
Use focus-lock to focus on a subject which is about the
same distance as the subject to be photographed (page
81), or set the focus mode switch to the [MF] position
and then use the matte screen to focus manually (
79)
The focus mode switch is at the [MF] position.
Use the focusing indicator and matte screen to adjust the
focus manually (see page 79). Or set the focus mode
switch to the [AF] position before taking pictures (
75).
◆ Exposure counter is not displayed or does not
advance.
[E] is blinking on the LCD panel.
Film has not been loaded properly. Load the film again
(
20).
◆ The built-in flash does not fire.
Check 1:
Countermeasure
Check 2:
Countermeasure
Check 3:
Countermeasure
126
Check 1:
Countermeasure
Imprinting data information on a picture is faint.
Replace the data back’s battery (CR2025) (
p.40).
◆ AE lock do not work.
Check 1:
Countermeasure
The camera is set to Manual Exposure.
Set the exposure mode to the Auto Picture Mode or
Picture Mode. (
25, 56).
◆ The built-in flash does not pop up automatically.
Check 1:
Countermeasure
The camera is not set to the Auto Picture Mode or
Picture Mode.
Set the exposure mode to the Auto Picture Mode or
Picture Mode.(
p.25, 56).
APPENDIX
Check 1:
Countermeasure
◆ Imprinting data on negative is faint.
The built-in flash is charging.
Wait until charging is finished (
31).
The "Battery Warning" symbol is blinking.
Replace the batteries with new ones (
13, 38).
The flash mode is set to [A] (auto flashing mode).
If the subject to be photographed in the auto flash mode is
bright, the flash will not light. Set to the flash ON mode to
cause lighting even for bright subjects (
84).
127
MZ-6(E)06 F2/119-133
11/8/02 12:13 PM
Page 128
SPECIFICATIONS TABLE
SPECIFICATIONS TABLE
● Type
TTL autofocus, multi-mode auto-exposure 35mm SLR with
built-in TTL auto flash (RTF)
● Format
24 × 36mm
● Usable Film
35mm perforated cartridge film. DX-coded film with ISO 255000; non-DX coded films with ISO 6-6400
● Exposure Modes
Auto Picture Mode, Picture Mode (Standard Operation Mode,
Portrait Program Mode, Landscape Program Mode, Close-up
Program, Action Program Mode, Night-scene Program Mode),
Shutter-Priority AE Mode, Aperture-Priority AE Mode, Metered
Manual Mode, Bulb Mode, TTL Flash Mode
Electronically controlled vertical-run focal-plane shutter,
Electromagnetic release, Speed range: (1)Auto 1/4000-30
sec.(stepless),(2)Manual 1/4000-30 sec.(3)Bulb,
● Lens Mount
Pentax KAF bayonet mount (K-mount with AF coupler, lens
information contacts).
● Compatible Lens
Pentax KAF2-, KAF-,KA-, and K-mount lenses are usable.
Autofocus is possible using AF Adapter with KA-and K-mount
lenses.
● Autofocus
System
● Viewfinder
TTL phase-matching multi-(3 points) autofocus system
switchable to Spot focusing, AF operational brightness range:
EV –1 to 18(at ISO 100 with f/1.4 lens), Focus lock available
using shutter release button/AF button, Focus Mode: AF.S(single), AF.C(predictive AF), Manual[MF]. AF illuminator
● Preview Button
Electronically controlled type and possible to use in all exposure modes
● Self-timer
Electronically-controlled type with delay time of 12 sec. Start
by depressing of shutter release button, Operation confirmation : Possible to set PCV beep tone. Cancelable after operation.
● Auto bracketing
Three frame consecutive shots with exposure bracketing in
0.5 EV step. Increment, Possible to use with exposure compensation
● Mirror
Quick-return mirror with AF secondary mirror.
● Film Loading
Film advances automatically to 1st frame after back cover is
closed, Film information window is provided.
● Film Wind
& Rewind
Auto wind/rewind by built-in motor, Consecutive or Single
advance mode, Approx.2 frames/sec.(consecutive mode),
Auto rewinding starts at end of roll, Film rewind/completion of
rewinding is displayed on the LCD panel, mid-roll rewind button will rewind film in mid-roll.
● Exposure Meter
TTL multi(6)-segment metering, Metering range from EV0 to
EV21 at ISO100 with 50mm f/1.4 lens.
● Exposure
Compensation
±3EV in 0.5EV step increments
● AE Lock:
Set by AE lock button, current exposure value remains for 20
sec. With the shutter release button pressed halfway down,
the exposure value remains continuously.
Fixed pentamirror, Natural-Bright-Matte focusing screen,
Field of view:92%, Magnification:0.7X(with 50mm f/1.4 lens at
infinity ), Diopter: –2 to +1m-1
● Viewfinder Indication Focus Information. In-focus (Green lamp [ ] is lit), front or
back focus signals and unable-to-focus indicator (Green
lamp blinks), Shutter speed indication, Aperture indication,
Flash ready indication [ ] is lit, Bar graph(exposure compensation),Over or Under exposure indication in Metered
Manual Mode, exposure compensation indication, Green
Operation Mode [ ], Portrait Program Mode [ ],
Landscape Program Mode [ ], Close-up Program Mode
[ ], Action Program Mode [ ], Night-scene Program
Mode [ ], [ ] AE Lock indicator
128
Shutter speed, Aperture value, [ ] = Built-in flash ready indication,
[ ] = blinking slowly flash recommended warning, [ ] = blinks
rapidly Inappropriate lens warning, [ ] = Red-eye reduction flash
mode, [
] = Auto pop-up flash function, Automatic flash function,
ISO indication, [
] = Film status information, [ ] = Battery
exhaustion warning, Exposure counter, [ ] = PCV signal indication, [ ] = Exposure compensation, Exposure compensation value,
[ ] = Self-timer, [ ]= Auto bracketing mode, [ ] = Consecutive
shooting, [ ] = Multiple exposure, [ ]=Wireless flash mode,
[ ]= High-speed flash sync
APPENDIX
● Shutter
● External LCD
panel Indication
129
MZ-6(E)06 F2/119-133
● Flash
● Flash sync
11/8/02 12:13 PM
Page 130
Series-control, Retractable TTL Auto Flash (RTF), Guide number:11 (ISO100/m), Illumination angle covers 28mm lens angle
of view, Flash-sync-speed in the range from 1/125 to a slower
speed, Slow-speed-sync flash, Contrast-control-flash sync
(ISO range=25-800), Auto pop-up, Red-eye reduction flash
function
Hot shoe with X-contact with couples with Pentax dedicated
auto flashes, ISO range=25-800, Flash-sync-speed in the
range from 1/125 to a slower speed. Possible to use highspeed sync, wireless flash mode, P-TTL mode with
AF360FGZ.
● Pentax function
11 user-defined functions
● Power source
Two 3V lithium batteries (CR-2 or the equivalent)
STATEMENT OF FCC COMPLIANCE
This device complies with Part 15 of the FCC Rules. Operation is subject to
the following two conditions: (1) This device may not cause harmful interference, and (2) this device must accept any interference received, including
interference that may cause undesired operation.
Changes or modifications not approved by the party responsible for compliance could void the user’s authority to operate the equipment.
This equipment has been tested and found comply with the limits for a Class B
digital device, pursuant to part 15 of the FCC Rules. These limits are designed
to provide reasonable protection against harmful interference in a residential
installation. This equipment generates, uses and can radiate frequency energy
and, if not installed and used in accordance with the instructions, may cause
harmful interference to radio communications. However, there is no guarantee
that interference will not occur in a particular installation. If this equipment does
not cause harmful interference to radio or television reception, which can be
determined by turning the equipment off and on, the user is encouraged to try
to correct the interference by one or more of the following measures:
● Dimension
and Weight
135.5mm(W) × 92mm(H) × 63mm(D) (5.3” × 3.6” × 2.5”)
400g (14.1 oz) body only without batteries
● Supplied
Accessories
Hot Shoe Cover FK, Release Socket Cap , Camera Strap FK
Eye Cup FK, Finder Cap
Data Back FJ Cover
(optional)
Crystal quartz controlled; LCD with digital clock, auto calendar
up to 2049.
• Reorient or relocate the receiving antenna.
● Data printout
7-segment, 6-digit LCD
• Consult the dealer or an experienced radio/TV technician for help.
● Printout
confirmation
“–”indication blinks for a few seconds on LCD panel.
● Printing mode
q Year/month/day, w day/hour/minute, e “---”,
r month/day/year, t day/month/year
● ISO range
ISO 25–1600 (automatic setting)
● Power source
CR2025 (lithium battery)
● Number of prints
Approx. 5,000
SPECIFICATIONS ARE SUBJECT TO CHANGE AT ANY TIME WITHOUT NOTIFICATION OR ANY
APPENDIX
● Battery Exhaustion Battery exhaustion symbol [ ] is lit. (The shutter is locked and
Warning
no indication in the viewfinder when starts blinking)
For customers in the USA
• Increase the separation between the equipment and receiver.
For customers in Canada
This Class B digital apparatus meets all requirements of the Canadian
Interference - Causing Equipment Regulations.
Pour les utilisateurs an Canada
Cet appareil numérique de la classe B respecte toutes les exigences du
Règlement sur le matériel brouilleur du Canada.
OBLIGATION ON THE PART OF THE MANUFACTURER.
130
131
MZ-6(E)06 F2/119-133
11/8/02 12:13 PM
Page 132
WARRANTY POLICY
Procedure During 12-month Warranty Period
In any case, however, shipping charges and customs clearance fees to be borne
by the sender. To prove the date of your purchase when required, please keep
the receipt or bills covering the purchase of your equipment for at least a year.
Before sending your equipment for servicing, please make sure that you are
sending it to the manufacturer's authorized representatives or their approved
repair shops, unless you are sending it directly to the manufacturer. Always
obtain a quotation for the service charge, and only after you accept the quoted
service charge, instruct the service station to proceed with the servicing.
The local warranty policies available from Pentax distributors in some
countries can supersede this warranty policy. Therefore, we recommend
that you review the warranty card supplied with your product at the time
of purchase, or contact the PENTAX distributor in your country for more
information and to receive a copy of the warranty policy.
APPENDIX
All Pentax cameras purchased through authorized bona fide photographic distribution channels are guaranteed against defects of material or workmanship
for a period of twelve months from date of purchase. Service will be rendered,
and defective parts will be replaced without cost to you within that period, provided the equipment does not show evidence of impact, sand or liquid damage,
mishandling, tampering, battery or chemical corrosion, operation contrary to
operating instructions, or modification by an unauthorized repair shop. The
manufacturer or its authorized representatives shall not be liable for any repair
or alterations except those made with its written consent and shall not be liable
for damages from delay or loss of use or from other indirect or consequential
damages of any kind, whether caused by defective material or workmanship or
otherwise; and it is expressly agreed that the liability of the manufacturer or its
representatives under all guarantees or warranties, whether expressed or
implied, is strictly limited to the replacement of parts as hereinbefore provided.
No refunds will be made on repairs by non-authorized Pentax service facilities.
Any Pentax which proves defective during the 12-month warranty period should
be returned to the dealer from whom you purchased the equipment or to the
manufacturer. If there is no representatives of the manufacturer in your country,
send the equipment to the manufacturer, with postage prepaid. In this case, it
will take a considerable length of time before the equipment can be returned to
you owing to the complicated customs procedures required. If the equipment is
covered by warranty, repairs will be made and parts replaced free of charge,
and the equipment will be returned to you upon completion of servicing. If the
equipment is not covered by warranty, regular charges of the manufacturer or
of its representatives will apply. Shipping charges are to be borne by the owner.
If your Pentax was purchased outside of the country where you wish to have it
serviced during the warranty period, regular handling and servicing fees may
be charged by the manufacturer's representatives in that country.
Notwithstanding this, your Pentax returned to the manufacturer will be serviced
free of charge according to this procedure and warranty policy.
132
133