1
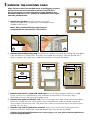
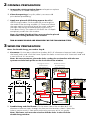
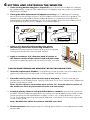
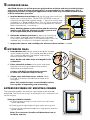
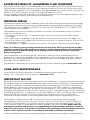
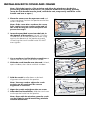
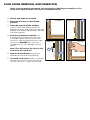
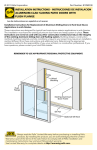
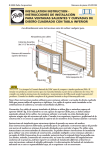
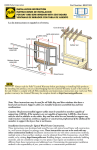
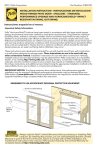
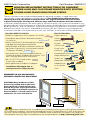
©2012 Pella Corporation
Part Number: 80WX0101
WINDOW REPLACEMENT INSTRUCTIONS FOR CASEMENT,
DOUBLE-HUNG AND CLAD FRAME WINDOWS INTO EXISTING
DOUBLE-HUNG FRAME USING FRAME SCREWS
These instructions were tested and developed for replacing windows in wood-frame wall
construction systems designed to manage moisture. This method of installation involves
removing the sash only of the existing window. The original window frame will remain
in place and only the existing sash, exterior stops and frame hardware must be removed.
Installation recommendations for other types of wall construction, wall systems or conditions may
be obtained from Pella Corporation or a local Pella retailer. Building designs, construction methods,
building materials, and site conditions unique to your project may require an installation method
different from these instructions and additional care on your part. Determining the appropriate
installation method is the responsibility of you, your architect, or other construction professional.
YOU WILL NEED TO SUPPLY:
•Cedar or Impervious shims/spacers (12 to 20)
TOOLS REQUIRED:
•Tape measure
•Closed cell foam backer rod/sealant backer (12 to 30 ft.)
•Level
•Pella® SmartFlash™ foil backed butyl window
and door flashing tape or equivalent
•Prybar
•Pella Window and Door Installation Sealant or
equivalent high quality, multi-purpose sealant
(1 tube per window)
SEALANT
SEALANT
•Putty knife
•Low expansion, low pressure polyurethane
insulating window and door foam sealant - DO
NOT use high pressure or latex foams
•#8 x 3-1/4" Finish head screws
(6 to 10 per window)
•Sealant gun
•Utility knife
•Hammer
•Screwdrivers (Flat & Phillips)
•Adjustable pliers
•Side Cuts
•Roto-tool, reciprocating saw
•Pella replacement window sill adapter
Installation will require two or
more persons for safety reasons.
•Wood chisel
•1/8" drill bit
•Drill
REMEMBER TO USE APPROPRIATE
PERSONAL PROTECTIVE EQUIPMENT
EX
TE
RIO
R
CAUTION: Many windows in older
homes are painted with lead-based
paint. Removal of old windows may
disturb this paint. Proper precautions
must be taken to minimize exposure to
dust and debris. Consult state or local
authorities for more information.
Sill Adapter
Flashing Tape
Always read the Pella® Limited Warranty before purchasing or installing Pella products.
By installing this product, you are acknowledging that this Limited Warranty is part of the terms of
the sale. Failure to comply with all Pella installation and maintenance instructions may void your
Pella product warranty. See Limited Warranty for complete details at http://warranty.pella.com.
1 REMOVE THE EXISTING SASH
Note: Remove the new window from its packaging. Inspect
and measure the new window to ensure it will fit into
the opening prior to removing the existing window. The
window needs to be 3/4" smaller in both width and height
than the pocket frame.
1A
A. Unlock the window. Raise the lower sash and
lower the upper sash so both are in the approximate
middle of the frame.
Note:Most of the following steps may be
completed from the exterior of the house.
OP
HEAD ST
J
A
M
B
Head Parting Stop
S
T
O
P
1B
1C
B. Remove the head parting stop. Remove any head parting stop by pulling the stop down
from the frame. In some cases, the stops are nailed on and can simply be pulled off. In
other situations the stops may need to be pried or cut out of the frame.
Head Stop
Remove Sashes
1D
Jamb Liner
1E
1C
Jamb Stops
C. Remove the exterior jamb and head stops. This can be accomplished with a wood
chisel, circular saw, reciprocating saw, roto-tool, or equivalent. Ensure the stop is
removed flush with the existing window jamb.
D. Remove the upper and lower sash. This will vary per manufacturer of existing windows.
Some will simply pull out, while others may need to be cut to be removed. Grasp the
sash and pull out of the frame. The jamb liner material may come out of the frame when
pulling the sash out.
E. Remove any and all jamb liner material. Some liners may have frame attachment
fasteners that will need to be removed before the liners can be removed.
Caution: Spring loaded balances can cause injury; use care when removing balances
from existing windows.
2 OPENING PREPARATION
A. Inspect the existing window frame and repair or replace
any defective or rotted wood parts.
EX
TE
B. Clean the opening of any dirt, debris, or excess old
paint before proceeding.
RIO
R
2C
C. Apply one piece of sill flashing tape to the sill of
the existing window. Cut the tape the same length as
the width of the existing window sill. Place one side of
the tape against the vertical leg of the stool, and work
the tape into the corner before applying to the sill.
Press down firmly. The tape will not cover the sill depth
completely under the new window.
2C
2C
Note:If needed, blocking/shims may need to be placed
where the existing balances were located.
TWO OR MORE PEOPLE ARE REQUIRED FOR THE FOLLOWING STEPS.
3 WINDOW PREPARATION
Note: For Double-hung, proceed to Step B.
A. Casement: On the room side of the window, drill 1/8" diameter clearance holes through
the head, jambs and sill of the frame. Space the holes a maximum of 6" from each end and
a maximum of 16" on center.
Note: On vent casements, place the holes so they do not interfere with the roto
operator and the latch points on the lock side of the window.
Designer Series®
and ProLine®
Architect Series®
Double-Hung
Double-Hung Head
Drill 1/8"
clearance hole
Double-Hung Head
1/2"
3A
3A
Casement Sill
3D
3B
6"
EVERY
16"
6"
EVERY
16"
Drill 1/8"
clearance hole
Double-Hung Jamb
Drill 1/8"
clearance hole
3D
3B
6"
1"
Drill 1/8"
clearance hole
6"
Single
Window
Clad Frame Head
Double-Hung Jamb
EVERY
16"
1/4"
Drill 1/8"
clearance hole
3D
3B
Drill 1/8"
clearance hole
Drill 1/8"
clearance hole
3D
3B
3D
3B
1"
Drill 1/8"
clearance hole
1/2"
6"
Drill 1/8"
clearance hole
Clad Frame Sill
6"
Double-Hung Sill
Double-Hung Sill
B. Double-Hung and Clad Frame: On the room side of the window, drill 1/8"
diameter clearance holes through the frame at the locations shown. Space the
holes a maximum of 6" from each end and a maximum of 16" on center.
Note: The lower sash must be raised to drill the holes in the sill of the
double-hung window.
4 SETTING AND FASTENING THE WINDOW
A. If the existing double-hung has a sloped sill the sill of the new window will need to
be supported by using the Pella replacement sill adapter accessory or by using wood
blocking as needed.
B. If using the Pella replacement sill adapter accessory the sill adapter will need to
be cut to the same length as the sill of the window and slid into the sill fin groove. This
adapter may be adjusted to accommodate different sill angles by breaking off the
grooved leg at the desired dimension. Dry fit the window to ensure the window will fit
in the opening and that the sill adapter is trimmed properly.
Casement Sill
Double-Hung Sill
4B
4B
Sill
Adapter
Sill
Adapter
(SILL CUTAWAY VIEW)
EX
TE
RIO
R
(SILL CUTAWAY VIEW)
C. Apply a 3/8" bead of sealant at the point where
the existing stool meets the existing window sill.
Additionally, place sealant at the ends of the flashing tape,
making sure to connect with the stool sealant.
4D
4C
D. Apply a continuous 3/8" diameter bead of sealant at
the exterior surface of the interior head and jamb stops.
Connect this bead of sealant to the sealant line on the stool.
TWO OR MORE PERSONS ARE REQUIRED FOR THE FOLLOWING STEPS.
E. Insert the replacement window in the opening. Check to make sure the window rests
against the interior blind stops and is making contact with the sealant.
F. From the exterior, place shims near the top of one jamb, in line with the top predrilled hole in the window frame. Partially insert one 3-1/4" finish wood screw. Repeat the
process for the other jamb.
Note: Position shims to ensure they allow at least 1/2" from the exterior surface of
the window to allow for placement of backer rod and sealant.
G. Continue placing shims at each pre-drilled hole as needed to plumb and square the
window. Check window for squareness by making sure the diagonal measurement from
corner to corner of the replacement window is within 1/8" in both directions. Insert a
3-1/4" finish wood screw into each pre-drilled hole in the frame. Finish inserting the top
screw in each jamb.
Note: DO NOT shim above the window. DO NOT over shim!
H. Check operation before applying the insulating foam sealant in case adjustments need
to be made.
5INTERIOR SEAL
CAUTION: Ensure use of low pressure polyurethane window and door insulating foams
and strictly follow the foam manufacturer’s recommendations for application. Use of
high pressure foams or improper application of the foam may cause the window frame
to bow and hinder operation.
EXTERIOR
A. Insulate between new frame and the existing frame with low
expansion insulating foam. FROM THE EXTERIOR insert the
nozzle of the applicator approximately 1" from the interior stop
and apply a 1" deep bead of foam. This will allow room for the
expansion of the foam and will minimize squeeze out. Follow
foam manufacturer's instructions.
Note:Masking between the window and the existing
interior stop will help alleviate possible squeeze out
of the expandable foam to the interior.
5A
B. Check the window operation by opening and closing
the window. If bowed, remove foam with a serrated
knife, then check operation. If still bowed, adjust shims as
needed, then insulate as instructed in previous step.
C. Inspect the interior and carefully trim all excess foam sealant if needed.
6EXTERIOR SEAL
A. Insert backer rod into the space around the window
at the head and jambs. This should provide at least
3/8" clearance between the backer rod and the
exterior face of the window.
EX
TE
6A
RIO
R
Note: Backer rod adds shape and depth for the
sealant line.
B. Place a bead of sealant at the jambs and head
between the existing window frame and the
replacement window frame.
Caution: DO NOT seal the bottom exterior
to allow for incidental water to weep.
6B
C. Shape, tool, and clean excess sealant. When
finished, the sealant should be the shape of an
hourglass.
Note: This method creates a more flexible sealant
line capable of expanding and contracting.
EXTERIOR FINISH OF EXISTING FRAME
The exposed wood on the exterior stop needs to be covered/
protected. There are many ways to accomplish this, and each case
can be unique.
A few possibilities include:
a) Covering the existing trim with aluminum coil wrap/
frame expander.
b) Sanding, priming and painting to match existing trim.
c) Covering the exposed wood with a high quality exterior
grade sealant.
Note: The contractor/installer will determine how to
finish the exterior.
EXTERIOR OF WINDOW
WITH FRAME EXPANDER
EXTERIOR FINISH OF ALUMINUM CLAD WINDOWS
The exterior frame and sash are protected by aluminum cladding with our tough EnduraClad® or
EnduraClad Plus baked-on factory finish that requires no painting. Clean this surface with mild
soap and water. Stubborn stains and deposits may be removed with mineral spirits. DO NOT use
abrasives. DO NOT scrape or use tools that might damage the surface.
Use of inappropriate solvents, brickwash or cleaning chemicals will cause adverse reactions with
window and door materials and voids the Limited Warranty.
INTERIOR FINISH
If products cannot be finished immediately, cover with clear plastic to protect from dirt, damage
and moisture. Remove any construction residue before finishing. Sand all wood surfaces lightly
with 180 grit or finer sandpaper. DO NOT use steel wool. BE CAREFUL NOT TO SCRATCH THE
GLASS. Remove sanding dust.
Pella products must be finished per the below instructions; failure to follow these instructions
voids the Limited Warranty.
• On casement and awnings, it is optional to paint, stain or finish the vertical and horizontal
sash edges.
• On single-hungs and double-hungs, do not paint, stain or finish the vertical sash edges, any
finish on the vertical sash edges may cause the sash to stick; it is optional to paint, stain or finish
the horizontal sash edges.
• On patio doors, it is optional to paint, stain or finish the vertical and horizontal panel edges.
Note: To maintain proper product performance do not paint, finish or remove the weatherstripping, mohair dust pads, gaskets or vinyl parts. Air and water leakage will result if these
parts are removed. After finishing, allow venting windows and doors to dry completely
before closing them.
Pella Corporation is not responsible for interior paint and stain finish imperfections for any
product that is not factory-applied by Pella Corporation. Use of inappropriate finishes, solvents,
brickwash, or cleaning chemicals will cause adverse reactions with window and door materials
and voids the Limited Warranty.
For additional information on finishing see the Pella Owner’s Manual or go to www.pella.com.
CARE AND MAINTENANCE
Care and maintenance information is available by contacting your local Pella
retailer. This information is also available at www.pella.com.
IMPORTANT NOTICE
Because all construction must anticipate some water infiltration, it is important that the wall system
be designed and constructed to properly manage moisture. Pella Corporation is not responsible
for claims or damages caused by anticipated and unanticipated water infiltration; deficiencies in
building design, construction and maintenance; failure to install Pella® products in accordance
with Pella installation instructions; or the use of Pella products in wall systems which do not allow
for proper management of moisture within the wall systems. The determination of the suitability of
all building components, including the use of Pella products, as well as the design and installation
of flashing and sealing systems are the responsibility of the Buyer or User, the architect,
contractor, installer, or other construction professional and are not the responsibility of Pella.
Pella products should not be used in barrier wall systems which do not allow for proper
management of moisture within the wall systems, such as barrier Exterior Insulation and Finish
Systems, (EIFS) (also known as synthetic stucco) or other non-water managed systems. Except
in the states of California, New Mexico, Arizona, Nevada, Utah, and Colorado, Pella makes no
warranty of any kind and assumes no responsibility for Pella windows and doors installed
in barrier wall systems. In the states listed above, the installation of Pella products in barrier
wall or similar systems must be in accordance with Pella installation instructions.
Product modifications that are not approved by Pella Corporation will void the Limited Warranty.
INSTALLING ROTO COVER AND CRANK
Note: Finish the interior of the window and allow the window to dry before
proceeding with these instructions. (To open the window for finishing, partially
insert the lock handle into the jamb, unlock the unit, temporarily attach the crank
handle and turn to open.)
A. Place the cover over the operator stud and
snap into place. Position the pocket end of the
cover into place.
Pocket End
Note: If the cover does not have the screw
hole, apply pressure on the pocket end of
the cover to snap the cover into place and
proceed to step C.
B. Insert the provided screw into the hole in
the bottom of the pocket. Use a # 1 Phillips
screwdriver to secure the pocket screw snug
against the bottom of the pocket to avoid
scratching the crank handle knob. DO NOT
over tighten.
C. Use a medium size flat-blade screwdriver to
loosen the set screw in the crank handle.
D. Slide the crank handle onto the stud. Unlock,
open window, then close and lock window.
Screw Hole
Operator Stud
A
B
Crank Handle D
Operator Stud
Set Screw
E. Fold the crank handle down and check
alignment of knob with the pocket.
C
Knob
E
Note: You may need to adjust the crank
position on the stud until the correct
alignment is achieved.
F. Open the crank and tighten the set screw.
G. After the final installation, fold the crank over
and snap the knob into the pocket.
Note: Even with the window open the crank
can be folded to avoid interferring with the
window treatments.
Pocket
LOCK LEVER REMOVAL AND INSERTION
Note: You may want to remove the lock lever prior to finishing the window, or if it
needs to be replaced with a lock lever in a different finish.
A. Unlock and open the window.
B. Place the lock lever in the locked
position.
B
Interior
Exterior
C
C. From the exterior of the window,
insert a small flat-blade screwdriver
between the cam and lock lever near the
bottom of the opening between the stop
and frame gasket.
D. Push the screwdriver inwards with
a small amount of pressure; then turn
the blade slightly clockwise for a left
hand unit, counter-clockwise for a right
hand units. DO NOT over-twist the
screwdriver, this can damage the lock
driver.
Note: This will release the hook in the
lever from the cam hook.
E. Remove the lock lever by pulling it
toward the interior of the building.
F. To install a lock lever, hold it in the lock
position and insert it, from the interior,
into the slot until it snaps into the cam.
Exterior
F
E
D
Interior