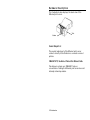
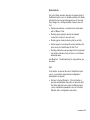
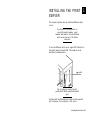
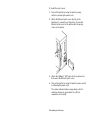
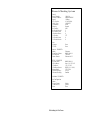
1
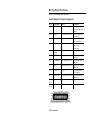
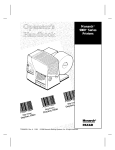
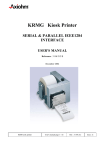
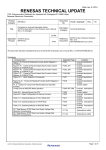
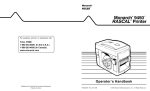
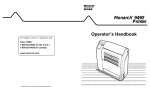
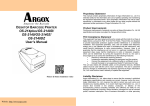
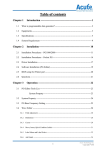
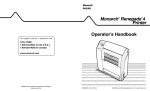
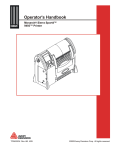
Monarch Printers 9840 TC9840ENOI Rev. AA 9/00 ©2000 Monarch Marking Systems, Inc. All rights reserved. Each product and program carries a respective written warranty, the only warranty on which the customer can rely. Monarch reserves the right to make changes in the product, the programs, and their availability at any time and without notice. Although Monarch has made every effort to provide complete and accurate information in this manual, Monarch shall not be liable for any omissions or inaccuracies. Any update will be incorporated in a later edition of this manual. ©2000 Monarch Marking Systems, Inc. All rights reserved. No part of this publication may be reproduced, transmitted, stored in a retrieval system, or translated into any language in any form by any means, without the prior written permission of Monarch Marking Systems, Inc. WARNING This equipment has been tested and found to comply with the limits for a Class A digital device, pursuant to Part 15 of the FCC Rules. These limits are designed to provide reasonable protection against harmful interference when the equipment is operated in a commercial environment. This equipment generates, uses, and can radiate radio frequency energy and, if not installed and used in accordance with the instruction manual, may cause harmful interference to radio communications. Operation of this equipment in a residential area is likely to cause harmful interference in which case the user will be required to correct the interference at his own expense. CANADIAN D.O.C. WARNING This digital apparatus does not exceed the Class A limits for radio noise emissions from digital apparatus set out in the Radio Interference Regulations of the Canadian Department of Communications. Le présent appareil numérique n’émet pas de bruits radioélectriques dépassant les limites applicables aux appareils numériques de la classe A prescrites dans le Réglement sur le brouillage radioélectrique édicte par le ministère des Communications du Canada. Trademarks Monarch is a registered trademark of Monarch Marking Systems, Inc. MonarchNet, 9800, 9840, and 9850 are trademarks of Monarch Marking Systems, Inc. Paxar is a trademark of Paxar Corporation. Centronics is a registered trademark of Centronics Data Computer Corporation. Microsoft and MS-DOS are registered trademarks of Microsoft Corporation. Windows and NT are registered trademarks of Microsoft in the U.S. and other countries. Novell and NetWare are registered trademarks of Novell, Inc. in the United States and other countries. Hewlett-Packard is a registered trademark of Hewlett-Packard Company. HP Jet Admin, HP Web Jet Admin, and HP JetDirect are trademarks of Hewlett-Packard Company. Other products are trademarks or registered trademarks of their respective holders and should be noted as such. Monarch Marking Systems 170 Monarch Lane Miamisburg, Ohio 45342 TABLE OF CONTENTS INTRODUCTION........................................................1-1 Product Overview ....................................................1-1 Related Documents ..............................................1-1 Hardware Description ..............................................1-2 Parallel Output Port ..............................................1-2 10BASE-T UTP, Unshielded Twisted-Pair Ethernet Cable ...................................................................1-2 Status Indicator ....................................................1-3 Test .....................................................................1-3 INSTALLING THE PRINT SERVER ............................2-1 Printer Information ...................................................2-3 Printing a Configuration Sheet ..................................2-3 TROUBLESHOOTING ...............................................3-1 Ethernet Print Server Status .................................3-1 MonarchNet Configuration Problems......................3-3 Unable to Print .....................................................3-3 SPECIFICATIONS .................................................... A-1 Ethernet Print Server .............................................. A-1 Wiring Specifications .............................................. A-2 Parallel Output Port Signal Assignments............... A-2 Table of Contents i ii Table of Contents 1 INTRODUCTION Product Overview The Monarch Marking Systems MonarchNet Ethernet Printer Server enables Ethernet network users to connect to a parallel printer using a high-speed, bi-directional parallel port. The Ethernet print server connects to a Monarch 9840 printer (version 6.5 or greater). MonarchNet consists of the following: ♦ Operating Instructions for the Ethernet print server (these instructions) ♦ Ethernet Print Server The print server may need to be configured before you can use it. Software is available on Monarch’s Web site (www.monarch.com) to configure the print server or you can order part number TC9840ENCD for the MonarchNet Utilities compact disc. The MonarchNet print server provides multiprotocol capabilities for users with Windows 95/98/2000, Windows NT , TCP/IP, and Novell NetWare . Related Documents Refer to your printer’s Operator’s Handbook for related information about printer configuration. A Technical Reference Manual, which includes additional Ethernet set-up and configuration information, is also available on our Web site. You can order part number TC9800ENTR for a printed copy of the Technical Reference Manual. Also, see your Network Operating System manuals for related information about network configuration and printing operations. Introduction 1-1 Hardware Description The illustration below displays the back view of the Ethernet print server. Test Status Parallel Output Port The parallel output port of the Ethernet print server connects directly to the Centronics connector on most printers. 10BASE-T UTP, Unshielded Twisted-Pair Ethernet Cable Twisted-pair systems use 10BASE-T hubs or c oncentrators. Adding the Ethernet print server does not interrupt network operation. 1-2 Introduction Status Indicator A bi-color Status indicator displays the general state of the Ethernet print server. In normal operation, the Status indicator flashes orange during power-up self test and then changes to a solid green when it passes the selftest. ♦ Solid green indicates a connection has been made with a 10Base-T hub. ♦ Flashing green rapidly indicates the network connection is faulty or does not exist. ♦ Flashing green slowly indicates print job activity. ♦ Solid orange for more than 30 seconds indicates the print server has failed Power On Self Test. ♦ Flashing alternately orange and green for longer than two minutes indicates the print server is in firmware download mode. See Chapter 3, “Troubleshooting” for any problems you may have. Test A test button, located on the side of the Ethernet print server, is provided to allow detailed configuration information to be printed. ♦ Restore to Factory Defaults - If the test button is pressed and held when the printer is turned on until the Status indicator turns green, the Ethernet print server configuration parameters are set to Factory Defaults and a configuration sheet prints. Introduction 1-3 1-4 Introduction INSTALLING THE PRINT SERVER 2 This chapter explains how to install the Ethernet print server. If you have not already done so, record the model number, serial number and address of your Ethernet print server and save it for future reference. To use the Ethernet print server, upper DIP switch 8 on the printer must be turned ON. This enables the bidirectional communication. Upper DIP Switches Do not plug any cables into the parallel port when using the Ethernet port. A printer with an Ethernet port cannot use the parallel port. However, the serial port is still active. Installing the Print Server 2-1 To install the print server: 1. Turn off the printer by using the printer’s power switch or removing the power cord. 2. Attach the Ethernet print server directly to the Centronics connector on the printer. Secure the Ethernet print server to the printer with the spring clicks on the printer. 3. Attach the 10Base-T UTP cable to the receptacle on the back of the Ethernet print server. 4. Turn on the printer by using the printer’s power switch or attaching the power cord. The status indicator blinks orange during self-test and then changes to green when the self-test completes successfully. 2-2 Installing the Print Server Printer Information When turning on the printer or after sending a ^PR (printer reset) immediate command, wait at least eight (8) seconds before sending data to the print server. Any data sent to the print server before the 8-second interval may be lost. For more information about immediate commands, refer to the optional Packet Reference Manual (part number TC9800PM), available on Monarch’s Web site. Printing a Configuration Sheet Configuration information prints automatically if the Ethernet print server senses a hardware error. To print configuration information on demand, press the Test button on the side of the Ethernet print server unit or use the configuration utility provided for your network operating system. The configuration label prints in MPCL format. The configuration label is best displayed using 4” wide by 6” long labels. If the label is too small, some information may print outside the label edges. See the following page for a sample configuration label. Installing the Print Server 2-3 Monarch Marking Systems General Serial Number: Ethernet Address: Speed: F/W Version: Cable Type: Link Status: Polarity: Rx Packets: Rx Packet Unavail: Rx Packet Errors: Checksum Errors: Tx Packets: Tx Packet Errors: Tx Packet Retries: 1949614 0040681DBFAE 10Mbps 6.3b (A024A) 10 BASET Good Normal 4243 2 0 0 272 0 0 Error Netware: TCP/IP: None None Netware: ENABLED Mode: Print Server Name: SAP Interval: Frame Forma t : Unknown MMS1949614 1 Minute Ethernet 802.3 TCP/IP: ENABLED System Name: Web Address: IP Address: IP Address Source: Subnet Mask: Default Gateway: Timeout Checking: MMS1949614 http://10.1.155.162 10.1.155.162 DHCP (10.1.10.41) 255.255.0.0 0.0.0.0 Enabled Jet Admin: ENABLED Port Configuration Name: Printer Status: Connected To: Error 2-4 Installing the Print Server Online printer None TROUBLESHOOTING 3 Ethernet Print Server Status The Ethernet print server has one bi-color LED that tells the status of the print server. During normal operation, the LED is solid green for more than 30 seconds. This does not mean the print server has an IP address or is attached to a NetWare queue, but that all of the hardware is functioning properly and it has detected the presence of the network. The following table describes the displays of the LED and possible solutions: LED Display LED flashing green very rapidly (9 times/sec) Description/Action The print server has not detected the presence of a network cable. To determine the problem: 1. Disconnect the print server from the printer. Remove the network cable from the print server. Plug the network cable back in until you hear a positive click. Check the other end of the cable in the same manner. Plug the print server back in. If the print server still does not detect a cable, continue below. 2. Verify the cable is a 10Base-T cable and it has an RJ-45 end. The network cable must have a CAT-3 or higher rating. Silver Satin or flat ribbon cable is not adequate. 3. Connect to a network drop that a currently working PC or print server is using. If the print server is still unable to detect the network cable, contact Technical Support for assistance. Troubleshooting 3-1 LED Display LED flashing green slowly (1 time/sec) LED is solid orange for more than 30 seconds LED alternately flashes orange and green for more than two minutes Description/Action The print server is trying to print a job. If the job does not print, check the following: Verify the printer has sufficient paper and toner. If the printer is showing any errors, the print server will not be able to send data to the printer. The LED continues to blink until the printer malfunction is resolved or until the print server is turned off. The print server has failed Power On Self Test (POST). If the failure is not catastrophic, press the test button to print a configuration label with more information. Failing POST can be caused by any of the following: ♦ The printer attached to the print server is malfunctioning. This can cause the print server to fail the POST. Remove the print server from the printer. If the print server still fails POST, continue below. ♦ The print server itself has a hardware problem that can only be fixed by replacing or returning the unit. Call Technical Support for repair or replacement information. The print server is in firmware download mode. This means that it is waiting for new firmware to be sent before it will continue functioning normally. Perform the following: 1. If the print server was purposely put into firmware download mode, finish the download with the proper update utility. See our Web site: http://www.monarch.com to download this utility. 2. Call Technical Support for help in recovering this unit. 3-2 Troubleshooting MonarchNet Configuration Problems If you are having problems using the MonarchNet utility to configure the unit, check the following: 1. If using MonarchNet for TCP/IP, verify there is not a router between the workstation running MonarchNet and the print server. Since the print server does not have an IP address, TCP/IP communication can not be started across a router. Run MonarchNet on the same subnet as the print server. MonarchNet for NetWare does not have this limitation. 2. Verify the print server has a solid green light. If the LED shows a rapidly flashing green light, make sure the network cable is attached. See “Ethernet Print Server Status” for more information. Unable to Print If you are having problems printing, please verify there is communication between the printer and the print server by printing a configuration page. To print a configuration label, press the Test button on the side of the Ethernet print server. If a configuration label does not print, verify the printer has supplies and is on-line. The configuration label prints in MPCL format. If problems persist, contact Technical Support. When turning on the printer or after sending a ^PR (printer reset) immediate command, wait at least eight (8) seconds before sending data to the print server. Any data sent to the print server before the 8-second interval may be lost. Troubleshooting 3-3 3-4 Troubleshooting A SPECIFICATIONS Ethernet Print Server Length: 3.6 inches (91 mm) Width: 2.5 inches (64 mm) Height: 0.8 inches (20 mm) Net Weight: 2.5 ounces (does not include power adapter) Operating Limits: 50 ° to 90 ° F (10 ° to 32.5 ° C) Storage Temperature: 32 ° to 96 ° F (0 ° to 35.5 ° C) Humidity: Operating and Storage 5% to 90% non-condensing Power Dissipation: Operating: 4 watts maximum Specifications A-1 Wiring Specifications See the following cable pin outs. Parallel Output Port Signal Assignments Pin # Signal Name Source Description 1 nSTROBE Ethernet print server Indicates when the data on the data lines is valid. 2- 9 DATA 1- 8 Ethernet print server Eight lines used for data transfer. 10 nACK Printer Data acknowledge signal from printer. 11 BUSY Printer Indicates the printer is not ready to receive data. 12 PAPER ERROR Printer Indicates a paper error. 13 SELECT Printer Indicates the printer is on- line. 14 nAUTOFEED Ethernet print server Used for IEEE 1284 compliance. 31 nINIT Ethernet print server Instructs the printer to initialize. 32 nFAULT Printer Indicates a printer error condition. 36 nSELECT IN Ethernet print server Used for IEEE 1284 compliance. 16, 17, G N D 19- 30 N/A Ground 15, 18, NC 33- 35 N/A Not connected A-2 Specifications