1
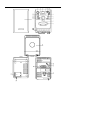
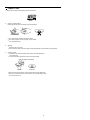
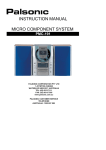
INSTRUCTION MANUAL
MICRO COMPONENT SYSTEM
PMC-211
PALSONIC CORPORATION PTY LTD
1 JOYNTON AVENUE
WATERLOO NSW 2017 AUSTRALIA
TEL: (02) 9313 7111
FAX: (02) 9313 7555
www.palsonic.com.au
PALSONIC CUSTOMER SERVICE
TELEPHONE
AUSTRALIA: 1300 657 888
14
Ib zb 21 .h
23 2 4 n
To achieve the utmost in enjoyment and performance, please read this manual carefully before
attempting to operate the unit in order to became familiar with its features, and assure you years of
faithful, trouble free performance and listening pleasure
.
.
.
.
.
Important Notes
Keep instructions the safety and operating instructions should be retained for future reference.
Avoid installing the unit in locations described below:
Places exposed to direct sunlight or close to heat radiating appliances such as electric heaters.
On top of other stereo equipment that radiate too much heat.
Places locking ventilation or dusty places.
Places subject to constant vibration.
Humid or moist places.
Make sure not to obstruct the ventilation opening.
Operate turning controls and switches as instructed in the manual.
Before turning on the power for the first time, make certain the power cord is properly installed.
Store your tapes or CD in a cool area to avoid damage from heat.
CAUTION
RISK OF ELECTRICAL SHOCK
DO NOT OPEN
CAUTION : TO REDUCE THE RISK OF ELECTRIC SHOCK DO NOT REMOVE COVER (OR BACK),
NO USER SERVICEABLE PARTS INSIDE, REFER SERVICING TO QUALIFIED SERVICE
PERSONNEL.
DANGEROUS VOLTAGE
Conductor dangerous voltage, that may be of sufficient magnitude to constitute a risk of
electric shock to persons is present within this product's enclosure.
ATTENTION
The owner's manual contains important operating and maintenance instructions, for your
safety, it is necessary to refer to the manual.
WARNING: TO PREVENT FIRE OR SHOCK HAZARD, DO NOT EXPOSE THIS APPLIANCE TO
DRIPPING OR SPLASHING.
Note:
This unit will become warm when used for a long period of time. This is normal and does not indicate a
problem with the unit.
This CD player includes micro-processors which may malfunction as A result of external electrical
interference or noise. If the CD player is not working properly, disconnect the power source and
then reconnect it.
1
LOCATION OF CONTROLS
19.
20.
21.
22.
23.
24.
25.
26.
27.
28.
29.
30.
31.
32.
33.
CASSETTE RECORD BUTTON
CASSETTE PLAY BUTTON
CASSETTE REWIND BUTTON
CASSETTE F.FWD BUTTON
CASSETTE STOP / EJECT BUTTON
CASSETTE PAUSE BUTTON
CASSETTE BUTTON COVER DOOR
CD DOOR
AC POWER CORD COVER
AC POWER CORD
SPEAKER TERMINALS
FM ANTENNA
BEAT CUT SWITCH
AC MAIN POWER SWITCH
TUNING CONTROL
1.
2.
3.
4.
5.
6.
7.
8.
9.
10.
11.
12.
13.
14.
15.
16.
17.
18.
SPEAKER
VOLUME CONTROL
DIAL SCALE
LED DISPLAY WINDOW
FM STEREO LED INDICATOR
CD SKIP/ REV BUTTON
CD PLAY / PAUSE BUTTON
CD SKIP/ FF BUTTON
CD PROGRAM BUTTON
CD REPEAT BUTTON
POWER ON BUTTON
POWER ON LED INDICATOR
FUNCTION SWITCH (RADIO/TAPE/CD)
HEADPHONE JACK
CD STOP BUTTON
BBS ON / OFF BUTTON
BAND SELECTOR SWITCH (FM ST/FM/AM)
CASSETTE DOOR
1.
Speakers Connection
Extend the SPEAKER WIRES and connect them to the SPEAKER TERMINALS Connect
the black wires to the black terminals Connect the black and grey to the red terminals.
Power Cord Connection
Before using, connect the AC Power Cord to the AC outlet, then turn on the MAIN POWER
switch of the unit.
SETUP BEFORE USE
2.
OPERATING THE UNIT
When you first power on the unit, it will be in standby mode. You can press the POWER button on
the unit (or on the remote control) to switch the unit ON and OFF Pull the AC plug out of the wall
socket if you want to switch off completely.
POWER / STANDBY
1.
2.
3.
4.
Press the POWER button on the unit (or remote control) to switch the unit on.
Select the sound source (CD, Radio or Tape) by switching the FUNCTION switch to
corresponding position.
Adjust the volume by the VOLUME control.
Press the POWER button to switch off the unit.
LISTEN THE MUSIC BY USING HEADPHONE
Headphone jack is provided on the unit You can use headphone by inserting the headphone plug
to the socket It is recommended to start with a lower volume and gradually increase to a desired
level.
BBS SYSTEM
You can Dress the BBS button to enhance the level of bass.
2
RADIO OPERATION
Set the FUNCTION switch to RADIO position
FM
Select the FM or FM STEREO by BAND SELECTOR switch. Turn the TUNING knob to select the
required station. The FM stereo LED indicator will light on when a stereo broadcast is being
received Fully extend the FM antenna and adjust its direction for best FM reception.
AM
Select AM by BAND SELECTOR switch. Turn the TUNING knob to select the required station. For
operation on AM the set contains a built-in ferrite aerial which is directional. Therefore, the set
should be positioned for the best signal strength.
Connect the FM Antenna
Connect the FM antenna wire to FM 75-ohm terminal, OR, For better FM reception, use of an 75 ohm
outdoor antenna is recommended, connect the 75 ohm outdoor antenna to FM 75 ohm terminal.
CASSETTE OPERATION
Set the FUNCTION switch to TAPE position.
Playing Of Cassette
Be sure to tighten any slack tape in the cassette before use, using either a pencil or a ball-point
pen, simply insert the pen or pencil into the centre of the spool and rotate to remove the slackness.
Depress the CASSETTE STOP / EJECT button to open the cassette door.
Insert the cassette into the compartment with the open end facing downwards and the full reel on
the left hand side, push the cassette well down and close the door, be sure not to touch the tape
surface. To play the cassette, press the CASSETTE PLAY button. For brief interruptions, press the
CASSETTE PAUSE button on the unit. To continue playback, press the CASSETTE PAUSE button
again. To stop playback, press the CASSETTE STOP / EJECT button once. To release the cassette,
press the CASSETTE STOP / EJECT button again.
Winding the tape
Press CASSETTE F.FWD button to fast-forward the tape.
Press CASSETTE REWIND button to fast-rewind the tape.
Press CASSETTE STOP / EJECT button to stop fast-forward or fast-rewind, before the
end of the tape.
When the tape reaches its end after fast winding, you must press CASSETTE STOP
/ EJECT button to release CASSETTE F.FWD / REWIND button
.
.
.
.
Recording From Radio
Set the FUNCTION switch to RADIO and select AM or FM by BAND SELECTOR switch. Tune to the
desired broadcast (refer to radio operation section). Insert a blank cassette into the deck and
press the CASSETTE RECORD button (together with the CASSETTE PLAY button). Press the
CASSETTE STOP / EJECT button to stop recording The CASSETTE PAUSE button can be used
to stop recording for short intervals.
Note : If beat noise is present when recording adjust the position of the BEAT CUT switch on
the rear of the unit (For AM only).
Recording From CD
Set the FUNCTION switch to CD Select the required tracks to be recorded. Insert a blank
cassette into the cassette deck and press the CASSETTE RECORD button (together with the
CASSETTE PLAY button) Press the CASSETTE STOP / EJECT button to stop recording.
Note : The volume level and the BSS function has no effect on the content of recording.
3
Auto Stop
When the tape reaches the end in playback or recording, the built-in auto stop system will release
the depressed CASSETTE PLAY, RECORD button. The auto stop system operates while recording
from the built-in RADIO or CD player, only the cassette function will stop automatically and the
RADIO or CD player will continue to play.
Type Of Cassettes
Use only good quality cassettes (IEC TYPE 1) for making recordings. The use of C120 cassettes is
NOT recommended in this machine.
Protecting Recordings
Normally, anything recorded on the tape is automatically erased when new recording is made.
It is possible to protect your recordings from accidental erasure by removing the tabs found on
the rear of the cassette.
When the cassette is held with the recorded side upper-most and exposed tape facing the front,
the protective tab will be found on the right rear of the cassette.
All pre-recorded cassette are protected in this way to prevent accidental erasure of the commercial
recordings. "Protected" cassettes will prevent the CASSETTE RECORD button from being operated.
If at any time you attempt to record and find that this button can not be depressed, never force the
mechanism or it may be damaged. Check that a cassette has been loaded and that tab has not
been removed. Recording on a cassette in which the tabs have been removed can be done by
covering the tab openings with a piece of adhesive tape.
Care Of Cassette Mechanism
Gently clean the tape head and pinch-wheel / capstan assemblies after every 10 hours of operation
until all traces of oxide deposit have been removed. A range of cassette care products are
available.
RECORD/PLAY HEAD
ERASE HEAD
CAPSTAN
PINCH ROLLER
The erase head and record / play head and the surface of the pinch roller are delicate and must
not be touched with metal objects such as screwdrivers. You may find it easier to clean the
assembly by pressing the CASSETTE PLAY button to bring head and pinch roller into view. Be
sure to press the CASSETTE STOP button after cleaning the mechanism.
Damage to the pinchwheel can occur if the unit is left in PLAY mode with the power switched off.
Under no circumstances should you attempt to lubricate any part of the machine.
WARNING
Disconnect from the mains at the wall socket when not in use. Do not expose the set to rain or
moisture.
4
LISTENING TO COMPACT DISC (CD)
If a Compact Disc Player is subject to sudden vibration while playing, it may skip or mistrack. It is
therefore preferable to use the player on a flat level and stable surface.
Playing a compact disc
Press the POWER button to switch on the set. Slide the FUNCTION switch to CD position
Insert the Compact Disc with label side facing upward and close the CD tray. The LED display
will indicate the number of tracks on the disc If the disc is inserted incorrectly, the disc will not
play.
Press the CD PLAY / PAUSE button once to start the disc playing. The right bottom dot of the LED
display will light on Adjust the VOLUME control as required. To stop playing, press the CD STOP
button.
Ensure the CD is stopped before opening the CD tray or press the CD STOP button first, then
open the CD tray.
.
Pause
If it is desired to pause during playback, press the CD PLAY / PAUSE button once. The right
bottom dot will be flashing. Press again to return to normal.
Skip
The skip function can be used during play, or when stopped in order to skip to the start of a track on
the disc.
To skip forwards press the CD SKIP / FF. button repeatedly until the desired track is reached.
To skip to the beginning of current track, press the CD SKIP / REV. button once. To skip to the
previous tracks, press this button repeatedly until the desired track is reached.
To search for a particular passage on a track during playback
Press and hold the CD SKIP FF / REV. button, the player will search rapidly forward or backward.
Release the button when you reach the desired point on the track and normal speed playback
will resume at that point. During searching, the volume is reduced.
Program playback
To program a CD, you can play up to 16 tracks in any desired order.
1. Place the disc to be programmed in the tray. Press the PROGRAM button once in STOP mode.
2. The "Pr" will light on the LED display.
3. Use CD SKIP FF. or SKIP REV. button to select the first track to be programmed.
4. When the desired track appears on the display, press the PROGRAM button again.
5. Repeat steps 3 and 4 to program up to 16 tracks.
6. Press the CD PLAY button, playback will start with the first track of the program. When
all tracks have been played, the display will show the number of tracks.
7. To cancel your program, press the CD STOP button twice, open the CD tray and close it
again, switch to other function except CD or change to STANDBY mode.
* There is no indication for PROGRAM play.
Repeat Play
1. Press the CD REPEAT button, the middle bottom dot on the LED display will be flashing. The
current sound track will play repeatedly until CD STOP button is pressed.
2. Press the CD REPEAT button again, the middle bottom dot on the LED display will light on. The
CD will play sequentially and repeatedly until the CD STOP button is pressed.
3. Press the CD REPEAT or STOP button to stop repeat function.
5
COMPACT DISC
1 Always use compact discs bearing the mark as shown.
2.
Notes on handling discs
Removing the disc from its storage case and loading it
.
.
.
Do not touch the reflective recorded surface.
Do not stick paper or write anything on the surface.
Do not bend the disc.
3.
Storage
Store the disc in its case.
Do not expose discs to direct sunlight or high temperatures, high humidity or dusty places.
4.
Cleaning a disc
Should the disc become soiled, wipe off dust, dirt and fingerprints
with a soft cloth.
The disc should be cleaned from the centre to the edge.
.
.
.
.
FROM THE CENTRE TO THE EDGE
CORRECT
INCORRECT
. Never use benzene thinners, record cleaner fluid or anti static spray.
. Be sure to close the CD door so the lens is not contaminated by dust.
Do not touch the lens.
6
SPECIFICATION
POWER SUPPLY:
OUTPUT POWER:
POWER CONSUMPTION:
UNIT DIMENSION:
SPEAKER BOX DIMENSION:
NET WEIGHT:
RADIO SECTION
FREQUENCY RANGE:
240V ~ 50Hz
2 WATTS x 2
18W
154 (L) x 218 (W) x 221 (H) mm
138 (L) x 136 (W) x 221 (H) mm
4.3 kg
FM 87.5 - 108 MHZ
AM 522 - 1620 kHz
CASSETTE SECTION
TAPE SPEED:
FREQUENCY RESPONSE :
4.75 cm/SEC
125Hz - 8kHz
COMPACT DISC SECTION
OPTICAL PICKUP:
FREQUENCY RESPONSE:
3 - BEAM LASER
100Hz - 16kHz
SPECIFICATION SUBJECT TO CHANGE WITHOUT FURTHER NOTICE.
Dripping warning : "The product shall not be exposed to dripping or splashing and that no
objects filled with liquids, such as vases, shall be placed on the product".
Ventilation warning : "The normal ventilation of the product shall not be impeded for intended use".
7
PALSONIC CORPORATION PTY LTD
1 JOYNTON AVENUE
WATERLOO NSW 2017 AUSTRALIA
TEL: (02) 9313 7111
FAX: (02) 9313 7555
www.palsonic.com.au
PALSONIC CUSTOMER SERVICE
TELEPHONE
AUSTRALIA: 1300 657 888