1
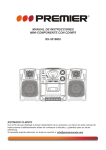
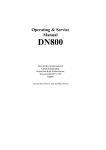
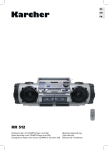
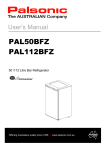
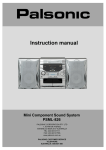
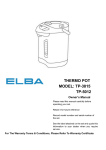
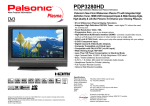
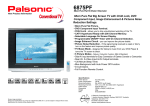
INSTRUCTION MANUAL
MICRO COMPONENT SYSTEM
PMC-191
PALSONIC CORPORATION PTY LTD
1 JOYNTON AVENUE
WATERLOO NSW 2017 AUSTRALIA
TEL: (02) 9313 7111
FAX: (02) 9313 7555
www.palsonic.com.au
PALSONIC CUSTOMER SERVICE
TELEPHONE
AUSTRALIA: 1300 657 888
LOCATION OF CONTROLS
1.)
CASSETTE
1
2.)
REWIND KEY
3
3.)
PLAY KEY
4.)
RECORD KEY
5.)
CD DOOR
6.)
REMOTE SENSOR
7.)
FUNCTION SELECTOR
8.)
MULTI FUNCTION DISPLAY
9.)
FM MODE / BEAT CUT SELECTOR
10.)
STANDBY / ON INDICATOR
11.)
POWER BUTTON
12.)
SKIP / TUNING DOWN BUTTON
13.)
PLAY/PAUSE
14.)
POWER (STANDBY) BUTTON
15.)
STOP BUTTON
16.)
BAND SELECTOR
17.)
HEADPHONE SOCKET
18.)
SKIP / TUNING UP BUTTON
19.)
EXTRA BASS
20.)
VOLUME UP/DOWN BUTTON
21.)
FAST FORWARD KEY
22.)
STOP / EJECT KEY
23.)
PAUSE KEY
24.)
AC POWER CORD
25.)
FM ANTENNA LEAD
26.)
SPEAKER JACKS ( L / R )
21
22
23
2
4
5
6
20
7
8
19
9
12
10
13
11
14
15
18
17
16
25
26
24
CAUTION:
USAGE OF CONTROLS OR ADJUSTMENTS OR PERFORMANCE OF PROCEDURES OTHER THAN THOSE
SPECIFIED HEREIN MAY RESULT IN HAZARDOUS RADIATION EXPOSURE.
THIS UNIT SHOULD NOT BE ADJUSTED OR REPAIRED BY ANYONE EXCEPT QUALIFIED SERVICE
PERSONNEL.
IMPORTANT:
SINCE MOVEMENT OF THE CD MECHANISM AND THE SENSITIVE CIRCUITRY MAY CAUSE INTERFERENCE,
TO THE RADIO TURNER NEARBY, SWITCH THIS UNIT OFF WHILE OPERATING OTHER RADIO DEVICES.
1
LISTENING TO RADIO
Manual Tuning
1.
2.
3.
4.
Set Function Selector to "Tuner" position.
Set Band button to the desired band.
Press Manual Tuning "UP" button or Manual Tuning "DOWN" button until your desired station is
reached.
Adjust the volume control to the appropriate level as desired.
Auto Tuning
1.
2.
3.
Follow steps 1, 2 of "Manual Tuning".
Press UP or DOWN button continuously to start the automatic tuning.
To terminate Auto Tuning, press the UP or DOWN button again.
PROGRAM INDICATOR
BAND
INDICATOR
STEREO
INDICATOR
FREQUENCY INDICATOR
STATION NO.
Preset Stations by Remote Handset
This unit equipped 10 preset station for FM and MW, 5 station for LW if LW is available. Once they are
preset broadcasting corresponded to those can readily be enjoyed by simply pressing the Preset Station
button.
1. Set in Tuner mode.
2. Your desired station can be received by "Manual Tuning" or "Auto Tuning".
3. Press the MEMORY button (at Remote), to enable program state.
4. Press the M-UP / REPEAT button (at Remote), to adjust preset station number.
5. Frequency is written in the Preset a Memory by pushing MEMORY button once again.
6. Repeat step 2 to step 5 to enter additional channels into Program.
7. To return normal Tuner mode, leave keys free.
.
Remarks: There are 5 seconds for program state. After 5 seconds this state would release automatically.
Calling the Preset Stations
Press the M-UP / Repeat Key (at Remote) to select the Preset Station in order.
FM & FM-Stereo Reception
.
.
Set FM mode selector at "MONO" position. Programs are received in Mono mode. In particular when
stereo signals are weak, it is preferable to receive the program in MONO.
Set FM mode selector at "STEREO" position for receiving stereo programs.
Beat Cut
When beats are produced while listening to recording an AM broadcast, active the beat cut switch so the
beats are eliminated or minimised.
PLAYING COMPACT DISC
Getting Started
1.
2.
3.
Set Function Selector to CD mode. lift up the CD door and put a disc into the Compact
Disc Compartment, then close the Compartment.
The Display will show "00" for a few seconds, then the total number of tracks and the total playing
time of the disc.
"DISC' will be displayed when there is no disc inside the compartment.
2
REPEAT
RANDOM
INDICATOR INDICATOR
MIN
General Operation
PLAY / PAUSE Button
STOP Button
SKIP Buttons
RANDOM Button (at Remote)
SEC
PROGRAM
INDICATOR
TRACK NO.
Press once to start play, press once again to stop the || disc play
temporarily. When CD player is paused, display is blinking.
Press to stop play.
Press once to skip to next track
| or back to previous track
|
UP/
| and DOWN / |
Press once, the display will show a "Random".
Press the Play button to play the disc in random order. When CD
is playing in Random mode, press UP /
| to select another track
randomly.
Press the Random button again to terminate the Random display.
. During CD Play Random Play is started by pressing the RANDOM button once.
. To obtain optimum sound performance for CD, select the switch at the back to CD position.
Program Play (For CD only) by Remote
Up to 20 tracks can be programmed for disc play in any order. Before use, be sure to press the Stop button.
STATION NO.
PROGRAM NO.
1.
2.
3.
4.
5.
6.
7.
Set in CD mode.
Press the MEMORY button (at remote), the display will show blinking "Track" and "Memory".
Moreover, it will indicate program no. and digits for track no. to be programmed.
Select a desired track by using the Skip buttons.
Press the MEMORY button again to enter the track into the program.
Repeat steps 2 and 3 to enter additional memories into the program, if necessary.
When all the desired tracks have programmed, press PLAY / PAUSE button to play the disc in the
order you have programmed. The display will show the Program Indicator "MEMORY" to identify
this function.
Press STOP button to terminate program play.
. Remarks: There are 5 seconds for memory writing enable state, after that the state would released
automatically.
Notes:
1.
2.
The program memory will be cleared when the Power button is set to "OFF", when CD mode is
changed to other modes, or when EJECT button is pressed.
During program play, press UP /
| button to select the programmed track in order.
3
You can repeat all programmed tracks endlessly by this function.
1. Follow stop 1 to step 5 in Program Play.
2. Press M-UP / REPEAT button.
3. To cancel Repeat Play, press the M-UP / REPEAT button again.
Repeat Play (For CD only) by Remote
Single Track Repeat Play (only available for normal playing)
You can repeat a particular track of the disc endlessly by this function.
1. Select a desired track by Skip buttons.
2. Press M-UP / REPEAT button twice at Remote.
3. The display will show "REPEAT" and flashing, and repeat function would be initialised.
4. Press PLAY / PAUSE Button to start.
5. To cancel repeat play, press the M-UP / REPEAT button one again.
. Remarks: To repeat the track that is playing, press the M-UP /REPEAT button twice.
All Tracks Repeat Play (available for both normal playing and programmed playing)
You can repeat the entire disc endlessly by this function.
1. Press M-UP / REPEAT button once.
2. The display will show "REPEAT".
3. Press PLAY / PAUSE button to start.
4. To cancel repeat play, press the M-UP / REPEAT button twice.
Playing the Beginning of each Track (INTRO)
The Intro feature lets you sample all of the CD tracks for 10 seconds.
Press INTRO. Intro play will begin with Track 1.
1.
To cancel Intro play and begin normal play, press INTRO again.
2.
LISTENING TO TAPE
General Operation
Stop / Eject key
Press to stop all deck operations. Press again to the Cassette Doors.
Fast Forward Key
Fast Rewind Key
Press to start rapid tape winding in either forward or reverse direction.
Press Stop / Eject Keys when the cassette spools stop turning.
Play Key
Press to start playing a tape.
Pause Key
Press to stop tape operation temporarily. Press again to resume tape operation.
Record Key
Press together with Play Key to start recording.
Playback
-
Set the Function selector to TAPE position.
Put in your cassette tape.
Press Play Key to activate playback.
Adjust the Volume Control to the desired level.
Use Pause Key when you want to stop playback temporarily.
Press Stop / Eject Key when finished.
4
RECORDING
A. Recording From Radio
Set in Tuner mode.
Tune in your station and put in your cassette tape.
Press Record Key and the Play Key of deck at the same time to start recording.
Press STOP / EJECT Key when finished.
NOTE: If beat noise is present when recording. Adjust the position of the Beat Cut switch on mode
selector ( For AM / MW or LW Band only).
.
.
.
.
From CD
.B. Recording
Set Function selector to "CD" position.
. Insert a cassette suitable for recording, press pause key then press record
Recording function will be on stand by.
. key.
Activate the CD player, and then press (to release) pause key to start recording.
. To stop recording, first press STOP button on CD player - then press the STOP / EJECT key on tape
deck.
REMOTE CONTROL TRANSMITTER
CONTROL FUNCTIONS
1.)
2.)
3.)
4.)
5.)
6.)
7.)
8.)
9.)
10.)
11.)
12.)
13.)
14.)
15.)
POWER
DIRECT SEARCH KEYS
VOLUME UP / DOWN
SKIP DOWN BUTTON
SKIP UP BUTTON
MODE BUTTON
RANDOM BUTTON
SCAN-UP BUTTON
BAND SELECTOR
MEMORY BUTTON
M-UP / REP BUTTON
INTRO BUTTON
PLAY / PAUSE BUTTON
STOP BUTTON
MUTE
15
1
2
14
13
3
4
5
12
11
10
9
6
7
8
BATTERY INSTALLATION
THE INFRARED TRANSMITTER REQUIRES 3.0 VOLTS FOR OPERATION. (UM-4/AAA SIZE)
Button Description
PLAY/PAUSE
STOP
SKIP |
SKIP
|
REPEAT
MEMORY
RANDOM
- IN CD MODE, PRESS ONCE TO START PLAYBACK. PRESS ONCE AGAIN TO
STOP THE DISC PLAY.
TEMPORARILY.
- PRESS TO TERMINATE CD PLAYBACK.
- PRESS ONCE TO SKIP TO PREVIOUS TRACK.
- PRESS ONCE TO SKIP TO NEXT TRACK.
- IN CD MODE, PRESS TO ENABLE REPEAT PLAY.
- IN CD / RADIO MODE, PRESS TO ENTER PROGRAM MODE.
- IN CD MODE, PRESS TO ENTER RANDOM MODE.
5
SPECIFICATIONS
GENERAL
Power Supply:
Power Consumption:
Output Power (RMS):
Terminal Impedance:
Unit Dimensions:
Unit Weight:
240V/50Hz
30 Watt
2 x 5W
Speaker 4.0 OHMS, Phones 32 OHMS
188(L) x 230(W) x 279(H) mm
7 kgs
CASSETTE SECTION
Tape Speed:
Recording System:
Erasing System:
Frequency Response:
4.75 cm/sec
AC BIAS
DC MAGNET
125-6300Hz
CD SECTION
Channel:
S/N Ratio:
Sampling Frequency:
Disc Size:
Frequency Response:
2 Channels
60dB
44.1kHz
75 or 120 mm
125Hz - 20kHz
RADIO SECTION
Tuning Frequency:
AM: 511 - 1620KHz
FM: 87.5 - 108MHz
6
PALSONIC CORPORATION PTY LTD
1 JOYNTON AVENUE
WATERLOO NSW 2017 AUSTRALIA
TEL: (02) 9313 7111
FAX: (02) 9313 7555
www.palsonic.com.au
PALSONIC CUSTOMER SERVICE
TELEPHONE
AUSTRALIA: 1300 657 888