1
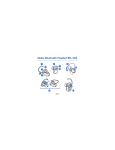
User Guide
Palm® Wireless Headset
Series 3 with Bluetooth® wireless technology
Intellectual property notices
Disclaimer and limitation of liability
© 2005–2007 Palm, Inc. All rights reserved. Palm, Palm OS, Palm
logo, and Treo are among the trademarks or registered trademarks
owned by or licensed to Palm, Inc. Microsoft and Windows Mobile
are either registered trademarks or trademarks of Microsoft
Corporation in the United States and/or other countries. All other
brand and product names are or may be trademarks of, and are used
to identify products or services of, their respective owners.
Palm, Inc. and its suppliers assume no responsibility for any damage
or loss resulting from the use of this guide. Palm, Inc. and its
suppliers assume no responsibility for any loss or claims by third
parties that may arise through the use of this software. Palm, Inc. and
its suppliers assume no responsibility for any damage or loss caused
by deletion of data as a result of malfunction, dead battery, or repairs.
Be sure to make backup copies of all important data on other media
to protect against data loss.
The TREO trademark is used by Palm in Sweden and Denmark with
the express consent of Pfizer and its affiliated companies. The
products marketed and/or sold by Palm under the TREO trademark
are in no way affiliated with Pfizer or its business.
Varumärket TREO används av Palm i Sverige och Danmark med
uttryckligt tillstånd från Pfizer och dess dotterbolag. De produkter
som marknadsförs och/eller säljs av Palm under varumärket TREO
ska på inget sätt alls kopplas samman med Pfizer eller dess
verksamhet.
TREO-varemærket anvendes af Palm i Danmark og Sverige med
udtrykkelig tilladelse fra Pfizer og Pfizers associerede selskaber. De
produkter, der markedsføres og/eller sælges af Palm under
TREO-varemærket, er på ingen måde tilknyttet Pfizer eller Pfizers
virksomhed.
Recycling
This symbol indicates that Palm products should be
recycled and not be disposed of in unsorted municipal
waste. Palm products should be sent to a facility that
properly recycles electrical and electronic equipment. For
information on environmental programs visit:
www.palm.com/environment.
PN: 406-11135-00
v 1.1
Contents
Wireless Headset . . . . . . . . . . . . . . . . . . . . . . . . . . . . . . . . . . . . . . . . . . . . . . . . . . . . . 1
Package contents . . . . . . . . . . . . . . . . . . . . . . . . . . . . . . . . . . . . . . . . . . . . . . . . . . . 2
Charging your headset . . . . . . . . . . . . . . . . . . . . . . . . . . . . . . . . . . . . . . . . . . . . . . . 3
Pairing your headset with your smartphone . . . . . . . . . . . . . . . . . . . . . . . . . . . . . . . 4
Turning your headset on and off . . . . . . . . . . . . . . . . . . . . . . . . . . . . . . . . . . . . . . . 6
Wearing your headset on your left or right ear . . . . . . . . . . . . . . . . . . . . . . . . . . . . . 7
Making a call . . . . . . . . . . . . . . . . . . . . . . . . . . . . . . . . . . . . . . . . . . . . . . . . . . . . . . . 10
Answering a call . . . . . . . . . . . . . . . . . . . . . . . . . . . . . . . . . . . . . . . . . . . . . . . . . . . . 10
Ending a call . . . . . . . . . . . . . . . . . . . . . . . . . . . . . . . . . . . . . . . . . . . . . . . . . . . . . . . 11
Using auto answer . . . . . . . . . . . . . . . . . . . . . . . . . . . . . . . . . . . . . . . . . . . . . . . . . . 11
Increasing or decreasing call volume . . . . . . . . . . . . . . . . . . . . . . . . . . . . . . . . . . . . 12
Muting a call . . . . . . . . . . . . . . . . . . . . . . . . . . . . . . . . . . . . . . . . . . . . . . . . . . . . . . . 12
What do the colored flashes and tones mean? . . . . . . . . . . . . . . . . . . . . . . . . . . . . 13
Advanced features . . . . . . . . . . . . . . . . . . . . . . . . . . . . . . . . . . . . . . . . . . . . . . . . . . 14
Disabling active call and standby indicator lights . . . . . . . . . . . . . . . . . . . . . . . . . . . 15
Troubleshooting . . . . . . . . . . . . . . . . . . . . . . . . . . . . . . . . . . . . . . . . . . . . . . . . . . . . 15
Customer support for your headset . . . . . . . . . . . . . . . . . . . . . . . . . . . . . . . . . . . . . 17
Caring for your headset . . . . . . . . . . . . . . . . . . . . . . . . . . . . . . . . . . . . . . . . . . . . . . 17
Glossary . . . . . . . . . . . . . . . . . . . . . . . . . . . . . . . . . . . . . . . . . . . . . . . . . . . . . . . . . . 18
Important safety and legal information . . . . . . . . . . . . . . . . . . . . . . . . . . . . . . . . . . . . . 19
CONTENTS
iii
iv
CONTENTS
USER GUIDE
Wireless Headset
Thank you for purchasing the Palm®
Wireless Headset Series 3 with Bluetooth®
wireless technology, a headset that
connects to your Palm® Treo™ smartphone
and enables you to use your smartphone
without using your hands.
What you’ll learn to do in this guide:
Please read this guide to make the best
use of your headset’s many features. For a
quick introduction to your Wireless
Headset, refer to Getting Started.
NOTE Before you can use the Wireless
•
Charge your headset and turn it on
•
Switch between wearing your headset
on your left or right ear
•
Make, answer, and end a call
•
Use the mute feature
•
Use advanced features
NOTE Read the Glossary at the end of this
guide to familiarize yourself with important
terms.
Headset with your smartphone, your
smartphone must be equipped with
Bluetooth® wireless technology.
1
USER GUIDE
Package contents
Headset
Indicator
light
Call
control
button
Volume/
mute
buttons
Small,
medium,
and large
soft-gel
ear tips
Microphone
Charging
adapter
Earloop
Charging
pocket
2
PACKAGE CONTENTS
USER GUIDE
Charging your
headset
Your headset contains a rechargeable
battery that you must fully charge before
using the headset for the first time. You
can use your fully charged headset for up
to 5 hours talk time or 70 hours standby
before you need to recharge it.
3 Insert your headset into the charging
pocket. The indicator light on your
headset glows red while your headset is
charging. Charge for three hours for a
full charge, until the indicator light turns
off.
4 Remove the AC charger from the
charging adapter.
Headset
The charging adapter included with your
headset works only with the AC charger
provided with your Treo™ smartphone or
with a replacement Palm® AC charger,
which you can purchase separately.
IMPORTANT Using an AC charger that is
not supported by Palm may damage or
destroy your headset and can void the
warranty on the product.
Charging
pocket
Charging
adapter
AC charger
(not included)
Charging your headset
1 Connect the charging adapter to the
charging pocket.
2 Connect your AC charger to the
charging adapter at the base of your
charging pocket and then plug the AC
charger into a wall outlet.
You are now ready to pair your headset and
your smartphone.
CHARGING YOUR HEADSET
3
USER GUIDE
Pairing your headset
with your
smartphone
2 On your smartphone, press
Applications and select Bluetooth
, or tap the Bluetooth icon
at the
top of the screen.
Pairing, also known as forming a
partnership, creates a unique and
encrypted wireless link between two
devices enabled with Bluetooth® wireless
technology, such as your Treo™
smartphone and your headset.
4 In the Bluetooth application on your
smartphone, select Setup Devices, and
then select Hands-free Setup.
Pairing with your Treo™ smartphone
(Palm OS® by ACCESS)
BEFORE YOU BEGIN
•
Make sure your Treo smartphone has
the latest software by going to
www.palm.com/support.
•
Your headset must be turned off before
you begin the pairing process. If it is on,
see Turning your headset on and off to
learn how to turn it off.
1 Press and hold the Call control button
until the headset indicator light
alternately flashes red and blue.
4
3 Select On to turn the Bluetooth setting
on.
5 Select Next. Make sure Show is set to
Nearby devices. When your
smartphone finds your headset, it
displays “Palm Headset” with a
headphone icon next to it. Select Palm
Headset, and then select OK.
6 A status message appears, telling you
that your smartphone is connecting
with your headset. When your
smartphone asks for a passkey, enter
0000, and then select OK.
7 If the Device Select screen appears,
select Headset and select Next.
8 On the confirmation screen, select
Done. The headset flashes blue every
five seconds when paired successfully.
PAIRING YOUR HEADSET WITH YOUR SMARTPHONE
USER GUIDE
Pairing with your Treo smartphone
(Windows Mobile®)
6 Check the Hands Free box if it is not
already checked, and then select Finish.
Select OK. The headset flashes blue
every five seconds when paired
successfully.
BEFORE YOU BEGIN
•
Make sure your Treo smartphone has
the latest software by going to
www.palm.com/support.
•
Your headset must be turned off before
you begin the pairing process. If it is on,
see Turning your headset on and off to
learn how to turn it off.
Pairing with other phones
1 Press and hold the Call control button
until the headset indicator light
alternately flashes red and blue.
2 On your smartphone, go to the Today
screen and tap Bluetooth .
3 Select the Mode tab and check the Turn
on Bluetooth box if it is not already
checked.
4 Select the Devices tab, and then select
New Partnership or Add new device.
When the smartphone finds your
headset, it displays “Palm Headset”
with a headphone icon next to it. Select
Palm Headset, and then select Next.
5 When your smartphone asks for a
passkey, enter 0000, and then select
Next.
BEFORE YOU BEGIN Your headset must
be turned off before you begin the pairing
process. If it is on, see Turning your
headset on and off to learn how to turn it
off.
1 Press and hold the Call control button
until the headset indicator light
alternately flashes red and blue.
2 Set your smartphone to discover your
headset by following your phone’s
instruction guide. Typically, the steps
involve going to a setup, connect, or
Bluetooth menu on your phone and
then selecting the option to discover a
Bluetooth device.
3 When your phone finds your headset, a
message appears asking if you want to
pair; select Yes or OK.
PAIRING YOUR HEADSET WITH YOUR SMARTPHONE
5
USER GUIDE
4 When a message on your phone screen
asks for a passkey, enter 0000, and then
select Yes or OK. The headset flashes
blue every five seconds when paired
successfully.
2 Turn off your headset by pressing and
holding the Call control button for at
least four seconds, until the indicator
light glows red. If you are wearing your
headset, you’ll hear three separate
beeps:
Turning your headset
on and off
1 Turn on your headset by pressing and
holding the Call control button until the
indicator light glows blue. If you are
wearing your headset, you hear a beep
when the power turns on. The indicator
light flashes blue every five seconds
when the power is on.
6
TURNING YOUR HEADSET ON AND OFF
•
A high tone when you press (and
hold) the button
•
A low tone as you continue to hold
the button
•
A middle tone as the headset turns off
When you turn your headset on, after a
brief delay, the indicator light displays one
of the following charge levels:
•
Three red flashes = greater than 2/3
battery charge
•
Two red flashes = 1/3 to 2/3 battery
charge
•
One red flash = less than 1/3 battery
charge
USER GUIDE
Wearing your
headset on your left
or right ear
Your headset comes with three soft-gel ear
tips and an optional earloop.
IMPORTANT For optimal performance,
wear your headset and your smartphone
on the same side of your body. In general,
you’ll get better performance when there
are no obstructions (including parts of your
body) between your headset and the
phone.
As you move away from your smartphone,
the audio quality may degrade. When you
go out of range of the smartphone, the
connection drops between the two
devices, and you hear a beep in your
headset. Only the headset’s power-off
function operates until you go back within
range of the smartphone.
NOTE If you want to use the optional
earloop with your headset, first read
Attaching the earloop.
Inserting a soft-gel ear tip
1 Select the ear tip size that fits most
comfortably in your ear.
2 Hold the ear tip with the elongated edge
pointing down, and push the post into
the opening on your headset. This is the
neutral position.
WEARING YOUR HEADSET ON YOUR LEFT OR RIGHT EAR
7
USER GUIDE
Right ear
3 With the ear tip facing you, twist the tip
toward the R for right-ear wearing or
toward the L for left-ear wearing. The
ear tip should rest against, but not
enter, the ear canal.
8
Neutral
position
Left ear
4 To remove the ear tip, make sure it’s in
the neutral position and then pull it away
from your headset.
WEARING YOUR HEADSET ON YOUR LEFT OR RIGHT EAR
USER GUIDE
Attaching the earloop
You can attach the earloop to your headset
to improve stability.
1 Remove the ear tip from your headset
by turning it to the neutral position and
pulling it away from your headset.
2 Attach the earloop between your
headset and the ear tip, and replace the
ear tip. For the right ear, the earloop
appears as shown in the following
figure. For the left ear, reverse the
orientation. The ear tip should rest
against, but not enter, the ear canal.
This earloop is positioned
to fit over the right ear
WEARING YOUR HEADSET ON YOUR LEFT OR RIGHT EAR
9
USER GUIDE
Making a call
Answering a call
IMPORTANT Use only short presses when
making, ending, or answering a call to
avoid accidentally activating your headset’s
Advanced features.
IMPORTANT Use only short presses when
ending or answering a call to avoid
accidentally activating your headset’s
Advanced features.
1 Make sure your headset is on.
1 Make sure your headset is on.
2 Dial the number on your smartphone.
The call is automatically transferred to
your headset, and you hear a series of
tones.
2 Answer a call:
NOTE You can also use voice-activated
dialing if your phone and wireless plan
support it. See the information about
voice-activated dialing in Advanced
features.
3 Adjust the volume as needed. See
Increasing or decreasing call volume for
specific volume control instructions.
From your headset: When you hear
your headset ring, press and release the
Call control button. You cannot answer
a call from the headset until the headset
begins ringing.
From your phone: Answer the call as
you normally would.
Most Treo® smartphones automatically
transfer calls to your headset. If your
phone doesn’t automatically send the
call to your headset, you may need to
press and release the Call control button
to transfer the call to your headset.
3 Adjust the volume as needed. See
Increasing or decreasing call volume for
specific volume control instructions.
10
MAKING A CALL
USER GUIDE
If you miss a call, the indicator light on your
headset flashes blue and purple every six
seconds to alert you to the missed call. To
clear this alert, press the Call control
button.
When your headset is paired with your
phone and you make or answer a call on
your phone while your headset is turned off
(or is out of range of the phone), your
headset automatically tries to connect to
the call when you turn it on (or when you
bring it back within range of your phone). If
your headset does not automatically
connect to the call in this case, quickly
press the Call control button to connect.
If you want to stop using the headset and
use the earpiece or a wired headset during
a call, do the following:
Smartphone using Palm OS®: Select
Cancel Bluetooth in Active Call View. To
return to using your headset, open the
Options menu and select Connect
Bluetooth.
headset, press Menu (right action key) and
select Connect Bluetooth.
Ending a call
To end a call, press and release the Call
control button, or use the controls on your
smartphone to end the call. A short beep
sounds to confirm that the call has ended.
Using auto answer
If your headset is in the charging pocket
when it receives a call, the charging pocket
vibrates after a few rings.
•
Remove your headset from the charging
pocket to automatically answer the call.
•
Return your headset to the charging
pocket to end the call.
Smartphone using Windows Mobile®:
Press Menu (right action key) and select
Cancel Bluetooth. To return to using your
ENDING A CALL
11
USER GUIDE
Increasing or
decreasing call
volume
Increase or decrease the call volume by
pressing the top or the bottom of the
Volume button
. The volume of the
confirmation tone you hear increases or
decreases to match the call volume.
WARNING Do not use your headset at
high volumes for an extended period of
time. Doing so can cause hearing loss.
Always listen at moderate levels.
Volume up
button
Volume down
button
12
INCREASING OR DECREASING CALL VOLUME
Muting a call
To mute your voice while on a call, press
both sides of the Volume button at the
same time until you hear a high tone
followed by a low tone and a high tone.
To turn off the mute feature, press both
sides of the Volume button until you hear
two high tones and one low tone.
USER GUIDE
What do the colored flashes and tones mean?
Headset status
Colored flashes and tones
Turning on
A single tone, and a blue flash followed after a few seconds by
red flashes, indicating the battery level:
3 red flashes = more than 2/3 battery charge available
2 red flashes = 1/3 to 2/3 battery charge available
1 red flash = less than 1/3 battery charge available
On
Blue flash every 5 seconds
Turning off
Red flash and 3 tones: high, then low, then middle
Off
No light
Incoming call
Ringing tone with rapid, alternating blue and red flashes
Active call
Long blue flash every 10 seconds
Mute on
Blue flash every 10 seconds and 2 tones sound every
30 seconds
Battery being charged
Constant red light
Battery fully charged
Red light turns off
Low battery
Red flash about every 2 seconds and 2 tones sound every 20
seconds
Pairing mode
Alternating blue and red flashes
Missed call
Rapid, alternating blue and purple flashes every 6 seconds
WHAT DO THE COLORED FLASHES AND TONES MEAN?
13
USER GUIDE
Advanced features
Advanced features are available for
smartphones that support the hands-free
Bluetooth® profile; this means you can use
your headset instead of your smartphone
to perform other tasks like redialing. Check
your smartphone’s instruction guide or
contact the manufacturer if you’re not sure
if your smartphone supports the hands-free
Bluetooth profile.
NOTE Most smartphones support the
hands-free profile.
Ignore an incoming call: When your
phone rings, press the Call control button
for two seconds to ignore the call. The call
goes to voicemail.
Redial the last number: To redial the last
number you called, quickly press the Call
control button twice. You hear a high tone
for each press.
14
ADVANCED FEATURES
Switch a call from phone to headset: To
switch a call from your phone to your
headset, press the Call control button for
two seconds or until you hear a tone.
Switch a call from headset to phone: To
switch a call from your headset to your
phone, press and hold the Call control
button for two seconds or until you hear a
tone.
NOTE The Wireless Headset does not
support call waiting. To use this feature,
use your phone’s controls to switch from
one call to the other. Refer to your phone’s
User Guide for instructions on how to use
call waiting with that device.
Use voice-activated dialing: Press and
hold the Call control button for two
seconds.
NOTE Depending on the model, your
smartphone may or may not support
voice-activated dialing through Bluetooth
wireless technology. If it is supported, you
must first set the voice tags on your
phone. For better recognition, record the
voice tags from your headset. Refer to your
USER GUIDE
phone’s User Guide for instructions on
setting up voice-activated dialing.
Disabling active call
and standby indicator
lights
Your headset comes with the active call
and standby indicator lights enabled.
Disabling the indicators
Press the Volume up button while turning
the headset on.
Volume up
button
NOTE This process only disables active
call and standby indicator lights when the
headset is connected to your smartphone.
All other indicator lights, such as low
battery, continue to function.
Troubleshooting
Enabling the indicators
Turn the headset off and then press the
Volume up button while turning the
headset on.
My headset doesn’t work with my
smartphone
Verify that your smartphone is capable of
using Bluetooth® wireless technology and
is within the standard operating range of
30 feet (10 meters). If it is, carefully follow
the pairing instructions again. See Pairing
your headset with your smartphone.
DISABLING ACTIVE CALL AND STANDBY INDICATOR LIGHTS
15
USER GUIDE
I hear static on my headset
Callers can’t hear me
Appliances such as cordless phones and
wireless networking equipment may cause
interference, adding a crackling noise. To
reduce interference, keep your headset
away from other devices that use or
produce radio waves.
Your headset might be muted. To turn
mute off, press both sides of the Volume
button until you hear two high tones and
one low tone.
I can’t hear callers
Try these solutions:
16
Can other phones pick up my
conversations when I'm using the
wireless headset?
When you pair your headset with your
smartphone, you are creating a private link
between only those two devices. Devices
outside that pairing cannot pick up the
transmission either by accident or on
purpose.
•
Make sure that the headset is turned
on. Press the Call control button for
about two seconds until you hear a
beep or see the indicator light glow
blue.
•
Move the headset closer to the
smartphone (the distance should be
less than 30 feet/10 meters).
•
Charge your headset battery using the
AC charger. See Charging your headset.
•
Press the Volume up button to increase
the sound heard in the headset.
Does my headset work with laptop,
desktop, or handheld computers?
•
Verify that your headset is paired with
your smartphone and that Bluetooth is
enabled on your smartphone. See
Pairing your headset with your
smartphone.
Your headset can work with other devices
besides your smartphone if those devices
are compliant with Bluetooth version 1.1 or
later specifications and they support the
TROUBLESHOOTING
My headset doesn’t work with my
cordless phone at home
Your headset is not designed for use with
cordless phones.
USER GUIDE
Bluetooth headset and/or hands-free
profile(s).
Willl my headset interfere with my car’s
electronics, radio, or computer?
Your headset produces significantly less
power than a typical mobile phone. It also
emits only signals that are compliant with
the international Bluetooth standard.
Therefore, your headset does not interfere
with standard consumer-grade electronic
equipment.
Customer support for
your headset
Caring for your
headset
•
To clean your headset, use a clean, soft,
slightly damp cloth.
•
Always store your headset with the
power off and keep it well protected.
•
Avoid storing your headset at high
temperatures (above 60°C/134°F)—such
as in a hot vehicle or in direct sunlight.
(Storage at high temperatures can
degrade performance and reduce
battery life.)
•
Do not expose your headset or any of
its supplied parts to rain or other liquids.
For customer support for your headset,
please go to www.palm.com/support.
CUSTOMER SUPPORT FOR YOUR HEADSET
17
USER GUIDE
Glossary
Bluetooth® wireless technology Radio
technology that was developed to connect
devices, such as mobile phones and
headsets, without wires or cords over a
distance of approximately 30 feet (10
meters). More information is available at
www.bluetooth.com.
Pairing (also known as forming a
partnership) Process that creates a
unique and encrypted communication link
between two Bluetooth devices and
enables them to communicate with each
other.
18
GLOSSARY
When you have paired your mobile phone
with your headset, the devices recognize
each other, allowing the phone to bypass
the discovery and authentication process
and automatically accept the transmission.
Passkey Code that you must enter on the
phone in order to pair the mobile phone
with your headset.
USER GUIDE
Important safety and
legal information
IMPORTANT Using a mobile phone while driving creates a
distraction to the driver, and this may increase the likelihood of an
accident. When using the phone while driving, keep the following in
mind:
•
Keep conversations short and do not make notes or read
documents.
•
Before answering calls, consider your circumstances.
•
Pull off the road and park before making or answering calls when
driving conditions require it—for example, bad weather, high
traffic density, the presence of children in the car, or difficult
junctions or maneuvers.
•
Always follow local laws.
FCC
This device complies with part 15 of the FCC Rules. Operation is
subject to the following two conditions: (1) This device may not cause
harmful interference, and (2) this device must accept any interference
received, including interference that may cause undesired operation.
This equipment has been tested and found to comply with the limits
for a Class B digital device, pursuant to part 15 of the FCC Rules.
These limits are designed to provide reasonable protection against
harmful interference in a residential installation. This equipment
generates, uses, and can radiate radio frequency energy and, if not
installed and used in accordance with the instructions, may cause
harmful interference to radio communications. However, there is no
guarantee that interference will not occur in a particular installation. If
this equipment does cause harmful interference to radio or television
reception, which can be determined by turning the equipment off and
on, the user is encouraged to try to correct the interference by one or
more of the following measures:
•
Increase the separation between the equipment and the receiver.
•
Connect the equipment into an outlet on a circuit different from
where the receiver is connected.
•
Consult the dealer or an experienced radio/TV technician for help.
Battery Precautions
To reduce the risk of fire or injury to persons, read and follow
these instructions.
•
Do not dispose of product in a fire. The battery may explode if
exposed to fire. Check with local codes for disposal instructions.
•
Do not open or mutilate battery pack. Released electrolyte is
corrosive and may cause damage to eyes or skin and may be
toxic if swallowed.
•
Charge the product in accordance with the instructions supplied
with this unit.
•
Observe proper orientation between product and charger
contacts.
Reorient or relocate the receiving antenna.
•
IMPORTANT Changes or modifications not covered in this manual
must be approved in writing by the manufacturer’s Regulatory
Engineering Department. Changes or modifications made without
written approval may void the user’s authority to operate the
equipment.
IMPORTANT SAFETY AND LEGAL INFORMATION
19
USER GUIDE
Approval marks
Palm wireless headset product family
CE mark
Tested to Comply
With FCC Standards
Mexico approval mark
FOR HOME OR OFFICE USE
Industry Canada Notice
Radio equipment The term “IC:” before the radio certification
number only signifies that Industry Canada technical specifications
were met. Operation is subject to the following two conditions: (1)
this device may not cause interference, and (2) this device must
accept any interference, including interference that may cause
undesired operation of the device. “Privacy of communications may
not be ensured when using this telephone.” This product meets the
applicable Industry Canada technical specifications of the RSS210.
Avis Industrie Canada
Équipement radio Le terme « IC/CI » avant le numéro
d’homologation radio signifie seulement que les specifications
techniques Industrie Canada ont été respectées. Le fonctionnement
de l’équipement est soumis aux deux conditions suivantes : (1) le
dispositif ne doit créer aucune interférence nuisible, et (2) le dispositif
doit accepter toute interférence reçue, y compris celles pouvant
causer le fonctionnement indésirable du dispositif. « La
confidentialité des communications n’est pas assurée lors de l’usage
du téléphone. » Ce produit répond aux spécifications techniques du
ministère de l’Industrie du Canada en vigueur pour le RSS210.
20
IMPORTANT SAFETY AND LEGAL INFORMATION
Static Electricity, ESD, and Your Palm Device
Electrostatic discharge (ESD) can cause damage to electronic devices
if discharged into the device, so you should take steps to avoid such
an occurrence.
Description of ESD
Static electricity is an electrical charge caused by the buildup of
excess electrons on the surface of a material. To most people, static
electricity and ESD are nothing more than annoyances. For example,
after walking over a carpet while scuffing your feet, building up
electrons on your body, you may get a shock—the discharge event—
when you touch a metal doorknob. This little shock discharges the
built-up static electricity.
ESD-susceptible equipment
Even a small amount of ESD can harm circuitry, so when working
with electronic devices, take measures to help protect your electronic
devices, including your Palm® smartphone or headset, from ESD
harm. While Palm has built protections against ESD into its products,
ESD unfortunately exists and, unless neutralized, could build up to
levels that could harm your equipment. Any electronic device that
contains an external entry point for plugging in anything from cables
to docking stations is susceptible to entry of ESD. Devices that you
carry with you, such as your smartphone, build up ESD in a unique
way because the static electricity that may have built up on your body
USER GUIDE
is automatically passed to the device. Then, when the device is
connected to another device such as a docking station, a discharge
event can occur.
Precautions against ESD
Make sure to discharge any built-up static electricity from yourself
and your electronic devices before touching an electronic device or
connecting one device to another. The recommendation from Palm is
that you take this precaution before connecting your Palm
smartphone to your computer, placing the smartphone in a cradle, or
connecting it to any other device. You can do this in many ways,
including the following:
•
Ground yourself when you’re holding your mobile device by
simultaneously touching a metal surface that is at earth ground.
For example, if your computer has a metal case and is plugged
into a standard three-prong grounded outlet, touching the case
should discharge the ESD on your body.
•
Increase the relative humidity of your environment.
•
Install ESD-specific prevention items, such as grounding mats.
Conditions that enhance ESD occurrences
Conditions that can contribute to the buildup of static electricity in the
environment include the following:
•
Low relative humidity.
•
Material type. (The type of material gathering the charge. For
example, synthetics are more prone to static buildup than natural
fibers like cotton.)
•
The rapidity with which you touch, connect, or disconnect
electronic devices.
While you should always take appropriate precautions to discharge
static electricity, if you are in an environment where you notice ESD
events, you may want to take extra precautions to protect your
electronic equipment against ESD.
IMPORTANT SAFETY AND LEGAL INFORMATION
21
USER GUIDE
Europe R&TTE Directive (Europe)
22
IMPORTANT SAFETY AND LEGAL INFORMATION
Palm, Inc.
950 W. Maude Ave.
Sunnyvale, CA 95085-2801
United States of America