1
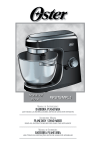
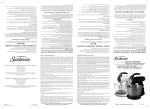
User Manual Manual de Instrucciones For product questions: Oster Consumer Service USA : 1.800.334.0759 Canada : 1.800.667.8623 www.oster.com © 2010 Sunbeam Products, Inc. doing business as Jarden Consumer Solutions. All rights reserved. Distributed by Sunbeam Products, Inc. doing business as Jarden Consumer Solutions, Boca Raton, Florida 33431. MODELS/ MODELOS Stand Mixer Batidora FPSTSM5101 FPSTSM5102 SPR-111610-802 Para preguntas sobre los productos llame: Oster Consumer Service EE.UU. : 1.800.334.0759 Canadá : 1.800.667.8623 www.oster.com © 2010 Sunbeam Products, Inc. operando bajo el nombre de Jarden Consumer Solutions. Todos los derechos reservados. Distribuido por Sunbeam Products, Inc. operando bajo el nombre de Jarden Consumer Solutions, Boca Raton, Florida 33431. Printed in China Impreso en China Visit us at www.oster.com P.N. 135787 Rev. B IMPORTANT SAFEGUARDS When using electrical appliances, basic safety precautions should always be followed, including the following: Read all instructions before use 1. To protect against risk of electrical shock, do not put mixer in water or other liquid. This may cause personal injury or damage to the product. 2. Close supervision is necessary when mixer is used by or near children or incapacitated persons. 3. Unplug from outlet while not in use, before putting on or taking off parts, and before cleaning. 4. Avoid contacting moving parts. Keep hands, hair, clothing, as well as spatulas and other utensils away from beaters during operation to reduce the risk of injury to persons and/or damage to the mixer. 5. To disconnect, turn off all controls and remove plug from outlet. 6. Do not operate mixer with a damaged cord or plug or after the appliance malfunctions, or is dropped or damaged in any manner. If the mixer becomes damaged please contact Consumer Services for assistance. 7. Do not use extension cord. 8. The use of attachments not recommended or sold by Jarden Consumer Solutions may cause fire, electrical shock or injury. 9. Do not use outdoors or for commercial purposes. 10. Do not let cord hang over edge of table or countertop or touch hot surfaces, including the stove. 11. Remove beaters from mixer before washing. 12. Do not place mixer or bowls on or near a hot gas or electric burner, in a heated oven (microwave, convention, convection, etc.), or on any other heated surface. 13. Do not use mixer for other than intended use. 14. Do not leave mixer unattended while it is operating. English-2 15. Mixer has an internal safety to prevent overheating. If the mixer shuts down because of overheating, reset the speed control dial to OFF and unplug unit from wall. Wait 1 minute and plug back in. Do not plug unit back in unless speed selection is set to OFF. 16. Any servicing, other than cleaning and user maintenance shall be performed by an authorized service representative. 17. When mixing liquids, especially hot liquid, use a tall container or make small quantities at a time to reduce spillage. 18. Don’t Abuse Cord. Never carry the mixer by the cord or yank it to disconnect from an outlet; instead, grasp the plug and pull to disconnect. SAFETY This Unit Is for Household Use Only The motor of your Mixer is protected by a heat cured insulation. This is a standard process. Due to the heat curing of the insulation, you may experience an odor and possibly a slight wisp of smoke from your mixer’s motor. This effect will disappear after the first few uses. SPECIAL INSTRUCTIONS For Products Purchased in the U.S. and Canada Only To reduce the risk of electrical shock, this appliance is equipped with a 3-prong plug. If you are unable to insert the plug into the outlet, contact a qualified electrician to replace the obsolete outlet. Do not attempt to defeat the safety purpose of the 3-prong plug by modifying it in any way. Also, do not pull, twist or otherwise abuse the power cord; instead, grasp the plug and pull to remove from the outlet. SAVE THESE INSTRUCTIONS Welcome Congratulations on your purchase of a Oster® Stand Mixer! To learn more about Oster® products, please visit us at www.oster.com. English-3 Features of Your Stand Mixer F G H A D On select models only C Attachments B I J K E A.Attachment Eject Button – The eject button, located on the top of the handle, releases the beaters or dough hooks for easy cleaning. B.Variable Bowl Speed – The bowl speed increases and decreases automatically as the beater speed is increased and decreased. C.Off-Center Head and Beaters – The head of the Stand Mixer and beaters are positioned off-center to the bowl to make it easier to add ingredients during mixing. D.Tilt Back Locking Head – The head of the Stand Mixer tilts back and locks securely into position to allow easy removal of mixing bowls and attachments. English-4 E.Bowl Selector – Reach under the base of the mixer and squeeze two tabs on the turntable while pushing up. Place the turntable in the hole and gently push down right hole for the large bowl. (See figure 1) Large bowl only is included with this model. Check www.oster.com for other bowls and accessories if available. F.Chrome Steel Dough Hooks – Heavy-duty dough hooks take the hard work out of kneading dough and other heavy mixtures. G.Chrome “V-Groove” Beaters – Heavy-duty “V-groove” beaters for creaming butter and sugar, plus mixing heavy cake mixes. H. Durable Whisks – make whipping and aerating foods an ease. (On select models only.) I.12-Speed Control Dial – The combination of 12-speeds and a powerful torque control motor in the mixer head ensures superior mixing control and maintains speed regardless of the mixing load. J.Polished Stainless Steel Mixing Bowl – 4.6 quart mixing bowl is ideal for all your mixing needs. K.Die-Cast Metal Body – The heavy-duty, die-cast metal body combined with non-slip rubber feet keep the Stand Mixer stable during operation. English-5 Preparing the Stand Mixer for Use Features of Your Stand Mixer (cont.) Before preparing the mixer for use, be sure the speed control dial is in the OFF position and the electric cord is unplugged. Be sure to wash bowls and attachments before initial use. Raising and Lowering the Mixing Head Press the tilt release button, located at the top of the neck of the Stand Mixer. While the button is depressed, hold the handle (1) and ease the head of the Stand Mixer back. The head will lock into this tilt position (2). To lower the mixing head, press the tilt release button. While the button is depressed, hold the handle (2) and ease the head of the Stand Mixer down (1). A “click” sound will indicate when the mixer head has locked into position. (See Figure 2) Figure 1 Figure 2 Installing the Attachments Cone Beater Figure 3 Speed Control Dial Square Beater Beaters, Dough Hooks, and Whisks (on select models) Select the pair of attachments best suited for your mixing job. (See Mixing Guide for recommendations). Take the attachment that has a green colored band around the top – illustrated as attachment (A). Insert attachment (A) into the socket on the side of the mixer nearest the side of the bowl. The socket is identified by a green dot beside it. Take the other attachment that has a gray colored band around the top – illustrated as attachment (B). Insert attachment (B) into the socket nearest the center of the bowl. (See Figure 3) Note: Be sure both attachments click firmly in place. You may need to twist the beater attachment slightly to engage it in position prior to pushing it in place. Figure 4 English-6 English-7 Preparation Adding the Mixing Bowl Place the mixing bowl onto the turntable. Note: Mixing bowls should NEVER be used in a conventional oven, microwave oven, on top of the range or on any other heated surface. Operating Instructions About the Speed Control Dial The speed control dial is used for turning the mixer ON and OFF and for selecting its 12 mixing speeds. (See Figure 4) Rotate the speed control dial in a clockwise direction to increase mixing speed, and in a counterclockwise direction to decrease mixing speed. Rotate the speed control dial until the indicator is aligned with the indicator line for the desired speed. Hint: During normal operation, the mixer may automatically adjust speeds as the consistency changes of your dough or mixture: This is for optimum performance. It is not recommended to operate the mixer without contents in the bowl. English-8 Mixing Guide Please keep in mind that the various mixing tasks and related speeds listed in the following table may vary slightly from recipe to recipe. For most recipes, it is better to begin your mixing on a slower speed until the ingredients begin combining, then move to the appropriate speed range for the particular task. When mixing larger quantities you may need to increase the Stand Mixer speed due to the amount of mixing required and the larger load on the machine. When building up a recipe that requires the addition of dry ingredients, such as flour, slow the speed down while these ingredients are being added to avoid a snow storm effect. Once the extra ingredients begin combining, slowly increase to the appropriate speed for the particular mixing task. Speed Setting Range Recommended Accessory Mixing Task LOW 1-3 FOLDING & KNEADING Folding Kneading- Doughs (pastry, bread, scones, etc.) Standard Beaters Dough Hooks MEDIUM 4-6 LIGHT MIXING Kneading- Heavy Doughs (large quantities) Beating- Packaged Mixes Beating- creaming sugar and butter Standard Beaters Dough Hooks HIGH 7-9 CREAMING & BEATING Whisking- Light Batters Beating- Cake Mixes, Heavy Batters, Icings, etc. Standard Beaters Whisks VERY HIGH 10-12 WHIPPING & AERATING Whisking- Egg Whites, Cream, etc. Standard Beaters Whisks English-9 Caring For Your Mixer Cleaning Your Mixer To clean the mixer, turn off and unplug from outlet, wipe the mixer head, stand and turntable with a damp cloth, then dry. DO NOT IMMERSE THE STAND MIXER IN WATER. Avoid the use of abrasive cleaners, as they may damage the finish of the mixer. Wash the beaters and bowls in hot, soapy water after each use. Rinse thoroughly and dry. Beaters and bowls may also be washed in an automatic dishwasher. Storing Your Mixer Store the mixer in a dry location, such as on a countertop or table top, or in a closet or cupboard. Insert the beaters into the proper sockets. Place the dough hooks and other attachments in the mixing bowl. Store the bowl(s) on the turntable. Wind the electric cord into a coil, then secure it with a twist fastener. Maintenance Helpful Hints • When mixing liquids, especially hot liquid, make small quantities at a time to reduce spillage. • Ingredients should be added to the mixing bowl as they are specified in the recipe. • Use the mixing speed that is recommended in the recipe. Use the speed control dial of the mixer to help you find the correct speed to use. • If times are specified in the recipe, use them! BE CAREFUL NOT TO OVERMIX. Overmixing can cause the mixture to become very tough. • Should an object, such as a spatula, fall into the bowl while the mixer is operating, turn the mixer OFF immediately, then, remove the object. • For easier clean-up remove beaters and rinse immediately with warm water. • Mixer is designed to be off-center when the large bowl is used for best performance. • Mixer turntable will come shipped placed in the correct hole for use with the large mixing bowl which is included. The motor of your stand mixer has been carefully lubricated at the factory and does not require any additional lubricant. Other than the recommended cleaning, no further user maintenance should be necessary. For servicing or repairs please contact Consumer Services for assistance. (1-800-334-0759 in the U.S. or 1-800-667-8623 in Canada) English-10 English-11 Recipes Make Ahead Mashed Potatoes 3 pounds (1.5 kg) white potatoes (about 6 medium) peeled and cut in chunks 6 ounces (170 g) cream cheese cut in 1-inch (2.5 cm) cubes 1 cup (250 ml) sour cream 2 tablespoons (30 ml) butter or margarine Cook potatoes in boiling water until tender. Drain. In large mixing bowl, beat potatoes until fluffy. Add remaining ingredients. Continue to mix until smooth. Put potatoes in a lightly greased 2-quart (2-liter) covered casserole dish. Refrigerate until ready to bake. Mashed Potato mixture may be stored up to 3 days before baking. To Bake Preheat oven to 350°F (180°C). Dot potatoes with 1 tablespoon (15 ml) of butter or margarine. Cover and bake for 30 minutes or until heated through. Yellow Cake 2-½ cups (625 ml) all-purpose flour 1-½ cups (375 ml) sugar 1 tablespoon (15 ml) baking powder ½ cup (125 ml) shortening 2 eggs 1 cup (250 ml) milk 1-½ teaspoons (7 ml) vanilla extract 1 teaspoon (5 ml) salt Preheat oven to 375°F (190°C). Lightly grease and flour two 9-inch (23 cm) cake pans. Place all ingredients in large mixing bowl and beat on low speed. As dry ingredients begin to incorporate with wet ingredients, gradually increase speed. Beat at medium speed until smooth and fluffy. Pour batter into prepared pans. Bake 25-30 minutes or until toothpick inserted in center comes out clean. Cool and remove from pans. Yield: 12-16 Servings English-12 Heavenly Angel Food Cake 1 cup (250 ml) cake flour ¾ cup (200 ml) sugar 1-½ teaspoons (7 ml) cream of tartar 1 cup (250 ml) sugar 1 teaspoon (5 ml) vanilla extract ½ teaspoon (2 ml) almond extract ½ teaspoon (2 ml) salt 1-½ cups (375 ml) egg whites (11-12 eggs), at room temperature Preheat oven to 375°F (190°C). Sift flour and ¾ cup of sugar together; set aside. In large mixer bowl, beat egg whites, cream of tartar and salt at very high speed until foamy. Add remaining amount of sugar, 1 tablespoon (15 ml) at a time, beating at a very high speed until meringue holds stiff peaks. Reduce mixer to a low speed and gently fold in flour-sugar mixture, ¼ cup (50 ml) at a time over meringue, folding in gently just until flour-sugar mixture disappears. Add vanilla and almond extract with last addition of flour-sugar mixture. Do not over mix. Pour batter into ungreased 10 x 4-inch (25 x 11 cm) tube pan. Gently cut through batter with rubber spatula. Bake for 45-50 minutes or until top of cake springs back when touched lightly. Cracks on top should be dry. Invert cake over funnel and let cake cool completely before removing from pan. Yield: 12 Servings Mocha Cheesecake 2 cups (500 ml) whipping cream ¹⁄³ cup (75 ml) butter, softened ¹⁄³ cup (75 ml) coffee flavored liqueur 2 teaspoons (10 ml) vanilla extract 2 cups (500 ml) semi-sweet 2 packages (8 ounces each) cream chocolate morsels cheese, softened Melt chocolate in a double boiler or microwave oven. In the small mixing bowl, beat cream at a very high speed until soft peaks form, set aside. In the large mixing bowl, beat butter and cream cheese until smooth and creamy. Add coffee flavored liqueur, vanilla and melted chocolate. Fold whipped cream into chocolate mixture at a low speed. Pour into prepared crust. (See Chocolate Cookie Crust Recipe Page 15) Chill 8 hours. Yield: 10-12 Servings English-13 Orange Cappuccino Cake 2 squares (1 ounce each) ½ cup (125 ml) water sweet baking chocolate 2 cups (500 ml) all-purpose flour 1 teaspoon (5 ml) baking soda ¼ (1.25 ml) teaspoon salt 1 cup (250 ml) softened margarine 2 cups (500 ml) sugar or butter 4 eggs, separated 1 teaspoon (5 ml) vanilla 1 cup (250 ml) buttermilk ¼ cup (50 ml) orange cappuccino 1-½ teaspoons (7 ml) grated orange peel flavored instant coffee mix (dry) Preheat oven to 350°F (180°C). Lightly grease and flour two 9-inch (23 cm) cake pans. Heat chocolate and water over low heat, stirring frequently, until chocolate is melted. Stir in coffee mix and orange peel. Set aside allowing mixture to cool slightly. Sift flour, baking soda and salt together, set aside. In large mixing bowl, beat margarine and sugar on medium speed until fluffy. Beat in egg yolks, one at a time, beating well after each addition. Add chocolate mixture and vanilla. Mix in flour mixture, ½ cup at a time, alternately with buttermilk, beating until smooth after each addition. In the small mixing bowl, beat egg whites on high speed until stiff peaks form, fold into batter. Pour an even amount of batter into the 2 pans. Bake for 30 minutes or until top springs back when touched lightly. Let cool 12 minutes. Remove from pans to wire rack and cool completely. Fill layers and frost with orange cappuccino frosting. (See Recipe Page 17) Yield: 12 Servings English-14 Chocolate Cookie Crust 1-½ cups (375 ml) chocolate cookies, finely crumbed ¼ cup (50 ml) butter, melted ½ teaspoon (2 ml) cinnamon Put all ingredients into small mixing bowl. Mix thoroughly. Pat mixture into bottom and sides of a 9-inch (23 cm) pie pan. Chill or bake 10 minutes at 350°F (180°C), let cool before filling. Yield: One 9-inch (23 cm) Crust Butter Cream Frosting 3 cups (750 ml) powdered sugar 3-4 tablespoons (45-60 ml) milk ½ cup (125 ml) butter or margarine, softened 1 teaspoon (5 ml) vanilla extract Put all ingredients into small mixing bowl. Mix at a low speed to combine ingredients. Increase speed to a medium speed; continue to mix until fluffy. Yield: Frosts Two 8 or 9-inch (20 - 23 cm) Layers Bittersweet Chocolate Frosting 2 squares (1 ounce each) unsweetened ¼ cup (50 ml) hot milk chocolate, cut into small pieces 2 tablespoons (30 ml) butter 2 cups (500 ml) powdered sugar 1 teaspoon (5 ml) vanilla extract Put all ingredients into small mixing bowl. Mix at a low speed to combine ingredients. Increase speed to a medium speed; continue to mix until smooth. If frosting is too thick, add a small amount of milk. Yield: About 1 Cup (250 ml) English-15 Cream Cheese Frosting 1 package (8 ounces) cream cheese, at room temperature 1-¹⁄³ cups (325 ml) powdered sugar 1 tablespoon (15 ml) light cream or half-and-half Put all ingredients into small mixing bowl. Mix at a low speed to combine ingredients. Increase speed to a high speed; continue to mix until smooth and of spreading consistency. Yield: Frosts a 9 x 13-inch (23 - 33 cm) Cake Orange Cappuccino Frosting ½ cup (125 ml) margarine or butter 2 squares (1 ounce each) 8 cups (2000 ml) powdered sugar sweet baking chocolate 1 tablespoon (15 ml) orange Cappuccino ¼ cup (50 ml) milk ¼ cup orange juice Melt chocolate and margarine over low heat, stirring frequently. Stir in coffee and set aside. Beat powdered sugar, milk, orange juice and chocolate mixture in large mixing bowl and beat on medium speed until light and fluffy. Holiday Sugar Cookies ¾ cup (200 ml) vegetable oil 1 cup (250 ml) sugar 2 eggs 1 teaspoon (5 ml) vanilla extract 3 cups (750 ml) all-purpose flour 2 teaspoons (10 ml) baking powder ¼ teaspoon (1 ml) salt Preheat oven to 375°F (190°C). In large mixing bowl, beat oil and sugar on a medium speed until well blended. Add eggs and vanilla and beat until light in texture. Reduce speed and add flour, baking powder and salt. Mix on a low speed until ingredients incorporate. Cover and refrigerate dough until firm, at least 30 minutes. Divide dough in half. Roll out between 2 sheets of lightly floured waxed paper until ¼ inch thick. Cut into cookies using any decorative shapes you like. Arrange 1 inch apart on a greased cookie sheet. Bake 12-15 minutes, until cookies are lightly browned around edges. Cool on wire rack. Yield: 48 Cookies Double Chocolate Brownies 1-¾ cups (450 ml) all-purpose flour 4 eggs 2 teaspoons (10 ml) baking powder 1 cup (250 ml) vegetable oil 1 teaspoon (5 ml) salt 2 teaspoons (10 ml) vanilla extract ¾ cup (200 ml) cocoa powder 1 cup (250 ml) semi sweet chocolate 2-½ cups (625 ml) sugar morsels Preheat oven to 350°F (180°C). Grease a 15-½ x 10-½ inch (39 x 27cm) jellyroll pan. In the large mixing bowl at a low speed, stir together the first 5 ingredients. Gradually add eggs, oil and vanilla. Increase mixer to a moderate speed. Mix until combined. Reduce speed to a low speed and stir in chocolate morsels. Spread into prepared pan and bake for 20-25 minutes. Do not overbake. Cool and cut into bars. English-16 English-17 Two Year Limited Warranty Sunbeam Products, Inc. doing business as Jarden Consumer Solutions or if in Canada, Sunbeam Corporation (Canada) Limited doing business as Jarden Consumer Solutions (collectively “JCS”) warrants that for a period of two years from the date of purchase, this product will be free from defects in material and workmanship. JCS, at its option, will repair or replace this product or any component of the product found to be defective during the warranty period. Replacement will be made with a new or remanufactured product or component. If the product is no longer available, replacement may be made with a similar product of equal or greater value. This is your exclusive warranty. Do NOT attempt to repair or adjust any electrical or mechanical functions on this product. Doing so will void this warranty. This warranty is valid for the original retail purchaser from the date of initial retail purchase and is not transferable. Keep the original sales receipt. Proof of purchase is required to obtain warranty performance. JCS dealers, service centers, or retail stores selling JCS products do not have the right to alter, modify or any way change the terms and conditions of this warranty. This warranty does not cover normal wear of parts or damage resulting from any of the following: negligent use or misuse of the product, use on improper voltage or current, use contrary to the operating instructions, disassembly, repair or alteration by anyone other than JCS or an authorized JCS service center. Further, the warranty does not cover: Acts of God, such as fire, flood, hurricanes and tornadoes. What are the limits on JCS’s Liability? JCS shall not be liable for any incidental or consequential damages caused by the breach of any express, implied or statutory warranty or condition. Except to the extent prohibited by applicable law, any implied warranty or condition of merchantability or fitness for a particular purpose is limited in duration to the duration of the above warranty. JCS disclaims all other warranties, conditions or representations, express, implied, statutory or otherwise. JCS shall not be liable for any damages of any kind resulting from the purchase, use or misuse of, or inability to use the product including incidental, special, consequential or similar damages or loss of profits, or for any breach English-18 of contract, fundamental or otherwise, or for any claim brought against purchaser by any other party. Some provinces, states or jurisdictions do not allow the exclusion or limitation of incidental or consequential damages or limitations on how long an implied warranty lasts, so the above limitations or exclusion may not apply to you. This warranty gives you specific legal rights, and you may also have other rights that vary from province to province, state to state or jurisdiction to jurisdiction. How to Obtain Warranty Service In the U.S.A. If you have any question regarding this warranty or would like to obtain warranty service, please call 1.800.334.0759 and a convenient service center address will be provided to you. In Canada If you have any question regarding this warranty or would like to obtain warranty service, please call 1.800.667.8623 and a convenient service center address will be provided to you. In the U.S.A., this warranty is offered by Sunbeam Products, Inc. doing business as Jarden Consumer Solutions located in Boca Raton, Florida 33431. In Canada, this warranty is offered by Sunbeam Corporation (Canada) Limited doing business as Jarden Consumer Solutions, located at 20 B Hereford Street, Brampton, Ontario L6Y 0M1. If you have any other problem or claim in connection with this product, please write our Consumer Service Department. PLEASE DO NOT RETURN THIS PRODUCT TO ANY OF THESE ADDRESSES OR TO THE PLACE OF PURCHASE. Please also see www.oster.com for more information. English-19 PRECAUCIONES IMPORTANTES Cuando use algún aparato eléctrico siempre deben seguirse precauciones básicas de seguridad incluyendo las siguientes: Lea todas las instrucciones antes de usar 1. Para protegerse contra peligros de electricidad no sumerja la batidora en agua u otros líquidos ya que podría ocasionar lesiones personales o daños al producto. 2. Es necesario contar con supervisión continua cuando la Batidora es usada o está cerca de niños o personas incapacitadas. 3. Desconecte la batidora del tomacorriente cuando el aparato no está en uso, antes de poner o quitar partes y antes de limpiarla. 4. Evite el contacto con las partes en movimiento. Mantenga las manos, cabello, ropa, así como también espátulas y otros utensilios lejos de los batidores durante el funcionamiento del aparato, para reducir el riesgo de lesiones personales o daños a la batidora. 5. Para desconectar, apague todos los controles y retire el enchufe del tomacorriente. 6. No opere la batidora que tenga el cable o enchufe dañado, ni después de haber detectado un mal funcionamiento o si se cae o está dañada de modo alguno. Si la batidora está dañada, comuníquese con Servicios al Consumidor para solicitar asistencia. 7. No utilice cable de extensión. 8. El uso de accesorios no recomendados o vendidos por Jarden Consumer Solutions puede causar incendios, descargas eléctricas o lesiones. 9. No use la tostadora al aire libre o para propósitos comerciales 10. No deje el cable colgado sobre el borde de la mesa ni que toque superficies calientes, incluyendo el horno. 11. Quite los batidores de la batidora antes de lavarlos. 12. No coloque la batidora o el tazón sobre o cerca de quemadores de estufas de gas o de quemadores eléctricos, o dentro de un horno caliente. 13. No use la Batidora más que para lo que ha sido diseñada. 14. No opere la batidora sin continua supervisión. Español-20 15. La batidora tiene una seguridad interna que evita el sobrecalentamiento. Si la batidora deja de funcionar por sobrecalentamiento, lleve el disco de control de velocidades a la posición OFF y desenchufe la batidora. Espere 1 minuto y vuelva a enchufarla. No lo haga si la velocidad no ha sido seleccionada como OFF. 16. Cualquier mantenimiento aparte de la limpieza y el cuidado de parte del usuario debe ser realizado por un representante de servicio autorizado. 17. Al mezclar liquidos, especialmente calientes, utilize el tazón de fuente que se mezcla grande o hace antidades pequeñas a la vez para reducir derramamiento. 18. No Abuse del Cordón. Nunca jale el mezclador por la cuerda ni dé tirones para desenchufar del tomacorriente; más bien, agarre del enchufe para jalar y desenchufar. SEGURIDAD Esta Unidad Es Sólo para Uso Doméstico El motor de su Batidora está protegido por una aislación curada térmicamente. Se trata de un proceso estándar. Debido al curado térmico de la aislación, puede sentir un olor desagradable y, posiblemente, observar vestigios de humo del motor de la batidora. Este efecto desaparecerá después de los primeros usos. INSTRUCCIONES ESPECIALES Para Productos Adquiridos En Ee.Uu. Y Canadá Exclusivamente Para reducir el riesgo de descarga eléctrica, este electrodoméstico viene equipado con un enchufe de 3 patas. Si no puede insertarlo en el tomacorriente, comuníquese con un electricista calificado para cambiar el tomacorriente obsoleto. De ninguna manera intente modificar esta medida de seguridad del enchufe de tres patas. También, no tire, no tuerza ni abuse de otra manera del cable eléctrico; en lugar, agarre el enchufe y tire para quitar del enchufe. GUARDE ESTAS INSTRUCCIONES Bienvenidos ¡Felicitaciones por su compra de una Batidora. Para aprender más sobre productos Oster®, por favor visítenos en www.oster.com! Español-21 Características de Su Batidora F G H A D En algunos modelos solamente C Accesorios B I J K E A.Botón de Expulsión – El botón de expulsión localizado en la parte superior del asa libera los batidores o ganchos para amasar para una fácil limpieza. B.Velocidad Variable del Tazón – La velocidad del tazón aumenta y disminuye automáticamente a medida que se incrementa o disminuye la velocidad de los batidores. C.Cabezal y Batidores Descentrados – El cabezal de la Batidora y los batidores están descentrados respecto del tazón para facilitar el agregado de ingredientes durante el mezclado. D.Cabezal Fijo e Inclinado Hacia Atrás – El cabezal de la Batidora se inclina hacia atrás se fija firmemente en posición para un fácil retiro de los tazones y accesorios de mezclado. Español-22 E.Selector del tazón – Bajo la base de la batidora, debe oprimir 2 lengüetas en la plataforma giratoria al mismo tiempo que presiona hacia arriba. Ubique la plataforma giratoria en el orificio y presione suavemente hacia abajo por el orificio derecho para el tazón grande. (Ver Figura 1) El tazón grande viene incluido sólo con este modelo. Visite www.oster.com para ver más tazones y otros accesorios disponibles. F.Ganchos para amasar de acero inoxidable – Los ganchos para amasar de alta resistencia eliminan el trabajo pesado de amasar u hacer otras mezclas difíciles. G.Batidores de cromo con ranura en V – Batidores con ranura en V de alta resistencia para batir mantequilla y azúcar, además de mezclar masas para pasteles. H. Batidores para airear durables – hacen el batido y aireado de las comidas más fácil. (En algunos modelos solamente) I.Disco de control de 12 velocidades – La combinación de 12 velocidades y un motor de control con un poderoso torque en el cabezal de la batidora garantizan un control de mezcla mayor, manteniendo la velocidad sin importar la carga de la mezcla. J.El Bol del Acero inoxidable – 4, 6 bol de cuarto de galón es ideal para todas sus necesidades mezcladas. K.Vacíe el Cuerpo Metálico – El cuerpo metálico, vaciado y para trabajos duros combinado con pies antideslizantes de goma mantiene el establo de Batidora de Soporte durante operación. Español-23 Cómo Preparar la Batidora por Primera Vez Características de Su Batidora (cont.) Antes de preparar la batidora por primera vez, asegúrese de que el disco de control de velocidades se encuentre en la posición OFF y que el electrodoméstico esté desenchufado. Asegúrese de lavar los recipientes y accesorios antes de usarlos por primera vez. Cómo Subir y Bajar el Cabezal de Mezclado Pulse el botón de liberación de la posición inclinada, localizado en la parte superior del cuello. Con el botón pulsado, sostenga el asa (1) y tire hacia atrás el cabezal para que quede trabado en esta posición inclinada (2). Para bajar el cabezal de mezclado, pulse el botón de liberación de la posición inclinada. Con dicho botón pulsado, sostenga el asa (2) y baje el cabezal (1). Un clic indicará cuándo el cabezal queda fijado en posición. (Vea Figura 2) Figura 1 Figura 2 Cómo Colocar los Accesorios Batidor Cónico Figura 3 Disco de Control de Velocidades Batidor Cuadrado Batidores, Ganchos para Amasar y Batidores para airear (En algunos modelos) Seleccione el par de accesorios adecuados para la mezcla. (Consulte la Guía de Mezclas para ver recomendaciones). Tome el accesorio con la banda verde que rodea la parte superior – ilustrado como accesorio (A). Introduzca el accesorio (A) en el receptáculo al lado de la batidora que está más cerca del lado del tazón. El receptáculo se puede identificar por un punto verde al lado. Tome el otro accesorio con la banda gris que rodea la parte superior - ilustrado como accesorio (B). Introduzca el accesorio (B) en el receptáculo que está más cerca del centro del tazón. (Ver Figura 3). Nota: Asegúrese de que ambos accesorios queden firmes en su lugar escuchando un clic. Probablemente necesite torcer el accesorio batidor levemente para que encaje en posición antes de empujarlo en su lugar. Figura 4 Español-24 Español-25 Preparación Cómo Agregar el Tazón de Mezclado Ubique el tazón de mezclado sobre la plataforma giratoria. NOTA: Los tazones de mezclado NUNCA se deben utilizar en hornos convencionales, hornos microondas, sobre la estufa o sobre cualquier otra superficie caliente. Instrucciones Operativas Acerca del Dial de Control de Velocidades El disco de control de velocidades se utiliza para encender (ON) y apagar (OFF) la batidora y para seleccionar las 12 velocidades de mezclado. (Vea Figura 4 ) Gire el disco de control de velocidad en el sentido de las manecillas del reloj para aumentar la velocidad de mezclado y en sentido contrario para disminuir la velocidad de mezclado. Gire el disco de control de velocidad hasta que el indicador esté alineado con la línea indicadora para la velocidad deseada. Sugerencia: Durante el funcionamiento normal, la batidora puede ajustar la velocidad, de manera automática, a medida que la consistencia de la masa o mezcla cambia. Esto es para óptimo rendimiento. No se recomienda usar la batidora con el tazón vacío. Español-26 Guía de Mezclado Tenga en cuenta que las diversas tareas de mezclado y velocidades relacionadas listadas en la siguiente tabla pueden variar levemente de una receta a otra. Para la mayoría de las recetas, es mejor comenzar su proceso de mezclado a una velocidad más lenta hasta que los ingredientes comiencen a unirse; después, migrar al rango de velocidad adecuada según la tarea específica. Al mezclar grandes cantidades, puede ser necesario aumentar la velocidad debido a la cantidad de mezclado requerida y a la mayor carga en la máquina. Al preparar una receta que requiera del agregado de ingredientes secos tales como harina, reduzca la velocidad mientras vaya incorporando dichos ingredientes para evitar un efecto de tormenta de nieve. Una vez que los ingredientes adicionales comiencen a unirse, vaya aumentando lentamente la velocidad hasta alcanzar la deseada para la tarea de mezclado específica. Rango de Posiciones de Velocidades Tarea de Mezclado Recomendado Accesorio BAJO 1-3 PLEGAR Y MOLDEAR Plegar, Moldear – Masas (pastelería, pan, scons, etc.) Batidores Estándar Ganchos para Amasar MEDIO 4-6 MEZCLADO SUAVE Moldear – Masas Pesadas (grandes cantidades) Batido- Mezclas Envasadas Batido- Azúcar y mantequilla a punto crema Batidores Estándar Ganchos para Amasar ALTO 7-9 CREMAS Y BATIDOS Batido con Escobillas – Pastas Livianas Batido – Bizcochuelos de Tortas, Pastas Pesadas, Hielo, etc. Batidores Estándar Batidores para airear MUY ALTO 10-12 BATIDO ENÉRGICO Y AIREADO Batido con Escobillas – Claras de Huevo, Crema, etc. Batidores Estándar Batidores para airear Español-27 Cómo Cuidar Su Batidora Cómo Limpiar Su Batidora Limpie el cabezal de la batidora, apagar, desenchufar la base y la plataforma giratoria con un paño húmedo; después, séquelos. NO SUMERJA LA BATIDORA EN AGUA. Evite el uso de limpiadores abrasivos porque pueden dañar el acabado de la batidora. Lave los batidores y tazones en agua caliente y jabonosa después de cada uso. Enjuague bien y deje secar. También puede lavarlos en el lavaplatos. Dónde Guardar la Batidora Guarde la batidora en un lugar seco, como por ejemplo sobre la mesa o superficie de trabajo, en un gabinete. Inserte los batidores en los receptáculos correspondientes. Coloque los ganchos para amasar y demás accesorios en el tazón de mezclado. Guarde el(los) tazón(tazones) en la superficie giratoria. Enrolle el cable eléctrico en una bobina; después, fíjelo al portacables. Mantenimiento El motor de su batidora ha sido cuidadosamente lubricado en la fábrica y no necesita lubricación adicional. No es necesario realizar ninguna tarea de mantenimiento además de la limpieza recomendada. Si necesita servicio técnico o reparaciones, comuníquese con Servicios al Consumidor para recibir asistencia. (1-800-334-0759 en EE.UU. o 1-800-667-8623 en Canadá) Español-28 Consejos Prácticos • Al mezclar líquidos, especialmente calientes, mezcle pequeñas cantidades para reducir derrames. • Los ingredientes se deben añadir al tazón de mezclado como se especifica en la receta. • Utilice la velocidad de mezclado que se recomienda en la receta. Haga uso del disco de control de velocidad de la batidora para encontrar la velocidad correcta. • Si se especifican periodos de tiempo en la receta, !obsérvelos rigurosamente! TENGA CUIDADO DE NO SOBREMEZCLAR. Sobremezclar puede hacer que la masa se vuelva muy dura. • Si algún objeto como una espátula u otro objeto cae dentro del tazón mientras está operando la batidora, APAGUE la batidora inmediatamente y retire el objeto. • Para una limpieza fácil, remueva los batidores y enjuague inmediatamente con agua caliente. • La mezcladora está diseñada para estar fuera de eje cuando se utiliza el tazón grande para un mejor desempeño. • La plataforma giratoria de mezclado viene ubicada en el orificio correcto para utilizarse con el tazón grande ya incluido. Español-29 Recetas Puré de Papas Preparado por Adelantado 3 libras (1,5 kg) de papas blancas (cerca de 6, medianas) peladas y cortadas en trozos grandes 6 onzas (170 kg) de queso crema en cubos de 1 pulgadas (2,5 cm) 1 taza (250 ml) de crema agria 2 Cu. (30 ml) de mantequilla o margarina Cocine las papas en agua hirviendo hasta que estén tiernas. Extraiga el agua. En el tazón de mezclado grande, bata las papas hasta que queden esponjosas. Agregue los ingredientes restantes. Continúe mezclando hasta que queden suaves. Coloque las papas en una plato engrasado con tapa para hornear de 2 cuartos (2 litros). Póngalo en la heladera hasta que esté listo para hornear. La mezcla de Puré de Papas puede guardarse hasta 3 días antes de hornearla. Para Hornear Precaliente el horno a 350°F (180°C). Pique las papas con 1 Cu. (15 ml) de mantequilla o margarina. Tape y hornee durante 30 minutos o hasta que se hayan calentado. Torta Amarilla 2-½ tazas (625 ml) de harina común 2 huevos 1-½ tazas (375 ml) de azúcar 1 taza (250 ml) de leche 1 Cu. (15 ml) de polvo de hornear 1-½ cuta. (7 ml) de esencia de vainilla ½ taza (125 ml) manteca para freír 1 cuta. (5 ml) de sal Precaliente el horno a 375°F (190°C). Engrase suavemente y enharine dos moldes para tortas de 9 pulg. (23 cm). Coloque todos los ingredientes en el tazón de mezclado grande y bata a poca velocidad. A medida que los ingredientes secos se vayan incorporando con los húmedos, aumente la velocidad gradualmente. Bata a velocidad media hasta obtener una mezcla suave y esponjosa. Vierta la pasta en los moldes preparados. Hornee de 25 a 30 minutos o hasta que el escarbadientes insertado en el centro salga limpio. Deje enfriar y desmolde Rinde de 12 a 16 Porciones Español-30 Torta Ángel Celestial 1 taza (250 ml) de harina para tortas ¾ taza (200 ml) de azúcar 1-½ cuta. (7 ml) de cremor tártaro 1 taza (250 ml) de azúcar 1 cuta. (5 ml) de esencia de vainilla ½ cuta. (2 ml) de extracto de almendra ½ cuta. (2 ml) de sal 1-½ tazas (375 ml) de claras de huevo (11-12 huevos), a temperatura ambiente Precaliente el horno a 375°F (190°C). Tamice la harina y ¾ de taza de azúcar; coloque aparte. En el tazón de mezclado grande bata las claras de huevo, el cremor tártaro y la sal a muy alta velocidad hasta obtener una mezcla espumosa. Agregue la cantidad de azúcar restante, de a 1 Cu. (15 ml) por vez, batiendo a muy alta velocidad hasta que el merengue forme picos duros. Reduzca la velocidad de la batidora y vierta suavemente en pliegues la mezcla de harina y azúcar, de a ¼ taza (50 ml) por vez, sobre el merengue hasta que desaparezca. Agregue la vainilla y el extracto de almendras con el último agregado de la mezcla de harina y azúcar. No mezcle en exceso. Vierta la pasta en una budinera sin engrase de 10 x 4 pulg. (25 x 11 cm). Suavemente haga cortes en la pasta con una espátula de goma. Hornee de 45 a 50 minutos o hasta que la superficie de la torta se contraiga al tacto suave. Las grietas de la superficie deben estar secas. Invierta la torta sobre el molde y deje secar completamente antes de desmoldar. Rinde 12 Porciones Torta de Queso Moca 2 tazas (500 ml) de crema batida enérgicamente ¹⁄³ taza (75 ml) licor de café ¹⁄³ taza (75 ml) de mantequilla blanda 2 cuta. (10 ml) de esencia de vainilla 2 tazas (500 ml) de trozos de chocolate semiamargo 2 paquetes (8 onzas c/u) de queso crema, bland Derrita el chocolate en un horno microondas o hervidor doble. En el tazón de mezclado pequeño, bata la crema a muy alta velocidad hasta que se formen picos suaves, deje aparte. En el tazón de mezclado grande, bata la mantequilla y el queso crema hasta obtener una mezcla suave y cremosa. Agregue el licor de café, la vainilla y el chocolate derretido. Vierta en pliegues la crema batida enérgicamente en la mezcla de chocolate, a baja velocidad. Vierta en la corteza (Ver la Receta de Corteza de Galletitas de Chocolate). Enfríe durante 8 horas. Rinde 10-12 Porciones Español-31 Torta Capuchino de Naranja 2 cuadrados (1 onza, cada uno) de chocolate ½ taza (125 ml) de agua dulce para hornear 2 tazas (500 ml) de harina común 1 cuta. (5 ml) bicarbonato de soda ¼ (1.25 ml) de cuta. de sal 1 taza (250 ml) de margarina o mantequilla 2 tazas (500 ml) de azúcar blanda 4 huevos, separados 1 cuta. (5 ml) de vainilla 1 taza (250 ml) de leche cortada ¼ taza (50 ml) mezcla de café instantáneo 1-½ cuta. (7 ml) de cáscara de capuchino con sabor a naranja naranja (seca) Precaliente el horno a 350°F (180°C). Engrase suavemente y enharine dos moldes para torta de 9 pulg. (23 cm). Caliente el chocolate y el agua a calor bajo, revolviendo frecuentemente hasta que el chocolate se derrita. Revuelva la mezcla de café y cáscara de naranja. Deje aparte para permitir que la mezcla se enfríe levemente. Mezcle la harina, bicarbonato de sodio y sal; aparte la mezcla. En el tazón de mezclado grande, bata margarina y azúcar a velocidad media hasta obtener una mezcla esponjosa. Incorpore las yemas de huevo, de a una por vez, batiendo bien después de cada agregado. Agregue la mezcla de chocolate y vainilla. Incorpore a la mezcla la harina, de a ½ taza por vez, alternativamente con la leche cortada, batiendo hasta obtener una mezcla suave después de cada agregado. En el tazón de mezclado pequeño, bata las claras de huevo a alta velocidad hasta que se formen picos duros, vierta por pliegues en la pasta. Vierta una cantidad uniforme de pasta en los 2 moldes. Hornee durante 30 minutos o hasta que se comprima la parte superior al tacto suave. Deje enfriar 12 minutos. Desmolde en una rejilla y deje secar completamente. Llene las capas y espolvoree con escarchado de capuchino naranja. Rinde 12 Porciones Español-32 Corteza de Galletitas de Chocolate 1-½ tazas (375 ml) de galletitas de chocolate, finamente procesadas ¼ taza (50 ml) de mantequilla derretida ½ cuta. (2 ml) de canela Coloque todos los ingredientes en el tazón de mezclado pequeño. Mezcle bien. Golpee la mezcla contra el fondo y lados de una budinera de 9 pulg. (23 cm). Enfríe u hornee 10 minutos a 350°F (180°C); deje enfriar antes de rellenar. Rinde una Corteza de 9 Pulg. (23 cm) Cubierta de Crema de Mantequilla 3 tazas (750 ml) de azúcar impalpable 3-4 Cu. (45-60 ml) de leche ½ taza (125 ml) de mantequilla o margarina 1 cuta. (5 ml) de esencia de vainilla blanda Coloque todos los ingredientes en el tazón de mezclado pequeño. Mezcle a poca velocidad para unir los ingredientes. Aumente la velocidad hasta media; continúe mezclando hasta obtener una pasta esponjosa. Rinde para Dos Cubiertas de dos Capas de 8 a 9 pulg. (20-23 cm) Español-33 Cubierta de Chocolate Amargo-Dulce 2 cuadrados (1 onza cada uno) de ¼ taza (50 ml) de leche caliente chocolate dulce en pequeños trozos 2 Cu. (30 ml) de mantequilla 2 tazas (500 ml) de azúcar impalpable 1 cuta. (5 ml) de esencia de vainilla Coloque todos los ingredientes en el tazón de mezclado pequeño. Mezcle a poca velocidad para unir los ingredientes. Aumente la velocidad hasta media; continúe mezclando hasta obtener una pasta suave. Si la cubierta es demasiado espesa, agregue un poco de leche. Rinde Aproximadamente 1 Taza (250 ml) Cubierta de Queso Crema 1 paquete (8 onzas) de queso crema, a temperatura ambiente 1 ¹⁄³ tazas (325 ml) de azúcar impalpable 1 Cu. (15 ml) de crema suave o mitad y mitad Coloque todos los ingredientes en el tazón de mezclado pequeño. Mezcle a poca velocidad para unir los ingredientes. Aumente la velocidad hasta alta; continúe mezclando hasta obtener una pasta suave y consistente. Rinde para una Cubierta de Torta de 13 x 9 pulg. (33-23 cm) Cubierta de Capuchino de Naranja ½ taza (125 ml) de margarina o mantequilla 2 barras (1 onza cada uno) 8 tazas (2000 ml) de azúcar impalpable de chocolate dulce para hornear 1 Cu. (15 ml) de café ¼ taza (50 ml) de leche capuchino con sabor a naranja ¼ taza de jugo de naranja Derrita el chocolate y la margarina a calor bajo, revolviendo frecuentemente. Revuelva en el café y deje aparte. Bata la mezcla de azúcar impalpable, leche, jugo de naranja y chocolate en el tazón de mezclado grande y bata a velocidad media hasta que quede suave y esponjoso. Español-34 Galletitas Azucaradas para Vacaciones ¾ taza (200 ml) de aceite vegetal 3 tazas (750 ml) de harina común 1 taza (250 ml) de azúcar 2 cuta. (10 ml) de polvo de hornear 2 huevos ¼ cuta. (1 ml) de sal 1 cuta. (5 ml) de esencia de vainilla Precaliente el horno a 375°F (190°C). En el tazón de mezclado grande, bata el aceite y el azúcar a velocidad media hasta que quede bien mezclado. Agregue los huevos y la vainilla y bata hasta obtener una mezcla de textura suave. Reduzca la velocidad y agregue la harina, el polvo de hornear y la sal. Mezcle a poca velocidad hasta que se hayan incorporado los ingredientes. Tape y ponga en heladera la masa hasta que quede firme, por lo menos 30 minutos. Divida la masa por la mitad. Enrolle entre 2 láminas de papel manteca levemente enharinado hasta obtener un espesor de ¼ de pulg. Corte en galletitas de las formas decorativas que desee. Coloque las galletitas a una separación de 1 pulgada sobre una placa engrasada. Hornee de 12 a 15 minutos hasta que las galletitas estén levemente doradas en los bordes. Enfríe en una rejilla. Rinde 48 Galletitas Brownies Dobles de Chocolate 1-¾ tazas (450 ml) de harina común 2 cuta. (10 ml) de esencia de vainilla 4 huevos ¾ taza (200 ml) de polvo de cacao 2 cuta. (10 ml) de polvo de hornear 1 taza (250 ml) de trozos de chocolate 1 taza (250 ml) de aceite vegetal semidulce 1 cuta. (5 ml) de sal 2-½ tazas (625 ml) de azúcar Precaliente el horno a 350°F (180°C). Engrase una placa de pionono de 15-½ x 10-½ pulg. (39 x 27 cm). En el tazón de mezclado grande y a poca velocidad, mezcle y revuelva los primeros 5 ingredientes. Gradualmente agregue los huevos, el aceite y la vainilla. Aumente la velocidad de la batidora a moderada. Mezcle hasta unir. Reduzca la velocidad hasta poca y revuelva en los trozos de chocolate. Distribuya en la bandeja preparada y hornee durante 20 a 25 minutos. No cocine en exceso. Deje enfriar y corte en barras. Rinde 24 Barras Español-35 Garantía Limitada de 2 Años Sunbeam Products, Inc. operando bajo el nombre de Jarden Consumer Solutions, o en Canadá, Sunbeam Corporation (Canada) Limited operando bajo el nombre de Jarden Consumer Solutions, (en forma conjunta, “JCS”), garantiza que por un período de dos años a partir de la fecha de compra, este producto estará libre de defectos de materiales y mano de obra. JCS, a su elección, reparará o reemplazará este producto o cualquier componente del mismo que presente defectos durante el período de garantía. El reemplazo se realizará por un producto o componente nuevo o reparado. Si el producto ya no estuviera disponible, se lo reemplazará por un producto similar de valor igual o superior. Ésta es su garantía exclusiva. No intente reparar o ajustar ninguna función eléctrica o mecánica de este producto. Al hacerlo elimínará ésta garantía. La garantía es válida para el comprador minorista original a partir de la fecha de compra inicial y la misma no es transferible. Conserve el recibo de compra original. Para solicitar servicio en garantía se requiere presentar un recibo de compra. Los agentes y centros de servicio de JCS o las tiendas minoristas que venden productos de JCS no tienen derecho a alterar, modificar ni cambiar de ningún otro modo los términos y las condiciones de esta garantía. Esta garantía no cubre el desgaste normal de las piezas ni los daños que se produzcan como resultado de uso negligente o mal uso del producto, uso de voltaje incorrecto o corriente inapropiada, uso contrario a las instrucciones operativas, y desarme, reparación o alteración por parte de un tercero ajeno a JCS o a un Centro de Servicio autorizado por JCS. Asimismo, la garantía no cubre actos fortuitos tales como incendios, inundaciones, huracanes y tornados. ¿Cuál es el límite de responsabilidad de JCS? JCS no será responsable de daños incidentales o emergentes causados por el incumplimiento de alguna garantía o condición expresa, implícita o legal. Excepto en la medida en que lo prohíba la ley aplicable, cualquier garantía o condición implícita de comerciabilidad o aptitud para un fin determinado se limita, en cuanto a su duración, al plazo de la garantía antes mencionada. JCS queda exenta de toda otra garantías, condiciones o manifestaciones, expresa, implícita, legal o de cualquier otra naturaleza. Español-36 JCS no será responsable de ningún tipo de daño que resulte de la compra, uso o mal uso del producto, o por la imposibilidad de usar el producto, incluidos los daños incidentales, especiales, emergentes o similares, o la pérdida de ganancias, ni de ningún incumplimiento contractual, sea de una obligación esencial o de otra naturaleza, ni de ningún reclamo iniciado contra el comprador por un tercero. Algunas provincias, estados o jurisdicciones no permiten la exclusión o limitación de los daños incidentales o emergentes ni las limitaciones a la duración de las garantías implícitas, de modo que es posible que la exclusión o las limitaciones antes mencionadas no se apliquen en su caso. Esta garantía le otorga derechos legales específicos y es posible que usted tenga otros derechos que varían de un estado, provincia o jurisdicción a otro. Cómo solicitar el servicio en garantía En los Estados Unidos Si tiene alguna pregunta sobre esta garantía o desea recibir servicio de garantía, llame al 1.800.334.0759 y podrá obtener la dirección del centro de servicio que le resulte más conveniente. En Canadá Si tiene alguna pregunta sobre esta garantía o desea recibir servicio de garantía, llame al 1.800.667.8623 y podrá obtener la dirección del centro de servicio que le resulte más conveniente. En los Estados Unidos, esta garantía es ofrecida por Sunbeam Products, Inc. operando bajo el nombre de Jarden Consumer Solutions, Boca Ratón, Florida 33431. En Canadá, esta garantía es ofrecida por Sunbeam Corporation (Canada) Limited operando bajo el nombre de Jarden Consumer Solutions, 20 B Hereford Street, Brampton, Ontario L6Y 0M1. Si usted tiene otro problema o reclamo en conexión con este producto, por favor escriba al Departamento de Servicio al Consumidor. POR FAVOR NO DEVUELVA ESTE PRODUCTO A NINGUNA DE ESTAS DIRECCIONES NI AL LUGAR DE COMPRA. POR FAVOR, CONSULTE WWW.OSTER.COM PARA MÁS INFORMACIÓN Español-37 NOTAS NOTES Español-38 Español-39