1
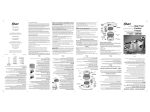
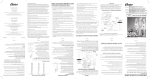
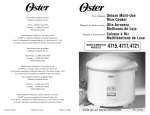
COFFEE BURR MILL
User
Manual
Model 6389-33
QUESTIONS? COMMENTS? IN CANADA: 1 800 667-8623
www.oster.com
P.N. 114418
introduction
Introduction
Thank you for selecting an Oster® Burr Mill, the finest coffee
burr mill in its class on the market. Your new burr mill presents an innovative 12 cup flexible, auto-off timer. The mill has
16 different settings – from fine to coarse – for the freshest
coffee ever, a translucent, 4.5 oz. or 8 oz. whole bean hopper,
a translucent, removable ground coffee chamber with capacity
for 12 5 oz. cups of medium grind coffee grounds, and hidden
cord storage. The removable ground coffee chamber is dishwasher safe, top rack.
Available in matte black or white, your new Oster® Burr Mill’s
sleek styling incorporates the latest in safety features, including a hopper lid safety switch to stop grinding operations if
the lid is opened; an auto-off switch that shuts off the mill
when the ground coffee chamber is not properly seated; and
easily accessible, clearly marked START and CANCEL buttons. The mill’s auto-off timer will shut off the unit when the
desired amount of beans have been ground.
Please read ALL of the instructions in this manual carefully
before you begin to use this appliance. Proper care and maintenance will ensure a long life and a trouble-free operation for
this appliance.
Please save these instructions
and refer to them for cleaning and care tips.
TABLE OF CONTENTS
Introduction . . . . . . . . . . . . . . . . . . . . . . . . . . . . . . . . . . . 2
Table of Contents . . . . . . . . . . . . . . . . . . . . . . . . . . . . . . . 2
Important Safeguards . . . . . . . . . . . . . . . . . . . . . . . . . . . . . 3
Special Cord Set Instructions . . . . . . . . . . . . . . . . . . . . . . 3
Parts Diagram . . . . . . . . . . . . . . . . . . . . . . . . . . . . . . . . . 4
Using your Oster® Burr Mill . . . . . . . . . . . . . . . . . . . . . . . 4
Grind Setting Chart . . . . . . . . . . . . . . . . . . . . . . . . . . . . . 5
Coffee Measurement Chart . . . . . . . . . . . . . . . . . . . . . . . . 6
Helpful Grinding Hints . . . . . . . . . . . . . . . . . . . . . . . . . . . 6
For Best Results . . . . . . . . . . . . . . . . . . . . . . . . . . . . . . . . 8
Cleaning Instructions . . . . . . . . . . . . . . . . . . . . . . . . . . . . 8
Troubleshooting Your Oster® Burr Mill . . . . . . . . . . . . . . 10
1 Year Limited Warranty . . . . . . . . . . . . . . . . . . . . . . . . . 12
How to Obtain Warranty Service . . . . . . . . . . . . . . . . . . . 12
2
IMPORTANT SAFEGUARDS
safety
To reduce the risk of fire, electric shock and/or injury to persons, basic safety
precautions should always be followed when using electrical appliances, including the following:
1. READ ALL INSTRUCTIONS BEFORE USING THE MACHINE
2. To protect against electric shock, do not immerse cord, plugs or machine
in water or in any other liquid.
3. Close adult supervision is necessary when this appliance is used by or near
children.
4. Turn the control switch to OFF and unplug from outlet when not in use
and before cleaning. Allow to cool before putting on or taking off parts
and before cleaning the appliance.
5. Avoid contacting moving parts.
6. Do not operate any appliance with a damaged cord or plug or after the
appliance malfunctions, or has been damaged in any manner. Return this
appliance only to the nearest Authorized Service Center for examination,
repair or adjustment.
7. The use of accessory attachments not recommended for Oster® or Mr.
Coffee® products may cause hazards or injuries.
8. Do not use the appliance outdoors.
9. Do not let the appliance cord hang over the edge of table or counter, or
touch hot surfaces.
10. Check the appliance hopper for presence of foreign objects before using.
11. Do not place this appliance on or near a hot gas or electric burner or in a
heated oven.
12. The appliance should be turned to the OFF position in order to disconnect
it from the power supply.
13. Do not use the appliance for other than household use.
14. Place the appliance on a stable, flat surface.
Special Cord Set Instructions
1. A short power supply cord is provided to reduce the hazards resulting
from a person or pet becoming entangled in or tripping over a longer
cord.
2. An extension cord may be purchased and used if care is exercised in its
use.
3. If an extension cord is used, the marked electrical rating of the extension
cord must be at least 10 amps and 120 volts. The resulting extended cord
must be arranged so that it will not drape over a countertop or tabletop
where it can be pulled on by children or tripped over accidentally
3
use
This appliance has a polarized plug (one blade is wider than
the other). To reduce the risk of electric shock, this plug will
fit in a polarized outlet only one way. If the plug does not fit
fully in the outlet, reverse the plug. If it still doesn’t fit, contact
a qualified electrician. Do not modify the plug in any way.
SAVE THESE INSTRUCTIONS
PARTS DIAGRAM
START & CANCEL BUTTONS
HOPPER LID SAFETY
SWITCH
WHOLE BEAN & HOPPER LID
AUTO-OFF TIMER
(CUPS) SETTING
KNOB
REMOVABLE
GROUND COFFEE
CHAMBER & LID
REMOVABLE TOP BURR
MILL (WITHIN HOPPER)
GRIND SETTING KNOB
GROUND COFFEE CHAMBER AUTO-OFF SWITCH
CORD STORAGE
USING YOUR OSTER® BURR MILL
The Oster® burr mill features 16 grinding settings, from very
fine to coarse. The coffee burr mill minimizes heat generation
in the grinding process by using opposing burrs to crush the
whole beans to a uniform grind, preserving the unique flavour
of your favourite coffee. To use:
1. Fill the whole bean hopper with fresh coffee beans and
close the lid to preserve freshness
2. Select the number of cups of coffee you will be brewing,
from 1 to 12 (adjusted to 5 oz. cups), with the TIMER
SETTING KNOB. To obtain the best cup of coffee or
espresso, grind only the amount of coffee you will use
immediately. The timer is programmed to grind the
4
use
3.
4.
5.
6.
7.
8.
number of cups indicated for an automatic drip coffee maker using a
medium grind, unless otherwise indicated.
Press the START button.
While the machine is ON, rotate the GRIND SETTING KNOB to
select your preferred coffee grind setting (see Grind Setting Chart). If
you turn the grind setting knob to the right, the grind will be progressively coarser at each point. As you familiarize yourself with the mill,
you will discover which settings best suit your coffee-making preferences. For best results always select the grind setting while the unit is
running or when the whole bean hopper is empty.
The appliance’s timer will shut off the burr mill when you have ground
the desired amount of beans. If the ground coffee chamber is not correctly seated while the mill is operating, the auto-off switch will shut
off the appliance.
When grinding is complete, pull out the ground coffee chamber and
remove the lid (Figure 1). Ground coffee can be easily poured from the
chamber.
Any beans older than 1 week should be removed from the hopper.
To ensure freshness, coffee beans should preferably be stored in the
refrigerator, tightly closed in their original bag or can.
Figure 1 (removing the ground coffee chamber)
GRIND SETTING CHART
Fine for Espresso
and Cappuccino
Medium for Automatic
Drip Coffee Makers
Coarse for Manual,
Percolator and Coffee Press
5
COFFEE MEASUREMENT CHART
use
MEDIUM GROUND COFFEE
CUPS OF COFFEE (5 OZ. EACH)
BEAN QUANTITY/TABLESPOONS
12 Cups
9 Tbsp
10 Cups
7.5 Tbsp
8 Cups
6 Tbsp
6 Cups
4.5 Tbsp
4 Cups
3 Tbsp
2 Cups
1.5 Tbsp
1. The amount of whole coffee beans required is about the same as the
specified quantity of medium ground tablespoons.
2. The unit will work for about 1 minute if you have selected the 12 cups
setting.
3. The unit may be stopped during grinding by:
a. The user – you may change the timer setting to avoid overfilling the
ground coffee chamber before resuming operation
b. Opening the hopper lid during operation – check that you have enough
beans. Close the lid and adjust the timer setting to avoid overfilling the
ground coffee chamber before resuming operation.
c. An out of position ground coffee chamber – check that it is not full.
Close the lid, place it in the correct position and adjust the timer setting
to avoid overfilling the ground coffee chamber before resuming operation.
Avoid overfilling the ground coffee chamber. This can cause the unit motor
to overheat and break a thermal fuse inside the mill, possibly damaging the
unit permanently.
HELPFUL GRINDING HINTS
You may customize the above bean quantity recommendations as you familiarize yourself with your new Oster® burr mill, but always bear in mind the
following:
1. Using finer grounds than required for brewing coffee in an automatic
drip coffee maker might cause an overflow of the paper filter and/or
the brew basket. Also, the taste of the coffee might be stronger than
desired. If this happens, use less coffee grounds or change the grind setting to medium or to whichever setting is necessary to obtain the
desired result.
2. Using coarser grounds than required for brewing coffee in an automatic drip coffee maker might cause an overflow of the paper filter and/or
the brew basket. Also, the taste of the coffee might be weaker than
desired. If this happens, use more coffee grounds to obtain the desired
result. For a regular or stronger cup of coffee, adjust the grind setting
to a medium to fine setting.
6
use
3. If a finer setting is required to brew espresso or cappuccino, please grind
the amount of coffee grounds recommended by your product manufacturer.
a. For Oster® Espresso products:
1) Set the burr mill to Fine grind
2) For 2 oz. of espresso coffee, 2 tsp (0.6 tbsp) of fine grind are
required. Set the Timer to 3 cups, this will keep the unit ON enough
time to grind the finer grounds required.
3) For 4 oz. of espresso coffee, 4 tsp (1.3 tsp) of fine grind are required.
Set the Timer to 5 cups, this will keep the unit On enough time to
grind the finer grounds required.
b. Using improper medium or coarse coffee grinding settings might affect
the taste of the brewed espresso coffee, because the optimum coffee
extraction is not achieved. If you like a strong cup of espresso, make
sure the grind setting is fine.
4. If a coarser setting is required to brew coffee manually, in a percolator
or using a coffee press, grind the amount of coffee grounds recommended by your product manufacturer.
a. The Oster® division recommends that you:
1) Set the burr mill to a coarse grind setting.
2) Set the Timer to 8-10 cups, this will keep the unit ON enough time to
grind enough coffee for 12 cups of brewed coffee.
3) Given that coarse grounds will take up more volume, always set the
timer for 2-4 cups less than the amount desired.
b. Remember, you can customize the recommendations above as you discover which setting best meets your personal coffee-making preference.
As in the case of automatic drip coffee makers,
1) Using an excessive amount of coffee grounds for brewing coffee in a
percolator might cause an overflow of the percolator brew basket.
2) Using finer grounds than required for brewing coffee manually in a
percolator, or using a coffee press, might cause an overflow of the
percolator brew basket and/or the taste of the coffee might be
stronger than desired. If you want a regular or weaker cup of coffee,
adjust the grind setting to a medium to coarse setting.
7
use
FOR BEST RESULTS
1. Use only coffee beans in this appliance.
2. Select grind setting while the mill is running or when the hopper is
empty.
3. The ground coffee chamber and its lid should always be in place when
using this appliance.
4. Do not leave the appliance unattended when grinding. The ground coffee
chamber cannot hold the full contents of the whole bean hopper. Be sure
to shut the appliance off if the ground coffee chamber is full.
5. Do not use the finest setting when grinding coffee for your automatic
drip coffee maker. The finer grounds could cause the coffee basket to
overflow.
6. To avoid overheating the motor, do not grind more than 2 full whole
bean hoppers or 2 full 12-cup cycles without a break. Allow the motor to
cool to room temperature at least 2 minutes between cycles.
7. Flavoured coffee beans will gum up the burrs and leave an oily residue
when stored in the whole bean hopper for longer periods of time. Be sure
to clean your burr mill more frequently when using flavoured beans and
to remove all caked-on coffee particles from your grinder during cleaning.
8. Clean after every third use for best performance.
9. After using, open the grinder to the coarsest setting and run empty to
clear the grinding path.
CLEANING INSTRUCTIONS
Clean your burr mill before using it for the first time. Then, to ensure optimal
mill function and durability, clean it regularly following these simple
steps.
1. Always unplug your burr mill after use and before cleaning.
2. Open the hopper lid. Empty any whole beans from the hopper.
Remove the top burr mill by rotating it clockwise (Figure 2). For
better results hold the grind setting button while rotating the burr
mill clockwise. This will allow you to clean the grinding wheel and
the grinding compartment.
3. Clean the interior recesses with a soft brush (Figure 3). Note: Never
use water nor any liquid to clean the lower grinding section of this appliance. BRUSH NOT INCLUDED.
4. Wipe the whole bean hopper, its lid and the mill exterior with a
damp cloth.
8
use
5. The ground coffee chamber and lid can be washed in mild detergent
and water. They both are top rack dishwasher safe. Do not immerse
the mill or the whole bean hopper in water or in any other liquid, or
place in dishwasher. Use only non-abrasive cleaners to remove stains.
6. After completely drying the whole bean hopper and top burr mill,
replace the burr mill in position by aligning snaps with receptacle and
rotating counterclockwise to lock it in position. For better results, hold
the grind setting button while rotating the burr mill counterclockwise.
Once the burr mill is in position, pull gently to check it is properly
locked in position. If the burr mill comes out, repeat this step again.
7. Replace the ground coffee chamber and lid, making sure both snap
securely into place.
8. Fill the hopper with whole beans.
B
C
D
Med
ium
E
Coarse
B
C
D
Med
ium
E
Coarse
Figure 2
Figure 3
9
troubleshooting
TROUBLESHOOTING YOUR OSTER® BURR MILL
Your Oster® Burr Mill has been carefully designed to give you many years
of trouble-free service. In the unlikely event that your new burr mill does
not operate satisfactorily, please review the following potential problems
and try the steps recommended BEFORE you call an Authorized Sunbeam®
Service Center.
PROBLEM
POSSIBLE CAUSE
SOLUTION
THE UNIT DOES NOT
GRIND
1. Timer has not been set
SET TIMER
2. Hopper lid has been
opened
CLOSE HOPPER LID
3. Ground coffee chamber is
not in position
PLACE CHAMBER IN
PROPER POSITION
4. Start button has not been
pressed
PRESS START BUTTON
5. Unit is unplugged
PLUG UNIT IN
6. There’s a power outage
WAIT FOR POWER TO
BE RESTORED
7. Motor has overheated,
thermal fuse is broken
CALL AUTHORIZED SUNBEAM® SERVICE CENTER
THE COFFEE GROUNDS
ARE INSUFFICIENT
1. Timer setting is incorrect
2. Insufficient amount of
whole beans in hopper
3. Hopper lid opened during
operation
4. Ground coffee chamber
moved out of position
during operation
5. Top burr mill is not in
proper position
6. Unit and burr mill are not
clean
7. There is a foreign object
between the two burr
mills
THE SIZE OF THE
GROUND COFFEE PARTICLES IS NOT CONSISTENT
1. Top burr mill is not in
proper position
2. Unit and burr mill are not
clean
3. There’s a foreign object
between the two burr
mills
4. Grind setting is not correct
10
SET TIMER CORRECTLY
ADD BEANS TO HOPPER
CLOSE HOPPER LID
PLACE CHAMBER IN
PROPER POSITION
UNPLUG UNIT, PLACE
TOP BURR MILL IN PROPER POSITION
CLEAN UNIT, UNPLUG IT
AND CLEAN BURR MILL
UNPLUG UNIT AND
CAREFULLY DISLODGE
FOREIGN OBJECT
UNPLUG UNIT, PLACE
TOP BURR MILL IN PROPER POSITION
CLEAN UNIT, UNPLUG IT
AND CLEAN BURR MILL
UNPLUG UNIT AND
CAREFULLY DISLODGE
FOREIGN OBJECT
TURN KNOB TO CORRECT GRIND SETTING
troubleshooting
PROBLEM
POSSIBLE CAUSE
SOLUTION
THE UNIT STOPS GRINDING
1. Timer setting is incorrect
SET TIMER CORRECTLY
2. Timer was inadvertently
rotated to OFF
SET TIMER CORRECTLY
3. Hopper lid has been
opened
CLOSE HOPPER LID
4. Ground coffee chamber is
not in correct position
PLACE CHAMBER IN
PROPER POSITION
5. Cancel button has been
pressed
PRESS START BUTTON
AGAIN
6. The unit has been
unplugged
PLUG UNIT IN
7. There’s a power outage
WAIT FOR POWER TO BE
RESTORED
8. Ground coffee chamber is
full and is clogging the
burr mill compartment
REMOVE CHAMBER,
EMPTY AND REPLACE;
UNPLUG UNIT AND
CLEAN BURR MILL COMPARTMENT IF NEEDED
9. Motor has overheated,
thermal fuse is broken
THE TIMER KNOB DOES
NOT TURN
1. Timer is at OFF setting,
cannot turn clockwise
anymore
2. Timer is at 12 setting,
cannot turn counterclockwise anymore
CALL AUTHORIZED SUNBEAM® SERVICE CENTER
TURN COUNTERCLOCKWISE TO SET DESIRED
NUMBER OF CUPS
TURN CLOCKWISE TO
SET DESIRED NUMBER OF
CUPS
CALL AUTHORIZED SUNBEAM® SERVICE CENTER
3. Timer knob is broken
TURN COUNTERCLOCKWISE FOR DESIRED
GRIND SETTING
THE GRIND SETTING
KNOB DOES NOT TURN
1. Knob is at the Fine (A)
Setting, cannot turn clockwise anymore
2. Knob is at the Coarse (E)
Setting, cannot turn counterclockwise anymore
3. Unit and burr mill are not
clean
TURN CLOCKWISE FOR
DESIRED GRIND SETTING
CLEAN UNIT, UNPLUG IT
AND CLEAN BURR MILL
UNPLUG UNIT AND
CAREFULLY DISLODGE
FOREIGN OBJECT
4. There’s a foreign object
between the two burr
mills
11
One Year Limited Warranty
Sunbeam Products, Inc., or if in Canada, Sunbeam Corporation (Canada) Limited
(collectively “Sunbeam”) warrants that for a period of one year from the date of purchase,
this product will be free from defects in material and workmanship. Sunbeam, at its
option, will repair or replace this product or any component of the product found to be
defective during the warranty period. Replacement will be made with a new or
remanufactured product or component. If the product is no longer available, replacement
may be made with a similar product of equal or greater value. This is your exclusive warranty.
This warranty is valid for the original retail purchaser from the date of initial retail
purchase and is not transferable. Keep the original sales receipt. Proof of purchase is
required to obtain warranty performance. Sunbeam dealers, service centers, or retail stores
selling Sunbeam products do not have the right to alter, modify or any way change the
terms and conditions of this warranty.
This warranty does not cover normal wear of parts or damage resulting from any of the
following: negligent use or misuse of the product, use on improper voltage or current, use
contrary to the operating instructions, disassembly, repair or alteration by anyone other
than Sunbeam or an authorized Sunbeam service center. Further, the warranty does not
cover: Acts of God, such as fire, flood, hurricanes and tornadoes.
What are the limits on Sunbeam’s Liability?
Sunbeam shall not be liable for any incidental or consequential damages caused by the
breach of any express, implied or statutory warranty or condition.
Except to the extent prohibited by applicable law, any implied warranty or condition of
merchantability or fitness for a particular purpose is limited in duration to the duration of
the above warranty.
Sunbeam disclaims all other warranties, conditions or representations, express, implied,
statutory or otherwise.
Sunbeam shall not be liable for any damages of any kind resulting from the purchase, use
or misuse of, or inability to use the product including incidental, special, consequential or
similar damages or loss of profits, or for any breach of contract, fundamental or otherwise,
or for any claim brought against purchaser by any other party.
Some provinces, states or jurisdictions do not allow the exclusion or limitation of incidental
or consequential damages or limitations on how long an implied warranty lasts, so the
above limitations or exclusion may not apply to you.
This warranty gives you specific legal rights, and you may also have other rights that vary
from province to province, state to state or jurisdiction to jurisdiction.
How to Obtain Warranty Service
In the U.S.A.
If you have any question regarding this warranty or would like to obtain warranty service,
please call 1 800 672-6333 and a convenient service center address will be provided to you.
In Canada
If you have any question regarding this warranty or would like to obtain warranty service,
please call 1 800 667-8623 and a convenient service center address will be provided to you.
In the U.S.A., this warranty is offered by Sunbeam Products, Inc., located in Boca Raton,
Florida 33431. In Canada, this warranty is offered by Sunbeam Corporation (Canada)
Limited, located at 5975 Falbourne Street, Mississauga, Ontario L5R 3V8.
PLEASE DO NOT RETURN THIS PRODUCT TO ANY OF THESE ADDRESSES OR
TO THE PLACE OF PURCHASE.
Printed in China
© 2004 Sunbeam Products, Inc. Boca Raton. FL 33431. All rights reserved. OSTER® and
SUNBEAM® are registered trademarks of Sunbeam Products, Inc. Imported and distributed by Sunbeam Corporation (Canada) Limited.
Rev 16/4/04
P.N. 114418
12