1
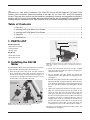
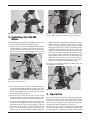
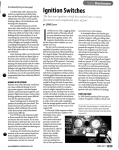
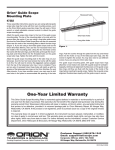
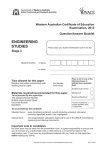
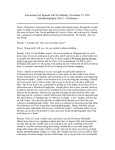
INSTRUCTION MANUAL
Orion
EQ-1M & EQ-2M
Single-Axis DC Motor Drive Systems
#7826, #7827
Customer Support (800) 676-1343
E-mail: [email protected]
Corporate Offices (831) 763-7000
Providing Exceptional Consumer Optical Products Since 1975
89 Hangar Way, Watsonville, CA 95076
IN 126 Rev. B 02/09
Welcome to a new world of adventure. The Orion EQ-1M and EQ-2M Single-Axis DC Motor Drive
Systems allow convenient hands-free tracking of the night sky for Orion EQ-1 and EQ-2 equatorial
mounts. The motor drive systems are also necessary components for doing any long-exposure astrophotography with the mounts; they provide accurate sidereal tracking with an electronic hand controller for
making positional corrections to the right ascension axis of the mount when guiding an astrophoto.
Table of Contents
1. Parts List................................................................................................................................
2. Installing the EQ-1M Motor Drive System.............................................................................
3. Installing the EQ-2M Motor Drive System.............................................................................
4. Operation...............................................................................................................................
5. Specifications.........................................................................................................................
1. PARTS LIST
2
2
3
3
4
Mounting bracket
EQ-1M and EQ-2M
1 Motor drive assembly
Drive coupling
1 Hand controller
1 Battery pack
EQ-1M only
1 2mm Allen wrench
1 4mm Allen wrench
Socket-head
setscrew
2. Installing the EQ-1M
Motor
Figure 2. The EQ-1M motor. The socket-head setscrew on the end
of the drive coupling connects the motor to the right end of the R.A.
worm gear.
The EQ-1M Motor Drive System is intended for use with telescopes that utilize the Orion EQ-1 equatorial mount.
1. When facing the front of the mount, the right ascension
(R.A.) slow-motion control cable should be mounted on
the left end of the R.A. worm gear shaft (see Figure 1). If
it is mounted on the right end, remove it from the mount,
and reinstall it on the left end of the shaft.
Sockethead bolt
Figure 1. Orion EQ-1M mount with R.A. slow-motion control
mounted on left end of R.A. worm gear shaft.
2
2. Loosen the socket-head setscrew on the drive coupling
of the motor drive assembly (see Figure 2) using the provided 2mm Allen wrench.
3. Use the provided 4mm Allen wrench and remove the
socket-head bolt on the right side of the equatorial mount
(see Figure 1).
4. Orient the motor drive so that the drive coupling slips over the
right end of the R.A. worm gear shaft. Now, attach the motor
to the mount by inserting the socket-head bolt through the
slot in the motor drive’s bracket, and rethreading it into the
mount.
R.A. slow-motion
control cable
Right end of R.A.
worm gear shaft
Input
jack
5. Tighten the socket head setscrew on the end of the coupling. The setscrew should seat into the groove on the
end of the worm gear shaft. You may need to rotate the
worm gear, using the R.A. slow-motion control cable, for
the setscrew and the groove to line up. Once the setscrew
is tightened, the motor is engaged. When the motor is
engaged, never, under any circumstances, should you use
the R.A. slow-motion control cable! If you want to use the
R.A. slow-motion control cable, you must first loosen the
socket-head set screw on the end of the drive coupling.
The motor is now properly installed on the EQ-1 mount, and
should appear as in Figure 3.
your fingers, try using a pair of pliers around the body of the
spring.
Motor gear
Figure 3. The EQ-1M motor properly installed on the EQ-1 mount.
3. Installing the EQ-2M
Motor
The EQ-2M Motor Drive System is intended for use with telescopes that utilize the Orion EQ-2 equatorial mount.
1. Many of the parts used for the EQ-2M Motor Drive System
are preinstalled on your EQ-2 mount. The circular gear on
the right end of the R.A. worm gear shaft, the odd-shaped
clutch mechanism, the motor mounting shaft, and the
knurled setscrew just underneath the R.A. worm gear are
allCircular
part ofgear
the motor drive system (see Figure 4).
Knurled
setscrew
Figure 5. Attaching the EQ-2M motor to the EQ-2 mount. Make sure
the motor gear is positioned directly underneath the circular gear.
5. Slightly loosen the locking T-bolt and the motor will engage.
When the motor is engaged, never, under any circumstances, should you use the R.A. slow-motion control cable!
Disengage the motor to use the R.A. slow-motion cable by
rotating the clutch mechanism on the mount clockwise. The
clutch mechanism pushes the motor down, and separates
the motor gear from the circular gear. Re-engage the motor
by rotating the clutch mechanism counter-clockwise; the
spring will then pull the motor back up, which causes the
motor gear and the circular gear to mesh properly once
again. If the spring does not pull the motor up so that the
gears mesh, the locking T-bolt is probably too tight.
The motor is now properly installed on the EQ-2 mount, and
should appear as in Figure 6.
Clutch
mechanism
Motor
mounting
shaft
Figure 4. Orion EQ-2 mount comes with many parts of the EQ-2M
Motor Drive System preinstalled.
2. The motor itself fits onto the motor mounting shaft. Loosen
the motor’s locking T-bolt and slide the cylinder of the motor
housing onto the shaft. Make sure that the small gear on the
motor is just underneath the circular gear on the end of the
R.A. worm gear shaft (see Figure 5).
3. Rotate the motor until the motor gear and the circular
gear mesh. Tighten the locking T-bolt; the end of the T-bolt
should seat into the groove in the motor mounting shaft.
4. Connect the spring (Figure 6) on the motor housing to the
knurled setscrew underneath the R.A. worm gear on the
equatorial mount. Do this by first loosening the setscrew
about five turns. Now, stretch the spring and slide its end
ring over the knurled head of the set screw and onto the
threads. If you are having trouble stretching the spring with
Spring
Figure 6. The EQ-2M motor properly installed on the EQ-2 mount.
4. Operation
Insert four D-cell batteries into the battery pack. Orient the
batteries as indicated on the white plastic battery holder.
Connect the end of the battery pack’s power cord to the DC
power input on the hand controller. Connect the hand controller plug into the input jack (Figure 2) on the motor.
For the motor drive system to work properly, the equatorial
mount must be polar-aligned. This involves aligning the R.A.
axis of the mount so it is parallel to the Earth’s axis of rotation
3
(polar axis). Consult the manual that came with your equatorial mount for details on how to polar-align it.
For observers in the Northern Hemisphere, the N/S switch on
the hand controller should be in the “N” position, and should be
in the “S” position for Southern Hemisphere observers. Make
sure the motor is engaged, and turn the power switch on the
hand controller to the “ON” position. The LED in the center
of the hand controller should be shining green. Tighten the
mount’s R.A. lock knob. If properly polar-aligned, the mount will
now be tracking the motion of the night sky, and the telescope
should hold any astronomical object in its eyepiece steady over
time.
To move your telescope to a new object, loosen both the R.A.
and Dec. lock knobs and move the telescope until it is pointed in
the general direction of the object you wish to view. Retighten the
R.A. and Dec. lock knobs. Now, disengage the motor and use the
R.A. and Dec. slow-motion control cables to center the object in
the eyepiece’s field-of-view. Re-engage the motor, and the motor
drive system will keep the object centered over time. Remember,
never use the R.A. slow-motion control cable when the motor in
engaged, or you could permanently damage the motor.
There are four buttons on the hand controller. If no buttons
are pressed, the motor will turn the R.A. axis of the mount at
sidereal rate. If the bottom right button is pressed, the motor
will turn at 2x sidereal rate, which will cause objects viewed in
the telescope’s eyepiece to move slowly eastward. If the bottom left button is pressed, the motor will stop turning (pause),
which will cause objects in the eyepiece to move slowly
westward. The bottom two buttons are most useful for guiding
purposes during long-exposure astrophotography.
For the EQ-1M, the top buttons move the mount at 8x sidereal
rate, while the EQ-2M’s top buttons move the mount at 4x
sidereal rate. The top two buttons are most useful for centering
an object within the field of view of an eyepiece.
Note that whenever any of the four buttons on the hand controller are pressed, the LED in the center of the hand controller will
shine red; when the button is released, the LED will shine green
again.
5. Specifications
EQ-1M
Guiding rate: 100% sidereal
Centering rate: 800% sidereal
Power requirement: 6V DC
Battery type: four D-cell
Northern or Southern Hemisphere operation
Externally clutched
EQ-2M
Guiding rate: 100% sidereal
Centering rate: 400% sidereal
Power requirement: 6V DC
Battery type: four D-cell
Northern or Southern Hemisphere operation
Externally clutched
Similarly, the top right button on the hand controller moves
objects in the telescope’s eyepiece quickly eastward, while
the top left button moves objects quickly westward.
One-Year Limited Warranty
This Orion EQ-1M & EQ-2M Motor Drives are warranted against defects in materials or workmanship for a period of one year
from the date of purchase. This warranty is for the benefit of the original retail purchaser only. During this warranty period Orion
Telescopes & Binoculars will repair or replace, at Orion’s option, any warranted instrument that proves to be defective, provided it
is returned postage paid to: Orion Warranty Repair, 89 Hangar Way, Watsonville, CA 95076. If the product is not registered, proof
of purchase (such as a copy of the original invoice) is required.
This warranty does not apply if, in Orion’s judgment, the instrument has been abused, mishandled, or modified, nor does it apply
to normal wear and tear. This warranty gives you specific legal rights, and you may also have other rights, which vary from state to
state. For further warranty service information, contact: Customer Service Department, Orion Telescopes & Binoculars, 89 Hangar
Way, Watsonville, CA 95076; (800) 676-1343.
Orion Telescopes & Binoculars
89 Hangar Way, Watsonville, CA 95076
Customer Support Help Line (800) 676-1343 • Day or Evening
4