1
EN
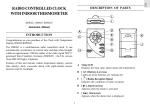
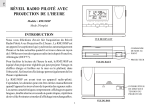
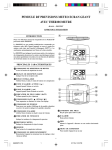
DESCRIPTION OF PARTS
RADIO CONTROLLED CLOCK
WITH INDOOR THERMOMETER
MODEL : RM962 / RM962U
Instruction Manual
INTRODUCTION
Congratulations on your purchase of the Clock with Temperature
Display RM962/RM962U .
The RM962 is a multifunction radio controlled clock. It can
automatically synchronize its current time and date when brought
within an approximate 1500 km radius of the radio signal DCF77
generated from Frankfurt, Germany (RM962U - the UK version
from MSF-60 Rugby, England).
Features of this unit include: indoor temperature display, current
date display, daily crescendo alarm with eight-minute snooze
function and EL backlight.
A 3-line LCD
Displays the time, date, alarm status and temperature
B [
] Battery-Low icon
Lights up when batteries are running dry
C [
] Radio-Reception Signal
Indicates the condition of radio reception
] Alarm-on icon
D [
Appears when the alarm is activated
E [
] Alarm icon
Appears when the alarm time is displayed
1
EN
F
MODE button
Toggles the calendar clock display modes or activates the
calendar clock setting mode
G UP [ ] and DOWN [ ] buttons
Increases or decreases the value of a setting
H ALARM button
Displays the alarm time or sets the alarm status
I
SNOOZE button
Activates the snooze function when an alarm activates or
turn on the back light for five seconds
J
Battery compartment
Accommodates two UM-4 or “AAA” size 1.5V batteries
Note: The battery life can be reduced vastly by frequent use of
the back light or snooze function.
If not disposed of properly batteries can be harmful.
Protect the environment by taking exhausted batteries
to authorized disposal stations.
K RESET button
Resets the unit by returning all settings to their default
values
HOW TO USE THE BACKLIGHT
L Rotatable stand
Press SNOOZE once. The back light will activate for five seconds.
BATTERY INSTALLATION
ABOUT RADIO RECEPTION
The unit uses two (2) UM-4 or “AAA” size 1.5V batteries.
This unit is a radio frequency (RF) controlled clock. When located
within a 1500km radius of radio signal (DCF77) at Frankfurt,
Germany, the clock time will automatically synchronize with DCF77
time-signal transmission. The benefit of a RF controlled clock is
that highly-accurate time is maintained and manual adjustments to
the time and date are not be required.
To insert batteries:
1. Click open the battery door as shown.
2. Insert the batteries strictly according to the polarities shown
therein.
3. Replace the battery compartment door.
(RM962U - UK version within a 1500km radius of radio signal
2
] and [ ] buttons for 2 seconds. The antenna icon will disappear
to show this deactivation.
When the batteries are first installed, the unit will automatically
search for a radio signal.
To activate the auto-reception again, press and hold both buttons for
2 seconds again and the antenna icon will re-appear.
When in search mode, the antenna icon [
] will blink. This
process takes between two (2) and ten (10) minutes. After initial
search, short periodic reception-signal scans will commence several
times a day.
“SECONDS” AND DAY-OF-THE-WEEK
DISPLAY
The antenna icon indicates the quality of reception.
The “seconds” and the day-of-the-week share the same section of the
display.
STRONG
NO RECEPTION
WEAK
RECEIVING
day-of-the-week display
When the reception is complete, the radio-reception signal will
stop blinking.
“second” display
Interference
The day-of-the-week is displayed as an abbreviation in five languages.
Reception can be affected by a number of factors. For best reception,
place the device away from metal objects and electrical appliances.
To change the “seconds” display to the day-of-the-week display:
• When the “seconds” are displayed, press MODE once.
Note: Interference from sources such as TV sets can affect
the signal. If, after batteries have been inserted for ten
minutes, the signal is not received, then set the time manually
(see section: How To Set The Calendar Clock Manually).
To change the day-of-the-week display to the “seconds” display:
• When the day-of-the-week is displayed, press MODE once.
To deactivate the auto-reception of RF signal, press and hold both [
3
EN
(MSF-60) from Rugby, England)
EN
CALENDAR AND ALARM TIME DISPLAY
3. Press MODE to confirm and proceed to set the day, display
language, day-of-the-week, hour and minute.
The calendar and the alarm-time share the same section of the
display.
4. For the display language, you can choose between (E) for English
(D) for German (F) for French, (I) for Italian and (S) for Spanish.
The calendar is displayed in a day-month format.
Day-of-the-week
Language
calendar mode
Monday
Tuesday
Wed.
Thursday
Friday
Saturday
Sunday
English
alarm mode
German
To change the calendar display to the alarm-time display:
French
• When the calendar is displayed, press ALARM once.
Italian
To change the alarm-time display to the calendar display:
• When the alarm time is displayed, press MODE once.
Spanish
HOW TO SET THE CALENDAR
CLOCK MANUALLY
5. When finished, press MODE to return to normal display. If
changes are made on the minutes, the seconds will reset and
start from zero.
If the unit is taken outside of the range of radio signal it will need
to be manually set.
HOW TO SET AND ACTIVATE
THE ALARM
To manually set the clock:
1. When the calendar is displayed, press and hold MODE for two
seconds. The month value will start to blink.
To set the alarm time:
2. Enter the month using the [ ] and [ ] buttons. Hold down
either button to rapidly increase or decrease the value.
1. Press and hold ALARM for two seconds when the alarm time is
displayed.
4
The button is required only when the unit is not operating in a
favorable way, such as in the rare case of a malfunction.
3. The alarm is automatically activated. To deactivate it, press
ALARM once.
PRECAUTIONS
This unit is engineered to give you years of satisfactory service if you
handle it carefully. Here are a few precautions.
ALARM AND SNOOZE FUNCTION
1. Do not immerse the unit in water. If you spill liquid over it, dry
it immediately with a soft, lint-free cloth.
When the alarm is set, it will activate at the set time. The back light
will go on for five seconds with the alarm-on icon [
] flashing.
2. Do not clean the unit with any alcohol containing detergent,
abrasive or corrosive materials. They may scratch the plastic
parts and corrode the electronic circuit.
The crescendo function allows the alarm to start gently and step up
its intensity in three steps. Without interruption, the alarm will
activate for a minute.
3. Do not subject the unit to excessive force, shock, dust,
temperature or humidity, which may result in malfunction,
shorter electronic life span, damaged battery and distorted
parts.
To stop the alarm, press any key. If the SNOOZE button is pressed,
the snooze function will be triggered. The alarm will stop for eight
minutes before activating again.
4. Do not tamper with the unit’s internal components. Doing so
will invalidate the warranty on the unit and may cause
unnecessary damage. The unit contains no user-serviceable
parts.
INDOOR TEMPERATURE
The temperature is shown in Centigrade (°C). The unit is capable of
measuring temperatures within the -5°C and 50°C range. If the
temperature goes above or below that, the display will show “HHH”
or “LLL”.
5. Only use fresh batteries as specified in the user’s instructions.
Do not mix new and old batteries as the old ones may leak.
6. Always read the user’s instructions thoroughly before operating
the unit.
HOW TO RESET THE UNIT
The RESET button allows you to return all settings to its factory
values.
5
EN
2. Enter the value for the hour digits. Press ALARM to confirm and
go to the minute digits. Enter the value and press ALARM to
confirm.
EN
TROUBLESHOOTING GUIDE — RM962
Trouble
Possible Cause
Remedy
Reception icon “Antenna” is not
shown
Auto-reception of clock radio signal has
been disabled
Enable this function by following the
instructions in the User’s Manual
Displayed Temperature data is
different from other measuring
instruments
(1) The measurement method is different
(1) Use the same instruments with
consideration of the tolerance of
readings
(2) The area under evaluation is different or
being influenced by climate
(1) Place the 2 instruments very closely for
a time period (no less then 30 minutes),
avoiding direct light and air movements
-
Clock time is not correctly
set; and/or
The clock radio signal is not received because:
-
Electromagnetic interference exist, or the
Main Unit is located within reinforced
concrete wall or shadowed area location
-
Orientation of placement is not at
optimum position for reception of clock
radio signal
Reception icon “Antenna”
displays as “No reception”
Warning:
-
For other cases not listed in the above, feel free to contact our help line
-
Do not dissemble the unit. This will void the warranty
6
-
Locate the Main Unit far from PC,
mobile phone etc and re-locate it near
the window sill. Wait at least 24 hours
(note: during night-time signal is less
attenuate particularly after raining)
-
The clock radio signal is searched at
1:00, 2:00, 3:00, 9:00, 15:00, 21:00
every day automatically
-
To force the signal reception please refer
to instructions in the User’s manual
Battery Type
Operating Temperature : 5° C to 50° C
Clock Functions
Radio Control
: Auto synchronize current time and
date by Radio signal generated from
Frankfurt, Germany DCF77
: Day of week in English / German /
French / Italian / Spanish
Current day / month format
Clock Time
: 24-hour format
(12-hour format for UK version)
Alarm Duration
: 1 minute crescendo
Snooze
: 8 minutes
Accuracy
: +/-0.5 second/day
(when RF is disabled)
: 80 g (without battery)
CAUTION
— The specification of this product can be changed without
any notice.
— Due to printing limitation, the displays shown in this
manual may differ from the actual display.
— The contents of this manual may not be reproduced
without the permission of the manufacturer.
: -5°C to 50°C
Temperature Resolution : 0.1°C
Temperature Accuracy
: 104 x 64 x 21 mm (H x W x D)
Unit Weight
— The content of this manual is subject to change without
further notice.
Temperature Measurement
Indoor Measurement
Unit Dimension
With carrying pouch
(the UK version from MSF-60 Rugby,
England)
Calendar
: Two (2) UM-4 or “AAA” size
1.5V battery
: -5°C to 0°C +/- 2.0°C
0°C to 40°C +/- 1.0°C
40°C to 50°C +/- 2.0°C
7
EN
General Specification
SPECIFICATIONS
EN
ABOUT OREGON SCIENTIFIC
EC-DECLARATION OF CONFORMITY
Visit our website (www.oregonscientific.com) to learn more about
Oregon Scientific products such as digital cameras; MP3 players;
children's electronic learning products and games; projection clocks;
health and fitness gear; weather stations; and digital and conference
phones. The website also includes contact information for our
customer care department in case you need to reach us, as well as
frequently asked questions and customer downloads.
This product complies with the essential requirements of Article 3 of the R&TTE 1999 / 5 / EC
Directive, if used as intended and the following standards have been applied:
Safety of information technology equipment
(Article 3.1.a of the R&TTE Directive)
Applied Standard
EN 60950: 2000
Electromagnetic compatibility
(Article 3.1.b of the R&TTE Directive)
Applied Standards
ETSI EN 301 489-1-3 (Ver.1.4.1) :2002-08
We hope you will find all the information you need on our website,
however if you'd like to contact the Oregon Scientific Customer Care
department directly, please visit www2.oregonscientific.com/service/support or call 949-608-2848 in the US. For international enquiries, please visit http://www2.oregonscientific.com/about/international/default.asp.
Additional information:
The product herewith complies with the requirements of the Low Voltage Directive 73 / 23 / EC,
the EMC Directive 89 / 336 / EC and carries the CE marking accordingly.
Carmelo Cubito
Agrate Brianza (MI) / Italy January 2004
EC Mandatory of Manufacturer
COUNTRIES RTTE APPROVAL COMPLIED
All EC countries, Switzerland CH
And Norway N
8