1
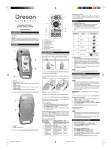
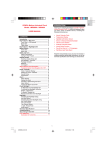
EN
Radio-controlled Outdoor Wall Clock
with Thermometer
Model: JM888
INTRODUCTION
Thank you for selecting the Oregon Scientific™ JM888
Radio-controlled Outdoor Wall Clock with Thermometer
as your product of choice.
USER MANUAL
This product is splash-proof and targeted for outdoor
usage, ideal for places such as a golfcourse clubhouse,
pool-side terrace, restaurant patio, garden shed, outdoor
terrace, veranda or balcony.
USER MANUAL CONTENTS
Introduction ............................................................
Key Features ...........................................................
Front View ..............................................................
Back View ..............................................................
LCD Display Symbols ............................................
Getting Started ........................................................
Unpacking the Product ..........................................
Batteries .................................................................
Placement of Unit ..................................................
Note on Where to Place the Unit ...........................
Temperature Display .............................................
Radio Reception .....................................................
Radio Reception Description .................................
Enabling/Disabling Radio Reception .....................
Setting the Clock Manually ....................................
Clock Setting Mode................................................
UV Measurement (With Optional UVR138) ...........
Getting Started ........................................................
Searching and Displaying the UV Data ..................
UV Index Display ...................................................
Temperature Readings ...........................................
Changing Celsius to Fahrenheit ............................
Reset Hole ...............................................................
Default Settings .....................................................
Safety & Care Restrictions .....................................
Safety Precautions .................................................
Caring for your Product ..........................................
Troubleshooting Guide ..........................................
Basic Functions .....................................................
Specifications .........................................................
Warnings .................................................................
About Oregon Scientific .........................................
EC-Declaration of Conformity ...............................
1
2
2
2
3
3
3
3
3
4
4
4
4
4
4
4
4
5
5
5
5
5
5
5
5
5
5
6
6
6
6
7
7
This device is designed to give you many years of
reliable service, including the following conveniences:
• Radio-controlled calendar clock*
• Local temperature display
• Optional UVI display (with UV sensor UVR138 purchased separately)
*Automatically synchronizes the current time and date
when it is brought within range of the radio signal DCF77
generated from Frankfurt, Germany for Central Europe
or MSF60 generated from Rugby, England .
NOTE Keep this manual handy as you use your new
product. It contains practical step-by-step instructions,
safety and care information, technical specifications and
warnings you should know. Read the manual thoroughly,
and keep it in a safe place in case you need to refer to it.
1
JM888_EN_R8
1
9/3/04, 6:33 PM
EN
KEY FEATURES
FRONT VIEW
1. Rubber ring
2. Transparent cover lens
1
2
BACK VIEW
1. Temperature sensor
2. Wall-mount recess hole - For mounting the unit to a
wall
3. Table stand - Can be pulled out and used to stand the
unit on a flat surface
4. Battery compartment - The unit uses 2 AA/UM-3
1.5V batteries for power
5. MODE button -Toggles between the clock display
modes and can manually adjust current time and
date
6. UP / DOWN buttons - To adjust settings up or down
one notch or to enable/disable RF radio reception
7. EU / UK switch - Slide to select your nearest radio
signal base i.e. England or Germany
8. RESET hole - Returns all settings to default values
9. °C / °F switch - Slide to select between °C / °F display
format
1
2
4
3
5
6
7
8
9
2
JM888_EN_R8
2
9/3/04, 6:33 PM
EN
To load the batteries:
1. Locate the battery compartment.
2. Unscrew the four small screws from the battery
compartment.
3. Install the batteries by matching the correct polarity.
Always use the correct battery type (2 x UM-3 AAsized 1.5V batteries).
LCD DISPLAY SYMBOLS
1
2
3
WARNING Reversing the polarity may damage the
product.
4
5
6
low
NOTE Replace the batteries whenever the
battery icon is shown, the display is dim, or the display
does not illuminate when the power is on. Replace all the
batteries at the same time - it is dangerous to mix old and
new batteries.
9
7
10
8
NOTE If the battery voltage level is low, the
battery” icon will be displayed.
1.
2.
3.
4.
5.
6.
7.
Time zone
Hourly chime indicator
Time display
Low battery icon for UV sensor
UV (Ultraviolet) index level indicator
UV Index
Local temperature / UV index display - Displays
currently monitored temperature / UV index
8. Radio reception signal - Indicates the condition of
radio reception
9. Low Battery - Appears when power is low
10. Current date display - Displays current date
PLACEMENT OF UNIT
You can either mount the main unit on a wall or make it
stand on a flat surface.
Table stand - The unit is already equipped with a table
stand. Simply pull out the table stand and rest the main
unit on a flat surface.
Wall mount - The main unit can be mounted onto a wall
using a No. 6 screw (3.0mm).
1. Position and nail the screw into the place where
you would like to hang your main unit.
2. Leave ample space between the wall and the
screw head while testing to make sure the nail is
secure.
3. Fit the unit’s wall-mount recess hole onto the
screw head.
GETTING STARTED
UNPACKING THE PRODUCT
When you unpack your clock, make sure to keep all the
packing materials in a safe place, in case you need to
later transport or return it for servicing.
In the box, you will find:
• Clock unit
• Batteries
• User manual
BATTERIES
3
JM888_EN_R8
3
“low
9/3/04, 6:33 PM
EN
NOTE ON WHERE TO PLACE THE UNIT
ENABLING / DISABLING RECEPTION
This unit is designed for outdoor usage.
To manually disable the reception of the radio clock
signal, press and hold the DOWN button for 2 seconds.
(The radio reception signal will not appear on the LCD
display).
When the unit is relocated from one place to another in
extreme temperatures (e.g. from a very hot area to a very
cold one), water condensation may occur on the lens at
the front. This will not affect the functions of the unit. In
this case, leave the unit in the same location for 2-3 hours
and the water condensation will disappear.
To enable the radio reception signal, press and hold the
UP button for 2 seconds. (The radio reception signal
will reappear on the LCD display).
The temperature sensor is located at the top of the unit.
When the unit is placed under direct sunlight, the accuracy
of the temperature display may be affected.
SETTING THE CLOCK MANUALLY
TIP It is suggested to put the unit under shade from
direct sunlight.
To adjust the clock settings manually without automatic
RF synchronization, remember to disable the radio
reception first.
TEMPERATURE DISPLAY
CLOCK SETTING MODE
After battery installation, the unit immediately reads and
displays the surrounding temperature.
To set the clock manually:
1. Press and hold the MODE button for 2 seconds. The
clock area will blink.
2. Select the time zone offset (+/- 23 hours), 12/24
format, hour, minute, year, calendar format (M/D or
D/M), month, day, language, and hourly chime on/
off.
3. Press UP or DOWN to change the setting.
4. Press MODE to confirm.
RADIO RECEPTION
This product is designed to synchronize its calendar
clock automatically once it is brought within range of the
radio signal.
NOTE When the unit is receiving the signal, the radio
reception symbol with start to blink. Generally, complete
reception takes around 2 to 10 minutes, depending on
the strength of the signal.
NOTE If no key pressed after 1 minute, it will automatically
return to local time display mode.
NOTE The language options are (D) German, (E)
English, (F) French, (I) Italian, and (S) Spanish.
To select the most suitable radio signal for your location,
slide the EU / UK switch to the appropriate setting. Press
RESET whenever you have changed the selected setting.
NOTE The hourly chime function when set to ON will
beep once at the beginning of every hour. The chime
icon will also show on the display.
NOTE This EU / UK switch is located inside the battery
compartment at the back of the unit.
UV MEASUREMENT (WITH OPTIONAL UVR138)
RADIO RECEPTION DESCRIPTION
With the optional UVR138 Ultra-Violet Radiation Sensor
(which can be purchase separately), the ultra-violet
Index (UVI) can be displayed on this unit.
Even though there are areas that may have more difficulty
in receiving a signal, the radio-controlled clock contains
accurate quartz movement and will retain precise timing
if the signal is missed on a rare occasion.
This UV sensor measures the sun’s ultra-violet radiation
and transmits readings back to the main unit . It is splash
proof and should be placed in an area with maximum
exposure to the sun.
NOTE Reception can be affected by a number of factors.
For best reception, place the device away from metal
objects and electrical appliances. Other causes for signal
interference include electrical transmission tower, steel
reinforced construction, and metal siding. Reception is
ideal when placed near a window.
It can also be used with Oregon Scientific’s new line of
weather monitoring tools. Please consult the user manual
of the UVR138 for more details and instruction.
4
JM888_EN_R8
4
9/3/04, 6:33 PM
EN
GETTING STARTED
CHANGING CELSIUS TO FAHRENHEIT
The sensor range is up to 30 meters (100 feet) with no
obstructions.
To change Celsius to Fahrenheit:
Simply slide the switch at the back of the clock from °C
to °F. (This switch is located inside the battery
compartment).
SEARCHING AND DISPLAYING THE UV DATA
To begin searching for remote signals from the UV
sensor, press and hold both the UP and DOWN buttons
simultaneously for more than 2 seconds. (The lower left
corner of the display will toggle between the temperature
and the UV reading when a UVI reading from a UV
sensor is detected).
THE RESET HOLE
If the clock behaves strangely or stops responding,
insert and press a blunt stylus into the clock’s RESET
hole to reset the unit’s settings. (This is located inside the
battery compartment).
NOTE The UV sensor must be activated beforehand.
Please refer to the UVR138 user manual for more
information.
DEFAULT SETTINGS
All segments of the LCD will be turned on for 3 seconds
and a beep sound will be given out. Then it will start RF
reception.
• The clock settings are: PM12:00, 1st January 2004,
RF enabled, English.
• The clock displays in 24 / 12 hour mode depending
on the selection of the radio signal EU/UK.
UV INDEX DISPLAY
UV Index
Level
0~2
Low
Icon Display
SAFETY & CARE INSTRUCTIONS
SAFETY PRECAUTIONS
3~5
Medium
6~7
High
Please observe the following safety precautions when
setting up and using this product:
• LCD panel - The LCD panel is made of glass, and
may break if the unit is dropped or impacted.
• Heat sources - Keep the product away from heat
sources such as radiators, stoves, heaters, and
other heat-generating products.
CARING FOR YOUR PRODUCT
8 ~ 10
Very high
11 ~ 25
Extremely high
To ensure you receive the maximum benefit from using
this product, please observe the following guidelines:
• Cleaning - Use a damp cloth. Do not use liquid
cleaning agents, benzene, thinner, or aerosols.
• Ventilation - The vents and other openings are
designed for ventilation, and should not be blocked
or covered.
• Blocking the vents can cause the product to overheat,
and can damage the unit.
• Repair - Do not attempt to repair the product or
modify the circuitry by yourself. Contact the retailer
or a qualified repairman if the product requires
servicing. Only use replacement parts that are
recommended by the manufacturer.
• Do not scratch hard objects against the LCD display
as this may cause damage.
NOTE When the index is calculated to be higher than
25, ““HH”” will blink.
TEMPERATURE READINGS
The temperature display range is from -20°C to +60°C.
The temperature beyond these limits will show ““LLL”” or
““HHH””.
5
JM888_EN_R8
5
9/3/04, 6:33 PM
EN
Power supply
2 x UM-3 / AA 1.5V batteries
TROUBLESHOOTING GUIDE
BASIC FUNCTIONS
Temperature unit
°C or °F
This section includes a list of frequently asked questions
for problems you may encounter. If your device is not
operating as you think it should, check here before
arranging for servicing.
Temperature measuring range
-20 °C to 60 °C (-4 °F to 140 °F)
Problem: Radio antenna is not displayed on the LCD
screen.
Symptom: The RF signal cannot be received.
Check this: Obstacles (either electromagnetic
interference or objects) are barring the signal from
reaching the main unit.
Remedy: Move the unit away from any sources of
interference, including other electronic devices.
WARNINGS
To ensure you use your product correctly and safely,
read these warnings and the entire user manual before
using the product.
The warnings given here provide important safety
information and should be observed at all times.
Problem: Low-battery signal is displayed on the LCD
screen.
Symptom: Batteries of the unit are low.
Check this: Check LCD display of the unit.
Remedy: Install new batteries into the unit.
WARNINGS
• Do not attempt to repair the product yourself. Contact
the retailer or our customer service department if it
requires servicing.
• Take precautions when handling all battery types.
They can cause injuries, burns, or property damage
as a result of contact with conducting materials, heat,
corrosive materials or explosives. Remove the
batteries before storing the product for long periods
of time.
• The product is a precision instrument. Never attempt
to take this device apart. There is a serious danger of
powerful electric shocks.
• Do not immerse the device in water.
• Do not, under any circumstances, touch the exposed
electronic circuitry of the device as there is a danger
of electric shock should it become exposed.
• Take special care when handling a damaged LCD
display, as the liquid crystals can be harmful to your
health.
• Do not use or store the device, including the remote
sensor, in locations that may adversely affect the
product such as rain, snow, desert, and magnetic
fields.
Problem: Clock time is not correctly set.
Symptom: No radio signal reception.
Check this: Electromagnetic interference or objects are
barring reception. Orientation or placement of main unit
is not optimum for receiving the RF signal.
Remedy: Place the main unit far away from PCs, phones,
and other electronic equipment.
Problem: Operation is not normal.
Symptom: Certain functions do not perform.
Check this: Device requires reset.
Remedy: Reset the unit with a blunt stylus pressed
against the RESET hole.
SPECIFICATIONS
Width x height x depth:
260 x 220 x 45mm (10.24 x 8.66 x 1.77 inches)
Weight:
776g (1.71 lbs) (without batteries)
RF Frequency System:
DCF77 (EU) or MSF60 (UK)
Display:
Hour Format:
12hr am/pm (MSF format)
24hr (DCF format)
Date format user-selectable
DD-MM or MM-DD
Day-of-week display
In English, French, German, Spanish, and Italian
6
JM888_EN_R8
6
9/3/04, 6:33 PM
EN
ABOUT OREGON SCIENTIFIC
EC-DECLARATION OF CONFORMITY
Visit our website (www.oregonscientific.com) to learn
more about Oregon Scientific products such as digital
cameras; MP3 players; children’s electronic learning
products and games; projection clocks; health and fitness
gear; weather stations; and digital and conference
phones. The website also includes contact information
for our customer care department in case you need to
reach us, as well as frequently asked questions and
customer downloads.
This product contains the approved transmitter module
that complies with the essential requirements of Article
3 of the R&TTE 1999 / 5 / EC Directive, if used as
intended and the following standards have been applied:
Safety of information technology equipment
(Article 3.1.a of the R&TTE Directive)
Applied Standard
EN 60950-1: 2001
Electromagnetic compatibility
(Article 3.1.b of the R&TTE Directive)
We hope you will find all the information you need on our
website, however if you’d like to contact the Oregon
Scientific Customer Care department directly, please
visit: www2.oregonscientific.com/service/support
Applied Standards
ETSI EN 301 489-1-3 (Ver.1.4.1) : 2002-08
Efficient use of radio frequency spectrum
(Article 3.2 of the R&TTE Directive)
OR
Call 949-608-2848 in the US.
Applied Standards
ETSI EN 300 220-3 (Ver1.1.1) : 2000-09
For international enquiries, please visit:
http://www2.oregonscientific.com/about/international/
default.asp
Additional information:
The product herewith complies with the requirements of
the Low Voltage Directive 73 / 23 / EC, the EMC Directive
89 / 336 / EC and carries the CE marking accordingly.
Carmelo Cubito
Agrate Brianza (MI) / Italy January 2004
Manufacturer’s EU R&TTE Representative
COUNTRIES RTTE APPROVAL COMPLIED
All EC countries, Switzerland CH
and Norway N
7
JM888_EN_R8
7
9/3/04, 6:33 PM
EN
Radio-controlled Outdoor Wall Clock
with Thermometer
Model: JM888
8
JM888_EN_R8
8
User Manual
9/3/04, 6:33 PM
EN
2004 Oregon Scienfitic. All rights reserved.
P/N: xxx-xxxxxx-xxx
9
JM888_EN_R8
9
9/3/04, 6:33 PM