1
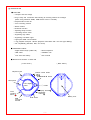
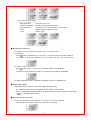
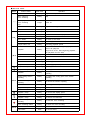
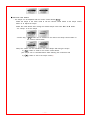
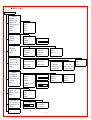
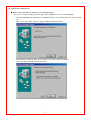
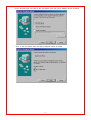
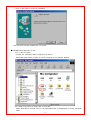
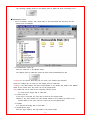
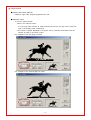
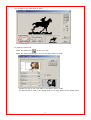
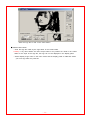
DIGITAL AUDIO PLAYER
(ORC-100)
User Manual
ORACOM Co., Ltd.
3rd. Fl. A-Sung Bldg. 999-3, Daechi-dong, Kangnam-gu, Seoul, Korea 135-280
TEL: 82-2-563-5633/FAX: 82-2-563-8774
-1-
www.oracomm.co.kr
# CONTENTS #
@ PREPARATION
■ Feature
■ Checking parts
■ Names and functions of ORC-100
@ INSTALLATION AND USE
■ Turning on/off the power
■ Setting the modes
■ Playing back digital music/voice files
■ Adjusting the volume
■ Searching music/voice file
■ Setting the section repeating function
■ Recording voice
■ File information display function
■ Bookmark function
■ Adjusting tempo
■ Setting hold function
■ Button table
@ APPLICATION
■ Setting the menu
■ Setting the repeat function
■ Setting the equalizer function
■ Managing files
■ Using a watch
■ Setting display function
■ Managing bookmark function
■ Setting tempo function
■ Menu table
@ COMPUTER CONNCETION
■ Installing USB Device Driver for Windows98/SE
■ Connecting ORC-100 to PC
■ Managing files
■ Formatting
■ Separating ORC-100 from PC
@ LOGO EDITOR
■ Installing logo editor
■ Editing logo
■ Installing logo
@ LISTENING VOICE RECORDER FILES ON PC
■ Installing voice file converting program
■ Converting voice recorder files
■ Listening voice recorder files on PC
@ CUSTOMER SERVICE
■ Product Specification
■ Service inquiry
■ Warranty
-2-
@ PREPARATION
■ FEATURE
° Compact and slim design
° Plug & Play and convenient data sending & receiving without file manager
(When using Windows 98/SE, USB Device Driver is needed.)
° Playback MP3 music file
° Voice recording function
° Watch function
° Bookmark function
° Adjusting tempo function
° Controlling diverse menu
° Supporting logo editor
° Supporting LCD Back Light
° High-speed USB communication
° Long playback time(over 10hours playback continuation with one AAA type Battery)
° OS compatibility (Windows, Mac, and Linux)
■ CHECKING PARTS
° Digital Audio Player (ORC-100)
° Stereo Earphone
° USB cable
° Installation CD
° One AAA size battery
° User manual
■ Names and functions of ORC-100
( Front Panel )
Earphone jack
( Back Panel )
Volume control button
+ ◀◀/Mode/▶▶ button
Microphone
LCD display
panel
▷□ button
Display button D
Voice
recoding
button
Bookmark
button B
Battery door
USB
connection
terminal
Hold switch
-3-
@ INSTALLATION AND USE
■ TURNING ON/OFF THE POWER
° Press the ▷□ button on the ORC-100 to turn on the power.
Digital music/voice file will be played back after logo displaying.
° Press the ▷□ button on the ORC-100 for longer than 2 seconds to turn off the power.
If the unit is in the Stop mode for longer than 1 minute, it will power off automatically.
(Normal mode)
(Watch mode)
Note) If the display panel is in watch mode, then, it converts into a watch display mode.
■ CONVERTING MODES
° Stop to playback and press the mode button.
It converts like Music mode → Voice mode/Voice mode → Music mode
(Music mode)
(Voice mode)
■ PLAYING BACK DIGITAL MUSIC/VOICE FILES
° To playback - Press ▷□ button on ORC-100 in stop mode, and digital music/voice
will be played back.
° To stop
- Press ▷□ button on ORC-100 in playback mode, and digital music/voice
will be stopped.
■ CONTROLLING VOLUME
° Control volume with volume control button( +
- )on ORC-100 player.
Volume can be controlled in the range from 0 to 30.
Press the button briefly to control the volume by one level.
Press and hold button to control continuously
■ SEARCHING MUSIC/VOICE FILE
° To move desired music/voice file
- Press the ◀◀ button to move one track backward in the playback or stop mode.
- Press the ▶▶ button to move one track forward in the playback or stop mode.
Note) If the ◀◀ button is pressed within 5 seconds after a song started,
the previous song will be repeated.
If the button is pressed 5 seconds after the song started,
the current song will be repeated.
(For VBR files, the previous song won't be played even if the button is pressed within
5 seconds.)
For VBR files, the actually playtime may not match the playback time displayed on
-4-
ORC-100.
* VBR(Variable Bit Rate) file: MP3 file which has multi compression rates applied
° To move the desired spot of the song during playback
Press the ◀◀ / ▶▶ button for longer than 1 second and release the ◀◀ / ▶▶ button
at the desired spot of the song.
■ SETTING SECTION REPEATING FUNCTION
° To set a start point of section repeating
Press the mode button briefly at the start point of the desired section repeating during digital
music/voice playback.
Then, the
icon brinks on the display panel.
° To set an end point of section repeating
Press the mode button again briefly at the end point of the desired section repeating.
Then, it shows
Icon on the display panel and the section from A to B will be
automatically repeated.
° To cancel a section repeating
Press the mode button in the section repeating status.
Then, the section repeating is cancelled, and it is played back automatically.
■ RECORDING VOICE
° To record voice
Press
button and recording starts.
Press ▷□ button to pause recording and press again to continue during recording.
° To finish voice recording
Press the
button. Then, recording stops and voice file will be created.
Note) When memory is fully used, recording stops automatically and voice file will be created.
Possible recording time shows in the middle of the display panel in accordance with memory
capacity.
■ FILE INFORMATION DISPLAY FUNCTION
° It is function of selecting the information of music/voice file displayed on the panel.
Press D button.
° File information is displayed in order each time pressing D button.
Appointed logo is displayed continuously on the panel if logo is selected.
In the case of music mode
- Play information:
Artist, Title, and Time
- CODEC information:
Bit rate and Sampling Frequency
- ID3 Tag information:
Artist and Album
- File information:
File name and File size
- Timer:
Sleep, Setting-up Wake up Time
- Logo:
Setting logo
-5-
In the case of voice mode
- Play information:
File name and Time
- CODEC information:
Bit rate and Sampling Frequency
- File information:
File name, File size, and Date of File created
- Timer:
Sleep, Setting-up Wake up Time
- Logo:
Setting Logo
■ BOOKMARK FUNCTION
It is function of moving appointed specific spot of music/voice file.
° To bookmark
Press B button to bookmark for longer than 1 second during music/voice playback.
The number of times for bookmark is up to 10 times each for music and voice file.
° To search bookmark
Press B button briefly.
It moves the bookmark section and playbacks.
It moves in order whenever B button is pressed after appointing bookmarks.
° To delete bookmark: Refer to Managing bookmark function in APPICATION
■ ADJUSTING TEMPO
° Adjusting Tempo function is useful for foreign language study.
The playback speed can be controlled with the volume control button.
Refer to "Managing bookmark function" in APPICATION to use the volume control button
( +
- ) to playback speed button
■ SETTING HOLD FUNCTION
° Push the hold switch in the direction of an arrow not to work ORC-100.
The display panel shows HOLD when any button is pushed.
-6-
■ BUTTON TABLE
Button
▷□
▶▶|
Former status
Operation
Power off
Briefly
Playback after power off
Music playback
Voice recording
Briefly
Stop
Music playback
Voice recording
Stop
Longer
Power off
Stop
Briefly
Playback/recording
Menu status
Briefly
To exit menu
Playback
Briefly
Playback the next file
Playback
Longer
Fast backward search in playback file
Stop
Briefly
To move the next file
Menu status
Briefly
To move in the menu
Time set
Tempo button use
|◀◀
Push time
Briefly/longer Time set(↑)
Briefly
Increasing playback speed
Playback
Briefly
Less than 5 sec. after beginning playback :
Former file playback
Longer than 5 sec. after beginning playback :
File playback from the start
Playback
Longer
Fast forward search in playback file
Stop
Briefly
To move the former file
Menu status
Briefly
To move in the menu
Time set
Tempo button use
Briefly/longer Time set(↓)
Briefly
Decreasing playback speed
+
Playback / Stop
Briefly/longer Volume(↑)
-
Playback / Stop
Briefly/longer Volume(↓)
Playback
Briefly
To appoint the starting spot of the section
repeating
During setting section
repeating
Briefly
To appoint the ending spot of the section
repeating
Briefly
To cancel the section repeating
Stop
Briefly
To change the mode(music ↔ voice)
Playback / Stop
Longer
To move the menu
Menu status
Briefly
To select the menu
Playback / Stop
Briefly
To convert the display panel
Playback
Longer
To bookmark
Playback / Stop
Briefly
To search the bookmark
All status except voice
recording
Briefly
To start the voice recording
Voice recording status
Briefly
To finish the voice recording
Work status
Push
To set HOLD
Hold status
Push
To cancel HOLD
MODE Status of setting section
repeating
D
B
HOLD
-7-
@ APPLICATION
■ SETTING THE MENU
° Press the mode button for longer than 1 sec., and it is converted to the menu mode.
When selecting, use the mode button and when moving the different order,
use ◀◀ / ▶▶ button.
° Pressing ▷□ button is to cancel the menu mode.
- Repeat:
when selecting the repeating playback
- EQ:
when using the equalizer function
- File:
when deleting or formatting the music/voice file
- Watch:
when selecting the watch function and setting the alarm function
- Display:
when controlling the display panel
- Bookmark:
when deleting the bookmark
- Tempo:
when controlling the playback speed
- Exit menu:
when exiting the menu
Note) If there is no any input in the menu mode for 10 sec., it will be cancelled automatically.
Return is not the function in the menu mode. Select Return to exit the present mode.
■ SETTING THE REPEAT FUNCTION
° Select Repeat in the menu mode.
Move the desired repeat mode with ◀◀ / ▶▶ button, and then select the mode button.
- Normal:
when playing back 1 time each of collection in order
- Repeat one: when listening one file repeatedly
- Repeat all:
when listening the appointed files repeatedly
- Repeat list:
when listening the file after making the list
- Shuffle:
when listening the appointed file randomly
- Intro:
when listening the first 10 sec. of all appointed files
° To make the repeat list
When the repeat list menu is selected, it shows the list control panel.
When selecting the desired music/voice file and making the list, it playbacks and repeats the
appointed song only
■ SETTING THE EQUALIZER FUNCTION
° Select EQ in the menu mode
Select the mode button after moving the desired the EQ mode with ◀◀ / ▶▶ button.
- Default: Setting the 0dB base equalizer
- User:
User can set the equalizer with user's taste
-8-
- Bass: Setting the bass from -5 to +5
- Treble: Setting the treble from -5 to +5
■ MANAGING FILES
° Select the file in the menu mode.
Select with the mode button after moving the desired file mode with ◀◀ / ▶▶ button.
° To delete
To select the place of the deleting file after selecting "delete".
Delete to select the mode button after moving the file that you want to delete.
° Format
All files of the memory are deleted if the format is selected.
Caution) All files are deleted when executing the format.
■ USING A WATCH
° Select the watch in the menu mode.
Select the mode button after moving the desired watch mode with ◀◀ / ▶▶ button.
° Set time: The watch can be set manually.
If the set time is selected, it is converted to the set time display panel.
Select ◀◀ / ▶▶ button when changing Year, Date, and Time, and press the mode button
when selecting.
° Set timer
Wake up, Sleep: If the wake up(sleep) is selected, it is converted to the wake up(sleep) set
display panel.
Select ◀◀ / ▶▶ button when changing the time, and press the mode button when selecting.
° Use watch
It can be selected if it is used to the watch function after power off
On: Use of the watch function
Off: Use of the power off
Note) Battery is consumed a liter while using the watch function.
-9-
■ SETTING DISPLAY FUNCTION
° Select display in the menu mode.
Select with the mode button after moving the desired display mode with ◀◀ / ▶▶ button
° Backlight
The backlight in the display panel can be controlled
1. Always:
Turned on always
2. Night:
Turned on accordance with the time.
3. Never:
Not turned on
4. Lighting Time: The lasting time of backlight
Set the time to press ◀◀ / ▶▶ button.
Note) If Never is selected, battery is saved.
° Contrast
Contrast can be controlled in the display panel.
Control the contrast to press ◀◀ / ▶▶ button.
° Scroll speed
The text passing speed can be controlled in the display panel.
Control the contrast to press ◀◀ / ▶▶ button.
° Logo
Logo can be selected in the display panel.
- Default: Oracom Logo
- User: User's Logo by using the logo editor
■ MANAGING BOOKMARK FUNCTION
° Select the bookmark in the menu mode.
Select with the mode button after moving the desired the bookmark mode with
◀◀ / ▶▶ button.
- Delete all:
All bookmarks are all deleted.
- Delete one:
The particular bookmark can be deleted.
° If the delete one is selected, it shows the control panel for the bookmark list.
Select the desired bookmark to delete.
- 10 -
■ SETTING THE TEMPO
° The tempo can be adjusted with the volume control button( + - ).
Select the tempo in the menu mode to use the volume control button to the tempo control
button or to adjust the tempo.
Select the mode button after moving the desired tempo mode with ◀◀ / ▶▶ button.
- Fix Tempo: To fix the tempo
- Volume Key: ( + - )button can be selected to be used if the tempo control button or
the volume control button
Note) The volume can be controlled in the fixed tempo after fixing the tempo
if ( +
- ) button is used to the volume control button.
(The tempo can be controlled button while listening the music/voice file
if ( + - ) button is set to the tempo control.)
- 11 -
■ MENU TABLE
MENU
Repeat
1.Normal
2.Repeat one
3.Repeat all
Repeat list
4.Repeat list ▶
1.file1
5.Shuffle
2.file2
6.Intro
3.file3 ...
Return
Return
EQ
User
1.Default
2.User ▶
Return
1.Bass
Bass / Treble
2.Treble
Return
File
Delete
1.Delete ▶
2.Format ▶
Return
Music/Voice
Format
1.Music ▶
1.M/V file1
1.OK
2.Voice ▶
2.M/V file1 ...
2.Cancel
Return
Return
Watch
1.Set time ▶
Set time
2.Set timer ▶
2002/01/01[MON]
1.Alarm TM
3.Use watch ▶
AM12:00:00
2.Sleep TM
Return
Set timer
[OK] [CNCL]
Use watch
Alarm TM
Sleep TM
1.On
2.Off
Everyday
Turn Off
AM12:00:00
After 000 mins
[ON] [OFF]
[ON] [OFF]
Logo
User
Display
1.Backlight ▶
Backlight
Cont / Scroll
2.Contrast ▶
1.Always
1.Default
1.Logo1
3.Scroll speed ▶
2.Night
2.User ▶
2.Logo2 ...
4.Logo ▶
3.Never
Return
4.Lighting time ▶
Lighting time
Return
Bookmark
1.Delete all
2.Delete one ▶
Return
Delete one
1.file1
2.file2 ...
Return
Play tempo
1.Fix tempo ▶
2.Volume key ▶
Return
Fix tempo
Volume key
1.For tempo
2.For volume
Exit menu
- 12 -
Return
Return
@ COMPUTER CONNCETION
■ INSTALLING USB DEVICE DRIVER FOR WINDOWS98/SE
Note) Do not need to install the driver again after installation for use of windows98/SE
° Insert the installation CD supported to "CD-ROM driver" in PC and plug ORC-100 into PC's USB
port.
Click on the next button when the pop-up diagram shows as below.
° Check "Search for the best driver for your device " and click on the next button
when the pop-up diagram shows as below.
- 13 -
° Check "CD-ROM drive" and click on the next button when the pop-up diagram shows as below.
° Click on the next button when the pop-up diagram shows as below..
- 14 -
° Click on the button to finish the installation
Now the driver has been installed into your system.
■ CONNECTING ORC-100 TO PC
° Turn on the PC power
Connect PC connection cable to USB port on the PC
"Removable Disk" folder is made in the My Computer of the Window Explore.
° The usage is the same as floppy disk or hard disk.
When ORC-100 is removed from PC, the Removable Disk is disappeared in the My Computer
folder.
- 15 -
The message, Waiting shows in the display panel of ORC-100 while connecting to PC.
■ MANAGING FILES
° There are MUSIC, VOICE, and LOGO folder in the Removable disk and they are still
existed even if formatted.
° To download the music file.
Save the music file in the MUSIC folder.
The display panel in ORC-100 shows as below while downloading the file.
Caution) Do not remove ORC-100 from PC even if PC monitor says finished
when PC<->Player (▶) is moving in the display panel of ORC-100.
Caution) If any other folders are used except MUSIC or any folders are made in the MUSIC
folder for the music input, the music can not be played back.
Note) ORC-100 can be used as the computer memory device.
It is used as the floppy disk or hard disk.
° To make voice file
If the voice is recorded, the voice file is saved in the VOICE folder.
Caution) If any other folders are used except VOICE or any folders are made in the
VOICE folder for the voice input, the voice can not be played back.
° To upload
It is used as the floppy disk or hard disk
° To download the logo
Save the logo made by the logo editor in the LOGO folder.
- 16 -
Caution) If any other folders are used except LOGO or any folders are made in the LOGO
folder for the input of the logo file, the logo can not be displayed in the display panel.
■ FORMATTING
° Click on the right side of the mouse after selecting removable disk.
Select format in the menu and click on the "start".
° Use ORC-100 when formatting is completed because ORC-100 is formatted again after
formatting in the PC.
Note) It is possible to format with the function, Menu->File->Format in ORC-100.
■ SEPARATING ORC-100 FROM PC
° Make sure if the data transfer is completed in the display panel of ORC-100 when
separating ORC-100 from PC.
The data is damaged while the data is being transferring when separating ORC-100 from PC.
Caution) Do not separate ORC-100 from PC during PC<->Player (▶) is moving in the display
panel of ORC-100.
Note) In Windows 2000, ME, and XP, the safe procedure will be to double click on the icon(
located at the bottom right corner of your screen and follow instructions before removing.
- 17 -
)
@ LOGO EDITOR
■ INSTALLING LOGO EDITOR
° Install the logo editor program supported from CD.
■ EDITING LOGO
° To use the frame function
- What is the frame function?
It is the logo editor function to make several pictures into one logo and to show the
logo in the display panel continuously.
- The number of pages displayed in the panel can be controlled accordance with the
number of page in the frame control
° The example of the first page for frame
° The example of the second page for frame
- 18 -
° The example of the third page for frame
° To import the picture file
Select the import icon (
) in the menu icon.
Select the desired picture file to click on the Open button as below.
Transfer the logo to the Logo Editor if the desired logo is made
The desired logo is made in the display panel of the Logo Editor as the sample above.
- 19 -
Save the logo file to click on the Save button.
■ INSTALLING LOGO
° Save the logo file made by the logo editor in the LOGO folder.
Caution) If any other folders are used except LOGO or any folders are made in the LOGO
folder for the input of the logo file, the logo can not be displayed in the display panel.
° Select Display->Logo->User in the menu mode and the display panel of ORC-100 shows
your own logo after the power-off.
- 20 -
@ LISTENING VOICE RECORDER FILES ON PC
■ INSTALLING VOICE FILE CONVERTING PROGRAM
° Install converting voice recorder files supported from CD.
■ CONVERTING VOICE RECORDER FILES
° For listening voice recorder files on PC, please convert vrf file(Recorded voice) to wave file
after uploading voice recorder file on PC
° Please click on convert button after inputting file name in the editor box or choosing file in
the menu.
° Filename.vrf file will be converted to filename.wave file
Note) The file converted to wave is made in the folder of an original voice file
■ LISTENING VOICE RECONRDER FILES ON PC
° The user can listen in the winamp or media player.
- 21 -
@ CUSTOMER SERVICE
■ PRODUCT SPECIFICATION
° Memory Capacity: 32/64/128/256MB built in memory
° Communication Method: Supporting USB 1.1(Plug & Play)
° Earphone Output Power: 6.0mW / 16Ω
° Noise ratio: 87dB / 0.1% (with 'A' filter )
° Output Frequency Range: 20Hz ~ 20KHz
° Operating temperature: 0 ~ 40C
° Battery: 1 x AAA size
° Supporting OS: Windows98/SE,ME,2000,XP, Mac 8.6 or higher and Linux kernel 2.4.0 or higher.
° Case: plastic
° Dimension: 56 x 56 x 11.5mm
° Weight: 35g (Without battery)
■ SERVCIE INQUIRY
° www.oracomm.co.kr
■ WARRANTY
° Oracom Co., Ltd. warrants this product as free of defects in material, design and workmanship
for the period of 12 months from the original date of purchase.
° If during the period of warranty this product proves defective under normal use and service you
should return the product to the retailer from whom it was originally purchased. The liability of
Oracom and its appointed maintenance company is limited to the cost of repair and/or
replacement of the unit under warranty. Return of the product for defective reasons should be to
the original purchaser, however Oracom Authorized Dealers and Authorized Service Centers will
comply with the warranty on the terms issued to purchasers in the country concerned, for further
information relating to the Authorized Service Centers contact.
° Warranty Conditions:
1. The warranty is only valid when the warranty card is properly completed, and upon
presentation of the proof of purchase consisting of original invoice or sales slip confirmation,
indicating the date of purchase, dealers name, model, serial No. and product number.
2. Oracom's obligations are to the repair of the defective part, and at its discretion, replacement
of the product(service exchange unit).
3. Warranty repairs must be carried out by an Authorized Oracom Dealer/Service Center.
No reimbursement will be made for repairs carried out by non Oracom Centers, and warranty
coverage will not be valid for any repairs or damage caused by such repairs.
4. Repairs or replacement under the terms of this warranty does not give right to extension to
or a new starting of the period of warranty.
Repair or direct replacement under the terms of
this warranty may be fulfilled with functionally equivalent service exchange units.
5. The warranty is not applicable in cases other than defects in material, design and
workmanship. The warranty does not cover the following:
* Periodic checks, maintenance, repair and replacement of parts due to normal wear
- 22 -
and tear.
* Abuse or misuse, including but not solely limited to the failure to use this product for
its normal purposed or in accordance with Oracom's instructions usage and maintenance.
* Failure of the product arising from incorrect installation or use not consistent with technical
or safety standards in current force, or failure to comply with product manual instructions.
* Accidents, Acts of God or any cause beyond the control of Oracom caused by lightning,
water, fire, public disturbances and improper ventilation.
* Unauthorized modifications carried out for the product to comply with local or national
technical standards in countries for which the Oracom product was not originally designed.
* Repairs performed by non-authorized service centers such as opening of the product
by a non-authorized person.
* The model, serial No. and product number on the product has been altered, deleted,
removed or made illegible.
6. This warranty does not affect the consumers statutory rights nor the consumers rights
against the dealer from their purchase/sales agreement.
THERE ARE NO EXPRESS WARRANTIES OTHER THAN THOSE LISTED AND DESCRIBED
ABOVE AND NO WARRANTIES WHETHER EXPRESS OR IMPLIED, INCLUDING, BUT NOT
LIMITED
TO,
ANY
IMPLIED
WARRANTIES
OF
MERCHANTABILITY
OR
FITNESS
FOR
A
PARTICULAR PURPOSE, SHALL APPLY AFTER THE EXPRESS WARRANTY PERIODS STATED
ABOVE, AND NO OTHER EXPRESS WARRANTY OR GUARANTY GIVEN BY ANY PERSON, FIRM
OR CORPORATION WITH RESPECT TO THIS PRODUCT SHALL BE BINDING ON ORACOM,
ORACOM SHALL NOT BE LIABLE FOR LOSS OF REVENUE OR PROFITS, FAILURE TO REALIZE
SAVINGS OR OTHER BENEFITS, OR ANY OTHER SPECIAL, INCIDENTAL OR CONSEQUENTIAL
DAMAGES
CAUSED
BY
THE
USE,
MISUSE
OR
INABILITY
TO
USE
THIS
PRODUCT,
REGARDLESS OF THE LEGAL THEORY ON WHICH THE CLAIM IS BASED, AND EVEN IF
ORACOM HAS BEEN ADVISED OF THE POSSIBILITY OF SUCH DAMAGES.
NOR SHALL
RECOVERY OF ANY KIND AGAINST ORACOM BE GREATER IN AMOUNT THAN THE PURCHASE
PRICE OF THE PRODUCT SOLD BY ORACOM AND CAUSING THE ALLEGED DAMAGE.
WITHOUT LIMITING THE FOREGOIN, PURCHASER ASSUMES ALL RISK AND LIABILITY FOR
LOSS, DAMAGE OR INJURY TO PURCHASER AND PURCHASER'S PROPERTY AND TO OTHERS
AND THEIR PROPERTY ARISING OUT OF THE USE, MISUSE OR INABILITY TO USE THIS
PRODUCT SOLD BY ORACOM NOT CAUSED DIRECTLY BY THE NEGLIGENCE OF ORACOM.
THIS LIMITED WARRANTY SHALL NOT EXTEND TO ANYONE OTHER THAN THE ORIGINAL
PURCHASER OF THIS PRODUCT, IS NONTRANSFERANBLE AND STATES YOUR EXCLUSIVE
REMEDY.
- 23 -