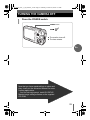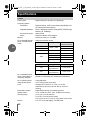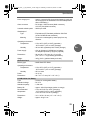
1
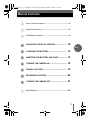
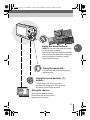
d4221_basic_e_00_bookfile_7.book Page 1 Monday, October 25, 2004 7:37 PM
DIGITAL CAMERA
Shoot and Play!
Basic
l
a
u
n
a
M
ENGLISH
2
FRANCAIS
26
ESPAÑOL
50
DEUTSCH
74
d4221_basic_e_00_bookfile_7.book Page 2 Monday, October 25, 2004 7:37 PM
For customers in North and South America
For customers in USA
Declaration of Conformity
Model Number
: Stylus 500/
Trade Name
: OLYMPUS
Responsible Party :
Address
: Two Corporate Center Drive, PO Box 9058, Melville, NY
11747-9058 U.S.A.
Telephone Number : 1-631-844-5000
Tested To Comply With FCC Standards
FOR HOME OR OFFICE USE
En
This device complies with Part 15 of the FCC rules. Operation is subject to the following
two conditions:
(1) This device may not cause harmful interference.
(2) This device must accept any interference received, including interference that may
cause undesired operation.
FCC Notice
• Radio and Television Interference
Change or modifications not expressly approved by the manufacturer may void the
user’s authority to operate this equipment. This equipment has been tested and found to
comply with the limits for a Class B digital device, pursuant to Part 15 of the FCC Rules.
These limits are designed to provide reasonable protection against harmful interference
in a residential installation.
This equipment generates, uses, and can radiate radio frequency energy and, if not
installed and used in accordance with the instructions, may cause harmful interference
to radio communications.
However, there is no guarantee that interference will not occur in a particular installation.
If this equipment does cause harmful interference to radio or television reception, which
can be determined by turning the equipment off and on, the user is encouraged to try to
correct the interference by one or more of the following measures:
- Adjust or relocate the receiving antenna.
- Increase the distance between the camera and receiver.
- Connect the equipment to an outlet on a circuit different from that to which the receiver
is connected.
- Consult your dealer or an experienced radio/TV technician for help. Only the
OLYMPUS-supplied USB or cable should be used to connect the camera to USB
enabled personal computers (PC).
Any unauthorized changes or modifications to this equipment would void the user’s
authority to operate.
For customers in Canada
This Class B digital apparatus meets all requirements of the Canadian InterferenceCausing Equipment Regulations.
For customers in Europe
“CE” mark indicates that this product complies with the European requirements
for safety, health, environment and customer protection. “CE” mark cameras
are intended for sales in Europe.
2
d4221_basic_e_00_bookfile_7.book Page 3 Monday, October 25, 2004 7:37 PM
Manual Contents
How to use the camera .................................................. 4
Safety Precautions ......................................................... 6
Weatherproof feature ..................................................... 9
UNPACKING THE BOX CONTENTS ................... 10
En
CHARGING THE BATTERY ............................. 12
INSERTING THE BATTERY AND CARD .............. 13
TURNING THE CAMERA ON
........................... 16
TAKING A PICTURE ...................................... 18
REVIEWING A PICTURE
................................ 20
TURNING THE CAMERA OFF .......................... 21
Specifications ............................................................... 22
3
d4221_basic_e_00_bookfile_7.book Page 4 Monday, October 25, 2004 7:37 PM
Navigation
How to use the camera
En
Using a computer...
Using the OLYMPUS Master
software on your computer lets you
enjoy editing, viewing, and printing
the pictures downloaded from your
camera.
Using a card...
Pictures taken with this
camera are stored on a
xD-Picture Card. By
storing the relevant print
reservation data with the
images on the card, you
can print pictures at a
photo shop or on a
PictBridge-compatible
printer.
Using a printer...
With a PictBridge-compatible
printer, you can print pictures
directly from your camera.
4
Using a TV...
You can use a TV to view
pictures or playback
movies from your camera.
d4221_basic_e_00_bookfile_7.book Page 5 Monday, October 25, 2004 7:37 PM
Using the direct buttons...
f lets you select the optimum settings
for the shooting conditions.
Direct buttons also let you perform functions
such as setting the flash mode or taking the
close-up pictures or self-timer, making
camera operation easy.
Using the mode dial...
Use the mode dial to select a shooting or
playback mode.
Using the arrow pad and e
button...
SET CARD CAMERA
The arrow pad and e button are for
selecting and setting menu options as well
as viewing pictures frame by frame.
ESP SELECT
ESP㧛5
PRINT MODE
DRIVE
PRINT
ISO
AUTO
ALL PRINT
DIGITAL ZOOM OFF
MULTI PRINT
AF MODEALLSPOT
INDEX
EXIT
SELECT
GO OK
Using the menus...
Shooting and playback-related
functions are set from the menus
displayed on the monitor.
5
En
d4221_basic_e_00_bookfile_7.book Page 6 Monday, October 25, 2004 7:37 PM
Safety Precautions
CAUTION
RISK OF ELECTRIC SHOCK
DO NOT OPEN
CAUTION: TO REDUCE THE RISK OF ELECTRICAL SHOCK, DO NOT
REMOVE COVER (OR BACK). NO USER-SERVICEABLE PARTS INSIDE.
REFER SERVICING TO QUALIFIED OLYMPUS SERVICE PERSONNEL.
Lightning flash with an arrowhead, enclosed in a triangle, alerts you to the presence of uninsulated voltage
points inside the product which could cause a serious electrical shock.
An exclamation mark enclosed in a triangle alerts you to important operating and maintenance instructions in
the documentation provided with the product.
WARNING!
TO AVOID THE RISK OF FIRE OR ELECTRICAL SHOCK, NEVER EXPOSE THIS PRODUCT TO WATER OR
OPERATE IN A HIGH HUMIDITY ENVIRONMENT.
En
General Precautions
Read All Instructions — Before you use the product, read all operating
instructions.
Save These Instructions — Save all safety and operating instructions for future
reference.
Heed Warnings — Read carefully and follow all warning labels on the product and
those described in the instructions.
Follow Instructions — Follow all instructions provided with this product.
Cleaning — Always unplug this product from the wall outlet before cleaning. Use
only a damp cloth for cleaning. Never use any type of liquid or aerosol cleaner,
or any type of organic solvent to clean this product.
Attachments — For your safety, and to avoid damaging the product, use only
accessories recommended by Olympus.
Water and Moisture — Never use this product around water (near a bathtub,
kitchen sink, laundry tub, wet basement, swimming pool or in the rain). For
precautions on products with weatherproof designs, read the weatherproofing
sections of their manuals.
Location — To avoid damage to the product and prevent personal injury, never
place this product on an unstable stand, tripod, bracket, table or cart. Mount
only on a stable tripod, stand, or bracket. Follow the instructions that describe
how to safely mount the product, and use only the mounting devices
recommended by the manufacturer.
Power Sources — Connect this product only to the power source described on
the product label. If you are not sure about the type of power supply in your
home, consult your local power company. Refer to your operating instructions
for information on using the product with a battery.
Grounding, Polarization — If this product can be used with a specified AC
adapter, the adapter may be equipped with a polarized alternating current line
6
d4221_basic_e_00_bookfile_7.book Page 7 Monday, October 25, 2004 7:37 PM
Safety Precautions
plug (a plug with one blade wider than the other). This safety feature allows the
plug to fit into the power outlet only one way. If you cannot insert the plug into
the wall outlet, pull it out, reverse it, and then reinsert it. If the plug still fails to
fit, contact an electrician and have the receptacle replaced.
Protecting the Power Cord — The power supply cord should be placed so it will
not be walked on. Never put a heavy object on the power cord or wrap it around
the leg of a table or chair. Keep the area around the power cord connection
points, at the power outlet, and at the product connection, free of all AC adapter
or accessory power cords.
Lightning — If a lightning storm occurs while using the specified AC adapter,
unplug it from the wall outlet immediately. To avoid damage from unexpected
power surges, always unplug the AC adapter from the power outlet and
disconnect it from the camera when the camera is not in use.
Overloading — Never overload wall outlets, extension cords, power strips, or
other power connection points with too many plugs.
Foreign Objects, Liquid Spillage — To avoid personal injury caused by fire or
electrical shock from contact with internal high voltage points, never insert a
metal object into the product. Avoid using the product where there is a danger
of spillage.
Heat — Never use or store this product near any heat source such as a radiator,
heat register, stove, or any type of equipment or appliance that generates heat,
including stereo amplifiers.
Servicing — Refer all servicing to qualified personnel. Attempting to remove the
covers or disassemble the product, could expose you to dangerous high
voltage points.
Damage Requiring Service — If you notice any of the conditions described below
while using the specified AC adapter, unplug it from the wall outlet and refer
servicing to qualified service personnel:
a) Liquid has been spilled onto the product or some other object has fallen into
the product.
b) The product has been exposed to water.
c) The product does not operate normally despite following operating
instructions. Adjust only the controls described in the operating instructions
as improper adjustment of other controls could damage the product and
require extensive repair work by a qualified technician.
d) The product has been dropped or damaged in any way.
e) The product exhibits a distinct change in performance.
Replacement Parts — When replacement parts are required, make sure that the
service center uses only parts with the same characteristics as the originals, as
recommended by the manufacturer. Unauthorized substitution of parts could
result in fire, electrical shock, or create other hazards.
Safety Check — Upon completion of servicing or repairs, ask the service
technician to perform safety checks to determine that the product is in good
working order.
7
En
d4221_basic_e_00_bookfile_7.book Page 8 Monday, October 25, 2004 7:37 PM
Safety Precautions
Legal and other notices
• Olympus makes no representations or warranties regarding any damages, or
benefit expected by using this unit lawfully, or any request from a third person,
which are caused by the inappropriate use of this product.
• Olympus makes no representations or warranties regarding any damages or
any benefit expected by using this unit lawfully which are caused by erasing
picture data.
Disclaimer of Warranty
En
• Olympus makes no representations or warranties, either expressed or implied,
by or concerning any content of these written materials or software, and in no
event shall be liable for any implied warranty of merchantability or fitness for any
particular purpose or for any consequential, incidental or indirect damages
(including but not limited to damages for loss of business profits, business
interruption and loss of business information) arising from the use or inability to
use these written materials or software or equipment. Some countries do not
allow the exclusion or limitation of liability for consequential or incidental
damages, so the above limitations may not apply to you.
• Olympus reserves all rights to this manual.
WARNING
Unauthorized photographing or use of copyrighted material may violate applicable
copyright laws. Olympus assumes no responsibility for unauthorized
photographing, use or other acts that infringe upon the rights of copyright owners.
Copyright Notice
All rights reserved. No part of these written materials or this software may be
reproduced or used in any form or by any means, electronic or mechanical,
including photocopying and recording or the use of any type of information storage
and retrieval system, without the prior written permission of Olympus. No liability
is assumed with respect to the use of the information contained in these written
materials or software, or for damages resulting from the use of the information
contained therein. Olympus reserves the right to alter the features and contents of
this publication or software without obligation or advance notice.
Trademarks
•
•
•
•
IBM is a registered trademark of International Business Machines Corporation.
Microsoft and Windows are registered trademarks of Microsoft Corporation.
Macintosh is a trademark of Apple Computer Inc.
All other company and product names are registered trademarks and/or
trademarks of their respective owners.
• The standards for camera file systems referred to in this manual are the “Design
Rule for Camera File System/DCF” standards stipulated by the Japan
Electronics and Information Technology Industries Association (JEITA).
8
d4221_basic_e_00_bookfile_7.book Page 9 Monday, October 25, 2004 7:37 PM
Weatherproof feature
This camera is weatherproof, but it cannot be used underwater.
Olympus will not assume any responsibility for malfunction of the camera
caused by water getting inside as a result of misuse by the user.
The camera is weatherproof and is not damaged by water spray from any
direction.
Observe the following precautions when using the camera.
Do not wash the
camera with water.
Do not drop the
camera into water.
Do not take pictures
underwater.
En
Water may get inside the camera if the battery compartment/card cover or
connector cover are not firmly closed so close them firmly.
Battery compartment/
card cover
o
n
Connector
cover
• If the camera gets splashed, wipe the water off as soon as possible with
a dry cloth.
• The rechargeable battery and other camera accessories are not
weatherproof.
9
d4221_basic_e_00_bookfile_7.book Page 10 Monday, October 25, 2004 7:37 PM
UNPACKING THE BOX CONTENTS
If you find any contents missing or damaged, contact the place of purchase.
Digital Camera
Strap
Card
LI-12B Lithium Ion Battery
LI-10C Battery Charger
USB Cable
En
AV Cable
Advanced Manual
(CD-ROM)
OLYMPUS Master CD-ROM Basic Manual (this manual)
Warranty Card
Registration Card
Contents vary depending on the area where you purchased this camera.
10
d4221_basic_e_00_bookfile_7.book Page 11 Monday, October 25, 2004 7:37 PM
UNPACKING THE BOX CONTENTS
Attaching the strap
1
Attach the strap as shown.
En
Pull the strap tight so that it does not come loose.
Note
Be careful with the strap when you carry the camera, as it can easily catch on
stray objects, causing injury or damage.
Do not swing the camera around by the strap or pull the strap with excessive
force as this may cause the strap to break.
Attach the strap correctly as shown above so that the camera does not fall off.
If the strap is attached incorrectly and the camera falls off, Olympus is not
responsible for any damages.
11
d4221_basic_e_00_bookfile_7.book Page 12 Monday, October 25, 2004 7:37 PM
CHARGING THE BATTERY
The battery is not fully charged at the time of purchase. Charge the
battery fully with the LI-10C charger before use.
1
Connect the power cable.
LI-10C battery charger
Power cable
n
AC wall outlet
o
En
2
Insert the battery into the charger.
S mark
LI-12B
lithium ion battery
Charging indicator
When charging starts, the indicator lights red.
When fully charged, the indicator turns green.
TIPS
The LI-12B battery takes approximately 120 minutes to charge.
Note
This camera uses an Olympus LI-12B/LI-10B lithium ion battery. No other
type of battery can be used.
Use only the specified charger.
Battery life varies depending on shooting conditions, etc.
The charger can be used within the range of AC100V to AC240V (50/60Hz).
When using the charger abroad, you may need a plug adapter to convert the
plug to the shape of the AC wall outlet. For details, ask at your local electrical
shop or travel agent.
Do not use voltage converters sold in stores traveling overseas as this could
damage your charger.
12
d4221_basic_e_00_bookfile_7.book Page 13 Monday, October 25, 2004 7:37 PM
INSERTING THE BATTERY AND CARD
1
Make sure the camera is off.
The lens is retracted.
The monitor is off.
The lamp is off.
Battery compartment/card cover
2
n Slide
3
En
Open the battery compartment/card cover.
o Lift
Insert the battery.
Battery lock
knob
To remove the battery
Slide the lock knob as
shown. The battery pops up
allowing you to grasp it.
The battery is locked into place
when inserted correctly.
Battery lock knob
13
d4221_basic_e_00_bookfile_7.book Page 14 Monday, October 25, 2004 7:37 PM
INSERTING THE BATTERY AND CARD
4
Insert the card.
Make sure that the card is
oriented correctly and
insert until it clicks while
keeping it straight,
otherwise the contacts on
the card may be damaged
or the card may get stuck.
Index area
Notch
To remove the card
En
Push the card all the way in and
release slowly.
Grasp and remove.
Â
Note
The card may not record properly if it is not inserted all the way in.
Releasing your finger quickly after pushing the card all the way in may
cause it to eject forcefully out of the slot.
5
Close the battery compartment/card cover.
o Slide
n Close
Press down on the center of the cover when sliding.
14
d4221_basic_e_00_bookfile_7.book Page 15 Monday, October 25, 2004 7:37 PM
INSERTING THE BATTERY AND CARD
The battery
Note
The amount of power consumed by the camera varies considerably
depending on shooting conditions, etc.
Power is consumed continuously during the conditions described below. This
discourages the power from lasting longer.
When the monitor is in playback mode for an extended period of time.
Repeated zoom adjustments.
Repeated auto focus by depressing the shutter button halfway.
When connected to a computer or printer.
If you use an exhausted battery, the camera may turn off without displaying
the battery level warning.
The card
En
This camera uses an xD-Picture Card (16 – 512MB).
Index area
You can use this space to write the contents of the card.
Contacts
The part where the data transferred from the camera
enters the card.
Note
This camera may not recognize a non-OLYMPUS card or a card that was
formatted on another device (such as a computer, etc.). Before use, be sure
to format the card on this camera.
Do not press on the card with hard or pointed items such as ballpoint pens.
Never open the battery compartment/card cover, or remove the card or the
battery while the camera is turned on. Doing so could destroy the data stored
on the card. Once destroyed, data cannot be restored.
Do not place a sticker or label on the card as this could prevent the card from
being ejected.
15
d4221_basic_e_00_bookfile_7.book Page 16 Monday, October 25, 2004 7:37 PM
TURNING THE CAMERA ON
1
Set the mode dial to K and press the POWER
switch.
POWER switch
Mode dial
En
Battery check indicator
Shooting scene/Shooting mode
The lens extends and the
monitor turns on.
o
HQ 2560 1920
30
Note
To save battery power, the camera automatically enters the sleep mode and
stops operating after about 3 minutes of non-operation. The camera activates
again as soon as you operate the shutter button or zoom button.
15 minutes after the camera enters sleep mode, the camera retracts the lens
and turns off automatically. Turn the camera on to use.
16
d4221_basic_e_00_bookfile_7.book Page 17 Monday, October 25, 2004 7:37 PM
TURNING THE CAMERA ON
Battery power
The battery check indicator changes according to how much power is
remaining.
e
Lit (green)
(Disappears after a while.)
Ready to shoot.
f
Blinking (red)
The battery needs charging
soon.
“BATTERY EMPTY”
is displayed.
No power is left. Charge the
battery.
Turning on the camera for the first time
En
Setting the date and time
The first time you use the camera, "Y/M/D"
is displayed prompting you to enter the date
and time. See "Setting the date and time" in
Chapter 7 of the Advanced Manual. The
camera operates without making this
setting.
Y/M/D
Language for on-screen display
The language for on-screen display varies
depending on the area where you
purchased this camera. The language for
on-screen display in Basic Manual and
Advanced Manual is the same as the box
description. To change the language, refer
to the "Selecting a language" in Chapter 7
of the Advanced Manual.
ENGLISH
FRANCAIS
ESPAÑOL
PORTUGUES
SELECT
GO
OK
17
d4221_basic_e_00_bookfile_7.book Page 18 Monday, October 25, 2004 7:37 PM
TAKING A PICTURE
1
Compose your picture.
Shutter button
Lamp
AF target mark
Using the monitor, place the AF
target mark on your subject.
En
o
HQ 2560 1920
2
30
Focus on your subject.
Press the shutter button
halfway and hold.
Green lamp
# mark
The green lamp lights when the
focus and exposure are locked
(Focus lock).
The # mark lights when the
flash is about to fire.
o
HQ 2560 1920
18
30
d4221_basic_e_00_bookfile_7.book Page 19 Monday, October 25, 2004 7:37 PM
TAKING A PICTURE
3
Take the picture.
Press the shutter button
completely.
The lamp on the camera blinks
red while the picture is recorded
onto the card.
o
HQ 2560 1920
30b
Memory gauge
En
Note
Press the shutter button gently. If it is pressed hard, the camera may move
and pictures may come out blurred.
Never open the battery compartment/card cover, remove the battery or
disconnect the AC adapter while the lamp on the camera is blinking red. Doing
so could destroy stored pictures and prevent storage of pictures you have just
taken.
Recorded pictures are saved on the card regardless of whether the camera
is turned off or the battery is replaced or removed.
When taking pictures against strong backlight, the area of the picture in
shadow may appear colored.
Memory gauge
Every time you press the shutter button, the memory gauge lights indicating
that the picture you have just taken is being recorded onto the card. The
memory gauge changes according to how many pictures the camera is
processing. This indicator is not displayed while recording movies.
a
Before taking
any pictures
(Off)
Shoot
b
After taking one
picture
(Lit)
Shoot
c
After taking
several pictures
(Lit)
Shoot
Wait
d
Maximum reached
(All lit)
Wait until the indicator
turns off again before
taking more pictures.
19
d4221_basic_e_00_bookfile_7.book Page 20 Monday, October 25, 2004 7:37 PM
REVIEWING A PICTURE
1
Press the QUICK VIEW button.
QUICK VIEW button
100-0030
100
0030
En
HQ
$05.02.16 15:30
30
2
Use the arrow pad to display the picture you want.
10 pictures back
Previous picture
20
You can display the last picture
you took while staying in any
shooting mode.
Press the QUICK VIEW button
again or press the shutter
button lightly when you are
ready to take another picture.
10 pictures forward
Next picture
d4221_basic_e_00_bookfile_7.book Page 21 Monday, October 25, 2004 7:37 PM
TURNING THE CAMERA OFF
1
Press the POWER switch.
POWER switch
The monitor turns off.
The lens retracts.
En
Now that you have mastered how to shoot and
play, check out the Advanced Manual for more
camera applications.
…And for extra enjoyment, install OLYMPUS
Master image editing software on the supplied
CD-ROM.
21
d4221_basic_e_00_bookfile_7.book Page 22 Monday, October 25, 2004 7:37 PM
Specifications
Camera
Product type
: Digital camera (for shooting and displaying)
Recording system
Still picture
: Digital recording, JPEG (in accordance with Design rule
for Camera File system (DCF))
Applicable standards
: Exif 2.2, Digital Print Order Format (DPOF), PRINT Image
Matching III, PictBridge
Sound with still pictures : Wave format
Movie
: QuickTime Motion JPEG support
Memory
: xD-Picture Card (16 – 512 MB)
No. of storable pictures
(when a 32 MB card is
used)
: Still picture (without sound)
Record mode
SHQ
En
HQ
SQ1
Image size
2560 × 1920
2048 × 1536
Card capacity in
number of pictures
8 frames
26 frames
40 frames
1600 × 1200
48 frames
1280 × 960
76 frames
1024 × 768
117 frames
640 × 480
180 frames
Record mode
Image size
Remaining recording time
HQ
320 × 240
(15 frames/sec.)
1 min. 23 sec
SQ
160 × 120
(15 frames/sec.)
3 min. 31 sec
SQ2
Movie (with sound)
No. of storable pictures
when a new battery is
used (fully charged)
: Approx. 200 frames
(based on CIPA battery life measurement standards)
No. of effective pixels
: 5,000,000 pixels
Image pickup device
: 1/2.5" CCD (primary color filter)
Lens
: Olympus lens 5.8 mm to 17.4 mm, f3.1 to f5.2,
(equivalent to 35 mm to 105 mm lens on a 35 mm
camera)
Photometric system
: Digital ESP metering, spot metering system
Shutter speed
: 1/2 to 1/1000 sec. (max. 4 sec. in Night scene mode)
Shooting range
: 0.5 m (1.6 ft.) to ) (normal)
0.2 m (0.7 ft.) to ) (macro mode)
0.07 m (2.8") to 0.5 m (1.6 ft.) (T only) (super macro mode)
Monitor
: 2.5" TFT color LCD display, 215,000 pixels
22
d4221_basic_e_00_bookfile_7.book Page 23 Monday, October 25, 2004 7:37 PM
Specifications
Flash charging time
: Approx. 4 seconds (fully charged new battery is used, and
the charging time is measured in the normal temperature
after a full flashing.)
Outer connector
: DC-IN jack, USB connector (Multi-connector),
A/V OUT jack (Multi-connector)
Automatic calendar system : 2000 up to 2099
Weatherproof
Type
: Equivalent to IEC Standard publication 529 IPX4
(under OLYMPUS test conditions)
Meaning
: Camera is not damaged by water spray from any
direction.
Operating environment
Temperature
Humidity
: 0°C to 40°C (32°F to 104°F) (operation)
-20°C to 60°C (-4°F to 140°F) (storage)
En
: 30% to 90% (operation)/10% to 90% (storage)
Power supply
: Only an Olympus LI-12B lithium ion battery
AC adapter specified by Olympus (optional)
Dimensions
: 99 mm (W) × 55.5 mm (H) × 31 mm (D)
(3.8" × 2.2" × 1.2") (excluding protrusions)
Weight
: 165 g (0.4 lb.) (without battery and card)
xD-Picture Card
Memory type
: NAND flash EEP-ROM
Operating environment
Temperature
Humidity
: 0°C to 55°C (32°F to 131°F) (operation)
-20°C to 65°C (-4°F to 149°F) (storage)
: 95% or lower
Power
: 3V (3.3V)
Dimensions
: 20 × 25 × 1.7 mm (0.8" × 1.0" × 0.1")
LI-12B Lithium ion Battery
Type
: Lithium ion rechargeable battery
Standard voltage
: DC 3.7V
Standard capacity
: 1,230 mAh
Battery life
: Approx. 300 full recharges (varies on usage)
Recommended
temperature
: 0°C to 40°C/32°F to 104°F (charging)
-10°C to 60°C/14°F to 140°F (operation)
0°C to 30°C/32°F to 86°F (storage)
Dimensions
: 31.9 × 45.8 × 10 mm (1.3" × 1.8" × 0.4")
Weight
: Approx. 36 g/1.2 oz.
23
d4221_basic_e_00_bookfile_7.book Page 24 Monday, October 25, 2004 7:37 PM
Specifications
LI-10C Battery Charger
Power requirements
: AC 100 to 240V (50 to 60 Hz)
9 VA (100V) to 16 VA (240V)
Output
: DC 4.2V 860 mA
Charging time
: Approx. 120 minutes
Recommended
temperature
: 0°C to 40°C/32°F to 104°F (operation)
-20°C to 60°C/-4°F to 140°F (storage)
Dimensions
: 46 × 37.5 × 86 mm (1.8" × 1.5" × 3.4")
Weight
: Approx. 75 g/2.6 oz. (without battery)
Design and specifications subject to change without notice.
En
24
d4221_basic_e_00_bookfile_7.book Page 25 Monday, October 25, 2004 7:37 PM
Memo
En
25