1
d4337_e_qsg_7.fm Page 1 Thursday, December 7, 2006 8:13 PM
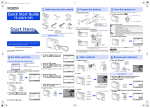
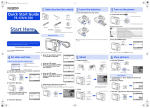
Gather these items (box contents)
Prepare the battery
a. Charge the battery
Quick Start Guide
FE-220/X-785
Turn the camera on
This section explains how to turn on the camera in shooting mode.
W
a. Set the mode dial to h
3
When shooting movies
Power Cable
Lithium Ion Battery
Digital camera
Strap
Lithium Ion
Battery (LI-42B)
Battery Charger
1
When shooting still pictures
Mode dial
2
Charging Indicator
Red light on: Charging
Light off: Charging complete
(Charging time: Approx. 300 minutes)
AC Wall
Outlet
Start Here
AV Cable
Battery Charger
USB Cable
(LI-40C)
Other items • Basic manual
Still picture shooting modes
h
h
Battery comes partially charged.
OLYMPUS Master
CD-ROM
b. Insert the battery in the camera
2
• Advanced manual
• Warranty card
Contents may vary depending on purchase location.
Insert the battery in the direction indicated
by the mark.
1
3
Attach the strap
The camera determines the optimum settings and shoots the picture.
This function reduces the blur caused by a moving subject or camera movement
when taking pictures.
Suitable for taking pictures of people.
B
E
M
f
g
Suitable for taking pictures of landscapes.
Suitable for taking pictures of people at night.
You can select a scene mode from among 10 set for various shooting conditions.
This function allows you to take the best picture by following the shooting guide
displayed on the screen.
b. Press the o button
X
Y
4
5
CANCEL
Battery lock
knob
VH933601
This camera does not require an optional xD-Picture Card™ (hereinafter referred
to as “the card”) to take pictures. For details on inserting an optional Card, please
refer to Advanced Manual.
Pull the strap tight so that it does not come loose.
e. Press the OF/< button and
the NY button to select [D].
Set date and time
X
Y
M
D TIME
----.--.-- --:--
CANCEL
Y/M/D
f. Press the Y# button.
g. Press the OF/< button and
the NY button to select “hour”
and “minute”.
The time is displayed in the 24-hour format.
a. Press the OF/< button and NY button to select [Y].
X
Y
M
D TIME
2007.--.-2007
.--.-- --:--
NY button
D TIME
Take a picture
Y/M/D
h. Press the Y# button.
i. Press the OF/< button and
NY button to select [Y/M/D].
MENU
Y
M
[
D TIME
2007.08
2007
08.26
26 12
12:30
30
HQ 3072×2304
4
Next
picture
SET OK
MENU
Arrow pad
b. Focus
Place this mark over your subject.
M
D TIME
Shutter button
Y/M/D
[
SET OK
MENU
]
HQ 3072×2304
ERASE
The number of still pictures
you can store is displayed.
[
i button
Erase pictures
4
The green lamp indicates that the
focus and exposure are locked.
The card access lamp blinks.
Y/M/D
Previous picture
[IN
IN]
c. Shoot
2007.08
2007
08.-.-- --:--
'07.08.26 12:30
100-0001
1
a. Press the X& button and the Y# button, to
display the picture you want to erase.
b. Press the S button.
X
Y
]
HQ 3072×2304
HQ
3072 ×2304
0.0
Y/M/D
Press halfway
D TIME
N
[IN
IN]
Y# button
M
Y
[IN
IN]
]
For a more accurate setting, you can press the i button when the time
signal hits 00 seconds.
Y
X
q button
CANCEL
X
Hint
The directions of the arrow pad (ONXY) are indicated with
ONXY in this manual.
Vertical grip
j. After all items have been set,
press the i button.
c. Press the OF/< button and
the NY button to select [M].
O
Review your pictures
MENU
b. Press the Y# button.
To turn off the camera, press the o button again.
a. Press the q button.
Horizontal grip
2007.08
2007
08.26
26 12
12:30
30
CANCEL
Y/M/D
X
CANCEL
The first two digits of the year are fixed.
OF/ < button
M
a. Hold the camera
Cancel the setting
MENU
Y
CANCEL
Y-M-D (Year-Month-Day)
Hour
Minute
Date format (Y-M-D, M-D-Y, D-M-Y)
MENU
X
2007.08
2007
08.26
26 --:--
About the date and time setting screen
Y/M/D
This screen appears if the date
and time have not been set.
To remove the battery, press the battery lock knob
in the direction of the arrow.
© 2007
Printed in China
D TIME
----.--.-- --:--
o button
For more information, please refer to the Basic & Advanced Manuals
or visit: www.olympusamerica.com/support
M
YES
NO
S button
BACK
MENU
SET OK
c. Press the OF/< button to select [YES] and press the
i button.
OF/< button
Shutter button
ERASE
[ IN ]
4
Press completely
YES
NO
d. Press the Y# button.
CANCEL
MENU
i button
BACK
MENU
SET OK
d4337_p_qsg_7.fm Page 1 Thursday, December 7, 2006 8:31 PM
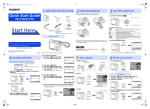
Reúnir estes itens (conteúdo da caixa)
Ligar a câmara
a. Carregue a bateria
Guia de iniciação rápida
FE-220/X-785
Preparar a bateria
Esta secção explica como ligar a câmara no modo fotografia.
W
a. Ajuste o selector de modo para h
3
Para gravar filmes
Cabo de alimentação
Câmara Digital
Correia
Bateria de iões de lítio
Bateria de iões de lítio
(LI-42B)
Carregador de
bateria
1
Selector de modo
2
Indicador de Carregamento
Luz vermelha acesa: A carregar
Luz desligada: Carregamento concluído
(Tempo de carregamento: Aprox. 300 minutos)
Tomada
de CA
Começar aqui
Carregador de
bateria (LI-40C)
Outros itens
Cabo USB
Cabo AV
CD-ROM
OLYMPUS Master
• Manual Básico
• Manual Avançado
• Cartão de garantia
O conteúdo pode variar conforme o local de aquisição.
2
Introduza a bateria na direcção
indicada pela marca .
1
Modos de fotografia
h
h
A câmara determina as definições óptimas e regista a imagem.
Esta função reduz o efeito de arrastamento causado por um objecto
móvel ou movimento da câmara quando fotografar imagens.
Indicado para fotografar fotografias tipo retrato.
B
E
M
f
A bateria fica parcialmente carregada.
b. Introduza a bateria na câmara
Indicado para fotografar paisagens.
Indicado para fotografar pessoas à noite.
g
3
Colocar a correia
Para fotografar
Pode seleccionar um dos 10 modos de cena definidos para as várias condições de
filmagem.
Esta função permite-lhe tirar melhores fotografias seguindo o guia de fotografia
mostrado no ecrã.
b. Prima o botão o
X
A M
Botão o
4
D
HORA
----.--.-- --:--
A/M/D
5
CANCEL
Para maiores informações, consulte os Manuais Básico e Avançado
ou visite a página web: www.olympusamerica.com/support
MENU
Este écran aparecerá se a data e a
hora não tiverem sido acertadas.
Travão da
bateria
Para desligar a câmara, prima o botão o novamente.
Para remover a bateria, prima o travão da
bateria na direcção indicada pela seta.
Esta câmara não precisa de um xD-Picture Card™ opcional (designado a partir
daqui apenas "cartão") para tirar fotografias. De modo a obter informações
sobre como introduzir um cartão opcional, consulte o Manual Avançado.
Puxar bem a correia de modo que não fique frouxa.
d. Prima o botão Y#.
e. Prima o botão OF/< e o botão
NY para seleccionar [D].
Acertar data e hora
Fotografar
X
A M
D
HORA
A/M/D
Acerca do ecrã de acerto da data e da hora
X
A M
D
HORA
----.--.-- --:--
CANCEL
A/M/D
Cancelar o acerto
MENU
A hora é exibida no formato de 24 horas.
a. Prima o botão OF/< e o botão NY para
seleccionar [A].
A M
D
HORA
2007.--.-2007
.--.-- --:--
Botão NY
Botão q
[
D
A/M/D
h. Prima o botão Y#.
i. Prima o botão OF/< e o botão
NY para seleccionar [A/M/D].
2007.08
2007
08.26
26 12
12:30
30
DEF
MENU
OK
Botão Y#
A M
D
HORA
A/M/D
DEF
MENU
Premir até
meio
[
A/M/D
Botão i
MENU
]
HQ 3072×2304
]
HQ 3072×2304
[ IN ]
a. Prima o botão X& e o botão Y# para fazer
aparecer a imagem que deseja apagar.
b. Prima o botão S.
4
A lâmpada verde indica que o foco e a
exposição estão fixos.
c. Fotografar
A lâmpada de acesso ao cartão pisca.
Botão disparador
HORA
[
A PA G A R
O número de fotografias
que podem ser
armazenadas é mostrado.
OK
X
CANCEL
Posicione esta marca sobre o seu motivo.
Botão disparador
Para uma definição mais precisa, pode-se premir o botão i quando o
sinal de hora chegar aos 00 segundos.
2007.08
2007
08.-.-- --:--
'07.08.26 12:30
100-0001
1
Fotografia prévia
b. Focar
HQ
3072 ×2304
0.0
Fotografia
seguinte
X
j. Após todos os parâmetros terem sido definidos,
prima o botão i.
D
[IN
IN]
Apagar imagens
CANCEL
A M
4
A/M/D
MENU
b. Prima o botão Y#.
c. Prima o botão OF/< e o botão
NY para seleccionar [M].
[IN
IN]
HORA
2007.08
2007
08.26
26 12
12:30
30
CANCEL
]
HQ 3072×2304
A M
Segurar na vertical
MENU
X
CANCEL
X
Y
a. Prima o botão q.
a. Segurar a câmara
Selector em cruz
Os primeiros dois dígitos do ano são fixos.
Botão OF/<
X
Ver as suas imagens
Segurar na horizontal
CANCEL
f. Prima o botão Y#.
g. Prima o botão OF/< e o botão
NY para seleccionar “hora” e
“minuto”.
Nete manual, as direcções do selector em cruz
(ONXY) estão indicadas com ONXY.
N
2007.08
2007
08.26
26 --:--
A-M-D (Ano-Mês-Dia)
Hora
Minuto
Formato da data (A-M-D, M-D-A, D-M-A)
O
Dica
SIM
NAO
Botão S
RETROCEDER
MENU
c. Prima o botão OF/< para seleccionar [SIM] e
então prima o botão i.
Botão OF/<
A PA G A R
Premir totalmente
SIM
NAO
[ IN ]
4
DEF OK
Botão i
RETROCEDER
MENU
DEF OK