1
d4261qsg_e_7.fm Page 2 Tuesday, February 15, 2005 4:45 PM
Quick Reference Guide
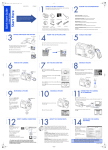
CAMERA DIAGRAM AND CONTROLS
POWER switch
Shutter button
D-630 ZOOM
Zoom button
(W/T, GU)
Self-timer lamp
Multi-connector
1. Camera Diagram and Controls
2. Shooting Scene Modes
3. Using the Zoom
4. How to Use the Autofocus
5. Flash Modes
6. Image Quality Modes
7. Recording a Movie
8. Viewing Pictures/Movies on a TV
9. How to Erase All Pictures
10. E-mailing a Picture
11. Printing a Picture
OK/MENU
button (Z)
Microphone
Connector cover
Self-timer button (Y)
Lens
DC-IN jack
GO OK
a. While positioning the AF target mark over the subject,
Shutter button
Green lamp
P
• The generic mode for taking pictures.
This camera features a zoom lens, letting you get closer to the action or
capture wide-angle shots.
i
• Lets you take impressive portrait shots.
h
• Lets you take pictures of the subject indoors together with background
scene.
k
• Lets you take the subject in the foreground as well as the landscape in the
background clearly.
l
• Lets you capture the vivid blues and greens of all the landscape from nearby
to far off in the distance.
j
• Lets you freeze-frame fast-moving action.
n
• Lets you take the subject in low light conditions or night.
R
• Lets you capture those details that would otherwise be cloaked in darkness
when taking pictures at night.
l
• Lets you take pictures of yourself - by yourself.
n
• Lets you record movies.
#
$
P
5
Zoom out: Press W on the
zoom button.
Zoom in: Press T on the
zoom button.
• Press W to zoom out and get more into the picture.
• Press T to zoom in and get closer to the action.
FLASH MODES
IMAGE QUALITY MODES
This camera features multiple flash modes. You can select the
appropriate flash mode to suit the situation. The icons that are
displayed on the monitor are shown below.
Your camera is equipped with multiple image quality modes, which
determine the quality and image size of the pictures you take. Below is
a general description of the commonly used modes. For a detailed
description of all quality modes, refer to the Advanced Manual
included on the CD-ROM.
• AUTO-FLASH - The camera decides if the flash is needed.
• RED-EYE REDUCTION - Reduces the incidence of red-eye by
emitting pre-flashes to shrink pupil size before taking the picture.
• FILL-IN FLASH - The flash always fires. Suitable for shooting backlit
subjects.
• FLASH OFF - The flash is turned off. Suitable for when flash
photography is not permitted.
a. With the camera in shooting mode, press d#.
HQ 2560 1920
Battery compartment/card cover
USING THE ZOOM
(None)
!
press and hold the shutter button halfway.
Tripod socket
Shooting Scene Mode Descriptions
HOW TO USE THE AUTOFOCUS
b. The green lamp, which indicates the focus and
exposure are locked, remains lit as long as the shutter
button is kept depressed halfway.
Macro button (&)
Scene mode
button (f)
Flash mode
button (#)
Lamp
PROGRAM AUTO
SELECT
Arrow pad (acbd)
Erase button (S)
press af.
and press Z.
Strap eyelet
Playback button ($)
a. With the camera in shooting mode,
1
Monitor
Shooting button (#)
SHOOTING SCENE MODES
b. Press a c to select a scene mode,
Flash
Image size becomes larger
INDEX
Image becomes clearer
Compression
Application
Low
compression
Image size
Select according to print size
For small-sized prints and websites
High
compression
2560 × 1920
SHQ
HQ
1600 × 1200
—
SQ1
640 × 480
—
SQ2
a. With the camera in shooting mode, press Z.
F
b. Press b to select [K].
b. Press ac to select the desired flash mode, and press
MODE MENU
WB
FLASH MODE
Z.
AUTO
AF target mark
The flash fires
with every picture.
c. Press ac to select the record mode, and press Z.
K
c. Press the shutter button completely to take the
SHQ 2560
HQ
picture.
SELECT
GO
OK
RECORDING A MOVIE
1920
SQ1 1600
1200
SQ2
640
SELECT
Shutter button
VIEWING PICTURES/MOVIES ON A TV
1920
2560
480
GO
OK
HOW TO ERASE ALL PICTURES
WARNING - PERFORMING THESE STEPS WILL DELETE ALL STORED
PICTURES!
a. With the camera in shooting mode, set the
a. Make sure that the camera and TV are off. Connect the camera to the TV
using the AV cable (included).
scene mode to n.
Connect to the TV’s video input (yellow)
and audio input (white) terminals.
(video and audio).
HQ
m
b. Press d to select [MODE MENU].
Connector cover
INFO
MODE MENU
0
00:
00:36
0:36
36
c. Press ac to select the [MEMORY] tab, and press d.
Select [ALL ERASE], and press d.
Remaining recording time
c. Press the shutter button again to stop.
AV cable (provided)
b. Turn on the TV and set to “video input.”
SET MEMORY EDIT PLAY
b. Press the shutter button to start recording
Multi-connector
a. With the camera in playback mode, press Z.
ALL ERASE
MEMORY FORMAT
BACKUP
d. Press ac to select [YES], and press Z.
ALL ERASE
c. Press the $. Use the arrow pad to display the picture you want to view.
CAUTION ERASING ALL
YES
Note: If the pictures are not displayed, consult your TV manual to set up the video
source.
NO
SELECT
E-MAILING A PICTURE
GO
PRINTING A PICTURE
CONTACT INFORMATION
Two Corporate Center Drive, P.O. Box 9058, Melville, NY 11747-9058
Using the OLYMPUS Master software (included), you can share your pictures with
others by using the built-in e-mail feature.
After installing OLYMPUS Master, open the program and click “ Browse
Images”. From the “Browse” window, select the picture(s) you want to send and
click the “ E-mail” tool button.
At this time, you can resize your pictures to make them more manageable for email. This helps you stay within the e-mail capacity limitations set by your e-mail
provider.
When finished, click the “ Launch Mailer” button at the bottom of the
window. Your default e-mail program will open, and the selected picture(s) will
automatically be attached to a new message.
Using the OLYMPUS Master software (included), you can make prints of your
pictures using your own photo printer.
After installing OLYMPUS Master, open the program and click the “Print Images”
icon on the main menu. You can create many different types of prints such as an
index print, photos, albums, or calendars. Simply select the image(s) and add
them to one of the many layouts within OLYMPUS Master. For detailed
instructions, please refer to the “Help” menu in the software.
You can also order prints online using the “Print Online” feature in OLYMPUS
Master.
Technical Support (USA):
24/7 online automated help: http://olympusamerica.com/support
Phone customer support: 1-888-553-4448 (toll free)
Our phone customer support is available from 8am - 10pm, (Monday to
Friday) ET
E-mail: [email protected]
Olympus software updates can be obtained at: http://olympus.com/digital
Alternatively, you can print your pictures by connecting your PictBridge*
compatible camera directly to a PictBridge* compatible printer, such as the
Olympus P-10 Digital Photo Printer. This permits fast, easy printing without using
a computer.
* For detailed instructions on using PictBridge, please refer to your camera’s
Advanced Manual included in digital format on the CD-ROM.
© 2005
OK