1
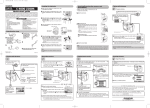
Zoom lever
Shutter button
Mode dial
Focuses (half press) or
shoots (full press).
Shooting
Playback
: Zooms in/out.
: Displays multiple pictures at
the same time
(Index-display),
or enlarges pictures (close-up
playback).
Print reserve: Sets trimming
size.
:Records movies.
A/S/M :Sets controls for Aperture-priority auto exposure/Shutter-priority
auto exposure/Manual exposure.
P :Programmed auto exposure
(several menu items).
:Portrait
:Sports Scene
:Landscape
AUTO:Full automatic exposure with
one press of the shutter button.
:Displays pictures.
Flash switch
Pops up the Flash.
How to use the buttons and dial
S
B UTTON Dial
Macro/Spot button
&
Flash mode button
Macro
: Takes close-up pictures (Working range
[Wide:0.1-0.6 m (0.3-2.0 ft)/Tele:1.22.0 m (3.9-6.5 ft)).
Spot
: Selects area for metering.
Playback : Selects pictures for printing (Print reserve).
Shooting: Selects flash modes
(Working range[Wide: 0.15.5 m (0.3-18.0 ft)/Tele: 1.24.4 m (3.9-14.4 ft)
Playback: Protects pictures from being
accidentally erased.
AE lock/Custom button
Shooting:AE lock (factory default setting)—Locks exposure.
Custom button— Performs
whichever function you have
set for it.
Playback:Rotates pictures.
DRIVE button
Shooting: Sets sequential shooting mode
or self-timer.
Playback:Each press erases one frame.
Viewfinder
Arrow pad
Monitor
POWER switch
Displays images
for shooting or
playback.
Shooting
: Sets aperture/shutter
speed/exposure compensation/manual
focusing values.
Playback : Selects pictures to be
displayed.
Menu screen:Selects menu items.
Turns on/off the power.
Monitor button
OK/Menu button
Shooting : Turns on/off the Viewfinder/
Monitor.
Two quick presses plays back
the picture you just took.
Playback : Selects whether to display
images on either the Viewfinder
or the Monitor.
●Displays menu screen.
●Sets selected items on the
menu screen.
●Puts the camera into manual
focus mode after being held
down for more than 1 second.
M ENU
How to use the Shooting Menu
Moving around the Menu screen
Top menu (Mode dial: “P”)
1
2
ISO
MODE MENU
Note:The Top menu and available menu functions vary
depending on the Mode
dial setting. (See the
Reference Manual for
more details.)
The Top menu functions can be changed to
your liking in the “P” and “A/S/M” modes
(SHORTCUT setting).
3
If you select MODE MENU in step 2
CAM Brings up CAMERA menu
SET CARD PIC CAMERA
4
WB
ISO
A/S/M
SLOW
SLOW
BKT
Brings up PICTURE menu
PIC
CARD Brings up CARD menu
SET
Brings up SETUP menu
CAMERA
ISO
Adjusts the ISO sensitivity. (AUTO/100/200/400/800)
Selects the exposure mode from A(Aperture priority auto),
S (Shutter priority auto) or M (Manual mode), when the
Mode dial is set to “A/S/M”.
A/S/M
Adjusts the flash intensity.
Adjusts the flash for slow shutter speeds. (
SLOW
SLOW/
SLOW1/
SLOW2)
Sets the exposure range (0.3/0.6/1.0) and number
of pictures (x3/x5) for Auto Bracketting.
BKT
Decides the best exposure by metering up to 8 different
spots in the picture.
MULTI
METERING
Zooming can be set up to 27x (equivalent to 38mm1000mm on a 35mm camera).
DIGITAL
ZOOM
Keeps the image in focus at all times without having to
press the shutter button halfway.
FULLTIME
AF
(for still
pictures)
Allows approx. 4 seconds of sound recording to be
attached to a picture.
(for
movies)
Allows sound to be recorded while shooting movies.
Allows panorama pictures to be taken (CAMEDIA
Master is required).
PANORAMA
Changes the picture color to BLACK&WHITE, SEPIA or
WHITE/BLACK BOARD.
FUNCTION
PICTURE
Sets the record mode. (TIFF/SHQ,/HQ/SQ)
Adjusts the white balance according to the light source.
(AUTO/PRESET/
)
WB
Allows you to make fine changes to the white balance.
Adjusts the sharpness of images.
(HARD/NORMAL/SOFT)
SHARPNESS
Adjusts the contrast of images. (HIGH/NORMAL/LOW)
CONTRAST
CARD
CARD SETUP
Formats cards (all images on the card are deleted).
SETUP
ALL RESET
Selects whether to keep the current camera settings when
you turn off the power. (ON/OFF/CUSTOM)
INFO
Changes the amount of information (ISO,WHITE BALANCE,
etc.) displayed on the Monitor/Viewfinder.
Turns the beep sound (used for warnings, etc.) ON/OFF.
REC VIEW
SLEEP
FILE NAME
Selects whether to display images on the
Monitor/Viewfinder while saving them to a card.
Chooses the length of time before the camera enters
SLEEP mode. (30 sec/1 min/3 min/5 min/10 min)
Creates file/folder names for images to be saved.
(RESET/AUTO)
Adjusts the brightness of the Monitor/Viewfinder.
Sets the date/time.
m/ft
BATTERY
SAVE
SHORTCUT
CUSTOM
BUTTON
Sets the measurement units (m/ft) during manual focus.
Sets the battery saving mode. (ON/OFF)
Selects items for the Shortcut menu on the Top menu screen.
Lets you assign a function to the Custom button on the
camera (factory default setting: AE lock).
M ENU
How to use the Playback menu
(still pictures)
Runs through all saved pictures one after another (slide-show).
MOVIE PLAY (movies)
MOVIE
PLAYBACK
INDEX
EDIT
Plays back movies.
Shows 9-frame indexes of still-shots from movies in
order to easily check the movies' contents.
Edits recorded movies.
INFO
Changes the amount of information (ISO, WHITE BALANCE, etc.)
displayed on the Monitor/Viewfinder.
PLAY (still pictures)
Adds sound to recorded still pictures.
CARD
CARD SETUP
Formats cards (FORMAT), or erases all images on
them (ALL ERASE).
SETUP
ALL RESET
Selects whether to keep the current camera settings
when you turn off the power. (ON/OFF)
Turns the beep sound (used for warnings, etc.) ON/OFF.
Adjusts the brightness of the Monitor/Viewfinder.
Sets the date/time.
Selects the number of frames in the Index display.
(4/9/16-frame)
●
PROBLEM
F A Q
digital
camera
Shooting
1
How do I turn on the Monitor?
2
How do I take a clear picture easily?
3
How do I stop the beep each time I
press a button?
Press the Monitor (
) button. The Viewfinder is always on
when the camera's power is on.
Try setting the “AUTO” mode on the Mode dial if you are a beginner. Your camera will then automatically decide the best settings.
Set the Mode dial to any position except “AUTO”, then press the
OK/Menu button (
). Select “MODE MENU”— “SETUP”—
“
”— “OFF”, then press
again.
4
Why doesn't the flash fire, even
though I'm in
AUTO mode?
Check that the flash is popped up. If not, press the Flash switch.
5
How do I take a black & white or
sepia tone picture?
Set the Mode dial to the desired position (except “AUTO”), then
press
. Select “MODE MENU”— “CAMERA”— “FUNCTION”— “BLACK&WHITE” or “SEPIA”, then press
again.
6
How do I brighten a subject when the
background light causes it to be
underexposed?
Use Spot metering to obtain proper exposure in an extreme
backlight situation.
When framing a picture where the subject is not in the center,
put the subject in the center of the Viewfinder/Monitor and lock
the focus and exposure by pressing the Shutter button halfway.
Then, without letting go of the Shutter button, frame the desired
picture and press the Shutter button fully. AE lock is also useful
when you only want to lock the exposure.
7
How do I focus on a subject not in the
center of the frame?
Unless the focus is locked, the camera always focuses on the center of the frame. If your subject is not in the center, place it there at
first, then press the Shutter button halfway to lock the focus and
exposure. Finally, without letting go of the Shutter button, compose
your desired picture and press the Shutter button fully.
8
How do I use the A/S/M modes?
A—Aperture priority
This lets you set the aperture manually. For example, if you want
to focus on both your subject and the background, make the
aperture smaller. If you want to focus on only your subject, make
the aperture larger.
S—Shutter speed priority
This lets you set the shutter speed manually. For example, setting a fast shutter speed lets you capture a moving subject without blur. Setting a slow shutter speed lets you create a sense of
movement (flowing water, sports scenes, etc.)
M—Manual exposure mode
This lets you set both the aperture and shutter speed.
Playback
1
How do I check my picture right after
shooting?
Press the Monitor button (
) twice quickly without turning the
mode dial to
. The picture you just took will be displayed. If you
don’t like it, press
, select YES, then press
to erase it. Use
the Arrow pad to select other pictures to check. Press the Shutter
button halfway to return to the shooting mode.
2
How do I view my pictures on a TV?
Connect your camera’s AV output terminal to your TV’s AV input
terminal using the provided AV cable. Also, refer to your TV’s
instruction manual before connection.
3
How do I display thumbnail pictures on
the camera?
Set the mode dial to
, then move the Zoom lever to “W” (Indexdisplay mode). To display an image in its full size, choose it with the
green frame on the display by using the Arrow pad, then move the
Zoom lever to “T”. To select the number of the frames to display in
this mode, select SETUP—
— 4, 9, or 16 from the menu.
Others
1
What types of batteries can be used
with this camera?
CR-V3 lithium battery packs (x 2), AA (R6) NiMH batteries (x 4),
NiCd batteries (x 4), Alkaline batteries (x 4) or lithium batteries
(x 4).
2
How do I erase all the pictures on the
card at the same time?
Set the mode dial to
. Select MODE MENU—CARD—CARD
SETUP—ALL ERASE , then press
.
3
How do I avoid erasing pictures on a
card accidentally?
Attach the provided write-protect seal to the part of the card
marked with .
Problem
d i g i t a l
c a m e r a
F A Q
VT255902
Printed in Japan
http://www.olympus.com
(Hotline numbers)
Tel. 01805-67 10 83
for Germany
Tel. 00800-67 10 83 00
for Austria, Belgium, Denmark, France,
Netherlands, Norway, Sweden, Switzerland,
United Kingdom
Tel. +49 180 5-67 10 83 for Finland, Italy, Luxembourg, Portugal, Spain,
Czech Republic
Tel. +49 40-237 73 899
for Greece, Croatia, Hungary and the rest of Europe
(E-Mail) [email protected]
For Europe
(Technical support) Tel. 1-888-553-4448 (Toll-free) (First 30 days after purchase)
(Technical support) Tel. 1-631-844-5520 (After 30 days)
(E-Mail) [email protected]
For America
P O C K E T
G U I D E
C-700
Ultra Zoom
d i g i t a l
c a m e r a