1
VT782801
QuickStart Guide
OLYMPUS AMERICA INC.
Two Corporate Center Drive, Melville,
NY 11747-3157, U.S.A.
http://www.olympusamerica.com/support
D-395 / C-160
Olympus Europa GmbH
Wendenstrasse 14-18,
20097 Hamburg, Germany
http://www.olympus-europa.com
http://www.olympus.com/
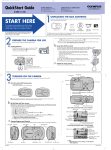
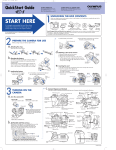
UNPACKING THE BOX CONTENTS
Gather your Digital camera and the parts as shown in the illustration. You’ll need these to complete the steps for the
camera set-up procedures that follow.
START HERE
It is strongly recommended that you follow these
step-by-step numbered instructions to set up and
quickly begin using your new Digital camera.
Digital camera
For more detailed instructions on advanced features, please refer
to the printed Basic Manual included in your package, or the
Reference Manual on the CD-ROM.
Strap
AA (R6) alkaline
batteries (x2)
CAMEDIA
Master CD-ROM
USB cable
(grey color)
xD-Picture Card
The following items are also included in this package: Basic Manual, warranty card, registration card (not pvovided in some
areas), and safety precautions booklet.
PREPARE THE CAMERA FOR USE
Before you begin using your Olympus Digital camera…
b.
a.
• Close the battery compartment cover so that it pushes the batteries down inside. While pressing
the
mark, slide the cover in the opposite direction of
.
• To remove the batteries, make sure that the monitor and the lamps at the side of the viewfinder
are off.
Insert the xD-Picture Card
Loading batteries
The xD-Picture Card is where the camera stores your pictures and is available in a variety
of memory capacities. The pictures you take with the camera
remain on the xD-Picture Card even when the camera is turned
off and/or the batteries are removed.
Note: The batteries and xD-Picture Card compartments are accessed by opening
the respective compartment covers.
• Close the lens barrier fully.
• Slide the battery compartment cover in the direction of A
(the direction indicated by the
mark on the cover),
and lift it up in the direction of B .
• Insert batteries in the direction shown in the illustration.
A
B
c.
When using AA (R6 batteries), also refer to
the mark on the bottom of the camera that
shows the correct way to insert batteries.
• Open the card cover.
• Face the card the correct way and insert it into the card slot. When the card is
inserted properly.
• Insert the xD-Picture Card into the spring-loaded card slot as
Notch
shown in the illustration. Push the card fully into the slot. The
Index area side
card will lock into place when fully inserted.
• To remove, push down on the xD-Picture Card. The card will
Strap eyelet
pop up.
Pull to remove.
• Close the card cover securely.
Confirm you have installed the batteries and xD-Picture Card properly
by pressing
. The "No Picture" message should be displayed in the
monitor. Turn the camera off by pressing
again.
Attach the strap
(OPTIONAL)
Attach the strap as illustrated to make the camera easier to handle.
Orange lamp
TURNING ON THE CAMERA
Green lamp
All you need to do is slide the lens barrier open or closed to turn the camera ON or OFF.
Viewfinder
a.
Arrow pad
Turn the camera ON
(SHOOTING MODE)
• Open the lens barrier.
• Close the lens barrier to turn the camera off.
Monitor
Power on
Power off
QUICK VIEW button
Playback button (
)
OK/Menu button
Lens barrier
TIP: To maximize battery life, the built-in power-saver operates, and the camera enters sleep mode after approximately three (3) minutes
of non-use.
b.
Set the Date and Time
(OPTIONAL)
Although this is not required, it is recommended that you set the date and time. This affects the way image
file names are created, and will conveniently include this information with each picture. The date and time
can also be set when the camera is in the playback mode.
• Open the lens barrier fully until it clicks.
• Press
to display the top menu.
• Press to select MODE MENU.
• Press
three times to select SETUP.
• Press once, and then
once to highlight
, and then press once.
• Use
to select the date format.
• Adjust the date and time in the appropriate fields by using to select the field, and
to set
the proper value. Repeat this step until all date/time fields have been set.
Note: Time is entered using the 24-hour format.
c.
• Press
Tripod socket
Camera Settings in Shooting Mode as shown in Monitor
Shooting mode
Battery check
Green lamp
Flash stadby
Macro
Flash mode
Now take a moment to familiarize yourself with the key areas of camera controls by reviewing the illustrations.
Card cover
Shutter button
Flash
Exposure compensation
Spot metering mode
White balance
AF target mark
Self-timer
(still pictures only)
Record mode
twice to set the date and time and exit the menu.
Camera Diagram and Controls
Strap eyelet
Battery compartment cover
Resolution (number of pixels)
USB connector
Number of storable still pictures/
seconds remaining for movies
Camera Settings in Playback Mode as shown in Monitor
Print reserveation
Number of prints
Battery check
File number
USB
Protect
Record mode
Number of pixels
Exposure compensation
White balance
DC IN 3.4V
Date and time
Frame number,Playing time/
Total recording time
Lens barrier
Self-timer lamp
Lens
DC-IN jack (3.4V)
Connector cover
Note: Depending on the camera settings, not all indicators
will be displayed.
Printed in China
TAKING PICTURES
There are two ways to compose your subject: using the
monitor or with the viewfinder. Depending upon the shooting
situation, there may be advantages to each method. Please
refer to the printed Basic Manual for more information.
a.
The Digital camera confirms the focus and
exposure are properly set when the green lamp in
the viewfinder lights steadily. The orange lamp
informs you that the flash is recommended and/or
recharging (when blinking); or ready to fire (when
steady).
Taking a Picture with the Monitor
• Open the lens barrier fully.
• Decide the composition while looking at the image on the
monitor.
d.
Flash Modes
This Digital camera features multiple flash modes.
Icon
The camera automatically decides if the flash is needed.
Red-eye
Reduction
Flash
Reduces incidence of red-eye by emitting pre-flashes to
shrink pupil size before firing the main flash. The strobe
effect is normal operation for this mode.
Fill-in Flash
The flash always fires with every picture.
Flash Off
Turns the flash off for times when flash photography is
prohibited or not desired. The flash never fires.
c.
Zooming
Each time you press
, the zoom magnification changes
in the following sequence:
1 time ➝ 1.3 times ➝ 1.6 times ➝ 2.0 times ➝ 2.5 times.
Number of Storable Pictures
Your digital camera can handle xD-Picture Card from 16 MB to
512 MB. The number of storable pictures depends on the image
quality selected.
• Press the shutter button halfway. The green lamp will light
steadily when the focus and exposure are set.
• Press the shutter button completely to take the picture. A short
beep confirms your picture has been taken.
Each time you press
, the zoom magnification changes
in the following sequence:
2.5 times ➝ 2.0 times ➝ 1.6 times ➝ 1.3 times ➝ 1 time.
• The zoom magnification changes continuously
while holding down
or
.
Taking a Picture with the Viewfinder
• Open the lens barrier fully.
• Compose your picture while
looking at the image in the
viewfinder.
• Press the shutter button halfway.
Press ( ) to cycle through the available flash modes. With the
shutter button depressed halfway, the flash is ready to fire when
the indicator in the monitor or the orange lamp next to the
viewfinder lights steadily. When the orange lamp is blinking, the
flash is charging.
e.
Icons representing camera settings appear on the monitor,
telling you important information such as the Flash and record
modes, battery life, and the number of frames remaining.
b.
Description
No indication Auto-flash
• Press the shutter button completely to take the
picture. A short beep confirms your picture has
been taken.
You can enlarge your subject when shooting by 1.3,
1.6, 2.0 or 2.5 times.
Flash Mode
See the Reference Manual for complete descriptions of each
record mode and the storable frame capacity for the various
resolution modes and xD-Picture Card capacities.
TIP: To find out how many frames you have left, turn on the monitor and look for
the number in the lower right corner. Remember, you can always delete unwanted
pictures to make room for more. (See Step 5.)
Orange lamp
Green lamp
VIEWING AND
ERASING PICTURES
With this Digital camera, you can easily view the photos
you want—and delete the ones you don’t.
a.
Viewing Pictures
There are two ways to access the Playback mode:
When you are finished reviewing your pictures:
• Press
to turn the camera off.
OR
• To return back to the shooting mode, press the shutter
button halfway.
b.
• If the camera is OFF and the lens barrier closed,
press
once.
OR
• If the camera is in the shooting mode with the lens
barrier fully open, press
(QUICK VIEW).
The last picture taken appears in the monitor. Use
to scroll though all the images saved on
your xD-Picture Card.
Erasing Pictures
Once erased, pictures cannot be restored.
The beauty of digital photography is your ability to keep
the photos you want, delete the rest, and reuse empty
memory space to take new pictures. This digital camera
offers two ways to permanently erase unwanted digital
photos:
Single-Frame Erase: Deletes only the picture
currently displayed in the monitor.
CONNECTING THE CAMERA
TO A COMPUTER
TIP: Olympus recommends using the optional AC adapter to ensure a consistent
power supply when downloading images.
Make sure that the camera is turned off before
connecting it to your computer.
Windows 98 users must install the "USB Driver for
Windows 98" software before connecting this
Digital camera to the computer.
Refer to the Software Installation Guide for
complete information.
TIP: Images can also be erased while in the "Quick View" mode
described in step 5a. This makes it easy to quickly erase a picture that
you just took.
All-Frame Erase: Deletes all pictures on the xD-Picture Card in one
operation, except for pictures you have protected.
• With the lens barrier closed, press
.
• Press
, then press
to select MODE MENU.
• Use
to select the CARD tab, then press twice to access
the CARD SETUP screen.
•
ALL ERASE should be highlighted. Press
.
• As a safeguard, this Digital camera will ask you to select
YES or NO to confirm erasing, as this process permanently
deletes all unprotected pictures. Select YES and press
.
Olympus makes it simple to connect this Digital camera to
your computer.
• Turn the camera off.
• Plug the supplied USB cable into the ports on your
camera and computer as illustrated at right.
• The camera turns on automatically.
• The monitor turns on and the selection screen for the USB
connection is displayed.
• Press
to select PC, and then press
on the
USB screen.
The camera starts communicating with the PC.
INSTALLING THE CAMERA
SOFTWARE
You've now mastered the basic functionality of your new Olympus
Digital camera! You are now ready to begin exploring the
possibilities that digital photography brings to your computer.
Activities such as photo editing, printing, and much more are
only steps away!
About the Olympus CAMEDIA Master CD-ROM
Your Olympus digital camera comes bundled with a suite of software and
documentation. The CD includes:
• CAMEDIA Master : To download pictures from the camera, view,
organize, retouch, and print your digital photos and movies.
• USB Driver for Windows 98: This utility must be installed to allow the
camera to communicate with your computer if it uses the Microsoft Windows 98
operating system.
• Olympus Digital Camera Reference Manual: A complete
reference guide in digital form, saved on the CD in PDF format.
You are now ready to install the computer software.
• Open the CAMEDIA Master CD-ROM package and locate the Software
Installation Guide in the language you wish to use.
• Continue to follow the step-by-step instructions for installing the software, and
enjoy your new digital photo processing capabilities!
• With the lens barrier closed, press
and use the arrow
pad to display the picture you want to erase.
• Press
. Press
to select
ERASE.
• Press
to select YES, and then press
.
USB
USB
DC IN 3.4V
DC IN 3.4V
Additional Camera Features
This Digital camera offers a host of advanced features to expand your creativity. Here’s just a small
sampling. See the Basic Manual for details on these capabilities, and more!
• 4 Scene Program Shooting Modes: This camera has 4 shooting modes to choose from
depending on the shooting conditions and the effect you want to achieve.
• Macro Mode: For close-ups as tight as 0.7 ft. (0.2m), select Macro Mode.
• Movie Mode: Yes, this Digital camera records movies! (Movie Mode does not record sound.)
• Two-in-one Pictures: Combine two separate images taken in succession and store them as a
single picture.
• Close-up Playback: Enlarge the pictures in the monitor to check details of the selected image.
• Index Display: View several thumbnail pictures on the monitor at once.
• Protecting Pictures: Prevents you from accidentally erasing photos.
• Panorama Shooting: Connect overlapping images into a single picture using the panorama
mode and Olympus CAMEDIA Master software.
• Direct Printing: Connect directly to your PictBridge-compatible printer with the USB cable to print
your favorite images easily.
TIP: Remember to complete and return your Registration Card (not provided in some areas), and keep all
camera documentation handy.
Technical Support (USA)
1-888-553-4448 (Toll-free)
8:00 AM - 10:00 PM ET
Monday - Friday
European Technical Customer Support
00800-67 10 83 00 (Toll-free)
+49 180 5-67 10 83 or +49 40-237 73 899 (Charged)
9:00 AM - 6:00 PM MET
Monday - Friday