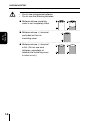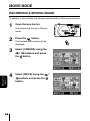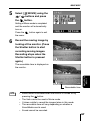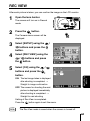
1
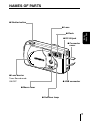
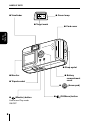
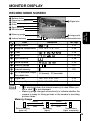
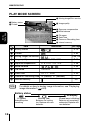
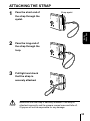
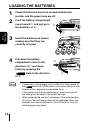
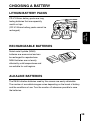
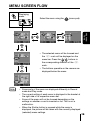
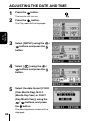
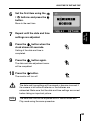
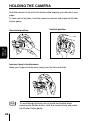
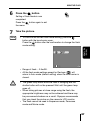
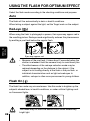
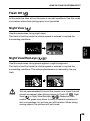
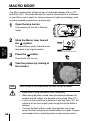
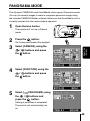
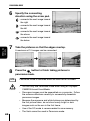
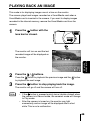
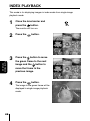
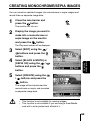
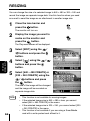
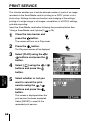
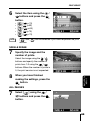
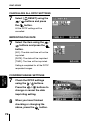
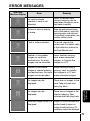
DIGITAL CAMERA
C-100
D-370
CAMERA
OPERATION
OPERATION MANUAL
● Thank you for purchasing an Olympus digital camera.
● Please read this manual carefully before using your camera. We recommend
that you check that your camera is functioning correctly by taking a number
of test shots.
INTRODUCTION
This manual explains the correct operating procedures for your camera.
Read it carefully and keep it in a safe place for future reference.
ABOUT THIS MANUAL
● The contents of this publication are subject to change without notice. For
the latest information, contact Olympus representative.
● Considerable care was taken in preparing this manual. If, however, you
have any questions or note any errors or omissions, please contact
Olympus representative.
● Duplication of this manual, in whole or in part, other than for personal
use, without the prior permission of Olympus is prohibited. Reproduction
without permission is strictly prohibited.
● Olympus assumes no liability for any damages, loss of profit or claims by
a third party arising from inappropriate use of this product.
● Olympus assumes no liability for any damages, loss of profit, etc. arising
from loss of image data due to repairs by a third party not approved by
Olympus, or any other cause.
● The quality of images recorded with this camera differs from the quality of
photographs taken with an ordinary film-type camera.
Copyright 2001 OLYMPUS OPTICAL Co., Ltd.
TRADEMARKS
All brand names and product names mentioned in this manual are
trademarks and/or registered trademarks of their respective owners.
ABOUT THE CAMERA FILE SYSTEM
The camera file system is the DCF (Design rule for Camera File) system
established by the Japan Electronics and Information Technology Industries
Association (JEITA).
2
INDEX
4
PREPARATIONS
7
OTHER FUNCTIONS
56
TROUBLESHOOTING
71
TROUBLE–
SHOOTING
45
OTHER
FUNCTIONS
PLAYING BACK PICTURES
PLAYINGBACK
PICTURES
22
TAKING
PICTURES
TAKING PICTURES
PREPARA–
TIONS
CONTENTS
3
CONTENTS
★ This symbol indicates pages recommended for reading by first-time users.
Introduction .......................................................................................... 2
Index .................................................................................................... 3
Contents .............................................................................................. 4
PREPARATIONS
7
Names of parts ★ ............................................................................... 7
Monitor display ..................................................................................... 9
Attaching the strap ★ ........................................................................ 11
Loading the batteries ★ .................................................................... 12
Choosing a battery ............................................................................ 13
Using the AC adapter (optional) ........................................................ 15
Using a SmartMedia card (optional) .................................................. 16
Turning the camera on/off ★ ............................................................. 18
Menu screen flow ............................................................................... 19
Adjusting the date and time ★ .......................................................... 20
TAKING PICTURES
22
Holding the camera ★ ...................................................................... 22
Taking pictures ★ .............................................................................. 23
Using the flash ★ .............................................................................. 26
Using the flash for optimum effect ..................................................... 28
Macro mode ★ ................................................................................. 30
Selftimer ............................................................................................ 31
Digital Tele mode ............................................................................... 33
Sequence mode ................................................................................ 34
Exposure compensation .................................................................... 36
Spot metering mode .......................................................................... 38
White Balance ................................................................................... 39
4
Image quality ..................................................................................... 41
Panorama mode ................................................................................ 43
CONTENTS
PLAYING BACK PICTURES
45
Playing back an image ★ ................................................................. 45
Index playback ................................................................................... 46
Auto playback .................................................................................... 48
Close-up playback ............................................................................. 49
Erasing an image ★ .......................................................................... 50
Erasing all images ............................................................................. 51
Protecting important images ★ ......................................................... 52
Creating monochrome/sepia images ................................................. 53
Resizing ............................................................................................. 54
Rotating ............................................................................................. 55
OTHER FUNCTIONS
56
Movie mode ....................................................................................... 56
Rec view ............................................................................................ 61
Beep sound ....................................................................................... 62
Displaying image information ............................................................. 63
Adjusting the monitor brightness ....................................................... 64
Card format/Memory setup ................................................................ 65
Memory back-up ................................................................................ 67
Print service ....................................................................................... 68
TROUBLESHOOTING
71
Error messages ................................................................................. 71
Problems ............................................................................................ 72
Specifications .................................................................................... 76
Index .................................................................................................. 78
5
CONTENTS
●About symbols used in this manual
Caution
Note
Indicates important precautions that may lead to failure or
trouble and operations that should be absolutely avoided.
Indicates items that it is useful to know for effective use of
the camera.
Indicates the reference pages in this manual.
★
6
Indicates pages recommended for first-time users.
NAMES OF PARTS
● Shutter button
● Lens
PREPARA–
TIONS
● Flash
● DC-IN jack
● Connector
cover
● Lens barrier
Turns Record mode
ON/OFF
● USB connector
● Macro lever
● Selftimer lamp
7
NAMES OF PARTS
● Green lamp
● Viewfinder
● Target mark
● Card cover
PREPARA–
TIONS
● Strap eyelet
● Monitor
● Battery
compartment
cover
● Tripod socket
●
●
(Monitor) button
Use to turn Play mode
ON/OFF
8
●
(Arrow pad)
(OK/Menu) button
MONITOR DISPLAY
RECORD MODE SCREEN
1 Battery status
2 Exposure compensation
3 Flash
4 Drive
5 Spot metering
6 White balance
0 Digital tele
A Image quality
8 Internal memory
9 No. of recordable images/Recordable time
Item
Indication
Ref. Page
1
Battery status
2
Exposure compensation
3
Flash
P. 26
4
Drive
P. 31, 34, 56
5
Spot metering
P. 38
6
White balance
P. 39
7
Memory gauge
P.9
8
Internal memory
P.9
9
No. of recordable images/
12 (frames), 12"(seconds)
Recordable time
0
Digital tele
1.6×, 2.0×, 3.2×, 4.0×
P. 33
A
Image quality
SHQ, HQ, SQ1, SQ2
P. 41
Note
PREPARA–
TIONS
7 Memory gauge
P.10
+1.5, +2.0, –1.5, –2.0
P. 36
–
•
is displayed when the internal memory is used. When you
use a card,
is not displayed.
• Memory gauge changes automatically to indicate whether the
camera is ready for taking pictures or the camera is recording
pictures taken.
Memory Gauge
Shoot
Shoot
Wait
Before shooting
(goes off)
Wait
Recording
(lights)
Cannot shoot
(lights completely)
9
MONITOR DISPLAY
PLAY MODE SCREEN
3 Moving image/Print service
1 Battery status
2 Protect
4 Image quality
5 Exposure compensation
6 White balance
PREPARA–
TIONS
7 File name
8 Date/Time
9 Frame no./Recording time
0 Internal memory
Item
Indication
1
Battery status
2
Protect
3
Moving image/Print service
Ref. Page
P. 10
P. 52
P.56, 68
4
Image quality
SHQ, HQ, SQ1, SQ2
P. 41
5
Exposure compensation
+1.5, +2.0, –1.5, –2.0
P. 36
6
White balance
7
File name
100-0012
8
Date/Time
’01. 1. 1 12:00
P. 39
–
P. 20
9
Frame no./Recording time 12 (frames), 12" (seconds)
0
Internal memory
Note
–
P.9
For details on how to display image information, see “Displaying
p.63).
image information” (
Battery status
No display
Lit (green)
Adequate power
remaining
10
Blinking (red)
Batteries are running
low. Replace with new
batteries.
(Green lamp is blinking)
Batteries are completely
exhausted. Replace with
new batteries.
ATTACHING THE STRAP
Pass the short end of
the strap through the
eyelet.
2
Pass the long end of
the strap through the
loop.
3
Pull tight and check
that the strap is
securely attached.
Strap eyelet
PREPARA–
TIONS
1
Caution
Make sure that the strap is securely attached. If the strap is
attached incorrectly and the camera comes loose and falls off,
Olympus will not be responsible for any damage.
11
LOADING THE BATTERIES
1
Check that the lens barrier is closed and both the
monitor and the green lamp are off.
2
Push the battery compartment
cover toward A and pull up in
the direction of B.
A
B
PREPARA–
TIONS
3
Insert the batteries as shown,
making sure that they are
correctly oriented.
4
Pull down the battery
compartment cover in the
direction of C and close
firmly by pressing the
mark in the direction
of D.
Note
12
D
C
• If the battery compartment cover is difficult to close, press on
mark and [OPEN] mark on the cover with your both
the
thumbs without applying unreasonable force.
• If the camera is left without batteries for about one hour, all
the settings will be reset to the default settings.
• When powering the camera by batteries, if the batteries start
to run low, the red battery status will be displayed. When the
batteries are close to exhaustion, the LCD monitor turns off
and the green lamp blinks.
CHOOSING A BATTERY
LITHIUM BATTERY PACKS
CR-V3 lithium battery packs are long
lasting batteries that are especially
useful on trips.
(CR-V3 lithium battery packs cannot be
recharged.)
PREPARA–
TIONS
RECHARGEABLE BATTERIES
Nickel metal hydride (NiMH)
batteries are economical and can
be recharged for repeated use.
NiMH batteries are not easily
affected by cold temperatures and
are suitable for cold regions.
ALKALINE BATTERIES
The R6/AA alkaline batteries used by this camera are easily obtainable.
The number of recordable images varies depending on the brand of battery
and the conditions of use. Turn the monitor off whenever possible to save
the batteries.
13
CHOOSING A BATTERY
Caution
• Do not use manganese batteries.
• Do not use the following batteries:
● Batteries whose insulating
cover is not completely intact.
--------------------------------------------------PREPARA–
TIONS
● Batteries whose (–) terminal
protrudes but has no
insulating cover.
---------------------------------------------------
● Batteries whose (–) terminal
is flat. (Do not use such
batteries, regardless of
whether the insulating cover
is intact or not.)
14
USING THE AC ADAPTER (OPTIONAL)
The optional Olympus CAMEDIA AC
adapter (C-7AU, 6V) enables you to
AC adapter
power the camera from a household
electrical outlet.
Power source
Camera
• If you use batteries to power the camera while the camera is
turned on for long periods of time (such as when downloading
images to a computer), the batteries may run out, resulting in
loss of image data.
Olympus recommends that you use an AC adapter when the
camera will be turned on for long periods of time.
• Do not connect or disconnect the AC adapter when the
camera is turned on as this may affect the camera settings.
• Never connect or disconnect the AC adapter while the green
lamp is blinking.
PREPARA–
TIONS
Caution
15
USING A SMARTMEDIA CARD (OPTIONAL)
A SmartMedia card should be used if you need to store a large number of
pictures. This camera only accepts SmartMedia removable memory. If you
insert a SmartMedia card, the image will be stored on the card and you can
playback the image with the card. If you remove the card from the camera,
the image will be stored on the internal memory and you can playback the
image with the internal memory.
PREPARA–
TIONS
1
Make sure that the lens barrier
is closed and both the
monitor and the green lamp
are off.
2
Open the card cover.
3
Insert the SmartMedia card
correctly as shown.
There is a mark showing the correct
orientation of the card on the inside
of the card cover.
Card orientation
mark
To remove the card, grasp it with your
fingertips and pull it out in the
direction shown.
16
USING A SMARTMEDIA CARD (OPTIONAL)
4
Close the card cover until it
clicks.
Caution
Non-Olympus or non-Lexar cards, or cards formatted on other
equipment, such as a PC, may not be recognized by the camera.
Format the card with the camera before using it. See “Card
format/Memory setup” (
p.65).
PREPARA–
TIONS
Note
• Never open the card cover or remove the SmartMedia card or
batteries when the camera is turned on. The data on the card
may be lost, and once lost, it cannot be restored.
• The SmartMedia card is a precision instrument. Do not
subject it to unreasonable force or impact. Do not touch the
gold-colored metal area of the card.
• Some of the camera function are ignored if a
write-protect seal is affixed to the SmartMedia
card. When you use these functions, remove the
seal from the card.
Write-protect seal
Approx. number of recordable images
Image quality
Card
memory capacity
SHQ
HQ
SQ1
Approx. 1
3
4
7
4MB
8MB
6
12
12
24
16
33
29
58
16MB
32MB
25
51
49
99
66
132
110
221
64MB
128MB
102
204
199
399
265
532
442
887
Internal memory
SQ2
17
TURNING THE CAMERA ON/OFF
WHEN TAKING PICTURES
Turning the camera on .... Open the lens barrier.
The camera will turn on in Record mode.
Turning the camera off ... Close the lens barrier.
The camera will turn off.
Camera turns on
Camera turns off
PREPARA–
TIONS
Note
• When the lens barrier is opened with no card inserted, “NO
CARD” will be displayed on the monitor. This is not a
malfunction. Use the internal memory of the camera to take
pictures.
• The camera’s mode will change to power save mode if you do
not carry out any operation for 3 minutes. To take pictures,
turn the camera on.
WHEN PLAYING BACK PICTURES
Turning the monitor on ... Press the
button with the lens barrier
closed.
The camera will turn on in Play mode and the
monitor will turn on.
Turning the monitor off ... Press the
button.
The camera and the monitor will turn off.
Camera with
Monitor turns on
Monitor turns off
the lens barrier
closed
lights up
goes off
Note
18
The camera’s mode will change to power save mode if you do
not carry out any operation for 3 minutes. To play back pictures,
turn the camera on.
MENU SCREEN FLOW
Displaying
menu
Select the menu using the
●
●
PREPARA–
TIONS
●
(arrow pad).
• The selected menu will be focused and
the v/u mark will be displayed on the
menu bar. Press the
/
buttons in
●
the corresponding direction of the v/u
mark.
Note
• The buttons operable on the camera are
displayed below the menu.
• Some parts of the menu are displayed differently in Record
mode and Play mode.
• The current setting of each menu is displayed in the bracket at
the right side of its respective menu bar.
• Some of the menu will not be focused depending on the
settings or whether a card is inserted or not. This is not a
malfunction.
• When the Shutter button is pressed while the menu is
displayed, the picture will be taken with the currently displayed
(selected) menu settings.
19
ADJUSTING THE DATE AND TIME
PREPARA–
TIONS
1
2
Press the
3
Select [SETUP] using the
button.
The monitor will turn on.
Press the
button.
The Play menu will be displayed.
buttons and press the
button.
4
Select [
] using the
/
buttons and press the
button.
5
Select the date format [Y-M-D
(Year-Month-Day), M-D-Y
(Month-Day-Year) or D-M-Y
(Day-Month-Year)] using the
/
buttons, and press
the
button.
The date adjustment screen will be
displayed.
20
/
ADJUSTING THE DATE AND TIME
6
Set the first item using the
/
buttons and press the
button.
Move to the next item.
Repeat until the date and time
settings are adjusted.
8
Press the
PREPARA–
TIONS
7
button when the
clock shows 00 seconds.
Setting of the date and time is
completed.
9
Press the
button again.
The date and time adjustment menu
will be completed.
10 Press the
button.
The monitor will turn off.
Caution
Note
The date and time settings will be erased or become incorrect if
the camera is left without batteries or the batteries are
exhausted. Make sure that the date and time settings are correct
before taking an important picture.
The date and time can be adjusted both in Record mode and
Play mode using the same procedure.
21
HOLDING THE CAMERA
Hold the camera firmly with both hands while keeping your elbows at your
sides.
To take vertical pictures, hold the camera as shown and press the Shutter
button gently.
Horizontal position
Vertical position
TAKING
PICTURES
Incorrect way to hold camera
Keep your fingers and the strap away from the lens and flash.
Note
22
To avoid blurred pictures, do not move the camera when
pressing the Shutter button. Hold the camera firmly and press
the Shutter button gently.
TAKING PICTURES
When you take a picture, the image is stored in the camera’s internal
memory. If you insert a memory card (optional), the image will be stored on
the card.
TAKING PICTURES USING THE VIEWFINDER
1
Open the lens barrier.
Slide the lens barrier open until it
clicks.
Position the subject using the
Target mark in the viewfinder.
TAKING
PICTURES
2
To take pictures at a distance of less
than 60cm (2ft.), see “Macro mode”
(
p. 30).
Green lamp
3
Press the Shutter button
halfway.
(This condition is called halfpressed.)
The green lamp next to the
viewfinder lights.
The exposure is locked while the
Shutter button is pressed halfway.
4
Press the Shutter button fully.
(This condition is called full-pressed.)
The picture is taken.
23
TAKING PICTURES
TAKING PICTURES USING THE MONITOR
1
Open the lens barrier.
2
Press the
button.
The monitor will turn on.
Press the
button again to turn the
monitor off.
TAKING
PICTURES
3
Compose the picture by looking
at the subject in the monitor.
4
Take the picture in the same
way as you would when using
the viewfinder.
See “Taking pictures using the viewfinder” (
Note
24
p. 23).
• If the green lamp blinks when the Shutter button is pressed
halfway, the flash is not fully charged. The green lamp blinks
while the camera is recording the picture taken. Wait for 2 to
40 seconds until the green lamp stops blinking.
• When the memory gauge is full, no more images can be
taken. Wait a few seconds until the memory gauge goes off
before taking any more pictures.
• When a picture is taken in bright light, such as sunlight, vertical
lines may appear on the monitor. This is not a malfunction.
• The monitor is for checking the composition only. Check the
hand jitter, focus and exposure accuracy afterwards by
displaying the image on a PC.
• It will take longer to record a picture when the monitor is used.
TAKING PICTURES
Caution
• Press the Shutter button gently. Pressing the button down hard
will cause the camera to move, resulting in a blurred picture.
• Never remove the battery or AC adapter, or open the card
cover while the green lamp is blinking. The picture you have
just taken may not be recorded and previous pictures may be
destroyed.
WHEN TO USE THE VIEWFINDER AND MONITOR
Viewfinder
Advantages
• Less risk of camera
movement
• Subject can be seen clearly
even in bright surroundings
• Little wear of batteries
Disadvantages Difference between range
seen in viewfinder and actual
recorded image when taking
subjects at close range
Monitor
When taking close-ups
of people, flowers, etc.
(approx. 25cm-60cm/
10''-2ft.)
Actual shooting range
can be accurately
checked
TAKING
PICTURES
Taking pictures When taking a lot of pictures,
such as snapshots, scenery,
etc. (approx. 60cm/2ft. - long
range)
• Risk of camera movement
• Difficult to see in bright
or dark surroundings
• Batteries soon exhausted
• The actual picture will be slightly larger than what you
see in the viewfinder.
• When shooting a subject at a close distance, there
will be a slight difference between the actual shooting
scope (as shown in hatched area on the left) and
what you see in the viewfinder.
25
USING THE FLASH
The flash automatically fires in low light and backlit conditions, but the flash
mode can be selected to suit various conditions.
1
Open the lens barrier.
2
Press the
The camera will turn on in Record
mode.
button.
The Camera menu screen will be
displayed.
TAKING
PICTURES
3
Select [CAMERA] using the
/
the
buttons and press
button.
4
Select [ ] using the
buttons and press the
button.
5
Select the flash mode from
the following using the
/
buttons: [AUTO], [
],
[ ], [
], [
] or [
].
/
See “Using the flash for optimum
effect” (
function.
26
p. 28) for details of each
USING THE FLASH
6
Press the
Press the
the menu.
7
Note
button.
Setting of flash mode is now
completed.
button again to exit
Take the picture.
• To comfirm the current flash mode setting, press the
button with the lens barrier open.
Press the
button after the confirmation to change the flash
mode setting.
TAKING
PICTURES
• Range of flash: ~ 2.5m/8ft.
• All the flash mode settings except for Red-eye (
) will
return to Auto mode (default setting) when the lens barrier is
closed.
Caution
• The green lamp blinks while the flash is charging and the
shutter button will not be pressed. Wait until the green lamp
goes off.
• When taking pictures at close range using the flash, the
appropriate brightness may not be achieved and there may
be pronounced shadows as a result. Olympus recommends
that you check the picture on the camera’s LCD monitor.
• The flash cannot be used in Sequence mode, Panorama
mode and Movie mode.
27
USING THE FLASH FOR OPTIMUM EFFECT
Select the flash mode according to the shooting conditions and purpose.
Auto
The flash will fire automatically in dark or backlit conditions.
When taking a subject against the light, set the Target mark on the subject.
Red-eye (
)
When using the flash to photograph a person, their eyes may appear red in
the resulting picture. Red-eye mode significantly reduces this phenomenon
by emitting a pre-flash before the regular flash.
TAKING
PICTURES
Eyes may appear red
Caution
• Because of the pre-flash, it takes about 2 seconds before the
shutter is released. Hold the camera firmly to avoid hand jitter.
• The effectiveness of the red-eye reduction mode may be
reduced depending on the distance to the subject, if the
subject is not looking directly at the flash or the pre-flash, or
individual characteristics such as light-colored eyes. In
addition, red-eye is often more pronounced in young children.
Flash On ( )
The flash fires under any circumstances. Use this mode to brighten up the
subject’s shaded face, in backlit conditions, or under artificial lighting such
as fluorescent lights.
Caution
28
This mode may not have the desired effect under excessively
bright light.
USING THE FLASH FOR OPTIMUM EFFECT
Flash Off (
)
In this mode the flash will not fire even in low-light conditions. Use this mode
in situations where flash photography is not permitted.
Night View (
)
Use this mode when taking night views.
The flash is fired first while the shutter speed is reduced to capture the
surrounding conditions.
TAKING
PICTURES
Night View/Red-eye (
)
Use this mode when taking people against a night background.
The flash is fired first while the shutter speed is reduced to capture the
surrounding conditions. The red-eye phenomenon is reduced by the preflash.
Caution
You are recommended to mount the camera on a tripod to avoid
camera movement when taking pictures in Flash Off ( ), Night
) or Night View/Red-eye (
) Reduction flash
View (
modes. The green lamp blinks to warn of camera movement in
dark surroundings, but pictures can still be taken. When taking
moving objects, the pictures will be blurred.
29
MACRO MODE
Use Macro mode when taking pictures at distances between 25cm (10")
and 60cm (2ft.). This mode can also be used to take pictures at a distance
of over 60cm, and is useful for taking pictures in bright surroundings, such
as snow-covered mountains on a sunny day.
1
Open the lens barrier.
The camera will turn on in Record
mode.
2
Slide the Macro lever toward
the
symbol.
To cancel Macro mode, slide the macro
TAKING
PICTURES
lever back to its original position.
3
Press the
4
Take the picture by looking at
the monitor.
Note
Caution
30
button.
The monitor will turn on.
Macro mode is canceled when the lens barrier is closed.
• Make sure to slide the macro lever completely.
• When using the Macro mode, keep the distance between the
camera and the subject at a distance of more than 25cm (10'').
• If you try to take a picture at a distance of less than 25cm (10''), the
autofocus will not work properly even though the Shutter button is
released.
• If you use the flash in Macro mode, the brightness may not be
correct and there may be pronounced shadows as a result. Olympus
recommends that you check the picture on the camera’s monitor.
SELFTIMER
You can use the selftimer to take photographs including the photographer.
Use a tripod to keep the camera steady.
1
Open the lens barrier.
2
Press the
3
Select [CAMERA] using the
/
buttons and press
the
button.
4
Select [DRIVE] using the
buttons and press the
button.
5
Select [
the
/
The camera will turn on in Record
mode.
button.
The Camera menu screen will be
displayed.
TAKING
PICTURES
press the
/
SELF-TIMER] using
buttons and
button.
Setting of selftimer is now completed.
Press the
the menu.
button again to finish
31
SELFTIMER
6
Take the picture.
The Selftimer lamp lights for 10 sec.
and then blinks for 2 sec. before the
picture is taken.
Selftimer lamp
Note
TAKING
PICTURES
32
• The Selftimer is canceled automatically after the picture is
taken.
• To cancel the Selftimer after the Shutter button has been
pressed, shut the lens barrier off.
DIGITAL TELE MODE
This mode enables you to enlarge the image digitally to magnifications 1.6×,
2×, 3.2× and 4×.
You can only set magnifications 3.2× and 4× in SQ2 modes. See “Image
Quality” (
p. 41).
1
Open the lens barrier.
The camera will turn on in Record
mode.
2
Press the
3
Press the
/
buttons
looking at the monitor.
button.
The monitor will automatically turn
on.
TAKING
PICTURES
The magnification will change in the
sequence [1.6×] → [2.0×] → [3.2×] →
[4.0×] each time the
button is
pressed, and in the sequence [3.2×]
→ [2.0×] → [1.6×] → [No display(1.0)]
each time the
button is pressed.
4
Note
Take the picture by looking at
the monitor.
• Press the
button to turn the monitor off and cancel Digital
Tele mode.
• The pictures taken in Digital Tele mode may become coarser.
33
SEQUENCE MODE
This function enables you to take eight or more still pictures in succession (in
HQ mode) while the shutter button is pressed. It is ideal for selecting images
from a series and taking moving subjects. You can erase a frame other than
specified from a series of picture taken. See “Erasing an image” (
p. 50).
TAKING
PICTURES
1
Open the lens barrier
2
Press the
3
Select [CAMERA] using the
/
buttons, and press
the
button.
4
Select [DRIVE] using the
buttons, and press the
button.
5
Select [
the
/
press the
The camera will turn on in Record
mode.
button.
The Camera menu screen will be
displayed.
/
SEQUENCE] using
buttons and
button.
Setting of Sequence mode is now
completed.
Press the
menu.
34
button again to exit the
SEQUENCE MODE
6
Note
Press the Shutter button and keep it pressed.
Recording will stop when the shutter button is released.
TAKING
PICTURES
• Sequence mode is canceled when the lens barrier is closed.
• The flash cannot be used in this mode.
• Since the shutter speed is set to the maximum 1/30 sec. to
prevent hand jitter, the resulting picture may be darker than
usual.
• It takes a while to record the images taken in this mode.
• The number of recordable pictures will vary depending on the
image quality mode and whether a SmartMedia card is used.
If you intend to take a lot of pictures, a SmartMedia card is
recommended.
35
EXPOSURE COMPENSATION
In addition to automatic exposure, you can adjust the exposure in 0.5
gradations to ±2.
Note
1
• This mode can be used to obtain the correct exposure when
the brightness of the subject and the background varies
greatly.
• Set a [+] value to make the image brighter and a [–] value to
make it darker.
Open the lens barrier.
The camera will turn on in Record
mode.
TAKING
PICTURES
2
Press the
button.
The Camera menu screen will be
displayed.
36
3
Select [CAMERA] using the
/
buttons and press
the
button.
4
Select [
] using the
/
buttons and press the
button.
EXPOSURE COMPENSATION
5
Adjust the exposure
compensation setting using
the
/
buttons and
press the
button.
Press
[–] to make the image
darker and
[+] to make it lighter.
Setting of exposure compensation is
completed.
Press the
menu.
Take the picture.
Note
Caution
• The setting of exposure compensation will be returned to ±0.0
(default setting) when the lens barrier is closed.
• When you adjust the exposure compensation, the image
displayed on the monitor changes to the relevant brightness
setting. If it is hard to see any difference because the subject
is dark, display the recorded image on the camera’s monitor
to check the brightness.
TAKING
PICTURES
6
button again to exit the
• The desired brightness (exposure compensation) may not be
obtained if the flash is used.
• The exposure compensation values may be inadequate if the
subject is in extremely bright or extremely dark surroundings.
37
SPOT METERING MODE
When taking pictures against the light, the image will appear dark if taken
with the normal light metering setting (Digital ESP). In this case, change the
setting to Spot metering, and you can take the picture according to the
brightness in the middle of the viewfinder without it being affected by the
background light.
1
Open the lens barrier.
The camera will turn on in Record
mode.
2
Press the
button.
The Camera menu screen will be
TAKING
PICTURES
displayed.
3
Select [CAMERA] using the
/
buttons and press
the
button.
4
Select [
] using the
/
buttons and press the
button.
5
Select [
SPOT] using the
/
buttons and press
the
button.
Setting of spot metering is
completed.
Press the
menu.
6
Note
38
button again to exit the
Take the picture.
The metering mode will return to ESP mode (default setting)
when the lens barrier is closed.
WHITE BALANCE
The white balance is automatically adjusted to give a natural look, but you
can also set the white balance to suit the weather or lighting when the
desired colors are not achieved.
Note
White balance settings
Auto (AUTO) : There is no display on the monitor.
Automatically ensures natural colors.
Daylight ( ) : Ensures natural colors outside in full daylight (sunny weather).
Cloudy (
) : Ensures natural colors outside in overcast daylight (cloudy weather).
Tungsten Light ( ) :
Ensures natural colors in tungsten light.
Fluorescent Light ( ) : Ensures natural colors in fluorescent light.
Open the lens barrier.
2
Press the
The camera will turn on in Record
mode.
TAKING
PICTURES
1
button.
The Camera menu screen will be
displayed.
3
Select [PICTURE] using the
/
buttons and press
the
button.
4
Select [
] using the
/
buttons and press the
button.
39
WHITE BALANCE
5
Select the white balance
setting from the following
using the
/
buttons
and press the
button:
[AUTO], [
], [
], [
],
[
].
Setting of white balance is
completed.
Press the
menu.
TAKING
PICTURES
6
Note
Caution
40
button again to exit the
Take the picture.
• The white balance setting will return to [AUTO] (default
setting) when the lens barrier is closed.
• Natural colors are hard to obtain under a mixture of artificial
and natural lighting or under fluorescent lights, etc.
] to obtain colors close to those under tungsten
• Select [
light.
• The white balance may not function under special lighting.
• Check that the setting is the optimum setting by displaying the
image on the monitor and checking the colors.
IMAGE QUALITY
Select the desired image quality.
Note
Image quality settings
For clear prints, large prints, and
SHQ
processing on a PC
(Super High Quality)
(1280 × 960 pixels*)
For viewing images on a PC or making
HQ
prints
(High Quality)
(1280 × 960 pixels*)
For e-mail attachments or taking a lot of
SQ
pictures
(Standard Quality) SQ1 (1024 × 768 pixels*)
SQ2 (640 × 480 pixels*)
1
Open the lens barrier.
2
Press the
3
Select [PICTURE] using the
/
buttons and press
the
button.
4
Select [
] using the
/
buttons and press the
button.
The camera will turn on in Record
mode.
TAKING
PICTURES
* Pixel is the unit used to represent the image size.
button.
Tne Camera menu screen will be
displayed.
41
IMAGE QUALITY
5
Select the image quality from
the following using the
/
buttons and press the
button: [SHQ 1280 × 960], [HQ
1280 × 960], [SQ1 1024 × 768]
or [SQ2 640 × 480].
Setting of image quality is completed.
Press the
button again to exit the
menu.
TAKING
PICTURES
6
Note
Take the picture.
• The image quality setting will remain even when the lens
barrier is closed.
• The number of recordable images varies depending on the
image quality setting and the storage method used. (The
camera’s internal memory capacity is 1MB, SmartMedia cards
are currently available in 8MB to 128 MB capacities.)
• The number of pixels is the same for HQ and SHQ, but the
compression rate is lower for SHQ, resulting in a clearer
image when enlarged. SHQ also requires more time to record
and play back images than HQ.
• When you change to a high image quality and the remaining
recordable image count is low, the internal memory or
SmartMedia card warning mark may be displayed. This
indicates that there is insufficient memory space. If this
happens, select a different
image quality.
Warning mark
42
PANORAMA MODE
The Olympus CAMEDIA brand SmartMedia cards support Panorama mode.
You can join several images to make a composite panorama image using
the included CAMEDIA Master software. Make sure the SmartMedia card is
correctly inserted into the camera before operation.
1
Open the lens barrier.
2
3
Press the
The camera will turn on in Record
mode.
button.
The Camera menu screen will be displayed.
4
Select [FUNCTION] using the
/
buttons and press
the
button.
5
Select [
PANORAMA] using
the
/
buttons and
press the
button.
TAKING
PICTURES
Select [CAMERA] using the
/
buttons and press
the
button.
Setting of panorama is completed.
The monitor will automatically turn
on.
43
PANORAMA MODE
6
Specify the connecting
direction using the arrow pad.
: connects the next image toward
the right
: connects the next image toward
the left
: connects the next image toward
the above
: connects the next image toward
the below
TAKING
PICTURES
7
A maximum of 10 images can be connected.
➜
8
Note
Caution
44
Take the pictures so that the edges overlap.
➜
Press the
button to finish taking pictures in
panorama mode.
Panorama mode is canceled when the lens barrier is closed.
• You can only use Panorama mode when using an Olympus
CAMEDIA brand SmartMedia.
• Panorama images must be assembled on a computer. Follow
the software directions carefully to successfully assemble
panorama images.
• Because the exposure and white balance are determined by
the first picture taken, do not shoot overly bright or dark
images such as the sun in the first frame.
• Use of the SQ mode is recommended to save memory.
• The flash cannot be used in Panorama mode.
PLAYING BACK AN IMAGE
This mode is for displaying images one at a time on the monitor.
The camera plays back images recorded on a SmartMedia card when a
SmartMedia card is inserted in the camera. If you want to display images
recorded in the internal memory, remove the SmartMedia card from the
camera.
1
Press the
button with the
lens barrier closed.
The monitor will turn on and the last
recorded image will be displayed on
the monitor.
PLAYINGBACK
PICTURES
2
Press the
Press the
/
buttons.
button to playback the previous image and the
button
to playback the next image.
3
Note
Press the
button to stop playing back the image.
The monitor will go off and the camera will turn off.
• If the
button is pressed quickly twice (double-clicked) when
the camera is in Record mode, the camera’s mode will change
to Play mode.
• After the camera is turned on, the monitor may light
momentarily and an image will be displayed after a short
while. This is not a malfunction.
45
INDEX PLAYBACK
This mode is for displaying images in index mode from single-image
playback mode.
1
Close the lens barrier and
press the
button.
The monitor will turn on.
PLAYINGBACK
PICTURES
2
Press the
3
Press the
button to move
the green frame to the next
image and the
button to
move the frame to the
previous image.
4
Press the
button.
The image in the green frame will be
displayed in single-image playback
mode.
46
button.
INDEX PLAYBACK
Changing the number of images in the index playback
Select the number of images in the index playback from 4, 9 or 16.
1
Close the lens barrier and
press the
button.
The monitor will turn on.
2
Press the
button.
The Play menu screen will be
displayed.
Select [PLAY] using the
buttons and press the
button.
/
4
Select [
] using the
buttons and press the
button.
/
5
Select the number of images
[4], [9] or [16] using the
/
PLAYINGBACK
PICTURES
3
buttons and press the
button.
Setting of the number of images in
the index playback is completed.
Press the
button again to exit the
menu.
47
AUTO PLAYBACK
1
Close the lens barrier and
press the
button.
The monitor will turn on.
PLAYINGBACK
PICTURES
2
Press the
3
Select [PLAY] using the
buttons and press the
button.
4
Select [
] using the
/
buttons and press the
button.
5
Select [START] using the
buttons and press the
button.
button.
The Play menu screen will be
displayed.
/
/
Auto Playback will start. Each image
will be played back for 3 sec. starting
from the image after the one
currently displayed.
To cancel Auto Playback, press the
button.
Note
48
If you display the Play menu while an image marked by the
Moving Image ( ) symbol is being played, you cannot select
]. Display a still picture first.
[
CLOSE-UP PLAYBACK
Images can be played back in 4 stages of magnification: 1.5×, 2×, 2.5× and
3×. This function is convenient when you want to check the details of the
picture taken.
1
Close the lens barrier and
press the
button.
The monitor will turn on.
2
Press the
button.
The image will be magnified in the
sequence [1.5×] → [2.0×] → [2.5×] →
button is
[3.0×] each time the
pressed.
Press the
button on the
close-up playback screen to
enable scroll mode.
Scroll up or down, left or right using
the
/
/
/
PLAYINGBACK
PICTURES
3
buttons to
display the area you want to see.
Press the
button again to exit
scroll mode.
4
Note
Press the
button after
exiting scroll mode to return
to the 1× single-image
playback screen.
The above operation cannot be performed while an image
marked by the Moving Image ( ) symbol is displayed. Display a
still picture first.
49
ERASING AN IMAGE
1
Close the lens barrier and
press the
button.
The monitor will turn on.
2
3
Display the image you want to erase.
See “Playing back an image” (
Press the
p. 45).
button.
The Play menu screen will be
displayed.
PLAYINGBACK
PICTURES
4
Select [PLAY] using the
buttons and press the
button.
5
Select [
] using the
buttons and press the
button.
/
6
Select [
] using the
buttons and press the
button.
/
/
The image will be erased.
Caution
50
• You can also move to the erase menu by keeping the
button pressed for at least 1 second while the image you want
to erase is displayed.
• If the image you want to erase is protected or a write-protect
seal is affixed to the SmartMedia card, the image cannot be
erased. Unprotect the image or remove the write-protect seal
on the SmartMedia card before attempting to erase the image.
• Erased images cannot be restored. Before erasing an image,
be sure that you are not erasing important data.
ERASING ALL IMAGES
You can erase all the images in the internal memory or on the SmartMedia card.
Caution
1
• When erasing images in the internal memory, do not insert a
SmartMedia card.
• When erasing images on a SmartMedia card, insert the card
first.
Close the lens barrier and
press the
button.
The monitor will turn on.
2
3
button.
The Play menu screen will be displayed.
Select [SETUP] using the
/
buttons and press the
button.
Select [
] or [
] using the
/
buttons and press
the
button.
5
Select [
ALL ERASE ]
using the
/
buttons
and press the
button.
6
Select [
] using the
/
buttons and press the
button.
All the images will be erased.
Caution
(When not using a SmartMedia
card)
PLAYINGBACK
PICTURES
4
Press the
(When not using a SmartMedia card)
• Protected images will not be erased.
• If a write-protect seal is affixed to the SmartMedia card, the
images on the card cannot be erased.
• Erased images cannot be restored. Before erasing, make sure
that you are not erasing important data.
51
PROTECTING IMPORTANT IMAGES
1
Close the lens barrier and
press the
button.
The monitor will turn on.
2
Display the image you want to protect.
3
Press the
4
Select [PLAY] using the
/
buttons and press the
button.
Select [
] using the
/
buttons and press the
button.
5
PLAYINGBACK
PICTURES
6
See “Playing back an image” (
p. 45).
button.
The Play menu screen will be displayed.
Select [ON] using the
buttons and press the
button.
/
The image will be protected.
To cancel the protect setting, select
[OFF].
Note
Caution
52
• You can also protect an image by keeping the
button
pressed for at least 1 second while the image you want to
protect is displayed.
symbol.
• The protected image is indicated by a
• The protect setting is saved when the camera is turned off.
• Protected images cannot be erased by [Erasing an image] or
[Erasing all images], but will be erased by formatting the card.
• Images on a card with a write-protect seal cannot be
protected.
CREATING MONOCHROME/SEPIA IMAGES
You can transform selected images into monochrome or sepia images and
record them as separate image data.
1
Close the lens barrier and
press the
button.
The monitor will turn on.
2
Display the image you want to
make into a monochrome or
sepia image on the monitor
and press the
button.
The Play menu screen will be displayed.
3
5
PLAYINGBACK
PICTURES
4
Select [EDIT] using the
/
buttons and press the
button.
Select [BLACK & WHITE] or
[SEPIA ON] using the
/
buttons and press the
button.
Select [CREATE] using the
/
buttons and press the
button.
The image will be transformed into
monochrome or sepia, and recorded
as separate image data.
(When creating monochrome image)
Caution
• This function is not available for moving images.
• This function is not available if you are using a SmartMedia
card with a write-protect seal affixed to it.
53
RESIZING
You can change the size of a selected image to 640 × 480 or 320 × 240 and
record the image as separate image data. Use this function when you send
an e-mail to send the image as an attachment in smaller image size.
1
Close the lens barrier and
press the
button.
The monitor will turn on.
2
Display the image you want to
resize on the monitor and
press the
button.
The Play menu screen will be displayed.
PLAYINGBACK
PICTURES
3
Select [EDIT] using the
/
buttons and press the
button.
4
Select [
] using the
buttons and press the
button.
5
Select [640 × 480 CREATE] or
[320 × 240 CREATE] using the
/
buttons and press
the
button.
/
The size of the image will be changed
and the image will be recorded as
separate image data.
Note
54
• This function is not available for moving images.
• If the selected image size is 640 × 480 or less, you cannot
select [640 × 480 CREATE] in the menu.
• If the selected image size is 320 × 240, you cannot select [320
× 240 CREATE] in the menu.
• This function is not available if you are using a SmartMedia
card with a write-protect seal affixed to it.
ROTATING
You can rotate a selected image 90 degrees clockwise or counterclockwise
and save it as a separate image. This function is useful for turning a vertical
image into a horizontal position.
1
Close the lens barrier and
press the
button.
The monitor will turn on.
2
Display the image you want to
rotate on the monitor and
press the
button.
The Play menu screen will be displayed.
Select [EDIT] using the
/
buttons and press the
button.
4
Select [
] using the
buttons and press the
button.
5
Select [+90°] or [–90°] using
the
/
buttons and
press the
button.
/
PLAYINGBACK
PICTURES
3
The image will be rotated, and the
rotated image will be recorded as
separate image data.
Caution
• This function is not available for moving images.
• This function is not available if you are using a SmartMedia
card with a write-protect seal affixed to it.
55
MOVIE MODE
RECORDING A MOVING IMAGE
In addition to still pictures, this camera has the ability to take movie pictures.
OTHER
FUNCTIONS
56
1
Open the lens barrier.
2
Press the
3
Select [CAMERA] using the
/
buttons and press
the
button.
4
Select [DRIVE] using the
buttons and press the
button.
The camera will turn on in Record
mode.
button.
The Camera menu screen will be
displayed.
/
MOVIE MODE
5
Select [
MOVIE] using the
/
buttons and press
the
button.
Setting of Movie mode is completed
and the monitor will automatically
turn on.
Press the
button again to exit
the menu.
6
Record the moving image by
looking at the monitor. (Press
the Shutter button to start
recording moving images.
Recording stops when the
Shutter button is pressed
again.)
The recordable time is displayed on
the monitor.
OTHER
FUNCTIONS
Recordable time
Note
• Movie mode is canceled when the monitor is turned off by
pressing the
button.
• The flash cannot be used in Movie mode.
• It takes a while to record the images taken in this mode.
• The recordable time will vary depending on whether a
SmartMedia card is used.
• Sound cannot be recorded.
57
MOVIE MODE
CHANGING THE QUALITY AND SIZE OF A MOVING IMAGE
There are two image quality settings (HQ and SQ) that can be used to
record moving images.
1
Select Movie mode and press
the
button.
The Camera menu screen will be
displayed.
Select [PICTURE] using the
/
buttons and press
the
button.
3
Select [
] using the
/
buttons and press the
button.
4
Select [HQ 320 × 240] or [SQ
160 × 120] using the
/
buttons and press the
button.
OTHER
FUNCTIONS
2
Setting of image quality is completed.
Press the
button again to exit the
menu.
5
58
Record the moving image.
MOVIE MODE
PLAYING BACK MOVING IMAGES
1
Close the lens barrier and
press the
button.
The monitor will turn on.
2
Display the desired image
with the
symbol indicated
and press the
button.
The Play menu screen will be displayed.
3
Select [PLAY] using the
buttons and press the
button.
4
Select [
] using the
buttons and press the
button.
5
Select [START] using the
buttons and press the
button.
/
/
/
OTHER
FUNCTIONS
The moving image will be played
back.
To cancel the moving image
playback, press the
button.
59
MOVIE MODE
TO PAUSE PLAYING BACK MOVING IMAGE
Press any button of the
to activate Pause status.
(arrow pad) during playback of a moving image
OPERATION DURING PAUSE STATUS
The following buttons can be operated while the moving image is in Pause
status.
OTHER
FUNCTIONS
60
Press
button
Playback resumes
Keep
button
Fast forward
Press
button
Rewind
Keep
button
Fast rewind
Press
button First frame of moving image is displayed
Press
button
Last frame of moving image is displayed
REC VIEW
After each picture is taken, you can confirm the image on the LCD monitor.
1
Open the lens barrier.
2
Press the
The camera will turn on in Record
mode.
button.
The Camera menu screen will be
displayed.
3
Select [SETUP] using the
4
Select [REC VIEW] using the
/
buttons and press
the
button.
5
Select [ON] using the
/
buttons and press the
button.
/
buttons and press the
button.
after shooting is completed. →
Straight to image confirmation
OTHER
FUNCTIONS
ON: The last image taken is displayed
OFF:The screen for shooting the next
picture is displayed immediately
after shooting is completed. →
Straight to next shooting
Setting of Rec View is completed.
Press the
button again to exit the menu.
Note
The Rec View mode is saved when the camera is turned off.
61
BEEP SOUND
This function enables you to turn off the beep sound.
1
Open the lens barrier.
2
Press the
3
Select [SETUP] using the
buttons and press the
button.
4
Select [
] using the
/
buttons and press the
button.
5
Select [OFF] using the
button.
The Camera menu screen will be
displayed.
/
/
buttons and press the
OTHER
FUNCTIONS
button.
The beep sound will be turned off.
Press the
menu.
Note
62
The camera will turn on in Record
mode.
button again to exit the
• The beep sound setting is not cancelled when the camera is
turned off.
• You can also set the beep sound from the Play menu.
DISPLAYING IMAGE INFORMATION
This function enables you to set display or non-display of image information
on the monitor while the image is played back. If you enable this function,
this information will be displayed for 5 seconds. For details of the items
displayed, see “Play mode screen” (
p.10).
Image data display ON
1
Image data display OFF
Close the lens barrier and
press the
button.
The camera will turn on in Play mode.
2
3
Press the
Select [PLAY] using the
buttons and press the
button.
/
4
Select [INFO] using the
buttons and press the
button.
/
5
Select [ON] using the
buttons and press the
button.
button.
The Play menu screen will be displayed.
OTHER
FUNCTIONS
/
The image information will be
displayed on the playback screen.
Press the
menu.
Note
button again to exit the
The image information setting will return to OFF (default setting)
when the camera is turned off.
63
ADJUSTING THE MONITOR BRIGHTNESS
1
Open the lens barrier.
2
Press the
3
Select [SETUP] using the
buttons and press the
button.
4
Select [
] using the
/
buttons and press the
button.
5
Adjust the brightness of the
monitor using the
/
buttons and press the
button.
The camera will turn on in Record
mode.
/
OTHER
FUNCTIONS
Press the
button to make the
monitor brighter and the
button
to make it darker.
6
Press the
Note
button.
Setting of monitor brightness is now completed.
Press the
64
button.
The Camera menu screen will be
displayed.
button again to to exit the menu.
• The setting is not cancelled when the lens barrier is closed.
• You can also set the monitor brightness from the Play menu.
CARD FORMAT/MEMORY SETUP
This function enables you to format the SmartMedia card or internal
memory. Any images on the card or in the memory will be erased when the
card or memory is formatted.
Caution
1
• When formatting the internal memory, do not insert a
SmartMedia card.
• When formatting a SmartMedia card, insert the card first.
• Before using a non-Olympus SmartMedia card or a card
formatted on a PC, format the card on the camera first.
Olympus CAMEDIA brand SmartMedia cards do not require
formatting.
Close the lens barrier and
press the
button.
The camera will turn on in Play mode.
2
Press the
3
Select [SETUP] using the
buttons and press the
button.
button.
The Play menu screen will be
displayed.
/
OTHER
FUNCTIONS
(When formatting a SmartMedia card)
4
To format the card, select
[ ] using the
/
buttons
and press the button.
To format the internal memory,
] using the
/
select [
buttons and press the
button.
(When formatting a SmartMedia card)
65
CARD FORMAT/MEMORY SETUP
5
Select [
FORMAT] using the
/
buttons and press
the
button.
6
Select [
FORMAT] using the
/
buttons and press
the
button.
(When formatting a SmartMedia card)
The card or internal memory will be
formatted.
Note
OTHER
FUNCTIONS
66
Caution
You can also format a card or the internal memory from the
Camera menu.
• All protected images will be erased. Once formatted, the
SmartMedia card or internal memory cannot be restored.
• If an Olympus template card is formatted, all the card
functions will be lost. For details, refer to the instruction
manual for the card.
• Cards with a write-protect seal affixed to them cannot be
formatted. Remove the seal before formatting the card. Do not
re-use seals.
MEMORY BACK-UP
This function enables you to copy (backup) all image data recorded in the
internal memory onto a SmartMedia card. Prepare a SmartMedia card and
insert it before following the procedure below.
1
Close the lens barrier and
press the
button.
The camera will turn on in Play mode.
2
3
Press the
Select [SETUP] using the
buttons and press the
button.
/
4
Select [
] using the
buttons and press the
button.
/
5
Select [
the
/
press the
button.
The Play menu screen will be displayed.
BACKUP] using
buttons and
button.
OTHER
FUNCTIONS
All the images in the internal memory
will be copied onto the card.
67
PRINT SERVICE
This function enables you to set the desired number of prints of an image
recorded on the SmartMedia card for printing on a DPOF printer or at a
photo shop. Settings include confirmation and changing of the settings,
printing of a single image or all images, cancellation of all DPOF settings,
and date imprinting.
Insert the SmartMedia card before following the procedure below. See
“Using a SmartMedia card (optional)” (
1
p.16).
Close the lens barrier and
press the
button.
The camera will turn on in Play mode.
OTHER
FUNCTIONS
2
Press the
3
Select [PLAY] using the
buttons and press the
button.
4
Select [
] using the
buttons and press the
button.
5
Select whether or not you
want to cancel the print
service using the
/
buttons and press the
button.
button.
The Play menu screen will be displayed.
/
/
This screen is displayed when the
print service has been requested.
Select [RESET] to reset all the
requested print service.
68
PRINT SERVICE
6
Select the item using the
buttons and press the
button.
•
•
•
•
•
Note
[
[
[
[
[
](
](
](
](
](
/
p.70)
p.69)
p.69)
p.70)
p.70)
[
] and [
service.
] can be selected if you have requested the print
SINGLE IMAGE
7
Specify the image and the
number of prints.
Select the image using the
/
buttons and specify the number of
/
prints from 1-9 using the
buttons. When the number of prints is
0, the print service is not requested.
When you have finished
making the settings, press the
button.
OTHER
FUNCTIONS
8
ALL IMAGES
7
Select [
] using the
/
buttons and press the
button.
69
PRINT SERVICE
CANCELLING ALL DPOF SETTINGS
7
Select [
RESET] using the
/
buttons and press
the
button.
All the DPOF settings will be
cancelled.
IMPRINTING THE DATE
7
Select the item using the
buttons and press the
button.
/
[NO] : The date and time will not be
imprinted.
[DATE] : The date will be imprinted.
[TIME] : The time will be imprinted.
Setting is completed for all the DPOF
requested images.
CONFIRM/CHANGE SETTINGS
OTHER
FUNCTIONS
70
7
Check the DPOF settings
using the
/
buttons.
Press the
/
buttons to
change or cancel the date
imprinting setting.
8
When you have finished
checking or changing the
above, press the
button.
ERROR MESSAGES
Warning/
Monitor display
Error
Remedy
Insert or reinsert card.
Internal memory can be
used even though no card
has been inserted.
Failure to record, display
or erase.
Wipe the gold-colored metal
area of the memory card with
cleaning paper and reformat.
If formatting is impossible, use
another memory card.
Card is write-protected.
To record, remove the
protect seal. For details, refer
to the instruction manual for
the SmartMedia card.
Number of recordable
images on card has
reached zero. No more
images can be recorded.
Insert another memory
card, erase unwanted
images, or transfer the
images to a PC.
Number of recordable
images in internal memory
has reached zero. No more
images can be recorded.
Make a backup using a
memory card, or transfer
the images to a PC and
erase unwanted images.
No images can be
displayed.
There are no images in the
card. Take pictures and
then play back.
No images can be
displayed.
There are no images in the
internal memory. Take
pictures and then play back.
TROUBLE–
SHOOTING
No card has been
inserted or card is not
detected.
Selected image cannot be Images on a card recorded with
another brand of camera or
displayed.
images transferred from a PC
sometimes cannot be displayed.
71
PROBLEMS
OPERATING PROBLEMS
The camera does not work
Cause
Remedy
Power is off
Open the lens barrier and turn
the camera on.
Ref. Page
P.18
Batteries not loaded
correctly
Reload the batteries correctly.
P.12
Battery power is low
Load new batteries.
P.12
Battery performance is poor Bring batteries to room
due to cold temperatures
temperature before use.
P.12
Power has been
automatically turned off
Close lens barrier, then reopen.
P.18
Camera is connected to a
PC
The camera will not function
while connected to a PC.
—
Condensation inside
camera
Remove batteries from the
camera and let the camera dry.
—
The flash does not fire
TROUBLE–
SHOOTING
72
Cause
Remedy
Bright subject
If you want to forcibly fire the
flash, set to Flash On mode.
Ref. Page
P.28
Sequence mode, Movie
mode, or Panorama mode
is set
Flash does not fire in Sequence
mode, Movie mode, or Panorama
mode.
P.27
The monitor is hard to see
Cause
Remedy
Brightness is incorrectly
set
Adjust the brightness.
In sunlight
Block the sunlight with your hand.
Ref. Page
P.64
—
PROBLEMS
No picture is taken when the Shutter button is pressed
Cause
Remedy
Power is off
Open the lens barrier.
Ref. Page
P.18
Flash has not finished
charging, or previous
picture is being processed
Release Shutter button and wait
until green lamp stops blinking.
P.26
Internal memory capacity
or card capacity is full
Erase unwanted images, transfer
the images to a PC, or insert a
new card.
P.16, 50
Batteries run out during
recording or while writing
data on card
Change the batteries. (If green
lamp is blinking, wait until
recording is finished.)
P.12
Write-protected seal on
card
Insert new card or remove the
seal.
P.17
Images cannot be displayed on the monitor
Cause
Remedy
Power is off
Close the lens barrier, press the
monitor button and turn the
monitor on.
Ref. Page
P.18
No images recorded on
internal memory or card
Record images and then
playback.
P.23
Cannot protect image, erase single or all images, or format card
Cause
Remedy
Ref. Page
P.17
TROUBLE–
SHOOTING
Write-protect seal is affixed Remove seal before using card.
Do not use the seal again.
to card
73
PROBLEMS
IMAGE FINISH IS POOR
Finished image is too bright
Cause
Remedy
Flash mode is set to Flash
On
Close the lens barrier and set the
flash mode to Auto or Flash Off.
Ref. Page
P.28
Subject is too bright
Adjust the exposure compensation
or change the camera position
toward the subject.
P.36
The picture is too dark
Cause
Remedy
Flash was blocked by
finger
Hold the camera correctly.
Ref. Page
P.22
Subject is out of range of
flash
Take the picture within 2.5m (8ft.)
P.26
Subject is too small and
backlit
Set the flash to Flash On.
P.28
The colors of pictures taken indoors look unnatural
TROUBLE–
SHOOTING
74
Cause
Remedy
Picture is affected by color
of lights
Set the flash mode to Flash On.
Ref. Page
P.28
Subject is mostly dark
Include a white object in the
composition or adjust the white
balance to suit the lighting.
P.39
White balance setting is
incorrect
Adjust the white balance to suit
the lighting.
P.39
PROBLEMS
Part of the image is obscured
Cause
Remedy
Lens was partly blocked by
finger or strap
Hold the camera correctly.
Ref. Page
P.22
Shooting distance is too
close
Check the composition of the
picture on the monitor before
taking the picture.
P.24
The picture is out of focus
Cause
Remedy
The camera moved when
the Shutter button was
pressed (hand jitter)
Hold the camera correctly and
press the Shutter button gently.
Lens is dirty
Clean the lens with a lens blower
and wipe gently with lens
cleaning paper.
—
Macro mode was not used
correctly
Use Macro mode when the
subject is within the range of 2560cm (10"-2ft.).
P.30
Shutter button was pressed
while standing right in front
of camera in Selftimer
mode
Press the Shutter button while
looking into the viewfinder, not
while standing in front of the
camera.
P.32
Flash was set to Flash Off As the shutter speed is slow and
in situation requiring use of a longer exposure time is
flash
needed, use a tripod or hold the
camera firmly.
Ref. Page
P.22, 23
P.22, 28
TROUBLE–
SHOOTING
75
SPECIFICATIONS
Product type:
Recording system:
TROUBLE–
SHOOTING
76
Digital camera (for recording and displaying)
Digital recording, compatible with JPEG
(based on DCF) and DPOF
Recording media:
Internal memory 1MB, SmartMedia card
(4MB, 8MB, 16MB, 32MB, 64MB, 128MB)
No. of recordable frames: SHQ/Approx. 1, HQ/Approx. 3,
SQ1/Approx. 4, SQ2/Approx. 7
(When using internal memory)
Sequence mode:
1.3 frames/second, 8 or more (HQ)
Erase:
Single-frame erase/All frames erase
Image pickup element:
1/3.2 inch CCD solid-state image pickup
1,310,000 pixels (gross)
Recording image:
1280 × 960 pixels (SHQ/HQ mode)
1024 × 768 pixels (SQ1 mode)
640 × 480 pixels (SQ2 mode)
White balance:
Full auto TTL
Preset (daylight, cloudy, tungsten light,
fluorescent light)
Lens:
Olympus lens 4.5mm, F4, 5 elements,
5 groups
(equivalent to 35mm lens on 35mm camera)
Photometric system:
Digital ESP metering system by image pickup
element
Exposure control system: Programmed auto exposure
Aperture:
F4, F8
1 ~ 1/1000 sec. (used with mechanical shutter)
Shutter*:
*Manual setting not available
Shooting range:
0.6m ~ ∞ (Standard mode)
0.25m ~ ∞ (Macro mode)
Viewfinder:
Optical real image viewfinder (Target mark),
LCD monitor
LCD monitor:
1.5 inch TFT color LCD display
No. of pixels:
Approx. 114,000 pixels
On-screen display:
Date/Time, frame number, protect, image
quality, battery level, file number, print service,
menu, etc.
SPECIFICATIONS
Flash charging time:
Design and specifications are subject to change without notice or obligation
on the part of the manufacturer.
TROUBLE–
SHOOTING
Less than approx. 6 sec. (at normal
temperature with new battery)
Flash shooting range:
~ 2.5m/8ft. (ISO100)
Flash modes:
Auto (automatic flash activation in low light
and backlight), red-eye reduction, flash off,
flash on, night view, night view/red-eye
Focus:
Pan-focus
Selftimer:
Approx. 12 sec. delay
External connector:
DC-IN jack, data INPUT/OUTPUT jack (USB)
Date and time:
Recorded with image data simultaneously
Automatic calendar function: Automatic adjustment in range of 1981 ~ 2031
Calendar power source:
Backup by built-in capacitor
Card function:
DPOF-compatible print service,
Panorama assembly (when an Olympus
standard card is used)
Operating environment
Temperature:
0 ~ 40°C/32 ~ 104°F (operation)
–20 ~ 60°C/–4 ~ 140°F (storage)
Humidity:
30 ~ 90% (operation)
10 ~ 90% (storage)
Power supply:
Four R6/AA alkaline batteries, R6/AA nickel
metal hydride batteries or R6/AA NiCd
batteries. Or two CR-V3 lithium battery packs
(LB-01 manufactured by Olympus), or optional
AC adapter.
R6/AA manganese batteries cannot be used.
Dimensions:
123(W) × 65(H) × 44.5(D) mm
(4.8"(W) × 2.6"(H) × 1.8"(D))
(not including protrusions)
Weight:
190g/0.4lb (without batteries/card)
77
INDEX
A
AC adapter .................................. 15
Alkaline batteries ......................... 13
Arrow pad ...................................... 8
Auto playback .............................. 48
B
Batteries ...................................... 12
Battery compartment cover ........... 8
Battery status .......................... 9, 10
Beep sound ................................. 62
C
Card ............................................ 16
Card format ................................. 65
Close-up playback ....................... 49
Cloudy ......................................... 39
Connector cover ............................ 7
D
Date/Time ................................... 10
Daylight ....................................... 39
DC-IN jack ..................................... 7
Digital ESP .................................. 38
Digital Tele mode ......................... 33
Drive .............................................. 9
TROUBLE–
SHOOTING
78
E
Erasing all images ....................... 51
Erasing an image ........................ 50
Exposure compensation ............. 36
F
File name .................................... 10
Flash ............................................. 7
Flash Off ..................................... 29
Flash On .....................................
Fluorescent light ..........................
Format .........................................
Frame no./Recording time ...........
28
39
65
10
G
Green lamp ................................... 8
H
HQ ............................................... 41
I
Image information ....................... 63
Image quality ............................... 41
Index playback ............................ 46
Internal memory ............................ 9
L
Lens .............................................. 7
Lens barrier ................................... 7
Light metering ............................. 38
Lithium battery ............................ 13
M
Macro lever ................................... 7
Macro mode ................................ 30
Memory back-up ......................... 67
Memory gauge .............................. 9
Memory setup ............................. 65
Monitor .......................................... 8
Monitor brightness ...................... 64
Monitor button ............................... 8
Monochrome ............................... 53
Movie mode ................................ 56
Moving image .............................. 56
INDEX
N
Night View ................................... 29
Night View/Red-eye ..................... 29
No. of recordable images/Recordable time ... 9
Number of recordable images ..... 17
O
OK/Menu button ............................ 8
P
Panorama mode ..........................
Play mode screen .......................
Playing back an image ................
Print service ................................
Protecting ....................................
T
Target mark ................................... 8
Tripod socket ................................. 8
Tungsten Light ............................. 39
U
USB connector .............................. 7
V
Viewfinder ..................................... 8
43
10
45
68
52
W
White Balance ............................. 39
Write-protected seal .................... 17
R
Rec view ..................................... 61
Rechargeable batteries ............... 13
Record mode screen ..................... 9
Red-eye ....................................... 28
Resizing ...................................... 54
Rotating ....................................... 55
TROUBLE–
SHOOTING
S
Selftimer ...................................... 31
Selftimer lamp ............................... 7
Sepia ........................................... 53
Sequence mode .......................... 34
SHQ ............................................ 41
Shutter button ............................... 7
SmartMedia card ........................ 16
Spot metering .............................. 38
SQ1 ............................................. 41
SQ2 ............................................. 41
Strap eyelet ................................... 8
79