1
Modern Classic SLRs Series :
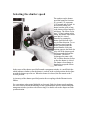
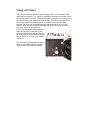
Nikon F - Camera Instruction Manual
Forewards
The Nikon F offers the quality performance, handling convenience and
versatility you need for truly professional shooting. To get the best results
from your camera, a thorough familiarity with its operation is essential. Study
the instructions carefully and practice using the controls before loading any
film in the camera. Keep this booklet handy for ready reference until you have
mastered its basics. Follow the instructions for camera care givenand your
Nikon F will always be ready for superlative picture-taking situation.
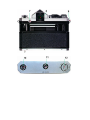
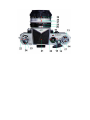
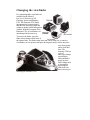
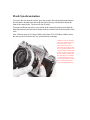
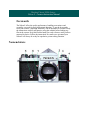
Nomenclature
1. Depth-of-field preview button Press to preview how much background or foreground is in
or out of focus.
2. Black dot For alignment with the black dot on the lens barrel when removing the lens.
3. Lens release button Unlocks the lens for removing or changing lenses.
4. Flash terminal Accepts synchro cord for electronic flash or flash units other than Nikon
BC-7.
5. Self-timer Can be set for picture-taking delay up to 10 seconds.
6. Mirror lock knob Locks the mirror up out of the way for use with Fisheye Nikkors.
7. Finder release button For removing the interchangeable viewEinder and focusing screen.
8. Finder eyepiece Permits comfortable viewing of the entire viewfinder screen, even for
eyeglass wearers.
9. Neck strap eyelet
10. Film-speed reminder dial Can be set for color or black-and-white, speeds from ASA
25-1600 as a reminder of the type of film loaded in the camera.
11. Tripod socket Threaded to accept standard tripod screw.
12. Lock For removing and replacing camera back.
13. Frame counter Indicates the number of frames exposed.
14. Film-load reminder Can be set to show whether film loaded is a 20- or 36-exposure roll.
15. Film-advance lever Advances the film, cocks the shutter and operates the frame counter.
16. Shutter release button (With screw thread for cable release).
17. A-R ring Sets for film advance (A) and rewind (R).
18. Synch-selector ring For flash synchronization control. Sets the camera's synchronization
mechanism to match the type of flashbulb and shutter speed.
19. Synch selector Has color-coded markings for setting the correct flash synchronization.
20. Shutter speed dial For setting shutter speed from 1/1000 to 1 second plus B and T.
21. Eye-level pentaprism viewfinder For comfortable, easy viewing, composing and
focusing.
22. Accessory shoe Accepts the Nikon Flash Unit BC-7 or Flash Unit Adapter.
23. Film-rewind crank Handle folds out for smooth, effortless: film rewinding.
24. Flash contact For cordless Flash Unit BC-7.
25. Distance indicator with depth-of-field scale Arrow points to the focused distance on the
distance scale. Color-coded markings give depth of field for different apertures.
26. Focusing ring with distance scale Easy-to-grip, knurled ring for quick, accurate focusing.
Distance scale shows focused distance or can be used to prefocus to a measured or
estimated distance.
27. Aperture indicator dot When lined up with the f/numbers engraved on the aperture ring,
shows the taking aperture at which the exposure will be made.
28. Lens aperture ring Used to set the lens diaphragm at the desired f/number.
29. Slotted couolinq prong For coupling diaphragm to exposure meter.
Contents
Nomenclature
Foreword
Loading the Camera
Unloading
Frame Counter and Film Load Reminder
Film-Speed Reminder Dial
Film-Plane Indicator
Film-Advance Lever
Selecting the Shutter Speed
Setting the Aperture
Aperture and Depth of Field
Using the Depth-of-Field Preview Button
How to Hold the Camera
Focusing
Changing the Viewfinder
Changing the Focusing Screen
Interchangeable Focusing Screens for the Nikon F
Focusing Screen Selector Chart
Changing the Lens
Locking Up the Mirror
Flash Synchronization
Using Self-Timer
Infrared Picture-Taking
Double Exposures
Accessories
Lens Hoods
Filters
Finder Eyecup
Eyepiece Correction Lenses
Camera Care
The Nikon Warranty
Nikon F Features/Specifications
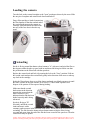
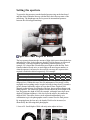
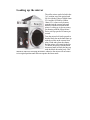
Loading the camera
Turn the lock on the camera baseplate to the "open" position as shown by the arrow Slide
the one-piece baseplate and camera back downward and off.
Drop a film cartridge or loaded cassette into
the film chamber so that the notched end of
the rewind knob engages the cassette or
cartridge. Insert the end of the film leader
into any of the four slots in the take-up
spool.
Unloading
Set the A-R ring around the shutter release button to "A" (Advance) and wind the film so
that it passes under the take-up spool with its emulsion side facing out. Make sure that
the perforations on the film mesh with the sprockets.
Replace the camera back and lock it by turning the lock to the "close" position. Fold out
the rewind crank and turn the rewind knob gently in the direction of the arrow to take up
any slack in the cartridge.
Stroke the film-advance lever to cock the shutter and make two blank exposures (or until
the frame counter on the film-advance fever rests at 1) These blank exposures will
dispose of the portion of film exposed during loading.
Make sure that the rewind
knob rotates in the direction
opposite the arrow when the
film is advanced. This
indicates that the film has been
loaded correctly and is being
advanced.
Set the A-R ring to "R"
(Rewind), unfold the rewind
crank and turn it with a
constant, gentle pressure in the direction of the arrow. Avoid uneven or excessively fast
rewinding. The red dot on the shutter release button rotates while the film is being
rewound and stops when the end of the film has been wound off the sprockets. Then the
camera back may be opened.
Caution: Never load the camera in direct sunlight as this may result in accidental fogging of the flm. To avoid
possible scratching the film guide rails by the pressure plate when replacing the camera back without a roll of
Frame Counter and Film-Load Reminder
The frame counter located in the hub of the
film-advance lever shows the number of frames
which have been exposed. It resets itself
automatically to two frames before zero when the
camera back is removed. There are red indicators
for numbers 0, 20 and 36, and the frame counter
stops at the 36 mark. The filmload reminder
opposite the frame counter is set manually by
means of an indicator pin to serve as a reminder of
the number of exposures on the film in the camera.
Film-Speed Reminder Dial
The film-speed reminder dial is located on the camera baseplate. It can
be set manually to indicate the type of film (color or blackand-white)
and ASA rating of the film loaded in the camera. "E" represents
empty.
Film-Plane Indicator
The exact position of the film plane can be determined by picturing an imaginary line drawn along
the top edge of the digits which make up the camera serial number. This is important to know
when measuring the film-to-subject distance, especially in close-ups and macrophotography.
Film-Advance Lever
The film-advance lever advances the film, cocks the shutter and operates the frame counter with a
single stroke of 136° or with a series of short strokes. A built-in safety device prevents the shutter
from being ret leased until it is fully cocked. The lever is designed so that it springs back when
released but does not strike the camera body. A 15° angle of clearance allows the thumb to be
inserted for easy, comfortable film advancing. The lever folds flat on top of the camera for storage
in the eveready case.
Selecting the shutter speed
The numbers on the shutter
speed dial stand for fractions
of a second. 125 represents
1/125 second and so forth. At
the B (Bulb) setting, the
shutter remains open as long
as the shutter release button is
held down. The Nikon F also
has a T (Time) setting; at this
setting, the shutter will remain
open until it is closed
manually by rotating the
shutter speed dial one click
stop in either direction. To set
the shutter speed, turn the
shutter speed dial until the
desired number clicks into
position opposite the black dot
to the left of the shutter speed
dial between the dial and the
viewfinder. The dial is
clickstopped to rotate a full
360° in either direction, before
or after the shutter is cocked.
The shutter release button is
threaded to accept the Nikon
cable release.
In the center of the shutter speed dial beneath a transparent window is a small black dot
which indicates whether or not the shutter is cocked; in the cocked position, the dot lines
up with the shutter speed in use. When the shutter is released, the dot returns to the 7
o'clock position.
A pin on top of the shutter speed dial permits direct coupling with the Photomicseries
finders.
For convenience when using flashhulbs or electronic flash, the shutter speed markings
are color-coded to match the markings on the synchronization selector located under the
transparent window just above the selector ring. For details refer to the chapter on flash
synchronization.
Setting the aperture
To preset the lens aperture, turn the knurled aperture ring on the lens barrel
until the desired f/number lines up with the black dot in the top center of the
milled ring. The diaphragm can also be preset for intermediate apertures
between the click-stopped markings.
Aperture and Depth of Field
The lens aperture determines the amount of light which passes through the lens
and strikes the film. It also influences depth of field. Apertures are expressed
in f/numbers, with larger numbers representing smaller apertures. For
example, f/4 is larger than f/8 and allows more light to reach the film. Each
f/number admits exactly twice as much light as the next largest number, so
when the aperture is increased or decreased by one stop, the exposure time
required is doubled or halved respectively. For example:
Aperture
f/1.4
f/2
f/2.8
f/4
Relative Exposure Time (seconds) 1/500 1/250 1/125 1/60
f/5.6
1/30
Depth of field refers to a zone extending in front of and behind the plane of
sharpest focus. Within this zone, blur (or unsharpness of the image) will be
negligible and everything can be accepted as being in sharp focus. It extends a
greater distance behind the subject in focus than in front. Depth of field
depends on three factors: focal length of the lens, lens-to-subject distance and
taking aperture. The smaller the aperture and the shorter the focal length of the
lens, the greater the depth of field (for example, wideangle lenses have more
depth of field than telephotos). Also, the closer the subject, the smaller the
depth of field. These three factors can be adjusted independently or in
combination to give the photographer creative control over the final picture.
By stopping down the lens only, the depth of field can be increased, as
illustrated by the following three photographs:
1.Lens at f/4. Small depth of field with only main subject in focus.
3.Lens at smallest aperture. Creat depth of field with subject, background and
foreground in focus.
Using the Depth-of-Field Preview Button
The depth of field at taking aperture can be seen by depressing the
depth-of-field preview button located on the front of the camera. When the
button is pressed, the diaphragm closes down to the preselected taking aperture
and the exact conditions of taking aperture and allows you to see how much
background or foreground is in or out of focus. Depth of field can also be
determined by referring to the color-coded scale printed on the lens barrel. The
colored lines on either side of the main index mark (black arrow) correspond to
different f/numbers which are engraved in corresponding colors. With the lens
focused on a subject and set for a preselected aperture, depth of field can be
read from the distance scale. For example, with the 50mm f/1.4 lens focused at
15 feet (4.5m) and used at a taking aperture of f/16, depth of field extends
from approximately 8 feet ( 2.4m) to infinity.
caution: Do not release the shutter while the depth-of-field preview hutton is held down as this may
Setting the aperture
To preset the lens aperture, turn the knurled aperture ring on the lens barrel
until the desired f/number lines up with the black dot in the top center of the
milled ring. The diaphragm can also be preset for intermediate apertures
between the click-stopped markings.
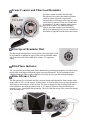
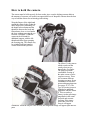
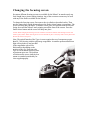
How to hold the camera
The camera must be held correctly for best results, since even the slightest camera shake at
the moment of exposure will result in an appreciable loss of sharpness. Photos show the best
way to hold the camera for rocksteady picture taking.
Wrap the fingers of the right hand
around the camera body so that the
index finger rests comfortably on
the shutter release button and the
thumb fits between the body and
film-advance lever so it can stroke
the lever without removing the eye
from the viewfinder. Cradle the
camera in the left hand for
additional support, with the left
thumb and index finger grasping
the focusing ring. The camera may
be switched from horizontal to
vertical format in this position.
The Nikon F is the camera
which records on film
exactly what you see
through the viewfinder.
The eyepiece permits
comfortable viewing of
the entire screen even for
eyeglass wearers. There
are seventeen different
focusing screens to fit any
combination of lens and
picture-takingrequirements
(see pages 21-23). The
Type A focusing screen is
furnished as standard
equipment with the Nikon
F. This screen has a
3mm¢-circular split-image
rangefinder in the center
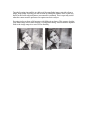
for quick and accurate
focusing. If the image
seen in the circle is in
focus it will appear
continuous. When the subject is out of focus, the rangefinder image will appear split into two
parts.
Turn the focusing ring until the two halves of the rangefinder image coincide to form a
single, sharp image. Focusing can also be done by setting the distance scale on the lens
barrel for the lensto-subject distance as measured or estimated. This is especially useful
when the camera must be prefocused to capture an elusive subject.
Focusing is always done at full aperture with Nikkor Auto lenses. This ensures a bright,
clear finder image for accurate focusing, viewing and framing. It also minimizes depth of
field so the image snaps in or out of focus distinctly.
Out of focus
In focus
Changing the viewfinder
Five interchangeable viewfinders are
available for the Nikon F:
Eye-Level, Waist-Level, 6X
Focusing, Action and Photomic
FTN. The Photomic FTN finder
incorporates the centerweighted
thru-the-lens metering system and
couples to shutter speed and aperture
controls. With the exception of the
Photomic FTN, all viewfinders are
interchanged in the same way.
To remove the finder, press the
finder release button on the back of
the camera body. The finder snaps loose and can be lifted out! To attach a
viewBinder, set it in position and press down gently until it clicks into place.
press down gently
until it clicks into
place. The
Photomic FTN has
a pair of
pincer-type clamps
to position the
finder and hold it
snugly in place.
These clamps must
be loosened by
depressing the
finder lock lever
when removing or
attaching the Photomic FTN.
Changing the focusing screen
Seventeen different focusing screens are available for the Nikon F to match exactly any
focal-length lens or picture-taking situation. Any of the seventeen screens may be used
with any of the finders available for the Nikon F.
To change the focusing screen, first remove the viewfinder as described earlier. Then
turn the camera body upside down and press the finder release button a second time. The
screen will drop into your hand. To attach a screen, place it in position with the flat side
facing down and the Nikon F mark pointing toward the front of the camera. Press the
finder release button and the screen will drop into place.
Caution: When changing the focusing screen be careful not to touch the surfaces with the fingers as this will
result in greasy marks. When removing the screen it is advisable to place a clean, dry cloth over the palm of the
hand for the screen to drop onto.
Note: The optical formula of the Type A screen requires the use of an aperture greater
than f/4.5 for focusing with the split-image rangefinder. At smaller aperturesinsufficient
light will reach the eye and one-half
of the rangefinder spot will be
blackened out depending on the
position of the eye. Focusing with
Type A screen should always be done
at maximum aper sure. The problem
of blackout also occurs when the lens
mount is extended considerably for
close-up photography.
Interchangeable Focusing Screens for the Nikon
F
Type A,L
Type B
Type C
Type A: Matte Fresnel field with 3mm¢circular split-image
rangefinder spot and 12mm¢ circle. Rapid and accurate focusing.
Excellent for general photography. Type L: Same as Type A screen
but with split-image rangefinder line at a 45° angle. Best for
subjects with horizontal lines.
Matte Fresnel field with 12mm¢ finegroudd matte focusing spot in
the center. Good for general photography, especially with long
telephoto lenses.
Fine-ground matte field with 4mm~p clear spot and cross-hair
reticle. For photon~icro graphy, astrophotography and other
highmagnification applications, and for parallax focusing.
Type D
Overall fine-ground matte field. For specialized close-up
photography and for use with long focal length lenses.
Type E
Matte Fresnel field with 12mmp fineground matte spot and etched
horizontal and vertical lines. Ideal for architectural photography.
Type G
Clear Fresnel field with extra--bright 12mm microprism focusing
spot for viewing and focusing in poor light. Four models (G1G4)
are available corresponding to specific focal length lenses. Depth of
field cannot be observed.
Type H
Clear Fresnel field with microprism focusing pattern over the entire
screen area. Permits rapid focusing on any part of the screen with
optimum edge-to-edge brightness in poor light. Available in four
models (H1-H4) corresponding to particular focal length lenses.
Type J
Matte Fresnel field with central microprism focusing spot and
12mm circle. Good for general photography.
Type K
Type M
Combination of Type A and J screens. Matte Fresnel field with
3mm¢ split-image rangefinder spot surrounded by lmm¢
microprism doughnut. Rapid and accurate focus~g for subjects with
both straight lines and ill-defined contours. Suitable for general
photography.
Fine ground Fresnel field with 5.5mm¢ clear spot and double
crosshair for use in parallax focusing on aerial image, plus
micrometer scales for calculation of individual magnification of
objects or for measuring objects. Brilliant image in dim light.
Suitable for close-ups, photomicrography and other
high-magnification applications.
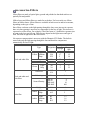
Focusing Screen Chart
Caution: Sooner or later dust will find its way onto and under the {ocusing screen. Keep its surface clean using a
fine dust brush designed for photographic lenses. If fingerprints or greasy marks do get onto the screen, blow
gently on the surface and wipe away the marks carefully with photographic lens tissue. The rear surface of the
screen is made of acryl resin. Special care should be taken to protect it from scratching or excessive pressure.
The chart at right has been prepared to assist you in choosing the right screen for the lens
to be used.
Especially recommended
The image is uniformly bright from edge to edge. However, with lenses marked (*),
focusing must be done on the surrounding matte area because the central split-image,
microprism or cross-hair area cannot be used for focusing due to image darkening (Type
A, L, C, J and K screens).
Acceptable
In actual use these screens present little obstruction, although the viewfield over the entire
area is less satisfactory because of slight vignetting or moire phenomenon (in the case of
microprisms). Of course these drawbacks have no effect on the image recorded on film.
Combinations represented by a blank space are unusable because of image darkening or
considerable moire over the screen area.
Type of screen
A/L B C D E G1 G2 G3 G4 H1 H2 H3 H4 J K M
Lens
6mm
8mm
20mm
24mm
28mm
Wideangle
28mm
35mm
35mm
35mm
50mm
Normal
50mm
55mm
85mm
105mm
135mm
135mm
180mm
Telephoto
200mm
300mm
400mm
600mm
800mm
1200mm
43-86mm
50-300mm
Zoom
80-200mm
85-250mm
200-600mm
GN
45mm
Micro-P
55mm
PC
35mm
Bellows
105mm
Medical
200mm
500mm
Reflex
1000mm
Telephoto
2000mm
Fisheye
f/2.8
f/2.8
f/3.5
f/2.8
f/3.5
f/2
f/2.8
f/2
f/1.4
f/2
f/1.4
f/1.2
f/1.8
f/2.5
f/3.5
f/2.8
f/2.8
f/4
f/4.5
f/4.5
f/5.6
f/8
f/11
f/3.5
f/4.5
f/4.5
f/4
f/9.5
f/2.8
f/3.5
f/2.8
f/4
f/5.6
f/8
f/11
f/11
*
*
*
*
*
*
*
* *
* *
*
*
* *
*
*
*
*
*
*
*
*
*
*
*
*
*
*
*
*
*
*
*
*
*
*
Flash Synchronization
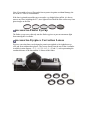
To remove the lens from the camera, press down on the lens release button and turn the
lens clockwise until the black dot on the lens barrel lines up with the black dot on the
front of the camera body. The lens will slip off easily.
To mount a different lens, place it in position in the camera's bayonet mount, align the
black dots and twist the lens barrel counterclockwise until the lens locks into place with a
click.
Note: With the 6mm f/5.6 Fisheye-Nikkor and 10mm f/5.6 OP Fisheye-Nikkor lenses,
the mirror must be locked in the "up" position before mounting.
Caution : A body cap should be
placed over the lens opening to
protect the interior of the
camera whenever the lens is
removed for any length of time.
The lens opening should not be
exposed to bright sunlight when
the lens is removed, especially
when the camera is loaded with
film. When the lens is handled
or stored separately, front and
rear lens caps should be used to
protect the lens surfaces and
interior from dust and damage.
Looking up the mirror
The reflex mirror can be locked in the
"up" position out of the optical path
for use with the Fisheye-Nikkor 6mm
f/5.6 and the OP Fisheye-Nikkor
10mm f/5.6, whose rear elements
protrude into the camera body and
interfere with the movement of the
mirror. Locking up is also necessary
for shooting with the Nikon Motor
Drive at its top speed of 4 frames per
second.
Turn the mirror lock knob upward so
that the black dot on the knob lines up
with the red dot on the camera front
plate. Wind and release the shutter,
and the mirror will remain locked up.
To unlock the mirror, turn the knob
downward until its black dot lines up
with the black dot on the body. This
should be done after releasing the shutter, otherwise the mirror will not return
to its original position until after an exposure has been made.
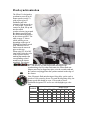
Flash synchronization
The Nikon F is designed to
synchronize correctly at all
shutter speeds (except T)
with various types of
flashbulbs and with
electronic flash at speeds up
to 1/60 second. To set the
camera for flash, lift up and
turn the milled
synchro-selector ring around
the shutter speed dial until
the desired marking appears
in the selector window. The
table on page 27 shows
which marking to use,
depending on the type of
flashbulb and shutter speed
used. Photomic-series
finders must be removed
prior to this step.
When using FP, M or MF
class bulbs, select the color
of the synchro-selector
marking that matches the
corresponding colored
numbers on the shutter
speed dial. The selector
should be set at FX for electronic flash. The Nikon Flash Unit
BC-7 fits directly over the rewind crank and requires no
synchronizing cord. For other flash units, the Nikon flash unit
adapter must first be slipped into place over the rewind crank and
the synchro cord plugged into the synchro terminal on the edge of
the camera.
Note: Electronic flash units having no firing delay can be used at
speeds of 1/60 second or slower. For units having firing delay, the
shutter speed dial should be set at 1/30 second or slower.
Flashbulbs designated "B" are for use with daylight-type color
film.
Flashbulb
FP class
M class
MF class
X class
1000
O
-
500
O
-
250
O
-
125
O
O
-
Shutter speed
60 30 15
O OF OF
O OF OF
OF OF
FX FX FX
8
OF
OF
OF
FX
4
OF
OF
OF
FX
Using self-timer
The self-timer trips the shutter at any time delay trom 3 to 10 seconds. It has
white indicator dots for 3-, 6- and ]O-second delay and can be set either before
or after the shutter is wound. To set the self-timer, turn the lever on the front of
the camera body downward for the desired delay. The timer is actuated by its
own release button, located beneath the end of the lever in its uncocked
position. The lever can be turned back after setting the timer, to cover the
release button and prevent accidental triggering. lf you decide not to use the
self-timer after it has already been
cocked, use the shutter release button to
make the exposure. Then shut off the
self-timer before advancing the film for
the next exposure by pressing the release
button. This way you can avoid wasted
exposures.
It is also helpful for minimizing camera
shake at slow shutter speeds with the
camera hand-held or tripod-mounted.
Infrared picture-taking
In infrared photography, the plane of sharpest image is slightly more distant
than the one produced by visible light and seen by the naked eye through the
viewfinder. To compensate for the shTh in focus, Nikkor lenses have a red dot
or line engraved on the lens barrel near the color-coded depth-of-field index
scale on top of the lens. After focusing the image sharply through the
viewfinder, turn the focusing ring to the left until the red dot lines up with the
prefocused distance.
For example, in the picture
below the 50mm f/1.4 lens has
been focused at infinity (oo).
The focusing ring is turned
slightly to the left so that the
infinity marking appears in line
with the red dot When a lens
having a focal length of 50mm
or less (normal or wideangle) is
used at an aperture of f/8 or
smaller, no adjustment is
necessary. The lens has
sufficient depth offield at such
small i apertures to compensate for the shift in focus.
Intentional double exposures can be made with the Nikon F as follows: After
making the first exposure, set the A-R ring around the shutter release button to
"R" and turn the rewind crank in the direction of the arrow until the red dot on
the shutter release button rotates a full 360 degrees (or slightly more). Reset the
A-R ring to "A" and wind the shyster for the second exposure. The film
winding is confirmed by checking the red dot on the shutter release button
which rotates a full 360 degrees. Any shutter speed may be used for the second
exposure.
The exposure counter will not compensate for the rewinding, so the film in the
camera will actually have one frame or two more than indicated.
Double exposures
The use of a lens hood is recommended at all times to prevent extraneous light
from striking the lens surface and causing flare or ghost, and as an added
measure of protection against damage to the lens. Nikon lens hoods come in
four types depending on the lens: Screw-In, Snap-On, Slip-On and Builtln.
They are calculated precisely for each focal-length Nikkor lens to provide
maximum protection against stray light.
To attach or remove the snap-on lens hood, simply depress the buttons on
either side of the hood. It will also fit directly over a screw-in filter, so both
can be used on a lens at the same time. When not in use, the snapon hood can
be reversed for storage on the lens, and the lens and its hood can be stored
together in the eveready case.
Accessories-Lens Hoods
The use of a lens hood is recommended at all times to
prevent extraneous light from striking the lens surface
and causing flare or ghost, and as an added measure
of protection against damage to the lens. Nikon lens
hoods come in four types depending on the lens:
Screw-In, Snap-On, Slip-On and Builtln. They are
calculated precisely for each focal-length Nikkor lens
to provide maximum protection against stray light.
To attach or remove the snap-on lens hood, simply
depress the buttons on either side of the hood. It will
also fit directly over a screw-in filter, so both can be
used on a lens at the same time. When not in use, the
snapon hood can be reversed for storage on the lens,
and the lens and its hood can be stored together in the
eveready case.
Accessories-Filters
Nikon filters are made of optical glass, ground and polished so that both surfaces are
optically flat and parallel.
Nikkor lenses and Nikon filters are made for each other. For best results, use Nikon
filters on Nikkor lenses. Nikon filters are available in both screw-in and series mounts,
depending on the type of lens.
Since filters cut down on the light passing through the lens, some increase in exposure
time or in lens opening is necessary to compensate for the loss of light. This increase is
expressed as a filter factor. For example, if the filter factor is 2, double the exposure time
or open up the lens one full stop. Filter factors depend on the light source and type of
film. The chart at right shows the filter factors.
No exposure compensation is necessary with the Photomic FTN finder. The built-in
meter reads only the light passing through the lens and therefore compensates
automatically for loss of light.
Type
Black-and-white film
Esposure factor
Daylight Tungsten
light
Light
Yellow Medium
Deep
Y44
Y48
Y52
1.5
1.7
2
1
1.2
1.4
Orange
Red
O56
R60
3.5
6
2
5
X0
X1
2
5
1.7
3.5
Green
Black-and-white and
color films
Designation
Light
Deep
Ultraviolet
L37
L39
1
Polarizing
Polar
2.4
Neutral Density
Skylight
ND 4X
ND 8X
ND 100X
ND 400X
4
8
10
400
L1A
1
Amber
Light
Deep
A2
A12
1.2
2
Amber
Light
Medium
Deep
B2
B8
B12
1.2
1.6
2.2
Color film
Note: If you wish to leave a filter on the lens to protect it against accidental damage, the
use of the L37 filter is recommended.
If the lens is pointed toward the sun or toward a very bright light at ni2rkt, it is best to
remove any filter, including the L37, since light reflected from the filter surface may form
ghost images on the film.
Accessories-Finder Eyecup
The finder eyecup screws directly onto the finder eyepiece to prevent extraneous light
from entering the viewfinder.
Accessories-Eyepiece Correction Lenses
Eyepiece correction lenses are designed to permit near-sighted or far-sighted users to
view and focus without their glasses. They screw directly into the rear of the viewfinder.
Available in nine diopters, -2,-3, - 4,-5, O, +0.5, +1, +2 and +3, each representing the
combined dioptry of the lens and the -1 diopter of the finder.
Camera care
Good camera care is primarily common sense care. Treat your Nikon F as you
would any valuable precision instrument and it will last a lifetime.
Although the Nikon F is ruggedly constructed to stand up for years under
normal use, it may be damaged by shock, heat, water or misuse. The
following are some basic tips for keeping your camera in top condition.
Storage
Keep the camera in an eveready case or compartment case when not in use to
protect it from dust.
Avoid storing the camera in excessively hot, cold or damp places.
Always attach a body cap when the camera body is stored separately.
Do not leave film in the camera for a long period of time.
Never leave the shutter or self-timer cocked if the camera is to be stored
overnight or longer.
Camera Body
Brush the inside of the camera periodically using a soft brush. Do not exert
pressure on the shutter curtain as this may damage the curtain.
Keep the mirror free from fingerprints and dust.
If smudges or fingerprints persist, use lens tissue moistened slightly with
alcohol.
Lens
Keep the lens surface free from fingerprints and dust as far as possible.
Use lens tissue to remove dust, never use cloth or ordinary tissue.
If smudges or fingerprints persist, use lens tissue moistened sparingly with
alcohol.
Remember: Even an approved lens cleaner can cause damage if it seeps into the
lens mount.
Keep the camera away from water.
Avoid excessive moisture. When using the camera near water, guard against
splashes, especially salt-water spray.
Never oil any part of the camera.
Lubrication should be left to an authorized serviceman.
Prior to taking a holiday trip or being assigned an important photo job, test
your camera by making a few trial exposures. Remember, it takes at least two
or three weeks for processing the test film and making any needed repairs or
adjustment. Follow this important precaution and you will have pictures to
remember.
Nikon F features/ specifications
35mm single-lens-reflex camera. Negative size 24 x 36mm (about 1"
x 1-1/2")
Interchangeable Eye-Level finder with pentaprism supplied as
starrdard equipment
Type A interchangeable focusing screen supplied as standard
equipment
Vibration-free automatic instant-return mirror with locking-up feature
Focal-plane shutter with titanium foil shutter curtain. Shutter speeds
from 1/1000 to 1 second plus B and T
Built-in calibrated self-timer can be set for 3- to 10-second delay, with
markings for 3, and 10 seconds
Flash synchronization at any speed except T with flashbulbs and at
speeds up to 1/60 second with electronic flash
Depth-of-field preview button
Nikon F bayonet-type lens mount
Self-resetting frame counter
Single-stroke film-advance lever winds the film, cocks the shutter and
operates the frame counter
Film-rewind crank folds flat when not in use
Detachable camera back is interchangeable with Nikon Motor Drive
backs
Fixed take-up spool
Tripod socket on the baseplate
Film-speed reminder dial can be set for color or black-and-white.
ASA rating from ASA 25-1600
Dimensions: width 147mm (5.79 in.), height 98mm (3.86 in.),
thickness 56mm (2.2 in.) (without lens)
Weight: body without lens 685g (1.5 lbs); with 50mm f/1.4 lens
1,010g (2.2 lbs)
Credit: This manual is converted by Mr Lye. With permission from Shiro Malaysia.
Home - Photography in Malaysia