1
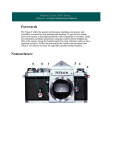
Asahi Pentax ES Operating Manual Excerpts
Reproduced for Historical and Reference Purposes by Paul M. Provencher
http://whitemetal.com Not For Resale.
1
Asahi Pentax ES Operating Manual Excerpts
Table of Contents
NOMENCLATURE ........................................................................................................................................................2
SPECIFICATIONS .......................................................................................................................................................4
HOW IT WORKS..........................................................................................................................................................6
FILM LOADING AND WINDING..........................................................................................................................8
SETTING ASA FILM SPEED.......................................................................................................................................9
FILM TYPE REMINDER DIAL................................................................................................................................9
EXPOSURE FACTOR CONTROL DIAL............................................................................................................10
DIAPHRAGM SETTING...........................................................................................................................................11
TTL METERING AND AUTOMATIC SHUTTER............................................................................................12
OPEN-APERTURE
OR STOP-DOWN READING.............................................................13
MECHANICAL SHUTTER.......................................................................................................................................14
FILM UNLOADING....................................................................................................................................................15
BATTERY CHECK AND REPLACEMENT .........................................................................................................16
FLASH SYNCHRONIZATION...............................................................................................................................17
DEPTH-OF-FIELD GUIDE.....................................................................................................................................18
INFRA-RED PHOTOGRAPHY ...............................................................................................................................19
MULTIPLE EXPOSURE............................................................................................................................................20
IMPORTANT NOTES................................................................................................................................................21
Reproduced for Historical and Reference Purposes by Paul M. Provencher
http://whitemetal.com Not For Resale.
1
Asahi Pentax ES Operating Manual Excerpts
NOMENCLATURE
Reproduced for Historical and Reference Purposes by Paul M. Provencher
http://whitemetal.com Not For Resale.
2
Asahi Pentax ES Operating Manual Excerpts
Reproduced for Historical and Reference Purposes by Paul M. Provencher
http://whitemetal.com Not For Resale.
3
Asahi Pentax ES Operating Manual Excerpts
SPECIFICATIONS
Type
35mm TTL-metering single-lens reflex camera with
focal plane electronic shutter for automatic
exposure control.
Film and Picture Size
35mm film (20 ir 36 exposures). 24mm x 36mm.
Standard Lenses
Super-Multi-Coated Takumar 50mm f/1.4 and
55mm f/1.8 with fully automatic diaphragm. 7
elements in 6 groups. Distance scale: 0.45m (1.5
feet) to infinity. Filter size: 49mm. With depth-offield scale.
Shutters
TTL-metering electronic shutter for automatic
exposure control + mechanical shutter for manual
speed selection. Horizontal run focal plane shutter.
Electronic shutter speeds:
Unlimited variation
between 8 and 1/1000 sec. Mechanical shutter: B,
1/60 (X), 1/125, 1/250, 1/500, 1/1000 sec.
Viewfinder
Eye-level pentaprism finder with Fresnel lens +
microprism. 0.89x magnification with 50mm lens.
-1.0 dioptry. Shutter speed calibration, TTL meter
needle and battery "check" mark in the viewfinder
screen.
Focusing
Turn the distance scale ring until the subject image
in the viewfinder comes into sharp focus. Minimum
focusing distance: 0.45m (1.5 feet).
Reflex Mirror
Instant return type.
Film Advance
Ratchet type rapid wind lever.
and 160° advance angle.
Reproduced for Historical and Reference Purposes by Paul M. Provencher
http://whitemetal.com Not For Resale.
4
10° pre-advance
Asahi Pentax ES Operating Manual Excerpts
Film Rewind
Rapid rewind crank. Film rewind button on base of
camera body releases film from take-up spool for
rewind.
Film Exposure Counter
Automatic re-set type.
Cocked Indicator
A red disk appears in a small window alongside the
shutter release button when the shutter is cocked,
and blacks out when it is released.
Lens Mount
42mm thread (Pentax-mount).
Flash Synchronization
FP + X contacts for conventional flash cord
connection. X contact on hot shoe for convenient
cordless flash connection.
Exposure Meter
CdS-activated TTL meter for open-diaphragm and
stop-down reading. Light measurement range: EV1
- 18 with ASA 100 film. ASA speed scale: 20 1600.
Exposure Factor Control Dial
1x for normal exposure.
2x, 4x, 1/2x for
intentional over- or under-exposure.
Battery
6V silver battery (Eveready #544).
Film Type Indicator
* (black & white), * (color daylight), * (color
tungsten) and EMP. (empty).
Dimension
Width 143mm (5.6") x height 98mm (3.86") x
thickness 91mm (3.6").
Weight
940 gr. (2 lb. 1 oz.)
Reproduced for Historical and Reference Purposes by Paul M. Provencher
http://whitemetal.com Not For Resale.
5
Asahi Pentax ES Operating Manual Excerpts
HOW IT WORKS
A silver battery is packed separately. Be sure to insert it into the
battery housing before operating the camera. For insertion, refer to
page 19.
1. Load your film and set ASA
film speed.
2. Keep this at "1x" for normal
exposure.
4. Set shutter speed dial at
"AUTOMATIC".
Reproduced for Historical and Reference Purposes by Paul M. Provencher
http://whitemetal.com Not For Resale.
6
3. Pre-select f/stop
5. Keep this lever down for openaperture
exposure
reading.
(Lens aperture stays fully open,
and stops down to pre-selected
f/stop as you depress shutter
release.) Move it up for depthof-field preview or for stop-down
exposure
reading.
(Lens
aperture actually stops down to
pre-selected f/stop.)
Asahi Pentax ES Operating Manual Excerpts
6. TTL Meter Reading. Softly depress the
shutter button.
Electric circuit is now
switched on. Meter needle starts moving and
indicates correct shutter speed.
7. Electronic memory device stores exposure
reading information, whether through openaperture or stopped-down aperture.
8. Depress shutter button completely.
9. Memory device automatically releases
electronic shutter.
CORRECT EXPOSURE
Reproduced for Historical and Reference Purposes by Paul M. Provencher
http://whitemetal.com Not For Resale.
7
Asahi Pentax ES Operating Manual Excerpts
FILM LOADING AND
WINDING
Avoid direct light when loading your film
1. Open the back by pulling out
the rewind knob until the back
cover snaps open.
2. Place the film cassette properly into the cassette chamber, and
push down the rewind knob. Insert the film leader into the slot of the
take-up spool.
3. Advance the film by alternately
turning the rapid wind lever and
depressing the shutter button
until both sprockets engage the
film perforations properly. Close
the back by pressing it firmly.
4. Cock the rapid wind lever, and watch to see that the film rewind
knob automatically turns counter-clockwise, indicating that the film is
properly loaded and is moving from cassette to take-up spool. Trip
the shutter.
5. The first portion of the film cannot be used for picture taking as
they have already been exposed to light. Generally, two or three
blank exposures should be made before taking your first picture.
Therefore, advance the film until the exposure counter turns to "1",
indicating that the first picture is ready to be taken.
Reproduced for Historical and Reference Purposes by Paul M. Provencher
http://whitemetal.com Not For Resale.
8
Asahi Pentax ES Operating Manual Excerpts
SETTING ASA FILM SPEED
The ASA film speed is given in the data sheet packed with each roll of
film. The higher the ASA number, the more sensitive the film.
Lift the outer ring of the exposure factor control dial, and turn it until
the same number as the ASA number of the loaded film appears in the
ASA speed indicator window.
FILM TYPE REMINDER DIAL
Use this dial as a reminder of the
type of film loaded. To set the
dial, pull out the rewind knob
softly, and move the selector to
the * for daylight type color film,
* for tungsten type color film, *
for black-and-white and EMP.
when film is not loaded.
Reproduced for Historical and Reference Purposes by Paul M. Provencher
http://whitemetal.com Not For Resale.
9
Asahi Pentax ES Operating Manual Excerpts
EXPOSURE FACTOR CONTROL DIAL
The scale (4x 2x 1x 1/2x ) indicates exposure
factor
Turn the outer ring of the film type dial, and set 1x
against the orange arrow for normal exposures.
Use this control only when necessary to give
intentional over- or under-exposures within the
range of these factors while working on
"AUTOMATIC". For example, set the dial at 2x or
4x when shooting against the light, and at 1/2x
against dark backgrounds. In addition, the dial can
be set between the indicated positions to achieve
more specific exposure control.
Reproduced for Historical and Reference Purposes by Paul M. Provencher
http://whitemetal.com Not For Resale.
10
Asahi Pentax ES Operating Manual Excerpts
DIAPHRAGM SETTING
Set the shutter speed dial at "AUTOMATIC".
Rotate the diaphragm ring to pre-select the
desired aperture such as follows:
Fine weather……………..f/8 - f/11
Cloudy weather………….f/4 - f/5.6
Indoor……………………f/2 - f/2.8
This is a rough guide to acquaint you with the
automatic shutter operation. As you get used to
it, you will have your own yardstick for aperture
pre-selection depending on your subject and
lighting conditions.
The shutter speed of the ES is automatically
determined at any speed within the range of 8 to
1/1000 sec. according to the brightness of your
subjects.
Reproduced for Historical and Reference Purposes by Paul M. Provencher
http://whitemetal.com Not For Resale.
11
Asahi Pentax ES Operating Manual Excerpts
TTL METERING AND AUTOMATIC SHUTTER
For open-aperture reading, be sure that the stop-down lever is
DOWN.
After cocking the rapid wind lever, press the shutter release
button lightly to switch on the electric circuit. The meter needle
in the viewfinder indicates the correct shutter speed.
If the needle goes above "1000", close down the diaphragm until
the needle moves below "1000". If the needle goes below "1",
the shutter speed indicates an exposure longer than 1 second.
The electronic shutter of the ES is guaranteed to work properly
down to 8 sec. (When making longer exposures with your eye off
the viewfinder, use the viewfinder cap to shield the light coming in
through the viewfinder as it may interrupt the correct exposure.
Caution: At slow speeds - slower than 1/30 sec. - support your
camera rigidly or use a tripod to prevent camera movement.
Depress the shutter release button completely when ready to take
your picture. When the shutter is released and your finder is off
the shutter button, the meter circuit is off and the needle will
return to the top of the scale.
Reproduced for Historical and Reference Purposes by Paul M. Provencher
http://whitemetal.com Not For Resale.
12
Asahi Pentax ES Operating Manual Excerpts
OPEN-APERTURE
OR STOP-DOWN READING
With the new Super-Multi-Coated (SMC) Takumar
lenses with an open-aperture reading pin (1),
mounted directly on the ES camera body, the TTL
meter reads exposure through the fully open
aperture or stopped-down taking aperture for
correct automatic exposure.
For open-aperture
reading, the stop-down lever should be DOWN; for
stop-down reading, push up the lever.
With all other lenses or when using Extension
Tubes, Bellows Unit or Microscope Adapter,
remember always to push up the stop-down lever
for stopped-down aperture reading and correct
exposure.
The SMC Takumar 85mm f/1.9 (photo at the top
right) and SMC Takumar-Zoom 85mm~210mm
lenses do not have the open aperture reading pin
(1), and therefore, they should be used on the ES
for stop-down reading.
Also remember that the TTL metering does not
work unless the shutter dial is set at "AUTOMATIC".
Reproduced for Historical and Reference Purposes by Paul M. Provencher
http://whitemetal.com Not For Resale.
13
Asahi Pentax ES Operating Manual Excerpts
MECHANICAL SHUTTER
In addition to the electronic
shutter for the automatic exposure
control, the ES has a mechanical
shutter for speeds 1/60 X for
electronic flash synchronization,
1/125, 1/250, 1/500. 1/1000 sec.
plus B (Bulb).
To operate at any one of these
speeds, just turn the shutter dial
from "AUTOMATIC" to the desired
speed setting. Now the electric
circuit and the TTL meter circuit
are off.
Reproduced for Historical and Reference Purposes by Paul M. Provencher
http://whitemetal.com Not For Resale.
14
Asahi Pentax ES Operating Manual Excerpts
FILM UNLOADING
After the final picture on the roll has been taken,
the rapid wind lever will not turn, indicating that
the film must be rewound.
Unfold the rewind crank. Depress the film rewind
release button and turn the rewind crank as
indicated to rewind the film into the film cassette.
Rewind until the tension on the crank lessens,
indicating that the leader end of the film has been
released from the take-up spool.
Pull out the film rewind knob (the back will open
automatically), and remove the film cassette.
AVOID DIRECT LIGHT WHEN LOADING OR
UNLOADING THE FILM.
Reproduced for Historical and Reference Purposes by Paul M. Provencher
http://whitemetal.com Not For Resale.
15
Asahi Pentax ES Operating Manual Excerpts
BATTERY CHECK AND REPLACEMENT
A silver battery powers the TTL meter and
electronic shutter. The power circuit is on only
when you depress the shutter release (lightly for
meter reading and completely for electronic
shutter) with the shutter speed dial set at
"AUTOMATIC". When not operating the camera, be
sure to keep the shutter dial off the "AUTOMATIC"
setting and set to any mechanical shutter setting,
so that you prevent wasting battery power if the
shutter release button is accidentally depressed.
The battery lasts about one year. To check its life,
set the shutter speed dial at "AUTOMATIC", and
push the black check button alongside the exposure
factor control dial. If the meter needle drops to the
notch facing "30", the battery has sufficient
capacity. If it does not, replace the battery. (If
you release the shutter at "AUTOMATIC" setting
when the battery is dead, the shutter will operate
at the mechanical speed of 1/1000 sec.)
For replacement, use Eveready #544 6V silver
battery. Open the battery housing cover on the
body front. When inserting, be sure that the (-) of
the battery faces inward.
Caution: Do not throw a dead battery into fire, as
it may explode. Also, keep beyond the reach of
small children.
Reproduced for Historical and Reference Purposes by Paul M. Provencher
http://whitemetal.com Not For Resale.
16
Asahi Pentax ES Operating Manual Excerpts
FLASH SYNCHRONIZATION
The Pentax ES as FP and X terminals at the front of the
camera body, and an additional X contact on the builtin hot shoe atop the pentaprism housing, As indicated
in the table, set the shutter dial at 1/60 X for
electronic flash, and the flash cord plugged into the X
terminal. Set the shutter dial at 1/60 or faster for FP
class flash bulb, with the cord plugged into the FP
terminal.
Use the hot shoe flash contact when using a shoemount electronic flash like the Pentax Super Lite II
which also has a flash contact on the shoe bracket. In
this case you do not have to plug the flash cord into
the X terminal on the body front.
The hot shoe flash contact turns to "hot" (switched on)
only when you insert a shoe-mount electronic flash. It
remains cold (disconnected) and you never get a shock
even when using an electronic flash with its cord
plugged into the X terminal on the body front.
Reproduced for Historical and Reference Purposes by Paul M. Provencher
http://whitemetal.com Not For Resale.
17
Asahi Pentax ES Operating Manual Excerpts
DEPTH-OF-FIELD GUIDE
If you want to know how great the depth of field is
at a certain aperture, look at the depth-of-field
guide. In the above photograph, the distance scale
scale is set at 5 meters…the lens is focused on a
subject 5 meters away. The calibrations on each
side of the distance index correspond to the
diaphragm setting and indicate the range of focus
distance for different lens apertures. For example,
if the lens opening of f/4 is to be used, the range
on the distance scale ring covered within the figure
4 on the depth-of-field guide indicates the area
in focus at the lens opening. You will note from the
depth-of-field guide in the photograph that the
range from approximately 4.5 to 6.5m is in focus.
Note that as the lens apertures change, the
effective depth of field also changes. For the depth
of fields at different apertures and distances, refer
to the next page.
Depth of field is the range between the nearest and
farthest distances which are in focus at different
lens apertures.
Reproduced for Historical and Reference Purposes by Paul M. Provencher
http://whitemetal.com Not For Resale.
18
Asahi Pentax ES Operating Manual Excerpts
INFRA-RED PHOTOGRAPHY
If you intend to take infra-red photographs,
remember to use the infra-red index marked with
an orange line or a small "R" on the depth-of-field
guide.
First focus your lens on your subject. Determine
the lens-to-subject distance from the distance
scale. Then match your lens-to-subject distance to
the infra-red index by turning the distance scale
accordingly. For instance, if your subject is in focus
at infinity, turn the distance ring and move the
infinity (∞) mark to the index. The index marking
on the Takumar lenses is based on the lens setting
at infinity.
Reproduced for Historical and Reference Purposes by Paul M. Provencher
http://whitemetal.com Not For Resale.
19
Asahi Pentax ES Operating Manual Excerpts
MULTIPLE EXPOSURE
For deliberate multiple exposures, make the first
exposure in the normal way. Then tighten the film
by turning the rewind knob (1), and keep hold of
the rewind knob. Depress the film rewind release
button (2) and cock the rapid wind lever. This
tensions the shutter without advancing the film.
Finally, release the shutter to make a second
exposure. Then make one blank exposure, before
taking the next picture, to avoid overlapping.
Registration may not be exact.
Reproduced for Historical and Reference Purposes by Paul M. Provencher
http://whitemetal.com Not For Resale.
20
Asahi Pentax ES Operating Manual Excerpts
IMPORTANT NOTES
1.
Always keep the stop-down lever down for open-aperture reading. Also,
be sure to keep it down when interchanging lenses, otherwise, the
automatic diaphragm pin of the lens will hit the diaphragm activating
lever in the body. Move it up only when checking the depth of field or
using stop-down metering lenses or Extension Tubes, Bellows Unit, etc.
inserted between the lens and camera body.
2.
If you set the shutter dial of the ES at "AUTOMATIC" and release the
shutter, the reflex mirror will be blocked up for safety, if
1) the lens cap is on.
2) the lens is removed from the body.
3) the stop-down lever is down, when using stop-down
metering lenses or close-up accessories.
To bring the reflex mirror down, just turn the shutter dial off the
"AUTOMATIC" setting, or move up the stop-down lever.
Reproduced for Historical and Reference Purposes by Paul M. Provencher
http://whitemetal.com Not For Resale.
21
Asahi Pentax ES Operating Manual Excerpts
3.
The following two lenses will not properly fit the
Pentax ES camera body due to the difference of
mechanical design and construction:
•
Super-Takumar 50mm f/1.4
•
Super-Takumar 55mm f/1.8 (with "1.8"
engraved on the left of the diaphragm ring and
"16" on the right.)
4.
The length of a tripod's screw should not exceed
the normal length of 4.5mm (3/16").
Do not
extend it longer than this length when mounting
your camera on a tripod. Forcing longer screws
into the tripod receptacle of the camera will
damage the mechanism.
Reproduced for Historical and Reference Purposes by Paul M. Provencher
http://whitemetal.com Not For Resale.
22
Asahi Pentax ES Operating Manual Excerpts
Reproduced for Historical and Reference Purposes by Paul M. Provencher
http://whitemetal.com Not For Resale.
23