1
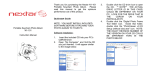
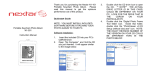
ITEM# MD1008
8” TFT Color Display
Flip Down Monitor
INSTRUCTION MANUAL
ITEM# MD1008
TABLE OF CONTENTS
Thanks from Nextar
2
Important Caution
Adjusting Light on LCD
2
Understanding the LCD
Control LCD
About The Screen of LCD
LCD Protection
3
Wiring Diagram
5
Installation
6
Describing the units buttons
7
Remote Control
7
Function Description
Changing the Battery
Caution
8
Operation Of LCD
Turn On/ Off Buttons
Function Setup Buttons
Key Of Reading Light
9
Specifications
10
1
ITEM# MD1008
APPRECIATION
Thank you for purchasing Nextar 4:3 TFT-LCD ceiling monitor. Please read
this Manual thoroughly, and retain this document for future reference.
IMPORTANT CAUTION
1. Please take note and use all caution terms of this manual.
2. Please do not permit anyone to operate this machine before he/she has
reads or knows how the unit operates.
3. Please do not put the LCD in the positions below:
A. Any position blocking the sight of the driver.
B. Any position which may harm the operation or safety system of
the
vehicle, including the air chamber.
C. Any position which may affect the driver to safely operate the
vehicle.
4. To ensure safe driving please keep the volume at a suitable level for
your
vehicle.
5. Same as any other equipment in your car, you must pay complete
attention
to your driving and not your LCD. In the event of your LCD having
trouble
please stop at a safe location to make the necessary adjustments.
6. Do not equip or attempt to repair the LCD yourself. It is very dangerous
for
you to personally repair this unit if you are not familiar with the internal
components.
7. Avoid water or any moisture in order to protect the machine.
2
ITEM# MD1008
UNDERSTANDING THE LCD
Warning
• Please cut off the power right away and go to your local authorized repair
service when water or other objects or liquids enter into the machine. If you
do not cut the power immediately this may lead to electric shock and/or fire.
• Please cut off the power right away and go to your local authorized repair
service if smoke or a peculiar burning smell occurs. Failing to do so will lead
to system errors.
• Please do not remove the back cover of the LCD. If exposed it is important
to know you are at risk of being electrically shocked. Always inquire at your
local authorized repair service to perform any inspection, adjustment, and
repairs.
Adjusting Light on the LCD
Be advised the adjustment for angles and a clear LCD maybe limited by design.
You can adjust for a clearer picture by adjusting the lightness of the screen.
When you first use this machine please adjust the LCD for viewing in the
furthest position.
Control LCD
• The temperature of the LCD may become high if exposed to direct sunlight
for long periods of time, resulting in damages to the unit. Please put the
machine in safe keep while not using.
• LCD should work with in the following temperatures:
Working temperature area from 32 degrees F (0 Celsius) to 140º F (60º Celsius)
If above or below the temperatures listed the LCD may not function properly.
• Do not touch the LCD, as it may become dirty or damaged.
• Please note that putting anything between the LCD and its docking station
will prevent the unit from functioning properly.
3
ITEM# MD1008
About the Screen of LCD
• Please avoid any direct air from the AC/Heater to the LCD, cool and warm
air from AC will affect the inside groupware and wiring which may cause
damage. If any of this occurs your screen will become dark or decrease the
working life of your screen.
• There maybe some little black or white dots, which is the characteristics of
LCD screens, this does not mean something is wrong with your unit.
• In low temperature environments, the screen of the LCD maybe dark
momentarily when you first power on.
• The picture of the LCD will be unclear if directly exposed to sunlight.
LCD Protection
• Please cut the power off before cleaning the LCD screen.
• Please use a soft cloth or proprietary cloth of LCD to clean the screen, use
carefully to avoid damage. Do not use any rough cloth or causticity liquids to
clean this unit.
4
ITEM# MD1008
WIRING DIAGRAM
White (L-IN)
Red (+12V)
Red (R-IN)
Black (-)
Yellow (AVI)
Green (AV2)
5
ITEM# MD1008
INSTALLATION
Notice:
Please use the components accompanied with this product. Using parts
produced by other factories may cause problems. If holes need to be made
during installation or any other modifications in the car, always inquire with a
professional installer.
Please install this product in a position where the driver is completely
unaffected from any distraction. Please install this unit in a position where
passengers are not affected by sudden stops.
The product may be altered at any time to improve the specifications and
design without any notification.
6
ITEM# MD1008
DESCRIBING THE UNITS BUTTONS
1
2
3 (back)
4
5
6
7
8
1. Open Button
2. Reading Lamps
3. Reading Lamp Switch
4. Display Screen
5. Up
6. Menu
7. Down
8. Power On/off
1
3
5
7
9
2
4
6
8
10
7
1. AV1/AV2 turning
2. Power on/off
3. Brightness Control 4. Brightness Control +
5. Contrast Control 6. Contrast Control +
7. Color Control 8. Color Control +
9. Menu control 10. Menu control +
ITEM# MD1008
HOW TO CHANGE THE BATTERY
Back of Remote Control
+
Battery
Flute
Battery Clip
1. Take off battery clip, and draw out battery by the flute.
2. Put new battery in flute with (+) face up.
3. Put battery clip back into the remote.
Caution:
1. Improper installation may heat the battery up causing it to burn out or
explode.
2. If the battery leaks this may destroy the functions of the Remote Control.
3. Do not open remote control as it may short circuit. Keep away from fire or
extreme temperatures.
4. Danger! Do not allow children to play with the battery.
8
ITEM# MD1008
OPERATION OF LCD
Note:
Before using, please be sure Audio and Video RCA’s are connected, yellow
plug connects with the video signal 1, and green plug connects with video
signal 2, white plug link with left audio channel, red plug link with right audio
channel.
1. Press “Open” to release the LCD; adjust the viewing angle by pushing it back.
2. Press the Power button to turn the LCD on or off, when the LCD is off the
bottom is blue, if on the buttons will illuminate.
3. Press “menu” at the bottom and work with these buttons to adjust the
screen brightness, saturation , contrast, tint , sharpness, OSD H-Position,
original factory settings, OSD level position, OSD vertical position, OSD
waiting time, self-searching channel (TV mode) and exit menu.
4. V1/V2 bottom can exchange the Video 1 and Video 2.
5. Infrared wireless headphones
• The receiving area of the headphones is 8m and 45 degree angle.
• Before using the head phone, please be sure they are powered on.
Make sure the volume is not loud or it will cause damage to hearing.
6. The reading lamp switch is located at the bottom and can be powered on or
off from there.
9
ITEM# MD1008
SPECIFICATIONS
Display system:
Pixel of Display:
Definition:
Screen Size:
Display Region
Shadow Light
Machine Construction:
Working power:
Consumption:
Working Temperature:
Weight:
Size:
8 inches (20.5cm) TFT LCD color
super clean picture screen display
280000pixel (600x480xRGB)
864000 dots
4:3
163.5(W) x 122(H)mm
Operate properly can last for 10000 hours
Manual ON-OFF system
DC12V
1000mA (usual)
0-60º
1.8kg
215(W) *215(D)*28(H) mm
10