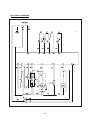
1
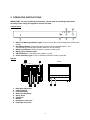
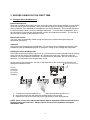
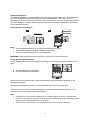
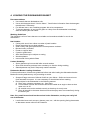
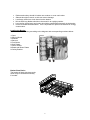
.
Please read and save these instructions.
NewAir ADW-2600W
Portable Dishwasher
Instruction Manual
Read This Manual
Dear Customer,
This instruction manual will provide you with valuable information necessary for the proper care
and maintenance of your new appliance. Please take a few moments to carefully read this
manual, as it contains safety, operating and installation instructions, as well as troubleshooting
tips. We also recommend retaining it for future reference and giving it to any subsequent
owners of this appliance.
Before Calling for Service
Occasionally a minor problem may arise and a service call may not be necessary. Please refer
to our troubleshooting tips located in the back of the manual for a possible solution. If the
problem persists, please contact an authorized service department or customer service.
Note:
Due to a policy of constant product development and updates, the manufacturer may make
modifications without giving prior notice.
Table of Contents
1)Safety Information --------------------------------------------------------------- 1
2)Operating Instructions ---------------------------------------------------------- 2
Control Panel -------------------------------------------------------------------------- 2
Dishwasher Features ---------------------------------------------------------------- 2
3)Before Using for the First Time ------------------------------------------------ 3
A.Filling the Rinse Aid Dispenser -------------------------------------------------- 3
B.Using Detergent -------------------------------------------------------------------- 4
C.Loading the Dishwasher Basket ---------------------------------------------- 6
Loading the Basket ------------------------------------------------------------------- 7
The Cutlery Basket ------------------------------------------------------------------- 8
4)Starting a Wash Cycle ----------------------------------------------------------- 9
Wash Cycle Table --------------------------------------------------------------------- 9
Turning on the Appliance ------------------------------------------------------------ 9
Changing Wash Cycles -------------------------------------------------------------- 10
At the End of the Wash Cycle ------------------------------------------------------- 10
5)Maintenance and Cleaning ----------------------------------------------------- 11
Filtering System ---------------------------------------------------------------------- 11
Maintaining Your Dishwasher ------------------------------------------------------ 12
6)Installation Instructions -------------------------------------------------------- 13
Positioning the Appliance ----------------------------------------------------------- 14
Power Connection -------------------------------------------------------------------- 14
Water Connection --------------------------------------------------------------------- 15
Starting the Dishwasher ------------------------------------------------------------- 16
7)Troubleshooting Tips ------------------------------------------------------------ 17
Before Calling for Service ----------------------------------------------------------- 17
Error Codes ---------------------------------------------------------------------------- 19
Technical Information ---------------------------------------------------------------- 20
Detailed Parts Diagram -------------------------------------------------------------- 21
Electrical Diagram -------------------------------------------------------------- 22
1. IMPORTANT SAFETY INFORMATION: READ ALL INSTRUCTIONS
BEFORE USING THIS APPLIANCE
WARNING! Follow the precautions below when using your dishwasher.
GROUNDING INSTRUCTIONS
• This appliance must be grounded. In the event of a malfunction or breakdown,
grounding will reduce the risk of electric shock by providing a path of least resistance to
the electric current. This appliance is also equipped with a power cord with an
equipment grounding conductor and a grounding plug.
• The plug must be plugged into an appropriate outlet that is in accordance with all local
codes and ordinances.
• WARNING! Improper use of the grounded plug can result in electric shock.
• Check with a qualified electrician or service representative if you have any questions
about the electrical connection. Do not modify the plug provided with the appliance. If it
does not fit with your existing outlet, have one properly installed by a qualified electrician.
SAFETY PRECAUTIONS
• Do not sit or stand on the door or dish rack.
• Do not touch the heating element during or immediately after use (only applicable with a
visible heating element).
• Do not operate your dishwasher unless all enclosure panels are properly in place. Open
the door carefully if the dishwasher is in operation, as water may leak out.
• Do not place heavy objects on the door when it is open. Doing so can cause the
appliance to tip forward.
• When loading items into the dishwasher:
1. Be aware of sharp items and make sure they cannot damage the door seal.
2. Warning! All knives and utensils with sharp points must be loaded into the basket
with the points facing down. They can also be placed horizontally in the dishwasher.
• When using your dishwasher, prevent plastic items from coming into contact with the
heating element (only applicable with a visible heating element).
• Make sure the detergent receptacle is empty after a wash cycle is completed.
• Do not wash plastic items in the dishwasher unless they are marked dishwasher safe.
For plastic items that are not marked as such, check with the manufacturer.
• Only use detergent and rinse additives that are designed for automatic dishwashers.
• Never use soap, laundry detergent or regular dishwashing detergent in the dishwasher.
Also keep these products out of reach of children.
• Keep children away from detergent and rinse aids. Also keep children away from the
dishwasher if the door is open, as there could still be some detergent left inside.
• This appliance is not intended for use by persons (including children) with reduced
physical, sensory or mental capabilities, unless they have been given supervision or
instruction concerning its use by a person responsible for their safety.
• Supervise children and make sure they do not play with the appliance.
• Dishwashing detergents are strongly alkaline and can be extremely dangerous if
swallowed. Avoid contact with skin and eyes, and keep children away from the
dishwasher if the door is left open.
• Do not leave the door in the open position for extended periods of time, as this can
present a tripping hazard.
• If the power cord is damaged, it must be replaced by the manufacturer, a service agent
or a similarly qualified person in order to avoid a hazard.
• Remove the dishwasher door when discarding the unit.
• Please dispose of packing materials properly.
• Use the dishwasher only for its intended function.
• During installation, the power supply must not be excessively bent or flattened.
• The appliance must be connected to the water line using new hose sets. Do not reuse
old hose sets.
• The maximum number of place settings to be washed is 6.
• The maximum permissible inlet water pressure is 1 Mpa.
• The minimum permissible inlet water pressure is 0.04 Mpa.
SAVE THESE INSTRUCTIONS
1
2. OPERATING INSTRUCTIONS
IMPORTANT: To ensure optimal performance, please read all operating instructions
carefully before using this appliance for the first time.
Control Panel
4
6
Dishwasher Features
START
RESET
PROG.
6
2
1
ON/OFF
7
3
5
1. Rinse Aid Warning Indicator Light: Turns on when the rinse aid dispenser needs to be
refilled.
2. Start/Reset Button: Press this button to start or pause the dishwasher. The
corresponding indicator light will blink when the unit is starting.
3. Wash Cycle Button: Press this button to select a wash cycle.
4. Wash Cycle Indicator Light
5. ON/OFF Button: Turns the power supply on or off.
6. Power Indicator Light: Turns on when the ON/OFF button is pressed.
Interior
6
7
1
1.
2.
3.
4.
5.
6.
7.
8.
9.
5
3
2
8
4
Detergent Dispenser
Cutlery Basket
Filter Assembly
Rinse Aid Dispenser
Spray Arms
Cup Shelf
Basket
Drain Pipe Connector
Inlet Pipe Connector
2
9
3. BEFORE USING FOR THE FIRST TIME
A. Filling the Rinse Aid Dispenser
Rinse Aid Dispenser
Rinse aid is released during the final rinse to prevent water from forming droplets on your dishes,
which can leave spots and streaks. Using rinse aid also improves drying by allowing water to
sheet off dishes. Your dishwasher is designed to use liquid rinse aids. The rinse aid dispenser
is located inside the door next to the detergent dispenser. To fill the rinse aid dispenser, open
the cap and pour rinse aid into the dispenser until the level indicator turns dark. The volume of
the rinse aid container is approximately 110 ml.
Rinse Aid Function
The rinse aid is automatically added during the last rinse to ensure thorough rinsing and
spot/streak-free drying.
Attention!
Only use rinse aid designed for dishwashers. Do not fill the rinse aid dispenser with any other
substances such as dishwashing liquid or detergent. Doing so can damage the dishwasher.
Refilling the Rinse Aid Dispenser
If the rinse aid warning indicator light is not on, you can see how much rinse aid is left by looking
at the color of the rinse aid level indicator “C” located next to the cap. When the rinse aid
container is full, the indicator will be dark. As rinse aid level decreases, the size of the dot will
decrease. Do not let the rinse aid get below 1/4 full.
As the rinse aid level decreases, the size of the black dot on the rinse aid level indicator will
change as illustrated below:
C (Rinse-Aid indicator)
O Full
O 3/4 Full
O 1/2 Full
O 1/4 Full
O Empty
1
2
3
3
1. To open the rinse aid dispenser, turn the cap to the left arrow and lift it out.
2. Pour the rinse aid into the dispenser and be careful not to overfill.
3. Replace the cap and turn the cap to the right arrow to close the dispenser.
NOTE: Clean up any rinse aid that has spilled with an absorbent cloth to avoid excessive
foaming during the next wash. Always replace the rinse aid cap before closing the
dishwasher door.
3
Adjusting the Rinse Aid Dispenser
The rinse aid dispenser has 4 settings. The recommended
setting is “3”. If dishes are still not drying properly or are
spotted, adjust the dial to the next higher number, “4”.
Adjust lever
(Rinse)
MAX
NOTE: Increase the amount of rinse aid if there are still
water droplets on your dishes. Reduce the amount of
rinse aid if there are white stains on your dishes or if there
is a bluish film on glassware or cutlery.
B. Using Detergent
Proper Use of Detergent
Detergents remove debris from your dishes and then help remove them from your dishwasher.
Only use detergent specifically designed for dishwashers. Keep detergent fresh and dry, and
do not put powered detergent into the dispenser until you are ready to wash dishes.
Types of Detergent
There are 3 types of detergent:
• Phosphate and chlorine
• Phosphate without chlorine
• Without phosphate or chlorine
Most pulverized detergents will be phosphate-free. Since phosphate is a natural water
softening agent, if you are using a phosphate-free detergent, we recommend putting salt in the
container even when the water hardness is only 6°dH. If phosphate-free detergents are used in
hard water, white spots will often appear on dishes and glassware. If this is the case, add more
detergent to achieve better cleaning results. Detergent without chlorine may not be able to
remove large/heavy stains. In this case, please choose a wash cycle with a higher temperature.
Concentrated Detergent
Based on their chemical composition, dishwashing detergents can be split into 2 basic types:
• Conventional, alkaline detergents with caustic components
• Low alkaline detergents with natural enzymes
The use of “normal” washing programs in conjunction with concentrated detergents reduces
pollution and is good for your dishes. These wash programs are specifically designed to be
used with concentrated detergent. For this reason, “normal” wash programs with concentrated
detergent can achieve the same results that can otherwise only be achieved using “intensive”
programs.
Detergent Tablets
Depending on the brand, detergent tablets can dissolve at different speeds. For this reason,
some detergent tablets cannot dissolve and develop their full cleaning power during short
programs. Please use a longer wash program/cycle when using detergent tablets to ensure
complete removal of residual detergent.
Note: Detergent tablets can only be used in dishwashers with 3-in-1 functionality or 3-in-1
programs.
4
Detergent Dispenser
The detergent dispenser must be refilled prior to the start of each wash cycle. This dishwasher
uses less detergent and rinse aid than a conventional dishwasher. Generally, only one
tablespoon of detergent will be required for a normal wash load. For more heavily soiled dishes,
use more detergent. Always add the detergent just before starting the dishwasher, otherwise it
will not dissolve properly.
Proper Amount of Detergent
1
2
Detergent powder
Detergent tablet
Push latch to open
Note:
• If the detergent dispenser lid is closed, press the latch to open it.
• Always add detergent just before starting a wash cycle.
• Only use branded detergent for your dishwasher.
WARNING: Dishwashing detergent is corrosive. Keep it out of reach of children.
Filling the Detergent Dispenser
Fill the detergent dispenser with detergent according to the dosage levels as illustrated on the
right:
A. Accommodates 15g of detergent
B. Accommodates 25g of detergent
Please observe the manufacturer’s dosing and storage recommendations as stated on the
detergent packaging.
After filling the detergent dispenser, close the lid and make sure it locks into place.
If dishes are heavily soiled, put more detergent into the pre-wash detergent chamber. This
detergent will be used during the pre-wash phase.
Note:
• Information on the amount of detergent for a single program is listed on the last page.
• Please be aware that the amount of detergent you should use will vary depending on the
soilage level and hardness level of your water.
• Please observe manufacturer’s recommendations on the detergent packaging.
5
4. LOADING THE DISHWASHER BASKET
Recommendations
• Use utensils that are dishwasher safe.
• Use a mild detergent that is “kind to dishes.” Seek further information from the detergent
manufacturer if necessary.
• For delicate items, use a washing program with a low temperature.
• To prevent damage, do not remove glass or cutlery from the dishwasher immediately
after the wash cycle has ended.
Washing Guidelines
The following is a list of items that are not suitable and somewhat suitable for use in the
dishwasher:
Not Suitable:
• Cutlery with wood, horn china or mother of pearl handles
• Plastic items that are not heat resistant
• Older cutlery with glued parts that are not temperature resistant
• Bonded cutlery or dishes
• Pewter or copper items
• Crystal or glass items
• Steel items that may be subject to rusting
• Wooden platters
• Items made from synthetic fibers
Limited Suitability:
• Some glasses may become dull after several washes
• Silver and aluminum products have a tendency to discolor during washing
• Glazed patterns may fade if frequently machine washed
Dishwasher Basket Loading Guidelines
For best performance, follow these guidelines before and after loading the dishwasher basket.
Basket and cutlery baskets may vary according to model.
•
•
Scrape off large amounts of leftover food from your dishes. Soften and remove burnt
food remnants from pans. It is not necessary to rinse dishes before washing.
Place objects in the dishwasher in the following manner:
A. Place cups, glasses, pots/pans, etc., face down.
B. Curved items or those with recesses should be loaded at an angle or slant so that
water can run off.
C. All utensils are must be stacked securely so that they do not tip over.
D. Place all utensils in the same direction so that the spray arms can rotate freely during
the wash cycle.
Note: Very small items should not be washed in the dishwasher, as they can easily fall
out of the basket.
•
Load hollow items such as cups, glasses, pans, etc., with the opening facing downwards
so that water cannot collect in the container.
6
•
•
•
•
•
•
Dishes and cutlery should lie inside one another or cover each other.
Glasses should not touch, as this can cause damage.
Load large, difficult to clean items into the basket.
Knives with long blades should not be stored in an upright position.
Long and/or sharp items and cutlery should be positioned horizontally in the basket.
Do not overload the dishwasher. This is important for optimal results and for energy
conservation.
Loading the Basket
Position dishes and cutlery according to the diagram and corresponding numbers below:
1 Cups
2 Serving Bowls
3 Glasses
4 Saucers
5 Fruit Bowls
6 Oval Platter
7 Dinner Plates
8 Bread and Butter Plates
9 Cutlery Basket
6
5
IN
4
8
1
1
7
3 9
Basket Plate Racks
The basket is fitted with plate racks
which may be stowed horizontally
if needed.
7
2
The Cutlery Basket
Cutlery should be placed in the cutlery basket with the handles at the bottom. If the rack has
side baskets, spoons should be loaded individually into the appropriate slots. Especially long
utensils should be placed in the horizontal position at the front of the upper basket as shown.
1 Dinner Forks
2 Salad Forks
3 Knives
4 Teaspoons
5 Serving Spoons
6 Serving Forks
IN
3 2 5
3 2
3 2
4 441
4 44
4 1
41
14
1 4
4 4
14 4
2 3
6 2 3
5 2 3
WARNING!
• Do not let any items extend through the bottom of the basket.
• Always load sharp utensils with the sharp points pointing down.
For personal safety and optimal performance, place silverware according to these
guidelines:
• Do not nest them together.
• Place silverware with the handles facing down.
• Place knives and other sharp objects with the handles facing up.
8
5. Starting a Wash Cycle
Wash Cycle Table
Note:
•
Indicates that you will need to fill rinse aid dispenser
• *AHAM DW-1-2005: This program is the test cycle; the recommended rinse aid
dispenser setting is 6.
Program
Heavy
Normal
*(AHAM)
Light
Speed
Soak
Cycle
Selection
Information
For extremely
soiled loads
including
pots, pans
and dishes
with food that
has dried and
hardened.
For normally
soiled loads
including
plates,
glassware and
lightly soiled
pans.
For lightly
soiled loads,
including
plates,
glassware and
bowls.
For quickly
washing lightly
soiled loads
that do not
require drying.
For rinsing
dishes you
plan to wash at
a later time.
Description of Cycle
Pre-wash
Pre-wash122º F(50º C)
Pre-Wash 122º F (50º C)
Wash140º F (60º C)
Wash 122º F (50º C)
Rinse
Rinse 149º F (65º C)
Drying
Pre-wash
Pre-wash
Pre-wash
Wash 131º F (55º C)
Rinse
Rinse149º F (65º C)
Drying
Pre-wash
Pre-Wash122º F (50º C)
Wash122º F (50º C)
Rinse
Rinse 140º F (60º C)
Drying
Pre-Wash
Pre-Wash122º F (50º C)
Wash122º F (50º C)
Rinse
Rinse131º F (55º C)
Pre-wash
Deterge
nt
Pre/Mai
n
Run
Time
(Minutes)
Energy
(Kwh)
Water
(Liters)
3/15g
110
0.499
15.9
3/15g
85
0.344
13.6
3/15g
75
0.317
11.5
15g
45
0.236
11.5
N/A
10
0.01
2.5
Rinse
Aid
Turning on the Appliance
To start a wash cycle:
Pull out the dishwasher basket. See section “Loading the Dishwasher Basket.”
Pour in dishwashing detergent. See section “Using Detergent.”
Insert the plug into appropriate outlet. Remember: the power supply is 120V/60 Hz.
Make sure that the water supply is turned to full pressure.
Select appropriate wash program.
Heavy Normal Light Speed Soak
Press the Start/Reset button. The dishwasher will start.
Note:
If you press the Start/Reset button while the dishwasher is running, the selected program light
will stop blinking and the dishwasher will beep every minute until Start/Reset is pressed again.
9
Changing Wash Cycles
If the dishwasher has only been running for a short period of time, you can change the wash
cycle. However, if the machine has run long enough that the detergent has already been
released, it is also possible that the wash water has already been drained. In this case, you will
need to refill the detergent dispenser and then choose the appropriate cycle. See section
“Using Detergent.”
Press the Start/Reset button and hold for three seconds. This will put the dishwasher into
standby mode and allow you to change your wash cycle to the appropriate program. After
choosing the appropriate wash cycle, press the Start/Reset button one more time. The
dishwasher will resume washing in approximately 10 seconds.
Note: Opening the door while the dishwasher is running will cause the dishwasher to
momentarily pause. To start the wash again, close the door and push the Start/Reset button.
The dishwasher will resume washing in approximately 10 seconds.
Indicator Lights:
A. All program lights off:
Stand-by
B. One program light is illuminated
Paused
C. One program light is blinking
Running
Note: If you open the door while the dishwasher is running, the dishwasher will pause. After
closing the door and pushing Start/Reset, the dishwasher will resume in approximately 10
seconds.
Adding a Dish
You can add an additional dish at any time before the detergent has been released from the
detergent dispenser.
1. Press the Start/Reset button.
2. Open the door slightly to pause the washing.
3. After spray arms have stopped, you can open the door completely.
4. Add any additional dishes.
5. Close the door.
6. Press the Start/Reset button. Dishwasher will begin to run again in approximately 10
seconds.
At the End of the Wash Cycle
When the dishwasher cycle has completed, the dishwasher will sound an alarm for 8 seconds
and then stop. Turn off your dishwasher by pressing the ON/OFF button, then turn off the water
supply and open the door. Extremely hot dishes are more susceptible to breaking, so wait
approximately 15 minutes before unloading. Dishes will also dry better if given time to properly
cool.
• Turn off the dishwasher.
Check to make sure all indicator lights are off, signaling that the wash cycle has ended.
Turn off your dishwasher by pressing the ON/OFF button.
Turn off tap water.
•
Carefully open the door.
Hot dishes are more susceptible to breaking. Allow them to cool for 15 minutes before
removing.
Open the dishwasher door and leave it open to allow cool air to circulate. This will
improve your drying.
•
Unload the dishwasher.
It is normal for the dishwasher to remain wet inside after the wash cycle has finished.
WARNING! It is dangerous to open the door while the machine is washing; hot water
has the potential to scald and/or burn.
10
6. MAINTENANCE AND CLEANING
Filtering System
The filter is designed to prevent stray pieces of food and small objects from getting inside the
pump.
1. Main Filter
Food and soil particles trapped by the main filter are
pulverized by a special jet on the spray arm and washed
down the drain.
2. Fine Filter
The fine filter holds soil and food residue in the sump area
to prevent it from being redeposited on dishes during the
wash cycle.
3. Coarse Filter
The coarse filter traps larger items like bone or glass that
could potentially block the drain. To remove items caught
by the coarse filter, gently squeeze the side tabs on the
filter and lift out.
3
2
1
Filter Assembly
The filter will efficiently remove all food particles from the wash water, making it fit to be re-used
again during the cycle. For best performance and results, you should clean the filter assembly
regularly. Remove the large food particles trapped in the coarse filter after each wash cycle by
rinsing the filter under running water. To remove the filter assembly, simply pull up on the
handle.
WARNING!
• Never run the dishwasher if the filters are not in place.
• The dishwasher should never be used without filters.
• Improperly replacing the filter will reduce the performance level of the dishwasher
and potentially damage your dishes and utensils.
Step 1:
Step 2:
Turn the coarse filter in a counter-clockwise motion
Lift up
Step 3:
Lift the main filter out
NOTE: Replace the filter assembly by reversing steps 3 through 1. Insert the main filter back in
place, insert the fine filter and coarse filter, and screw the coarse filter back in place by turning it
in a clockwise motion.
11
Remember:
• Inspect all filters before every cycle to ensure there are no food particles.
• By unscrewing the coarse filter, the entire filter assembly can be removed. Always
remove food remnants and clean the filters by placing them under running water.
NOTE: The entire filter assembly should be cleaned once a week.
Cleaning the Filter
Use a cleaning brush to clean both the coarse filter and the fine filter. Reassemble all filter parts
as shown in the diagram and re-insert entire filter assembly into the dishwasher by positioning
and pressing down.
WARNING: When cleaning the filters, do not hit them against a surface. This could
cause the filters to become misshaped and potentially affect the dishwasher’s
performance.
Maintaining Your Dishwasher
Clean your control panel by using a lightly damp cloth. Finish by drying thoroughly.
To clean the exterior, use a wax specifically designed for dishwashers.
Never use any sharp objects, scouring pads or harsh chemical cleaners on any part of your
dishwasher.
Cleaning the Door
Clean the edge around the door with a soft cloth that is lightly damp. Never use any type of
spray cleaners to ensure that water does not enter the door lock and affect electrical
components.
WARNING!
• Never use a spray cleaner to clean the door panel. The door lock and electrical
components may be damaged.
• Never use abrasive cleaning products or rough towels to avoid scratching or
leaving spots on the stainless steel surface.
Protection against Freezing
During the winter months, implement the following procedures after each wash cycle to prevent
water lines from potential damage:
1. Cut off all electrical power to the dishwasher.
2. Turn off the water supply and disconnect the water inlet pipe from the water valve.
3. Drain water from both the inlet pipe and the water valve. You can use a pan to catch
any water.
4. Reconnect the water inlet pipe to the water valve.
5.
Remove the filter at the bottom of the dishwasher tub. You can use a sponge to soak
up excess water in the sump.
NOTE: If your dishwasher stops working due to ice, please contact an authorized service
department.
12
Cleaning the Spray Arms
You can easily remove the spray arms to for
periodically cleaning the nozzles. This will prevent
possible clogging. To remove a spray arm, simply
grasp in the middle and pull upwards. Wash nozzles
by placing under a stream of running water. Carefully
replace them, making sure that they can rotate freely.
Keep Your Dishwasher Running Smoothly
•
•
•
•
•
After Every Wash
After every wash, turn off the water supply and leave the door slightly open to ensure
that any lingering moisture and odor can properly escape.
Remove Electrical Plug
Before any type of cleaning or maintenance, always unplug your dishwasher from the
electrical outlet.
No Solvents or Abrasive Cleaning Products
Never use solvents or abrasive cleaning products when cleaning the exterior or rubber
parts of your dishwasher.
Always use a soft cloth and warm, soapy water
To clean spots or stains on the interior surface, use a soft cloth with vinegar or a product
specifically designed for interior use on dishwashers.
Vacation
If you plan on leaving for an extended period of time, run one wash cycle with the
dishwasher completely empty. Then unplug your dishwasher from the electrical outlet,
turn off the water supply and leave the door slightly open. The door seals will last longer
and you will eliminate the potential for any odors to accumulate.
Cleaning the Seals
If food becomes trapped within the seals, odors can quickly form. To prevent this, clean
all seals periodically with a damp cloth.
7. INSTALLATION INSTRUCTIONS
Attention: The installation of the pipes and electrical equipment should always be done
by a professional.
WARNING: Electrical Shock Hazard
Disconnect all electrical power before you install your dishwasher.
Failure to do so can result in electrical shock, injury or death.
Preparing for Installation
For ideal use, install your dishwasher near an existing inlet, drain hose and power code.
Choose one side of your dishwasher to use for connecting drain hoses.
13
POSITIONING THE APPLIANCE
Place your dishwasher in the desired location, ensuring that there is a wall for the back to rest
against. Your dishwasher is equipped with water supply and drain hoses that can be positioned
on either the right or left in order to meet varying installation needs.
POWER CONNECTION
WARNING!
To ensure your safety:
• NEVER USE AN EXTENSION CORD OR ADAPTER PLUG WITH THIS DISHWASHER.
• DO NOT, UNDER ANY CIRCUMSTANCES, CUT OR REMOVE THE GROUNDING
PRONG FROM THE POWER CORD.
Electrical Requirements:
View the rating label on your dishwasher for the proper voltage requirements and then connect
the dishwasher to the appropriate power supply. Use the required fuse 10 amp, time delay fuse,
or circuit breaker as recommended and provide a separate circuit that will only be used with this
dishwasher.
WARNING: Ensure proper grounding exists before use.
Electrical Connection
Always check to make sure that the voltage and frequency of the power you are using
corresponds to those listed on the dishwasher rating plate. Only insert the plug into an electrical
outlet that is properly grounded. If the electrical outlet is not appropriate, replace the outlet. Do
not use adapters or anything similar; they can cause overheating and burns.
Grounding Instructions:
This dishwasher must be grounded. If there is any type of malfunction or breakdown, grounding
will reduce the risk of electric shock by providing the path of least resistance for the current to
travel. This dishwasher is equipped with a power cord and 3 prong grounding plug. It must be
plugged into a 3-prong outlet that has been installed and grounded in accordance with all local
standards and requirements.
WARNING!
• Improperly grounding this dishwasher can result in electric shock.
• Always have a certified electrician check to make sure that your dishwasher is
properly grounded if you are ever unsure.
• Never alter or modify the 3-prong plug that is installed on the electrical cord. If it
does not fit into your wall outlet properly, please contact a certified electrician.
14
WATER CONNECTION
Back View
Back of Dishwasher:
1. Drain port
2. Power Cord
3. Inlet port
Your dishwasher comes equipped with a “quick connect” assembly that includes the inlet and
drain hose. However, the faucet adapter must be installed on your faucet before you can
connect the dishwasher. The adapter is compatible with faucets that have either inside (female)
or outside (male) threaded connections.
Quick Connect Assembly
Drain Hose:
1. Drain port connection
2. Quick connect connection
Inlet Hose
3. Inlet port connection
4. Quick connect connection
Faucet Adapter
5. Faucet adapter
6. Faucet washer
Quick Connect:
7. Pressure relief valve
8. Faucet adapter connection
9. Locking collar
10. Inlet hose connection
11. Drain hose connection
WARNING!
In order to avoid unnecessary water in the hose, close the faucet after use.
15
1. Screw the faucet adapter onto/into your faucet. Check to make sure there are no leaks.
You can use Teflon tape to temporarily eliminate leaks if necessary.
2. Connect the six-sided connection of the drain hose to the drain port on the back of your
dishwasher. Make sure not to damage the threads by over-tightening.
3. Connect the star shaped connection of the inlet hose to the inlet port on the back of the
dishwasher. Make sure not to damage the threads by over tightening.
4. Connect the circular connection of the drain hose to the longer (bottom) male connection
on the quick connect.
5. Connect the circular connection of the inlet hose to the shorter (top) male connection on
the quick connect.
6. To attach the quick connect onto the faucet adapter, pull down on the outer locking collar
of the quick connect while pushing the quick connect upward into the faucet adapter.
7. When the quick connect snaps onto the faucet adapter, release the locking collar.
Check to make sure that the connection is secure.
8. Slowly open the hot water line and check to see if there are any water leaks at the hose
connections. If you see a leak, immediately turn off the water supply and repair the
connection.
Important:
1. Once the water supply is open, even if you close it immediately after, the inlet hose will
become pressurized.
2. To relieve water pressure from inside the inlet hose, first make sure the water line (faucet)
is closed, then press and hold the red pressure relief button on the quick connect until the
water stops flowing.
WARNING
Failure to relieve water pressure before disconnecting the quick-connect from the faucet
will result in back-pressure and over-spray. This water can be very hot and can
potentially cause severe burns and/or scalding.
DANGER
Do not let children disconnect the dishwasher. Closely supervise all children near the
dishwasher.
Note:
Hard water conditions will negatively affect your dishwasher’s washing performance. Hard
water can also contribute to a white filmy substance, also known as “lime,” on the stainless steel
surface of the dishwasher tub and heating element. To minimize the buildup of lime,
periodically run the dishwasher empty with 1 cup of white vinegar. For optimal results, do this
on a weekly basis.
To Disconnect your Dishwasher
1. Completely shut off the water supply at the faucet.
2. Unplug the electrical cord from the outlet.
STARTING THE DISHWASHER
Before starting your dishwasher, you should check to make sure:
1. The dishwasher is level
2. The inlet valve is open
3. None of the connections are leaking
4. All wires are tightly connected
5. Power is turned on
6. The inlet and drain hoses are not knotted
7. Remove all packing materials and printed inserts from inside the dishwasher.
Attention:
After installation, keep this manual for easy reference. The contents will be very
helpful for ensuring optimal performance.
16
8. TROUBLESHOOTING TIPS
Before Calling for Service
Please refer to these troubleshooting tips for possible solutions to minor problems. If the
problem persists, please contact an authorized service department or customer service.
Problem
Dishwasher will
not start.
Technical
Problems
Water is not
pumped out.
Possible Causes
A fuse may be blown
or the circuit breaker
may have tripped.
The power supply
isn’t turned on.
Dishwasher door
hasn’t been properly
closed.
There’s a kink in the
drain hose.
The filter is plugged.
Kitchen sink is
plugged.
Lingering
detergent suds
Wrong detergent
Rinse aid was spilled.
General
Problems
Stains on inside
of dishwasher
White film on
the inside
surface
Cutlery has rust
stains
Detergent with
colorant was used.
Hard water
Your cutlery is not
corrosion resistant.
Traces of salt got into
the wash cycle.
The lid of the water
softener container is
loose.
Noise
Noise in interior
of dishwasher
The spray arm is
hitting an item in the
17
What to Do
Replace the fuse or reset your circuit breaker.
Turn off other appliances that may be sharing the
same circuit.
Make sure that the dishwasher is turned on.
Check to make sure that the power cord is
properly plugged into the wall outlet.
Re-close the dishwasher door and make sure
that it has properly latched.
Check to make sure the drain hose doesn’t have
any kinks or bends.
Check the coarse filter to make sure there are no
food particles lodged inside. See “Cleaning the
Filter.”
Check to make sure that your kitchen sink is
draining properly. If not, you may need to
contact a professional plumber.
You must use the proper dishwasher detergent to
eliminate sud build-up. If suds do accumulate,
open the door and allow them to evaporate.
Then pour in a gallon of cold water to the bottom
of the dishwasher, close the door and turn the
machine to the “Soak” cycle to allow the water to
drain. Repeat as many times as necessary.
If you do spill rinse aid, make sure to wipe it up
immediately to avoid suds.
Use a non-colorant detergent.
Wear rubber gloves and scrub the interior with a
damp sponge and dishwasher detergent.
Use corrosion resistant cutlery
After adding dishwasher salt, make sure to run
the Quick Wash cycle with an empty load. (Do
not choose Turbo cycle if it is an option).
Check lid and make sure it is securely closed.
Pause the wash cycle and rearrange the dishes.
Rattling nose in
interior
Noise in the
water pipes
Dishes aren’t
clean
Unsatisfactory
Washing
Results
Glasses look
cloudy
Dishes appear
to have black or
gray marks
Detergent
dispenser still
has detergent
remaining after
the wash.
The dishes are
not dry
basket.
An item is not
securely placed in
the basket.
Potentially an
installation problem
or loose connections
at cross-sections in
the piping
Dishes were
improperly loaded
The wash cycle
selected was not
strong enough
There wasn’t enough
detergent
Dishes blocked the
spray arms
Filter system is not
clean or is improperly
fitted. This can also
cause the spray arms
to become clogged.
Soft water and too
much detergent
Aluminum cutlery has
been rubbed against
the dishes
Dishes were likely
blocking the
dispenser and
preventing it from
opening properly
Improperly loaded
Not enough rinse aid
used
Removing dishes too
early
Unsatisfactory
Drying
Results
Wrong wash cycle
Cutlery has a poor
quality coating
18
Pause the wash cycle and rearrange the dishes.
Will not harm your dishwasher’s performance.
Contact your plumber.
See “Loading the Dishwasher.”
Select a stronger wash cycle, see “Wash Cycle
Table.”
Use more detergent or opt for a more powerful
detergent.
Rearrange dishes, ensuring that the spray arms
can move freely.
Check to make sure the filter is clean and
properly inserted. Clean the spray arm jets. See
“Cleaning the Spray Arms”
Use less detergent if you have soft water, and
choose the shortest cycle possible for washing
glassware.
A mild abrasive cleaner will eliminate the marks.
Re-load the dishes properly and re-wash.
Load the dishwasher properly as suggested in
“Loading the Dishwasher.”
Increase/Re-fill the rinse aid dispenser.
Never empty your dishwasher immediately after
washing. Open the door slightly and allow steam
to escape and unload dishes only when they
have cooled. Always empty the low basket first
to prevent the top dishes from dripping water
onto those beneath.
Shorter wash cycles also have a lower washing
temperature. Choose a wash cycle that’s longer
and has a higher temperature.
Water will not drain properly with low or poor
quality cutlery. These type of dishes are not
suitable for the dishwasher.
ERROR CODES
In the event of a malfunction, the dishwasher will display error codes:
Code
The Start/Reset light blinks
intermittently.
Meaning
Longer inlet time
Overflow
Possible Cause
Faucet is not open, water
intake is restricted, or the
water pressure is too low.
The dishwasher is leaking.
WARNING!
• If overflow occurs, turn off the main water supply and call an authorized service
department or customer service.
• If there is lingering water in the tub due to an overfill or leak, be sure to remove
the water before starting the dishwasher again.
19
TECHNICAL INFORMATION
Height
Width
Depth
Voltage:
Water Pressure
Hot Water Connection:
Power Supply:
Capacity
17.25 inches
21.70 inches
19.70 inches
See Rating Label
0.04-1.0MPa
Max: 140º F 60 º C
See Rating Label
6 place settings
20
DETAILED PARTS DIAGRAM
21
ELECTRICAL DIAGRAM
22