1
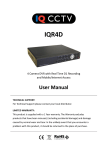
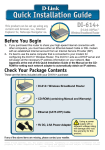
2 Install the ME101 Configuration Utility
802.11b Wireless Ethernet Bridge ME101
Default
Ethernet
DC in 5V
Antenna
ME101 Wireless
Ethernet Bridge
Installation Guide
Follow these quick steps to install your bridge.
Note: Before you begin, have your wireless network set up and working.
up the ME101 Wireless Ethernet Bridge
1 Set
a. Unpack the box and verify the contents.
Note: To run the configuration utility, you must have the bridge
connected to a computer with Windows® 98, Me, 2000, or XP —
either directly or through a hub. If you have a Macintosh® computer,
please refer to the User’s Guide on the ME101 Resource CD for configuration instructions.
Gaming console or other
Ethernet-enabled device
f. Connect the power adapter to the wireless bridge and plug
the power adapter in to a power outlet. The Power
and
Wireless
lights should light up.
g. After the Wireless light
lights up, turn on the Ethernet-enabled
device.
Connecting multiple devices
e. Connect the ME101 Wireless Bridge to a hub using the provided
Ethernet cable. Then, connect the powered down game console(s)
and the powered down Ethernet-enabled device(s) to the hub.
a. Insert the ME101 Resource CD in a networked computer’s
CD-ROM drive.
The NETGEAR software installation utility should start up
automatically.
b. Click Install Utility.
c. Follow the instructions on screen to install the ME101
Configuration Utility.
d. Click Finish.
e. Restart the computer.
Power adapter
Cat 5 crossover
Ethernet cable
3 Connect the Bridge to the Computer
Cable or
DSL modem
Resource CD for Wireless
Ethernet Bridge, Installation guide,
Support information card,
Warranty card
Wireless Router
MR814
a. If you had the bridge powered up, unplug it.
b. Connect the provided Ethernet crossover cable between the
computer and the bridge.
PC
ME101 Wireless Ethernet Bridge
b. Place the bridge away from potential sources of interference, such
as computers, monitors, TVs, microwaves, cordless phones, or
large metal surfaces and in an elevated location such as a high shelf
or on a wall in the center of your wireless access area.
Warning: Failure to follow these guidelines can cause
intermittent or complete failure of wireless connectivity.
c. Lift the bridge’s antenna so it is vertical.
d. Turn off the gaming console(s) or other Ethernet-enabled device(s).
Connecting one device
e. Connect the provided Ethernet cable between the ME101 Wireless
Bridge and the gaming console or other Ethernet-enabled device.
Note: You may connect the computer to the bridge through a hub.
ME101 Wireless
Ethernet Bridge
10 BASE-T HUB
EN104
Link
Rx
PWR
Default
Ethernet
DC in 5V
Antenna
Normal / Uplink
COL
1
2
3
4
EN104TP Ethernet Hub
Gaming console or other
Ethernet-enabled device
f. Connect the power adapters to the bridge and the hub. Plug the
power adapters in to power outlets. The Power
and
Wireless
lights should light up.
g. After the Wireless light
lights up, turn on any game console(s)
first. Then, turn on any other Ethernet-enabled devices.
For either setup, if the bridge and the Ethernet-enabled device(s) are
successfully connected, the Network light
will light up. This
light flashes when there is network activity.
Note: If your setup works with the default settings, you don’t need to
install the software from the provided CD to configure the bridge.
Default
Ethernet
DC in 5V
Antenna
ME101 Wireless
Ethernet Bridge
c. Plug the power adapter into the bridge and then plug the power
adapter into a power source.
4
ME101 802.11b Wireless Ethernet Bridge Lights
Configure the Bridge
Once you are logged into the Configuration Utility, you can view the
status of your home wireless network and current configuration of the
bridge, change the password, enable WEP security (if you have it set
up on your wireless network), select a specific network for the wireless
connection, or make other configuration changes.
PWR
Green
WLAN
Green
LAN
Green
a. Choose Programs>NETGEAR ME101 Bridge>ME101
Configuration Utility from the Start menu.
b. If the bridge’s name doesn’t appear in the Bridge Name list, select
Browse to have the utility search for an active bridge.
OFF: No power to the unit.
ON: Power applied to the unit.
OFF: No wireless LAN activity.
Flashing: Searching for an access point or
wireless router.
ON: Communicating to a wireless LAN.
OFF: No Ethernet traffic.
Flashing: Wired Ethernet traffic.
ON: Connected to the Ethernet.
Reset to Factory Defaults
•
Check that the Wireless light
is on steadily.
•
Make sure the Network Name (SSID), WEP key (if WEP is enabled),
and Country/Region selections are the same for all devices connected
to the same wireless network.
•
If the device is connected to a hub, disconnect all the devices from the
hub and connect the problem device directly to the bridge to test it.
The Configuration Utility cannot see any bridge even if I click Browse.
•
Verify that the cable connecting your computer and the bridge is the
correct crossover cable.
•
Make sure the Ethernet cable’s connectors are securely plugged in.
d. Click Login.
Hold the Default button for at least 6 seconds and then release the
button. This reboots the ME101 Bridge and reverts all the current settings
to the factory defaults.
e. Click the Configuration tab.
Troubleshooting
Technical Support
f. Either select an available
Network Name (SSID) from
the list or type the SSID name.
If you have trouble setting up your ME101, check these tips.
PLEASE REFER TO THE SUPPORT INFORMATION CARD THAT SHIPPED
WITH YOUR PRODUCT.
g. If you are not in the United
States, select a country or region
from the Country/Region list.
•
Check the configuration utility for the router or access point to see if
it lists the ME101 Bridge.
•
Use the configuration utility for the bridge to verify that the Network
Name (SSID), Country/Region, and WEP settings match those of
the router or access point.
c. Type password as the password.
The Wireless light
h. Type a unique IP address for
the bridge. The first three sets
of numbers (xxx.xxx.xxx.yyy)
should be the same as your
access point or router. The last
number (.yyy) should be a
unique number on your network.
Note: If you have more than one ME101 on the network, only one
can use the default address of 192.168.0.200.
i. Click Apply.
j. If you are through making changes, click Exit.
k. To use the bridge with a different computer or other Ethernetenabled device, return to procedure 1 to connect the bridge.
June 2003
By registering your product at www.NETGEAR.com/register, we can provide
you with faster expert technical support and timely notices of product and
software upgrades.
NETGEAR, INC.
Support Information
Phone: 1-888-NETGEAR (For US & Canada only) — 24x7 phone support
My gaming console or remote computer can’t connect to the Internet.
For other countries see your Support information card.
•
E-mail: [email protected] (24x7 online support)
Turn off all devices. Then, power on the wireless router (or access
point) and power on the bridge. Check that the bridge connects to
the wireless router or access point. If it connects, power on the
gaming console or remote computer.
•
With power on, disconnect everything from the hub. Re-connect the
ME101, then the game console(s). Finally, connect the other device(s).
•
If the device is connected to a hub, disconnect all the devices from the
hub and connect the problem device directly to the bridge to test it.
My bridge-enabled computer could not communicate with my wirelessenabled computer or printer.
•
M-10034-02
is off. I can’t connect to the router or access point.
Note: For other troubleshooting information, please see the User’s Guide
on the ME101 Resource CD or at the NETGEAR, Inc. web site.
Check that the wireless-enabled computer or printer is on the same
wireless network as the computer using the bridge.
Web site: www.NETGEAR.com
0560 !
Attention: When you configure the wireless settings of this device
please make sure to select the correct country settings. Due to EU-law,
the country settings must be identical to the country where the device
is operating (important due to non-harmonized frequencies in the EU).
©2003 by NETGEAR, Inc. NETGEAR, the Netgear logo, Everybody’s Connecting, Auto
Uplink and The Gear Guy are trademarks or registered trademarks of Netgear, Inc. in the
United States and/or other countries. Microsoft and Windows are trademarks or registered
trademarks of Microsoft Corporation in the United States and/or other countries. Other
brand or product names are trademarks or registered trademarks of their respective owners.
Information is subject to change without notice. All rights reserved.