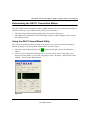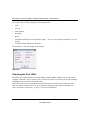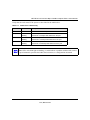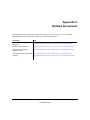
1
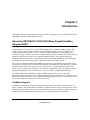
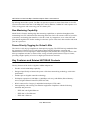
NETGEAR 10/100/1000
Mbps CardBus Adapter
GA511 User Manual
NETGEAR, Inc.
4500 Great America Parkway
Santa Clara, CA 95054 USA
202-10044-02
March 2007
v2.0
Technical Support
Please refer to the support information card that shipped with your product. By registering your
product at http://www.netgear.com/register, we can provide you with faster expert technical
support and timely notices of product and software upgrades.
NETGEAR, INC. Support Information
Phone: 1-888-NETGEAR, for US & Canada only. For other countries, see your Support
information card.
E-mail: [email protected]
North American NETGEAR website: http://www.netgear.com
Statement of Conditions
In the interest of improving internal design, operational function, and/or reliability, NETGEAR reserves the right to
make changes to the products described in this document without notice.
NETGEAR does not assume any liability that may occur due to the use or application of the product(s) or circuit
layout(s) described herein.
©2007 NETGEAR, Inc. NETGEAR, the NETGEAR logo, The Gear Guy and Everybody's Connecting are
trademarks or registered trademarks of NETGEAR, Inc. in the United States and/or other countries.
Microsoft and Windows are registered trademarks of Microsoft Corporation in the United States and/or
other countries. Other brand and product names are trademarks or registered trademarks of their respective
holders. Information is subject to change without notice. All rights reserved.
March 2007
Certificate of the Manufacturer/Importer
It is hereby certified that the Model GA511 Gigabit CardBus Adapter has been suppressed in accordance with the
conditions set out in the BMPT- AmtsblVfg 243/1991 and Vfg 46/1992. The operation of some equipment (for example,
test transmitters) in accordance with the regulations may, however, be subject to certain restrictions. Please refer to the
notes in the operating instructions.
Federal Office for Telecommunications Approvals has been notified of the placing of this equipment on the market and
has been granted the right to test the series for compliance with the regulations.
VCCI Statement
This equipment is in the Class B category (information equipment to be used in a residential area or an adjacent area
thereto) and conforms to the standards set by the Voluntary Control Council for Interference by Data Processing
Equipment and Electronic Office Machines aimed at preventing radio interference in such residential areas. When used
near a radio or TV receiver, it may become the cause of radio interference. Read instructions for correct handling.
ii
v2.0, March 2007
Contents
About This Manual
Conventions, Formats and Scope ..................................................................................... v
How to Use This Manual .................................................................................................. vi
How to Print this Manual ................................................................................................... vi
Revision History ................................................................................................................vii
Chapter 1
Introduction
About the NETGEAR 10/100/1000 Mbps Gigabit CardBus Adapter GA511 ..................1-1
CardBus Support ......................................................................................................1-1
Bus-Mastering Capability .........................................................................................1-2
Frame Priority Tagging for Virtual LANs ...................................................................1-2
Key Features and Related NETGEAR Products ............................................................1-2
What’s in the Box? ..........................................................................................................1-4
Hardware Description .....................................................................................................1-5
Chapter 2
Basic Setup
What You Need Before You Begin ..................................................................................2-1
Verifying System Requirements ...............................................................................2-1
Preparing to Install Your GA511 Gigabit CardBus Adapter .............................................2-2
Selecting the Network Cable ....................................................................................2-2
Installation Order ......................................................................................................2-2
Basic Installation Instructions .........................................................................................2-3
Determining the GA511 Connection Status ....................................................................2-7
Using the GA511 Smart Wizard Utility .....................................................................2-7
Checking the Port LEDs ...........................................................................................2-8
Chapter 3
Configuration and Troubleshooting
Understanding the Configuration Options ......................................................................3-1
Configuring Optional Adapter Properties ........................................................................3-2
Contents
iii
Troubleshooting ..............................................................................................................3-3
Basic Tips .................................................................................................................3-4
Checking the Device Driver Installation ...................................................................3-4
Using a Troubleshooting Checklist ...........................................................................3-5
Frequently Asked Questions ....................................................................................3-5
Appendix A
Technical Specifications
Technical Specifications for the GA511 ......................................................................... A-1
Appendix B
Preparing Your PCs for Network Access
Preparing Your Computers for TCP/IP Networking ....................................................... B-1
Configuring Windows 98 and Me for TCP/IP Networking .............................................. B-1
Install or Verify Windows Networking Components ................................................. B-1
Enabling DHCP in Windows 98 and Me .................................................................. B-3
Selecting Windows Internet Access Method ........................................................... B-5
Verifying TCP/IP Properties .................................................................................... B-5
Configuring Vista, Windows 2000, or XP for TCP/IP Networking .................................. B-6
Install or Verify Windows Networking Components ................................................. B-6
DHCP Configuration of TCP/IP in Windows Vista, XP or 2000 ............................... B-7
Appendix C
Related Documents
Index
iv
Contents
About This Manual
The NETGEAR® NETGEAR 10/100/1000 Mbps CardBus Adapter GA511 User Manual describes
how to install, configure and troubleshoot the NETGEAR 10/100/1000 Mbps Gigabit CardBus
Adapter GA511. The information in this manual is intended for readers with intermediate
computer and Internet skills.
Conventions, Formats and Scope
The conventions, formats, and scope of this manual are described in the following paragraphs:
•
•
Typographical Conventions. This manual uses the following typographical conventions::
Italics
Emphasis, books, CDs, file and server names, extensions
Bold
User input, IP addresses, GUI screen text
Fixed
Command prompt, CLI text, code
italics
URL links
Formats. This manual uses the following formats to highlight special messages:
Note: This format is used to highlight information of importance or special interest.
Tip: This format is used to highlight a procedure that will save time or resources.
Warning: Ignoring this type of note may result in a malfunction or damage to the
equipment.
v
v2.0, March 2007
NETGEAR 10/100/1000 Mbps CardBus Adapter GA511 User Manual
Danger: This is a safety warning. Failure to take heed of this notice may result in
personal injury or death.
•
Scope. This manual is written for the GA511 Gigabit CardBus Adapter according to these
specifications:
Product Version
NETGEAR 10/100/1000 Mbps Gigabit CardBus Adapter GA511
Manual Publication Date
March 2007
.
Note: Product updates are available on the NETGEAR, Inc. website at
http://kbserver.netgear.com/products/GA511.asp.
How to Use This Manual
The HTML version of this manual includes the following:
•
Buttons,
at a time
and
, for browsing forwards or backwards through the manual one page
•
A
button that displays the table of contents and an
button. Double-click on a
link in the table of contents or index to navigate directly to where the topic is described in the
manual.
•
A
model.
•
Links to PDF versions of the full manual and individual chapters.
button to access the full NETGEAR, Inc. online knowledge base for the product
How to Print this Manual
To print this manual, you can choose one of the following options, according to your needs.
•
Printing a Page from HTML. Each page in the HTML version of the manual is dedicated to
a major topic. Select File > Print from the browser menu to print the page contents.
vi
v2.0, March 2007
NETGEAR 10/100/1000 Mbps CardBus Adapter GA511 User Manual
•
Printing from PDF. Your computer must have the free Adobe Acrobat reader installed in
order to view and print PDF files. The Acrobat reader is available on the Adobe Web site at
http://www.adobe.com.
– Printing a PDF Chapter. Use the PDF of This Chapter link at the top left of any page.
–
•
Click the PDF of This Chapter link at the top left of any page in the chapter you want
to print. The PDF version of the chapter you were viewing opens in a browser
window.
•
Click the print icon in the upper left of your browser window.
Printing a PDF version of the Complete Manual. Use the Complete PDF Manual link
at the top left of any page.
•
Click the Complete PDF Manual link at the top left of any page in the manual. The
PDF version of the complete manual opens in a browser window.
•
Click the print icon in the upper left of your browser window.
Tip: If your printer supports printing two pages on a single sheet of paper, you can
save paper and printer ink by selecting this feature.
Revision History
Part Number
Version
Description
Number
202-10044-02
2.0
Addition of Vista compatibility
vii
v2.0, March 2007
NETGEAR 10/100/1000 Mbps CardBus Adapter GA511 User Manual
viii
v2.0, March 2007
Chapter 1
Introduction
This chapter introduces the features, package contents, and appearance of the NETGEAR 10/100/
1000 Mbps Gigabit CardBus Adapter GA511.
About the NETGEAR 10/100/1000 Mbps Gigabit CardBus
Adapter GA511
Congratulations on your purchase of the NETGEAR® GA511 Gigabit CardBus Adapter. The
GA511 connects your CardBus notebook to a Gigabit Ethernet network, incorporating a new
technology that transfers data at a rate of 1 Gbps or 1000 megabits per second (Mbps) over
standard Category 5 cables. Performance is optimized and network overhead on the host system is
minimized with the use of the GA511 Gigabit CardBus Adapter. This guide describes the
installation and use of the GA511 for operation with a Microsoft® Windows® Vista, Windows®
XP, Windows® 2000, Windows® Me, or Windows® 98SE 2nd edition system.
The GA511 has demonstrated interoperability with all major Gigabit Ethernet equipment on the
market that is compliant with IEEE 802.3ab standards and should work with most non-compliant
Gigabit Ethernet products. In addition, because the GA511 uses standard Ethernet frame and
Media Access Control (MAC) formats, it provides full compatibility with Fast Ethernet network
equipment through network switches from a variety of vendors, including NETGEAR®.
The NETGEAR 10/100/1000 Mbps Gigabit CardBus Adapter GA511 is a 32-bit, highperformance adapter that allows any CardBus-equipped computer to connect to an Ethernet or Fast
Ethernet network. The Model GA511 supports hot-swapping, allowing you to insert and remove it
as necessary, without having to turn off or reset your PC.
CardBus Support
CardBus is a 32-bit bus-mastering architecture that operates at PCI local-bus speeds of up to 33
MHz, yielding a peak bandwidth of 132 MB/sec. Unlike 16-bit PC Cards, which operate at slower
ISA bus speeds of 8 MHz using an ISA-like asynchronous protocol, CardBus provides a fast 32-bit
multiplexed address/data path that allows full access to gigabit Ethernet's bandwidth.
1-1
v2.0, March 2007
NETGEAR 10/100/1000 Mbps CardBus Adapter GA511 User Manual
By utilizing internal bus speeds, CardBus can operate at speeds six times faster than a 16-bit PC
Card and five times faster than a 100 Mbps PC Card. In addition, CardBus PC cards operate at 3.3
Volts, saving power and conserving your PC's battery life.
Bus-Mastering Capability
Model GA511 features leading-edge bus-mastering capabilities to optimize throughput while
maintaining low CPU utilization. Bus mastering allows the GA511 to assume control of your PC's
system bus, accelerating data transfers. 16-bit PC Cards, by comparison, act as a bus slave and
pass data through the CPU before sending it to the host system. This slows data transfers and strain
your PC's processor.
Frame Priority Tagging for Virtual LANs
The GA511 is 802.1Q/1p-compliant for frame priority tagging. The IEEE 802.1Q standard defines
the operation of Virtual LAN (VLAN) bridges that permit the definition, operation and
administration of VLAN topologies within a bridged LAN infrastructure. Using the GA511 with
802.1p-compliant switches or routers offers a range of traffic prioritization of Layer 2 frames,
providing a higher quality of service on high-speed local area networks.
Key Features and Related NETGEAR Products
The key features of the GA511 Gigabit CardBus Adapter are:
•
Flexible 10/100/1000 Mbps capability
•
Designed specifically to harness the power of the latest networking technology with 32-bit
performance
•
Includes proven Gigabit controller technology
•
Full-duplex operation (2,000 Mbps: 1,000 Mbps each way) with DMA (Direct Memory
Access) Gigabit Ethernet interface (IEEE 802.3ab)
•
RJ-45 connector for Category 5 unshielded twisted pair (UTP) cable
•
Interoperability with existing Fast Ethernet equipment compliance with the following
standards and protocols:
–
IEEE 802.3ab Gigabit Ethernet
–
IEEE 802.3u Fast Ethernet
–
IEEE 802.3 Ethernet
1-2
v2.0, March 2007
NETGEAR 10/100/1000 Mbps CardBus Adapter GA511 User Manual
–
IEEE 802.3u Auto Negotiation for auto-selectable 10/100/1000 Mbps line speed
–
IEEE 802.1Q VLAN
•
Standard Ethernet frame size (up to 1500 bytes), optional Jumbo frame size (3000 bytes)
•
33 MHz, 32-bit CardBus bus master with adaptive DMA channels
•
Software driver support for Windows Vista, Windows XP, Windows 2000, Windows Me, and
Windows 98SE
The optional advanced configuration choices include:
•
Configurable 802.1Q VLAN ID and 802.1Q/1p VLAN frame tagging for traffic prioritization
•
Optional Jumbo Ethernet frame size (3000 bytes)
•
Configurable link speed and duplex mode
•
Checksum offloading to the network card
•
Offload of TCP large packets to the network card
The following NETGEAR products can be configured to communicate with the GA511 Gigabit
CardBus Adapter:
•
FS750AT Modular Fast Ethernet Switch with 48-Port 10/100 Mbps + 2 Gigabit Ports
•
FS726AT Modular Fast Ethernet Switch with 24-Port 10/100 Mbps + 2 Gigabit Ports
•
FS526T 24-Port Smart Switch with Gigabit Ports
•
GS104 4-Port Gigabit Ethernet Switch
•
GS108 8-Port Copper Gigabit Switch
•
GS105 5-Port 10/100/1000 Mbps Gigabit Ethernet Switch
•
GS524T 24-Port 10/100/1000 Mbps Copper Gigabit Switch
•
GS516T 16-Port 100/1000 Mbps Copper Gigabit Switch
•
GSM712 12-Port Managed Gigabit Switch
•
GSM712F 12-Port Managed Fiber Gigabit Switch
•
FSM750S 48-Port 10/100 Mbps Managed Stackable Switch with Gigabit Ports
•
FSM726S 24-Port 10/100 Mbps Managed Stackable Switch with Gigabit ports
•
FSM726 24-Port Mbps Managed Switch with Gigabit Ports
•
FS526T 24-Port Smart Switch with Gigabit Ports
1-3
v2.0, March 2007
NETGEAR 10/100/1000 Mbps CardBus Adapter GA511 User Manual
•
GSM7324 24-Port Layer 3 Managed Gigabit Switch
•
GSM7312 12-Port Layer 3 Managed Gigabit Switch
What’s in the Box?
The product package should contain the following items:
•
GA511 Gigabit CardBus Adapter Installation Guide for the NETGEAR 10/100/1000 Mbps
Gigabit CardBus Adapter GA511 (201-10177-01)
•
NETGEAR Adapter Resource CD, including:
•
–
Driver and System Utility Software
–
NETGEAR 10/100/1000 Mbps CardBus Adapter GA511 User Manual
–
Animated Network Properties Configuration Tutorial
–
PC Networking Tutorial
Warranty/Support information card
If any of the parts are incorrect, missing, or damaged, contact your NETGEAR dealer. Keep the
carton, including the original packing materials, in case you need to return the product for repair.
To qualify for product updates and product warranty registrations, fill out the registration
information within 30 days of purchase. For priority service, register online on the NETGEAR
Web page at: http://www.NETGEAR.com/support/main.asp
You can also fill out and return the Warranty & Registration Card that is included in your product
package.
1-4
v2.0, March 2007
NETGEAR 10/100/1000 Mbps CardBus Adapter GA511 User Manual
Hardware Description
As illustrated in the figure below, the GA511 Gigabit CardBus Adapter has an RJ-45 connector
port and two LEDs.
Figure 1-1
Thefront panel of the GA511 has two LEDs: one for the port speed option (100 Mbps and 1000
Mbps) and one LED for the data transfer status.
1-5
v2.0, March 2007
NETGEAR 10/100/1000 Mbps CardBus Adapter GA511 User Manual
1-6
v2.0, March 2007
Chapter 2
Basic Setup
This chapter describes how to install your NETGEAR 10/100/1000 Mbps Gigabit CardBus
Adapter GA511 and set up basic connectivity on your Local Area Network (LAN) using the
setup.exe utility.
What You Need Before You Begin
You need to verify your computer meets the minimum system requirements and identify the
network configuration settings of the LAN where you will connect before you can configure your
gigabit Ethernet adapter and connect.
Verifying System Requirements
Before installing the NETGEAR 10/100/1000 Mbps Gigabit CardBus Adapter GA511, please
make sure that these minimum requirements have been met:
•
You must have a notebook PC with a Pentium® 300 MHz or higher compatible processor with
an available CardBus slot.
•
A CD-ROM drive
•
64 MB of memory
•
At least 5 MB of disk space
•
Windows Vista, Windows XP Home, Windows XP Professional, 2000, Me, 98SE (2nd
edition), Windows 2000 Professional, Windows 2000 Server, or Windows 2000 Advanced
Server
Note: Some versions of Windows may ask for the original Windows operating
system installation files to complete the installation of the GA511 driver software.
2-1
v2.0, March 2007
NETGEAR 10/100/1000 Mbps CardBus Adapter GA511 User Manual
Preparing to Install Your GA511 Gigabit CardBus Adapter
Follow the instructions provided in this section for installing the GA511 Gigabit CardBus Adapter
in your notebook computer. For additional information about performing these tasks on your
particular system, refer to the manuals included with your system hardware.
Before installing your gigabit Ethernet adapter:
1. Make sure that your system meets the hardware and software requirements referenced in
“Verifying System Requirements” on page 2-1.
2. Make sure that your system uses the latest BIOS.
Selecting the Network Cable
The GA511 has one RJ-45 connector used for attaching the system to an Ethernet copper-wire
segment.The card will automatically negotiate the fastest connection speed and duplex possible. If
a specific speed or duplex is desired, the card can be placed into one of the supported modes: 1000
Mbps full duplex; 100 Mbps full duplex, 100 Mbps half duplex; 10Mbps full duplex, 10Mbps half
duplex. Prepare an appropriate cable. The cable specifications are:
•
Port type: 10/100/1000BASE-T
•
Connector: RJ-45
•
Media: CAT 5 UTP/CAT 5e UTP
•
Maximum Distance: 325 feet (100 meters)
Note: 1000BASE-T signaling requires four twisted pairs of Category 5 balanced
cabling, as specified in ISO/IEC 11801:1995 and ANSI/EIA/TIA-568-A (1995) and
tested using procedures defined in TIA/EIA TSB95.
Installation Order
1. First, install the GA511 driver and utility software using the setup.exe program on the
NETGEAR Adapter Resource CD.
Note: If you are installing the GA511 adapter on a Windows Vista machine, insert the
GA511 before installing the GA511 driver and utility software.
2-2
v2.0, March 2007
NETGEAR 10/100/1000 Mbps CardBus Adapter GA511 User Manual
2. When the Windows system boots up after installing the GA511 Gigabit CardBus Adapter, the
system automatically detects the new hardware and prompts you to install the driver software
for the device. Follow the prompts of the Found New Hardware Wizard to automatically use
the driver installed in step 1.
If you are installing more than one GA511 Gigabit CardBus Adapter, you must perform these steps
for each card.
Basic Installation Instructions
Use the procedure below for installation on a Windows Vista, XP, 2000, 98SE 2nd edition, or Me
system.
FIRST, INSTALL THE GA511 SOFTWARE.
a. Power on your notebook, let the
operating system boot up completely,
and log in as needed.
b. Insert the NETGEAR Adapter Resource
CD into your CD-ROM drive. The
Adapter Resource CD main page will
load.
c. From the Windows Start menu, select
Run. The Run dialog box opens.
d. Enter the path to the GA511 setup.exe
file on the CD. For example, if your CDROM is drive D, enter
D:\GA511\setup as the path.
Then, click OK.
e. Follow the InstallShield Wizard steps,
click Finish when done, and if prompted,
restart your computer.
Now, the GA511 driver and utility software
are installed.
Adapters Resource CD
Windows Start > Run
2-3
v2.0, March 2007
NETGEAR 10/100/1000 Mbps CardBus Adapter GA511 User Manual
Next, install the GA511 Gigabit CardBus
Adapter.
a. Locate an available CardBus slot on the
side of your notebook. Hold the PC Card
with the NETGEAR logo facing up and
insert it into the CardBus slot.
Note: Do not use excessive force, but
make sure the card is fully inserted into
the slot.
b. A Found New Hardware Wizard dialog
box appears, indicating that Windows
has found the adapter. Accept the “Install
the software automatically” setting, and
click Next to proceed.
Windows Found New Hardware Wizard
Note: If Windows Vista, XP or 2000
displays a Windows XP Logo Testing or
a Digital Signature Not Found warning,
click Continue Anyway or Yes to
proceed.
c. Click Finish to complete the installation.
If prompted to restart the computer,
remove your adapter CD from the
CDROM drive and click OK. You will
see the GA511 Smart Wizard icon on the
lower right of the Windows task bar.
Local Area Connection Icon before you connect a
network cable
GA511 System Tray icon
For assistance with configuring the network
settings, please see the networking tutorials on
the NETGEAR Adapter Resource CD.
2-4
v2.0, March 2007
NETGEAR 10/100/1000 Mbps CardBus Adapter GA511 User Manual
NEXT, CONFIGURE THE GA511 GIGABIT
CARDBUS ADAPTER.
a. Double-click the connection icon in the
Windows system tray to open the
Windows network connection page.
Connection icon
For assistance with configuring the network
If the connection icon is not visible, you
settings, please see the networking tutorials on
can change the connection properties by
the NETGEAR Adapter Resource CD.
going to Start > Control Panel >
Network Connections.
b. Double-click on the NETGEAR GA511
Gigabit CardBus Adapter connection.
c. Click Configure.
d. Click Properties and configure the
GA511 according to your network
requirements.
2-5
v2.0, March 2007
NETGEAR 10/100/1000 Mbps CardBus Adapter GA511 User Manual
Finally, Verify connectivity to your network.
a. Connect one end of a Cat 5 (or higher) Ethernet cable to the GA511 Gigabit CardBus
Adapter.
b. Connect the other end of the cable to an RJ-45 Ethernet network port.
c. Turn on power to the notebook computer and then to the connected device.
d. Verify that one of the LEDs is on, indicating that there is a good link to the card.
e. Click the GA511 system tray NETGEAR Smart Wizard utility icon
on the lower
right side of the Windows task bar. Verify that the GA511 status information matches your
network.
NETGEAR GA511 Smart Wizard Utility
If there is a problem with the installation of the driver, an exclamation point will appear
next to the NETGEAR GA511 Gigabit Adapter. Try rebooting your computer.
Note: If you are unable to connect, see troubleshooting tips in “Troubleshooting” on page 3-3.
2-6
v2.0, March 2007
NETGEAR 10/100/1000 Mbps CardBus Adapter GA511 User Manual
Determining the GA511 Connection Status
The NETGEAR 10/100/1000 Mbps Gigabit CardBus Adapter GA511 provides the following two
indicators which give you feedback on the status of your connection:
•
The GA511 Smart Wizard utility displays the current status of the device.
•
The LEDs on the NETGEAR 10/100/1000 Mbps Gigabit CardBus Adapter GA511 indicate
the condition of link.
Using the GA511 Smart Wizard Utility
The GA511 Smart Wizard utility provides a convenient way to check the status of the adapter
without needing to view the top of the adapter itself. To run the utility:
1. The GA511 Smart Wizard utility icon
taskbar.
appears in the right section of the Windows
2. Click the GA511 Smart Wizard utility icon to view the current status. If the utility is not
displayed on the taskbar, you can start it by going to Start > Programs > NETGEAR GA511
Adapter > GA511 Smart Wizard Utility.
Figure 2-1
2-7
v2.0, March 2007
NETGEAR 10/100/1000 Mbps CardBus Adapter GA511 User Manual
The GA511 System Utility displays the following details:
•
Link
•
Activity
•
MAC address
•
IP number
•
Speed
•
TCP/IP Transmit/Receive Performance graph — select to view packets transmitted, received,
or both
•
TCP/IP Transmit and Receive Statistics
Click Details to view the settings of the adapter:
Figure 2-2
Checking the Port LEDs
The LEDs on the NETGEAR 10/100/1000 Mbps Gigabit CardBus Adapter GA511 indicate the
condition of the link. The top of the GA511 card has two LEDs: one for the port speed (100 Mbps/
1000Mbps) and one for the current link status.
Before the LEDs can provide troubleshooting information, the card must be connected to the
network, and the network drivers for your particular operating system must be installed. See
“Basic Installation Instructions” on page 2-3 for more information.
2-8
v2.0, March 2007
NETGEAR 10/100/1000 Mbps CardBus Adapter GA511 User Manual
Verify that the card status LEDs operate as described in the table below:
Table 2-1. GA511 Port LED Activity
100/1000
Link/Act
Description
Off
Off
No data detected on the port
Off
On
Blinking
Good 10 Mbps Ethernet link
Brief bursts of 10 Mbps data detected on the port
Amber
On
Blinking
Good 100 Mbps Ethernet link
Brief bursts of 100 Mbps data detected on the port
Green
On
Blinking
Good 1000 Mbps Ethernet link
Brief bursts of 1000 Mbps data detected on the port
.
Note: If the 100/1000 light is blinking, it could indicate a problem with the link such as
a speed mismatch, possible bad cable, bad connector, or configuration mismatch
2-9
v2.0, March 2007
NETGEAR 10/100/1000 Mbps CardBus Adapter GA511 User Manual
2-10
v2.0, March 2007
Chapter 3
Configuration and Troubleshooting
This chapter describes how to use the advanced configuration options of your NETGEAR 10/100/
1000 Mbps Gigabit CardBus Adapter GA511 and basic troubleshooting techniques.
Understanding the Configuration Options
The GA511 adapter provides the following advanced options:
•
Configure the 802.1Q VLAN ID. The IEEE 802.1Q standard defines the operation of Virtual
LAN (VLAN) Bridges that permit the definition, operation and administration of Virtual LAN
topologies within a Bridged LAN infrastructure.
•
Configure 802.1Q/1p VLAN tagging. The 802.1p Quality of service (QOS) is an OSI layer 2
standard for prioritizing network traffic at the data link sublayer.
•
Enable Jumbo frames to extend Ethernet frames to 3000 bytes
•
Set the link speed and the duplex mode:
–
Auto Negotiation
–
1000Mbps/Full Duplex
–
100Mbps/Full Duplex
–
100Mbps/Half Duplex
–
10Mbps/Full Duplex
–
10Mbps/Half Duplex
•
Set up checksum offloading to the network card
•
Set up the offload of TCP large packets to the network card
3-1
v2.0, March 2007
NETGEAR 10/100/1000 Mbps CardBus Adapter GA511 User Manual
Configuring Optional Adapter Properties
The table below introduces the optional advanced capabilities of the adapter.
Table 3-1. Advanced GA511 Adapter Properties
Properties
Description
802.1Q VLAN ID
Set the Virtual Lan ID number. The range is from 1 to 4094.
802.1Q/1p VLAN
Tagging
When enabled, tags are recognized by 802.1p-aware switches and routers.
Disabled by default.
Jumbo Frame
Extends the default Ethernet frame size from 1500 to 3000 bytes if enabled.
Disabled by default.
Link Speed/Duplex Mode A performance option that allows you to choose how the card transmits and
receive packets over the network.You can select auto negotiation, or set the
speed and whether to use half or full duplex.
Network Address
Displays the network address.
Offload Checksum
Supports hardware offload of checksum in the transmit and receive directions.
When enabled, this option allows the card to verify the TCP/IP checksum of
incoming (Rx) and/or outgoing (Tx) packets. This improves the TCP/IP transmit/
receive performance by offloading this operation from the CPU.
Offload TCP_LargeSend
Supports hardware offload of large TCP packets in the transmit and receive
directions. When enabled, this option improves the TCP/IP transmit/receive
performance by offloading this operation from the CPU. Disabled by default.
To configure the optional advanced adapter properties:
1. Click the Local Area Connection icon
in the lower right section of the Windows taskbar.
If the connection icon is not visible, you can change the connection properties by going to
Start > Control Panel > Network Connections. Right-click on the NETGEAR GA511 Gigabit
CardBus Adapter connection and click Properties.
2. Click Configure.
3-2
v2.0, March 2007
NETGEAR 10/100/1000 Mbps CardBus Adapter GA511 User Manual
Figure 3-1
3. Select the Advanced tab to display the advanced configuration options. Be careful when
changing these settings. Incorrect Advanced settings can cause your GA511 to behave
unpredictably or not function.
4. Select the Property to configure, then click the drop-down arrow to set the Value.
5. Click OK when you have finished changing the configuration.
Troubleshooting
Use the information below to solve common problems you may encounter. Also, please refer to the
knowledge base on the NETGEAR Web site at http://ww.netgear.com/support/main.asp.
If you have problems with accessing network resources, the Windows software might not be
installed and configured properly on your computers. Please refer to Appendix B, “Preparing Your
PCs for Network Access”.
3-3
v2.0, March 2007
NETGEAR 10/100/1000 Mbps CardBus Adapter GA511 User Manual
Basic Tips
If you have problems connecting to your wireless network, try the tips below.
Table 3-2. GA511 Adapter connection tips
Symptom
Cause
Solution
The Adapter LED The GA511 is not
lights are not lit. inserted into the
slot properly or the
GA511 software is
not loaded.
Make sure the notebook is fully powered on.
The Link/Act
LED light is lit,
but the 100/1000
LED is not lit.
The GA511 is
operating at 10
Mbps.
The computer is connected to a router or other network
device that is operating at 10 Mbps. If you connect to a
100 or 1000 Mbps device, the 100/1000 LED will be lit.
The 100/1000
LED is blinking
intermittently.
There is a problem
with the link such
as a speed
mismatch, possible
bad cable, bad
connector, or
configuration
mismatch.
Check the network cable and make sure it is functioning
properly.
Remove and reinsert the GA511.
Check the Windows device manager to see if the
GA511 Gigabit CardBus Adapteri s recognized and
enabled. Reload the GA511 software, if necessary.
Try plugging the network cable into a different port on
the router attached to the gigabit Ethernet adapter.
Checking the Device Driver Installation
You can use Device Manager to verify your device driver installation. For example, to verify the
driver installation on a Windows XP system:
1. Right click My Computer on the desktop and select Properties.
2. Select the Hardware tab and then click the Device Manager button.
3. Double-click Network adapters.
4. Double-click GA511 Gigabit CardBus Adapter. A message appears describing the status of
the device.
If there is a problem with the installation of the driver, an exclamation point will appear next to the
GA511 Gigabit CardBus Adapter.
3-4
v2.0, March 2007
NETGEAR 10/100/1000 Mbps CardBus Adapter GA511 User Manual
Using a Troubleshooting Checklist
If you need to test the network adapter further, check the following items:
•
Inspect all cables and connections. Check the length and rating of the cable.
•
Connect the adapter to a different network port and run the tests again. If successful, the
original network port may be defective or improperly configured.
•
Check the adapter installation by reviewing “Basic Installation Instructions” on page 2-3.
Make sure that the adapter is properly inserted in a CardBus slot.
•
Check for specific hardware problems, such as broken traces or loose/broken solder
connections.
•
Check the configuration settings and change them if they conflict with another device.
•
Try inserting the network adapter in another slot. If the new position works, the original slot in
your system may be defective.
•
Replace the failed network adapter with one that is known to work properly. If the second
adapter works in the slot where the first one failed, the original adapter is probably defective.
•
Install the network adapter in another functioning system and run the tests again. If the adapter
passed the tests in the new system, the original system may be defective.
•
Remove all other network adapters from the system and run the tests again. If the adapter
passes the tests, the other adapters might be causing the conflict.
Frequently Asked Questions
What Happens if I Force a CardBus Card into a PC Card Slot?
Extensive testing by PCMCIA standards developers, as well as system and peripheral
manufacturers, makes it extremely unlikely that even a card forced into the wrong type of slot will
cause any damage, but it is NOT a good idea to try it. Even if the unique CardBus frame keying is
bypassed, special pin lengths and socket configurations in the 68-pin connector used by CardBus
devices ensure that inappropriate 5V signals cannot damage the adapter.
Although the CardBus device will not damage the PC Card slot, the CardBus adapter will not
function in the PC Slot.
3-5
v2.0, March 2007
NETGEAR 10/100/1000 Mbps CardBus Adapter GA511 User Manual
What are the Differences Between CardBus and 16-bit PCMCIA Cards?
CardBus is a higher performance version of a PCMCIA card. CardBus also offers lower power
consumption: CardBus Cards are all 3.3-volt cards, while 16-bit PCMCIA Cards can be 5-volt or
3.3-volt.
The key difference is the data path interface. 16-bit PCMCIA Cards are based on a 16-bit “ISAlike” interface, while CardBus Cards use a 32-bit “PCI-like” interface. This allows the CardBus
Card to transfer data at speeds exceeding 100 Mbps, while a 16-bit PCMCIA card transfers data at
approximately 20 Mbps.
Will the GA511 Gigabit CardBus Adapter Work on My Laptop?
NETGEAR's GA511 Gigabit CardBus Adapter has a CardBus interface, so the laptop must, as
well. Most computer specifications describe the interface type (CardBus or 16-bit PCMCIA Card)
for the PC Card slots.
Alternatively, you can check the interface type in Windows by accessing the Device Manager, as
described below.
To access the Device Manager:
1. Click Start > Settings > Control Panel > System (For Windows 2000 or Windows XP, click
Start > Control Panel > System). The System Properties window opens.
2. Click Device Manager (For Windows 2000 or Windows XP, click Hardware > Device
Manager). This opens the Device Manager window.
3. Expand the PCMCIA Socket/Adapters category by double-clicking on the box with the small
plus sign. If CardBus is supported, it will be listed here. If you only see references to 16-bit
PCMCIA Card, CardBus is not supported.
Note: Most laptops made after 1999 have CardBus slots. CardBus slots are
backwards compatible, they accept either CardBus cards (32-bit) or PCMCIA cards
(16-bit). However, a PC slot (16-bit) can only accept 16-bit PCMCIA Cards
How Do I Remove the GA511 Software and Utility?
You can uninstall the utility in either of the following ways:
•
Go to Start > Programs > NETGEAR GA511Adapter > Uninstall GA511 utility.
•
Use Add or Remove Programs in the Control Panel and remove the GA511 Gigabit CardBus
Adapter entry.
3-6
v2.0, March 2007
Appendix A
Technical Specifications
This appendix provides technical specifications for the NETGEAR 10/100/1000 Mbps Gigabit
CardBus Adapter GA511.
Technical Specifications for the GA511
Cable Specifications for the GA511 (10/100/1000BASE-T)
•
Port type: 10/100/1000BASE-T
•
Connector: RJ-45
•
Media: CAT 5 UTP/CAT 5e UTP
•
Maximum Distance: 325 feet (100 meters)
Note: 1000BASE-T signaling requires four twisted pairs of Category 5 balanced cabling, as
specified in ISO/IEC 11801:1995 and ANSI/EIA/TIA-568-A (1995) and tested for additional
performance using testing procedures defined in TIA/EIA TSB95.
Standards Compatibility
IEEE 802.3ab 1000Base-T Gigabit Ethernet
IEEE 802.3u 100Base-TX Fast Ethernet
IEEE 802.3 10Base-T Ethernet
IEEE 802.3u Auto Negotiation
IEEE 802.1Q VLAN
GA511Network Connection
RJ-45 connector for Category 5 UTP cable
Full-duplex 2000 Mbps (1000 Mbps each way) Gigabit Ethernet
Host Connection
32-bit, 33 MHz CardBus slot
DC Operating Voltage
+3.3V +/- 5%
Power Consumption
0.5 watts, maximum
Dimensions
W 111.3 x D 54.0 x H 14.2 mm (4.38 x 2.13 x 0.56 in.)
Weight
55 g (1.94 oz)
Operating Temperature
0º to 55º C
A-1
v2.0, March 2007
NETGEAR 10/100/1000 Mbps CardBus Adapter GA511 User Manual
Storage Temperature
-10 degrees to 70 degrees
Operating Humidity
10% to 90% noncondensing
Agency Compliance
FCC Class B, CE mark, VCCI, C-Tick
A-2
v2.0, March 2007
Appendix B
Preparing Your PCs for Network Access
This appendix describes how to prepare your PCs to connect to the Internet through the
NETGEAR 10/100/1000 Mbps Gigabit CardBus Adapter GA511.
For adding file and print sharing to your network, please consult the Windows help information
included with the version of Windows installed on each computer on your network.
Preparing Your Computers for TCP/IP Networking
Computers access the Internet using a protocol called TCP/IP (Transmission Control Protocol/
Internet Protocol). Each computer on your network must have TCP/IP installed and selected as its
networking protocol. If a Network Interface Card (NIC) is already installed in your PC, then TCP/
IP is probably already installed as well.
Most operating systems include the software components you need for networking with TCP/IP.
Windows 95 or later includes the software components for establishing a TCP/IP network.
In your TCP/IP network, each PC and the Product Family must be assigned a unique IP addresses.
Each PC must also have certain other TCP/IP configuration information such as a subnet mask
(netmask), a domain name server (DNS) address, and a default gateway address. In most cases,
you should install TCP/IP so that the PC obtains its specific network configuration information
automatically from a DHCP server during startup.
Configuring Windows 98 and Me for TCP/IP Networking
As part of the PC preparation process, you may need to install and configure
TCP/IP on your PC. Before starting, locate your Windows CD; you may need to insert it during the
TCP/IP installation process.
Install or Verify Windows Networking Components
To install or verify the necessary components for IP networking:
1. On the Windows taskbar, click the Start button, point to Settings, and then click Control Panel.
B-1
v2.0, March 2007
NETGEAR 10/100/1000 Mbps CardBus Adapter GA511 User Manual
2. Double-click the Network icon.
The Network window opens, which displays a list of installed components.
Figure B-1
You must have an Ethernet adapter or an GA511, the TCP/IP protocol, and the Client for
Microsoft Networks.
Note: It is not necessary to remove any other network components shown in the
Network window in order to install the adapter, TCP/IP, or Client for Microsoft
Networks.
If you need to add TCP/IP:
a. Click the Add button.
b. Select Protocol, and then click Add.
c. Select Microsoft.
d. Select TCP/IP, and then click OK.
If you need to add the Client for Microsoft Networks:
a. Click the Add button.
b. Select Client, and then click Add.
B-2
v2.0, March 2007
NETGEAR 10/100/1000 Mbps CardBus Adapter GA511 User Manual
c. Select Microsoft.
d. Select Client for Microsoft Networks, and then click OK.
If you need to add File and Print Sharing for Microsoft Networks:
a. Click the Add button.
b. Select Client, and then click Add.
c. Select Microsoft.
d. Select File and Print Sharing for Microsoft Networks, and then click OK.
3. Restart your PC for the changes to take effect.
Enabling DHCP in Windows 98 and Me
After the TCP/IP protocol components are installed, each PC must be assigned specific
information about itself and resources that are available on its network. The simplest way to
configure this information is to allow the PC to obtain the information from a DHCP server in the
network.
You will find there are many similarities in the procedures for different Windows systems when
using DHCP to configure TCP/IP.
The following steps will walk you through the configuration process for each of these versions of
Windows.
Locate your Network Neighborhood icon.
•
If the Network Neighborhood icon is on the Windows desktop, position your mouse
pointer over it and right-click your mouse button.
•
If the icon is not on the desktop,
•
Click Start on the task bar located at the bottom left of the window.
•
Choose Settings, and then Control Panel.
Locate the Network Neighborhood icon and click on it. This will open the Network panel as
shown below.
B-3
v2.0, March 2007
NETGEAR 10/100/1000 Mbps CardBus Adapter GA511 User Manual
Verify the following settings as shown:
•
Client for Microsoft Network exists
•
Ethernet adapter is present
•
TCP/IP is present
•
Primary Network Logon is set to
Windows logon
Click on the Properties button. The following
TCP/IP Properties window will display.
B-4
v2.0, March 2007
NETGEAR 10/100/1000 Mbps CardBus Adapter GA511 User Manual
By default, the IP Address tab is open on
this window.
•
Verify the following:
Obtain an IP address automatically is
selected. If not selected, click in the
radio button to the left of it to select it.
This setting is required to enable the
DHCP server to automatically assign an
IP address.
•
Click OK to continue.
Restart the PC.
Repeat these steps for each PC with this
version of Windows on your network.
Selecting Windows Internet Access Method
1. On the Windows taskbar, click the Start button, point to Settings, and then click Control Panel.
2. Double-click the Internet Options icon.
3. Select “I want to set up my Internet connection manually” or “I want to connect through a
Local Area Network” and click Next.
4. Select “I want to connect through a Local Area Network” and click Next.
5. Uncheck all boxes in the LAN Internet Configuration screen and click Next.
6. Proceed to the end of the Wizard.
Verifying TCP/IP Properties
After your PC is configured and has rebooted, you can check the TCP/IP configuration using the
utility winipcfg.exe:
1. On the Windows taskbar, click the Start button, and then click Run.
2. Type winipcfg, and then click OK.
B-5
v2.0, March 2007
NETGEAR 10/100/1000 Mbps CardBus Adapter GA511 User Manual
The IP Configuration window opens, which lists (among other things), your IP address, subnet
mask, and default gateway.
3. From the drop-down box, select your Ethernet adapter.
The window is updated to show your settings, which should match the values below if you are
using the default TCP/IP settings that NETGEAR recommends for connecting through a
router or gateway:
•
The IP address is between 192.168.0.2 and 192.168.0.254
•
The subnet mask is 255.255.255.0
•
The default gateway is 192.168.0.1
Configuring Vista, Windows 2000, or XP for TCP/IP
Networking
As part of the PC preparation process, you may need to install and configure
TCP/IP on each networked PC. Before starting, locate your Windows CD; you may need to insert
it during the TCP/IP installation process.
Install or Verify Windows Networking Components
To install or verify the necessary components for IP networking:
1. On the Windows taskbar, click the Start button, point to Settings, and then click Control Panel.
2. Double-click the Network and Dialup Connections icon.
3. If an Ethernet adapter is present in your PC, you should see an entry for Local Area
Connection. Double-click that entry.
4. Select Properties.
5. Verify that ‘Client for Microsoft Networks’ and ‘Internet Protocol (TCP/IP)’ are present. If
not, select Install and add them.
6. Select ‘Internet Protocol (TCP/IP)’, click Properties, and verify that “Obtain an IP address
automatically is selected.
7. Click OK and close all Network and Dialup Connections windows.
8. Then, restart your PC.
B-6
v2.0, March 2007
NETGEAR 10/100/1000 Mbps CardBus Adapter GA511 User Manual
DHCP Configuration of TCP/IP in Windows Vista, XP or 2000
You will find there are many similarities in the procedures for different Windows systems when
using DHCP to configure TCP/IP.
To configure each of these versions of Windows, see “Internet Networking and TCP/IP
Addressing” at the following location: http://documentation.netgear.com/reference/enu/tcpip/index.htm.
B-7
v2.0, March 2007
NETGEAR 10/100/1000 Mbps CardBus Adapter GA511 User Manual
B-8
v2.0, March 2007
Appendix C
Related Documents
This appendix provides links to reference documents you can use to gain a more complete
understanding of the technologies used in your NETGEAR product.
Document
Link
Internet Networking and TCP/IP
Addressing
http://documentation.netgear.com/reference/enu/tcpip/index.htm
Wireless Communications
http://documentation.netgear.com/reference/enu/wireless/index.htm
Preparing a Computer for
Network Access
http://documentation.netgear.com/reference/enu/wsdhcp/index.htm
Virtual Private Networking (VPN) http://documentation.netgear.com/reference/enu/vpn/index.htm
Glossary
http://documentation.netgear.com/reference/enu/glossary/index.htm
C-1
v2.0, March 2007
NETGEAR 10/100/1000 Mbps CardBus Adapter GA511 User Manual
C-2
v2.0, March 2007
NETGEAR 10/100/1000 Mbps CardBus Adapter GA511 User Manual
Index
Numerics
H
10/100/1000BASE-T 2-2
Hardware Description 1-5
802.1Q VLAN ID 3-1
802.1Q/1p VLAN tagging 3-1
I
IEEE 802.1Q 1-2
C
IEEE 802.1Q VLAN 1-3
Cat5 cable 2-2
IEEE 802.3 Ethernet 1-2
checksum offloading 3-1
IEEE 802.3ab Gigabit Ethernet 1-2
Compatible NETGEAR products 1-3
IEEE 802.3u Auto Negotiation 1-3
Configuration Options 3-1
IEEE 802.3u Fast Ethernet 1-2
Connection Status 2-7
Installation Instructions 2-3
Connector
RJ-45 2-2
IP
checksum offload 3-2
number 2-8
transmit/receive performance 3-2
Customer support 1-ii
D
IP networking
for Windows B-1, B-6
Direct Memory Access 1-2
duplex mode 3-1
E
Ethernet 1-1
Ethernet frame size 1-3
J
Jumbo frames 3-1
L
Layer 2 frames 1-2
F
LEDs
troubleshooting 2-8
Fast Ethernet 1-1
link speed 3-1
features 1-2
Full-duplex operation 1-2
M
MAC address 2-8
G
Media Access Control (MAC) 1-1
Gigabit Ethernet 1-1
Index-1
v2.0, March 2007
NETGEAR 10/100/1000 Mbps CardBus Adapter GA511 User Manual
N
Network Cable 2-2
O
offload of TCP large packets 3-1
R
registering 1-ii
RJ-45 connector 1-5
S
Support 1-ii
System Requirements 2-1
System Utility 2-7
T
TCP/IP
checksum offload 3-2
LargeSend offload 3-2
Transmit and Receive Statistics 2-8
Transmit/Receive Performance graph 2-8
TCP/IP properties
verifying for Windows B-5
Technical Support 1-ii
traffic prioritization 1-2
Troubleshooting
Checklist 3-5
Tutorial
Animated Network Properties Configuration 1-4
PC Networking 1-4
U
Universal dual-voltage signaling 1-3
W
warranty registration 1-4
Windows, configuring for IP routing B-1, B-6
winipcfg utility B-5
Index-2
v2.0, March 2007