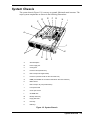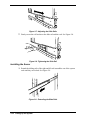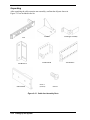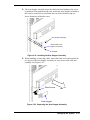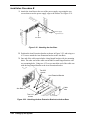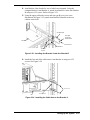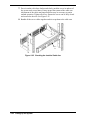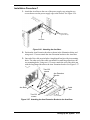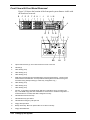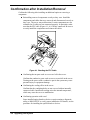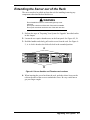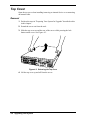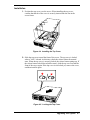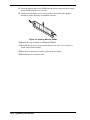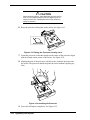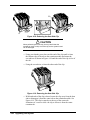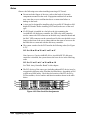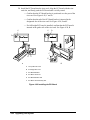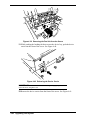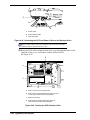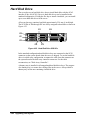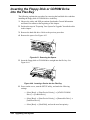
1
EXPRESS5800/120Rf-2 () User’s Guide ■ ■ ■ ■ ■ ■ ■ ■ ■ ■ ■ ■ ■ ■ ■ ■ ■ ■ ■ ■ ■ ■ ■ ■ ■ ■ ■ ■ ■ ■ ■ ■ ■ ■ ■ ■ ■ ■ ■ ■ ■ ■ ■ ■ ■ ■ ■ ■ ■ ■ ■ ■ ■ ■ ■ ■ ■ ■ ■ ■ ■ ■ ■ ■ ■ ■ ■ ■ ■ ■ ■ ■ ■ ■ ■ ■ ■ ■ ■ ■ ■ ■ ■ ■ ■ ■ ■ ■ ■ ■ ■ ■ ■ ■ ■ ■ ■ ■ Proprietary Notice and Liability Disclaimer The information disclosed in this document, including all designs and related materials, is the valuable property of NEC Solutions (America), Inc. and/or its licensors. NEC Solutions (America), Inc. and/or its licensors, as appropriate, reserve all patent, copyright and other proprietary rights to this document, including all design, manufacturing, reproduction, use, and sales rights thereto, except to the extent said rights are expressly granted to others. The NEC Solutions (America), Inc. product(s) discussed in this document are warranted in accordance with the terms of the Warranty Statement accompanying each product. However, actual performance of each product is dependent upon factors such as system configuration, customer data, and operator control. Since implementation by customers of each product may vary, the suitability of specific product configurations and applications must be determined by the customer and is not warranted by NEC Solutions (America), Inc. To allow for design and specification improvements, the information in this document is subject to change at any time, without notice. Reproduction of this document or portions thereof without prior written approval of NEC Solutions (America), Inc. is prohibited. Trademarks Windows 2000 is a registered trademark of Microsoft Corporation. Intel is a registered trademark of Intel Corporation. Xeon is a trademark of Intel Corporation. All other product, brand, or trade names used in this publication are the trademarks or registered trademarks of their respective trademark owners. PN: 456-01669-000 January 2003 Copyright 2003 NEC Solutions (America), Inc 10850 Gold Center Drive, Suite 200, Rancho Cordova, CA 95670 All Rights Reserved Contents Proprietary Notice Using This Guide Text Conventions .................................................................................................................. x Related Documents .............................................................................................................. xi Safety Notices ..................................................................................................................... xii Safety Notices for Users Outside of the U.S.A. and Canada ........................................ xiii Care and Handling.............................................................................................................. xiv 1 System Overview Overview ............................................................................................................................ 1-2 System Features ................................................................................................................. 1-3 System Chassis................................................................................................................... 1-5 Power Supply ..................................................................................................................... 1-6 Peripheral Bays .................................................................................................................. 1-6 SAF-TE Logic.................................................................................................................... 1-6 System Board Features....................................................................................................... 1-7 Xeon™ Processors........................................................................................................ 1-8 System Memory ............................................................................................................ 1-8 PCI Riser Slots.............................................................................................................. 1-8 Video Controller ........................................................................................................... 1-9 SCSI Controller............................................................................................................. 1-9 Network Controller ....................................................................................................... 1-9 Keyboard and Mouse .................................................................................................. 1-10 RJ-45 Serial Port ......................................................................................................... 1-10 ACPI ........................................................................................................................... 1-10 System Board Management Controller (BMC) .......................................................... 1-11 System Functions ............................................................................................................. 1-12 Degradation Feature.................................................................................................... 1-12 AC Link Mode ............................................................................................................ 1-12 Remote Power-On (Wake ON LAN) Function........................................................... 1-12 System Security................................................................................................................ 1-13 Security with Mechanical Locks and Monitoring....................................................... 1-13 Software Locks via the System Setup Utility ............................................................. 1-13 Using Passwords ......................................................................................................... 1-13 Secure Mode ............................................................................................................... 1-14 Summary of Software Security Features .................................................................... 1-15 Contents iii 2 Setting Up the System Overview ............................................................................................................................2-2 Selecting a Site ...................................................................................................................2-2 Unpacking the System ........................................................................................................2-3 Installing the Server into the Rack......................................................................................2-4 Before You Begin..........................................................................................................2-4 Static Precautions ..........................................................................................................2-4 Preparation ....................................................................................................................2-5 Checking Components ..................................................................................................2-6 Required Tools ..............................................................................................................2-6 Installation Procedure....................................................................................................2-7 Removing the Rail Assemblies .....................................................................................2-7 Installing the Rail Brackets onto the Sliding Rails........................................................2-8 Installing the Rail Assemblies .......................................................................................2-9 Installing the Server.....................................................................................................2-10 Securing the Server .....................................................................................................2-12 Installing the Cable Arm Assembly..................................................................................2-13 Introduction .................................................................................................................2-13 Unpacking ...................................................................................................................2-14 Preparation ..................................................................................................................2-15 Installation Procedure..................................................................................................2-15 Installation Procedure A..............................................................................................2-16 Installation Procedure B ..............................................................................................2-20 Installation Procedure C ..............................................................................................2-23 Removing the Server from the Rack ................................................................................2-26 Connecting Peripheral Devices.........................................................................................2-27 Connecting the Power Cord..............................................................................................2-30 Getting Familiar with the System .....................................................................................2-31 Front View with Front Bezel Closed...........................................................................2-31 Front View with Front Bezel Removed.......................................................................2-32 Rear View....................................................................................................................2-34 Status Indicators ...............................................................................................................2-36 ACT Lamp ..................................................................................................................2-36 POWER Lamp ............................................................................................................2-36 STATUS Lamp ...........................................................................................................2-36 DISK ACCESS Lamp .................................................................................................2-38 UID Switch and Lamp.................................................................................................2-38 Disk Access Lamp.......................................................................................................2-38 Hard Disk Lamp ..........................................................................................................2-38 LAN Connector Lamps ...............................................................................................2-39 LINK/ACT Lamps...............................................................................................2-39 Speed lamp ..........................................................................................................2-39 POST Lamp.................................................................................................................2-40 AC POWER Lamp ......................................................................................................2-40 Using the System ..............................................................................................................2-41 Front Bezel ..................................................................................................................2-42 Installing or Removing the Front Bezel ..............................................................2-42 POWER Switch...........................................................................................................2-43 Power On .............................................................................................................2-43 POST ...........................................................................................................................2-44 POST Execution Flow .........................................................................................2-45 POST Error Messages .........................................................................................2-47 iv Contents Power Off ............................................................................................................ 2-47 3 Configuring Your System Configuring Your System .................................................................................................. 3-2 BIOS Setup Utility ............................................................................................................. 3-3 Using the BIOS Setup Utility........................................................................................ 3-3 BIOS Setup Configuration Settings .............................................................................. 3-4 Main Menu.................................................................................................................... 3-5 Primary and Secondary Master and Slave IDE Submenus ................................... 3-6 Processor Settings Submenu ................................................................................. 3-6 Advanced Menu ............................................................................................................ 3-7 PCI Configuration Menu....................................................................................... 3-8 Onboard NIC 1 / Onboard NIC 2 Submenu .......................................................... 3-9 Onboard SCSI Submenu ....................................................................................... 3-9 Onboard Video Submenu ...................................................................................... 3-9 Peripheral Configuration Submenu....................................................................... 3-9 Memory Configuration Submenu........................................................................ 3-10 Advanced Chipset Control Submenu .................................................................. 3-10 Security Menu............................................................................................................. 3-11 Server Menu................................................................................................................ 3-12 Server Menu (Continued)............................................................................................ 3-13 System Management Submenu ........................................................................... 3-13 Console Redirection Submenu ............................................................................ 3-14 Event Log Submenu ............................................................................................ 3-14 Boot Menu .................................................................................................................. 3-15 Boot Device Priority Submenu ........................................................................... 3-15 Hard Drives Submenu ......................................................................................... 3-15 Removable Devices Submenu............................................................................. 3-16 Exit Menu.................................................................................................................... 3-16 SCSISelect Utility ............................................................................................................ 3-17 Running the SCSISelect Utility .................................................................................. 3-17 Adaptec SCSI Utility Configuration Settings ............................................................. 3-18 SCSI Disk Utilities...................................................................................................... 3-19 Exiting Adaptec SCSI Utility...................................................................................... 3-20 Configuring the RAID Controller .................................................................................... 3-21 Configuring System Board Jumpers ................................................................................ 3-22 Before You Begin ....................................................................................................... 3-22 Moving System Board Jumpers .................................................................................. 3-23 Clearing CMOS .......................................................................................................... 3-23 Clearing and Changing the Passwords........................................................................ 3-24 4 Upgrading Your System General Information ........................................................................................................... 4-2 Static Precautions ............................................................................................................... 4-2 Equipment Log................................................................................................................... 4-2 Tools Recommended for Upgrading Your System ............................................................ 4-3 Preparing Your System for Upgrade.................................................................................. 4-3 Confirmation after Installation/Removal............................................................................ 4-4 Extending the Server out of the Rack................................................................................. 4-5 Top Cover........................................................................................................................... 4-6 Removal ........................................................................................................................ 4-6 Installation..................................................................................................................... 4-7 Contents v Modifying the System Board..............................................................................................4-8 Replacing the Real-time Clock Battery.........................................................................4-8 DIMMs ........................................................................................................................4-10 Installing DIMMs ................................................................................................4-11 Removing DIMMs...............................................................................................4-13 Processors....................................................................................................................4-14 Installing Processors ............................................................................................4-15 Removing Processors ..........................................................................................4-19 PCI Option Board .............................................................................................................4-23 Notes............................................................................................................................4-24 Installing a PCI Option Board .....................................................................................4-26 Removing a PCI Option Board ...................................................................................4-31 Disk Array Controller Board ............................................................................................4-32 Installing a Disk Array Controller...............................................................................4-33 Removing a Disk Array Controller .............................................................................4-34 Using Internal Hard Disk Drives in a Disk Array Configuration................................4-34 SCSI Cabling...............................................................................................................4-34 LED Relay Cabling .....................................................................................................4-35 Disk Array Configuration of Internal Hard Disk Drives.............................................4-36 Backup Device..................................................................................................................4-37 Installing a Backup Device..........................................................................................4-38 Removing a Backup Device ........................................................................................4-47 Hard Disk Drive................................................................................................................4-48 Installing a Hard Drive into the Hard Drive Bay.........................................................4-49 Installing a Hard Disk Drive into the Flex Bay...........................................................4-51 Removing a Hard Disk Drive from the Hard Drive Bay.............................................4-54 Inserting the Floppy Disk or CDROM Drive into the Flex Bay.......................................4-56 Power Supply Unit............................................................................................................4-57 Installing a Power Supply............................................................................................4-57 Replacing a Power Supply...........................................................................................4-59 5 Problem Solving Problem Solving .................................................................................................................5-2 Static Precautions ...............................................................................................................5-2 Resetting the Server............................................................................................................5-3 Forced Shutdown................................................................................................................5-3 Troubleshooting Checklists ................................................................................................5-4 Initial System Startup ....................................................................................................5-4 Running New Application Software .............................................................................5-5 After System Has Been Running Correctly...................................................................5-6 Diagnostic Procedures ........................................................................................................5-7 Error Checking ..............................................................................................................5-7 Troubleshooting Guide..................................................................................................5-7 Preparing the System for Diagnosing Problems....................................................5-7 Monitoring POST ..................................................................................................5-8 Verifying Proper Operation of Key System Indicators .........................................5-9 Confirming Loading of the Operating System ......................................................5-9 Specific Problems and Corrective Actions .......................................................................5-10 Power LED Does Not Light ........................................................................................5-10 Incorrect or No Beep Code..........................................................................................5-10 No Characters Appear on Screen ................................................................................5-11 Characters are Distorted or Incorrect ..........................................................................5-11 System Cooling Fans Do Not Rotate...........................................................................5-11 vi Contents Diskette Drive Activity LED Does Not Light............................................................. 5-12 CD-ROM Drive Activity Light Does Not Light ......................................................... 5-12 Problems with Application Software .......................................................................... 5-12 Bootable CD-ROM Is Not Detected ........................................................................... 5-13 Problems with the Network.............................................................................................. 5-13 Plug and Play Installation Tips......................................................................................... 5-13 Error Messages................................................................................................................. 5-14 POST Error Codes and Messages ............................................................................... 5-14 POST Error Code Hardware References..................................................................... 5-19 Beep Codes ................................................................................................................. 5-20 How to Identify BIOS and BMC Revision Levels........................................................... 5-21 A Specifications System Specifications ....................................................................................................... A-2 B nstalling and Configuring Windows® 2000 Overview ........................................................................................................................... B-2 Device Drivers .................................................................................................................. B-2 Installation Assumption .................................................................................................... B-3 Installation Preparation ..................................................................................................... B-4 Installing Microsoft Windows® 2000 Operating System .................................................. B-5 Installation Notes ......................................................................................................... B-5 Windows 2000 Installation .......................................................................................... B-5 Installing LAN Adapters................................................................................................... B-7 Driver Installation for the Intel PRO/100+ LAN Adapter ........................................... B-7 Setting Network Driver Details.................................................................................... B-7 Driver Installation for the ATI RAGE XL Display Adapter............................................. B-8 C Interrupt Requests Interrupt Requests ............................................................................................................. C-2 Glossary Equipment Log INDEX Contents vii viii Contents Using This Guide The EXPRESS5800/120Rf-2 User’s Guide provides a quick reference to information about your system. Its goal is to familiarize you with your system and the tasks necessary for system configuring and upgrading. This guide contains the following information: ! Chapter 1, “System Overview” provides an overview of your system and describes your system’s major system components. See this chapter to familiarize yourself with the features of your system. ! Chapter 2, “Setting Up Your System” tells you how to select a site, unpack the system, install the system into a system rack, make cable connections, and power on your system. This chapter also familiarizes you with your system’s controls and indicators. ! Chapter 3, “Configuring Your System” tells you how to configure the system and provides instructions for running the BIOS Setup Utility. This chapter also provides information on system board jumper settings. ! Chapter 4, “Upgrading Your System” provides you with instructions for upgrading your system with an additional processor, optional memory, options cards, and peripheral devices. ! Chapter 5, “Problem Solving” contains helpful information for solving problems that might occur with your system. ! Appendix A, “Specifications” includes hardware information about your system. ! Appendix B, “Installing and Configuring Windows 2000® ” contains instructions to install and configure hardware and software used with the Microsoft Windows 2000 Operating System. ! Appendix C, “Interrupt Requests” lists the factory-set interrupt requests (IRQs). ! “Glossary” defines the standard acronyms and technical terms used in this manual. ! “Equipment Log” provides you with a sample equipment log for documenting the system configuration and future updates you may make to your system. Using This Guide ix Text Conventions This guide uses the following text conventions. Warnings, cautions, and notes have the following meanings: ! WARNING Warnings alert you to situations that could result in serious personal injury or loss of life. ! CAUTION Cautions indicate situations that can damage the system hardware or software. Note: Notes give important information about the material being described. ! Names of keyboard keys are printed as they appear on the keyboard. For example, Ctrl, Alt, or Enter. ! Text or keystrokes that you enter appear as boldface type. For example, type abc123 and press ENTER. ! File names are printed in uppercase letters. For example, AUTOEXEC.BAT. x Using This Guide Related Documents In addition to this guide, the following system documentation is included with your server either as electronic files on EXPRESSBUILDER or as paper copy shipped with your server. ! System Release Notes Release Notes provide you with the latest information about your system. This information was not available to be included in your user's guide at the time it was developed and released. ! Getting Started Sheet The Getting Started Sheet provides several easy-to-follow steps to become familiar with your server documentation and to complete your installation successfully. Using This Guide xi Safety Notices ! ! Caution: To reduce the risk of electric shock which could cause personal injury, follow all safety notices. The symbols shown are used in your documentation and on your equipment to indicate safety hazards. ! Warning: Lithium batteries can be dangerous. Improper handling of lithium batteries may result in an explosion. Dispose of lithium batteries as required by local ordinance or as normal waste if no local ordinance exists. ! Warning: The detachable power supply cord is intended to serve as the disconnect device. ! Warning: This equipment has a 3-wire, grounded power cord. To prevent electrical hazards, do not remove or defeat the ground prong on the power cord. Replace the power cord if it gets damaged. Contact your dealer for an exact replacement. ! Warning: The DC push-button on/off switch on the front panel does not turn off the system AC power. Also, +5vdc is present on the system board whenever the AC power cord is connected between the system and an AC outlet. Before doing the procedures in this manual, make sure that your system is powered off and unplug the AC power cord from the back of the chassis. Failure to disconnect power before opening your system can result in personal injury and equipment damage. In the U.S.A. and Canada, the power cord must be a UL-listed detachable power cord (in Canada, CSA-certified), type ST or SJT, 16 AWG, 3-conductor, provided with a molded-on NEMA type 5-15 P plug cap at one end and a molded-on cord connector body at the other end. The cord length must not exceed 9 feet (2.7 meters). Outside the U.S.A. and Canada, the plug must be rated for 250 VAC, 10 amp minimum, and must display an international agency approval marking. The cord must be suitable for use in the end-user country. Consult your dealer or the local electrical authorities if you are unsure of the type of power cord to use in your country. The voltage change occurs via a switch in the power supply. ! Warning: Under no circumstances should the user attempt to disassemble the power supply. The power supply has no user-replaceable parts. Inside the power supply are hazardous voltages that can cause serious personal injury. A defective power supply must be returned to your dealer. xii Using This Guide Safety Notices for Users Outside of the U.S.A. and Canada ! PELV (Protected Extra-Low Voltage) Integrity: To ensure the extra-low voltage integrity of the equipment, connect only equipment with mains-protected electricallycompatible circuits to the external ports. ! Remote Earths: To prevent electrical shock, connect all local (individual office) computers and computer support equipment to the same electrical circuit of the building wiring. If you are unsure, check the building wiring to avoid remote earth conditions. ! Earth Bonding: For safe operation, only connect the equipment to a building supply that is in accordance with current wiring regulations in your country. In the U.K., those regulations are the IEE. Using This Guide xiii Care and Handling Use the following guidelines to properly handle and care for your system. Protect the system from extremely low or high temperatures. Let the system warm (or cool) to room temperature before using it. Keep the system away from magnetic forces. Keep the system dry. Do not wash the system with a wet cloth or pour fluid into it. Protect the system from being bumped or dropped. Check the system for condensation. If condensation exists, allow it to evaporate before powering on the system. Keep the system away from dust, sand, and dirt. xiv Using This Guide 1 System Overview ! Overview ! System Features ! System Chassis ! Power Supply ! Peripheral Bays ! SAF-TE Logic ! System Board Features ! System Functions ! System Security Overview Your server is a modular, multiprocessing server based on the Intel Xeon microprocessor. It is a solid performer and offers the latest technology. The combination of compute performance, memory capacity, and integrated I/O provides a high performance environment for many server market applications. These range from large corporations supporting remote offices to small companies looking to obtain basic connectivity capability such as file and print services, e-mail, web access, web site server, etc. Your server is a rack-mount system. See Figure 1-1.Your server conveniently installs into a standard EIA 19-inch rack assembly. Figure 1-1. System Front View Your server includes a 3.5-inch diskette drive, a CD-ROM drive, six hot-swap SCSI hard disk drive bays, and a removable media device bay. The hot-swap SCSI hard disk drive bays support up to six 1.0-inch SCSI hard disk drives that can be swapped in or out of the system without powering it down, if RAID functionality is configured in the system. Alternately, your server can be configured to include a 7th SCSI hard disk drive. This configuration includes a removable media drive bay and seven hot-swap SCSI hard disk drive bays. The removable media drive bay may be used for installation of a high-speed tape drive. As application requirements increase, you can expand your server with an additional processor, additional memory, add-in boards and peripheral devices: tape devices, and hard disk drives. 1-2 System Overview System Features Your system features the following major components: ! Single or dual high-performance Intel™ Xeon™ 2.00GHz or 2.80GHz processors. ! 256 MB to 6 GB of ECC SDRAM two way interleaved memory, using up to six DIMMs. ! Six PCI expansion slots for add-in boards (three full-length, full height 64bit/100MHz PCI-X riser slots and three low profile 64-bit/100MHz riser slots). ! A maximum of seven hot-swap SCSI hard disk drive bays accessible from the front of the chassis. ! Hot-swap SCSI disk drive backplane; a failed drive can be removed and replaced with a new drive without system power being turned off (if an optional Redundant Array of Independent Disks (RAID) controller is installed.) ! High degree of SCSI disk fault tolerance and advanced disk array management features through the use of RAID technology, if an optional RAID controller is installed. ! Embedded PC-compatible support (serial, parallel, mouse, keyboard, diskette, USB, LAN, and video). ! Integrated onboard ATI RAGE XL Video Graphics Array (VGA) controller with 8MB of video memory (VRAM). ! Adaptec AIC-7902W SCSI controller providing dual channel Ultra-320 SCSI interfaces. ! Integrated Network Interface Controller (NIC), a dual channel Intel 82546EB Gigabit Ethernet LAN controller supporting 10Base-T/100Base-TX/1000Base-T network systems. ! Dual channel enhanced IDE controller (secondary channel supported only). ! One 3.5-inch removable media expansion bays. ! IDE 24X CD-ROM drive and 3 ½-inch diskette drive. ! Three integrated Universal Serial Bus (USB) ports, one located at the front panel and two located at the rear panel. ! Hardware monitors (temperature, fans, and voltage) and software monitors to indicate failures. System Overview 1-3 ! Chassis that supports up to two power supply modules. The additional power supply is needed to provide hot-swappable redundant power (i.e., the system will continue to operate with a single power supply failure). With two power modules installed, one power module can be easily removed or installed from the back of the chassis without turning the system power off. ! Fully lockable front bezel including Server Management software that monitors the front bezel intrusion switch. 1-4 System Overview System Chassis The system chassis (Figure 1-2) is an easy-to-expand, fabricated metal structure. The major system components are shown in the following illustrations. E D F G C H I B A J K P O N M L A SCSI backplane B Power supply unit C Cooling fans D Processor duct (dashed-line) E Riser card (for full-height boards) F Processor (mounted under the CPU and heat sink) G DIMM (Two DIMMs are mounted as standard in slots #1A and #1B.) H Mother board I Riser card (for only low-profile boards) J Front panel board K Cover open sensor L CD-ROM drive M Backup device bay N Floppy disk drive O Flex bays P Disk bays Figure 1-2. System Chassis System Overview 1-5 Power Supply The power supply consists of the power supply bay and one power supply module. A second power supply module can be purchased to provide a redundant, 1+1 system. With either configuration, the power supply provides 500 watts of power and is designed to minimize EMI. The power subsystem supports implementation of remote management features including remote enable that permits power to be activated from a variety of sources. Peripheral Bays Your server supports a variety of standard PC AT-compatible peripheral devices. The chassis includes these peripheral bays: ! A removable media front panel bay for mounting a half-height 3.5-inch peripheral device such as an optional tape drive. ! Depending on your configuration, your server includes either six or seven hotswap SCSI hard disk drive bays for mounting hard disk drives installed in easily removable drive carriers. Note: The hot-swap SCSI hard disk drive bays contain a hotswap back plane that requires an 80-pin single connector attachment (SCA) connector on the drives that you install. The flex bay can be used with either the standard CD-ROM/FDD module or a seventh hot swappable SCSI HDD. The CD-ROM/FDD module may only be inserted or removed from the flex bay when system power is turned off. The CD-ROM/FDD module is NOT hot swappable. The standard 3.5-inch diskette drive supports 720 KB and 1.44 MB diskette media. The chassis includes four 60-mm non-hot-swappable system fans for cooling the processor(s), hard drives, and add-in cards. The system fans are mounted in a fan assembly located in the middle of the chassis to pull cooling air through the chassis. The power supply contains a single fan for cooling. SAF-TE Logic The SCSI backplane includes SAF-TE (SCSI Accessed Fault Tolerant Enclosure) logic that provides an interface to the disk subsystem that supports status signals, hot swapping drives, and enclosure monitoring. The transport mechanism for the standardized alert detection and status reporting is the SCSI bus. Disk drives, power supplies, cooling fans, and temperature are continually monitored and the conditions then reported over the SCSI bus to the system. When used with RAID management software the user can be alerted of impending or imminent disk conditions requiring attention. This allows the user to react to conditions that could normally go unnoticed until data loss. 1-6 System Overview System Board Features The system board (Figure 1-3) offers a “flat” design with the processor and memory subsystems residing on the board. This figure shows the major components on the system board. The following subsections describe the system board major components. A B C D E F G-2 G-1 U H T I J S R Q P O N M L K A Rear serial port connector L Lithium battery B Internal SCSI connector (connected to the SCSI backplane) M Front serial port connector C ICMB connector N FDD/CDROM front panel connector D PCI riser slots (For low-profile boards. 100 MHz/64-bit, 3.3V, PCI) O Configuration jumper switch E IPMB connector P Front panel USB connector F DIMM sockets Q PCI riser card slot (For full-length boards, 100MHz/64-bit, 3.3V, PCI-X) G Processor sockets. G-1 is Processor #1 (CPU #1); G-2 is Processor #2 (CPU #2). R Hard disk drive access lamp pin header H Processor power connector S Speaker I System fan connector T Jumper (J5A2) J Main power connector U Connectors for external devices K Power signal connector Figure 1-3. System Board System Overview 1-7 Xeon™ Processors Depending on system configuration, each system includes one or two Intel Xeon 2.00GHz or 2.80GHz processors. Each processor plugs into a INT3/FCPGA socket package. The processor includes a 512K cache. When two processors are installed, both processors must be of identical bus and core speed. The processor external interface operates at a maximum of 400MHz. The second-level cache is located on the substrate of the processor cartridge. The cache includes burst pipelined synchronous static RAM (BSRAM). System Memory The system board contains six 168-pin DIMM sockets. Memory is partitioned as three banks of registered SDRAM DIMMs (DDR200 compatible) that must be populated in pairs, each providing 72 bits of buffered two-way interleaved memory (64-bit main memory plus ECC). Your system may include from 256 MB to 6 GB of memory, using up to six DIMMs. System memory begins at address 0 and is continuous (flat addressing) up to the maximum amount of DRAM installed (exception: system memory is noncontiguous in the ranges defined as memory holes using configuration registers). The system supports both base (conventional) and extended memory. PCI Riser Slots The server's expansion capabilities meet the needs of file and application servers for high performance I/O by providing PCI expansion slots. The system board has three full-length, full height 64-bit/100MHz PCI-X slots (riser slot B) and three low profile 64-bit/100MHz PCI slots (riser slot A). Riser slot A provides the following features: ! Bus speed up to 100MHz ! 184 pin, 5 volt keyed, 64-bit expansion slot connector ! Support for a 3-slot PCI riser card ! Support for only low profile PCI cards Riser slot B provides the following features: ! Bus speed up to 100 MHz ! 184 pin, 5 volt keyed, 64-bit expansion slot connector ! Support for a 3-slot PCI riser card ! Support for only full length, full height PCI cards. 1-8 System Overview Video Controller The system board uses an ATI RAGE XL PCI graphics accelerator with 8 MB of video SDRAM. The embedded SVGA video subsystem supports: ! Resolutions up to 1600 x 1200 under 2D and 1024 x 768 under 3D ! CRT and LCD monitors up to 100 Hz vertical refresh rate. The system board supports disabling of the onboard video through the BIOS setup menu or when a plug in video card is installed in any of the PCI slots. SCSI Controller The system board includes an embedded Adaptec AIC7902W dual function SCSI controller. The AIC7902W provides Ultra-320 SCSI interfaces as two independent PCI functions. As implemented on the system board, the interface attaches to an Ultra-320 SCSI backplane that supports up to seven Ultra-320 SCA drives. Network Controller The system board uses a dual-channel Intel® 82546EB Gigabit Ethernet Controller and supports 10Base-T/100Base-TX/1000Base-T network subsystems. The 82546EB controller supports the following features: ! 64-bit, 100 MHz PCI-X interface ! Integrated IEEE 802.3 10Base-T, 100Base-TX, and 1000Base-T compatible PHY ! IEEE 820.3u auto-negotiation support ! Chained memory structure similar to the 82557, 82558, 82559 and 82596 ! Full duplex support at 10 Mbps, 100 Mbps, and 1000 Mbps operation ! Low power +3.3 V devices. On the system board, NIC1 can be used as both a network interface and server management interface. System Overview 1-9 Keyboard and Mouse The keyboard/mouse controller is PS/2-compatible. The server may be locked automatically if there is no keyboard or mouse activity for a predefined length of time. Once the inactivity (lockout) timer has expired, the keyboard and mouse do not respond until the previously stored password is entered. A Y-cable can be used if both a PS/2 mouse and keyboard are required at the same time. RJ-45 Serial Port The rear RJ-45 serial port is a fully functional serial port that supports any standard serial device and provides support for serial concentrators. For server applications that use a serial concentrator to access the server management features of the mother board, a standard 8-pin CAT-5 cable from the serial concentrator is plugged directly into the rear RJ-45 serial port. The 8 pins of the RJ-45 connector can be configured to match either of two pin-out standards used by serial port devices. To accommodate either standard, the J5A2 jumper block located directly behind the rear RJ-45 serial port must be jumpered appropriately according to the desired standard. ACPI An Advanced Configuration and Power Interface (ACPI) aware operating system can place the system into a state where the hard drives spin down, the system fans stop, and all processing is halted. However, in this state the power supply is still on and the processors are still dissipating some power such that the power supply fan and processor fans are still running. Note: ACPI requires an operating system that supports its feature. ! CAUTION Only when the AC power is disconnected is the system completely off. The sleep states are defined as follows: ! s0: Normal running state. ! s1: Processor sleep state. No context will be lost in this state and the processor caches will maintain coherency. ! s4: Hibernate or Save to Disk. The memory and machine state are saved to disk. Pressing the power button or other wakeup event restores the system state from the disk and resumes normal operation. This assumes that no hardware changes have been made to the system while it was off. ! s5: Soft off. Only the RTC section of the chipset and the BMC are running in this state. 1-10 System Overview Note: The system is Off only when the AC power cord is disconnected. System Board Management Controller (BMC) Server management is concentrated in the System Board Management Controller (BMC). The BMC and associated circuitry are powered from a 5Vdc standby voltage, which remains active when system power is switched off, but the ac power source is still on and connected. The BMC supports the Management Workstation Application (MWA), which allows remote server management via a modem or direct connection to a manager system. Events monitored by the manager system include over-temperature and over-voltage conditions, fan failure, or chassis intrusion. Information on the Management Workstation Application (MWA) may be found in Appendix B of this User’s Guide. One major function of the BMC is to autonomously monitor system management events, and log their occurrence in the nonvolatile System Event Log (SEL). The events being monitored include overtemperature and overvoltage conditions, fan failure, or chassis intrusion. To enable accurate monitoring, the BMC maintains the nonvolatile Sensor Data Records (SDRs), from which sensor information can be retrieved. The BMC provides an ISA host interface to SDR sensor information, so that software running on the server can poll and retrieve the server's current status. The BMC performs the following: ! Monitors server board temperature and voltage ! Monitors processor presence and controls Fault Resilient Boot (FRB) ! Detects and indicates baseboard fan failure ! Manages the SEL interface ! Manages the SDR Repository interface ! Monitors the SDR/SEL timestamp clock ! Monitors the system management watchdog timer ! Monitors the periodic SMI timer ! Monitors the event receiver ! Controls secure mode, including video blanking, diskette write-protect monitoring, and front panel lock/unlock initiation ! Controls Wake On LAN via Magic Packet support. System Overview 1-11 System Functions The following subsections describe select system functions. Degradation Feature The degradation feature automatically isolates a failed DIMM or processor to assure continuous operation of the server when the POST (Power On Self-Test, self-diagnosis program after power on) detects such a DIMM or processor. Note: The degradation feature is only available when at least four DIMMs or two processors are installed. Failed DIMMs and processors may be identified by POST displays, or by using the BIOS setup utility (see Chapter 3). They may also be identified on a system that has ESMPRO installed. AC Link Mode The AC link mode allows the system to monitor its AC input power so that when the AC input power is lost and then restored the system will return itself to one of three preselected settings, listed as follows: ! Power On ! Last State (Factory Default Setting) ! Stay Off. The AC link mode settings can be changed by running the BIOS Setup Utility (F2). Refer to Chapter 3 "Configuring Your System." Remote Power-On (Wake ON LAN) Function The remote power-on function turns on the system power by way of a network or modem. If the system power is set to OFF, it can be turned on remotely by sending a specific packet from the main computer to the remote system. This feature can be enabled or disabled using the BIOS Setup Utility. See Chapter 3. 1-12 System Overview System Security To help prevent unauthorized entry or use of the system, the system includes a full lockable front panel and Server Management software that monitors the front bezel intrusion switch. Security with Mechanical Locks and Monitoring The front bezel contains a mechanical lock and an intrusion switch to prevent access to the front of the computer chassis. The computer chassis includes an intrusion switch on the top cover. When any of these covers are opened, the switch transmits an alarm signal to the system board, where server management software processes the signal. Software Locks via the System Setup Utility The BIOS Setup Utility provides a number of security features to prevent unauthorized or accidental access to the system. Once the security measures are enabled, access to the system is allowed only after the user enters the correct password(s). For example: ! Enable the keyboard lockout timer so that the server requires a password to reactivate the keyboard and mouse after a specified time-out period 1 to 120minutes. ! Set and enable an administrative password. ! Set and enable a user password. ! Set secure mode to prevent keyboard or mouse input and to prevent use of the front panel reset and power switches. ! Activate a hot key combination to enter secure mode quickly. ! Disables access to the boot sector of the operating system hard disk drive. ! Disable writing to the diskette drive when secure mode is set. Using Passwords You can set either the user password, the supervisor password, or both passwords. If only the user password is set, you: ! Must enter the user password to enter BIOS Setup. ! Must enter the user password to boot the server if Password on Boot is enabled in the BIOS Setup. ! Must enter the user password to exit secure mode. If only the supervisor password is set, you: ! Must enter the supervisor password to enter BIOS Setup. ! Must enter the supervisor password to boot the server if Password on Boot is enabled in the BIOS Setup. ! Must enter the supervisor password to exit secure mode. System Overview 1-13 If both passwords are set, you: ! May enter the user password to enter BIOS Setup. However, you will not be able to change many of the options. ! Must enter the supervisor password if you want to enter BIOS Setup and have access to all of the options. ! May enter either password to boot the server if Password on Boot is enabled in either the BIOS Setup. ! May enter either password to exit secure mode. Secure Mode Configure and enable the secure boot mode by using the BIOS Setup. When secure mode is in effect: ! You can boot the server and the operating system will run, but you must enter the user password to use the keyboard or mouse. ! You cannot turn off system power or reset the server from the front panel switches. Secure mode has no effect on functions enabled via remote server management or power control via the watchdog timer. Taking the server out of secure mode does not change the state of system power. That is, if you press and release the power switch while secure mode is in effect, the system will not be powered off when secure mode is later removed. However, if the front panel power switch remains depressed when secure mode is removed, the server will be powered off. 1-14 System Overview Summary of Software Security Features The Table 1-1 lists the software security features and describes what protection each offers. In general, to enable or set the features listed here, you must run BIOS Setup and go to the Security Subsystem Group, menu. Table 1-1. Software Security Features Feature Description Secure mode How to enter secure mode: Setting and enabling passwords automatically places the system in secure mode. If you set a hot-key combination (through Setup), you can secure the system simply by pressing the key combination. This means you do not have to wait for the inactivity time-out period. When the system is in secure mode: The server can boot and run the operating system, but mouse and keyboard input is not accepted until the user password is entered. At boot time, if a CD is detected in the CD-ROM drive or a diskette in drive A, the system prompts for a password. When the password is entered, the server boots from CD or diskette and disables the secure mode. If there is no CD in the CD-ROM drive or diskette in drive A, the server boots from drive C and automatically goes into secure mode. All enabled secure mode features go into effect at boot time. To leave secure mode: Enter the correct password(s). Disable writing to diskette In secure mode, the server will not boot from or write to a diskette unless a password is entered. To write protect access to diskette whether the server is in secure mode or not, use the Setup main menu, Floppy Options, and specify Floppy Access as read only. Set a time out period so that keyboard and mouse input are not accepted. Also, screen can be blanked, and writes to diskette can be inhibited Control access to using the BIOS Setup: set supervisor password Specify and enable an inactivity time out period of from 1 to 120 minutes. If no keyboard or mouse action occurs for the specified period, attempted keyboard and mouse input will not be accepted. The monitor display will go blank, and the diskette drive will be write protected (if these security features are enabled through Setup). To resume activity: Enter the correct password(s). To control access to setting or changing the system configuration, set a supervisor password and enable it through Setup. If both the supervisor and user passwords are enabled, either can be used to boot the server or enable the keyboard and/or mouse, but only the supervisor password will allow Setup to be changed. To disable a password, change it to a blank entry or press CTRL-D in the Change Password menu of the Supervisor Password Option menu found in the Security Subsystem Group. To clear the password if you cannot access Setup, change the Clear Password jumper (see Chapter 3). System Overview 1-15 Feature Description Control access to the system other than BIOS Setup: set user password To control access to using the system, set a user password and enable it through Setup. To disable a password, change it to a blank entry or press CTRL-D in the Change Password menu of the User Password Option menu found in the Security Subsystem Group. To clear the password if you cannot access Setup, change the Clear Password jumper (see Chapter 4). Boot without keyboard The system can boot with or without a keyboard. During POST, before the system completes the boot sequence, the BIOS automatically detects and tests the keyboard if it is present and displays a message. Specify the boot sequence The sequence that you specify in setup will determine the boot order. If secure mode is enabled (a user password is set), then you will be prompted for a password before the server fully boots. If secure mode is enabled and the “Secure Boot Mode” option is also enabled, the server will fully boot but will require a password before accepting any keyboard or mouse input. 1-16 System Overview 2 Setting Up the System ! Overview ! Selecting a Site ! Unpacking the System ! Installing the Server into the Rack ! Installing the Cable Arm Assembly ! Removing the Server from the Rack ! Connecting Peripheral Devices ! Connecting the Power Cord ! Getting Familiar with the System ! Status Indicators ! Using the System Overview This chapter describes how to select a site, unpack the system, assemble the rack-mount system unit into a cabinet and install the cable arm assembly. Information on front and rear panel features, switches, and LEDs are also included in this chapter. Selecting a Site The system operates reliably in a typical office environment. Choose a site that is: ! Near grounded, three-pronged power outlets. Note: For the United States and Canada, this means a NEMA 5-15R outlets for 100-120 VAC or NEMA 6-15R outlets for 200-240 VAC. For other international sites, this means three-pronged power outlets applicable for the electrical code of the region. ! WARNING Be sure the power service connection is through a properly grounded outlet. ! CAUTION When two power supplies are installed in the system the power plug from each of the power supplies must be plugged into the same common ground power outlets. ! Clean, dust-free, and well ventilated. Front and rear ventilating openings kept free of obstructions. Away from sources of heat, vibration or physical shock. ! Isolated from strong electromagnetic fields and electrical noise produced by electrical devices (such as air conditioners, large fans, large electric motors, radio and TV transmitters, and high-frequency security devices) ! Spacious enough to provide at least ten inches (25 centimeters) in front of the system and five inches (13 centimeters) behind the system. ! Easily accessible for system maintenance and installation of system upgrades. 2-2 Setting Up the System Unpacking the System ! WARNING The system can weigh up to 55 pounds (25kg). If the system contains numerous optional boards and peripheral devices, it will weigh more. To avoid personal injury, make sure you have someone help you lift or move the system. When you receive your system, inspect the shipping containers prior to unpacking. If the shipping boxes are damaged, note the damage, and if possible, photograph it for reference. After removing the contents of the containers, keep the cartons and the packing materials. If the contents appear damaged when you unpack the boxes, file a damage claim with the carrier immediately. Setting Up the System 2-3 Installing the Server into the Rack This section provides the instructions for installing your rack-mount server into a standard EIA 19-inch rack cabinet. Before You Begin Before you begin, please review the following cautions, warnings, and general guidelines. ! WARNING Be sure that power to the system is turned off and unplugged. All voltage is removed only when the power cords are unplugged. ! Avoid excessive vibration and shock. Dropping an electronic component can cause serious damage. ! Do not disconnect or remove parts other than those specified in the procedure. ! Do not touch I/O connector pins. ! All screws are Phillips-head, unless otherwise specified. ! On completion of any assembly or reassembly, perform a power-on test. If a fault occurs, verify that the assembly or reassembly was performed correctly. If the problem persists, see "Problem Solving" in Chapter 5. Static Precautions An electrostatic discharge (ESD) can damage disk drives, option boards, and other components. You can provide some ESD protection by wearing an antistatic wrist strap attached to chassis ground when handling system components. Electronic devices can be easily damaged by static electricity. To prevent damage, keep them in their protective packaging when they are not installed in your system. 2-4 Setting Up the System Preparation ! CAUTION Ensure that the location of the rack-mount server does not create an unstable condition when installed in the rack cabinet. Before you begin select an appropriate location in your rack cabinet for the rack-mount server. To improve rack stability, mount heavier items towards the bottom of the rack cabinet. If the rack is a stand-alone unit and the rack is more than 75% filled with components, consider installing an optional stabilizer kit. Note: When planning your system configuration for the rack cabinet you should consider the length of the cables that interconnect system components. Your server is mounted on a set of slide rail assemblies that allows it to move freely in and out of the system rack. To mount your server in a rack you must attach two center slide rails on each side of the server chassis and then install two rail assemblies in the rack cabinet. The following sections describe how to assemble the rack-mounting hardware and mount the server in a rack cabinet. Procedures for installing the cable arm assembly onto the rear of your server are also included. Setting Up the System 2-5 Checking Components The rail assemblies may be shipped already mounted to the sides of the server. The following additional components are needed to install the server into the rack. See Figure 2-1. A B C A Right Rail Bracket B Left Rail Bracket C Large Screws (8) D Small Screws (4) E Washers (8) D Figure 2-1. Rack Components Required Tools A Phillips screwdriver is required to install the server into the rack. 2-6 Setting Up the System E Installation Procedure Perform the following procedures to install the server into the rack: Removing the Rail Assemblies 1. The rail assemblies may be shipped already mounted to the sides of the server. Each rail assembly consists of a stationary rail attached to the server and a removable sliding rail. Following Steps 2 and 3, remove the sliding rails from the server. Note: The removed rail assemblies are to be installed on the inner rails later. To install each rail assembly on the correct inner rail, mark each rail as removed. Similarly, when installing more than one server, distinguish between the pairs of inner rails and rail assemblies of the servers by marking the left and right hand rails. 2. Hold the rails and slowly slide them toward the rear of the server until a "click" is heard. The click indicates that the rails are in the locked position. 3. Push the release levers on the right and left sides of the rails (Figure 2-2, A), and remove the sliding rail assemblies from the server. A Figure 2-2. Removing the Rail Assemblies from the Server Note: The inner stationary rails remain screwed to the server when the rail assemblies have been removed. See Figure 2-3. Setting Up the System 2-7 Figure 2-3. Inner Rails Attached to the Server Installing the Rail Brackets onto the Sliding Rails 1. Position a rail bracket behind each sliding rail assembly as shown in Figure 2-4. Figure 2-4. Positioning the Rail Bracket 2. Line up the screw holes (slots) at the end of each rail assembly to the screw holes in the rail bracket. Install two small screws (Figure 2-1, D) into each rail bracket and loosely tighten the screws to temporarily secure the rail assembly and bracket. See Figure 2-5. 3. When each rail bracket is installed on the rail assembly, the catch tab at the top end of the rail bracket should point upwards like the catch tab at the opposite end of the rail assembly. See Figure 2-5. C A B D F A Catch B Attached to front side of the rack C Rail Assembly D Rail Bracket E Catch F Rack Depth Adjustment Screws. G Attached to the rear side of the rack Figure 2-5. Installing the Rail Bracket 2-8 Setting Up the System E G Installing the Rail Assemblies 1. Align the left slide rail assembly behind the mounting holes in the verticalmounting rail located on the left side of the rack cabinet. The catch tabs on the front and rear of the slide rail assembly help to align it with the holes in the vertical-mounting rail. See Figure 2-6. 2. Install two of the large screws and washers to secure the front of the slide rail assembly to the front vertical-mounting rail and loosely tighten them. See Figure 2-6. A B A A Catch B Screw hole for securing the server to the rack Figure 2-6. Installing the Rail Assemblies into the Rack 3. Carefully align the rear holes of the slide rail assembly with the holes in the rear vertical-mounting rail. 4. Install two screws and washers to secure the rear of the slide rail assembly to the vertical-mounting rail. 5. Tighten all four screws holding the slide rail assembly to the vertical mounting rails. 6. Repeat steps 1 through 5 for the mounting the right slide rail assembly on the right side of the rack cabinet. Note: The screws in the oblong slots of the outer slide rail may need to be readjusted and tightened. See Figure 2-7. Setting Up the System 2-9 Figure 2-7. Adjusting the Slide Rails 7. Firmly secure the rail bracket to the slide rail and the rack. See Figure 2-8. Figure 2-8. Tightening the Slide Rail Installing the Server 1. Extend the sliding rails of the right and left rail assemblies out of the system rack until they are locked. See Figure 2-9. Figure 2-9. Extending the Slide Rails 2-10 Setting Up the System ! WARNING The system can weigh up to 55 pounds (25kg). If the system contains numerous optional boards and peripheral devices, it will weigh more. To avoid personal injury, at least two persons are required to install the server into the rack. 2. Firmly fit the inner rails on the sides of the server into the rail assemblies that are installed to the rack. Slowly push the server into the rack (Figure 2-10). If the server is locked on its way into the rack, slowly push it in while pressing the release levers on the right and left sides of the server (Figure 2-10, A). Note: When the server is installed for the first time, the mechanical parts may offer resistance. You may feel strong friction when sliding the server into the rack for the first time. A Figure 2-10. Pushing the Server into the Rack 3. Confirm that the sliding rails work normally by moving the server in and out of the rack several times. Setting Up the System 2-11 Securing the Server 1. Push the server into the rack as far as it will go. A A Figure 2-11. Securing the Server in the Rack 2. Tighten the right and left thumbscrews on the front panel to secure the server to the rack. See Figure 2-11, A. 3. If you are installing the cable arm assembly, proceed to the next installation procedure, otherwise perform Step 4. 4. Install the front bezel. This completes installing of the server. 2-12 Setting Up the System Installing the Cable Arm Assembly Introduction The triple-hinged cable retention arm attaches to the rear of the server and the system rack allowing cables to move as the server slides back and forth within the rack cabinet. The server cables are tie-wrapped to the cable retention arm. The following sections provide procedures for installing the cable retention arm assembly to your server and your system rack. Installation of the cable retention arm differs depending on the type of system rack used. The cable retention arm components that shipped with your server are shown on the next page. Follow procedures pertaining to your system rack. Setting Up the System 2-13 Unpacking After unpacking the cable retention arm assembly, confirm that all parts shown in Figure 2-12 are included in the kit. Arm Base Arm Arm Stopper Assembly Arm Bracket C Arm Bracket B Arm Bracket A Screw A (No 6-32) Arm Extension Screw B Figure 2-12. Cable Arm Assembly Parts 2-14 Setting Up the System Preparation The following tool is required to install the cable retention arm assembly. Small Philips driver Installation Procedure This document includes three cable arm installation procedures. They are Installation Procedure A, Installation Procedure B, and Installation Procedure C. The procedure you use for installing the cable retention arm assembly varies depending on the depth of your system rack. Also, some of the hardware used differs depending on the procedure you use. Use the table below to determine the correct installation procedure you should use. Distance between the mounting surface of the front and rear vertical rails Installation procedure you should use 700mm ~ 774mm (27.6in ~ 30.5in) Procedure A 775mm ~ 829mm (30.5in ~ 32.6in) Procedure B 830mm ~ 900mm (32.6in ~ 35.4in) Procedure C If you are unsure of the depth of your system rack, refer to the illustration below and measure the distance between the inside surface of the front and rear vertical mounting rails of your system rack. See Figure 2-13. Figure 2-13. Measuring the Rack Setting Up the System 2-15 Installation Procedure A 1. Attach the Arm Base to the rear of the power supply cage using the two screws that secure the power supply cage to the chassis. See Figure 2-14. Power Supply Cage Screws (2) Arm base Figure 2-14. Attaching the Arm Base 2. One end of the cable arm includes a long hinged bracket with six mounting holes. The other end of the cable arm includes a small hinged bracket with two mounting holes. Using two 6-32 screws attach the end of the cable arm with the long hinged bracket to the Arm Base installed in the previous step. See Figure 2-15. Two 6-32 screws Arm base Cable arm Figure 2-15. Installing the Cable Arm to the Arm Base 2-16 Setting Up the System 3. Arm Bracket A has four holes, two of which are elongated. Using the elongated holes in Arm Bracket A, attach Arm Bracket A onto Arm Bracket B using two 6-32 screws. Refer to Figure 2-16. 4. Using the upper rail bracket screw and one type B screw (see screw illustrations in Figure 2-12), attach Arm Bracket B bracket to the rear cabinet vertical rail. Vertical rail Arm stopper Bracket A B Two screw A Use upper vertical rail bracket screw Arm base Two 6-32 screws Use screw B. See Page 3. bracket Arm Arm Bracket A Figure 2-16. Installing Arm Bracket A and Arm Bracket B. 5. Install the free end of the cable arm to Arm Bracket A using two 6/32 screws. See Figure 2-17. Arm bracket A Arm Bracket Two 6-32 screws Figure 2-17. Installing the Cable Arm to Arm Bracket A Setting Up the System 2-17 6. Press in on the rail release latches and slowly push the server in and out of the system rack several times. Ensure proper movement of the cable arm. Adjustment of the cable arm hinged brackets may be necessary to attain smooth operation. Tighten all screws. Ensure the server can be fully closed and secured to the rack. See Figure 2-18. 7. Bundle all the server cables together and tie-wrap them to the cable arm. Cable arm Figure 2-18. Checking the Installed Cable Arm 2-18 Setting Up the System 8. The Arm Stopper Assembly keeps the cable arm from binding as the server is pulled out of or pushed into the rack. Attach the Arm Stopper Assembly to the left rear vertical rail (viewed from the rear of the cabinet) using one Screw B and one rail bracket screw. Arm Stopper Assembly Rail bracket screw (upper screw hole). Screw B Figure 2-19. Installing the Arm Stopper Assembly 9. When installing or removing cables, loosen the fixed screw and separate the two pieces of the Arm Stopper Assembly for easy access to the cable arm assembly. See Figure 2-20. Fixed screw Arm stopper Figure 2-20. Separating the Arm Stopper Assembly Setting Up the System 2-19 Installation Procedure B 1. Attach the Arm Base to the rear of the power supply cage using the two screws that secure the power supply cage to the chassis. See Figure 2-21. Power Supply Cage Screws (2) . Arm base Figure 2-21. Attaching the Arm Base 2. Position the Arm Extension bracket as shown in Figure 2-22, and using two 6-32 screws attach the Arm Extension bracket to the Arm Base. 3. One end of the cable arm includes a long hinged bracket with six mounting holes. The other end of the cable arm includes a small hinged bracket with two mounting holes. Using two 6-32 screws attach the end of the cable arm with the long hinged bracket to the Arm Extension bracket. Two 6-32 screws Arm Extension Bracket Cable Arm Arm Base Two 6-32 screws Figure 2-22. Attaching the Arm Extension Bracket to the Arm Base 2-20 Setting Up the System 4. Arm Bracket A has four holes, two of which are elongated. Using the elongated holes in Arm Bracket A, attach Arm Bracket A onto Arm Bracket B using two 6-32 screws. Refer to Figure 2-23. 5. Using the upper rail bracket screw and one type B screw (see screw illustrations in Figure 2-12), attach Arm Bracket B bracket to the rear cabinet vertical rail. Arm Bracket B Use upper vertical rail bracket screw Arm Base Use screw B. See Page 3. Arm Bracket A Two 6-32 screws Figure 2-23. Installing Arm Bracket A and Arm Bracket B 6. Install the free end of the cable arm to Arm Bracket A using two 6/32 screws. See Figure 2-24. Two screw A Arm Arm Bracket A Figure 2-24. Installing the Cable Arm to Arm Bracket A. Setting Up the System 2-21 7. Press in on the rail release latches and slowly push the server in and out of the system rack several times. Ensure proper movement of the cable arm. Adjustment of the cable arm hinged brackets may be necessary to attain smooth operation. Tighten all screws. Ensure the server can be fully closed and secured to the rack. See Figure 2-25. 8. Bundle all the server cables together and tie-wrap them to the cable arm. Cable Arm Figure 2-25. Checking the Installed Cable Arm 2-22 Setting Up the System Installation Procedure C 1. Attach the Arm Base to the rear of the power supply cage using the two screws that secure the power supply cage to the chassis. See Figure 2-26. Power Supply Cage Screws (2) . Arm base Figure 2-26. Attaching the Arm Base 2. Position the Arm Extension bracket as shown in the illustration below and using two 6-32 screws attach the Arm Extension bracket to the Arm Base. 3. One end of the cable arm includes a long hinged bracket with six mounting holes. The other end of the cable arm includes a small hinged bracket with two mounting holes. Using two 6-32 screws attach the end of the cable arm with the long hinged bracket to the Arm Extension bracket. See Figure 2-27. Two 6-32 screws Arm Extension Bracket Cable Arm Arm Base Two 6-32 screws Figure 2-27. Attaching the Arm Extension Bracket to the Arm Base Setting Up the System 2-23 4. Arm Bracket A has four holes, two of which are elongated. Using the elongated holes in Arm Bracket A, attach Arm Bracket A onto Arm Bracket C using two 6-32 screws. Refer to the following illustration. 5. Using the upper rail bracket screw and one type B screw (see screw illustrations on page 3), attach Arm Bracket C to the rear cabinet vertical rail. See Figure 2-28. Arm Bracket C Use upper vertical rail bracket screw Arm Base Use screw B. See Page 3. Two 6-32 screws Arm Bracket A Figure 2-28. Attaching Arm Bracket C and Arm Bracket A 2-24 Setting Up the System 6. Install the free end of the cable arm to Arm Bracket A using two 6/32 screws. See Figure 2-29. Two screw A Arm bracket Two 6-32 screws Arm Arm Bracket A Figure 2-29. Installing the Cable Arm to Arm Bracket A 7. Press in on the rail release latches and slowly push the server in and out of the system rack several times. Ensure proper movement of the cable arm. Adjustment of the cable arm hinged brackets may be necessary to attain smooth operation. Tighten all screws. Ensure the server can be fully closed and secured to the rack. See Figure 2-30. 8. Bundle all the server cables together and tie-wrap them to the cable arm. Arm Figure 2-30. Completed Cable Arm Assembly Setting Up the System 2-25 Removing the Server from the Rack ! WARNING The system can weigh up to 55 pounds (25kg). If the system contains numerous optional boards and peripheral devices, it will weigh more. To avoid personal injury, at least two persons are required to install the server into the rack. 1. Release the security lock, open and remove the front bezel. See Figure 2-31. Figure 2-31. Opening the Front Bezel 2. Confirm that the server is powered OFF, and disconnect the power cable and all the interface cables connected to the server. 3. If a cable arm is installed, remove the two screws securing the cable arm to the server and remove the cable arm from the server. 4. Loosen the two front thumbscrews (Figure 2-32, B) securing the server to the rack. 5. Holding the handles (Figure 2-32, A), slowly and carefully pull the server out of the rack. A click is heard as the slide rails lock in the extended position. A B Figure 2-32. Server handles and Thumbscrew Locations 2-26 Setting Up the System ! WARNING Two persons are required when performing the next step. 6. Slowly slide the server out of the rack until the release levers click and lock the server in place. Figure 2-33. Removing the Server from the Rack 7. Press in the right and left release levers and carefully slide the server from the rack. 8. Place the server on a flat stable surface. Connecting Peripheral Devices The server is provided with connectors for wide variety of peripheral devices on its front and rear. Figure 2-34 illustrates available peripheral devices for the server in the standard configuration and locations of the connectors for the devices. ! CAUTION Power off the server and peripheral device before connection. Connecting a powered peripheral device to the powered server may cause malfunctions and failures. ! Before connecting a third-party peripheral device or interface cable to the server, consult with your sales agent. Some third-party devices may not be used with the server. ! The total length of a cable (including the connection cable within a SCSI device) is limited by the SCSI standard. Ask your service representative for details. (The internal SCSI cable of the server is 0.1 m long.) Setting Up the System 2-27 ! The LAN connector and the serial port 2 connector of this server have the same shape. Be careful not to connect a cable to the wrong connector. Tag all LAN and serial port cables. ! A leased line cannot be connected directly to the serial port connectors. 2-28 Setting Up the System Figure 2-34. Making Connections Setting Up the System 2-29 Connecting the Power Cord Plug the female end of each AC power cord shipped with your system into the input receptacle on the rear of each power supply shipped with your system. Plug the male end of the power cord into NEMA 5-15R outlet for 100-120 VAC or NEMA 6-15R outlet for 200-240 VAC. If a power cord supplied with the system is not compatible with the AC wall outlet in your region, obtain a suitable power cord that meets the following criteria. ! The power cord must be rated for the available AC voltage and have a current rating that is at least 125% of the current rating of the system. ! The power cord connector that plugs into the wall outlet must be terminated in a grounding-type male plug designed for use in your region. It must have certification marks showing certification by an agency acceptable in your region. ! The power cord connector that plugs into the system must be an IEC- type CEE-22 female connector. ! The power cord must be less than 1.8 meters (6.0 feet) long. When connecting the power cord to a power control unit such as an UPS unit, confirm that the power control unit is powered OFF. Connecting the power cord while power is supplied to the power control unit may cause a failure. ! WARNING A power cord is provided for each power supply shipped with your system. Do not attempt to modify or use the supplied AC power cord if it is not the exact type required. 2-30 Setting Up the System Getting Familiar with the System Before turning on and setting up your system, you should become familiar with the system’s features, such as the location of your system's front and rear panel switches, indicators and connectors, etc. This section describes the system switches, indicators and connectors. Front View with Front Bezel Closed Figure 2-35 shows the location of the front system features visible with the front bezel installed. C D 1 2 E F G ID A B A Front bezel The front bezel is a cover protecting the front devices during daily operation. A security key is provided to lock the cover. B Key slot Insert the security key into this slot when unlocking the front bezel. C ACT lamp (green) This lamp is on while the system is connected to the network and blinks if there is network activity. The number "1" on the icon indicates LAN port 1, and the number "2" indicates LAN port 2. D POWER lamp (green) This lamp turns green when the power is turned on. E STATUS lamp (green/amber) (on the front panel) This lamp indicates the server status. The lamp is green during normal operation. The lamp turns amber or flashes when the server experiences a fault. F DISK ACCESS lamp (green/amber) This lamp is green during access to the internal hard disks. The lamp turns amber when one of the internal hard disks fails. G UID lamp (blue) This lamp illuminates when the UID switch is pressed. (The lamp also turns on or blinks when software issues a command.) Figure 2-35. Front View Controls and Indicators (Bezel Closed) Setting Up the System 2-31 Front View with Front Bezel Removed Figure 2-36 shows the location of the front panel system features visible with the front bezel removed. B C D E F G H I J K L M B A A Q R P S O N T U V W BB X AA Y Z A Captive thumb screws (2). The screws secure the server to the rack. B Handles (2) C Hard disk bay (ID 0) D Hard disk bay (ID 1) E Hard disk bay (ID 2) F DISK lamp (green/amber) Each hard disk blinks green during disk activity. The lamp turns amber when the hard disk fails. The lamp flashes switching back and forth between green and amber during build processing (in a disk array configuration only.) G Hard disk bay (ID 3) H Hard disk bay (ID 4) I Hard disk bay (ID 5) J Flex bay. A hard disk or CD-ROM, floppy disk drive combination can be mounted in this bay. A CD-ROM, floppy disk drive combination is mounted in the standard configuration. If a hard disk drive is mounted, SCSI ID8 is assigned to the bay. K CD-ROM drive disk access lamp L CD-ROM drive tray eject button M CD-ROM drive emergency CD eject hole N Floppy disk eject button O Backup device bay. Mount an optional DAT or AIT drive in this bay. P Floppy disk diskette slot 2-32 Setting Up the System Q Floppy disk access lamp R Front VGA connector. Connect a display monitor to this connector. S ACT lamp (green) This lamp is on while the system is connected to the network and blinks during network activity. The number "1" on the icon indicates LAN port 1, and the number "2" indicates LAN port 2. T POWER switch. Press this switch to turn on/off the power. Pressing the switch once turns on the power, and the POWER lamp goes on. Pressing it again turns off the power. Pressing the switch for 4 seconds or more turns off the power during a forced shutdown. U POWER lamp (green) . This lamp turns green when the power is turned on. V STATUS lamp (green/amber) (on the front panel). This lamp indicates the server status. The lamp is green during normal operation. The lamp turns amber or flashes when the server enters an abnormal state. W DISK ACCESS lamp (green/amber). This lamp blinks green during disk activity. The lamp turns amber when even one of the internal hard disks fails. X UID lamp (blue). This lamp illuminates when the UID switch is pressed. (The lamp also turns on or blinks when software issues a command.) Y UID (Unit ID) switch. Press this switch to turn on/off the UID lamps on the front and rear panels of the server. Pressing the switch once turns on the lamps. Pressing it again turns them off. Z Reset switch. Press this switch to reset operation. AA USB connectors. Connect USB-compliant devices to the connectors. BB DUMP switch (NMI switch). Press this switch to dump memory. Figure 2-36. Front View Controls and Indicators (Bezel Removed) Setting Up the System 2-33 Rear View Figure 2-37 shows the location of the rear panel system features. A B C D E F G H I J Y X W V Q P O N M L K U T S R A Low-profile PCI board expansion slots. Mount PCI boards of the low-profile type into the slots. The slots are called 3C, 2C, and 1C from the top. B Serial port 1 connector (DB-9). Connect a serial device to this connector. Note: The console of a management PC, etc. can be connected to only serial port 2. (BIOS setting required) A leased line cannot be connected directly to this connector. C Mouse/keyboard connectors. Connect the mouse and keyboard to the connectors through the included Y-cable. D Rear serial port 2 connector (RJ-45). Connect a serial device to this connector. The setting of the server needs to be changed depending on the device to be connected. This connector is capped for preventing incorrect connection. A leased line cannot be connected directly to this connector. E USB connector. Connect a USB-compliant device to this connector. F Full-height PCI board expansion slots. Mount full-height PCI boards in the slots. The slots are called 3B, 2B, and 1B from top. G Power supply unit (power supply slot 1). H Power supply unit expansion slot (power supply slot 2). Mount an optional power supply unit in this slot. I AC inlet (for the power supply unit in slot 1). J AC inlet (for an additional power supply unit) K AC POWER lamp. This lamp turns green and flashes when the server receives AC power from the power cord. The lamp turns green when the server power switch is turned on, and it turns amber when a power failure occurs. L AC cord holder. M STATUS lamp (green/amber). This lamp indicates the server status. The lamp is green during normal operation. The lamp turns amber or flashes when the server enters an abnormal state. N UID lamp (blue). This lamp goes on when the UID switch is pressed. (The lamp also goes on when software issues a command.) O Console Redirection switch. This switch enables the console redirection feature via serial 2-34 Setting Up the System port 2. P POST lamps (on the system board). The lamps are mounted onboard. They are on during POST after the power is turned on. Q Speed lamp (amber). This lamp indicates the transmission speed of the LAN port 2. R Speed lamp (amber). This lamp indicates the transmission speed of the LAN port 1. S LAN PORT 1 connector. Connects the server to the LAN network. T LINK/ACT lamp (green). This lamp indicates the access status of LAN port 1. U LAN PORT 2 connector. Connects the server to the LAN network. V LINK/ACT lamp (green). This lamp indicates the access status of LAN port 2. W SCSI connector. Connect external SCSI device to this connector. X Rear VGA connector. Connect a display unit to this connector. Y USB connector. Connect a USB-compliant device this connector. (Windows NT 4.0 needs the compliant driver.) Figure 2-37. Rear View Controls and Indicators Setting Up the System 2-35 Status Indicators Your server includes many LED status indicators providing you with detailed status of server operation. This section provides detailed descriptions of all server status indicators. ACT Lamp ( ) The ACT lamp is green while the server is connected to the LAN. The lamp flashes while the server is accessed via the LAN (during transmission/reception of packets). The number "1" on the icon indicates LAN port 1, and the number "2" indicates LAN port 2. The location of this indicator is shown in Figure 2-35, C. POWER Lamp ( ) The green POWER lamp lights to indicate normal operation while the server is powered. When the server is powered off, the POWER lamp is unlit. The POWER lamp indicates that the server is running in the power-saving mode (sleep mode). If the OS supports the power-saving mode such as Windows 2000, running a command places the server in a power-saving mode and causes the power lamp to blink. Press the POWER switch to bring the server out of power-save mode. The power-saving mode is only available when the OS supports the powersaving feature. Some OS's allow you to set the server to automatically enter the power-saving mode when no access is made to the server for a certain period of time or to select the power-saving mode with a command. The location of this indicator is shown in Figure 2-35, D. STATUS Lamp ( ) The STATUS lamp is green while the server is operating normally. Your server includes this important status lamp on both the front and the rear panels. The location of this indicator on the front panel is shown in Figure 2-35, E. The location of this indicator on the rear panel is shown in Figure 2-37, M. If the STATUS lamp turns amber and/or flashes, it indicates that the server is in an abnormal state. The Table 2-1 details the STATUS lamp descriptions and the procedures you should follow should the status lamp indicate an abnormal state. Note: If ESMPRO or the offline maintenance utility is installed, you can determine the cause of a failure by referring to the error log. 2-36 Setting Up the System Table 2-1. System Status LED Indicator STATUS lamp indication Description Procedure On (green) The server is operating normally. None required (normal) Flashing (green) The server is operating with the memory, CPU, or power supply unit in degraded state. Check the AC POWER lamp indication on the rear panel of the server. Off A single-bit memory error has often occurred. Identify the device in degraded state by using the BIOS setup utility "SETUP," and replace it as soon as possible. The power is off. – POST is in progress. Wait for a while. The STATUS lamp turns green when POST is completed. A CPU error occurred. Turn the power off and then turn it on. If the POST screen displays an error message, take note of the message, and contact your service representative. A CPU temperature alarm was detected. (Thermal-Trip) A watchdog timeout occurred. A CPU bus error occurred. On (amber) A memory dump request has been made. Wait until the memory dump is completed. A temperature alarm was detected. Check if the internal fans are clean and if the fan units are firmly connected. If the STATUS lamp indication does not change when the fans are normal, contact your service representative. A voltage alarm was detected. Contact your service representative. All the power supply units failed. Flashing (amber) Either of the following was detected in the redundant power configuration: Connect the power cord to supply power. If the power supply unit is faulty, contact your service representative. AC power not supplied to one of the two power supply units Failure of one of the two power supply units A fan alarm was detected. Check if the fan units are firmly connected. If the STATUS lamp indication does not change when the fans are normal, contact your service representative. A temperature warning was detected. Check if the internal fans are clean and if the fan units are firmly connected. If the STATUS lamp indication does not change when the fans are normal, contact your service representative. Setting Up the System 2-37 DISK ACCESS Lamp ( ) The DISK ACCESS lamp indicates the status of the hard disks mounted in the 3.5-inch disk bay. The lamp flashes green each time access is made to the hard disks in your system. The location of this indicator is shown in Figure 2-35, F. When the DISK ACCESS lamp turns amber, it indicates that a hard disk failure has occurred. Check the hard disk lamp located on each hard disk to determine the failing drive. Note: If a hard disk in the server is connected to a disk array controller, the access lamp signal cable must be connected from the disk array controller to the system board. UID Switch and Lamp (UID) Pressing the UID switch located on the front panel (see Figure 2-35, Y) toggles the front panel UID lamp (blue) and the system board UID lamp on and off. The system board UID lamp is visible through the rear of the chassis and allows you to locate the server you're working on from the rear of the servers in a rack. The location of the rear panel UID lamp is shown in Figure 2-36, N. Disk Access Lamp The disk access lamp of the floppy disk drive or CD-ROM drive is on while the drive is accessed. Hard Disk Lamp A Figure 2-38. Hard Disk Drive Activity Lamp The disk lamp located on each disk in the 3.5-inch disk bay (see Figure 2-38) indicates the following status: ! Flashing (green) indicates that the hard disk is being accessed. ! On (amber) indicates a failure of the hard disk in the disk array configuration. 2-38 Setting Up the System Note: Even if one of the hard disks fails in disk array configuration (RAID1, RAID5, or RAID0+1), the server can continue operation. However, replace the disk as soon as possible, and perform reconstruction (rebuild) processing. (The failing disk can be replaced in hot swap mode.) ! Flashing switching back and forth between green and amber indicates that reconstruction (rebuild) processing is being performed for the hard disk. (This flashing does not indicate a failure.) When a failing hard disk is replaced in disk array configuration, the system automatically rebuilds the data. (Auto-rebuild function) The lamp switches back and forth between green and amber during rebuild processing. The lamp goes off when the rebuild processing has terminated. It turns amber when the rebuild processing fails. Note: If the server is turned off during rebuild processing, the processing is stopped. Restart the server, mount the new hard disk in hot swap mode, and then perform the rebuild processing again. Observe the following notes on using the auto-rebuild function: Do not turn the power off. (Once the power is turned off, the auto-build function does not start.) Let 90 seconds or more pass between dismounting a failing hard disk and when mounting a new one. Do not replace a failing hard disk while rebuild processing is being performed for another hard disk LAN Connector Lamps There are two lamps for each of the two LAN ports (connectors) on the rear panel. See Figure 2-37, Q, R, T, and V for the locations of the LAN connector lamps. LINK/ACT Lamps Each LINK/ACT lamp indicates the status of the standard network port of the server. While power is supplied to the server and HUB and the connection is correct, the lamp is on green. (LINK) The lamp turns green and flashes while the network port is transmitting/receiving data. (ACT) Speed lamp This lamp indicates whether the network port is operating through a 1000BASET, 100BASE-TX or 10BASE-T network interface. If the lamp is lit amber, the network port is operating through 1000BASE-T. If the lamp is lit green, the network port is operating through 100BASE-TX. If the lamp is off, the network port is operating through 10BASE-T. Setting Up the System 2-39 POST Lamp Four lamps indicating the POST progress are located on the system board. They are visible through the slits on the rear panel of the server. If POST does not complete, the screen displays an error message, or you hear beeps, note the beep pattern and contact your service representative. The location of POST lamps is shown in Figure 2-37, P. AC POWER Lamp The AC POWER lamp is located on the rear of each power supply. See Figure 2-37, K. The lamp turns green and flashes when the power supply unit receives AC power from the power cord, which is connected to an AC outlet. The lamp turns green when the server power switch is turned on. If the lamp does not go on when the server power switch is turned on or if it turns or blinks amber, the power supply unit is probably faulty. In this case, contact your service representative to replace the power supply unit. 2-40 Setting Up the System Using the System The following subsections describe how to use this server system properly and safely, including an explanation of the server system power on/off sequences, what the POST program checks in the server, and how to perform a forced power shutdown. When using the server system the following precautions should be observed. ! Do not delete the hard disk partition exclusively provided for maintenance of the server although it may appear on the operating system (OS). Deleting the hard disk partition may cause malfunction of the server. ! Make sure you power off the server before connecting or disconnecting cables between the server and peripheral devices. Connecting or disconnecting the cables while the server is powered on may cause malfunction or failures within the server. ! Verify that the access lamp on the diskette drive is unlit before turning off the server or ejecting the floppy disk. Turning off the server or ejecting the floppy disk while the access lamp is lit may damage data being stored on the floppy disk. ! After turning off the server, wait at least 40 seconds before turning it on again. Cycling the power immediately may cause malfunction or failures of the server. ! Before relocating the server, turn off the power and unplug the power cord from the outlet. Moving the server when it is powered may cause malfunction or failures of the server. ! Some software includes a command to eject the CD-ROM tray or media in a device mounted in the 3.5-inch device bay. Make sure that the front bezel is removed before running the command. Running this command with the front bezel attached may cause the CD-ROM tray or the media to hit against the front bezel, resulting in a possible failure. ! Clean the server regularly. Regular cleaning prevents failures of the server and its components. ! Lightning may cause a momentary voltage drop. To prevent this problem, an uninterruptible power supply unit is recommended. ! Only use options qualified for the server. A non-qualified option may be mounted or connected to the server, but it may fail to operate normally or even cause failures. These types of failures are not covered under warranty. Setting Up the System 2-41 Front Bezel You must remove the front bezel to power on/off the server, to access the floppy disk drive, CD-ROM drive, removable media device, and to install/remove hard disks to the 3.5-inch disk bays. Note: To open the front bezel, you must unlock the door with the provided security key. Installing or Removing the Front Bezel 1. Insert the security key into the key slot and turn the key towards the front bezel to release the lock. See Figure 2-39. Unlock Lock Figure 2-39. Unlocking the Front Bezel 2. Hold the right end of the front bezel lightly to pull it toward you. 3. Slide the front bezel to the left a little to remove the tab from the frame and then remove the front bezel from the server. See Figure 2-40. Figure 2-40. Removing the Front Bezel 4. To install the front bezel, latch the tab at the left side of the front bezel on the server frame. After the installation, lock the front bezel by using the key for security. See Figure 2-41. 2-42 Setting Up the System Figure 2-41. Installing the Front Bezel POWER Switch Use the POWER switch to turn on/off the server. Power On Press the POWER switch on the front of the server chassis. The POWER lamp lights in green. B A A Power switch B Power lamp Figure 2-42. Power Switch and Lamp Setting Up the System 2-43 IMPORTANT: ! If the power cord is connected to a power control device such as a UPS (Uninterruptible Power Supply), make sure that the power control device is powered. ! The server management logic on your system board monitors and logs system voltage changes. When plugging the power cord to the system, you may experience a 10 second delay from the time you press the POWER switch on the front panel to the time the unit powers up. This is normal system operation and is required by the server management logic. ! Do not turn off the server until characters following logo screen appear. POST POST (Power-On Self-Test) is the server's self-diagnostic program stored in the system BIOS. When you power on the server, the system automatically runs POST to check the mother board, ECC memory module, CPU module, keyboard, and mouse. POST also displays messages of the BIOS SETUP utility, such as the start-up message, while in progress. With the factory setup of the server, the logo screen appears on the display unit while POST is in progress. (To display the POST check results, press Esc.) Note: You can set the POST check results to appear on the display unit without pressing Esc. To do so, select "Enabled" for "Boot-time Diagnostic Screen" under the Advanced menu of the BIOS SETUP utility. You don't always need to check the POST check results. Check messages that POST displays when: ! you use the server for the first time. ! the server appears to fail. ! the server beeps for many times between power-on and OS start-up. ! an error message appears on the display unit. 2-44 Setting Up the System POST Execution Flow The following describes the progress of POST in chronological order. IMPORTANT: ! Do not make key entries or perform mouse operations while POST is in progress. ! Some system configurations may display the message "Press Any Key" to prompt a key entry. This message is driven by BIOS of an installed optional board. Make sure to read the manual that comes with the optional board before any key entry. ! Powering on the server, after you installed or removed an optional PCI board or moved it to another slot, may display the massage that indicates incorrect board configuration and suspend POST. In such a case, press F1 to continue POST. Board configuration can be made using the utility described later. 1. After a few seconds from power-on, POST starts checking the memory. The count message of the basic and expansion memory appears on the display unit screen. The memory check may take a few minutes to complete depending on the memory size of the server. Also, it may take approximately one minute for the display to appear after rebooting the server. 2. Some messages appear upon completion of the memory check. These messages indicate that the system has detected the CPU, keyboard, and mouse. 3. After a few seconds, POST displays the following message prompting you to launch the setup utility, stored in the BIOS of the server. This message appears at bottom left on the screen. Press <F2> to enter SETUP, Press <F12> to Network Launch the BIOS SETUP utility when you need to change the settings to meet the requirements for the server. As long as the above message is not displayed with an error message, you don't have to launch the utility. (Ignore the message. POST will automatically proceed.) To launch the SETUP utility, press F2 while the above message is displayed. See Chapter 4 for setup and parameters. The server automatically restarts POST when you exit the SETUP utility. Press F12 to start the operating system from the network. Setting Up the System 2-45 5. POST then detects the internal SCSI controller and displays the message prompting you to launch the SCSI device utility. (Ignore the message. POST will automatically proceed a few seconds later.) Press <Ctrl> <A> for SCSISelect(TM) Utility! To launch the SCSI device utility, press Ctrl and A. See Chapter 3 for setup and parameters. You need to use the SCSI device utility when: you installed an SCSI device in a backup device bay. you connected an external SCSI device. you changed internal SCSI device connections of the server. The server automatically restarts POST all over again when you exit the SCSI device utility. If more than one SCSI controller is installed on the PCI bus of the server, the system detects the boot devices in order of the PCI slots 1B → 2B → 3B → 1C → 2C → 3C. The system starts detecting the slots in each PCI riser card in ascending order of the slot numbers, and displays the message indicating activation of the SCSI BIOS SETUP utility. The RAID controller must be installed in the PCI slot that has the highest boot priority. 6. POST displays SCSI ID numbers used by the connected SCSI devices on the screen. 7. If an optional disk array controller is installed, the system displays the message prompting you to activate the disk array BIOS SETUP utility. (The start message and operation may vary depending on the mounted board.) For details, see the manual provided with the board or the online document in the EXPRESSBUILDER CD-ROM provided with the server. 8. If you set a password using the BIOS setup utility, the password entry screen appears upon successful completion of POST. Up to three password entries will be accepted. Three incorrect password entries disable the server from booting. In this case, turn off the power and wait at least 30 seconds before turning the power on again. Note: Do not set a password before installing an operating system (OS). 9. The OS starts when POST completes. 2-46 Setting Up the System POST Error Messages When POST detects an error, it displays an error message on the display unit. See Chapter 8 for POST error codes. IMPORTANT: Take a note on the messages displayed before consulting with your sales agent. Alarm messages are useful information for maintenance. Power Off Follow the procedure below to power off the server. If the power cord of the server is connected to a UPS, refer to the manual that comes with the UPS or the manual for the application that controls the UPS. IMPORTANT: Always allow POST to complete before turning off the server. 1. Shut down the OS. 2. Press the POWER switch on the front of the server. The POWER lamp goes off. 3. Power off peripheral devices. Setting Up the System 2-47 3 Configuring Your System ! Configuring Your System ! BIOS Setup Utility ! SCSISelect Utility ! Configuring the RAID Controller ! Configuring System Board Jumpers Configuring Your System Configuration and setup utilities are used to change your system configuration. You can configure your system, as well as option boards you may add to your system, using the BIOS Setup Utility. Several unique system parameters are configured using the BIOS Setup, which is stored in the system FLASH memory. The SCSISelect Utility detects the SCSI host adapters on the system board. Use this utility if you need to configure the two SCSI controllers in your system or to perform a SCSI disk format or verify disk operation on the SCSI disk drives. The Adaptec Configuration Utility is also used to configure any SCSI removable media devices installed in your system. If your system has been factory configured, the BIOS Setup or SCSISelect Utility do not need to be run unless you want to change the password or security features, add certain types of option boards or devices, or upgrade your system board. This chapter also provides information on several system configuration parameters that are set by jumpers on the system board. However, these parameters do not usually require change. Use the EXPRESSBUILDER CD-ROM to create the device driver diskettes. 3-2 Configuring Your System BIOS Setup Utility The BIOS Setup Utility is used to change system configuration parameters. The utility is resident in the system FLASH memory and does not require a diskette or an operating system present to run. Using the BIOS Setup Utility You access the BIOS Setup utility when you turn on or reboot your system. To run the BIOS Setup Utility, perform the following procedure: 1. Power-on or reboot the system. “Press <F2> to enter SETUP” displays. 2. Press F2. The BIOS Setup Utility starts and the Main Menu is displayed. The menu bar at the top of the Main Menu lists the following selections: Menu Use Main Use this menu for basic system configuration. Advanced Use this menu for setting the Advanced Features available on your system. Security Use this menu to set User and Supervisor Passwords and the Backup and Virus-Check reminders. Server Use this menu for configuring unique Server features. Boot Use this menu to configure Boot Device priority. Exit Exits the current menu. Use the arrow keys to select a menu or an item on a displayed menu. Press the value keys (listed in the table below) to cycle through the allowable values for the selected field. Use the Exit menu’s “Save Values” selection to save the current values on all the menus. To display a submenu, position the cursor on a selection that has a submenu and press ENTER. An arrow precedes selections with submenus. Refer to the following table for information on the keys that you use with BIOS Setup. These keys are also listed at the bottom of the Setup menu. Configuring Your System 3-3 Key Function in Setup Menu F1 or Alt-H Get Help about an item. ESC Exit the current menu and return to the previous menu. Left or right arrow keys Move between menus. Up or down arrow keys Move cursor up and down. The cursor moves only to the settings that you can change. HOME or END Move cursor to top or bottom of window. PAGE UP or PAGE DOWN Move cursor to next or previous page. F5 or - Select the previous value for the field. F6 or + or SPACE Select the next value for the field. F9 Load default configuration values for this menu. F10 Save configuration values and exit. ENTER Execute command or Select ➨ submenu. BIOS Setup Configuration Settings The BIOS Setup Configuration tables show the default settings for the BIOS Setup Utility and provide a place for you to record any changes you make to these settings. Recommended values are bold in the following tables. 3-4 Configuring Your System Main Menu Feature Choices or Display Only Description System Time HH:MM:SS Set the System Time. System Date MM/DD/YYYY Set the System Date. Legacy Floppy A Disabled 1.44/1.25 Mb 3½” 720Kb 3.5” 2.88MB 3.5” Hidden if not detected. Legacy Floppy B Disabled 1.44 / 1.25 Mb 3½” 720Kb 3.5” 2.88MB 3.5” Hidden if not detected. Hard Disk Pre-delay Disabled Allows additional time for slower spin-up drives to come ready. 3 seconds 6 seconds 9 seconds 12 seconds 15 seconds 21 seconds 30 seconds Primary IDE Master Selects sub-menu Primary IDE Slave Selects sub-menu Secondary IDE Master Selects sub-menu Processor Settings Selects sub-menu Language English (US) French, German Spanish, Italian Your Setting Selects which language BIOS displays. Note: This feature immediately changes to the language BIOS selected. Configuring Your System 3-5 Primary and Secondary Master and Slave IDE Submenus Choices or Display Only Description Type Auto None Select Auto if a device is attached to the IDE channel. Multi-Sector Transfer Disabled 2 Sectors 4 Sectors 8 Sectors 16 Sectors Specifies the number of sectors that are transferred per block during multiple sector transfers. This field is informational only, for Type Auto. PI0 Mode Standard FPIO 1 FPIO 2 FPIO 3 FPIO 4 FPIO 3 / DMA 1 FPIO 4 / DMA 2 Select the method for moving data to/from the drive. This field is informational only, for Type Auto. This field is updated to display only the modes supported by the attached device. Ultra DMA Disabled Enabled Selects the Ultra DMA mode used for moving data to/from the drive. This field is informative only for Type Auto. Feature Your Setting Processor Settings Submenu Feature Choices or Display Only Description Processor POST Speed Setting Information Only Displays measured processor speed. Processor Retest Disabled Enabled If yes, BIOS will clear historical processor status and retest all processors on the next boot. After retesting, BIOS resets this option automatically to “Disable”. Hyper-Threading Disabled Enabled Specifies whether HyperThreading Technology is enabled or disabled. Processor 1 CPUID CPUID Not Installed Disabled Reports CPUID for Processor 1, if present. If empty, reports Vacant. If disabled by BMC, reports Disabled. Processor 1 L2 Cache Size Information Only Displays L2 Cache Size for Processor 1. Processor 2 CPUID CPUID (OFXX) Not Installed Disabled Reports CPUID for Processor 2, if present. If empty, reports Vacant. If disabled by BMC, reports Disabled. Processor 2 L2 Cache Size Information Only Displays L2 Cache Size for Processor 2. 3-6 Configuring Your System Your Setting Advanced Menu Feature Choices or Display Only PCI Configuration Select sub-menu. Peripheral Configuration Select sub-menu. Memory Configuration Select sub-menu. Advanced Chipset Control Select sub-menu. Boot-time Diagnostic Screen Disabled Enabled Description Your Setting Specifies whether POST messages are displayed. If this item is set to "Disabled," the logo appears during POST. The Boot-time Diagnostic Screen is automatically enabled if redirection is enabled. Reset Configuration Data No Yes Select ‘Yes’ if you want to clear the System configuration Data during next boot. Automatically reset to ‘No’ in next boot. Numlock On Off Sets power on Numlock state. Configuring Your System 3-7 PCI Configuration Menu Feature Choices or Display Only Onboard NIC Select sub-menu. Onboard SCSI Select sub-menu. Onboard Video Controller Select sub-menu. PCI Slot 1B ROM Disabled Enabled Used to enable or disable an option ROM that may be present on a PCI add-in card connected to the full-height riser card. PCI Slot 2B ROM Disabled Enabled Used to enable or disable an option ROM that may be present on a PCI add-in card connected to the full-height riser card. PCI Slot 3B ROM Disabled Enabled Used to enable or disable an option ROM that may be present on a PCI add-in card connected to the full-height riser card. PCI Slot 1C ROM Disabled Enabled Used to enable or disable an option ROM that may be present on a PCI add-in card connected to the low-profile riser card. PCI Slot 2C ROM Disabled Enabled Used to enable or disable an option ROM that may be present on a PCI add-in card connected to the low-profile riser card. PCI Slot 3C ROM Disabled Enabled Used to enable or disable an option ROM that may be present on a PCI add-in card connected to the low-profile riser card. 3-8 Configuring Your System Description Your Setting Onboard NIC 1 / Onboard NIC 2 Submenu Feature Onboard NIC Onboard NIC 1 ROM Embedded NIC 2 ROM Choices or Display Only Description Your Setting Enabled Disabled Enabled Disabled Enabled Disabled Enables or disables onboard LAN controller. Enables or disables onboard LAN controller expansion ROM. Enables or disables onboard LAN controller expansion ROM. Onboard SCSI Submenu Feature Onboard SCSI Onboard SCSI ROM Choices or Display Only Description Your Setting Enabled Disabled Enabled Disabled Enables or disables onboard SCSI controller. Enables or disables onboard SCSI ROM Onboard Video Submenu Feature Onboard Video Choices or Display Only Description Your Setting Enabled Disabled Enables or disables onboard video controller. Peripheral Configuration Submenu Feature Serial Port 1 (DB9) Address Serial Port 1 (DB9) IRQ Serial Port 2 (RJ45) Address Serial Port 2 (RJ45) IRQ Legacy USB Support PS/2 Mouse Support Choices or Display Only Description Disabled 3F8 2F8 3E8 2E8 4 3 Disabled 3F8 2F8 3E8 2E8 4 3 Used to configure the base I/O address for serial port 1. Disabled Keyboard Only Auto Keyboard and Mouse Disabled Enabled Your Setting Used to configure the interrupt for serial port 1. Used to configure the base I/O address for serial port 2. Used to configure the interrupt for serial port 2. Disables or enables support for USB keyboards and mice. Set to Enable for use with a non-USB aware operation system such as DOS. Specify whether the mouse is enabled or disabled. Configuring Your System 3-9 Memory Configuration Submenu Choices or Display Only Description Extended Memory Test 1 MB 1 KB Every-Location Disabled Extended memory test options run during POST. 1MB: Tests every 1-MB memory. 1KB: Tests every 1-KB memory. Every-Location: Tests every memory location. Disabled: Initializes memory. DIMM Bank #1 - #3 Installed Disabled Not Installed Memory Retest Disabled Enabled Indicates the current memory status. "Normal" indicates the normal status, "Error" indicates a memory error, and "None" indicates no DIMM installed (view only). Bank #1 indicates DIMMs in DIMM sockets #1A and #1B. Bank #2 indicates DIMMs in DIMM sockets #2A and #2B. Bank #3 indicates DIMMs in DIMM sockets #3A and #3B. (Memory is interleaved so that two DIMMs are used per bank.) Clears memory error information and retests all DIMMs on the next system boot. This option will be automatically reset to [Disabled] on the next system boot. Feature Your Setting Advanced Chipset Control Submenu Choices or Display Only Description Wake on Ring Disabled Enabled Wake on LAN/ PME PCI-XB Disabled Enabled Wake on PME PCI-XC Disabled Enabled Wake on RTC Alarm Disabled Enabled Enables or disables the remote power-on features via serial port (modem). Enables or disables the remote power-on features via network or PCI device (PCI Power Management Enable wake up event). Enables or disables the remote power-on features by PCI device (PCI Power Management Enable wake up event) installed to the PCI riser C. Enables or disables the remote power-on features using RTC Alarm features. Feature 3-10 Configuring Your System Your Setting Security Menu Note: Enabling the Supervisor Password field requires a password for entering Setup. The passwords are not case sensitive. Feature Choices or Display Only User Password is Installed Not Installed Installed Administrator Password is Not Installed Set Admin Up to 7 Password alphanumeric characters Set User Password Up to 7 alphanumeric characters Password On Boot Disabled Enabled Fixed Disk Boot Sector None Write Protect Secure Mode Timer Security Hot Key CTRL-ALT- 1 minute 2 minutes 5 minutes 10 minutes 20 minutes 60 minutes 120 minutes L Z Secure Mode Boot Disabled Enabled Power Switch Inhibit Disabled Enabled Description Your Setting Indicates whether the user password is set (view only). Indicates whether the administrator password is set (view only). Press Enter to display the administrator password entry screen. With the administrator password, all SETUP menus are available for access. This option is available only when you log into the SETUP utility with the administrator password. Press Enter to display the user password entry screen. With a user password, only certain menus are accessible. This option is available only if the Administrator Password is specified. Specify whether to request a password entry at boot-up. Administrator password setup is required. Prevents data from being written to IDE hard disks. The server does not support IDE hard disks. Set the period from no input from the keyboard or mouse to the point at which the system enters into the secure mode. If this item is set to "Disabled," the system does not enter the secure mode. Specify the hot key to invoke secure mode features. Pressing the assigned key along with Ctrl and Alt invoke secure mode. This option is enabled when User Password is set. Specify whether the system boots in secure mode. This option is enabled when User Password is set. Enables or disables the POWER switch. If "Enabled" is selected, power-off with the POWER switch becomes unavailable after OS boot-up. (Forced shut down also becomes unavailable. Forced shut down is a feature to shut down by pressing the POWER switch for at least four seconds.) Configuring Your System 3-11 Server Menu Feature Management Console Redirection Event Log Configuration Assert NMI on PERR Choices or Display Only Select Submenu Select Submenu Select Submenu POST Error Pause Disabled Enabled Disabled Enabled Disable BSP Do not Disable BSP Retry 3 Times Disable FRB2 Timer Disabled IRQ 5 IRQ 11 Stays Off Last State Power On Disabled Enabled Disabled Enabled Platform Event Filtering Disabled Enabled Boot Monitoring Disabled 5 minutes 10 minutes 15 minutes 20 minutes 25 minutes 30 minutes 35 minutes 40 minutes 45 minutes 50 minutes 55 minutes 60 minutes Assert NMI on SERR FRB-2 Policy BMC IRQ AC-Link Temperature Sensor Description 3-12 Configuring Your System Sets support of PCI PERR. Sets support of PCI SERR. Set this item to "Disable BSP." Sets the BMC IRQ. Sets the AC-LINK feature. Determines the mode of operation if a power loss occurs. Enables or disables temperature sensor monitoring feature. Specifies whether the system waits for user intervention on critical POST errors. If no keyboard is connected to the system, this option is ignored and the system always continues. Disable or enable the event report function of Baseboard Management Controller (BMC). Indicates whether the boot monitoring function is enabled or disabled and the timer value on booting. To use this function, install ESMPRO Agent. Do not use this function if the system is booted from OS without installation of ESMPRO Agent or CDROM. Set this item to "Disabled" if ARCServe uses the Disaster Recovery Option. Your Setting Server Menu (Continued) Feature Boot Monitoring Policy Choices or Display Only Retry 3 Times Retry Service Boot Always Retest Description Your Setting This item indicates the processing at the occurrence of timeout during boot monitoring. If [Retry 3 times] is selected, the system is reset after the occurrence of timeout and OS boot is retried up to three times. The failure in the third boot causes the boot to be tried from the service partition*. If [Retry Service Boot] is selected, the system is reset after the occurrence of timeout and OS boot is retried up to three times. Then the boot is tried from the service partition for three times. The system halts if the system fails to boot from the service partition. If [Always Reset] is selected, the system is reset after the occurrence of timeout and OS boot is retried repeatedly. * If no service partition exists in the system, BIOS continues to bootup from the system partition. System Management Submenu Board Part Number Choices or Display Only – Board Serial Number – System Part Number – System Serial Number – Chassis Part Number – Chassis Serial Number – BIOS Version – BMC Device ID – BMC Firmware Revision – BMC Device Revision – PIA Revision – SDR Revision – HSBP Revision – Feature Description Your Setting Indicates the part number of mother board. (View only) Indicates the serial number of mother board. (View only) Indicates the system part number. (View only) Indicates the serial number of system. (View only) Indicates the part number of chassis. (View only) Indicates the serial number of chassis. (View only) Indicates BIOS version number. (View only) Indicates the device ID of BMC (Baseboard Management Controller. (View only) Indicates BMC (Baseboard Management Controller) firmware revision number. (View only) Indicates BMC (Baseboard Management Controller) device revision number. (View only) Indicates the revision of PIA (Platform Information Area). (View only) Indicates the revision of SDR (Sensor Data Record). (View only) Indicates HSBP (Hot-Swap Backplane) revision number. (View only) Configuring Your System 3-13 Console Redirection Submenu Feature BIOS Redirection Port ACPI Redirection Port Baud Rate Flow Control Terminal Type Choices or Display Only Description Disabled Serial Port A (DB-9) Serial Port B (RJ45) Disabled Serial Port A (DB-9) Serial Port B (RJ45) 9600 19.2k 57.6k 115.2k No Flow Control CTS/RTS XON/XOFF CTS/RTS+CD VT100+ VT-UTF8 PC ANSI Specify the serial port to which a hardware console is connected. Your Setting Specify the serial port to which an ACPI console is connected. Selects a baud rate for communications with the connected HW console. Select a flow control method. Specify the type of remote console. Event Log Submenu Feature Clear All Event Logs Event logging Critical Event Logging Choices or Display Only No Yes Enabled Disabled Enabled Disabled 3-14 Configuring Your System Description Clears the DMI event log after a system reboot. Allows Event logging If enabled, BIOS will detect log events for critical system errors. Critical errors are fatal to system operation. Errors included are PERR, SERR, ECC memory errors and NMI. Your Setting Boot Menu Feature Boot Device Priority Hard Disk Drives Removable Devices ATAPI CDROM Drives Choices or Display Only Description Your Setting Description Your Setting Select sub-menu. Select sub-menu. Select sub-menu. Select sub-menu. Boot Device Priority Submenu Feature 1st Boot Device 2nd Boot Device 3rd Boot Device 4th Boot Device 5thBoot Device Choices or Display Only ATAPI CD-ROM Removable Devices Hard Drive IBA 1.1.05 Slot 0339 IBA 1.1.05 Slot 0338 Attempts to boot from an ATAPI CD-ROM drive. Attempts to boot from a removable media device. Attempts to boot from a hard drive device. Attempts to boot from a network devices connected to the LAN port 1 (PXE boot). Attempts to boot from a network devices connected to the LAN port 2 (PXE boot). Hard Drives Submenu Item Description 1. Drive #1 (or actual drive name) 2. Other bootable cards "Other bootable cards" cover all the boot devices not reported to the system BIOS through BIOS Boot Specification mechanisms. It may or may not be bootable, and may not correspond to any device. Configuring Your System 3-15 Removable Devices Submenu Item Description Lists Bootable Removable devices in the system. Select one of the detected devices. This list includes legacy 1.44-MB floppy drives and 120MB floppy drives. Selects the Boot sequence from available devices. Lists ATAPI CDROM Drives Exit Menu You can make the following selections on the Exit Menu. Select an option using the up or down arrow keys, then press <Enter> to execute the option. Pressing <Esc> does not exit this menu. You must select one of the items from the menu or menu bar to exit. Choices Description Exit Saving Changes Exit after writing all modified Setup item values to NVRAM. Exit Discarding Changes Exit leaving NVRAM unmodified. User is prompted if any of the setup fields were modified. Load Setup Defaults Load default values for all SETUP items. Load Custom Defaults Load values of all Setup items from previously saved Custom Defaults. NOTE: This is hidden if custom defaults are not valid or present. Save Custom Defaults Stores Custom Defaults in NVRAM. Discard Changes Read previous values of all Setup items from NVRAM. 3-16 Configuring Your System SCSISelect Utility The SCSISelect Utility detects and configures the SCSI controller located on the system board or an optional SCSI controller board installed in your system. This utility may be started with a simple key operation while POST is in progress and requires no specific start-up disk. The SCSISelect Utility is used mainly to set the transfer rate of connected SCSI device. Use the SCSISelect Utility to: ! Change default values ! Check and/or change SCSI device settings that may conflict with those of other devices in the server. Running the SCSISelect Utility You access the SCSISelect Utility when you turn on or reboot your system. To run the utility, perform the following procedure: 1. Power-on or reboot the system. 2. When this message appears on the video monitor: Press Ctrl-A to run SCSI Utility... 3. Press Ctrl+A to run this utility. The SCSI utility starts. When the Adaptec SCSI Utility detects more than one AIC-79xx host adapter, it displays a selection menu listing the bus and device number of each adapter. When the selection menu appears, select the channel you wish to configure as follows: Bus : Device : Channel Selected SCSI Adapter 04 : 07 : A* AIC-7902 04 : 07 : B AIC-7902 *Internal SCSI connector. 4. Once you select the adapter, the following screen is displayed: Menu Description Configure/View Host Adapter Settings Configure host adapter and device settings. SCSI Disk Utilities The utility scans the SCSI bus for SCSI devices, reports a description of each device. Run these utilities before configuring SCSI devices. 5. If you wish to format a disk, verify disk media, or display a list of devices and their SCSI IDs, select “SCSI Disk Utilities”. If you wish to configure the adapter or a device, select “Configure/View Host Adapter Settings”. Configuring Your System 3-17 Adaptec SCSI Utility Configuration Settings The following keys are active for all Adaptec SCSI Utility screens: Key Action Arrows Up and down arrows move from one parameter to another within a screen. ENTER Displays options for a configurable parameter. Selects an option. ESC Moves back to previous screen or parameter or EXIT if at the Main menu. F5 Switches between color and monochrome. F6 Resets to host adapter defaults. The following table shows the normal settings for the Adaptec SCSI Utility and provides a place for you to record any changes you make to these settings. Table 3-1. SCSISelect Utility Setup Configurations OPTION RECOMMENDED SETTING OR DISPLAY ONLY SCSI Bus Interface Definitions SCSI Controller ID SCSI Controller Parity SCSI Controller Termination 7 Enabled Enabled Additional Options Boot Device Configuration Master SCSI Controller SCSI Device Configuration AIC-7902 at Slot 0004:07:00 Press ENTER for menu Sync Transfer Rate (MB/Sec) 320 Packetized Yes QAS Yes Initiate Wide Negotiation Yes Enable Disconnection Yes Send Start Unit Command Yes BIOS Multiple LUN Support No 1 Include in BIOS Scan Yes 1 Advanced Configuration Reset SCSI Bus at IC Initialization 1 Press ENTER for menu No effect if BIOS is disabled. 3-18 Configuring Your System Press ENTER for menu. Enabled YOUR CONFIGURATION Table 3-1. SCSISelect Utility Setup Configurations (continued) RECOMMENDED SETTING OR DISPLAY ONLY OPTION 1 2 Display <Ctrl-A> Messages During BIOS Initialization Enabled Extended Int13 Translation for DOS Drives >1 GByte Enabled POST Display Mode Verbose SCSI Controller Int13 Support Enabled 1 Domain Validation Enabled 1 Support Removable Disks Under Int13 as Fixed Disks Disabled BIOS Support for Bootable CDROM Enabled 1 BIOS Support for Bootable CDROM Enabled 1 YOUR CONFIGURATION 1, 2 No effect if BIOS is disabled. Do not remove media from a removable media drive if it is under BIOS control. SCSI Disk Utilities This utility scans the SCSI bus for SCSI devices, reports a description of each device. Run these utilities before configuring SCSI devices. To enter the utility, select "SCSI Disk Utilities" on the Options menu. The SCSI ID scan begins displaying the message as shown below. Scanning SCSI ID : 0 LUN Number : 0 When the SCSI ID scan completes, the screen listing SCSI IDs and associated devices appears. Select SCSI Disk and press <Enter> SCSI ID #0 : No device SCSI ID #1 : No device SCSI ID #2 : No device SCSI ID #3 : No device SCSI ID #4 : No device SCSI ID #5 : No device SCSI ID #6 : No device SCSI ID #7 : Adaptec AIC-7899 SCSI ID #8 : No device : No device SCSI ID #9 SCSI ID #10 : No device SCSI ID #11 : No device SCSI ID #12 : No device SCSI ID #13 : No device SCSI ID #14 : No device SCSI ID #15 : No device Configuring Your System 3-19 With this screen you can determine the SCSI IDs for installed options. You can also view the device information by selecting a device and pressing Enter. The following sub menu appears. SCSI ID#4 Firmware Capacity : xxGB : xxxxxxxxx : xxxx xxx Format Verify Disk Media The following table lists submenu items and descriptions. Submenu item Description Format Verify Disk Media Formats the selected device. Verifies all the sectors in the selected device. If one or more bad sectors are found, the sectors are remapped. Exiting Adaptec SCSI Utility To exit the Adaptec SCSI Utility, press ESC until a message prompts you to exit (if you changed any settings, you are prompted to save the changes before you exit). 3-20 Configuring Your System Configuring the RAID Controller RAID (Redundant Array of Independent Devices) options are available for your system, providing added security and high availability. If you order a system with a RAID controller, the system is pre-configured at the factory according to Table 3-2 below. Table 3-2. RAID Configurations Number of Hard Drives RAID Level Configured Hard Drives in Array 1 7 1 JBOD (RAID 7) Known as Just a Bunch of Drives, JBOD allows the controller to access the drives independently. This configuration has no redundancy and does not use striping. 2 1 2 Mirroring (RAID 1) Drives are paired and mirrored. All data is 100% duplicated on an equivalent drive (fully redundant). 3 5 3 Striping with Parity (RAID 5) Data is striped across several physical drives. Parity protection is used for data redundancy. 4 or more 5 4 (one standby drive) Striping with Parity (RAID 5) with a standby drive The array consists of three ON-LINE drives and one STANDBY drive. The standby replacement drive, or hot spare, is one of the most important features RAID provides to achieve automatic, non-stop service with a high degree of fault-tolerance. Description If you want to change the RAID level or add additional hard disks to the array, use the RAID configuration utility. The RAID configuration utility is included with the RAID controller. If you are adding the RAID controller to an existing system, the RAID configuration utility allows you to configure your disk array before reinstalling your network operating system. The RAID controllers support various versions of RAID technology (referred to as RAID levels). To use any RAID level, you must configure the RAID controller using the RAID configuration utility prior to installing your Network Operating System. For an explanation of this utility, refer to the documentation that was shipped with the RAID controller. It describes RAID technology and provides tips on making your array perform well in your specific application. It also covers array hardware preparation, configuration, and initialization. After completing the steps in the manual, you can install your Network Operating System. If you want to remotely configure the array (from a PC client); increase array capacity online; or monitor statistics on disk and controller activity, you must install the array manager provided with your RAID subsystem. Increasing array capacity is covered in the user's guide shipped with the option. Configuring Your System 3-21 Configuring System Board Jumpers Before You Begin Only a qualified technical person should perform the procedures in this section. ! CAUTION Electrostatic discharge (ESD) can damage the system board. Modify the system board only at an ESD workstation. Otherwise, wear an antistatic wrist strap attached to chassis ground. The system board jumpers enable you to set specific operating parameters for your system. A jumper is a small plastic-encased conductor (shorting plug) that slips over two jumper pins. Figure 3-1 shows the location of system board jumpers. Referring to Figure 3-1, jumper A is the CMOS clear configuration jumper. Jumper B shown in Figure 3-1 is the password clear configuration jumper. Table 3-3 lists the factory default settings for the CMOS and password configuration jumpers. A B C A CMOS Clear B Password Clear C Factory Setting (Do not change) Figure 3-1. System Board Jumpers 3-22 Configuring Your System Table 3-3. Password/CMOS System Board Jumper Summary Jumper On/Off (default in bold) What it does at system reset. CMOS clear Off, Protect On, Erase Preserves the contents of CMOS. Clears CMOS. B Password disable Off, Enable On, Disable Enables password protection. Disables the password. C Reserved Off, Not Used Do Not Change. Jumper Function A Moving System Board Jumpers ! CAUTION Before doing the procedures in this section, make sure that your system is powered off and unplug the AC power cords from the back of the chassis. Failure to disconnect power before moving the jumpers can result in personal injury and equipment damage. Observe static precautions. Use an antistatic wrist strap. Clearing CMOS Clear CMOS as follows. 1. Unlock and open the front bezel and power off the system. 2. Slide the server out of the rack into the locked position as described in Chapter 4 of this guide. 3. Remove the top cover. 4. Remove the system power cord from the back of the system. 5. Locate the position of the CMOS jumper on the system board. See Figure 3-1. To change a jumper setting, use a pair of needle-nose pliers or your fingers to remove the jumper from its current location. Position the jumper over the two pins shown at Figure 3-1, A and press it onto the pins. Be careful not to bend the pins. Also refer to Table 3-3 for system board jumper setting descriptions. 6. Connect the power cord, power on the system and after POST completes, power down the system and unplug the power cord. 7. Remove the CMOS jumper to its original position. 8. Replace the top panel, connect the power cord, and power on the system. 9. Press F2 at the prompt to run the BIOS Setup utility, and select “Get Default Values” at the Exit menu. Configuring Your System 3-23 Clearing and Changing the Passwords To clear and change the passwords: 1. Unlock and open the front bezel and power off the system. 2. Slide the server out of the rack into the locked position as described in Chapter 4 of this guide. 3. Remove the top cover. 4. Remove the system power cord from the back of the system. 5. Locate the position of the password jumper on the system board. See Figure 3-1. To change a jumper setting, use a pair of needle-nose pliers or your fingers to remove the jumper from its current location. Position the jumper over the two pins shown at Figure 3-1, B and press it onto the pins. Be careful not to bend the pins. Also refer to Table 3-3 for system board jumper setting descriptions. 6. Connect the power cord, power on the system and after POST completes, power down the system and unplug the power cord. 7. Remove the password jumper to its original position. 8. Replace the top panel, connect the power cord, and power on the system. 9. Press F2 at the prompt to run the BIOS Setup utility. Specify a new password, if desired. 3-24 Configuring Your System 4 Upgrading Your System ! General Information ! Static Precautions ! Equipment Log ! Tools Recommended for Upgrading Your System ! Preparing Your System for Upgrade ! Confirmation after Installation/Removal ! Extending the Server out of the Rack ! Top Cover ! Modifying the System Board ! PCI Option Board ! Disk Array Controller Board ! Backup Device ! Hard Disk Drive ! Inserting the Floppy Disk or CDROM Drive into the Flex Bay ! Power Supply Unit General Information ! WARNING The DC push-button on/off switch on the front panel does not turn off the system AC power. Also, +5vdc is present on the system board whenever the AC power cord is connected between the system and an AC outlet. Before doing the procedures in this manual, make sure that your system is powered off and unplug the AC power cord from the back of the chassis. Failure to disconnect power before opening your system can result in personal injury and equipment damage. ! CAUTION Operating your system with the top access cover removed can damage your system components. For proper cooling and airflow, always replace the top cover before powering on your system. WARNING Avoid burns: If the system has been running, any installed processor and heat sink will be hot. To avoid the possibility of a burn, be careful when removing or installing components that are located near processors. Contact your service representative or dealer for a list of approved optional peripheral devices. Static Precautions An electrostatic discharge (ESD) can damage disk drives, option boards, and other components. You can provide some ESD protection by wearing an antistatic wrist strap attached to chassis ground when handling system components. Electronic devices can be easily damaged by static electricity. To prevent damage, keep them in their protective packaging when they are not installed in your system. Equipment Log Use the equipment log form located at the end of this manual to record the model and serial number of your system, all installed options, and any other pertinent information specific to your system. You will need this information when configuring your system. 4-2 Upgrading Your System Tools Recommended for Upgrading Your System Depending on the upgrade, you will need one or more of the following tools: ! Phillips screwdriver (#1 bit and #2 bit) ! Flat-head screwdriver ! Small needle nose pliers ! Pen or pencil ! ESD workstation or antistatic wrist strap (recommended) Preparing Your System for Upgrade To prepare your system for installation or removal of system components perform the following procedure: 1. Observe the safety and ESD precautions listed under General Information and Static Precautions at the beginning of this chapter. 2. Shutdown the operating system (OS). 3. Unlock and remove the front bezel. 4. Press the power on/off switch on the front panel of the server (see Front View in Chapter 2). The power-on LED goes out. 5. Power off the peripheral devices. 6. Unplug the system power cord(s) from the AC wall outlet(s). Note: If the system power cord is connected to a power control unit such as an UPS (Uninterruptible Power Supply), refer to the UPS user's guide for proper power-off procedures. 7. Unplug all the I/O cables connected to the rear panel of your system. Upgrading Your System 4-3 Confirmation after Installation/Removal Confirm the following after installing an additional option or removing a component: ! Reinstalling removed components exactly as they were. Install the components and cables that were removed and disconnected exactly as they were. The server may malfunction if certain components are not reinstalled or if cables are not connected properly. In particular, make sure that the FPC cable (Figure 4-1, A) is firmly connected. Be sure to securely install the components and connect the cables. A Figure 4-1 Checking the FPC Cable ! Confirming that no parts such as screws are left in the server. Confirm that conductive parts such as screws are not left in the server. Turning on the power with a conductive part in the system may cause personal injury or equipment damage. ! Confirming the cooling effect in the server. Confirm that the ventilating holes are not covered with an internally connected cable. Insufficient cooling raises the internal temperature, which may cause the server to malfunction. ! Confirming operation with a tool Some installed option boards or devices require running a diagnostic utility or BIOS SETUP to verify proper installation. For details, see the procedure for installing the option boards or devices. 4-4 Upgrading Your System Extending the Server out of the Rack The server needs to be pulled out from the rack for installing/removing any components other than the hard disk drives. ! WARNING Do not install the server in a rack leaving the top cover removed. Do not pull a device out of the rack if the rack is unstable. Do not pull more than one device out of the rack at a time. 1. Perform the steps in "Preparing Your System for Upgrade" described earlier in this chapter. 2. Loosen the two captive thumbscrews on the front panel. See Figure 4-2, B. 3. Hold the handles and slowly pull out the server from the rack. See Figure 42, A. A click is heard as the slide rails lock in the extended position. A B Figure 4-2. Server Handles and Thumbscrew Locations 4. When inserting the server back into the rack, push the release levers on the rails on the sides of the server to unlatch the server. Be very careful not to get your finger caught. Upgrading Your System 4-5 Top Cover Open the top cover when installing/removing an internal device or reconnecting an internal cable. Removal 1. Perform the steps in "Preparing Your System for Upgrade" described earlier in this chapter. 2. Extend the server out from the rack. 3. Slide the top cover toward the rear of the server while pressing the lock button on the cover. See Figure 4-3. Figure 4-3. Releasing the Top Cover 4. Lift the top cover up and off from the server. 4-6 Upgrading Your System Installation 1. Position the top cover over the server. When installing the top cover, confirm that the tab of the cover is securely inserted into the slot in the server frame. Figure 4-4. Installing the Top Cover 2. Slide the top cover toward the front of the server. The top cover is locked when a "click" is heard. At this time, check the release button for normal state. When the top cover is securely locked, the release button springs up. If the release button is held down (hollow state), slide the top cover toward the front of the server again. If the top cover is not locked yet, remove the cover, and then install it again. Figure 4-5. Locking the Top Cover Upgrading Your System 4-7 Modifying the System Board The following sections provide procedures for upgrading and configuring the system board in your system. Topics covered include: ! Replacing the real-time clock battery ! Removing and installing a processor ! Installing or removing DIMMs. ! CAUTION Electrostatic discharge (ESD) can damage add-in boards and other components; place them on an antistatic surface. Modify the system board only at an ESD workstation. Otherwise, wear an antistatic wrist strap attached to chassis ground. Replacing the Real-time Clock Battery You may need to replace the real-time clock (RTC) battery because of its life span. The battery powers the clock in the absence of power. When the battery starts to weaken, it loses voltage, and the system settings stored in CMOS RAM (for example, the date and time) may be wrong. The 3V battery (Vendor Part #CR2032) is a commodity part available through many vendors. It is located on your system board (see Figure 4-6). Notice the plus (+) sign on the battery. This sign will assist you in correctly positioning the battery on the system board. Contact your service representative or dealer for a list of approved devices. ! CAUTION Danger of explosion if battery is incorrectly replaced. Replace only with same or equivalent type recommended by manufacturer. Dispose of lithium batteries as required by local ordinance or as normal waste if no local ordinance exists. Do not expose the component to excessive heat or fire. Keep all batteries away from children ! CAUTION Observe static precautions. Use an antistatic wrist strap. 4-8 Upgrading Your System To replace the RTC battery, perform the following procedures: 1. Observe the safety and ESD precautions listed under General Information and Static Precautions at the beginning of this chapter. 2. Perform the steps in "Preparing Your System for Upgrade" described earlier in this chapter. 3. Extend the server out from the rack. 4. Remove the top cover of the system chassis. See Top Cover Removal found earlier in this chapter. ! CAUTION For proper cooling and airflow, do not operate the system with the top cover removed. Always replace the top cover before powering on the system. Figure 4-6. Replacing the Real-Time Clock Battery 5. If present, remove the protective plastic cover located over the top of the lithium battery (see Figure 4-6). 6. Insert the tip of a small flat-bladed screwdriver, or equivalent, under the plastic tab on the plastic retainer (see Figure 4-6, A). 7. Gently push down on the screwdriver to lift the battery (see Figure 4-6, B). 8. Remove the battery from its socket (see Figure 4-6,C). 9. Dispose of the battery according to local ordinance. 10. Remove the new lithium battery from its package, and, being careful to observe the correct polarity (plus sign (+) up) insert it into the battery socket. 11. If applicable, reinstall the plastic cover on the lithium battery socket. Upgrading Your System 4-9 12. Reinstall the top cover on the system chassis. See Top Cover Installation found earlier in this chapter. 13. Plug in the system power cord(s), and turn on the system. 14. Run the BIOS Setup to restore the configuration settings to the real-time clock. 15. Reinstall the server into the rack. DIMMs The system board contains six DIMM sockets (Figure 4-7). Each socket can hold a single 72-bit DIMM module with 128MB, 256MB, 512MB, or 1GB of memory. When all six sockets are populated, the system board supports a maximum of 6GB of memory with 1GB DIMMs. Memory is partitioned as three banks of SDRAM that must be populated in pairs, each providing 72 bits of buffered two-way interleaved memory (64-bit main memory plus ECC). DIMMs will always be installed in sockets 1A and 1B (Figure 4-7). When you install additional DIMMs, you must start with the first empty socket next to the last DIMMs already installed. When you remove DIMMs, you must start with the highest numbered occupied DIMM sockets on the system board. 3B 3A 2A 2B 1A 1B Note: DIMMs are always added in pairs in the ascending order of DIMM socket numbers. 1A 1B 2A 2B 3A 3B DIMM #1-A DIMM #1-B DIMM #2-A DIMM #2-B DIMM #3-A DIMM #3-B DIMM Group Bank #1 DIMM Group Bank #2 DIMM Group Bank #3 Figure 4-7. DIMM Locations on the System Board 4-10 Upgrading Your System Installing DIMMs 1. Observe the safety and ESD precautions listed under General Information and Static Precautions at the beginning of this chapter. 2. Perform the steps in "Preparing Your System for Upgrade" described earlier in this chapter. 3. Extend the server out from the rack. 4. Remove the top cover of the system chassis. See Top Cover Removal found earlier in this chapter. ! CAUTION For proper cooling and airflow, do not operate the system with the top cover removed. Always replace the top cover before powering on the system. 4. Locate the appropriate DIMM sockets on the system board (see Figure 4-7). 5. If present, remove the DIMM connector cover from its socket (see Figure 4-8). Save the DIMM connector cover for future use. Note: If you are replacing a DIMM, you must first remove the DIMM from its socket (see Removing DIMMs later in this chapter). Figure 4-8. Removing the DIMM Connector Cover 6. Holding a DIMM module only by the edges, remove it from its antistatic package. ! CAUTION Observe static precautions. Use an antistatic wrist strap. Hold the DIMM only by its edges. 7. Position the DIMM so that the two notches in the bottom edge of the DIMM align with the keyed socket. See Figure 4-9. Upgrading Your System 4-11 8. Insert the bottom edge of the DIMM into the socket, and press down firmly on the DIMM until it seats correctly. 9. Gently push the plastic ejector levers on the socket ends to the upright position to ensure that they are installed correctly. Figure 4-9. Inserting Memory DIMMs 10. Repeat the steps to install each additional DIMM. 11. Reinstall the top cover on the system chassis. See Top Cover Installation found earlier in this chapter. 12. Plug in the system power cord(s), and turn on the system 13. Reinstall the server into the rack. 4-12 Upgrading Your System Removing DIMMs ! CAUTION Use extreme care when removing a DIMM. Too much pressure can damage the socket slot. Apply only enough pressure on the plastic ejector levers to release the DIMM 1. Observe the safety and ESD precautions listed under General Information and Static Precautions at the beginning of this chapter. 2. Perform the steps in "Preparing Your System for Upgrade" described earlier in this chapter. 3. Extend the server out from the rack. 4. Remove the top cover of the system chassis. See Top Cover Removal found earlier in this chapter. ! CAUTION For proper cooling and airflow, do not operate the system with the top cover removed. Always replace the top cover before powering on the system. 5. Locate the appropriate DIMM sockets on the system board (see Figure 4-7). 6. Gently push the plastic ejector levers out and down to eject a DIMM from its socket. See Figure 4-10. 7. Hold the DIMM only by its edges, being careful not to touch its components or gold edge connectors. Carefully lift it away from the socket, and store it in an antistatic package. Figure 4-10. Removing a DIMM Repeat the above steps to remove the remaining DIMMs. 8. Reinstall the top cover on the system chassis. See Top Cover Installation found earlier in this chapter. 9. Plug in the system power cord(s), and turn on the system 10. Reinstall the server into the rack. Upgrading Your System 4-13 Processors The processor board includes two Intel Xeon processor ZIF sockets. See Figure 4-11. The following sections provide procedures for installing and removing the processors. 2 1 Figure 4-11. Processor Sockets Note: Your system may have up to two processors on the system board. All installed processors must be matched for speed and cache size. If replacing a processor, the replacement processor must match the speed and cache size of all installed processors. If upgrading a processor, all processors must be upgraded to match. ! CAUTION Electrostatic discharge (ESD) can damage components. Place them on an antistatic surface. Use an antistatic wrist strap attached to chassis ground when working on the processor board. ! WARNING If the system was running, any processor and heat sink installed is hot. To avoid the possibility of a burn, let the components cool for 10 minutes before continuing with these procedures. 4-14 Upgrading Your System Installing Processors Note: Your system may have up to two processors on the system board. All installed processors must be matched for speed and cache size. If replacing a processor, the replacement processor must match the speed and cache size of all installed processors. If upgrading a processor, all processors must be upgraded to match. To install a processor: 1. Observe the safety and ESD precautions listed under General Information and Static Precautions at the beginning of this chapter. 2. Perform the steps in "Preparing Your System for Upgrade" described earlier in this chapter. 3. Extend the server out from the rack. 4. Remove the top cover of the system chassis. See Top Cover Removal found earlier in this chapter. ! CAUTION For proper cooling and airflow, do not operate the system with the top cover removed. Always replace the top cover before powering on the system. 5. Lift up on the plastic processor air duct and remove it from the server. See Figure 4-12. Figure 4-12. Removing the Processor Air Duct Upgrading Your System 4-15 ! CAUTION When performing Step 6, make absolutely sure the locking lever is in its full open position (120-135 degrees) prior to insertion of the CPU. Catastrophic failure may result from improper insertion! 6. Raise the processor locking bar on the socket. See Figure 4-13. Figure 4-13. Raising the Processor Locking Lever 7. Orient the processor so that the triangle on the corner of the processor aligns with the triangle on the corner of the socket. See Figure 4-14. 8. Aligning the pins of the processor with the socket, insert the processor into the socket. The processor should drop into the socket without requiring any force. ` Figure 4-14. Installing the Processor 9. Lower the locking bar completely. See Figure 4-15. 4-16 Upgrading Your System Figure 4-15. Lowering the Processor Locking Lever 10. If the heat sink does not already have thermal interface material applied to it, follow the instructions packaged with the applicator and apply thermal grease to the top of the processor. 11. Place the heat sink on top of the processor. See Figure 4-16. Figure 4-16. Installing the Heat Sink. 12. Install both heat sink clips as follows: ! CAUTION Do not allow the heat sink to rock back and forth while securing the heat sink clips. If the CPU becomes dislodged from the socket, catastrophic failure may occur. Upgrading Your System 4-17 Place the heat sink clip on the center tab of the retention module and rotate the clip towards the heat sink to engage the center tab. Repeat this step with the second clip. See Figure 4-17. While ensuring the heat sink is level and secure with one hand, snap one end of the clip down over the corresponding tab on the retention module. Then snap the opposite corner clip. Snap the remaining end of the clips down over the corresponding tabs. Be sure the clip is adequately engaged with the tab. Ensure the heat sink is absolutely level. See Figure 4-17. Figure 4-17. Installing the Heat Sink and Clips 13. Install the plastic processor air duct removed in Step 5 of this procedure. See Figure 4-12. 14. Reinstall the top cover on the system chassis. See Top Cover Installation found earlier in this chapter. 15. Plug in the system power cord(s). 16. Power on the server, start the BIOS SETUP utility, and set "Processor Retest" of "Processor Settings" on the Main menu to "Enable". 17. Reboot the system. Verify that POST displays no error messages. If POST displays an error message, take a note on the message and see the POST error messages listed in Chapter 5. 18. Set "Reset Configuration Data” under the Advanced menu to "Enable". This setting is required to change the hardware configuration data. Reboot the system. 19. Reinstall the server into the rack. 4-18 Upgrading Your System Removing Processors To remove a processor: 1. Observe the safety and ESD precautions listed under General Information and Static Precautions at the beginning of this chapter. 2. Perform the steps in "Preparing Your System for Upgrade" described earlier in this chapter. 3. Extend the server out from the rack. 4. Remove the top cover of the system chassis. See Top Cover Removal found earlier in this chapter. ! CAUTION For proper cooling and airflow, do not operate the system with the top cover removed. Always replace the top cover before powering on the system. 5. Lift up on the plastic processor air duct and remove it from the server. See Figure 4-12. ! WARNING If the system was running, any processor and heat sink installed is hot. To avoid the possibility of a burn, let the components cool for 10 minutes before continuing with these procedures. 6. Remove both heat sink clips as follows: Slide one of the two heat sink clips to one side to partially release tension of the clip over the tab. See Figure 4-18, A. Depending on the tension of the clip, very little motion may be felt. Insert a flat blade screwdriver or the provided tool (Figure 4-18, B) into the slot at the end of the heat sink clip. Upgrading Your System 4-19 B A Figure 4-18. Releasing the Heat Sink Clip ! CAUTION When performing the next step, be very careful that the screwdriver does not slip out of the clip, as the system board can be damaged. Using your thumb, press down on this end of the clip until it clears the bottom edge of the tab on the retention module and rotate the screwdriver as shown in Figure 4-18 until the end of the clip is free of the tab. Using the screwdriver, release the other end of the clip. Figure 4-19. Removing the Heat Sink Clip With both ends of the clip released, rotate the clip away from the heat sink to disengage it from the center tab on the retention module. See Figure 4-19. The clip is rotated over the top of the center tab. Sometimes it’s easier to slide the clip to release it from the center retention tab. 4-20 Upgrading Your System Rotate the heat sink lightly to the left and then to the right to free it from the CPU. Do not forcibly remove the CPU. Lift the heat sink straight out of the retention module. See Figure 4-20. Figure 4-20. Removing the Heat Sink 7. Raise the locking bar on the socket. See Figure 4-13. 8. Remove the processor from the socket. See Figure 4-21. Figure 4-21. Removing the Processor 9. Install the plastic processor air duct removed in Step 5 of this procedure. See Figure 4-12. 10. Reinstall the top cover on the system chassis. See Top Cover Installation found earlier in this chapter. 11. Plug in the system power cord(s). 12. Power on the server, start the BIOS SETUP utility, and set "Processor Retest" of "Processor Settings" on the Main menu to "Enable". Upgrading Your System 4-21 13. Reboot the system. Verify that POST displays no error messages. If POST displays an error message, take a note on the message and see the POST error messages listed in Chapter 5. 14. Set "Reset Configuration Data” under the Advanced menu to "Enable". This setting is required to change the hardware configuration data. Reboot the system. 15. Reinstall the server into the rack. 4-22 Upgrading Your System PCI Option Board The server has two "riser cards" on the system board that enable installation of low-profile and full-height PCI boards. Three PCI boards can be installed on each riser card. (Up to six PCI boards can be installed in total.) Figure 4-22 shows the locations of the PCI riser slots on the system board. Notes: The PCI board is extremely sensitive to static electricity. Make sure to touch the metal frame of the server to discharge static electricity from your body before handling the PCI board. Do not touch the PCI board terminals or on-board parts by a bare hand or place the PCI board directly on the desk. For static notes, see the section "Anti-static Measures". Some restrictions are imposed on the combination of PCI boards which can be installed in the server. Contact your sales agent for details. A riser card is designed for installing only low-profile PCI boards or full-height PCI boards. Before installing a PCI board, make sure of the card specification. Some PCI boards use an on-board expanded ROM. See the manual provided with the PCI board to determine whether expanded ROM needs to be loaded. A B A Riser card slot dedicated to low-profile PCI boards B Riser card slot dedicated to full-height PCI boards Figure 4-22. Riser Card Slots Upgrading Your System 4-23 Notes Observe the following notes when installing/removing a PCI board: ! Do not touch the fingers of the riser cards or the leads of electronic components mounted on the cards. Fingerprints and dust left on them may cause the server to malfunction due to a connection failure or damage to the leads. ! A riser card is designed for installing only low-profile PCI boards or fullheight PCI boards. Before installing a PCI board, make sure of the card type. ! If a PCI board is installed in a slot below the slot containing the AcceleRAID 160 disk array controller, the LED relay cable cannot be used to connect the LED connector on the disk array controller board and the DAC LED connector on the system board. In this case the disk access lamps on the front of the server cannot indicate the status of access to the hard disk drives connected with the disk array controller. ! The system searches for the PCI board in the following order (See Figure 4-23): PCI Slot 1B → 2B → 3B → 1C → 2C → 3C Note, however, if an AcceleRAID 160 or AcceleRAID 352 disk array controller is installed, the system detects the boot device in the following order. PCI Slot 3C → 2C → 1C → 3B → 2B → 1B See "Disk Array Controller Board" in this chapter. ! The PCI devices of the same type (including onboard PCI device) may be recognized in different order from that described above, depending on OS or disk array BIOS utility. Check the slot location of the PCI device by PCI bus number, device number and function number shown in the table below. 3B 2B 1B 3C 2C 1C Figure 4-23. Riser Card Slot Assignments 4-24 Upgrading Your System Bus number Device number Function number Onboard NIC1 3 7 0 Onboard NIC2 3 7 1 Slot 1B 3 8 X Slot 2B 3 9 X Slot 3B 3 10 X Onboard SCSI Ch A (external) 4* 7 0 Onboard SCSI Ch B (internal) 4* 7 1 Slot 1C 4* 8 X Slot 2C 4* 9 X Slot 3C 4* 10 X * The bus number may be 5 or greater depending on the board installed in Slot 1B, 2B, or 3B. ! Set "Disabled" for the optional ROM of a LAN device not to be booted by using the BIOS SETUP utility. ! If an additional LAN device is installed in slot 3C or 3B, it is hard to push the catch of the RJ45connector with your finger. Disconnect the connector pushing the catch with a standard screwdriver. Be very careful to avoid damage. ! If a bootable PCI board (e.g., a disk array controller, SCSI controller, or LAN card) is installed, the boot priority is changed to the default. After the installation, start BIOS SETUP, select [Boot] → [Boot Device Priority], and set the new boot priority. ! If a 33MHz PCI board is installed in one of the slots (1C, 2C, and 3C, or 1B, 2B, and 3B) on a PCI riser card, the cards installed in the other slots of the same riser card are subjected to operation at only 33MHz. ! Contact your service representative for a list of acceptable PCI boards. Upgrading Your System 4-25 Installing a PCI Option Board ! CAUTION Each riser card supports either a low-profile or full-height PCI boards. Before installing a PCI board, check the type of PCI board you are installing. When installing a PCI board, confirm that the card connector matches the connector of the riser card. 1. Observe the safety and ESD precautions listed under General Information and Static Precautions at the beginning of this chapter. 2. Perform the steps in "Preparing Your System for Upgrade" described earlier in this chapter. 3. Extend the server out from the rack. 4. Remove the top cover of the system chassis. See Top Cover Removal found earlier in this chapter. ! CAUTION For proper cooling and airflow, do not operate the system with the top cover removed. Always replace the top cover before powering on the system. 5. Lift straight up and remove the riser card from the server. See Figure 4-24. A B A Riser card slot dedicated to low-profile PCI boards B Riser card slot dedicated to full-height PCI boards Figure 4-24. Removing Riser Cards 6. Unlock and open the retainer clip. See Figure 4-25. 4-26 Upgrading Your System B A A Low-profile riser card retainer clip B Full-height riser card retainer clip Figure 4-25. Removing the Riser Card Retainer Clip 7. Push out the expansion slot cover. Keep the removed expansion slot cover for future use. See Figure 4-26. Figure 4-26. Removing the Expansion Slot Cover 8. If you are installing a full-height/full-length PCI board remove the retainer (if present) from the PCI board. See Figure 4-27. Figure 4-27. Removing the Retainer from the PCI Board Upgrading Your System 4-27 9. Install the PCI board into the riser card. Align the PCI board with the riser card slot, and firmly push the PCI board until it is fully seated. Confirm that the PCI board bracket is positioned over the post of the riser card. See Figure 4-28, C and D. Confirm that the tab of the PCI board bracket is inserted in the designated slot of the riser card. See Figure 4-28, E and F. If a full-height PCI board is installed, confirm that the PCI board is inserted in the guide rails of the riser card. See Figure 4-28, B C C D D F E F E A B A Low-profile riser card B Full-height riser card C PCI Board Bracket D PCI Riser Card Post E PCI Board Bracket Tab F PCI Riser Card Assembly Slot Figure 4-28. Installing the PCI Board 4-28 Upgrading Your System 10. Close and lock the retainer clip. See Figure 4-29. C C D D A B A Low-profile riser card B Full-height riser card C Retainer Clip D Locking Tab Figure 4-29. Closing and Locking the Retainer Clip 11. Align the riser card with the slot on the system board, and firmly push the riser card until it is fully seated. See Figure 4-30. A B A Low-profile riser card B Full-height riser card Figure 4-30. Installing the Riser Cards Upgrading Your System 4-29 12. Ensure the white insulator is positioned between the frame of the riser card and the power supply unit. See Figure 4-31, A. The metal frame of the riser card should not touch the power supply. A Figure 4-31. Checking the PCI Riser Card Insulator 13. Ensure the tabs of the riser cards are inserted into the slots in the rear panel as shown in Figure 4-32, C C C A B A Low-profile riser card B Full-height riser card C Riser Card Mounting Tabs Figure 4-32. Checking the PCI Riser Card Insulator 4-30 Upgrading Your System 14. Reinstall the top cover on the system chassis. See Top Cover Installation found earlier in this chapter. 15. Plug in the system power cord(s). 16. Power on the server and verify that POST displays no error messages. 17. If POST displays an error message, take note of the message and see the POST error messages listed in Chapter 5. 18. Run the BIOS Setup Utility. Select "Yes" for [Advanced] → [Reset Configuration Data]. This setting is required to change the hardware configuration data. 19. Run the configuration utility (if applicable) for the installed card, and set up the card. For details, see the manual provided with the card. 20. If a PCI board (e.g., a disk array controller, SCSI controller, or LAN card) with a bootable device connected to it is installed, the boot priorities must be reconfigured. After installation of the PCI board, run the BIOS setup utility, select [Boot] → [Boot Device Priority], and set the new boot priorities. (See Chapter 3.) Removing a PCI Option Board Remove a PCI board in reverse order of the installation steps. After the PCI board is removed , start the BIOS setup utility, select [Boot] → [Boot Device Priority], and set the new boot priorities. (See Chapter 3.) Upgrading Your System 4-31 Disk Array Controller Board The disk array controller board is an optional PCI board provided to improve data reliability. Installing the disk array controller board allows you to use hard disks in the device bays of the server and those in the optional expansion disk cabinet in the disk array configuration. IMPORTANT: ! The disk array controller board is extremely sensitive to static electricity. Make sure to touch the metal frame of the Server to discharge static electricity from your body before handling the disk array controller board. Do not touch the disk array controller board terminals or on-board parts by a bare hand or place the disk array controller board directly on the desk. For static notes, see the section "Anti-static Measures" described earlier. ! Installing the disk array controller or changing the RAID level initialization of the hard disk drives. If the hard disk to be configured in the array has your valuable data stored, make sure to make a backup copy of the data before installing the disk array controller board and configuring the array. ! The disk array configuration requires at least two hard disks. ! Use hard disks of the same capacity and performance (e.g., RPMs) for each pack in the array. NOTES: ! Before installing a disk array controller board, start the SETUP utility, select [Advanced] → [PCI Configuration], and confirm that [Enabled] is set for the parameter [PCI Slot xx ROM] (xx: PCI slot number). ! A disk array configuration of RAID1, RAID5, or RAID0+1 increases disk reliability. However, the available capacity becomes smaller. 4-32 Upgrading Your System Installing a Disk Array Controller See "PCI Option Board" for the installation of a disk array controller. IMPORTANT: ! A riser card is designed for installing only low-profile PCI boards or fullheight PCI boards. Before installing a PCI board, make sure of the card specification. ! If a PCI board is installed in a slot lower than the one containing the disk array controller, the LED connector on the disk array controller board cannot be connected to the DAC LED connector on the system board. (The disk access lamps on the front of the server will not indicate the status of access to the hard disk drives connected with the disk array controller.) ! If more than one AcceleRAID 160 or AcceleRAID 352 disk array controller board is installed, the system disk to boot the system must be connected to the disk array controller board installed in the slot having the highest boot priority. The boot priority of the disk array controller board is: 3C → 2C → 1C → 3B → 2B → 1B ! To switch the internal hard disk drives into a disk array configuration by connecting a disk array controller to the full-height riser card, connect the cable before installing the riser card on the system board. ! When connecting a disk array controller, start the BIOS SETUP utility, select [Boot] → [Hard Disk Drives], and set the 8th priority or earlier for the controller. If the 9th priority or later is set, the system is unable to start the disk array controller configuration menu. Upgrading Your System 4-33 Removing a Disk Array Controller See "PCI Option Board" for the removal of a disk array controller. Using Internal Hard Disk Drives in a Disk Array Configuration To use the internal hard disk drives with a disk array controller, reconnect the SCSI cables on the system board. The internal hard disk drive interface cable is connected to the SCSI connector on the system board at shipment. See Figure 4-33. SCSI Cabling To use the internal hard disk drives in a disk array configuration, disconnect the SCSI cable from the SCSI connector on the system board, and connect it to the connector of the disk array controller board. Note: To switch the internal hard disk drives into a disk array configuration by installing a disk array controller into the full-height riser card, connect the SCSI cable to the disk array controller before installing the riser card into the system board. A B C D A SCSI Connector B System Board C HDD LED Connector D SCSI Cable E SCSI Backplane E Figure 4-33. SCSI Cable Connections 4-34 Upgrading Your System LED Relay Cabling To indicate disk access status in a disk array configuration, connect the LED relay cable connected on the system board connector to the HDD LED connector of the disk array controller. See Figure 4-34. Note: To switch the internal hard disk drives into a disk array configuration by installing a disk array controller into the full-height riser card, connect the SCSI cable to the disk array controller before installing the riser card into the system board. The LED relay cable is free from polarities. Either end of the cable can be connected to either of the HDD LED connectors. IMPORTANT: If a card is installed in a slot below the one containing the AcceleRAID 160 disk array controller, the LED relay cable is connected to the disk array controller. This prevents the cable connector from touching the card in the lower slot. A Red LED Active (Red) LED Active (Red) Black Black Red B A HDD LED Connector B AcceleRAID 160 Disk Array Controller C AcceleRAID 352 Disk Array Controller C Figure 4-34. LED Relay Cable Connections Upgrading Your System 4-35 Disk Array Configuration of Internal Hard Disk Drives Observe the following notes on configuring a disk array: ! The server must contain more than one SCSI hard disk drive having the same capacity and the same rotational speed. (The minimum number of required disks depends on the configuration of RAID (Redundant Arrays of Independent Disks).) ! Select/set a RAID level "RAID0", "RAID1", "RAID5", or "RAID0+1" of disk array configuration. When installing an operating system on an internal hard disk, you should use "Express Setup" to perform all the procedures for RAID configuration, OS installation, and then OS setup. Use Express Setup even when not installing an operating system. Start Express Setup, select [OS Selection] → [Others]. The installer automatically performs all the procedures for RAID configuration, maintenance partition setting, and then maintenance utility installation. When manually setting up the server, use the RAID configuration utility of the array controller. You can start the utility during execution of POST that automatically starts immediately after you turn on the server power switch. For details, see the online document in the EXPRESSBUILDER CD-ROM provided with the server. (The utility varies depending on the disk array controller board.) For details on the data transfer rate, RAID, and array configuration, see the manual provided with the disk array controller board as well as the online document. 4-36 Upgrading Your System Backup Device The server has one slot for installing a backup device such as a magnetic tape drive. See Figure 4-35, A. IMPORTANT: ! A disk array controller (option) is necessary for installing a backup device. In this configuration internal hard disk drives are connected to a disk array controller. The backup device is connected to the SCSI connector on the system board. ! Set "OFF" for the terminating resistor of the backup device you are going to install, and set a SCSI ID different from those of other devices. For the settings, see the manual provided with the server. ! Install only an authorized backup device. A Figure 4-35. Backup Device Upgrading Your System 4-37 Installing a Backup Device 1. Observe the safety and ESD precautions listed under General Information and Static Precautions at the beginning of this chapter. 2. Perform the steps in "Preparing Your System for Upgrade" described earlier in this chapter. 3. Extend the server out from the rack. 4. Remove the top cover of the system chassis. See Top Cover Removal found earlier in this chapter. ! CAUTION For proper cooling and airflow, do not operate the system with the top cover removed. Always replace the top cover before powering on the system. 5. Remove the riser card for full-height PCI boards following procedures previously documented in this chapter. 6. Remove the processor air duct following procedures previously documented in this chapter. 7. Disconnect the two fan cables from the system board. See Figure 4-36. Figure 4-36. Removing the Fan Cables 8. Remove the FPC cable fastener and disconnect the FPC cable connecting the system board and SCSI backplane. See Figure 4-37. 4-38 Upgrading Your System Figure 4-37. Removing the FPC Cable IMPORTANT: Be careful not to damage the FPC cable. 9. While pushing the release tab (Figure 4-38, A) of the fan module towards the fans, slide the fan module to the left as viewed from the front of the server. A Figure 4-38. Releasing the Fan Unit IMPORTANT: Be careful not to damage the main power cable, the flat cable, or components in the server. 10. Lift the fan module straight up and remove it from the server. See Figure 4-39. Upgrading Your System 4-39 Figure 4-39. Removing the Fan Unit from the Server 11. While pushing the latching tab that secures the device bay, push the device carrier out the front of the server. See Figure 4-40. Figure 4-40. Releasing the Device Carrier IMPORTANT: Be careful not to bend the latching tab by applying excess force. If the tab bends, straighten it out. 12. Remove the device carrier from the front of the server. See Figure 4-41. 4-40 Upgrading Your System Figure 4-41. Removing the Device Carrier. 13. Push in on the tabs securing the front panel to the device carrier. See Figure 4-42. Figure 4-42. Releasing the Device Bay Front Panel 14. Remove the front panel. See Figure 4-43. Figure 4-43. Removing the Device Bay Front Panel IMPORTANT: Keep the removed front panel for future use. Upgrading Your System 4-41 15. Place the backup device on the device carrier. See Figure 4-44. Figure 4-44. Placing the Backup Device into the Device Carrier 16. Secure the backup device with the four screws included. Tighten two screws on each side. See Figure 4-45. Figure 4-45. Securing the backup Device to the Device Carrier Notes: ! ! Be sure to use the screws provided with the backup device. Position the backup device so that the device screw holes align with the screw holes in the device carrier. 4-42 Upgrading Your System 17. Connect the included power extension cable to the power connector of the device. See Figure 4-46. This cable is shipped in the accessories box of the system. Figure 4-46. Connecting the Power Extension Cable 18. Insert the device carrier into the backup device bay. Push the device carrier as far as it will go into the system. It is locked when a "click" is heard. See Figure 4-47. Figure 4-47. Inserting the Backup Device into the backup device Bay Note: Be careful not to catch the connected power extension cable in inserting the device carrier. 19. Connect the SCSI cable and power cable to the device. The other end of the power cable connects to the power connector (J6) located on the SCSI backplane. See Figure 4-48, B. The other end of the SCSI cable connects to the SCSI connector on the system board. Upgrading Your System 4-43 C A B A Power Cable B SCSI Interface Cable C SCSI Terminator Figure 4-48. Connecting the SCSI and Power Cables to the Backup Device Note: Confirm where to place the terminator at the end of the SCSI cable. The terminator must be placed in the device bay. 20. Route the SCSI cable starting from the device, pass through the frame on the right side of the server, and connect with the on-board SCSI. See Figure 4-49. B A C D A SCSI connector on the system board B SCSI cable connected between the SCSI connector on the system board and the backup device C Disk array controller D SCSI cable connected between the disk array controller board and the SCSI backplane Figure 4-49. Routing the SCSI Interface Cable 4-44 Upgrading Your System 21. Place the fan unit in the server. The bottom of the fan module has slots that slide into tabs located on the bottom of the server. Align the slots with the tabs and place the fan module. See Figure 4-50. Figure 4-50. Install the fan Module IMPORTANT: Be careful not to damage the power cables, peripheral cables, or components. 22. Slide the fan module to the right when viewed from the front of the server. A click is heard as the fan module locks into position. Confirm that the release tab of the fan unit is locked. Upgrading Your System 4-45 23. Connect the FPC cable and fastener. See Figure 4-51. Figure 4-51.Installing the FPC Cable and Cable Fastener Note: Confirm that the FPC cable is securely connected to the connector on the SCSI backplane and the one on the system board. 4-46 Upgrading Your System 24. Connect the two fan cables. See Figure 4-52. Figure 4-52. Installing the Fan Cables 25. Reinstall the top cover on the system chassis. See Top Cover Installation found earlier in this chapter. 26. Plug in the system power cord(s). Removing a Backup Device Remove the backup device in reverse order of the installation steps. Upgrading Your System 4-47 Hard Disk Drive The server has seven hard disk drive slots to install hard disks with the SCA2 interface (Ultra 160 SCSI.) Up to six hard disk drives can be installed in the standard configuration. If using the flex bay to install a hard disk, you can install up to seven hard disk drives in the server. All seven slots may contain a hard disk approximately 25.4 mm (1 inch) high. The SCSI IDs of ID0 through ID5 are always assigned to hard disks as shown in Figure 4-53. ID3 ID8 ID0 ID1 ID2 ID4 ID5 Figure 4-53. Hard Disk Drive SCSI IDs In the standard configuration hard disk drive bays are connected to the SCSI connector on the system board when the server is shipped. To use the hard disk drives in a disk array configuration, reconnect the cable from the connector on the system board to the disk array controller connector. For the cable reconnection, see "Disk Array Controller". A dummy tray is installed in all unpopulated hard disk drive bays. The purpose of a dummy tray is to ensure the cooling effect in the server. Always install a dummy tray in slots not containing a hard disk drive. 4-48 Upgrading Your System Installing a Hard Drive into the Hard Drive Bay Perform the following steps to install a hard disk drive. This procedure applies to all the hard disk drive bays. See the next section for the procedure installing a hard disk drive in the flex bay. See Figure 4-54. Note: The front bezel must be removed to access the hard disk drives. 1. Observe the safety and ESD precautions listed under General Information and Static Precautions at the beginning of this chapter. 2. Perform the steps in "Preparing Your System for Upgrade" described earlier in this chapter. 3. Locate the slot in which you are going to install a hard disk drive. Install hard disk drives starting with the lowest available SCSI ID. 4. Release the dummy tray lever by pushing it to the left. 5. Swing the dummy tray lever to the left. 6. Remove the dummy tray. A B C Figure 4-54. Removing the Dummy tray Upgrading Your System 4-49 7. Secure the drive in the drive carrier with the four screws supplied with the disk drive. See Figure 4-55. Figure 4-55. Mounting the Hard Drive into the Drive Carrier 8. Firmly hold the hard disk drive (with the tray provided) and handle, and insert it into the slot. IMPORTANT: ! Carefully hold the hard disk drive with both hands. ! .Push the hard disk drive until the handle engages with the frame. Figure 4-56. Installing the hard Drive 9. Slowly close the handle. See Figure 4-56. The handle is locked when a "click" is heard. 4-50 Upgrading Your System 10. Power on the server, start the SETUP utility, select [Boot] → [Hard Disk], and set the boot priority in the submenu. This procedure is necessary because installing an additional hard disk drive clears the current setting of the boot priority. IMPORTANT: ! To add a hard disk during operation of the Global Array Manager (GAM), click the Scan Device key after about 90 seconds have passed from the installation of the hard disk. If you click the Scan Device key after executing the Expand Array, the added disk appears correctly. ! If a hard disk is added to the server operating in RAID1 by using the expand array feature, the RAID is automatically changed to RAID0+1. (However, it is not possible to set RAID0+1 directly by using a specific utility.) 11. Install the front bezel. Installing a Hard Disk Drive into the Flex Bay This section explains the procedure for removing the floppy disk and CD-ROM drives installed in the flex bay and then installing the seventh hard disk drive in the bay (SCSI ID 8). Note: You cannot use the floppy disk or CD-ROM drive while the flex bay contains a hard disk drive. 1. Observe the safety and ESD precautions listed under General Information and Static Precautions at the beginning of this chapter. 2. Perform the steps in "Preparing Your System for Upgrade" described earlier in this chapter. 3. Lift up the carrier handle at the bottom of the floppy disk drive. See Figure 4-57. Figure 4-57. Lifting the Carrier Handle 4. Hold the carrier handle, and pull it out straight to remove the floppy disk and CD-ROM drives from the flex bay. See Figure 4-58. Upgrading Your System 4-51 Figure 4-58. Removing the Drive from the Flex Bay 5. Install the provided spacer on the server. See Figure 4-59. Figure 4-59. Installing the Spacer 6. Secure the drive in the drive carrier with the four screws supplied with the disk drive. See Figure 4-55. 7. Firmly hold the hard disk drive (with the tray provided) and handle, and insert it into the flex bay slot. IMPORTANT: ! Push the hard disk drive until the handle hook engages with the frame. 4-52 Upgrading Your System Figure 4-60. Installing the hard drive into the Flex Bay Slot ! Carefully hold the hard disk drive with both hands. 8. Slowly close the handle. The handle is locked when a "click" is heard. See Figure 4-60. Note: Confirm that the hook tray is engaged with the drive bay. 9. Power on the server, start the SETUP utility, select [Boot] → [Hard Disk], and set the boot priority in the submenu. This procedure is necessary because installing an additional hard disk drive clears the current setting of the boot priority. Upgrading Your System 4-53 Removing a Hard Disk Drive from the Hard Drive Bay Perform the following steps to remove a hard disk drive. NOTE: If removing a failed hard disk drive, confirm the slot in which the disk lamp of the hard disk drive is amber before starting the removal. See Figure 4-61, A. A Figure 4-61. Disk LED Lamps 1. Observe the safety and ESD precautions listed under General Information and Static Precautions at the beginning of this chapter. 2. Perform the steps in "Preparing Your System for Upgrade" described earlier in this chapter. 3. Locate the slot in which you are going to install a hard disk drive. 4. Push the latch to the left to unlock, and then open the tray handle. See Figure 4-62. 5. Firmly hold the handle and hard disk drive, and pull out the hard disk drive carrier. 6. If using the server with the hard disk drive removed, install a dummy tray in the empty slot. A B Figure 4-62. Removing a Hard Disk Drive 4-54 Upgrading Your System C 7. Power on the server, start the SETUP utility, select [Boot] → [Hard Disk], and set the boot priority in the submenu. This procedure is necessary because installing an additional hard disk drive clears the current setting of the boot priority. 8. Install the front bezel In the disk array configuration, you can use the auto-rebuild feature to restore the data that was on the removed hard disk drive. The auto-rebuild feature is available for the RAID1, RAID5, or RAID0+1 disk array configurations. Auto-rebuild is carried out when you hot-swap a failed hard disk with a new one (replacing the disk drive with a new one while the server is powered up). The DISK lamp flashes green and amber alternatively to indicate the auto-rebuild is in process. IMPORTANT: ! When auto-rebuild fails, the disk lamp lights amber. Remove and install the hard disk again to restart auto-rebuild. ! If the disk array monitoring utility is installed, it may display or act as follows. If the disk lamp does not light in amber after auto-rebuild, however, auto-rebuild has completed successfully. – Displays "Rebuild was cancelled" on the screen while auto-rebuild is in progress. – Appears to stop and restart auto-rebuild. Observe the following notes for auto-rebuild. ! Do not power off the server during auto-rebuild. ! When you remove a hard disk, wait at least 90 seconds before reinstalling the hard disk. ! Do not replace another hard disk while rebuilding is in progress. (The disk lamp flashes in green and amber alternatively while rebuilding the hard disk.) ! Perform the above procedure when replacing the hard disk drive in the flex bay. Upgrading Your System 4-55 Inserting the Floppy Disk or CDROM Drive into the Flex Bay The following explains the procedure for removing the hard disk drive and then installing the floppy disk or CD-ROM drive in the bay: 1. Observe the safety and ESD precautions listed under General Information and Static Precautions at the beginning of this chapter. 2. Perform the steps in "Preparing Your System for Upgrade" described earlier in this chapter. 3. Remove the hard disk drive. Refer to the previous procedure. 4. Remove the spacer. See Figure 4-63. Figure 4-63. Removing the Spacer 5. Insert the floppy disk or CD-ROM drive straight into the flex bay. See Figure 4-64. Figure 4-64. Inserting a Device into the Flex Bay 6. Power on the server, start the SETUP utility, and make the following settings: Select [Boot] → [Boot Device Priority] → [ATAPI CD-ROM Drive] → [1st Boot Drive]. Select [Boot] → [Boot Device Priority] → [Removable Drive] → [2nd Boot Device]. Select [Boot] → [Hard Disk], and set the new boot priority. 4-56 Upgrading Your System This operation is necessary because installing the floppy disk drive or CDROM drive clears the current settings. 7. Install the front bezel. Power Supply Unit Even if a single power supply unit fails, the server can continue its operation without interruption (redundancy feature) provided that both power supplies are installed. Installing a Power Supply Perform the following steps to install a power supply unit: 1. Observe the safety and ESD precautions listed under General Information and Static Precautions at the beginning of this chapter. 2. Perform the steps in "Preparing Your System for Upgrade" described earlier in this chapter. 3. Extend the server out of the rack, and locate the slot for installing an optional power supply unit. 4. Squeeze and pull the handle of the blank cover. See Figure 4-65. The blank cover is unlocked. Figure 4-65. Removing the Power Supply Blank Cover 5. Remove the blank cover. IMPORTANT: Keep the removed blank cover for future use. Upgrading Your System 4-57 6. Insert the power supply unit. Confirm the power supply handle is securely hooked. See Figure 4-66. Figure 4-66. Installing a Power Supply 7. Firmly push the handle. The power supply unit is locked when a "click" is heard. See Figure 4-67. Figure 4-67. Locking the Power Supply 8. Connect two power cords. Use the power s provided with the server. The AC POWER lamps flash when the power cords are connected. See Figure 4-68. Figure 4-68. Installing the Power Cords 4-58 Upgrading Your System 9. Power on the server. The AC POWER lamps go on. 10. Confirm, by the STATUS lamp or on the POST screen, that there are no errors related to the power supply units. See Chapter 5 for details on the error messages. If the AC POWER lamps are off, reinstall the power supply units. If the same error message still appears, contact your service representative. Replacing a Power Supply IMPORTANT: Do not remove a power supply unit operating normally. NOTE: If one power supply unit fails and the server contains two power supply units in a redundant configuration, the failing power supply unit can be replaced with the system power on. (If your server is running in the redundant power configuration, skip Step 1 and 2 in the following procedure.) 1. Observe the safety and ESD precautions listed under General Information and Static Precautions at the beginning of this chapter. 2. Perform the steps in "Preparing Your System for Upgrade" described earlier in this chapter 3. Locate the failing power supply unit by the AC POWER lamp on the rear of each power supply unit. (The lamp of the failing power supply unit is amber.) 4. Hold and pull the handle of the failing power supply unit. The power supply unit is unlocked. 5. Remove the power supply unit. See Figure 4-69. Figure 4-69. Removing a Supply 6. If operating the server with a single power supply unit without installing a new one, install the blank cover. IMPORTANT: To maintain the cooling effect in the server, install the blank cover in the slot not containing a power supply unit. Upgrading Your System 4-59 7. Install the new power supply unit following the power supply installation procedure previously described in this chapter. 4-60 Upgrading Your System 5 Problem Solving ! Problem Solving ! Static Precautions ! Resetting the Server ! Forced Shutdown ! Troubleshooting Checklists ! Diagnostic Procedures ! Specific Problems and Corrective Actions ! Problems with the Network ! Plug and Play Installation Tips ! Error Messages ! How to Identify BIOS and BMC Revision Levels Problem Solving This chapter helps you identify and solve problems that may occur during system installation or while using your system. The first section of this chapter tells you how to reset your system in the event of problems. The next few sections provide troubleshooting checklists and procedural steps that help you isolate specific system problems. The last section includes BIOS and system user information. ! WARNING The DC push-button on/off switch on the front panel does not turn off the system AC power. Also, +5vdc is present on the system board whenever the AC power cord is connected between the system and an AC outlet. Before doing the procedures in this manual, make sure that your system is powered off and unplug the AC power cords from the back of the chassis. Failure to disconnect power before opening your system can result in personal injury and equipment damage ! CAUTION Operating your system with the cover removed can damage your system components. For proper cooling and airflow, always replace the top panel before powering on your system. Static Precautions An electrostatic discharge (ESD) can damage disk drives, option boards, and other components. You can provide some ESD protection by wearing an antistatic wrist strap attached to chassis ground when handling system components. Electronic devices can be easily damaged by static electricity. To prevent damage, keep them in their protective packaging when they are not installed in your system. 5-2 Problem Solving Resetting the Server If the server halts before starting the operating system (OS), press and hold Ctrl and Alt and press Delete. This restarts the server. IMPORTANT: Resetting the server clears the DIMM memory and the data in process. To reset the server when it is not frozen, make sure that no processing is in progress. ! Hard Reset Press the RESET switch at the front of the server. A Figure 5-1. Reset Switch ! Soft Reset If the server halts before starting the OS, press and hold Ctrl and Alt and press Delete. This restarts the server. Forced Shutdown Use this function when an OS command does not shut down the server, the POWER switch does not turn off the server, or resetting does not work. Press and hold the POWER switch on the server for at least four seconds. The power is forcibly turned off. To turn on the power back again, wait approximately 10 seconds after turning off the power (forced shutdown). A Figure 5-2. Power Switch IMPORTANT: If the remote power-on function is used, cycle the power once to load the OS, and turn off the power again in the normal way. Problem Solving 5-3 Troubleshooting Checklists The following subsections provide troubleshooting checklists for problems that occur at initial system startup, when you run new application software, and after the system hardware and software have been running correctly. Initial System Startup Incorrect installation or configuration usually causes problems that occur at initial system startup. Hardware failure is a less frequent cause. If you have problems during initial system startup, check the following: ! Are the system power cords properly connected to the system and plugged into a NEMA 5-15R outlet (100-120 VAC), a NEMA 6-15R outlet (200-240 VAC), or an UPS that meets the power specifications of the system? ! Is AC power available at the wall outlet? ! Is the system cover closed properly? A power interlock switch detects if the cover is open. If the cover is not closed properly, power is not supplied to the server system. ! Is the power on/off push-button switch on the front panel in the ON position (power on LED should be lit)? ! Are all cables correctly connected and secured? ! Are all the PCI option boards fully seated in their connector slots in the riser cards? ! Are all jumpers and switch settings on option boards and peripheral devices correct? If applicable, ensure that there are no conflicts; for example, two option boards sharing the same interrupt. ! Are the processors fully seated in their slots on the system board? Refer to the Processors subsection of Upgrading Your System in Chapter 4 for installation instructions? ! Are all DIMMs fully seated and installed correctly? Refer to the DIMMs subsection of Upgrading Your System in Chapter 4 for installation instructions. ! Are all option boards and disk drives installed correctly? Refer to the Options Boards and Hard Disk Drives subsections of Upgrading Your System in Chapter 4 for installation instructions. ! Is the system hard disk drive properly formatted or defined? ! Is the operating system properly loaded? Refer to the operating system documentation. ! Are all drivers properly installed? ! Are the configuration settings in BIOS Setup and the SCSISelect Utility correct? For information about running these utilities, refer to the Configuring Your System in Chapter 3. 5-4 Problem Solving If the above items are all correct, but the problem reoccurs, refer to Additional Troubleshooting Procedures in this chapter. Running New Application Software Problems that occur when you run new application software are usually related to the software. Faulty equipment is much less likely, especially if other software runs correctly. If you have problems while running new application software, check the following: ! Does the system meet the minimum hardware requirements for the software? Refer to the software documentation. ! Is the software an authorized copy? Unauthorized copies often do not work. Obtain an authorized copy of the software. ! If you are running the software from a diskette, is it a good copy? ! If you are running the software from a hard disk drive, is the software correctly installed? Where all necessary procedures followed and files installed? ! If you are running the software from a CD-ROM disk is the disk scratched or dirty? ! Are the correct device drivers installed? ! Is the software correctly configured for the system? ! Are you using the software correctly? ! If other software runs correctly on the system, contact your vendor about the failing software. If the problems persist with the software, contact the software vendor's customer service representative. Problem Solving 5-5 After System Has Been Running Correctly Problems that occur after the system hardware and software have been running correctly often indicate equipment failure. However, many situations that are easy to correct can also cause such problems. If you have problems after the system has been running correctly, check the following: ! If you are running the software from a diskette or CD-ROM, try a new copy of the software. ! If you are running the software from a hard disk drive, try running it from a floppy. If the software runs correctly, there may be a problem with the copy on the hard disk. Reinstall the software on the hard disk drive and try running it again. Make sure all the necessary files are installed. ! If the problem recurs, you may need to reformat the hard disk drive. The hard disk drive, the drive controller, or the system board set may be defective. ! If the problems are intermittent, there may be a loose cable, dirt in the keyboard (if keyboard input is incorrect), a marginal power supply, or other random component failures. ! If you suspect that a transient voltage spike, power outage, or brownout might have occurred, reload the software and try running it again. Symptoms of voltage spikes include a flickering video display, unexpected system reboots, and the system not responding to user commands. Note: Voltage spikes can corrupt or destroy data files on the drive. If you are experiencing voltage spikes on the power line, install a surge suppresser between the power outlet and the system power cord. If the problem recurs after you have checked and corrected all of the above items, refer to Diagnostic Procedures in this chapter. 5-6 Problem Solving Diagnostic Procedures This section provides a more detailed approach to diagnosing and identifying problems and then locating their sources. Error Checking Each time you turn on the system, POST (Power-On-Self-Test) runs automatically and checks the system board, processors, memory board, keyboard, and mouse. If POST finds an error, it displays an error message. Refer to the Error Message section in this chapter for an explanation of each error message. Troubleshooting Guide Use the following troubleshooting procedures to help you identify a problem. These general procedures lead you through the following: ! Preparing the system for diagnosing problems ! Monitoring POST while it is running ! Verifying proper operation of key system LEDs ! Confirming loading of the operating system. Preparing the System for Diagnosing Problems To prepare the system for diagnosing problems, perform the following: Note: Before disconnecting any peripheral cables from the system, turn off the system and any external peripheral devices. Failure to do so can cause permanent damage to the system and/or the peripheral devices. 1. Turn off the system and all external peripheral devices. Disconnect all devices from the system except the keyboard and video monitor. 2. Make sure the system power cords are plugged into a properly grounded AC outlet. 3. Make sure your video display monitor and keyboard are correctly connected to the system. Turn on the video monitor. Set its brightness and contrast controls to at least two-thirds of their maximum ranges (refer to the documentation supplied with your video display monitor). 4. If the operating system normally loads from the hard disk drive, make sure there is no diskette in drive A. Otherwise, place a diskette containing the operating system files in drive A. 5. Turn on the system. If the power indicator LED does not light, refer to Power Light Does Not Light found later in this chapter. Problem Solving 5-7 Monitoring POST Each time you turn on the system, the Power-On Self-Test (POST) runs automatically and checks the system board, processors, memory board, keyboard, and mouse. During the memory test, POST displays the amount of memory that it is able to access and test. Depending on the amount of memory, it may take several minutes to complete the memory test. When the memory test completes, the following is displayed: Press <F2> to enter SETUP Press <F2> to enter BIOS SETUP. When the utility appears, follow the instructions on your monitor to configure BIOS. See Chapter 3, "Configuring Your System." If you do not press <F2>, the above message remains for a few seconds and the boot process continues. When this message appears: ™ Press <Ctrl> <A> for SCSISelect Utility! Press <Ctrl+A> if you want to configure SCSI devices in your system. When the utility appears, follow the instructions on your monitor to configure the SCSI host adapter settings and run the SCSI disk utilities. See Chapter 3, Configuring Your System. If you choose not to run SCSISelect™ Utility, the boot process continues. If POST finds an error, it displays an error message and, in case there is a problem with the display, it emits a series of long and short beeps. Write down any beep code emitted. This information is useful to your service representative. Refer to the “Error Messages” section in this chapter for a list of items to check for each error code and for an explanation of the error beep codes. The POST Tests table at the end of this chapter lists keys active during POST and provides a description of errors that may occur. The BIOS indicates errors by writing an error code to the PS/2-standard logging area in the Extended BIOS Data Area, and by displaying a message on the screen, which is sometimes preceded by the POST Error Code. The error code will also be logged to the Event Logging area. Report any error code to your service representative. POST Keys and Errors Action/Message Description If POST Beeps Before Video Appears Initialization failed before video initialized. Most beep code errors are fatal; initialization cannot continue. Refer to the section “Error Messages” in this chapter. If Monitor Displays Error Note error; press F1 to continue boot or F2 to enter Setup. Refer to the section “Error Messages” in this chapter. To Enter Setup Setup changes specific options, then writes to CMOS, NVRAM. Press F2 during initialization to run Setup. If you do not press F2, the boot process continues. Enter BOOT Diskette If prompted, insert the boot diskette. 5-8 Problem Solving Verifying Proper Operation of Key System Indicators As POST determines the system configuration, it tests for the presence of each mass storage device installed in the system. As each device is checked, its activity indicator should turn on briefly. Check for the following: ! Does the diskette drive activity indicator turn on briefly? If not, refer to “Diskette Drive Activity Indicator Does Not Light” in this chapter. ! If there is a hard disk drive or SCSI devices installed in the system, does the hard disk drive activity indicator turn on briefly? If not, refer to Hard Disk Drive Activity Indicator Does Not Light in this chapter. Confirming Loading of the Operating System Once the system boots up, the operating system prompt appears on the screen. The prompt varies according to the operating system. If the operating system prompt does not appear, refer to Problems with Application Software found later in this chapter. Problem Solving 5-9 Specific Problems and Corrective Actions This section provides possible solutions for the following specific problems: ! Power LED does not light ! No beep or incorrect beep pattern ! No characters appear on screen ! Characters on the screen appear distorted or incorrect ! System cooling fan does not rotate ! Diskette drive activity LED does not light ! Hard disk drive activity LED does not light ! CD-ROM drive activity LED does not light ! Problems with application software ! The startup prompt “Press <F2> key if you want to run Setup” does not appear on the screen. ! The bootable CD-ROM is not detected. Try the solutions in the order given. If you cannot correct the problem, contact your service representative for assistance. Power LED Does Not Light Check the following: ! Is the system operating normally? If so, the power LED is probably defective. ! Are there other problems with the system? If so, check the items listed under System Cooling Fans Do Not Rotate. Incorrect or No Beep Code Check the following: ! Is the speaker operating? If the system operates normally, but there was no beep, the speaker may be defective, contact your service representative for assistance. Record the beep code emitted by POST, and see the “Messages and Beep Codes” section found later in this chapter. 5-10 Problem Solving No Characters Appear on Screen Check the following: ! Is the keyboard working? Check to see if the Num Lock light is functioning. ! Is the video display monitor plugged in and turned on? ! Are the brightness and contrast controls on the video monitor properly adjusted? ! Are the video monitor switch settings correct? ! Is the video monitor signal cable properly installed? ! Is the onboard video controller enabled? If you are using a video controller board, verify that the video controller board is fully seated in its connector If there are still no characters on the screen after you reboot the system, contact your service representative or authorized dealer for assistance. POST emits one long beep and two short beeps pattern to indicate a possible problem with the video display controller. If you do not receive a beep pattern and characters do not display, the video display or video controller may have failed. Contact your service representative or authorized dealer for assistance. Characters are Distorted or Incorrect Check the following: ! Are the brightness and contrast controls properly adjusted on the video display? Refer to the documentation supplied with your video display. ! Are the video monitor's signal and power cables properly installed? ! If the problem persists, the video monitor may be faulty or it may be the incorrect type. Contact your service representative for assistance. System Cooling Fans Do Not Rotate Check the following: ! Is AC power available at the wall outlet? ! Are the system power cords properly connected to the power supplies and the AC wall outlets? ! Is the cooling fan module power connectors seated properly? ! Is the front panel power on indicator lit? If the switches and connections are correct and the power outlet is functioning, the power supply has probably failed. Contact your service representative for assistance. Problem Solving 5-11 Diskette Drive Activity LED Does Not Light Check the following: ! Is the diskette drive properly configured? ! Is the CDROM/Floppy Disk Drive combo properly installed in the flex bay? Use BIOS Setup to make sure that the diskette drive controller is set to Enabled. For information about running BIOS Setup, refer to the Configuring Your System chapter. If the problem persists, there may be a problem with the diskette drive, system board, or drive signal cable. Contact your service representative for assistance. CD-ROM Drive Activity Light Does Not Light Check the following: ! Is the CDROM/Floppy Disk Drive combo properly installed in the flex bay? ! Are all relevant switches and jumpers on the drive set correctly? ! Is the drive properly configured? ! Is the onboard IDE controller enabled? Problems with Application Software If you have problems with application software, perform the following: ! Verify that the software is properly configured for the system. Refer to the software installation and operation documentation for instructions on setting up and using the software. ! Verify a different copy of the software to see if the problem is with the copy that you are using. ! Make sure all cables are installed correctly. ! Verify that the system board jumpers are set correctly. Refer to the Configuring Your System chapter for jumper settings. ! If other software runs correctly on the system, contact your vendor about the failing software. If the problem persists, contact the software vendor's customer service representative for assistance. 5-12 Problem Solving Bootable CD-ROM Is Not Detected Check the following: ! Is the BIOS set to allow the CD-ROM to be the first bootable device? Check your BIOS Setup (F2) configuration. Problems with the Network Diagnostics pass, but the connection fails: ! Make sure the network cable is securely attached. The controller stopped working when an add-in adapter was installed: ! Make sure the cable is connected to the port from the onboard network controller. ! Make sure the other adapter supports shared interrupts. ! Try reseating the add-in adapter. The add-in adapter stopped working without apparent cause. ! Try reseating the adapter first; then try a different slot if necessary. ! The network driver files may be corrupt or deleted. Delete and then reinstall the drivers. ! Run the diagnostics. Plug and Play Installation Tips Certain drivers may require interrupts that are not shared with other PCI drivers. The BIOS Setup Utility can be used to adjust the interrupt numbers for PCI devices. For certain drivers, it may be necessary to alter settings so that interrupts are not shared. Problem Solving 5-13 Error Messages This section describes the POST error codes and messages. POST Error Codes and Messages Whenever a recoverable error occurs during POST, BIOS displays a message on the video display screen and causes the speaker to beep as the message appears. BIOS also issues a beep code (one long tone followed by two short tones) during POST if the video configuration fails or if an external ROM module does not have the correct checksum. The BIOS indicates errors by writing an error code to the PS/2-standard logging area in the Extended BIOS Data Area, and by displaying a message on the screen, which is sometimes preceded by the POST Error Code. The error code will also be logged to the Event Logging area. Table 5-1 POST Error Codes and Messages is a list of the error codes and messages written at the start of each POST test. Table 5-2 POST Error Beep Codes is a list of beep codes issued for each POST test. The devices associated with the POST error codes are shown in subsection POST Error Code Hardware References that follow. Table 5-1. POST Error Codes and Messages On-screen error message Action 100 Timer Channel 2 Error 101 Master Interrupt Controller Contact your service representative to replace the system board. 102 Slave Interrupt Controller 103 CMOS Battery Failure 104 CMOS Option not Set Contact your service representative to replace the system board. (Restart the computer, and then execute SETUP to correct the setting.) 105 CMOS/GPNV Checksum Bad Execute SETUP to correct the setting. 106 CMOS Display Error Contact your service representative to replace the system board. 107 Insert Key Pressed Release the key. 108 Keyboard Locked Message Reconnect the keyboard. 109 Keyboard Stuck Key Release the key. Try a different keyboard. If the problem persists, contact your service representative to replace the system board. 10A Keyboard Interface Error Reconnect the keyboard. Try a different keyboard. If the problem persists, contact your service representative to replace the system board. 10B System Memory Size Error Install the DIMMs correctly. Check if all the installed DIMMs are the same specification. Contact your service representative to replace the DIMMs. 5-14 Problem Solving Table 5-1. POST Error Codes and Messages (continued) On-screen error message Action 10E Install the CPU (processor) correctly. External Cache Failure Contact your service representative to replace the CPU. 110 Floppy Controller Error Contact your service representative to replace the floppy disk drive or system board. This server does not support floppy disk drive B. 111 Floppy A: Error 112 Floppy B: Error 113 Hard disk 0 Error 114 Hard disk 1 Error 115 Hard disk 2 Error 116 Hard disk 3 Error 117 CD-ROM disk 0 Error 118 CD-ROM disk 1 Error 119 CD-ROM disk 2 Error 11A CD-ROM disk 3 Error 11B Date/Time not set Activate the BIOS SETUP utility to set the date and time. 11E Cache memory bad Install the CPU (processor) correctly. Contact your service representative to replace the system board, SCSI back-plane, or hard disk. Contact your service representative to replace the system board, SCSI back-plane, or hard disk. Contact your service representative to replace the system board or the CD-ROM drive. Contact your service representative to replace the CPU. 120 NVRAM cleared by Jumper Activate the BIOS SETUP utility to set the CMOS or password. 121 Password clear 140 PCI Error Securely install the PCI boards and PCI riser card. 141 PCI Memory Allocation Error 142 PCI IO Allocation Error Contact your service representative to replace the PCI board, system board, or PCI riser card. 143 PCI IRQ Allocation Error Activate the BIOS SETUP utility to set the PCI board. 144 Shadow of PCI ROM Failed Securely install the PCI boards and PCI riser card. Contact your service representative to replace the PCI board, system board, or PCI riser card. 145 PCI ROM not found Securely install the PCI boards and PCI riser card. Contact your service representative to replace the PCI board, system board, or PCI riser card. 146 Insufficient Memory to Shadow PCI ROM For PCI boards which do not need to be bootable, activate the BIOS SETUP utility to disable extension of the expanded ROM on the PCI board. Securely install the PCI boards and PCI riser card. Contact your service representative to replace the PCI board, system board, or PCI riser card. Problem Solving 5-15 Table 5-1. POST Error Codes and Messages (continued) On-screen error message Action 8110 Processor 1 Internal error (IERR) Securely install the processor. 8111 Processor 2 Internal error (IERR) 8120 Processor 1 Thermal Trip error 8121 Processor 2 Thermal Trip error 8130 Processor 1 disabled Securely install the processor. 8131 Processor 2 disabled 8140 Processor 1 failed FRB level 3 timer Contact your service representative to replace the processor or system board. 8141 Processor 2 failed FRB level 3 timer Contact your service representative to replace the processor or system board. On-screen error message Action 8150 Processor 1 failed initialization on last boot Securely install the processor. 8151 Processor 2 failed initialization on last boot If the message is displayed each time the system is booted, contact your service representative to replace the processor or system board. 8160 Processor 01: unable to apply BIOS update Contact your service representative to replace the processor or system board. 8161 Processor 02: unable to apply BIOS update 8170 Processor P1 :L2 cache failed 8171 Processor P2 :L2 cache failed 8180 BIOS does not support current stepping for Processor P1 8181 BIOS does not support current stepping for Processor P2 8190 Watchdog Timer failed on last boot 8191 4:1 Core to bus ratio: Processor Cache disabled 5-16 Problem Solving Securely install the processor. If the message is displayed each time the system is booted, contact your service representative to replace the processor or system board. Table 5-1. POST Error Codes and Messages (continued) On-screen error message Action 8192 L2 Cache size mismatch Install processors under the same specification. 8193 CPUID, Processor Stepping are different 8194 CPUID, Processor Family are different 8195 Front Side Bus Speed mismatch. System Halted Securely install the processor. 8196 Processor Model are different Install processors under the same specification. 8197 CPU Speed mismatch 8198 Failed to load processor microcode Securely install the processor. 8300 Baseboard Management Controller failed to Function Contact your service representative to replace the system board. 8301 Front Panel Controller failed to Function 8305 Hotswap Controller failed to Function 8420 Intelligent System Monitoring Chassis Opened Install the top cover correctly. 84F1 Intelligent System Monitoring Forced Shutdown Confirm that the system starts normally. If the system is in abnormal state, contact your service representative to replace the system board. 84F2 Server Management Interface Failed Contact your service representative to replace the system board. 84F3 Baseboard Management Controller in Update Mode Ask your service representative for maintenance. 84F4 Sensor Data Record Empty Contact your service representative to replace the processor or system board. Contact your service representative to replace the processor or system board. Problem Solving 5-17 Table 5-1. POST Error Codes and Messages (continued) On-screen error message Action 84FF System Event Log Full Clear the event log by using the BIOS SETUP utility. If the error is not eliminated, contact your service representative to replace the system board. The error message is displayed periodically if ESMPRO is not installed. The event log must be cleared periodically. 8500 Bad or missing memory in Slot 3A Check to see that the all DIMMs are firmly seated in the slot. 8501 Bad or missing memory in Slot 2A Contact your service representative to replace the memory or system board. 8502 Bad or missing memory in Slot 1A 8504 Bad or missing memory in Slot 3B 8505 Bad or missing memory in Slot 2B 8506 Bad or missing memory in Slot 1B 8601 All memory marked as fail Forcing minimum back online 8306 OS Boot Watchdog Time failure Contact your service representative. 5-18 Problem Solving POST Error Code Hardware References Figure 5-3 shows the location of specific components referenced in the POST Error Codes and Messages table. Processor 2 3B 3A 2A 2B 1A 1B Processor 1 Note: DIMMs are always added in pairs in the ascending order of DIMM socket numbers. 1A 1B 2A DIMM #1-A DIMM #1-B DIMM #2-A 2B 3A 3B DIMM #2-B DIMM #3-A DIMM #3-B DIMM Group Bank #1 DIMM Group Bank #2 DIMM Group Bank #3 Figure 5-3 . Processor and DIMM Locations on the System Board Problem Solving 5-19 Beep Codes If an error occurs during the POST, the server beeps, indicating the type of error. Each number indicates the number of short beeps, and a hyphen indicates a pause. For example, the beep interval 1-5-2-2 indicates 1 beep, pause, 2 beeps, pause, 2 beeps, pause, and 3 beeps notifying that no processor is detected on the system board. Table 5-2. Post Error Beep Codes Beeps Error Recommended Action 1 Refresh timer error Contact your service representative to replace the system board 2 Parity error 3 Base memory failure Check if the DIMM cards are mounted correctly. If the error still occurs when the check result is normal, contact your service representative to replace the DIMM card or system board. 4 System timer error Contact your service representative to replace the system board. 5 Processor failure Contact your service representative to replace the processor or system board. 6 Keyboard controller error Check if the keyboard is connected correctly. 7 Processor exception interrupt error Contact your service representative to replace the processor or system board. 8 Display memory read/write error Contact your service representative to replace the system board. 9 10 ROM checksum error Contact your service representative to replace the system board. Shutdown register error 11 BIOS disabled 1-5-1-1 FRB failure Contact your service representative to replace the processor or system board. 1-5-2-1 Processor type error Check if the type of the mounted processor is correct. If the error still occurs when the check result is normal, contact your service representative to replace the processor or system board. 1-5-2-2 Processor not detected Check if the processor is mounted correctly. If the error still occurs when the check result is normal, contact your service representative to replace the processor or system board. 1-5-4-2 Power failure Contact your service representative to replace the power supply unit, power jumper board, or system board. 1-5-4-3 Chip set control error Contact your service representative to replace the system board. 1-5-4-4 Power control error 5-20 Problem Solving Contact your service representative to replace the keyboard or system board. Contact your service representative to replace the power supply unit, power jumper board, or system board. How to Identify BIOS and BMC Revision Levels To identify your system's current BIOS and BMC revision levels, perform the following procedure: 1. Power-on or reboot the system. “Press <F2> to enter SETUP” displays. 2. Press F2. The BIOS Setup Utility starts and the Main Menu is displayed. The menu bar at the top of the Main Menu lists the following selections: Menu Use Main Use this menu for basic system configuration. Advanced Use this menu for setting the Advanced Features available on your system. Security Use this menu to set User and Supervisor Passwords and the Backup and Virus-Check reminders. Server Use this menu for configuring unique Server features. Boot Use this menu to configure Boot Device priority. Exit Exits the current menu. 3. Use the arrow keys to select the Server menu. 4. Select System Management and press ENTER. The BIOS and BMC revision level are displayed. Problem Solving 5-21 5-22 Problem Solving A Specifications ! System Specifications System Specifications Item CPU Express5800/120Rf-2 Type Intel Xeon processor Intel Xeon processor Clock/Cache 2.0GHz/512KB 2.80GHz/512KB Number of processors 1 Maximum 2 Chipset Memory E7501 (533MHz) Standard 256MB Maximum 6GB Expansion unit 2 DIMMs (128MB×2/256MB×2/512MB×2/1024MB×2) Expansion times 2 times Memory module SDRAM DIMM (Low Profile PC133 Buffered Type) Error check ECC Graphics (VRAM) ATI RAGE XL (VRAM 8MB) Auxiliary input device Floppy disk (standard) 3.5-inch drive × 1 Hard disk (standard) None Hard disk (maximum) 1025.5 GB (146.5 GB × 7) CD-ROM (standard) ATAPI interface × 1 (Load on tray type, x24 speed) Additional bay Hard disk bay 7 slots 3.5-inch bay 1 slot Additional slot PCI (64-bit) 3 slots *1 *2 Low Profile PCI (64-bit) 3 slots LAN interface External interface *1 1000Base-T/100Base-TX/10Base-T (2 ports) Keyboard/mouse MINI DIN 6-pin connector (1 port) USB 4-pin (3 ports, 1 at front panel, 2 at rear panel) Serial 2 ports, (D-sub 9-pin (1 port) and RJ-45 (1 port)) Network RJ-45 (2 ports) Display MINI D-sub 15-pin (2 ports, 1 for front and rear panels each, exclusively usable) SCSI Ultra 320 SCSI (1 port) Cabinet design Rack-mount type (2U) External dimensions 483 (width) × 88 (height) × 613 (depth) mm Weight 25 kg (Max.) Power supply 100 to 120 VAC ±10%, 200 to 240 VAC ±10%, 50/60 Hz ±1 Hz Power consumption (maximum) 816VA, 500 W Environmental requirements Temperature 10 to 35°C Humidity 20 to 80% RH (no condensation) Others *3 EXPRESSBUILDER supported, ESMPRO provided in the standard configuration *1 Cannot be used if a hard disk drive is installed in Flex bay. *2 When one slot is used as a hard disk bay *3 660 mm when the front bezel is installed. A-2 Specifications B Installing and Configuring Windows® 2000 ! Overview ! Device Drivers ! Installation Assumption ! Installation Preparation ! Installing Microsoft Windows® 2000 Operating System ! Installing LAN Adapters ! Driver Installation for the ATI RAGE XL Display Adapter Overview This appendix contains supplemental instructions needed to install and configure hardware and software used with the Microsoft Windows® 2000 Operating System. This information is intended to supplement the more detailed procedural documents available from Microsoft. This information is not intended to be the central source of installation and configuration information for your system. Read this entire chapter along with Microsoft's Windows® 2000 Setup procedures before starting the installation process. Note: Read the System Release Notes for the latest system information before attempting to install Windows 2000 Operating System on your system. Device Drivers The drivers required for the devices listed in Table B-1 below are located on the EXPRESSBUILDER CD that is included with your system. To create the required diskettes, perform “Tools” on the EXPRESSBUILDER CD. ! CAUTION When creating the required diskettes from the EXPRESSBUILDER CD make sure you use the drivers required for the devices on your specific system. Always read the information in the release notes or inserts, included with any options for they supersede the information in this guide. Table B-1. Device Drivers Supported Device Required Driver Media* SCSI Controllers HALs Windows 2000 OEM Diskette* (If applicable) System Board Windows 2000 Update Module** *Diskette generated from the EXPRESSBUILDER CDROM **Run this application from the EXPRESSBUILDER CDROM; diskette not required B-2 Installing and Configuring Windows 2000 Installation Assumption The installation and configuration instructions in this chapter assume the following: ! You have properly completed the hardware installation. ! You have run the BIOS Setup Utility to check system configuration. ! You will be installing Windows® 2000 Operating System from the CD-ROM media. Note: If you have an optional disk array controller preinstalled on your system, it was preconfigured at the factory. Refer to your system's User's Guide and to the RAID Installation Guide and the Disk Array Controller Installation Guide and User’s Manual for additional information on this option card. If you need to change the RAID level from the factory setting, you must change the setting before installing the operating system. Installing and Configuring Windows 2000 B-3 Installation Preparation Before starting the installation procedure, you need to obtain certain information for use during the installation. Table B-2 lists the information you need in advance for the installation. It is recommended that you obtain the information from your server administrator and record it in Table B-2 before starting. After completing the installation, you might want to use the Windows 2000 Control Panel to configure additional devices or Windows 2000 services and facilities. Table B-2. Advanced Information Item Information Required 1 Name of the Windows 2000 user. 2 Name of the licensed organization. 3 Product Key number for Microsoft Windows 2000 Server Software. This number is on the Certificate of Authenticity included with your Windows 2000 Server Software. 4 Name that you assign to the server. 5 Obtain your network configuration information. For example, if network settings are to be customized: TCP/IP Configuration values such as IP address values, DNS and WINS address resolution facilities, DHCP Relay and Routing configuration values. 6 The name of any Administrative Domain or Workgroup that this server is to be a member of. B-4 Installing and Configuring Windows 2000 Enter Your Information Here Installing Microsoft Windows® 2000 Operating System Use the following procedure to set up and perform a clean Windows 2000 Operating System installation on your server. Before performing the installation, read the “Installation Notes” in the following section. Installation Notes Before beginning the Windows 2000 installation, consult your server’s “System Release Notes” to determine whether SCSI controller device drivers and/or Hardware Abstraction Layer (HAL) programming on the “Windows 2000 OEM DISK” are required. Windows 2000 Installation 1. Insert the Windows 2000 CD into the CD-ROM drive and boot your system by pressing CTRL+ALT+Delete. If a bootable operating system is installed, press Enter while the message “Press any key to boot from CD” is displayed at the top of the screen. Note: Perform Step 2 if a SCSI Disk or RAID controller drivers and/or HAL on the “Windows 2000 OEM DISK” are required; otherwise go to Step 9. 2. While the message “Setup is inspecting your computer’s hardware configuration” or a solid blue background is displayed on the screen, perform one of the following: ! Press the F6 key if SCSI Disk or RAID Controller drivers are included on the “Windows 2000 OEM DISK,” are required. ! Press F5, if a HAL included on the “Windows 2000 OEM DISK,” is required. ! Press F5 and F6 simultaneously if both a SCSI Disk or RAID Controller drivers and HAL programming are included on the “Windows 2000 OEM DISK.” Note: There is no visible indication on the screen when the F5 or F6 key is pressed. Note: Perform Steps 3 and 4 if you pressed F5; perform Steps 5 through 8 if you pressed F6. Installing and Configuring Windows 2000 B-5 3. When the following message is displayed, select Other, then press Enter. “Setup could not determine the type of computer you have, or you have chosen to manually specify the computer type. Select the computer type from the following list or select “Other” if you have the device support disk provided by the computer manufacturer.” 4. Insert the “Windows 2000 OEM-Disk” into the floppy diskette drive, and press Enter. Select the computer type which is displayed. 5. When the following message is displayed, press S. “Setup could not determine the type of one or more mass storage devices installed in your system, or you have chosen to manually specify an adapter”. Currently, Setup will load support for the following mass storage devices. 6. When the following message is displayed, select Other then press Enter. Select the SCSI Adapter your want from the following list, or select "Other" if you have a device support disk provided by an adapter manufacturer 7. Insert the "Windows 2000 OEM-DISK" diskette into the floppy disk drive, and press Enter. A list of mass storage devices is displayed. 8. Select the RAID disk array controller installed in your server from the list of mass storage devices. 9. Follow the messages on the screen to continue to install. Note: Please consult the Microsoft Windows 2000 Installation Guide for more extensive installation procedures. For LAN adapter driver installation, see Installing LAN Adapter Drivers later in this chapter. 10. After installing Windows 2000, logon to the system using the administrator account or other account, which is a member of the Administrator’s group. 11. Insert the EXPRESSBUILDER CD into the system CDROM drive. The “Master Control” menu displays. Select Setup and then select Update NEC 5800 System from the displayed menu items. Note: If you change the configuration of the system (by adding or removing hardware or operating system software components), or repair the system, you must run the Windows 2000 Update Module again. B-6 Installing and Configuring Windows 2000 Installing LAN Adapters The following section includes special driver installation instructions for the Intel PRO/100+ LAN adapter used in your system. Driver Installation for the Intel PRO/100+ LAN Adapter The PRO/100+ driver is initially installed during the installation of Windows 2000 and upgraded when you run the “Windows 2000 Update Module, see “Installing Microsoft Windows® 2000 Operating System” found earlier in this appendix. In order to utilize the PRO/100+ LAN adapter “teaming features,” use the following procedure to install “PROSET II for Windows 2000.” 1. Power on, start Windows 2000, and log on. 2. Insert the EXPRESSBUILDER CD into the system CDROM drive. The “Start” menu displays. Cancel out of the Start menu and run: D:\WINNT\W2k\PC62\HD1\WINDOWS\PROSet2\IA32\PROSet.msi (where D: is the drive letter for your CDROM drive.) Note: PROSet.msi may not be located in the exact location described here. The Intel PROSetII install wizard displays. 3. Click on the NEXT button and select “I accept the terms in the license agreement.” 4. Click on the NEXT button and the installation options screen displays. Select “TYPICAL” and click on the NEXT button. 5. Click on the INSTALL button. The message "Digital signature not found" displays. 6. Click on the YES button. “Install Shield Wizard Completed” appears after all files have been copied. 7. Click on FINISH button. Once the ProSetII driver installation completes, reboot the system. 8. Proceed to the next section to set transfer speed and duplex mode. Setting Network Driver Details. 1. Open the Control Panel and double-click the “Intel(R) PROSetII” icon. The 82546EB Based Dual Port Network Connection screen displays. 2. Select “Intel(R) 82546EB Based Dual Port Network Connection #1.” 3. Select the “Link Configuration” tab and set the “Auto Negotiation” value to DISABLE. Also set the “Forced Speed and Duplex” value according to the value specified for your HUB. 4. Select “Intel(R) 82546EB Based Dual Port Network Connection #2.” Installing and Configuring Windows 2000 B-7 5. Select the “Link Configuration” tab and set the “Auto Negotiation” value to DISABLE. Also set the “Forced Speed and Duplex” value according to the value specified for your HUB. Note: When selecting the "1000/Full" setting, set “Auto Negotiation” to ENABLE and select only the "1000/Full" setting at the “Negotiable Speeds and Duplexes” item. Also, add/delete any other protocols and services, as necessary. Driver Installation for the ATI RAGE XL Display Adapter To take full advantage of the on-board ATI RAGE XL display adapter, perform the following driver installation procedure: 1. Power on, start Windows 2000, and log on. 2. Insert the EXPRESSBUILDER CD into the system CDROM drive. The “Start” Menu displays. Cancel out of the Start menu and run: D:\WINNT\Video\W2k\Setup.exe (where D: is the drive letter for your CDROM drive.) 3. Follow the screen prompts. 4. When the message "Digital signature not found" displays, select YES to continue the installation. 5. At the conclusion of the ATI Rage XL installation, reboot the system. B-8 Installing and Configuring Windows 2000 C Interrupt Requests Interrupt Requests The factory-set interrupt requests (IRQs) are listed below. IRQ Peripheral Device (Controller) IRQ Peripheral Device (Controller) 0 System timer 12 Mouse 1 Keyboard 13 Numeric processor 2 – 14 Primary IDE 3 COM2 serial port (PCI) 15 Secondary IDE 4 COM1 serial port (PCI) 16 USB 5 PCI 17 VGA 6 Floppy disk drive 18 – 7 PCI 19 USB 8 Real-time clock 30 LAN1 9 ACPI compliant system 31 LAN2 10 PCI 49 Adaptec SCSI 11 PCI 50 Adaptec SCSI C-2 Interrupt Requests Interrupt Requests C-3 Glossary A AC (Alternating Current) The type of current available in wall outlets. All computers must convert alternating current to direct current to operate. See also DC. ACPI (Advanced Configuration and Power Interface) Provides the programming standard for power management features. address A label, name, or number that identifies a location in computer memory. AGP Accelerated Graphics Port. ASCII (American Standard Code for Information Interchange) A standard number assigned to each of the alphanumeric characters and keyboard control code keys to enable the transfer of information between different types of computers and peripherals. B backplane slot A connector on the backplane board in desktop computers and expansion boxes that allows you to install circuit cards. backup A copy of data for safe-keeping. The data is copied from computer memory or disk to a floppy disk, magnetic tape, or other media. backup battery The battery in your computer that maintains the real-time clock and the configuration information when the computer's power is removed. base memory An area of memory between 0 and 640 kilobytes. baud rate The speed with which data is transmitted during serial communication. The computer's operating system and software program must be configured for the same baud rate as the communication device, such as a serial printer. See also bps. BIOS (Basic Input/Output System) A program stored in flash EPROM or ROM that controls the keyboard, disk drives, video monitor, and other devices. See also flash EPROM, EPROM, and ROM. Glossary 1 bit Derived from BInary digiT, a bit is the smallest unit of information a computer handles. See also byte. BMC (Baseboard Management Controller) Contains all of the server management functions. One major function of the BMC is to monitor system management events and log their occurrence in the System Event Log (SEL). boot The process of loading the operating system into memory. bps (bits per second) The number of bits transferred in one second during serial communication, such as modem transmission. byte A group of eight bits. C cache memory A very fast, limited portion of RAM set aside for temporary storage of data for direct access by the microprocessor. CD-ROM drive (Compact Disk ROM drive) A type of mass storage device that reads information from a compact disk. Centronics port An industry standard parallel port. See also parallel port. CGA (Color Graphics Adapter) A type of video display system that provides low-resolution text and graphics on TTL monochrome and color monitors. CMOS (Complimentary Metal-Oxide Semiconductor) A type of low-power integrated circuit used in computers. See also TTL. COM1 or COM2 The name you can assign a serial port to set or change its address. See also serial port. command An instruction that directs the computer to perform a particular operation. configuration The way in which a computer is set up to operate. Some configurable options include CPU speed, serial port designation, and memory allocation. 2 Glossary CPU (Central Processing Unit) See microprocessor. CRT (Cathode-Ray Tube) The type of video display used in monitors for desktop computers. D DC (Direct Current) The type of current available in the rechargeable battery packs used in portable computers. See also AC. default The factory setting your computer uses unless you instruct it otherwise. For example, when powering up, the computer will boot from the default drive. density The capacity of information (bytes) that can be packed onto a storage device, such as a floppy disk. device driver A software program that a computer must use to recognize and operate certain hardware, such as a mouse or a video monitor. disk drive A device that stores data on a hard or floppy disk. A floppy disk drive requires a floppy disk to be inserted; a hard disk drive has a permanently encased hard disk. DOS (Disk Operating System) See operating system. DRAM (Dynamic RAM) See RAM. E ECC (Error Checking and Correction) A method of detecting and correcting errors. EEPROM (Electrically Erasable Programmable Read-Only Memory) A type of memory device that stores password and configuration information. EGA (Enhanced Graphics Adapter) A type of video display system that provides mediumresolution text and graphics on TTL monochrome, color, and enhanced color monitors. Glossary 3 EMP The Emergency Management Port (EMP) provides an interface to the console manager. This interface allows remote server management via a modem or direct connection. EMS (Expanded Memory Specification) A method of accessing memory beyond the 640K limit of DOS by exchanging data in and out of main memory at high speeds. Some software requires EMS to operate. EPROM (Erasable Programmable Read-Only Memory) A type of memory device that is usually used to store system BIOS code. This code can be erased with ultraviolet light, but is not lost when the computer is powered off. See also flash EPROM and ROM. expansion slot See backplane slot. extended memory The protected memory above 1M that is directly accessible by the microprocessor through certain utilities and operating systems. F flash EPROM A type of memory device that is usually used to store system BIOS code. This code can be replaced with updated code from a floppy disk, but is not lost when the computer is powered off. See also EPROM and ROM. floppy disk drive See disk drive. format The process used to organize a hard or floppy disk into sectors so it can accept data. Formatting destroys all previous data on the disk. FRB (Fault Resilient Boot A server management feature. FRB attempts to boot the system using the alternate processor or DIMM. G (Gigabyte) 1,073,741,824 bytes. See also byte. 4 Glossary H hard disk drive See disk drive. hardware The physical parts of your computer, including the keyboard, monitor, disk drives, cables, and circuit cards. hot swap A method used to insert or remove SCSI disk drives into or from an operating bus. This method is typically used in RAID subsystems. When used in non-RAID subsystems the operating system must typically be restarted. I IC (Integrated Circuit) An electronic device that contains miniaturized circuitry. IDE (Integrated Drive Electronics) A type of hard disk drive with the control circuitry located inside the disk drive rather than on a drive controller card. interface. A connection between the computer and a peripheral device that enables them to exchange data. See also parallel port and serial port. ISA (Industry Standard Architecture) An industry standard for computers and circuit cards that transfer 16 bits of data at a time. J jumper A small electrical connector used for configuration on some computer hardware. K (Kilobyte) 1,024 bytes. See also byte. L LAN (Local Area Network) A group of computers linked together within a limited area to exchange information. LCD (Liquid Crystal Display) The type of video display used in portable computers. Glossary 5 LED (Light-Emitting Diode) A small electronic device that glows when current flows through it. LPT1 or LPT2 The name you can assign a parallel port to specify its address. See also parallel port. LVD Super-fast Ultra 2 SCSI Low Voltage Differential (LVD) Parallel SCSI Interface. A new SCSI interface that provides greater I/O bandwidth, device connectivity, data reliability, and longer cable lengths for Ultra2 SCSI hard disk drives. Note that in order to achieve LVD performance all devices including cable, controller, and drive must support LVD. M (Megabyte) 1,048,576 bytes. See also byte. memory The circuitry in your computer that stores data and programs. See also EMS, extended memory, RAM, and ROM. microprocessor The integrated circuit that processes data and controls the basic functions of the computer. modem A device used to exchange information with other computers over telephone or data lines. module A circuit board that plugs into a dedicated connector on the system board in your computer. mouse A small input device that you guide on a flat surface to control the cursor movement and operation of the computer when using certain software programs. N NVRAM (Nonvolatile RAM) A type of RAM that retains its contents even after the computer is powered off. This memory stores EISA configuration information. See also RAM and SRAM. O operating system A set of programs that provides the interface between other software programs and the computer. 6 Glossary P parallel port The connector on the back of your computer that allows the transfer of data between the computer and a parallel device, such as a parallel printer. partition The process of dividing the storage space on a hard disk into separate areas so that the operating system treats them as separate disk drives. password A security feature that prevents an unauthorized user from operating your computer. See also EEPROM. PCI Peripheral Component Interconnect. PCI is a high-performance peripherals I/O bus supporting data transfers of up to 528MB per second. Pentium A type of microprocessor, with a built-in math coprocessor, cache memory, and memory and bus controllers, that processes and communicates 32 bits of data at a time. This microprocessor also contains power management capabilities. peripheral A device connected to and controlled by the computer, such as an external disk drive or a printer. pixel The smallest element that is visible on a video display. The resolution of a video display system is measured in pixels. PnP (Plug-n-Play) Plug-and-play is the ability to plug a device into a computer and have the computer recognize that the device is there. The user doesn't have to tell the computer. POST Power-On-Self-Test. R RAM (Random-Access Memory) A temporary storage area for data and programs. This type of memory must be periodically refreshed to maintain valid data, and is lost when the computer is powered off. See also NVRAM and SRAM. real-time clock The IC in your computer that maintains the time and date. Glossary 7 ROM (Read-Only Memory) A type of memory device that usually is used to store system BIOS code. This code cannot be altered and is not lost when the computer is powered off. See also BIOS, EPROM, and flash EPROM. RS-232C port An industry standard serial port. See also serial port. S SAF-TE (SCSI Accessed Fault Tolerant Enclosure) A specification for monitoring the state of the drives and enclosure environment (fan, power supply, temperature, etc.) using the SCSI bus to indicate faults. save To store information on a floppy disk, hard disk, magnetic tape, or some other permanent storage device. SCSI (Small Computer System Interface) An industry standard interface that provides high-speed access to tape drives, hard disk drives, and other peripheral devices. SEL (System Event Log) A record of system management events. The information stored includes the name of the event, the date and time the event occurred and data pertinent to the event. Event data may include POST error codes that reflect hardware errors or software conflicts within the system. serial communication Information sent sequentially, one bit at a time. serial port The connector on the back of your computer that allows the transfer of data between the computer and a serial device, such as a mouse, a modem, or a serial printer. setup program The program that you use to change the configuration of some ISA desktop and notebook computers. This program also contains information about the hardware in the computer. software Programs with specific functions, such as word processing, data base management, communications, and operating system. SRAM (Static RAM) A temporary storage area for data and programs. This type of memory does not need to be refreshed, but it is lost when the computer is powered off. See also NVRAM and RAM. 8 Glossary SVGA (Super VGA) A type of video display system that provides very high-resolution text and graphics on analog color monitors. system board The main circuit board in your computer. It contains most of the connectors and ports. T tape drive A type of storage device using magnetic tape. TTL (Transistor-Transistor Logic) A type of integrated circuit used in computers. See also CMOS. U ultra 160/m SCSI Ultra 160/m is a parallel SCSI interface based on Ultra3 SCSI technology. This interface features data transfer speeds up to 160MB/second (double-edge clocking), cyclical redundancy checking (CRC) providing higher levels of data reliability, and domain validation that detects the configuration of the SCSI bus and automatically tests and adjusts the SCSI bus transfer rate to optimize interoperability. Note that the Ultra 160/m uses the standard Ultra2 LVD cabling and termination, making it backward compatible for easy implementation. V VGA (Video Graphics Array) A type of video display system that provides high-resolution text and graphics on analog color monitors. Glossary 9 10 Glossary Equipment Log Use this equipment log form to record pertinent information about your system. You will need some of this information to run the System Setup Utility. Be sure to update the equipment log when you add options. Record the model and serial numbers of the system components, dates of component removal or replacement, and the name of the vendor from whom the component was purchased. Be sure to record the same information for any components added to the system, such as a power supply, hard disk drives, add-in boards, or printers. Record the model and serial numbers of the unit and system board. The model and serial numbers of the system unit are recorded on a label attached to the rear of the unit. The location of serial numbers on add-in boards, hard disk drives, and external equipment, such as video displays or printers, varies from one manufacturer to another. Literature accompanying these products should illustrate or describe the location of model and serial numbers. Equipment Log 1 Component Server System Board Processor 1 Processor 2 DIMM Slot 1A DIMM Slot 1B DIMM Slot 2A DIMM Slot 2B DIMM Slot 3A DIMM Slot 3B Modem Diskette Drive Tape Drive CD-ROM Drive Hard Disk Drive 1 Hard Disk Drive 2 Hard Disk Drive 3 Hard Disk Drive 4 Hard Disk Drive 5 Hard Disk Drive 6 Hard Disk Drive 7 Network Controller 1 Network Controller 2 RAID Controller SCSI Controller Monitor Keyboard Mouse Power Supply (standard) Power Supply (optional) 2 Equipment Log Manufacturer Name & Model Serial Number (if available) Date Installed Index A L AC link mode, 1-12 Advance menu configuring in setup, 3-7 Lithium backup battery installing, 4-9 M B Battery installing, 4-9 BIOS using the setup utility, 3-3 Main menu configuring in setup, 3-5 Memory addresses, 1-8 N C Configuring system board jumpers, 3-22 Configuring your system, 3-2 Network problems, 5-13 O D Overview, 1-2 Diagnostic procedures, 5-7 Drivers Windows 2000, B-2 P E Error codes. See POST Error messages, 5-14 Exit menu configuring in setup, 3-16 F Features system board, 1-7 G Getting familiar with the system, 2-31 I Installation assumption Windows 2000, B-3 Installing 3.5-inch hard disk, 4-49 Windows 2000, B-5 Integrated peripheral configuration menu, configuring in Setup, 3-8 Intrusion detection, 1-13 J Jumpers CMOS clear, 3-23 password, 3-23 system board, 3-22 Password clearing and changing, 3-24 user, 1-13 POST error codes and messages, 5-14 Power on/off switch does not turn off AC power, 4-2 Problems application software, 5-12 beep code, 5-10 bootable CD-ROM not detected, 5-13 CD-ROM drive activity light, 5-12 characters distorted, 5-11 diskette drive activity LED, 5-12 network, 5-13 no characters on screen, 5-11 PCI installation tips, 5-13 power LED, 5-10 system cooling fans, 5-11 R Rack-mount subsystem assembly, 2-4 RAID controller configuration, 3-21 Real-time clock running SSU to configure settings, 4-10 Real-time clock/calendar replacing the battery, 4-8 Remote power-on (wake on LAN) function, 112 Index-1 S SCSISelect utility adaptec, 3-17 Security, 1-13 software lock, SSU, 1-13 Security menu configuring in setup, 3-11 Server management intrusion detection, 1-13 Server menu configuring in setup, 3-12 Setup advanced menu, 3-7 exit menu, 3-16 integrated peripheral configuration menu, 3-8 main menu, 3-5 security menu contents, 3-11 server menu, 3-12 SSU software locking feature, 1-13 Switches DC power, 4-2 System configuring, 3-2 unpacking, 2-3 System board features, 1-7 System chassis, 1-5 T Troubleshooting checklists, 5-4 U Unpacking system, 2-3 Upgrading your system installing and removing DIMMs, 4-10 modifying the system board, 4-8 preparation, 4-3 replacing the real-time clock/calendar battery, 4-8 tools recommended, 4-3 User password, 1-13 Using the system, 2-41 W Wake on LAN (remote power-on) function, 112 Warning components might be hot, 4-2 power on/off switch, 4-2 Windows 2000 advanced information, B-4 installation assumption, B-3 Index-2 installing display adapter driver, B-8 installing operating system software, B-5 overview, B-2 preparation, B-4 required diskettes, B-2 xx ■ ■ ■ ■ ■ ■ ■ ■ ■ ■ ■ ■ ■ ■ ■ ■ ■ ■ ■ ■ ■ ■ ■ ■ ■ ■ ■ ■ ■ ■ ■ ■ ■ ■ ■ ■ ■ ■ ■ ■ ■ ■ ■ ■ ■ ■ ■ ■ ■ ■ ■ ■ ■ ■ ■ ■ ■ ■ ■ ■ ■ ■ ■ ■ ■ ■ ■ ■ ■ ■ ■ ■ ■ ■ ■ ■ ■ ■ ■ ■ ■ ■ ■ ■ ■ ■ ■ ■ ■ ■ ■ 456-01669-000