1
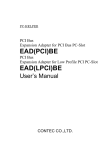
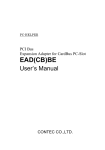
Keep this User’s Guide at hand for quick reference at any time it may be required.
Read “SAFETY NOTES” first, then set up this kit.
Provide this User’s Guide along with this kit when you transfer to the third party.
N8143-56F/56E Rack Conversion Kit
User’s Guide
Preface
This product is mechanical parts for installing NEC Express server into 19-inch rack system.
Read this document and the manual of the NEC Express server to understand installation
method before installing this product to the server.
SAFTY NOTES
Follow instructions given in this document for proper installation and safe use of the server.
Refer to the User’s guide of the NEC Express server regarding the safety indications.
Install this kit only to the server which define as optional parts.
Failure to follow these instructions may cause the server to operate
incorrectly and/or personal injury or damages of surrounding servers to
occur.
More than two persons are required to carry or install the rack.
Failure to follow this instruction may cause the rack to fall to result in
personal injury and/or breakage of surrounding servers.
Read this document and the manual of the NEC Express server to
understand installation method before installing this product to the
server. Failure to follow these instructions may cause the server to
operate incorrectly and/or personal injury or damages of surrounding
servers to occur.
Attach cables not to contact the slide rail assembly and neighboring
units. Failure to follow these instructions may cause the server to
operate incorrectly and/or personal injury or damages of surrounding
servers to occur.
Do not disassemble, repair, or modify the server. Otherwise, an electric
shock or fire may be caused.
856-122660-101-A Rev.1.2
1
Chapter 1
Preparation for Installation
This chapter describes preparations required for installing the server on a 19-inch rack step by
step.
Step 1
Unpacking
The rack conversion kit contains the following components. Make sure that everything listed
below are inside and no damage is observed after unpacking.
2
5
11
17
6
12
18
4
3
1
7
8
9
13,14
19
15
20
2
21
10
16
22
No.
1
2
3
4
5
Part Name
Front Cover
Slide Rail Assembly
Cable Arm
Arm Bracket
Arm Stopper
6
Arm Support (1)
1
7
Arm Support (2)
1
8
9
10
11
12
13
14
15
16
Foot Cover
Device Cover
HDD Cover (1)
HDD Cover (2)
Template
Model Name Label
Model Name Label
Icon Label
Washer
4
3
1
1
1
1
1
1
8
17
Screw A
8
18
Screw B
10
19
Screw C
8
20
Screw D
11
21
22
Cable Tie
User’s Guide
10
1
Step 2
QTY
1
2
1
1
1
Notes
EIA Mounting Flange to Rear
Mounting Flange : 700_743mm
EIA Mounting Flange to Rear
Mounting Flange : 743_900mm
For 5.25” bay
For Fixed HDD model
For Hot Plug ATA HDD model
120Lg/120Ef 用
120Lh/120Lg 用
For fixing the slide rail assembly
M4 Bind-head screws
(color :Gold)
M5 Bind-head screws
#6-32UNC pan-head screws
(color :silver)
M4 pan-head screws with
Washer (color :Gold)
This manual
Preparing the Required Tools
Required tools are listed below.
? Phillips screwdriver
3
Chapter 2
Installation
This chapter describes the procedures for installing the rack mountable server into a 19-inch
rack.
Step 1
Convert from tower type to rack-mount type
(1) Pull the hinge pin out. Then slide the front bezel to remove it from the other hinge
pin and remove the front bezel.
(2) Remove the bezel hinge. (four screws)
(3) Remove five nylon rivets from the top cover.
Front Bezel
Nylon Rivet
Bezel Hinge
Hinge Pin
(4) Remove four feet from the bottom chassis. (Total eight screws)
Front Bezel
Foot
(5) Fix the device covers together with the dummy covers
which were installed to blank bays in the chassis.
Device Cover
4
(6) Fix the HDD cover (1 or 2) with the screw (D) to the inside of front cover.
( Do not attach the HDD cover into Hot Plug SCSI HDD (6slots) model. )
?
Fixed HDD (4slots) model
Fix HDD cover (1) with four screws (D)
Front Cover
HDD Cover (1)
?
Hot Plug ATA HDD (4slots) model
Fix HDD cover (2) with two screws (D)
Front Cover
HDD Cover (2)
(7) Fix four foot covers with four screws (C) to the bottom of server.
(8) Fix the front cover with four screws (C) to the front of server.
Foot Cover
Front Cover
5
Step2
(1)
Mounting the server into the rack
Fully slide the rails out until they lock in place. And while pressing down on the
release lever, slide the rails to remove the inner rail.
Slide Rail Assembly
Outer Rail
Inner Rail
Release Lever
(2)
Fix the inner rail with eight screws (A) to both sides of the server.
(3) Place the template in the desired location of the rack and attach four core nuts that
come with the rack assembly to the mount flange in the rack.
Core nut positions
Cable Arm position
Slide
Rail
Front side
Core nut positions
Slide
Rail
Back side
6
(4)
Loosen three screws for fixing the rear mounting bracket in order to move the rear
mounting bracket. Repeat this step for the other rail.
Rear
Mounting
Slide Rail Assembly
Outer Rail
Screws
for Rear Mounting bracket
(5)
Place slide rail assemblies to the mounting flanges of the rack. Attach the washer to
the screw (B) and then fix both sides of slide rails with eight screws (B).
Refer to the template for the position.
Back side
Front side
(6)
Tighten six screws that were loosened in (4).
7
(7)
Slide two slide rails out from the rack until they were locked. And then with three or
more persons assisting you, lift the server and align the inner rails attached to the
both side of the server with the extended rails.
(8) Insert the inner rails into the extended slide rails and push the server into the rack
until it stops.
(9) Carefully press down the release levers on the inner rails to release the locks and slide
the server all the way into the rack.
(10) To check that the server slides in and out of the rack, grasp the two handles on the
front of the server slowly pull the server out and push it back in.
(11) Tighten the four captive thumbscrews to secure the server to the rack.
Note sufficiently that your fingers may not be caught between a
rail and other mechanical parts or cut by a rail at installation or
removal of the server from the rack.
Front Cover
Captive thumbscrews
Release Lever
? Do not connect any cables before attaching the cable arm.
? Secure four captive thumbscrews when mounting the server to the rack.
8
Step 3
Installing the cable arm and cables
(1) Fix the arm bracket with two screws (D) to the back of the server.
Arm Bracket
(2)
Server
When the distance between the front mounting flange and the rear mounting flange is
about 743mm, align one end of the cable arm with the outside of the core nuts
installed to the rear of the rack frame and secure it with the two screws (B).
9
(3) When the distance is from 700mm to 742mm, use the arm support (1) to adjust the
position of cable arm.
(4) When the distance is from 745mm to 900mm, use the arm support (2) to adjust the
position of cable arm..
Arm Support (2)
Arm Support (1)
Cable Arm
Cable Arm
Attach the cable arm
to the arm support to
shorten this distance
as much as possible.
Distance between the front mounting
flange and the rear mounting flange:
700_742mm
Distance between the front mounting
flange and the rear mounting flange:
745_900mm
(5) Align the small holes in the cable arm and the arm bracket, and then fix the cable arm
with two screws (D) to the arm bracket that fixed in step (1).
Arm Bracket
Small Hole
Cable Arm
10
(6) Check to see that no excess force is applied to the cable arm by pulling out the server
and pushing it back in. And this cable arm is rotated to backside for connection of
cables and exchange of the power supply unit. Check to see that no excess force is
applied to the cable arm by rotating it.
(7) Attach cables to the server according to the manual of the server.
(8)
Bundle cables to the cable arm by the repeat ties.
? Attach cables and repeat ties not to contact the slide rails and neighboring units and
the rack.
? Tie cables slackly between the cable arm and the server to avoid of excess force to
be added by pulling out the server and pushing it back in.
? Attach cables to avoid of excess force to the plug of power cords.
11
(9)
Check to see that no excess force is applied to cables by pulling out the server and
pushing it back in. And this cable arm is rotated to backside for connection of cables
and exchange of the power supply unit. Check to see that no excess force is applied to
cables by rotating it. If the excess force is applied to cables, tie again cables more
slackly and check to see that no excess force is applied to cables and check the cable
does not touch slide rails, neighboring units, and the rack.
(10) Fix the arm stopper with a screw (D) to the cable arm.
Arm Stopper
Cable Arm
12
Step 4
Applying the labels
(1) Stick the model name label corresponding to each model on the front cover.
(2) Stick the icon label corresponding to each model on the front cover.
Icon Label
Model Name Label
10mm
10mm
For NEC Express5800/120Lg
For NEC Express5800/120Ef
For NEC Express5800/120Lh
For NEC Express5800/120Eg
Model Name Label
For NEC Express5800/120Lg
For NEC Express5800/120Lh
For NEC Express5800/120Ef
For NEC Express5800/120Eg
Icon
13
Chapter 3
Operation
Step 1
Attaching/Removing the arm stopper
This cable arm is rotated to backside for connection of external cables and exchange of the
power supply unit. This step describes the procedures for rotating the cable arm to backside.
(1) Loosen the screw (D) and slide the arm stopper to upside and then remove the arm
(2)
(3)
(4)
(5)
stopper.
Rotate the cable arm to backside.
Attach/remove cables and power supply units.
Rotate the cable arm to previous position.
Attach the arm stopper and then tighten the screw (D) that was loosened in (1).
Cable Arm
Arm Stopper
Screw (D)
14
Step 2
Sliding the server out from the rack
It is necessary to slide the server out from the rack when doing maintenance of the internal
components. This step describes the procedures for sliding the server out from the rack.
Note sufficiently that your fingers may not be caught between a rail and
other mechanical parts or cut by a rail at installation or removal of the
server from the rack.
(1) Loosen four captive thumbscrews on the front of the server.
(2) Grasp the two handles on the front of the server slowly pull it out until it stops (locks)
by the release levers.
(3) Do the maintenance of internal components according to the manual of the server.
(4) Carefully press down the release levers on the inner rails to release the locks and slide
the server all the way into the rack.
(5) Grasp the two handles on the front of the server slowly push it in until it stops.
(6) Tighten four captive thumbscrews on the front of the server.
Front Cover
Captive thumbscrews
Release Lever
15
856-122660-101-A Rev.1.2