1
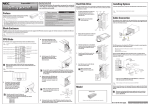
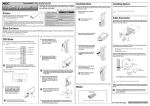
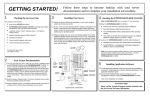
Read this Guide First.
Getting Started describes the procedures necessary for running the
server after you unpack the product. Follow these steps to complete
your installation successfully.
Hard Disk Drive
Installing Options
Up to two hard disk drives can be connected to a CPU blade. Each drive must be
installed in a drive carrier. (To order a disk with a carrier, contact your sales
representative or dealer.)
Install the optional devices required for the CPU blade and the blade enclosure.
1.
Preface
Refer to the following items of the User’s
Guide and follow the instructions for your
safety to setup the server:
Unpack the carton box and make sure that you have everything
and that individual components are not damaged.
"SYMBOLS USED IN THIS USER’S
GUIDE AND WARNING LABELS" and
"SAFETY INDICATION"
Do not disconnect/connect the power plug while your hands are wet.
Failure to follow this warning may cause an electric shock.
Make sure to power off the CPU blade and take out the CPU blade
from the blade enclosure before installing/removing internal optional
devices.
If it starts thundering, do not touch any part of the server including
the cables. Failure to follow this warning may cause an electric shock.
Never attempt to disassemble, repair, or alter the server on any
occasion other than described in this User's Guide.
See the attached packing list.
The "NEC EXPRESSBUILDER" DVD is to be used when setting up (or resetting up) your server, therefore
store them in a designated place. We recommend you to print out the "User's Guide" stored in the
"NEC EXPRESSBUILDER" DVD and read it along with this guide before setting up your server. See the
"NEC EXPRESSBUILDER" on the rear face of this guide.
Keep the removed hard disk
tray for future use.
At least four persons are required to carry the blade enclosure. Firmly hold the handle on the blade
enclosure while carrying the blade enclosure.
Do not install the server in dusty, humid, smoke or oily place. Also avoid installing the server in a place
exposed to direct sunlight.
Use the power cord that comes with your blade enclosure or NEC-specified power cord.
Plug in to a proper power source.
Do not install the enclosure where you need an extension cord.
Refer to blade enclosure User’s Guide for detail.
Remove a tray that does not contain
hard disk drive.
Cable Connection
The keyboard, mouse, display unit, and network devices are connected to the
Connector board in the blade enclosure that is connected with the MP connector
at the rear of the blade enclosure.
Blade Enclosure
The blade enclosure is the rack mount chassis exclusively used to be equipped with CPU blades and power supply unit. The blade enclosure is installed in the NEC rack
or NEC-recommended rack conforming to the EIA standard.
2.
Refer to blade enclosure User's Guide for detail.
Release the lock of the lever on the hard
disk drive to make the lever opened.
Monitor
CPU Blade
The CPU blade can be equipped with memory module and additional board.
For options, refer to Chapter 9 of the User's Guide stored in the provided DVDROM.
(2) Gently put the CPU blade on the
clean, rigid, and flat desk. Loosen
the screw of the ejector to allow the
ejector to be opened.
3.
POWER switch
POWER lamp (green/amber)
DUMP switch
STATUS lamp(green/amber/red)
Hold the hard disk drive so that the BP
connector faces the CPU blade and the
lever on the front of the drive carrier
faces the top.
DMP
RESET switch
1
LAN1 Link/Access lamp (green)
LAN2 Link/Access lamp (green)
RST
2
ID switch
Ejector
ID
4.
ID lamp(blue)
Insert the end of the drive carrier into
the hard disk drive slot slowly and
carefully.
(3) Hold the frame of the CPU blade so
that its MP connector faces the
Blade Enclosure and the hard disk
drive downward.
SUV connector
Eject lever
0
Mouse
Keyboard
The SUV connector on the front of the CPU blade is not used in normal operation.
Use the SUV connector in the following cases:
ⓦ
ⓦ
ⓦ
Installing OS (when the CPU blade is installed in blade enclosure(10U))
Maintenance
Updating BIOS and firmware
Connect the K410-150(00) SUV cable (separately priced, or provided with the
Blade Enclosure) to the SUV connector. Then, connect peripheral devices to the
connectors of SUV cable.
CPU blade
Monitor
1
DMP
USB
1
RST
External
floppy disk drive
2
ID
Make sure that the blade enclosure does not contain any CPU blade.
Install the blade enclosure in the rack. Then, install the CPU blade in the
blade enclosure.
5.
Refer to Chapter 2 of the User's Guide stored in DVD-ROM.
Do not hold the ejector to install the CPU blade in the Blade Enclosure.
The ejector may be disengaged from the CPU blade that causes the CPU
blade to fall down. Or, the ejector may be bent that causes damage to
the CPU blade.
<Installation of CPU blades>
Insert the drive carrier until it hits the
slot end, and lift the lever.
A click occurs to lock the drive carrier.
0
1
Mouse
Keyboard
* When you use the N8460-009 external DVD-ROM drive, use the branch
USB cable provided with the CPU blade.
Refer to Chapter 2 of the User's Guide stored in DVD-ROM.
Finally, connect the power cord coming with the power supply unit to the AC inlet
of power supply unit at the rear of the blade enclosure and the AC outlet for 200240 VAC.
1
Model
Make sure that the ejector hook is hit
to the frame of the blade enclosure, as
shown in the figure.
Diskless model
The power cord coming with the power supply unit can be exclusively
used for the 200-240 VAC power. Connect the power cord only to an AC
outlet for 200-240 VAC.
Frame
Lever
Ejector hook
Keep the removed slot cover for future use.
Do not remove the slot cover from any other slot.
External
DVD-ROM
drive*
USB
Make sure that the lever hook
is hung on the frame.
(4) Align the frame of the CPU blade with
the guide rails of the blade enclosure,
and insert the CPU blade into the end
of blade enclosure slowly and
carefully.
(1) If an optional slot cover is installed
on the slot on which the CPU blade
is to be installed, remove it. Unlock
the CPU blade by holding the lever
at the front, pull out the CPU blade,
and then remove the slot cover.
Self-powerd USB hub
(5) Firmly push in the ejector of the CPU blade, and push the frame at the
5
front of the blade enclosure. Then, tighten the screw of the ejector to fix
the CPU blade to the blade enclosure.
Prepare the hard disk drive and operating system separately.
Go on to the next page.
Installing the Operating System
Server Management Utilities
NEC EXPRESSBUILDER
Install the Operating System (Windows Server 2003 x64 Editions/Windows Server 2003).
Install and set up various utilities that manage overall system operation supported by the NEC Express5800
series. Set up the utilities in accordance with the operating environment in order to reduce TCO (Total Cost of
Ownership), prevent serious failures, and make quick recovery if a failure occurs.
This section introduces various utilities that are already installed in the hard disk drive of the customized
installation model. (Some utilities are installed with the default values. Set up the utilities with suitable values
according to the document.)
Run the NEC EXPRESSBUILDER DVD to:
Refer to Chapter 5 of the User's Guide in the DVD-ROM for details on the setup procedure.
❑ Run the maintenance utilities.
❑ Create driver floppy disks, BIOS update floppy disks and so on.
To run the NEC EXPRESSBUILDER DVD, insert the DVD-ROM into the DVD-ROM drive connected to the CPU
blade, reboot the system and follow the screen prompts.
For installation and setup, refer to Chapter 6 of the User's Guide contained in the DVD-ROM or the online document.
Utilities not mentioned here are explained in the User's Guide or online document.
Configuring Subsystems
Configure the subsystems such as network, graphics accelerator, and so on.
Refer to “Setup of Device Driver” in Chapter 5 of the User's Guide in the DVD-ROM for details on the setup
procedure.
NEC ESMPRO Agent
This utility monitors the system internal temperature, the fan status,
and the hard disk drive status. If a server error or failure occurs, the
utility automatically turns off the server and sends the report to the
computer for monitoring the server. (NEC ESMPRO Agent does not
need any setup in particular.) The status of the system containing
NEC ESMPRO Agent can be viewed on the display of the management
PC (NEC ESMPRO Manager).
Put the NEC EXPRESSBUILDER DVD in the DVD-ROM drive on a system running Microsoft Windows (Windows
XP, Vista, Windows Server 2003 or later).
The following menu will appear automatically.
If the menu does not appear, select "My computer" by using the Explorer, and double-click the icon of the DVD
drive that contains the EXPRESSBUILDER DVD.
Advanced Settings
Setup the debug information, Windows Dr. Watson, and network monitor in advance so that your server can
recover from any trouble precisely and as soon as possible when it should occur.
Refer to “Setting for Solving Problems” in Chapter 5 of the User's Guide in the DVD-ROM for details on the setup
procedure.
NEC ESMPRO Manager
Linked with NEC ESMPRO Agent installed in CPU blade, this utility
enables the monitoring of the overall system.
Use this menu to:
❑ Install the management software (see “Server Management Utilities”).
❑ Read documentation.
–User's Guide (this is explaining about detailed information)
–Online documents (these are explaining about the installation of the software)
Updating the System
Use the NEC EXPRESSBUILDER DVD to install the update modules.
Some documents are written in the PDF file format. Use Adobe Acrobat Reader to view or print these
documents.
Refer to “Updating the System” in Chapter 5 of the User's Guide in the DVD-ROM for details on the setup procedure.
NEC Express5800 Web Site
DianaScope
http://www.nec.co.jp/express/
DianaScope is a software to manage servers by remote control.
Configuring Terminal Service
Use the Windows operating system DVD-ROM to configure the terminal service.
Refer to “Terminal Service” in Chapter 5 of the User's Guide in the DVD-ROM for details on the setup procedure.
Trademark
NEC ESMPRO is a trademark of NEC Corporation. All other product, brand, or trade names used in this publication are the trademarks or
registered trademarks of their respective trademark owners.
© 2008 NEC Corporation All rights reserved.
No part of this publication may be reproduced, photocopied, stored on a retrieval system, or transmitted without the express written consent of
the publisher.