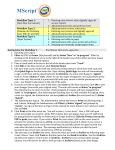
1
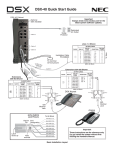
DSX-80 Demo Kit Quick Start Guide
1093096 - 56
DSX-80 Cabinet
8SLIU
PCB
8COIU
PCB
Surge
Protector
Dedicated
AC Outlet
16ESIU
PCB
CPU
Power
Supply
To Electrical
Service Ground
302
Optional
DSX IntraMail
8-Conductor
Cable
P/N 80891
301
Adaptor
P/N 80890
back of unit
300
Making Lines Ring
To ring this line:
Do this:
Line 1
Press INTERCOM and dial 316
Line 2
Press INTERCOM and dial 317
Line 3
Press INTERCOM and dial 318
Line 4
Press INTERCOM and dial 319
Important
These instructions are for reference only. Do
not install the system without first reading
the Hardware Manual.
Basic Installation Layout
Default Features
Default Features for Lines
1.
All lines are loop start DTMF.
• Use 3101-01: Line Type to change this assignment.
2.
•
•
3.
To customize line ringing, use one of the following:
• User Programmable Features code #RAL. (See the User Programmable Features feature for more.)
• Use 2132-[01-64]: Line Ringing.
Lines 1-12 ring on line keys 1-12 for extensions 300-315. (Lines 13-64 do not appear on line keys.)
All other extensions are lamp only for lines 1-12.
Default Features for Extensions
1.
The circuit types for keyset extensions are automatically set when the extension is plugged in.
2.
Keyset users can place outside calls by:
• Pressing a line key and dialing the outside number. (See the Central Office Calls, Placing feature for more.)
• Pressing INTERCOM, dialing 9, then dialing the outside number. (See the Line Group Routing feature for more.)
• Line Dial-Up and Direct Line Access are disabled. (See the Central Office Calls, Placing feature for more.)
3.
All extensions have full incoming and outgoing access to all outside lines.
• See Initial Startup Programming below to change this assignment.
4.
By default, Feature Keys 1-12 are line keys. Keys 13-24 are undefined. See the Feature Keys feature for more.
Default Features for IntraMail
1.
Each extension has an IntraMail voice mailbox.
2.
All mailboxes are enabled. To disable a mailbox, see 2141-01: Station Mailbox Type.
3.
The IntraMail Automated Attendant does not answer outside calls. (See the Automated Attendant feature for more.)
Initial Startup Programming
1.
Enter the programming mode.
1. From any display telephone, press INTERCOM + Dial #*#* + Enter the system password + HOLD.
2. The system passwords are:
- 632379 (NECDSX) for Installer (level 3), 9999 for System Administrator 2 (level 2), 0000 for System
Administrator 1 (level 1).
2.
Assign the correct circuit type to each of your installed lines.
1. In 3101-01: Line Type, assign the line circuit type (e.g., enter 1 or press Feature Key 2 for loop start).
2. In 3103-03: DTMF Dialing, normally enter 1 (or press Feature Key 2) for DTMF dialing.
3.
By default, each extension has full incoming and outgoing access to each line. To change this assignment:
1. In 2131-[01-64]: Line Access, change each extension’s line access as required. The options are:
- 0 for no access, 1 for incoming access only, 2 for outgoing access only, 3 for full access
2. Using 902x-Copy may save you time.
4.
By default, extensions 300-315 ring immediately day and night for lines 1-12. To change this assignment:
1. In 2132-[01-64]: Line Ringing, set the ringing option for each extension, The options are:
- 0 for lamp only (no ringing) day and night, 1 for day and night ringing, 2 for night ringing only, 3 for delay
ringing day and night
2. Using 902x-Copy may save you time.
5.
To change the default system passwords:
1. Turn to the System Programming Password Protection feature for more about system passwords.
(1093068)
September 27, 2006, Rev 2
Printed in U.S.A.
Empowered by Innovation