1
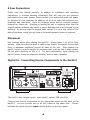
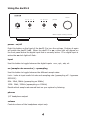
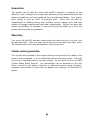
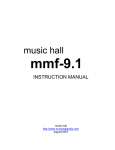
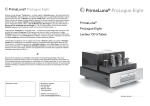
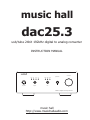
music hall
dac25.3
usb/tube 24bit 192kHz digital to analog converter
INSTRUCTION MANUAL
volume
coa- opt- usb
on/off
input
xlr
lock 96k 192k
phones
src
dac 25.3 digital to analog converter
music hall
http://www.musichallaudio.com
Congratulations on Your Purchase
You have selected a state of the art digital-to-analog converter (DAC). Each
component chosen for assembly and construction of the music hall dac25.3 was
selected to provide you with superior performance and the highest level of sound
reproduction available today. We know of no digital-to-analog converter that costs
as much to produce that sells for so little. Please take a few moments to read
over the instruction manual to ensure that you get the best performance from
your unit and years of trouble-free service.
Safety Guidelines
This product is designed and manufactured to strict quality and safety standards.
However, you should be aware of the following installation and operation
precautions:
1. Take heed of warnings and instructions
Read all the instructions before connecting or operating the unit.
Keep this manual so you can refer to these safety instructions. Heed all warnings
and safety information in these instructions and on the unit.
2. Water and Moisture
To reduce the risk of fire or electric shock, do not expose the unit to moisture or
water. If the unit is exposed to moisture, immediately disconnect the power cord
from the wall. Take the unit to an authorized music hall service center for
inspection. Do not touch the unit, power cord, or plug with wet hands.
3. Object or liquid entry
Do not allow foreign objects or liquids into the unit. If this happens, immediately
disconnect the power cord from the wall and take the unit to an authorized music
hall service center for inspection.
4. Ventilation
You must allow 2 inches (5 cm.) of unobstructed clearance around the unit. Do
not place the unit on a bed, sofa, rug, or similar surface that could block
ventilation from the bottom. Do not stack another component on top of the
amplifier. If the component is placed in a bookcase or cabinet, it must be
ventilated to allow proper cooling.
1
5. Heat
Keep the unit away from naked flames, radiators, heat registers, stoves, or any
other heat-producing appliances (including amplifiers).
6. Climate
The unit has been designed for use in moderate climates. Do not attempt to use
below 41 degrees Fahrenheit (5 degrees Celsius) or above 95 degrees Fahrenheit
(35 degrees Celsius).
7. Rack and Stands
Place the unit on a fixed, level surface strong enough to support its weight. Do
not place it on a moveable cart that could tip over. We recommend only using
stands approved for use with audio equipment.
8. Cleaning
Unplug the unit from the mains supply before cleaning. The case should normally
require only a wipe with a soft lint-free cloth.
9. Power Sources
Only connect the unit to a power supply of the type and voltage described in the
operating instructions or specified on the rear panel of the unit.
10. Power cord protection
Connect the unit to the power outlet only with the cord supplied. Do not modify
the supplied cable in any way. Do not attempt to defeat grounding and/or
polarization provisions. Do not use extension cords. Do not route the power cord
where it will be crushed, pinched, bent at severe angles, exposed to heat, or
damaged in any way.
11. Non-use periods
If the unit is to be left unused for a long period of time, the power cord should be
unplugged from the wall outlet.
2
12. Damage Requiring Service
Stop using the unit immediately and have it inspected by an authorized music hall
service center whenever:
1. The power supply cord or plug has been damaged.
2. Liquid has been spilled into the unit.
3. The unit has been exposed to rain.
4. The unit does not operate properly.
5. The unit has been dropped or damaged.
6. Smoke or any unusual smell is detected from the unit.
CAUTION: TO REDUCE THE RISK OF ELECTRIC SHOCK, DO NOT REMOVE
COVER. NO USER-SERVICEABLE PARTS INSIDE. REFER SERVICING TO
QUALIFIED SERVICE PERSONNEL.
Getting Started
Thank you for purchasing the music hall dac25.3. The dac25.3 is a tube digitalto-analog converter (DAC) designed for the music lover. We chose a select group
of technologically advanced components to create this sophisticated digital-toanalog converter. The dac25.3 can accept any coax (s/pdif), USB, XLR, or optical
digital input from one of music hall's compact disc players, a CD/DVD transport,
iPod transport, computer, media server, Sonos, Squeezebox, DVD in stereo, and
will output two channel stereo analog. When used with your computer or in a
top-end audio system, your music hall digital-to-analog converter will provide
years of listening enjoyment.
The dac25.3 features the latest Texas Instruments (formerly Burr-Brown) PCM
1796 24bit, 192kHz, advanced segment, stereo audio digital-to-analog converter.
This processor features 123dB dynamic range, an 8 x oversampling digital filter,
and just 0.0005% THD. The dac25.3 upsamples to either 96kHz or 192kHz; user
selectable on the front panel. To achieve the best sound, we use an advanced
asynchronous reclocking and anti-jitter control system upstream of the PCM1796
digital-to-analog converter. For this system, we are using the Philips 74HC574 in
conjunction with the Texas Instruments SRC4192 Asynchronous Sample Rate
Converter, whose master clock is a high precision active crystal oscillator. The
dac25.3 also features a large, high current oversize power supply and a tube
output for warm rich sound. A headphone output is provided for convenient
personal listening.
3
A Few Precautions
Please read this manual carefully. In addition to installation and operating
instructions, it provides valuable information that will help you get optimum
performance from your system. Please contact your authorized music hall dealer
for answers to your questions. In addition, all of us at music hall welcome your
questions and comments. Save the shipping carton and all enclosed packing
material for future use. Shipping or moving the unit in anything other than the
original packing material may result in severe damage that is not covered by the
warranty. Be sure to keep the original sales receipt. It is your best record of the
date of purchase, which you will need in the event warranty service is required.
Placement
Use common sense when placing the dac25.3. Always place it on a firm, level
surface. Make sure that the shelf or cabinet can support the weight. Ensure that
there is adequate ventilation around all sides of the unit. Avoid placing the
dac25.3 where it may be subject to excessive heat, such as near a heat register.
Do not place anything on top of it. For best performance, avoid placing the
dac25.3 where it may be subject to vibration, such as near a speaker.
Digital In - Connecting Source Components to the dac25.3
MODEL: dac 25.3
SERIAL NO.:
VOLTAGE SELECTOR
Designed and developed in the USA
~115V
AUDIO OUT
XLR
RCA
XLR
XLR
OPT-
USB
COA-
AC IN
R
T1AL/~250V
L
R
~230V
DIGITAL IN
L
The dac25.3 has 4 digital inputs: coax (s/pdif), optical, USB, and XLR.
Connect your source components to the appropriate inputs on the back of the
dac25.3. You can connect one or all four inputs at the same time. Choose
between the inputs using the input selector button on the front panel.
4
Special note: When using the USB input with your computer; the dac25.3 and
your computer should both be powered up. Your computer will recognize the new
hardware and self install the necessary drivers.
Connect the USB cable to the dac25.3 from your computer prior to launching your
audio player software: iTunes, Windows Media, Real Media, etc. If you haven't
followed this instruction, close your audio player software, then re-launch.
You will probably find that setting your audio player's and computer's volume to
max will sound best.
Apple Computer Users:
With both your computer and the dac25.3 powered on; connect the USB cable.
Go to System Preferences
Sound
Output
choose the USB Audio DAC for
output. Close System Preferences. Launch iTunes.
Audio Out
To avoid damage to the dac25.3, make sure it is NOT plugged into an AC outlet
while connecting up or disconnecting either of the audio outputs. The dac25.3
has two sets of fixed audio outputs on the back. One single ended set labeled
RCA: R and L. And one balanced set labeled XLR: R and L. Connect the RCA or
XLR audio outputs to the correct audio inputs on your integrated amplifier,
preamplifier, or receiver.
The phones (headphone) output on the front is variable.
Connecting to the Mains - Plugging In
Check that the Power Switch on the front of the dac25.3 is in the off position.
Look at the voltage selector slider on the back of the unit and confirm that it is
set for the correct voltage: (~115V USA/~230V Europe). Push the plug (IEC line
socket) of the power cable supplied with the dac25.3 into the socket AC IN on
back of the unit. Make sure it is pressed in firmly. Plug the other end of the
power cable into an AC wall outlet.
5
Using the dac25.3
volume
coa- opt- usb
on/off
input
xlr
lock 96k 192k
phones
src
dac 25.3 digital to analog converter
power - on/off
Push this button on the front of the dac25.3 to turn the unit on. Pushing it again
will switch the dac25.3 off. When the dac25.3 is on; a blue light will appear on
the front panel below the digital input that is currently active. If no digital input is
active the src lock light will flash.
input
Use this button to toggle between the digital inputs: coa-, opt-, usb, xlr.
src (sample rate converter) - upsampling
Use this button to toggle between the different sample rates:
Lock: locks at input audio bit rate and sampling rate (upsampling off - bypasses
SRC4192)
96k: 24bit, 96kHz (upsampling on 96kHz)
192K: 24bit, 192kHz (upsampling on 192kHz)
Decide which sample rate sounds best on your system by listening.
phones
1/4" headphone output.
volume
Controls volume of the headphone output only.
6
Troubleshooting
If no sound comes out of the system with the dac25.3 connected, there are
several areas to check. Either you are not getting an audio signal to your
preamplifier, or you don't have a good digital source feeding the dac25.3.
First, check to make sure your preamplifier, integrated amp, or receiver is
switched to the same input the dac25.3 is connected to. Test the connection and
the cables to make sure. Keeping the input selected and using the same cable,
connect this input to a known good source like a tuner or the analog output of a
CD player. If that works, then it is most likely not a connection problem between
the dac25.3 and the preamp, integrated amp, or receiver.
The next step is to check and see if the digital input is properly connected. Look
on the front panel of the dac25.3 to see if the lock light is illuminated. If it is not,
this is most likely the problem. Push the input selector and toggle through all the
inputs to see if one locks. If one does not lock, you either have a bad digital cable
or you aren't getting a good digital signal. Try replacing the digital cable on the
input you've selected. For instance, if you are using a coax connection try
replacing the coax cable with another coax cable. If this doesn't work, try
selecting a different input (optical for instance) and try using the CD player's
optical output with an optical cable instead.
If you are using a USB connection, it is necessary for the computer to recognize
the dac25.3 as a connected device. Check in the computer's control panel under
USB devices and see if the dac25.3 is recognized. If not, with both the dac25.3
and your computer powered up, remove the USB cable from the computer and
then re-insert it. Watch the computer monitor for an indication it has found the
hardware. Apple computers may not automatically recognize the dac25.3. Apple
users check your System Preferences as suggested above.
If the lock light is lit and you're not getting any output, plug in a set of
headphones and turn up the volume to hear if you're getting any output. If you
are getting output through the headphones and you've verified that your cable is
good and properly connected to the correct input on your preamp, integrated, or
receiver, it's possible the tube is not properly seated in the tube socket or it has
failed. If you are familiar with tubes and comfortable checking it, please do. If
not, call your dealer or music hall for guidance.
7
Technical Specifications
THD+N: ..................................................................... <0.04% Tube out (1KHz)
<0.0015% Balanced out (1KHz)
Output level: .............................................................................................. 2.0V
Frequency response: ......................................................... 2Hz~20KHz +/-0.2dB
SNR: .................................................................................................... >110dB
Power dissipation: ................................................................................... <30W
Dynamic range: ....................................................................... > 120dB (24 bit)
> 96dB (16bit)
Crosstalk: ............................................................................................ <-110dB
Operating temperature: ........................................................................ 0 ~ 40
USB input: ............................. supports 24-bit audio at sample rates up to 96kHz
All other inputs: ........................ accept 24-bit audio at sample rates up to 192kHz
Headphone output level: ........................................................................ 4V max
Headphone output resistance: ............................................................... 0.3 ohm
Power supply: .......................................................... AC115V/60Hz - 230V/50Hz
Ti PCM1796 24bit, 192kHz DAC
Philips 74HC574
Ti SRC4192 Asynchronous Sample Rate Converter w/high precision active crystal
oscillator master clock.
1 x 6922 Electro-Harmonix tube
Physical
Dimensions: ..................................................... W x D x H (8.5 x 13.5 x 3.75 in.)
Weight: ........................................................................................... 10 lbs. Pkg.
Supplied Accessories: ....................................................................... Mains Lead
USA - This product complies with FCC requirements.
8
Guarantee
This entitles you to have the music hall dac25.3 repaired or replaced, at our
discretion, free of charge for one year after purchase, at any authorized music hall
dealer, provided the unit was purchased from an authorized dealer. Your original
sales receipt is used as proof of purchase date. Music hall can take no
responsibility for defects arising from accident, misuse, abuse, wear and tear,
neglect or through unauthorized repair and or adjustment. Neither can music hall
accept responsibility for damage or loss occurring during transit to or from the
person claiming under the guarantee.
Warranty
Your music hall dac25.3 warranty covers parts and labor costs for one year from
the purchase date. After one year, you must pay for both parts and labor costs.
The warranty does not cover transportation costs at any time.
Claims under guarantee
The unit should be packed in the original packing and returned to the dealer from
whom it was purchased, or to an authorized music hall service center. It should
be sent by a reputable carrier, carriage prepaid. Do not send the unit via USPS
(United States Postal Service). No responsibility can be accepted for the unit
while in transit to the dealer, customer, or authorized service agent, therefore,
customers are advised to insure the unit against loss, damage, or theft while in
transit.
9
For further details contact Music Hall LLC:
108 Station Road
Great Neck, NY 11023
Tel: 516-487-3663
Fax: 516-773-3891
http://www.musichallaudio.com