1
1
Preface
Tablet PC
User’s Manual
Preface
Contents
Chapter 1: Preface
Content ............................................................................ 1-2
Regulations and Statements ......................................... 1-4
FCC-B Radio Frequency Interference Statement ....... 1-4
FCC Conditions ........................................................... 1-4
FCC ............................................................................. 1-5
IC ................................................................................. 1-5
CE Conformity ............................................................. 1-5
Battery Regulations ..................................................... 1-6
WEEE Statement ........................................................ 1-6
Safety Instructions ......................................................... 1-7
Trademarks ..................................................................... 1-9
Reversion History........................................................... 1-9
Chapter 2: Introductions
Manual Map ..................................................................... 2-2
Unpacking ....................................................................... 2-2
Product Overview ........................................................... 2-3
Top-Open View ............................................................ 2-3
Specification ................................................................... 2-6
Chapter 3: Getting Started
Power Management ....................................................... 3-2
AC Power .................................................................... 3-2
Connecting the AC Power ........................................... 3-2
Battery Power .............................................................. 3-3
Powering ON ............................................................... 3-4
Power Management in Windows OS .......................... 3-5
Basic Operations ............................................................ 3-7
Inserting a Micro-SD Card or SIM Card to Your Tablet
PC ............................................................................... 3-8
1-2
Knowing the Display Features..................................... 3-9
Using the Fingerprint Reader .................................... 3-11
Wireless Activation for Windows 8 ............................ 3-13
Connecting the External Devices ............................... 3-14
Peripheral Devices .................................................... 3-14
Wireless / Bluetooth / Camera Functions .................. 3-15
1-3
Preface
Regulations and Statements
FCC-B Radio Frequency Interference Statement
This equipment has been tested and found to comply with the limits for a Class B digital device,
pursuant to part 15 of the FCC rules. These limits are designed to provide reasonable
protection against harmful interference in a residential installation.
This equipment generates,
uses and radiates radio frequency energy, and, if not installed and used in accordance with the
instructions, may cause harmful interference to radio communications.
guarantee that interference will not occur in a particular installation.
However, there is no
If this equipment does
cause harmful interference to radio or television reception, which can be determined by turning
the equipment off and on, the user is encouraged to try to correct the interference by one or
more of the following measures:
Reorient or relocate the receiving antenna.
Increase the separation between the equipment and receiver.
Connect the equipment into an outlet on a circuit different from that to which the receiver
is connected.
Consult the dealer or an experienced radio TV technician for help.
NOTE
The changes or modifications not expressly approved by the party responsible for
compliance could void the user’s authority to operate the equipment.
Shield interface cables and AC power cord, if any, must be used in order to comply
with the emission limits.
FCC Conditions
This device complies with part 15 of the FCC Rules.
Operation is subject to the following two
conditions:
This device may not cause harmful interference.
This device must accept any interference received, including interference that may cause
undesired operation.
1-4
FCC
FCC RF Radiation Exposure Statement:
This equipment complies with FCC RF radiation exposure limits set forth for an uncontrolled
environment. This device was tested for typical lap held operations with the device contacted
directly to the human body to the back side of the notebook computer. To maintain compliance
with FCC RF exposure compliance requirements, avoid direct contact to the transmitting
antenna during transmitting SAR information 1.56 W/kg@1g (body).
IC
The product comply with the Canada portable RF exposure limit set forth for an uncontrolled
environment and are safe for intended operation as described in this manual. The further RF
exposure reduction can be achieved if the product can be kept as far as possible from the user
body or set the device to lower output power if such function is available.
SAR information: 1.56 W/kg@1g (body)
Industry Canada
This Class B digital apparatus complies with Canadian ICES-003. To reduce potential radio
interference to other users, the antenna type and its gain should be so chosen that the
equivalent isotropically radiated power (e.i.r.p.) is not more than that permitted for successful
communication. This device complies with Industry Canada licence-exempt RSS standard(s).
Operation is subject to the following two conditions: (1) This device may not cause interference,
and (2) This device must accept any interference, including interference that may cause
undesired operation of the device.
Cet appareil numerique de la classe B est conforme a la norme NMB-003 Canada.
Pour réduire le risque d'interférence aux autres utilisateurs, le type d'antenne et son gain
doivent être choisis de façon que la puissance isotrope rayonnée équivalente (PIRE) ne
dépasse pas ce qui est nécessaire pour une communication réussie.
Cet appareil est conforme aux normes d'exemption de licence RSS d'Industry Canada. Son
fonctionnement est soumis aux deux conditions suivantes : (1) cet appareil ne doit pas causer
d'interférence et (2) ce dispositive doit accepter toute interference reçue, y compris les
interférences qui peuvent causer un mauvais fonctionnement du dispositif.
CE Conformity
This device is in compliance with the essential safety requirements and other
relevant provisions set out in the European Directive.
1-5
Preface
Battery Regulations
European Union:
Batteries, battery packs, and accumulators should not be disposed of
as unsorted household waste. Please use the public collection system
to return, recycle, or treat them in compliance with the local
regulations.
Taiwan:
For better environmental protection, waste batteries should be
collected separately for recycling or special disposal.
California, USA: The button cell battery may contain perchlorate material and requires special
handling when recycled or disposed of in California.
For further information please visit: http://www.dtsc.ca.gov/hazardouswaste/perchlorate/
Safety Guideline for Using Lithium-ion Battery
Danger of explosion if battery is incorrectly replaced. Replace only with the same or
equivalent type recommended by the equipment manufacturer. Discard used batteries
according to manufacturer’s instructions.
WEEE Statement
Under the European Union ("EU") Directive on Waste Electrical and Electronic
Equipment, Directive 2002/96/EC, which takes effect on August 13, 2005,
products of "electrical and electronic equipment" cannot be discarded as
municipal waste anymore and manufacturers of covered electronic equipment
will be obligated to take back such products at the end of their useful life.
1-6
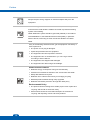
Safety Instructions
Read the safety instructions carefully and thoroughly.
All cautions and
warnings on the equipment or user’s manual should be noted.
Keep this equipment away from humidity and high temperature.
Lay this equipment on a stable surface before setting it up.
The openings on the enclosure are used for air convection and to
prevent the equipment from overheating.
Do not cover the openings.
Do not leave the equipment in an unconditioned environment with a
storage temperature above 60OC (140OF) or below 0OC (32OF),
which may damage the equipment.
This unit should be operated under maximum ambient temperature
of 40OC (120OF).
Make sure the power voltage is within safety range and has been
adjusted properly to the value of 100~240V before connecting the
equipment to the power outlet.
Always unplug the AC power cord before installing any add-on card
or module to the equipment.
Always disconnect the AC power cord or uninstall the battery pack
or switch off the wall socket if the equipment would be left unused
for a certain time to achieve zero energy consumption.
Never pour liquid into the opening that could damage the equipment or
cause an electrical shock.
Place the power cord in a way that people are unlikely to step on it.
Do
not place anything on top of the power cord.
1-7
Preface
Always keep the strong magnetic or electrical objects away from the
equipment.
When installing the coaxial cable to the TV Tuner, it is necessary to
ensure that the metal shield is reliable connected to protective earthing
system of the building.
Cable distribution system should be grounded (earthed) in accordance
with ANSI/NFPA 70, the National Electrical Code (NEC), in particular
Section 820.93, Grounding of Outer Conductive Shield of a Coaxial
Cable.
If any of the following situations arises, get the equipment checked by a
service personnel:
The power cord or plug is damaged.
Liquid has penetrated into the equipment.
The equipment has been exposed to moisture.
The equipment has not worked well or you can not get it work
according to User’s Manual.
The equipment was dropped and damaged.
The equipment has obvious signs of breakage.
Green Product Features
Reduced energy consumption during use and stand-by
Limited use of substances harmful to the environment and health
Easily dismantled and recycled
Reduced use of natural resources by encouraging recycling
Extended product lifetime through easy upgrades
Reduced solid waste production through take-back policy
Environmental Policy
The product has been designed to enable proper reuse of parts and
recycling and should not be thrown away
Users should contact the local authorized point of collection for
recycling and disposing of their end-of-life products.
1-8
Trademarks
All trademarks are the properties of their respective owners.
SRS Premium Sound, SRS and the symbol are trademarks of SRS Labs, Inc.
THX and THX TruStudio Pro are trademarks of THX Ltd. which may be registered in some
jurisdictions. All rights reserved.
Revision History
Version
Revision History
Date
1.0
First Released
01, 2014
1-9
2
Introductions
Introductions
Congratulations on becoming an user of this product, the finely designed Tablet PC.
This
brand-new exquisite Tablet PC will give you a delightful and professional experience in using it.
We are proud to tell our users that this product is thoroughly tested and certified by our
reputation for unsurpassed dependability and customer satisfaction.
Manual Map
This User’s Manual provides instructions and illustrations on how to operate this Tablet PC.
It
is recommended to read this manual carefully before using this Tablet PC.
Chapter 1, Preface: Provide users the basic safety information and caution that is relevant
when using this Tablet PC.
It is recommended to read these information or caution when using
this Tablet PC for the first time.
Chapter 2, Introductions: Include the descriptions of all the accessories of this Tablet PC.
It
is recommended to check out that if you have all the accessories included when you open the
packing box. If any of these accessories is damaged or missing, please contact the vendor
where you purchased this product. Also, this chapter provides the specification of this Tablet
PC , and introduces the function buttons, connectors, LED of this product.
Chapter 3, Getting Started: Provide the basic operation instructions when using this Tablet PC.
Unpacking
First, unpack the shipping carton and check all items carefully.
If any item contained is
damaged or missing, please contact your local dealer immediately.
packing materials in case you need to ship the unit in the future.
Also, keep the box and
The package should contain
the following items:
Tablet PC
Quick Start Manual
AC/DC adapter / Interchangeable Plug
Y Cable (Female USB Port and Power Jack)
USB Charging Cable
These accessories listed above may
change without notice.
2-2
Product Overview
This section provides the description of basic aspects of the Tablet PC. It will help you to know
more about the appearance of this device before using it. Please be aware that the Tablet PC
shown in this section may vary from the actual one that users purchased.
Top-open View
The figure of top-open view and description shown below will lead you to browse the main
operating area of this Tablet PC.
The figures show here are for reference only.
2-3
Introductions
1.
Front Camera
This built-in front camera can be used for picture taking, video recording or conferencing,
and any other interactive applications.
2.
Light Sensor
With Light Sensor function turned on, this Tablet PC is capable to adjust the display
brightness level higher or lower according to the surrounding light source.
Refer to Light
Sensor switch under [Settings/ Change PC Settings/ PC Settings/ General/ Screen] on
the desktop to check the function status.
3.
Camera LED
Camera LED indicator, next to the front camera, glows when webcam function is activated;
LED goes out when this function is turned off.
4.
Internal Microphone
This is the built-in microphone and its function is the same with microphone.
5.
Headphone Jack
Used for connecting the speakers or headphones.
6.
SIM Card Slot (optional)
Used for inserting or replacing SIM card to activate 3G/ LTE function.
* Please push the SIM card inward to eject it, do not force to remove it or the SIM card
slot will be damaged.
7.
Micro-SD Card Slot
Used for inserting or replacing micro-SD card to increase the storage capacity of the Tablet
PC.
8.
Reset Hole
If the Tablet PC cannot be turned off normally or no respond by pressing the power button
for 4 seconds, insert a straightened paperclip to the hole.
Note that in this case, AC power must be connected before restarting the Tablet PC.
9.
Windows Key
Tapping the Windows key can switch to the Metro APPs.
10. Touch Screen
Whenever the display is rotated, the touch screen will be rotated and expanded to fit the
display automatically.
* This function will be changed depends on the user’s settings.
11. Dock Connector
A dock connector is an expansion unit used to attach a mobile electronic device
simultaneously to multiple external resources.
* Does not support external HDD or ODD.
2-4
12. Power Button
Press this button to turn this product ON and OFF.
* i. Before powering on the Tablet PC for the very first time, you must connect it with
AC power.
ii. Press and hold the power button for 4 seconds can shut down the Tablet PC.
13. Speaker
Support high quality sound.
14. Volume Up
/ Volume Down
Button
Press the Volume Up or Volume Down button to adjust the sound volume.
15. Fingerprint Reader
This is the security protection device for the Tablet PC.
2-5
Introductions
Specification
The Specification may change without notice. The actual products sold may differ and depend
on areas.
Please check the detailed Specification with your local dealers.
Physical Characteristic
Dimension
307.9 (W) x 195.8 (D) x 9.9 (H) mm
Weight
688g
CPU
Processor Type
AMD® Dual Core Processor
Supported Processor
AMD® Temash
Memory
Technology
DDR3L 1066 MHz
Memory
2GB on board
Maximum
up to 2 GB
Power
AC/DC Adapter
18W, 12V
Input: 100~240V, 50~60Hz
Output: 12V
RTC Battery
1.5A
Yes
Storage (items listed here may very without notice)
SSD
mSATA 64 / 128GB (optional)
I/O Port
Headphone Jack
x1
Internal Microphone
x1
Fingerprint Reader
x1
Dock Connector (40 pin)
x1
SIM Card Slot
x 1 (optional)
Micro-SD Card Slot
x 1 (The supported memory cards may vary without
notice.)
2-6
Communication Port
Wireless LAN
Supported
Bluetooth
Supported
Display
LCD Type
11.6”, IPS display
Resolution
1366 x 768
Multi Touch
10-Point Touch Supported
Brightness
Brightness controlled by setting
Video
Graphics
UMA
Audio
Internal Speaker
2 speakers
Sound Volume
Adjust by volume button & SW
WebCam
Front Camera
720P (1280x720) pixels camera
Others
e-Compass
Supported
G-Sensor
Supported
Gyroscope
Supported
Light-Sensor
Supported
Vibration Motor
Supported
The actual function preinstalled in this product depends on the model you
purchased, and may vary without notice.
2-7
Introductions
2-8
3
Getting Started
Getting Started
Power Management
AC Power
It is strongly recommended to connect the AC/DC adapter to the Tablet PC and use the AC
power while using this Tablet PC for the first time. When the AC power is connected,
recharging the battery will start immediately.
Note that the AC/DC adapter included in the package is approved for your Tablet PC; using
other adapter model may damage either the Tablet PC or other devices attached to it.
Do not cover the AC/DC adapter since it may generate a certain heat while in use.
Always be
aware of heat coming from the AC/DC adapter in use.
Connecting the AC Power
1.
Take up the interchangeable plug and look for the groove on the interchangeable plug
which can be used for locking on the AC/DC adapter. Then align the groove of the
interchangeable plug on the tenon of the AC/DC adapter with correct orientation. Next,
rotate the interchangeable plug 90 degrees clockwise until it is fixed on the AC/DC adapter.
2.
Plug the Y cable in the Dock Connector of the Tablet PC.
3.
Please connect with the external device need in this step.
4.
Plug the DC plug of the AC/DC adapter in the power jack of the Y cable and then plug the
joined AC/DC adapter in the power outlet.
5.
When remove, please follow the steps 432.
Note: i. The interchangeable plug may vary depending on countries or regions.
ii. It is recommended that the source power current should be higher than or equals
to 1.5A when using USB charging cable.
iii. The Y cable does not support Hot-Plug.
3-2
Battery Power
This Tablet PC is equipped with a built-in high-capacity Lithium-ion Polymer battery pack. The
rechargeable Lithium-ion Polymer battery pack is an internal power source of the Tablet PC.
Be aware that this battery pack may be damaged if users try to disassemble the battery pack on
their own.
Also, please note that the limited warranty of the battery pack will be voided if the
battery pack is disassembled by non-authorized technicians.
Please follow your local laws and regulations to recycle the Tablet PC and the built-in battery
pack.
Conserving Battery Power
Efficient battery power is critical to maintain a normal operation. If the battery power is not
managed well, the saved data and customized settings may be lost.
To optimize battery life and avoid a sudden power loss, read the tips below:
Suspend system operation if the system will be idle for a while or shorten the suspend
time period.
Turn off the system if you won’t be using it for a period of time.
Disable unnecessary settings or remove idle peripherals.
Connect an AC/DC adapter to the system whenever possible.
Charging the Battery Pack
The built-in battery pack can be recharged when the Tablet PC is connected to the AC power.
Please pay attention to the following tips before recharging the battery:
You can use the system, suspend system operation or shut down and turn off the
system without interrupting the charging process.
The built-in battery pack uses Lithium-ion Polymer battery cells that have no “memory
effect.”
It is unnecessary to discharge the battery before recharging.
However, to
optimize the life of battery, we suggest that consuming the battery power completely
once a month is necessary.
The actual charging time will be determined by the applications in use.
3-3
Getting Started
Powering ON
Long press the Power Button to power on the Tablet PC.
3-4
Power Management in Windows OS
Power management of personal computers (PCs) and monitors has the potential to save
significant amounts of electricity as well as deliver environmental benefits. To be energy efficient,
turn off your display or set your Tablet PC to standby/hibernate mode after a period of user
inactivity.
Follow the instructions below to adjust the power management settings in Windows OS:
“Power Options” in Windows OS allows you to control the power management features of your
display, hard drive, and battery.
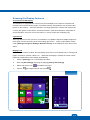
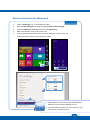
In Windows 8 Metro APPs screen, please select “Desktop” to return back to the desktop.
Slide your finger from the right edge of the desktop leftward will bring a list of functional
icons. Find the [Settings] icon on the desktop.
3-5
Getting Started
Tap [Settings] icon will get the following selection menu. Select Control
Panel in the menu.
Tap System and Security.
Tap Power Options.
3-6
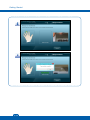
Then select a power plan that meets your personal needs.
The Power icon will present various and relative options as following:
You can wake up your computer from power saving mode by pressing the power
button.
3-7
Getting Started
Basic Operations
Inserting a Micro-SD Card or SIM Card to Your Tablet PC
You may purchase the Micro-SD card to increase the storage capacity of the Tablet PC, or SIM
card to activate 3G/ LTE function, please follow the steps below to insert or replace it:
1.
Please power off the Tablet PC before inserting or ejecting the SIM card.
2.
Locate the Micro-SD card and SIM card slot on the Tablet PC as shown.
3.
Dig the edge of the Micro-SD card and SIM card slot cover with your finger tip carefully.
4.
Insert or replace the Micro-SD card/ SIM card into the corresponding slot with correct
direction as shown. Then close the slot cover of the Tablet PC. (The figures of Micro-SD
card and SIM card here are for reference only)
3-8
Knowing the Display Features
Ten-point-touch IPS Display
This Tablet PC is equipped with a ten-point-touch IPS display which delivers consistent and
accurate color from all viewing angles, and makes viewing more pleasure with vivid and clear
picture on the screens.
Users are allowed to use finger gestures to interact with multi-media
content, play games, read e-books, access documents, create special effects, manipulate art
and photographs, and even surf on the internet, in a truly unique and compelling way.
Light Sensor
With Light Sensor function turned on, this Tablet PC is capable to adjust the display brightness
level higher or lower according to the surrounding light source.
Refer to Light Sensor switch
under [Settings/ Change PC Settings/ General/ Screen] on the desktop to check the function
status.
Display Lock
With a built-in G-sensor module, this IPS display gives users a more flexible way in viewing web
pages, documents, pictures, videos, etc. Whenever the display is rotated, the screen will be
rotated and expanded to fit the display automatically.
1.
Find the [Settings] icon on the desktop and tap it.
2.
Enter the [PC Settings] main page by tapping [Change PC Settings].
3.
Select this Screen icon
4.
Tap this
to enable this function.
icon again will lock the screen
.
3-9
Getting Started
3-10
Using the Fingerprint Reader
1.
2.
Find the [id] Validity FMA icon
on the desktop and tap it.
Enter the [Validity Fingerprint Manager] main page to set up Fingerprint Reader login
security.
3.
Select the finger you would like to enroll, then you can use it to log into Windows next
time.
4.
Swipe the selected finger on the sensor of the Fingerprint Reader. The Maximum is 8
swipes. You might be requested to ensure the fingerprint is correctly recorded a couple of
times.
5.
Fingerprint enrolled process is completed.
3-11
Getting Started
3-12
Wireless Activation for Windows 8
1.
Find the [Settings] icon on the desktop and tap it.
2.
Enter the [PC Settings] main page by tapping [Change PC Settings].
3.
Unfold the [Wireless devices] selections under [Wireless].
4.
Make sure Airplane mode is set to OFF here.
5.
Turn the WLAN or Bluetooth function on/off by sliding the function switch bar.
Refer to the Status LED to check the device status.
1. When Airplane mode is set to ON, the WLAN and
Bluetooth function will be disabled at once.
2. The information provided here is for reference only,
and may be vary without notice.
3-13
Getting Started
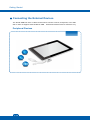
Connecting the External Devices
The female USB Port of the Y cable can be used to connect a mouse, a keyboard, or an USB
disk. It does not support external HDD or ODD.
Peripheral Devices
3-14
All devices listed here are for reference only.
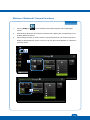
Wireless / Bluetooth/ Camera Functions
1.
Tap the [SCM] icon
on the desktop to bring SCM (System Control Manager)
screen.
2.
Find Wireless, Bluetooth and Camera in SCM screen, tapping the corresponding icon to
enable/ disable the device.
3.
After enabling wireless or camera function, tap the windows key can switch the present
display to Windows8 main screen. Then you can use the Internet Explorer or camera for
your own desire.
3-15
Getting Started
3-16