1
Modelo: BSA-1520
Micro-Sistema HI-FI con Lector CD/MP3
/Radio AM /FM ST/Cassette Grabador
MICRO HI-FI SYSTEM WITH
CD/MP3 PLAYER STEREO RADIO
CASSETTE RECORDER
MANUAL DE INSTRUCCIONES
INSTRUCTION MANUAL
190105
AVISOS:
•
•
•
•
•
•
•
•
•
•
•
•
•
•
Conserve estas instrucciones de seguridad para futuras consultas.
Use solo pilas ALCALINAS para evitar pérdida de ácido, que dañaría la unidad.
Para prevenir el riesgo de descargas eléctricas, no exponga esta unidad a lluvia ó humedad.
Evite el contacto de la unidad con cualquier tipo de líquidos.
Evite situar la unidad en los siguientes emplazamientos: Sobre equipos de audio que emitan
mucho calor, frente a estufas etc. En lugares sujetos a vibración.
Evite que la radiación solar alcance directamente a la unidad por largos periodos de tiempo.
Almacene sus cintas ó CD en lugares frescos y secos, no expuestos a la radiación solar.
Considere normal un ligero calentamiento de la unidad después de un largo tiempo de
funcionamiento.
Esta unidad incluye un Micro-Procesador el cual puede ser afectado por descargas
electrostáticas. Si Observa un mal funcionamiento de los controles ó del display, desconecte la
unidad de la alimentación, y reconecte después de unos segundos.
Si usted deja la unidad durante largos periodos desconéctela de la toma de red.
Ante cualquier duda sobre seguridad u operativa de esta unidad deberá ser aconsejado por
personal cualificado del proveedor.
No continúe usando esta unidad si usted tiene dudas sobre su uso normal, o si nota que esta
dañada.
No sitúe objetos que contengan agua (vasos, floreros,...) sobre la unidad, puede causar daños
irreparables si el agua se introduce en la unidad a través de cualquier ranura.
No obstruya las ranuras de ventilación de esta unidad, obstruir estos conductos de ventilación
puede causar sobre calentamiento de la unidad y acortará la vida de la unidad.
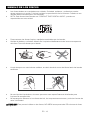
El sistema de lectura de CD emplea un haz láser de baja potencia. No
obstante puede dañar la vista si éste incide directamente sobre los ojos.
El sistema incluye dispositivo de protección para evitar el funcionamiento
del láser con la tapa abierta.
No intente desmontar el mecanismo. La intervención en el interior de la
unidad debe realizarse por personal cualificado.
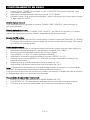
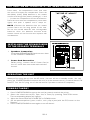
INVISIBLE RADIACION LASER EN EL INTERIOR
PRODUCTO LASER CLASE - 1
CLASS-1 LASER PRODUCT
ATENCION/ CAUTION
RIESGO DE DESCARGA
ELECTRICA, NO ABRIR
IMPORTANTE
PARA REDUCIR EL RIESGO DE DESCARGAS ELÉCTRICAS, NO ABRIR LA UNIDAD.
NO ES NECESARIO INTERVENCION ALGUNA POR PARTE DEL USUARIO EN EL INTERIOR DE
LA UNIDAD. LA INTERVENCION DEBE SER REALIZADA POR PERSONAL CUALIFICADO.
WARNING:
TO REDUCE THE RISK OF ELECTRIC SHOCK, DO NOT REMOVE COVER ( OR BACK ). NO
USER-SERVICE-ABLE PARTS INSIDE, REFER SERVICING TO QUALIFIED SERVICE
PERSONNEL.
ES - 1
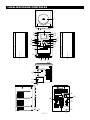
LOCALIZACION DE CONTROLES
2
3
4
5
6
29
28
7
8
9
10
11
12
27
26 25
24
23
22
13
14
16 18 20
17 19 21
1
1
30
31
32
35
34
36
33
15
ES - 2
37
32
38
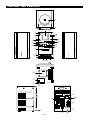
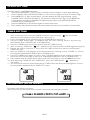
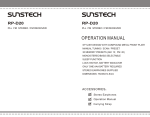
CARACTERISTICAS Y CONTROLES
1.
2.
3.
4.
5.
6.
ALTAVOCES.
PUERTA DE CD
APERTURA Y CIERRE DE CD
LCD DISPLAY
ENCENDIDO/APAGADO/STANDBY BUTTON
ENCENDIDO/APAGADO/STANDBY
INDICADOR
7. FIND/ESP(ACTIVACION ANTI-SHOCK 40 SEG.).
8. SENSOR DE INFRAROJOS
9. BOTON UP/Busqueda de presintonias hacia arriba.
10. BOTON TIMER(Apagado y encendido Temporizado)
11. MEMORIA/CLK.ADJ BOTON(Memoriza emisoras).
12. BOTON DOWN/Busq. de presintonias hacia abajo.
13. PUERTA DE CASSETTE
14. AURICULAR
15. PUERTA DE CASSETTE
16 BOTON REC/RABACION DE CASSETTE.
17. BOTON PLAY(CASSETTE).
18. BOTON DE RETROCESO DE CASSETTE.
19. BOTON DE AVANCE DE CASSETTE .
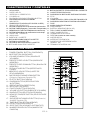
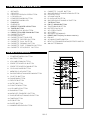
MANDO A DISTANCIA
1. POWER/STANDBY BUTTON ( ENCENDIDO)
2. MUTE BUTTON (SILENCIADO)
3. VOLUME DOWN BUTTON ( BAJADA DE
VOLUMEN)
4. PRESET/FOLDER UP BUTTON (SUBIDA DE
MEMORIA)
5. PRESET/FOLDER DOWN BUTTON ( BAJADA DE
MEMORIA)
6. CD PLAY/PAUSE BUTTON (REPRODUCIR,
PAUSA)
7. MEMORY/C-ADJ BUTTON (AJUSTE DE
RELOJ/MEMORIA)
8. SKIP/SEARCH/TUNING DOWN BUTTON
(Sintonía / Retroceso Canción CD)
9. CD STOP BUTTON (PARADA)
10. RANDOM BUTTON (REPRODUCCION
ALEATORIA)
11. REPEAT BUTTON (REPETICION)
12. INTRO BUTTON (INTRO)
13. FUNCTION BUTTON (FUNCION)
14. VOLUME UP BUTTON (SUBIDA DE VOLUMEN)
15. BAND BUTTON (SELECCION DE BANDA)
16. MONO/ST./FIND/ESP BUTTON (SELECCION DE
SONIDO)
17. SKIP/SEARCH/TUNING UP BUTTON (Sintonía /
AVANCE Canción CD)
18. TIMER BUTTON (BOTON HORARIO)
19. EQ BUTTON (EQUALIZADOR)
20. SLEEP BUTTON (APAGADO AUTOMATICO)
21. NUMBER SEARCH BUTTON (NUMERO DE
CANCION)
ES - 3
20. BOTON CASSETTE STOP/APERTURA CASSETTE.
21. CASSETTE BOTON PAUSA.
22. SKIP/SEARCH/ BOTON DE SINTONIA EN RADIO
23. STOP
24. VOLUMEN
25. CONMUTADOR A CD/PLAY/PAUSE EN MODO CD
26. SKIP/SEARCH/BOTON DE SINTONIA EN RADIO
27. TAPE
28. MODO RADIO/FM ST/MONO.
29. RADIO/BANDA
30. BATERIA MEMORIAS (BACK-UP)
31. TAPA CABLE ALIMENTACION
32. CABLE ALIMENTACION
33. TERMINALES DE ALTAVOZ
34. RESET(No incluido en este modelo)
35. ANTENA DE FM
36. INTERRUPTOR PRINCIPAL
37. SUPRESOR DE INTERFERENCIA EN
GRABAC. AM
38. TERMINAL DE ANTENA AM
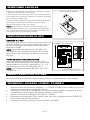
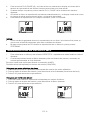
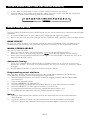
INSERTANDO LAS PILAS
Presione en ambos lados de la flecha marcada en la tapa
y deslice hacia abajo la misma hacia.
Inserte dos pilas alcalinas tipo UM3, AAA, R6, respetando
la polaridad de las mismas. Observe los dibujos marcados
en el fondo del alojamiento.
Cierre de Nuevo la tapa de pilas presionando ligeramente
hacia abajo. Cuando observe que el mando pierde
alcance, cambie las pilas por nuevas.
NOTA: reemplace las dos pilas al mismo tiempo. No
mezcle pilas de distinto tipo, ni tampoco pilas agotadas
con pilas nuevas. Retire las pilas cuando el mando no va
a ser usado por largo periodo de tiempo.
** PILAS NO INCLUIDAS **
PREPARACION PARA EL USO
CONEXIÓN A LA RED
Conecte el cable de red en la toma de corriente alterna de
220V de su hogar ( Confirme que el voltaje de la toma es
de 220V). Actúe sobre el pulsador de encendido para
alimentar la unidad.
NOTA: Inserte dos pilas alcalinas de 1,5V UM3, AA ó
equivalentes en el compartimiento inferior de la unidad,
para mantener las memorias en el caso de un corte de
corriente.
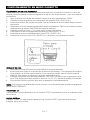
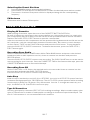
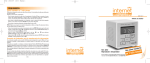
FORMA DE CONECTAR LOS ALTAVOCES
Inserte los cables de altavoces dentro de los CLIPS
dispuestos a este efecto en la parte trasera de la unidad.
Altavoz derecho en los CLIPS marcados con “ R “, Y el
altavoz izquierdo en los CLIPS marcados con “ L “.
NOTA: Sitúe el cable con banda “BLANCA” en el CLIP
marcado con “ + “.
INTERRUPTOR PRINCIPAL
CABLE ALIMENTACION
MANEJO BASICO DEL SISTEMA
Una vez conectado el cable de red a la toma de corriente, la unidad estará en modo “standby”,
ENCENDIDO / APAGADO ( POWER / STANDBY)
1.
2.
3.
4.
5.
Presione el botón de encendido / apagado ( 1 ) ( POWER /STANDBY) de la unidad ó del mando
a distancia para encender ó apagar el sistema.
Seleccione la fuente de sonido deseada, CD, Radio ó Cassette (Tape), presionando el control
correspondiente de la unidad ó del mando a distancia ( FUNCTION).
Ajuste el volumen al nivel deseado (VOLUME UP / DOWN).
Seleccione el tono deseado ( Pass, Classic, Rock, Pop, Jazz ) mediante el control PRESET EQ
de la unidad ó del mando a distancia.
Para apagar la unidad, presione de nuevo el botón de POWER.
ES - 4
AJUSTE DE LA HORA DEL RELOJ
1.
2.
3.
4.
5.
6.
Apague la unidad mediante el botón de POWER /STANDBY.
Pulse y mantenga presionado el control MEMORY/C.ADJ hasta que en el display parpadee la
indicación 24H ó 12H.
Seleccione el modo deseado de presentación de la hora de 12H ó 24H, mediante los controles
de sintonía TUNING.
Pulse de nuevo el control MEMORY/C.ADJ. Los dígitos de las horas parpadean. Pulse los
controles de sintonía TUNING para ajustar las horas.
Pulse de nuevo el control MEMORY/C.ADJ. Los dígitos de los minutos parpadean. Pulse los
controles de sintonía TUNING para ajustar los minutos.
Pulse de nuevo el control MEMORY/C.ADJ para salir del modo de ajuste.
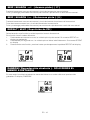
TEMPORIZADOR DE ENCENDIDO (Despertador) “TIMER”
Con la unidad apagada:
1.
Después de ajustar la hora del reloj, presione el control TIMER ( Del mando a distancia) hasta
que en el display se muestre “TIMER” parpadeando y la hora del temporizador.
2.
Presione y mantenga presionado por más de 3 segundos el control MEMORY/C.ADJ. Los
dígitos de las horas parpadean. Ajuste las horas mediante los controles de sintonía TUNING.
3.
Pulse de nuevo el control MEMORY/C.ADJ. Los dígitos de los minutos parpadean. Pulse los
controles de sintonía TUNING para ajustar los minutos.
4.
Presione MEMORY/C.ADJ una vez más para aceptar los cambios.
5.
Al alcanzar el reloj la hora prefijada, el sistema se encenderá automáticamente en el modo en
el cual se apagó (Radio, CD ó Cassette). TIMER parpadeará en el display.
6.
Una hora más tarde, la unidad se apagará automáticamente.
PARA SELECCIONAR LA FUNCION SLEEP ( Apagado automático)
Si usted desea dormirse con música sin preocuparse de apagar la unidad, esta función le será muy
útil.
1.
Pulse el control SLEEP en el mando a distancia de forma repetida.
2.
Usted puede ajustar el tiempo de apagado de la unidad entre 90 y 10 minutos, en pasos de 10
minutos.
El display le mostrará “SLEEP” parpadeando. Para desactivar esta función, pulse de nuevo
este control cuando la palabra “SLEEP” dejó de parpadear.
ES - 5
FUNCIONAMIENTO EN RADIO
1.
2.
3.
Pulse el control “ TUNER” de la unidad, ó el de “FUNCTION” del mando a distancia, para
seleccionar el modo Radio.
Seleccione la banda deseada mediante el control “STOP / BAND”
Extienda el cable de la antena completamente y ajuste la dirección del mismo hasta conseguir
la mejor recepción en FM.
Sintonía manual I<< >>I
Pulse repetidamente los controles de sintonía “TUNING / SKIP / SEARCH “ hasta conseguir la
frecuencia deseada.
Sintonía automática I<< >>I
Pulse los controles de sintonía “TUNING / SKIP / SEARCH “ por más de un segundo, y la unidad
localizará la siguiente ó la anterior estación, dependiendo del control pulsado.
Selector de FM estéreo
1.
Para recibir una emisión de FM en modo estéreo, presione el botón de FM MODE( ST / MONO).
El indicador de estéreo se iluminará cuando una emisora estéreo sea sintonizada. Este control
no es activo en la banda de AM.
Memorizando emisoras
Para almacenar una emisora en una determinada posición de memoria, siga los pasos siguientes:
1.
Seleccione la banda deseada FM ó AM mediante el selector STO / BAND.
2.
Sintonice la emisora deseada mediante los controle TUNING.
3.
Pulse MEMORY / C. ADJ ( En display parpadea “MEMORY”).
4.
Seleccione el número de memoria mediante el control “REPEAT / M. UP)
5.
Pulse de nuevo el control MEMORY / C. ADJ para confirmar la selección y la estación ha
quedado memorizada.
6.
Para almacenar el resto de estaciones, repita los pasos de 1 a 5.
7.
Para cambiar una emisora memorizada, repita los pasos del 2 al 5.
Nota: Si almacenamos una emisora en una determinada posición de memoria, la nueva estación
sustituye a la anteriormente memorizada en dicha posición de memoria.
Si se interrumpe el suministro de corriente a la unidad y no tenemos insertadas las pilas de memoria
en el alojamiento inferior, las memorias serán borradas.
Recuperación de una emisora memorizada
1.
Pulse STOP / BAND para seleccionar la banda deseada AM / FM.
2.
Pulse REPEAT / M. UP repetidamente hasta alcanzar el número de la memoria deseada.
3.
El número de la memoria seleccionada y la frecuencia es mostrado en el display.
ES - 6
FUNCIONAMIENTO EN MODO CASSETTE
Reproducción de una cinta de cassette
Compruebe que la cinta está convenientemente tensada en el interior de su estuche, si no es así,
tense la misma insertando un lápiz ó bolígrafo en el eje de uno de los carretes, y gire en el sentido
conveniente.
1.
Abrir la tapa de los mandos del cassette tirando de la zona marcada con “OPEN”.
2.
Presione la tecla de apertura de la compuerta del cassette STOP / EJECT( 20 ).
3.
Inserte una cinta en los carriles de la tapa, con las ventanas de la cinta hacia abajo y cierre la
compuerta.
4.
Seleccione la función cassette pulsando el control marcado con TAPE en la unidad ó pulsado
repetidamente el control FUNCTION del mando a distancia.
5.
Presione la tecla de PLAY > ( 17 ) para iniciar la lectura de la cinta.
6.
Para detener la lectura temporalmente presione la tecla PAUSA II ( 21 ).
7.
Para detener la lectura definitivamente, pulse STOP / EJECT ( 20 ).
8.
Para extraer la cinta, pulse STOP / EJECT ( 20 ) de nuevo, y la compuerta se abrirá.
Grabación de cinta
1.
Seleccione el modo CD ó bien el modo RADIO en la banda deseada.
2.
Inserte una cinta virgen en la unidad con la abertura hacia abajo. ( Compruebe que el seguro
de grabación de la cinta no está partido. Si se encuentra partido, tape el hueco mediante
adhesivo. Este seguro se localiza en el borde trasero de la cinta ).
3.
Presione suavemente esta tecla de grabación "RECORD" (16) para iniciar la grabación de la
cinta. Esta acción hará bajar también la tecla de " PLAY" (17), quedando ambas presionadas.
4.
El control de PAUSA le permite interrumpir la grabación momentáneamente.
NOTA: Si el seguro de grabación de la cinta no existe, no será posible bajar el botón de grabación.
NO INTENTE FORZARLO.
Rebobinado <<
Presione REW << para rebobinar la cinta. Presione "STOP" para detener la cinta en cualquier punto
de la misma.
Avance rápido >>
Presione F.FWD >> para avanzar rápido la cinta. Presione "STOP" para detener la cinta en
cualquier punto de la misma.
ES - 7
Auto Stop
Cuando la cinta llega al final de la reproducción , las teclas de PLAY / RECORD saltarán
automáticamente. Esta función no es activa en los modos de Rebobinado y Avance rápido.
BEAT CUT (37)( Supresor de interferencia de AM en grabación)
Si durante la grabación en la banda de AM, aparece una oscilación, cambie la posición de este
conmutador a la posición opuesta.
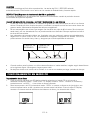
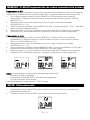
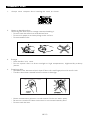
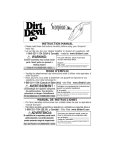
MANTENIMIENTO DEL CABEZAL LECTOR Y CUIDADOS DE LAS CINTAS
Cuide sus cintas para mantener su calidad de grabación. No permita que les dé la luz directa
del sol. Guardar en sitios limpios de polvo y suciedad, no toque la cinta con las manos llenas de
grasa o aceite. Mantenerlas alejadas de campos magnéticos.
•
No es aconsejable usar cintas que tengan una duración de más de 60 minutos (30 minutos por
cada cara), por ser demasiado fina, se puede enrollar con facilidad. Siempre expulse la cinta al
terminar de escucharla.
•
Los cabezales del cassette deben ser limpiados una vez cada seis meses aproximadamente,
hágalo con un paño suave ó con un bastoncillo de algodón empapado en alcohol. Esto sirve
para mantener un sonido rico y claro, y asegura que no exista pérdida de volumen.
•
CABEZAL DE
BORRADO
•
•
CABEZAL DE
BORRADO
RODILLO
Cuando realice esta limpieza, no utilice destornilladores ni nada metálico, hágalo según describimos
en la siguiente figura. No engrase ninguna parte móvil.
No deje las cintas en el interior de la unidad, si no van a ser usadas por largo periodo de tiempo.
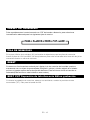
FUNCIONAMIENTO EN MODO CD
Reproducción de un disco
1.
Pulse el control marcado con CD de la unidad ó seleccione el modo CD en el mando a
distancia mediante el botón “ FUNCTION “. El display muestra " 00 00 " durante un momento y
posteriormente " no DISC " , si no existe un disco insertado.
2.
Abra la compuerta del CD pulsando el botón “OPEN “ e Inserte un disco en el eje de giro, con
la cara impresa hacia arriba y presione en la zona central del disco. Cierre la tapa. El display
muestra el número total de canciones incluidas en el disco, y la duración del mismo.
ES - 8
3.
4.
5.
6.
Pulse el control PLAY/PAUSE (6) y se inicia la lectura, mostrando el display el número de la
canción en reproducción así como el tiempo transcurrido en la pista actual.
Si desea realizar una pausa, pulse el control PLAY / PAUSE de la unidad ó del mando a
distancia.
Al finalizar el disco, la reproducción se detiene automáticamente, y el display muestra de nuevo
el número de pistas que contiene el disco y la duración del mismo.
Para detener la reproducción en cualquier momento, pulse STOP/BAND.
NOTAS:
•
Si esta unidad es golpeada durante la reproducción de un disco, la música sufrirá cortes ya
que es una unidad de sobremesa, pero esto no dañará sus discos.
•
No abra la compuerta del CD durante la reproducción de un disco sin pulsar primero
STOP/BAND.
REPRODUCCION DE UN DISCO MP3
1.
Para seleccionar un álbum pulse el botón PRESET/FOL, repetidamente hasta localizar el álbum
deseado.
2.
Cuando haya seleccionado el álbum deseado pulse los botones de avance o retroceso de
canción para acceder al titulo deseado.
Este es el modo más rapido para buscar una canción de MP3.
También existe la búsqueda por nombre del archivo (CANCIÓN)
Búsqueda por orden alfabético del disco.
1. Pulse una vez FIND/ESP, aparecerá la búsqueda de canción por orden alfabético
2. Pulse el botón de avance de canción, para seleccionar la letra deseada (incremento de letra)
3. Pulse PLAY para comenzar la reproducción.
Búsqueda por nombre del álbum:
1. Pulse dos veces FIND/ESP aparecerá la búsqueda por nombre de álbum.
2. Pulse el botón de avance de canción, para seleccionar el álbum deseado.
3. Pulse PLAY para comenzar la reproducción.
ES - 9
SKIP / SEARCH >>I ( Avance pista ) ( 17 )
Presione brevemente una vez este control y la unidad avanzará al tema siguiente.
Pulse y mantenga presionado este control para avanzar rápidamente a través del tema actual.
SKIP / SEARCH I<< ( Retroceso pista ) ( 8 )
Presione brevemente una vez este control y la unidad retorna al comienzo del tema actual.
Pulse dos veces consecutivas y la unidad cambiará al tema anterior.
Pulse y mantenga presionado este control para retroceder rápidamente a través del tema actual.
REPEAT / M.UP ( Repetición de CD )
Seleccionando esta función la unidad repetirá el tema ó disco actual.
Esta función tiene 2 modos diferentes.
1.
Presionando este control una vez, la unidad repite la pista actual. Se muestra REPEAT en
display parpadeando.
2.
Presionando por segunda vez, .la unidad repite el disco indefinidamente. Se muestra REPEAT
en display
3.
Para cancelar esta función, presione hasta que desaparezca la palabra REPEAT del display.
RANDOM ( Reproducción aleatoria ). SOLO DESDE EL
MANDO A DISTANCIA
En este modo la unidad reproduce los temas del disco en un orden distinto al que han sido
grabados. En display "RANDOM".
ES - 10
MEMORY /C.ADJ(Programación de orden reproducción pistas)
Programación en CD
Esta función le permite programar el orden en el que serán reproducidas las pistas del CD hasta un
máximo de 20. ( Posible solo con el disco parado, STOP y teniendo seleccionada la función CD)
1.
Con el disco parado, presione el control MEMORY /C.ADJ para entrar en el modo de
programación. El display muestra el número de pista y el de memoria ( Ejemplo: Pista 03;
Memoria P-01).
2.
Seleccione la pista que será reproducida en primer lugar, mediante los controles
SKIP/SEARCH >>I I<<.
3.
Valide la selección mediante el botón MEMORY/C.ADJ. El display cambia a " P-02 ", indicando
que la segunda selección está lista.
4.
Repita los pasos 1, 2 y 3 para memorizar el resto de temas del CD.( Máximo 20 memorias).
5.
Presione PLAY/ PAUSE para comenzar a reproducir los temas en el orden programado.
Programación en mp3:
1.
Con el disco parado, presione el control MEMORY /C.ADJ para entrar en el modo de
programación. El display muestra el número de álbum de pista y el de memoria ( Ejemplo:
álbum 01; Pista 03; Memoria P-01).
2.
Seleccione el álbum que será reproducida en primer lugar, mediante los controles
SKIP/SEARCH >>I I<<.
3.
Valide la selección mediante el botón MEMORY/C.ADJ. Pulse otra vez MEMORY /C.ADJ para
seleccionar la pista deseada, y pulse MEMORY/C.ADJ para validar.
4.
Repita los pasos 1, 2 y 3 para memorizar el resto de temas del CD.( Máximo 20 memorias).
5.
Presione PLAY/ PAUSE para comenzar a reproducir los temas en el orden programado.
NOTA: La programación será borrada en las siguientes condiciones:
Cuando la unidad es apagada.
Presionando el botón de STOP 4, en modo de programación.
Cuando la tapa del CD es abierta.
Cuando cambiamos a modo Cassette " TAPE " ó Radio.
MUTE Silenciamiento
1.
2.
Presionando el control de MUTE (2) de la unidad ó del mando a distancia, la unidad será
silenciada temporalmente.
Presione de nuevo el control MUTE para reiniciar la escucha de la música.
ES - 11
PRESET EQ Ecualizador
Pulse repetidamente el control marcado con EQ” del mando a distancia, para seleccionar
la ecualización adecuada para los siguientes tipos de musica:
PILA DE MEMORIAS
En la parte inferior de la unidad ( 26 ) se localiza el alojamiento para las pilas de memorias.
Inserte 3 pilas de 1,5V tipo UM-3, AA ó equivalentes para evitar el borrado de la hora del reloj ó las
memorias durante un corte de corriente.
RESET
Si observa un funcionamiento anómalo del display ó de los controles de la unidad, presione
suavemente con un objeto de punta afilada ( Bolígrafo ó similar ) el botón alojado en el taladro
próximo a la parte superior de las clavijas de altavoces. Esta función es similar al reset de un
ordenador(Esta funcion no esta incluida en esta version).
BEAT CUT Supresión de interferencia AM en grabación
Si durante la grabación de una cinta, observa una oscilación, cambie la posición de este
conmutador ( 37 ). Solo para la banda de AM.
ES - 12
MANEJO DE LOS DISCOS
•
•
Los discos deben ser manejados con cuidado. Suciedad, arañazos, y adhesivos pueden
causar cortes en el sonido, ó incluso impiden la reproducción de los mismos. Cuando no son
usados deben mantenerse en sus estuches.
NOTA: Solo discos identificados con "COMPACT DISC DIGITAL AUDIO", pueden ser
reproducidos en esta unidad.
•
•
Para mantener los discos limpios, manéjelos tomándolos por los bordes.
Huellas de dedos y suciedad, debería ser limpiada cuidadosamente de la cara transparente
del disco. Tome los discos por el borde.
•
Limpie siempre con movimientos radiales, es decir desde el centro del disco hacia los bordes
exteriores.
DESDE EL CENTRO HACIA LA PERIFERIA
CORRECTO
•
•
INCORRECTO
No use líquidos limpiadores, al menos que estos sean específicamente diseñados para
limpieza de compact disc.
No exponga los discos a la luz directa del sol, ó a temperaturas extremas y evite las fuentes de
calor ó humedad.
¡¡ATENCION!! Para prevenir daños en los discos, NO ABRA la compuerta del CD mientras el disco
está girando.
ES - 13
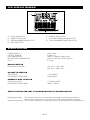
LCD DISPLAY
A.
B.
C.
D.
INDICADOR DE BUSQUEDA
INDICADOR DE TIEMPO
INDICADOR DE NUMERO DEÁLBUM
INDICADOR DE ESP
E. STEREO INDICADOR
F. VOLUMEN
G. INDICADOR DE NUMERO DE CANCION
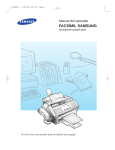
Especificaciones
SECCION RADIO
Rango de frecuencias en FM
Rango de Frecuencias en AM
: 87,5 - 108 Mhz
: 522 - 1620 Khz
SECCION CASSETTE
Sistema de pistas
Velocidad cinta
Respuesta de frecuencia
: Cassette Compacto Estéreo
: 4,75 cm seg.
: 125 - 8000Hz
SECCION CD
Respuesta de frecuencia
Frecuencia de muestreo
Lector CD
: 100 Hz - 16 Khz
: 44.1 Khz
: Tres Haces Láser
GENERAL
Potencia Máx. de salida
Potencia de Salida RMS
Peso
Dimensiones unidad principal
Dimensiones Altavoces
: 12 W + 12 W ( Musical )
: 5 + 5 W RMS
: Aprox.5,49 kgr.
: 160 x 192 x 262mm.
: 133 x 195 x 295,5 mm
ALIMENTACION
Corriente Alterna
: 220 Voltios/ 50 Hz.
Estas especificaciones están sujetas a cambios sin previo aviso.
ES - 14
To achieve the utmost in enjoyment and performance, please read this manual carefully before
attempting to operate the unit in order to became familiar with its features, and assure you years of
faithful, trouble free performance and listening pleasure.
*
*
*
*
*
Important Notes
Keep instructions the safety and operating instructions should be retained for future reference.
Avoid installing the unit in locations described below:
Places exposed to direct sunlight or close to heat radiating appliances such as electric heaters.
On top of other stereo equipment that radiate too much heat.
Places lacking ventilation or dusty places.
Places subject to constant vibration.
Humid or moist places.
Make sure not to obstruct the ventilation openings.
Operate turning controls and switches as instructed in the manual.
Before turning on the power for the first time, make certain the power cord is properly installed.
Store your tapes or CD in a cool area to avoid damage from heat.
For safety reasons, do not remove any covers or attempt to gain access to the inside of the product.
Refer any servicing to qualified personnel.
Do not attempt to remove any screws, or open the casing of the unit; there are no user serviceable
parts inside, refer all servicing to qualified service personnel.
CAUTION : TO REDUCE THE RISK OF ELECTRIC SHOCK DO NOT REMOVE COVER ( OR BACK ) ,
NO USER SERVICEABLE PARTS INSIDE, REFER SERVICING TO QUALIFIED SERVICE
PERSONNEL.
DANGEROUS VOLTAGE
Conductor dangerous voltage, that may be of sufficient magnitude to constitute a risk
of electric shock to persons is present within this products enclosure.
ATTENTION
The owners manual contains important operating and maintenance instructions, for
your safety, it is necessary to refer to the manual.
WARNING : TO PREVENT FIRE OR SHOCK HAZARD, DO NOT EXPOSE THIS APPLIANCE TO
DRIPPING OR SPLASHING.
Note:
This unit will become warm when used for a long period of time. This is normal and does not indicate
a problem with the unit.
The CD player includes micro-processors which may malfunction as a result of external electrical
interference or noise. If the CD player is not working properly, disconnect the power source and
then reconnect it.
UK-1
FEATURES AND CONTROLS
2
3
4
5
6
29
28
7
8
9
10
11
12
27
26 25
24
23
22
13
14
16 18 20
17 19 21
1
1
30
31
32
35
34
36
33
15
UK-2
37
32
38
FEATURES AND CONTROLS
1.
2.
3.
4.
5.
6.
7.
8.
9.
10.
11.
12.
13.
14.
15.
16.
17.
18.
19.
20.
SPEAKER
CD DOOR
CD DOOR OPEN/CLOSE BUTTON
LCD DISPLAY
POWER/STANDBY BUTTON
POWER/STANDBY LED
FIND/ESP
IR SENSOR
PRESET/FOLDER UP BUTTON
TIMER BUTTON
MEMORY/CLK.ADJ BUTTON
PRESET/FOLDER DOWN BUTTON
CASSETTE DOOR
PHONES JACK
CASSETTE BUTTON DOOR
CASSETTE RECORD BUTTON
CASSETTE PLAY BUTTON
CASSETTE REWIND BUTTON
CASSETTE FAST FORWARD BUTTON
CASSETTE STOP/ELECT BUTTON
21.
22.
23.
24.
25.
26.
27.
28.
29.
30.
31.
32.
33.
34.
35.
36.
37.
38.
REMOTE CONTROL
1. POWER/STANDBY BUTTON
2. MUTE BUTTON
3. VOLUME DOWN BUTTON
4. PRESET/FOLDER UP BUTTON
5. PRESET/FOLDER DOWN BUTTON
6. CD PLAY/PAUSE BUTTON
7. MEMORY/C-ADJ BUTTON
8. SKIP/SEARCH/TUNING DOWN BUTTON
9. CD STOP BUTTON
10. RANDOM BUTTON
11. REPEAT BUTTON
12. INTRO BUTTON
13. FUNCTION BUTTON
14. VOLUME UP BUTTON
15. BAND BUTTON
16. MONO/ST./FIND/ESP BUTTON
17. SKIP/SEARCH/TUNING UP BUTTON
18. TIMER BUTTON
19. EQ BUTTON
20. SLEEP BUTTON
21. NUMBER SEARCH BUTTON
UK-3
CASSETTE PAUSE BUTTON
SKIP/SEARCH/TUNING DOWN BUTTON
STOP BUTTON
VOLUME KNOB
PLAY/PAUSE BUTTON
SKIP/SEARCH/TUNING UP BUTTON
TAPE BUTTON
FM ST./MONO BUTTON
TUNER/BAND BUTTON
BATTERY BACK-UP
AC CORD COVER
AC CORD
SPEAKER TERMINALS
RESET BUTTO(Only for those version)
FM ANT
AC MAIN POWER SWITCH
BEAT CUT/FM MODE MONO/STEREO SWITCH
AM ANT TERMINAL
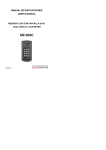
PUTTING THE BATTERIES INTO THE REMOTE CONTROL UNIT
Press down the compartment cover, and slide
the cover off to open the compartment. Place the
two (UM4), (AAA), (R03) batteries in the remote
control according to the polarity markings ("+" and
" - ") inside the compartment and on the batteries.
Place the cover over the compartment, press down
lightly, and push it upward until it snaps on.
NOTE : Remove the batteries from the remote
control if not in use for long period of the time.
Do not mix normal batteries with rechargeable
batteries, when the batteries become weak,
remote control will not function and replace with
new batteries.
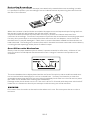
INSTALLING THE SPEAKER WIRE
TO THE SPEAKER TERMINALS
1.
Speakers Connection
Extend the SPEAKER WIRES and con nect them
to the SPEAKER TERMINALS.
2.
Power Cord Connection
Before using , connect the AC Power Cord to
the AC outlet .then turn on the main switch of
the unit.
OPERATING THE UNIT
When you first plug the unit into the AC outlet , the unit will be in standby mode , You can
press the POWER/STANDBY button on the unit ( or on the remote control ) to switch the unit ON
and OFF. Pull the AC plug out of the wall socket if you want to switch off completely.
POWER/STANDBY
1.
2.
3.
4.
5.
Press POWER/STANDBY button on the unit (or remote) to switch the unit on.
Select the sound source (CD , Tape , Aux, or Tuner) by pressing FUNCTION button.
The corresponding display will light up.
Adjust the volume with the VOLUME (UP or DOWN) button.
Set the preset equalizer ( pass, classic , rock , pop, or jazz) with the EQ button on the
Remote.
Press POWER/STANDBY button again to turn off the unit.
UK-4
CLOCK SETTING
Function switch on STANDBY position
1.
Press & hold MEMORY / C-ADJ. button until the time will display 12-hour digit flashing.
2.
Press TUNING / SKIP / SEARCH (DOWN or UP) button to adjust 12-hour or 24-hour digit.
3.
Press MEMORY / C-ADJ. button again , the time display HOUR digit flashing , press
TUNING / SKIP / SEARCH (DOWN or UP) button to adjust HOUR digit; Press MEMORY/
C-ADJ button once more, the MINUTE digit flashing, adjust it by the SKIP/SEARCH/
TUNING (UP or DOWN)button.
4.
Press the MEMORY/C-ADJ button again to confirm the time.
5.
Each enable state as shown above will be cleared if the key is not pushed in 10 seconds.
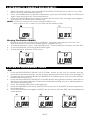
TIMER SETTING
1.
After adjusting clock, press the TIMER button for a few seconds, "
ON" and "00:00"
appears on the display and the HOUR digit flashing.(F1)
2. Press the TUNING / SKIP / SEARCH (UP or DOWN) Button to adjust it.
3. Press the TIMER button again, the MINUTE digit will start flashing, adjust it by pressing
the TUNING / SKIP / SEARCH (UP or DOWN) button.
4. Press the TIMER button once more to confirm/order TIMER ON time.
5. After adjusting "TIMER ON", "
OFF" appears on the display and the HOUR digit flashing.(F2)
6. Repeat the above steps 2 to 3, then press the TIMER button once more to confirm/order
TIMER OFF time.
7. Now the "TUNER" or "CD" appears on the display and the flashing , adjust "TUNER" or "CD" by
pressing the TUNING/SKIP/SERCH (UP or DOWN) button.
8. Press the TIMER button again, the timer "VOL" indicator appears on the display and flashing,
adjust the timer volume high or low by the TUNING/SKIP/SEARCH *(UP or DOWN) button.
9. Each enable state as shown above will be cleared if the button is not pushed in 10 seconds.
10. After adjusting "TIMER ON" and "TIMER OFF" ,press the TIMER button, "
" appears on
the display.
11. The unit will be switched on automatically at "TIMER ON" order and start playing & the unitl will
be switched off automatically at "TIMER OFF" order.
EQ CONTROL (on the remote)
EQ shows the present sound tone.
When you press the EQ button on the remote, the sound tone changes as below:
AUX PLAY
UK-5
TO SET SLEEP FUNCTION (for remote handset)
1.
2.
If you want to fall asleep to music, press SLEEP button on the remote.
You may adjust the Radio or CD player's sleep function to play from 90, 80, 70 up to 10
minutes of music before shutting itself off automatically.
RADIO OPERATION
Press the FUNCTION button to the TUNER mode on the unit (or remote),you can selected the Radio
operation.
1. Press the BAND button to select wave band range appearing on the display.
2. Select the desired wave band range with the TUNING / SKIP / SEARCH (UP or DOWN) button.
BAND SELECT
To tune for weak stations, use manual tuning by pressing TUNING / SKIP / SEARCH (UP or
DOWN) button continuously until you read the correct frequency or the reception at its best.
MONO/ STEREO SELECT
You can use only FM mode.
1. When you want to select FM stereo station, press the MONO/STEREO button .
When you receive a FM stereo station the "
" indicator will appear on the display.
2. When you press the MONO/STEREO button again , the FM STEREO indicator will turn off &
switch to MONO FM stratus.
Automatic Tuning
1.
2.
Press the TUNING / SKIP / SEARCH (UP or DOWN) button for a second or more, then
release the button. The tuner will automatically for the first station of sufficient signal
strength.
Repeat above procedure if you wish to select another station.
Programming preset stations
You can also preset stations of your choice and store up to10 AM and 10 FM stations
in its memory. To store your selected broadcasting stations:
1.
Press the BAND button on the unit(or remote) to toggle between AM and FM to make
your selection.
2.
Tune to the required station.
3.
Press the MEMORY / C-ADJ button.
4.
Press the PRESET/FOLDER(UP or DOWN) button for your desired station number.
5.
Press the MEMORY / C-ADJ again to confirm your selection.
6.
To program more stations into memory, repeat the above steps 2 to 5.
7.
To change the stored preset stations, repeat the above steps 2 to 5.
Notes:
1.
2.
Storing a new station into a preset location will erase the previously stored station in
that location.
Power off / failure or power cord disconnection will clear the memory of all preset
stations. Perform the stations presetting procedures again to store the stations.
UK-6
Selecting the Preset Stations
1.
2.
3.
Press the BAND button to select the desired band.
Press PRESET/FOLDER(UP or DOWN) button to select the desired preset station number.
The numeric location of that preset station is displayed along with the corresponding
frequency.
FM Antenna
FM antenna wire for better FM reception.
CASSETTE OPERATION
Playing Of Cassette
When playing of cassette, open the cover of the CASSETTE BUTTON DOOR first.
Be sure to tighten any slack tape in the cassette before use. Using either a pencil or a ball-point
pen, simply insert the pen or pencil into the centrex of the spool and rotate to remove slackness.
Depress the CASS. STOP / EJECT button to open the cassette door.
Insert the cassette into the compartment with the open end facing downwards and full reel on the
left hand side, push the cassette well down and close the door. Be sure not to touch the tape
surface. Select "TAPE" on the FUNCTION button and press the PLAY button. To stop playback,
press the CASS. STOP / EJECT button once. To release the cassette, press the CASS. STOP /
EJECT button again.
Recording From Radio
Set the FUNCTION button to TUNER select AM or FM on BAND button and press to the desired
broadcast (refer to radio operation section). Insert a cassette into the deck and press the
RECORD button.
Press the CASS. STOP / EJECT button to stop recording. The CASS. PAUSE button can be used to
stop recording for short intervals. Press the CASSETTE F.FWD to fast foreword the tape, press the
CASSETTE REWIND button to fast rewind the tape.
Recording From CD
Set the FUNCTION to CD. Select the required tracks to be recorded. Insert a cassette into the
cassette deck and press the CASS. RECORD button.
Press the CASS. STOP / EJECT button to stop recording.
Auto Stop
When the tape reaches the end in PLAY or RECORD, the built-in AUTO STOP system functions
to release the depressed PLAY, RECORD keys. The AUTO STOP system operates while recording
from the built-in RADIO or CD player. Only the cassette function is brought automatically to a
stop , the RADIO or CD PLAYER will continue to play.
Type Of Cassettes
Use only good quality cassettes (IEC TYPE1) for making recordings. May be used to replay other
types of cassette but is unable to make proper recordings on these more specialized tapes. The
use of C120 cassettes is not recommended in this machine.
UK-7
Protecting Recordings
Normally, anything recorded on the tape is automatically erased when new recording is made.
It is possible to protect your recordings from accidental erasure by removing the tabs found on
the rear of the cassette.
When the cassette is held with the recorded side upper-most and exposed tape facing the front,
the protective tab will be found on the left rear of the cassette.
All pre-recorded cassette are protected in this way to prevent accidental erasure of the
commercial recordings. "Protected" cassettes will prevent the record button from being operated.
If at any time you attempt to record and find that this button will not depress, never force the
mechanism or it may be damaged. Check that a cassette has been loaded and that tab has not
been removed. Recording on a cassette from which the tabs have been removed can be done by
covering the tab openings with a piece of adhesive tape.
Care Of Cassette Mechanism
Gently clean the tape head and pinch-wheel / capstan assemblies after every 10 hours of use
until all traces of oxide deposit have been removed. A range of cassette care products are
available.
The erase head and record/play head and the surface of the pinch roller are delicate and must
not be touched with metal objects such as screwdrivers. You may find it easier to clean the
assembly by pressing the PLAY button to bring head and pinch roller into view. Be sure to press
the CASS. STOP button after cleaning the mechanism.
Damage to the pinch wheel can occur if the unit is left in PLAY mode with the power switched off.
Under no circumstances should you attempt to lubricate any part of the machine.
WARNING
Disconnect from the mains at the wall socket when not in use. Do not expose the set to rain or
moisture.
UK-8
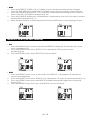
LISTENING TO COMPACT DISC (CD/MP3)
1.
When CD / Mp3 is playing , press the CD DOOR OPEN / CLOSE button on the unit first, then
the CD door will open automatically.(F3)
2. Insert the CD/MP3 disc into the CD compartment, press the CD DOOR OPEN / CLOSE button
again, then the CD door will close automatically.
3. Press the FUNCTION button on the unit to select the CD mode, This unit begin selecting and
shifting to the CD / MP3 mode automatically .
NOTE: (1) This unit can play CD, CD-R, CD-RW and MP3 discs.
(2) If no disc or can`t read TOC, NO DISC will be displayed.(F4)
Playing The Entire CD/MP3
1.
2.
3.
4.
Playback will be start by pressing PLAY/PAUSE . Playback starts with the first track , The
display shows the current track number and its elapsed time.(F5)
To interrupt playback , press PLAY/PAUSE button . The time elapsed indicator will flash.(F6)
To resume playback, press the PLAY/PAUSE again.
To stop playback, press the STOP button.
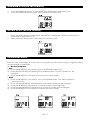
LISTEN TO THE DESIRED TRACK
- CD
1.
2.
3.
4.
5.
6.
Press the SKIP/SEARCH/TUNING ( UP or DOWN ) button on the unit (or remote), until the
required track number appears on the display, then press the PLAY button start playing.(F7)
During play, press the SKIP/SEARCH/TUNING (UP or DOWN) button, skip to the next track(or
head of the current track ).
Press the SKIP/SEARCH/TUNING (UP or DOWN) button during pause condition, then skips to
the next track(or the head of the current track) and keep pausing , and the " 00:00" appear on
the display and flashs.(F8)
Press the PLAY/PAUSE button to start playing.
Press the FIND/ESP button once, the ESP function will turn on & the ESP indicator appears on
the display.(F9)
Press the FIND/ESP button again, the ESP function will turn off & the ESP indicator disappears
on the display.
UK-9
- MP3
1. Press the PRESET/FOLDER ( UP or DOWN ) button, the album number will be changed;
press the SKIP/SEARCH/TUNING (UP or DOWN) button, the track number will be changed.
2. Press the FIND/ESP button once, TITLE indicator is displayed and flashing.(In that case if no
name in the disc, NOTHING is displayed.) (F10)
3. Press the FIND/ESP button twice, ALBUM name is displayed,(In that case if no name in the disc.
UN-KNOWN is displayed.) (F11)
4. When the desired track is displayed press the PLAY/PAUSE button to start playing the track.
REPEAT PLAY (on the remote)
- CD
1. Press the REPEAT button once on the remote, REPEAT is displayed. CD will play the current
track repeatedly.(F12)
2. Press the REPEAT button twice, REPEAT ALL is displayed. CD will play all tracks
repeatedly.(F13)
3. Press the REPEAT button third, REPEAT function will be off.
- MP3
1. Press the REPEAT button once on the remote, then REPEAT is displayed. CD will play the
current track repeatedly.
2. Press the REPEAT button twice, REPEAT ALL is displayed. CD plays all tracks repeatedly.(F14)
3. Press the REPEAT button third, then REPEAT ALBUM is displayed. Repeat the current play
album.(F15)
4. Press the REPEAT button four times, then REPEAT function will be off.
UK-10
RANDOM PLAY(on the remote)
1.
2.
Press the RANDOM button on the remote, then RANDOM is displayed.(F16)
Press the RANDOM button again, then resume to normally play.
INTRO PLAY (on the remote)
1.
2.
Press the INTRO button on the remote, then INTRO is displayed. INTRO will play the first
10 seconds of each track.(F17)
Press the INTRO button twice, then resume to normally play.
PROGRAM MODE
Used to listen to the songs selected. User can program up to 64 favorite songs. Program mode is
activated while in stop mode.
1. How to program
- CD
1) Press the MEMORY/C-ADJ button, shift to PROGRAM mode.(F18)
2) Press the SKIP/SEARCH/TUNING (UP or DOWN) button, the track number will be
changed.
3) Press the MEMORY/C-ADJ button to confirm the track number.
- Mp3
1) Press the MEMORY/C-ADJ button, shift to PROGRAM mode. The album number is
flashing. (F19)
2) Press the SKIP/SEARCH/ TUNING button, the album number will be changed.
3) Press the MEMORY/C-ADJ button , the track number is flashing.(F20)
4) Press the SKIP/SEARCH/TUNING button, the track number will be changed.
5) Press the MEMORY/C-ADJ button to confirm the track number.
UK-11
2. PROGRAM PLAY
After programming songs, press the PLAY/PAUSE button and it will play the songs as you
programmed.
3.
1)
2)
3)
CANCEL PROGRAM
While playing, press the STOP button.
Open the door.
Press the STOP button, during program memory.
BEAT CUT
If beat noise is present when recording, adjust the position of the BEAT CUT switch on the rear
of the unit .(For AM only)
MUTE SETTING(on the remote)
1.
2.
When you press the MUTE button once on the remote, the volume level will flash & the
audio output will be temporary terminate.(F21)
Press MUTE button again, the volume level and the audio output will return to normal.
LISTEN TO THE MUSIC BY USING HEADPHONE
A stereo headphone jack is provided for private listening . To listen to the unit with headphones
(not included ) insert the 3.5mm mini-stereo plug from the headphones into the PHONES
jack on the front panel. The external speakers are automatically disconnected when
headphones are using.
MEMORY BACK-UP
To insert 1.5V x 3, UM-3, AA or equivalent batteries in the battery compartment of the unit. It is
used to back-up the memory of the main CPU.
UK-12
COMPACT DISC
1.
Always use a compact discs bearing the mark as shown.
2.
Notes on handling discs
Removing the disc from its storage case and loading it.
* Do not touch the reflective recorded surface.
* Do not stick paper or write anything on the surface.
* Do not bend the disc.
3.
Storage
* Store the disc in its case.
* Do not expose discs to direct sunlight or high temperatures, high humidity or dusty
places.
4.
Cleaning a disc
* Should the disc become soiled, wipe off dust, dirt and fingerprints with a soft cloth.
* The disc should be cleaned from the centre to the edge.
* Never use benzene, thinners, record cleaner fluid or anti static spray.
* Be sure to close the CD door so the lens is not contaminated by dust.
* Do not touch the lens.
UK-13
LCD DISPLAY WINDOW
A.
B.
C.
D.
FIND INDICATOR
TIMER INDICATOR
ALBUM NUMBER INDICATOR
ESP INDICATOR
E. STEREO INDICATOR
F. VOLUME HIGH/LOW INDICATOR
G. TRACK/NUMBER/TIME INDICATOR
SPECIFICATION
POWER SUPPLY :
OUTPUT POWER :
UNIT DIMENSION :
SPEAKER BOX DIMENSION :
N. W. :
RADIO SECTION
FREQUENCY RANGE :
220V~50Hz
5 Watts x 2
160(L) x 192(W) x 260 (H) mm
133 (L) x 195 (W) x 259.5 (H) mm
5.49 kg
FM 87.5 - 108 MHz
AM 522 - 1620 kHz
CASSETTE SECTION
TAPE SPEED :
FREQUENCY RESPONSE :
4.75 CM/SEC
125Hz-8KHz
COMPACT DISC SECTION
OPTICAL PICKUP :
FREQUENCY RESPONSE :
3 - BEAM LASER
100Hz - 16kHz
SPECIFICATION SUBJECT TO CHANGE WITHOUT FURTHER NOTICE.
Dripping warning :
" The product shall not be exposed to dripping or splashing and that no
objects filled with liquids, such as vases, shall be placed on the product."
Ventilation warning : " The normal ventilation of the product shall not be impeded for intended use."
UK-14