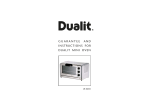
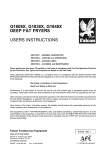
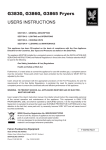
1
Compact fryer
Two year guarantee
This guarantee is valid in the UK and Ireland
only. It is in your interest to retain the retailers receipt
as proof of purchase. Please quote the following
information if the product develops a fault. These
numbers can be found on the base of the product.
Model No.
Serial No.
All Morphy Richards products are individually tested
before leaving the factory. In the unlikely event of any
appliance proving to be faulty within 28 days of
purchase it should be returned to the place of purchase
for it to be replaced.
If the fault develops after 28 days and within 24
months of original purchase, you should contact the
Helpline number quoting Model number and Serial
number on the product, or write to the address below.
You will be asked to return the product (in secure,
adequate packaging) to the address below along
with a copy of proof of purchase. Subject to the
exclusions set out below (see ‘Exclusions’) the faulty
appliance will then be repaired or replaced and
dispatched usually within 7 working days of receipt.
If for any reason this item is replaced during the 2
year guarantee period, the guarantee on the new
item will be calculated from original purchase date.
Therefore it is vital to retain your original till receipt or
invoice to indicate the date of initial purchase.
To qualify for the 2 year guarantee the appliance
must have been used according to the
manufacturers instructions. For example kettles
should have been regularly descaled or an iron cord
should have been stored as recommended by the
instructions.
EXCLUSIONS
Morphy Richards shall not be liable to replace
or repair the goods under the terms of the
Guarantee where:
1 The fault has been caused or is attributable to
accidental use, misuse, negligent use or used
contrary to the manufacturers recommendations
or where the fault has been caused by power
surges or damage caused in transit.
2 The appliance has been used on a voltage
supply other than that stamped on the
products.
3 Repairs have been attempted by persons other
than our service staff (or authorised dealer).
4 Where the appliance has been used for hire
purposes or non-domestic use.
5 Morphy Richards are not liable to carry out any
type of servicing work, under the guarantee.
6 Plastic filters for all Morphy Richards kettles
and coffee makers are not covered by the
guarantee.
This guarantee does not confer any rights other
than those expressly set out above and does not
cover any claims for consequential loss or damage.
This guarantee is offered as an additional benefit
and does not affect your statutory rights as a
consumer.
The After Sales Division, Morphy Richards Ltd, Mexborough, South Yorkshire, England, S64 8AJ
Helpline (office hours ): UK (local rate) 08450 777700, Republic of Ireland 1800 409119
Morphy Richards Website: www.morphyrichards.co.uk
Important Safeguards
Before using your electrical appliances for
the first time please read these safeguards.
15 Never leave the fryer unattended when
connected to the electricity supply.
16 Be careful not to touch those surfaces of
the fryer which become hot when you are
cooking, eg at or near joint of the lid and
body.
17 Never attempt to pour oil out of the fryer
when the fryer and oil are hot - allow to cool
first.
18 Whilst the lid of the fryer is water
immersible, the plastic body of the fryer
must never be immersed in water. The
external surfaces of the plastic fryer body
should only be cleaned by wiping with a hot,
damp cloth. They should then be thoroughly
dried. (Please refer to ‘Cleaning your Fryer’
section of this leaflet on page 6).
19 Never lean over the fryer when opening the
lid, as any trapped steam created by the
cooking process (which has not escaped
through the filter) will be released when the
lid is opened.
20 Always dry food BEFORE FRYING eg. chips
which are too wet can cause the hot oil to
froth excessively.
21 DO NOT LIFT THE FRYER WITH THE
BASKET HANDLE. USE THE HANDLES ON
THE SIDE OF THE BODY REFER TO PAGE 3
NUMBER 9.
1 Read all the instructions.
2 To protect against the risk of electrical
shock do not immerse cord, plugs or plastic
body in water or other liquid.
3 Close supervision is necessary when any
appliance is used near children.
NEVER ALLOW A CHILD TO USE THIS
PRODUCT.
4 Unplug from the socket when not in use,
before putting on or taking off attachments,
and before cleaning.
5 Do not operate any appliance with a
damaged lead or plug, or after an appliance
has malfunctioned, or has been dropped or
damaged in any way. Contact Morphy
Richards for advice on examination, repair,
or electrical or mechanical adjustment.
6 The use of attachments or tools not
recommended by Morphy Richards may
cause fire, electric shock or injury.
7 Do not use outdoors.
8 DO NOT let the mains lead overhang the
edge of the table or work-top, or touch hot
surfaces.
9 DO NOT PLACE THE APPLIANCE ON
OR NEAR A HOT GAS OR ELECTRIC
HOB, OR IN A HEATED OVEN.
10 The oil in the fryer will stay hot for some
time after it is switched off. NEVER attempt
to move your fryer until it is completely cool.
To lift the fryer use the recessed handle
grips at the sides.
11 Do not use the appliance for other than
intended use.
12 Never connect the fryer to the electricity
supply without placing oil in the non-stick
tank first.
13 If using solid fat, melt gently in a separate
pan then pour into the non-stick tank part of
the assembled fryer before switching the
fryer on. Do not melt the solid fat in the
frying basket as this may damage the fryer.
14 Never operate the fryer with oil level below
the minimum mark or above the maximum
mark.
SAVE THESE
INSTRUCTIONS
2
Electrical Requirements
Check that the voltage on the rating plate of
your appliance corresponds with your house
electricity supply which must be A.C.
(Alternating Current).
For appliances supplied with fitted plug.
If the socket outlets in your home are not
suitable for the plug supplied with this appliance the plug should be removed and the
appropriate one fitted.
IMPORTANT : THE PLUG REMOVED FROM
THE MAINS LEAD, IF SEVERED, MUST BE
DESTROYED AS A PLUG WITH BARED
FLEXIBLE CORD IS HAZARDOUS IF ENGAGED
INTO A LIVE SOCKET OUTLET.
WARNING: THIS APPLIANCE MUST
BE EARTHED.
Should the fuse in the 13 amp plug require
changing a 13 amp BS1362 fuse must be fitted
Features
Spring loaded removable lid
Basket with 500gms (1.1lb) food capacity
Basket raised rest position
Basket handle
Non stick coated tank
Safety lid release button
Heating indicator light
Variable temperature control
Carrying handle
Cord storage
‘Coolwall’ easy clean body
Filter panel
Oil pouring lip (on tank)
3
Before using for the
first time
Filling with oil
We recommend you use corn, groundnut,
vegetable or rapeseed oil.
Use a good quality solid
fat if you prefer but
remember never to mix
your oils or fats.
With your fryer disconnected from the
electricity supply, remove the basket and lid
(as described later) and wash by hand in hot
soapy water. Wipe the exterior and interior of
the tank with a damp cloth. DO NOT IMMERSE
THE BODY IN WATER. Dry all parts thoroughly
and the replace the basket and lid.
Oil level indicator
1 Pour your oil into the fryer until it reaches
the maximum level indicated in the tank
approximately 1.1 litres of oil). Alternatively
melt solid fat gently in a separate pan
before transferring to the tank
(approximately 1.1kg of solid fat or solid
oil).
2 Replace the basket into the oil and close the
lid of the fryer by pressing down at both
sides of the lid, this prevents steam
escaping.
3 Plug the
fryer into
the mains
socket and
switch on.
DO NOT
CONNECT
THE FRYER
TO THE
ELECTRICITY SUPPLY IF THERE IS NO OIL
OR FAT IN THE TANK.
4 Set the variable thermostat to the required
temperature. A cooking guide is given at the
end of this instruction booklet.
Instructions for use
Opening the lid
To unlock the safety lid, press the release
button
at the front.
This lid is spring loaded and will rise up on
its own.
Removing the basket
The basket in your fryer can be raised or
lowered with the lid open only. To do this raise
the lid
to the open position, lift the basket
and place it on the basket rest on the front
wall of the tank. Allow excess oil to drain,
shake the basket to ensure all the oil is
removed before lifting out the basket.
4
Cooking in your fryer
Cooking home battered foods
This method allows for the fact that if wet
batter is placed in the basket prior to cooking,
the food may stick to the basket. This method
of cooking requires extreme care.
Preheating
After approximately 20 minutes, the oil is at
the right temperature. The light indicator
may come on and go out once or twice with
thermostat changes.
1 Ensure that the correct temperature has
been reached (approximately 20 minutes
pre-heating) open the lid of the fryer,
leaving the basket in the down position.
2 Coat the raw food in the batter and allow to
drain slightly to get rid of excess coating.
Very carefully and slowly, lower the coated
food into the hot oil, using suitable
implement or tongs. This allows the batter
to become solid and prevents it sealing to
the mesh of the basket.
Remember to take care as the oil
may spit as the food is added.
3 Close the lid and allow the food to cook.
You may now follow the instructions as
given in ‘general cooking method’ from
point 3.
During frying
The indicator light
may come on and go
out several times as the correct preset
temperature is being maintained.
There are two methods of cooking in your
fryer; one general method for most food stuffs
and another for home battered products.
General cooking method
1 When the correct temperature for cooking
has been reached, open the lid of the fryer
raise the basket, rest it into its raised
position. Place the food to be cooked,
which should be as dry as possible, into
the raised basket of your fryer. THE
BASKET SHOULD ALWAYS BE IN THE
RAISED POSITION WHEN IT IS TO BE FILLED
WITH FOOD.
2 Lower the basket into the oil or fat and
close the lid.
3 Check the progress of your food during
cooking by opening the lid.
4 Open the lid and wait a few seconds
before raising the basket as this allows the
steam to escape. Care should be taken
when opening the lid, as steam may
still be released at pressure.
AFTER USE, DISCONNECT YOUR FRYER
FROM THE ELECTRICITY SUPPLY BY
REMOVING THE PLUG FROM THE WALL
SOCKET.
5
Hints and tips
Cleaning
•
Always ensure that you use a good quality
lard, solid oil or oil for deep frying. Corn,
groundnut, vegetable or rapeseed oil are
ideal. Do not use margarine or olive oil.
CLEANING SHOULD ONLY BE CARRIED
OUT WHEN THE FRYER IS SWITCHED OFF
AND THE PLUG IS REMOVED FROM THE
SOCKET. YOUR FRYER SHOULD HAVE
COMPLETELY COOLED.
•
Take into account the food to be cooked
before you select your frying temperature.
As a general guide precooked foods need a
higher cooking temperature than raw foods.
ALWAYS REMOVE THE CHARCOAL FILTER
BEFORE CLEANING THE LID.
•
Select your cooking utensils with care. Do
not use utensils which may melt. Metal
utensils become hot and should, therefore
have insulated handles. When using metal
utensils TAKE CARE NOT TO DAMAGE THE
SPECIAL NON-STICK COATING IN THE
TANK.
Replaceable charcoal filter
Your fryer is fitted with a white anti-grease
filter which collects grease from passing
steam and a black charcoal filter to reduce
odours. The filters can be used approximately
12 times before replacement, depending upon
quantity of food fried each time.
•
Do not use your fryer under wall mounted
cupboards which could prevent you
opening the lid fully, or allow steam to be
deflected into your face.
•
Cook your food thoroughly. Remember that
your food may begin to turn golden brown
before it is cooked through.
•
Your fryer will always be ready for use if
you store cooled and filtered oil inside, with
the lid closed.
Replace the filters as follows,
1 Remove the plug from the mains socket.
2 Unclip and lift out the filter panel from the
top of the fryer and remove both the black
and white filters and dispose of them.
3 Insert the new filters, white down, black
up, into the filter recess.
4 Replace the filter panel into the lid, then onto
the top of the fryer.
Contact the customer helpline using
the helpline number on the front of this
booklet for replacement filters.
•
All foodstuffs, particularly frozen food and
potatoes, contain moisture. When lowered
into the hot oil or fat the water in the food
turns into steam. Most of the steam which
is trapped escapes when you open the lid
of your fryer- SO CARE IS NEEDED.
•
Do not lean over the fryer when pressing
the lid release button as the lid mechanism
causes the lid to spring open.
•
Old potatoes are ideal for making chips.
Your chips should be evenly sized (10mm
square) so that they cook evenly and
should be rinsed and dried before they are
fried.
Part number - 45055
For pack of 2 grease and charcoal pads.
6
Removable washable lid
Note: If solid fat is
used for cooking,
the basket should be
removed when
cooking is completed
and washed
separately. The
fryer should then be
allowed to cool
completely before
removing
the majority of the
solid fat with a
plastic spatula
or spoon. (We
recommend the use of plastic utensils to
prevent damaging the non-stick lining of the
tank). The tank
can then be
washed.
4 Dry the tank
thoroughly. You
may store your
filtered oil
in the fryer if
you make sure
that it is covered
by the lid.
Open the fryer lid to a
vertical position and lift
upwards to remove.
To clean, lift out the
filter panel, REMOVE
THE FILTER and wash
the lid and filter panel
only in hot soapy water.
ENSURE THE LID IS
THOROUGHLY DRIED.
To replace the lid, slot
into position vertically
and close. Replace the filters (grease and
charcoal) then clip in the filter panel.
The fryer lid should be washed at regular
intervals.
Basket and handle
Your oil should be replaced after
about 10 cooking sessions and this is
usually an ideal opportunity to clean the
tank thoroughly.
The basket and its handle can be hand
washed in warm soapy water. THEY SHOULD
BE THOROUGHLY DRIED AFTERWARDS.
Easy to clean
When the oil has completely cooled, the
non-stick coated tank can be cleaned as
follows, PLEASE FOLLOW THESE DIRECTIONS
CAREFULLY.
1 Remove the lid as described above and
then remove the basket.
2 To empty the fryer, pour the oil out through
the pouring lip area and filter through fine
muslin or absorbent paper placed in a
suitable funnel and container.
3 The inside of the tank can be washed by
hand with hot soapy water but make sure
that you do not damage the special nonstick interior by using abrasives or sharp
instruments.
The fryer body
The exterior should only be cleaned by
wiping with a hot damp cloth and then
thoroughly dried.
NEVER IMMERSE THE BODY OF YOUR FRYER
IN WATER OR ANY OTHER LIQUID.
7
Conversion table,
frying times &
temperature chart
Conversion table
The temperature control is calibrated in
degrees C. To enable you to cook recipes
marked in oF, use the following approximate
table.
oC
130
150
170
190
oF
265
300
340
375
Frozen Foods
• Where possible refer to the packet
instructions for cooking guide.
•
Do not exceed 400g when cooking
frozen food. Size and shape of the food
usually determines a smaller weight.
•
In general frozen food requires a high
cooking temperature.
•
For fresh food keep a check on the frying
process, check that the food is completely
cooked before eating.
•
Generally a crispy browned outer surface
is an indication that the food is cooked.
•
It is advised that all fish cooked should be
between 12mm/1/2” and 25mm/1” in
thickness.
Frying times and temperature chart
These frying times are intended as a guide only
and should be adjusted to suit quantity or
thickness of food and your own taste.
Chips
Fresh chips (500g)
190oC 12-15 minutes
Frozen chips (400g) max. 190oC 12-15 minutes
Fish
Scampi - frozen in crumbs
just enough to loosely
130oC
cover the basket base
area - see packet for time
Whitebait -just enough to cover
the basket base area
190oC 1-2 minutes
Fresh Cod or Haddock
in batter (300g) max
190oC 5-10 minutes
Frozen Cod or Haddock 170oC 10-15 minutes
(300g) max
Frozen plaice (300g) max 190oC 5-6 minutes
Meat
Frozen hamburgers
(2oz/50g)
4oz/100g
Frozen veal escalopes
150oC
3-5 minutes
10 minutes
170oC 3-8 minutes
Chicken
Chicken portions in crumbs
small/medium size (2pc) 170oC 20-25 minutes
Chicken portions in
crumbs large size (1 pc) 170oC 20-30 minutes
Fresh chicken drumsticks
in crumbs
170oC 15-20 minutes
Vegetarians
Mushrooms (250g)
130oC 3 minutes
Morphy Richards products are intended for household use only.
Morphy Richards has a policy of continuous improvement in product quality and design.
The Company, therefore, reserves the right to change the specification of its models at any time.
Morphy Richards Limited, Mexborough,
South Yorkshire, England, S64 8AJ
443/8036/14 Rev 1