1
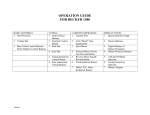
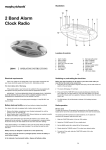
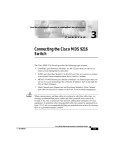
4 Band portable radio with PLL digital tuning 27004 OPERATING INSTRUCTIONS ILLUSTRATION Telescopic aerial Snooze button Tuning/Time set + / - buttons On/Off switch Volume control Memory button Light Distance Local switch Headphones DC 6 V Radio/Buzzer ○ ○ Alarm button ○ Sleep Mode 1...5 Preset button button buttons ○ ○ ○ Band selector switch Key lock 1 CONTROLS - Switches the radio on and off Switches off the alarm (radio or buzzer) when alarm function is activated Switches off the radio before preset sleep time has elapsed SNOOZE - Interrupts the alarm for approximately 5 minutes +/- Tuning/clock set - For setting the clock and alarm time. When radio is on, to start the station search (AUTO TUNING) or to advance the frequency step by step (MANUAL TUNING) MEMORY - Stores the tuned station in the memory position you choose LIGHT- Illuminates the display DIST/LOCAL- Reduces sensitivity during FM or SW reception RADIO/BUZZ - Sets the alarm to radio or buzzer ALARM - Switches the alarm function on and off BAND SELECTOR - Selects the waveband: MW - Mediumwave; LW - Longwave; SW - Shortwave; FM - VHF MODE -To enter the time and alarm time setting modes Changes the display information SLEEP - Switches on the radio for max. 90 minutes KEY LOCK - (base of the set) to lock all buttons 1....5 - station memory presets DC 6 V connection socket for a mains adaptor HEADPHONES - you can connect headphones with a 3.5 mm plug to the socket. The loudspeaker is then muted. VOLUME CONTROL - to adjust the volume 2 CONTROLS Back of the set -Battery compartment -Fold out stand Display • Pressing the MODE button will briefly change the display mode: -When the radio is off, the display indication changes between time and alarm time. -When the radio is on the display changes between radio frequency, time and alarm time. -If no button is pressed within 5 seconds, the display returns to the original indication. POWER SUPPLY Battery supply • • Open the battery compartment and insert 4 batteries, type LR6, UM3 or AA cells. Ensure correct polarity is observed. The battery low indicator lights up on the display, when the batteries are nearly exhausted. Back-up batteries for preset memory In order to keep the presets stored in the memory during the time that the unit is switched off, it is necessary to insert two additional back-up batteries. • • Place these batteries size RO3, AAA, alkaline type in the battery compartment. These batteries should always be inserted, regardless of the power supply (mains voltage or batteries). If the unit is not to be used for a prolonged period, remove the batteries to avoid battery leakage. In the interests of environmental safety, dispose of batteries safely. 3 AC MAINS ADAPTOR (SUPPLIED) You can connect the set to the mains using a mains adaptor. Only use a mains adaptor which supplies DC 6 V with the negative pole at the centre pin of the plug ( ). • Check that the mains voltage indicated on the rating plate of the adaptor matches your local mains voltage. • If the mains adaptor is equipped with a voltage selector, set this to the local voltage. • Connect the mains adaptor to the DC 6 V socket of the set and to the wall socket. -The mains supply is switched on. Note: If the DC 6 V socket is in use, the batteries will be switched off automatically. Note: If the unit is connected to the mains even when it is switched off. The unit is only fully isolated from the mains if the wall plug is removed from the wall socket. CLOCK Setting the clock time • • • While the time is being displayed, press the MODE button and hold it pressed, until the time indication starts flashing. Use the - button to set the hours and the + button to set the minutes. -A single press of the - or + button advances the setting by 1 hour or 1 minute respectively. If the button is held pressed the setting advances rapidly. Press the MODE button once more to store the setting. -If no button is pressed within 5 seconds, the time setting mode stops and the setting is stored automatically. 4 ALARM Setting the alarm time • • • • Press the MODE button briefly until the display shows the current alarm time. -The alarm indicator flashes on the display. While the alarm time is indicated, press and hold down the MODE button until the alarm time indicator starts flashing. Use the - button to set the hours and the + button to set the minutes. Press the MODE button once more to store the setting. -If no button is pressed within 5 seconds,the alarm time setting mode stops and the setting is stored automatically. Switching on the alarm • • • Press the ALARM button once until the alarm indicator appears steadily on the display. Select the desired alarm mode (with radio or with buzzer) with the RADIO/BUZZER switch. If you select alarm with radio, tune to a station which will be broadcasting at the alarm time and adjust the volume control to the required level. -At the preselected alarm time, the alarm will switch on and switch off again automatically 90 minutes later. Interrupting and repeating the alarm • • The alarm can be interrupted with the SNOOZE button. -After 5 minutes, the alarm comes on again. It is possible to interrupt the alarm function several times during the switch-on period. Switching off the alarm • • The alarm function can be switched off by pressing the On/OFF or ALARM button. The alarm remains set to operate the next day. If you wish to switch off the alarm completely, press the ALARM button briefly, until the alarm indicator disappears. 5 RADIO Radio reception • • • Switch the radio on and off with the button. -The frequency and the wave band will appear on the display. Select the desired waveband with the BAND SELECTOR switch. Adjust the volume by turning the VOLUME CONTROL. Aerials • • • For FM reception extend the telescopic aerial fully. To improve the reception you can incline and rotate the aerial. If the FM signal received is too strong (in direct vicinity of the transmitter) you can retract the aerial. For MW and LW reception, the set has a built in aerial, so the telescopic aerial is not needed. You can direct the aerial by turning the radio. For short wave reception (SW) extend the telescopic aerial and position it vertically. Selecting distant or local • Slide the DISTANCE/LOCAL selector to the LOCAL position to reduce interference and distortion when listening to strong FM or SW stations. This causes the signal to be weakened, thus reducing interference. The switch should normally be left in the DISTANCE position. Automatic tuning • To activate automatic station search (auto tuning), press + or - until the frequency display begins to run, then release the button. -The search stops as soon as a station is located. -Stations which are received with a weak field strength may be skipped. These can be tuned manually by pressing the + or button. 6 Manual tuning • • • Briefly press the + or - button to tune in the corresponding direction in individual steps. If you keep the button depressed, you can rapidly scan large frequency ranges. -When the button is released, auto tuning is automatically selected. If you briefly press one of the + or - buttons, manual tuning is selected. Last station memory • Your unit is provided with the function LAST STATION MEMORY. The station playing when the radio was switched off will automatically be selected. Storing stations You can programme 20 stations into the memory, 5 on each waveband. • Select the waveband with the BAND SELECTOR switch. • Tune to the station you want to store. • Press the MEMORY button. -The indication M starts flashing on the display for 5 seconds. • Press the preset number button (1....5) to assign the station. • Press MEMORY button again to store the station. • Select and store all desired stations in each memory location. Note: If a station is not stored within 5 seconds M is flashing, the storing mode is abandoned with no change to the current memory. Calling up a stored station • • Select the waveband with the BAND SELECTOR switch. To call up a stored station, simply press the corresponding button. -The unit switches to the station and the display indicates the waveband, frequency, M and the memory location number. 7 GENERAL Sleep function • • • Press the SLEEP button briefly. -The unit switches on the radio and the display will show the previous set sleep period. The sleep time can be adjusted from 90 minutes -->10 minutes by pressing the SLEEP button continuously. -After the preset sleep time has elapsed, the radio will switch off automatically. The SLEEP function can be terminated by pressing the ON/OFF button. Key Lock The key lock function is used to prevent accidental operation or changes to the settings. (e.g. when travelling, etc). position. • Set the key lock switch to the lock -The lock indicator lights up on the display. • Now you can only adjust VOLUME CONTROL, BAND SELECTOR switch, DISTANCE/ LOCAL and RADIO/BUZZER switch. • To disable this function, set the key lock switch back to the unlock position. -The lock indicator disappears from the display. Use of the stand • Fold out the stand on the rear of the set. You can now use the set in an inclined position. Maintenance Do not expose your clock radio to extremes of temperature. The product should be kept in a warm environment free from dust and damp. For external cleaning use only a soft, clean, damp cloth. Use of detergents may damage the finish. 8 GENERAL Technical specification Wavebands MW LW SW FM Power output Battery Station memory Adaptor 522 - 1620 kHz 144 - 281 kHz 5.950 - 15.600 MHz 87.5 - 108 MHz 800 mW peak power : 4 x AA batteries (not included) : 2 x AAA batteries (not included) : Model F4 -3537-14 Input power 230v 50Hz Output 6V DC 200mA Warning labels WARNING: to reduce the risk of electric shock, do not expose this appliance to rain or moisture or dripping or splashing. ATTENTION: To reduce the risk of electric shock, do not remove the cover. There are no user serviceable parts inside the unit. Refer any servicing to qualified personnel. Using your radio in Europe When using your radio in Europe the BBC World Service can be heard on the following wavebands and frequencies:WAVEBAND FREQUENCY IN MEGAHERTZ (MHz) SW1 SW2 SW3 SW4 SW5 SW6 6.180 7.115 9.410 11.780 15.485 17.640 6.195 7.120 7.150 7.325 11.785 15.575 17.705 IMPORTANT Not all the frequencies will be audible in all parts of Europe, the listener should try each frequency in turn as some are not used all the time and can change according to atmospheric conditions or because of interference. Further information can be obtained from:BBC World Service, Bush House, London WC2B 4PH Tel: +44-(0)171-240-3456 Fax: +44-(0)171-257-8258 E-mail: [email protected] Web:www.bbc.co.uk 9 TROUBLESHOOTING If a fault occurs, first check the points listed below before taking the set for repair. If you are unable to remedy a problem by following these hints, telephone our technical helpline number. TROUBLESHOOTING Problem Cause Solution button does not work Key lock switch is activated Switch off the key lock function No sound Volume is not adjusted. Headphones are connected. Batteries are exhausted. Batteries are incorrectly inserted. Mains adaptor is not securely connected. Adjust the volume. Disconnect the headphones. Insert new batteries. Insert the batteries correctly. Poor quality sound Batteries are nearly exhausted indicator lights up) ( Insert new batteries or use a mains adaptor. Poor radio reception Weak radio aerial signal Set too close to TV, VCR or computer. Adjust the aerial for best reception: FM incline and rotate telescopic aerial. MW/LW: rotate the entire set. SW: extend telescopic aerial vertically. Keep the set away from electrical equipment. Alarm does not work Alarm time is adjusted. Headphones are connected. Adjust the alarm time. Disconnect the headphones. Set does not react to operation of any button Electrostatic discharge Switch off the set, disconnect the mains adaptor / remove batteries, reconnect after a few minutes. Key lock switch is activated Switch off the key lock function. 10 Connect the mains adaptor properly. GUARANTEE Morphy Richards products are manufactured to internationally accepted quality standards. In addition to your statutory rights, Morphy Richards guarantee your product to be free from manufacturing and component defects for a period of TWO YEARS from date of purchase. If your product proves to be defective within 28 days of purchase, your Morphy Richards dealer from whom the product was purchased will be pleased to replace it free of charge. Should your product develop a defect within the guarantee period but after the replacement period, please return the product to the following address, together with the proof of purchase, brief details of the symptoms and your own name and address. Morphy Richards Limited Talbot Road Mexborough South Yorkshire S64 8AJ Your post office will provide a certificate of posting. The product will be repaired and returned to you promptly. If you need any further advice, please call our Helpline (UK local rate) on: 08450 777700 (Mon-Fri) Morphy Richards Website: www.morphyrichards.co.uk 446/8001/69 Rev 2 Imported by : Morphy Richards Ltd, Talbot Road, Mexborough, S64 8AJ