1
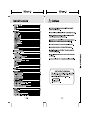
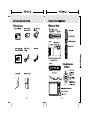
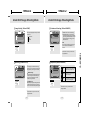
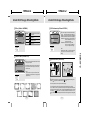
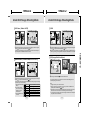
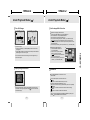
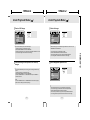
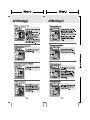
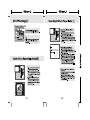
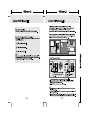
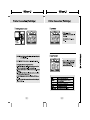
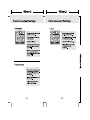
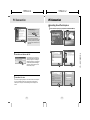
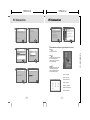
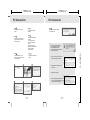
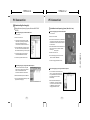
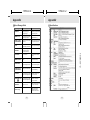
105mm+-2
105mm+-2
Getting Ready
Under Still Image Shooting Mode
Basic Photography For Still Image
Set The Shooting Mode (Default: AUTO)
1. Press the Power Button to turn on the camera.
2. Make sure the camera is set at Still Image Shooting Mode.
3. Use Tele/Wide Button to zoom in and zoom out.
4. Press the Macro Button ( ) if required (closer than 60cm).
5. Press the Shutter Button halfway for focusing and then press the
Shutter Button fully down to capture the image.
Press OK/Menu Button to set the shooting mode. There are 7 options
which are:
MENU
OK
Operation St eps
1
AUTO
PROGRAM
NIGHT
PORTRAIT
SUNSET
BACKLIGHT
FIREWORKS
MENU
OK
1. OK / MENU
2. or
3. OK / MENU
999
7M
999
7M
150mm+-2
2
8:08 AM
2007/01/05
MENU
OK
MENU
OK
Operation St eps
1. OK / MENU
2. or
3. OK / MENU
8:08 AM
2007/01/05
AUTO MODE
Operation St eps
3
4
MENU
OK
1. OK / MENU
2.
or
3. OK / MENU
MODE SET
MENU
OK
MENU
OK
AUTO
PROGRAM
NIGHT
PORTRAIT
SUNSET
EXIT : MENU
Under this mode the following settings will
be automatically locked at the factory
default settings and cannot be adjusted.
MOVE:
(a) Metering:Multi
(b )Sharpness:Normal
(c) Effect:Normal
(d) White Balance:Auto
(e) Shooting : Single
(f) Flash:Only
1. Auto Flash
2. Auto Flash & Red-eye Reduction
3. Flash Off are available.
5
999
9M
8:08 AM
2007/01/05
10
11
105mm+-2
Under Still Image Shooting Mode
PROGRAM MODE
105mm+-2
Under Still Image Shooting Mode
SUNSET MODE
Operation St eps
Operation St eps
1. OK / MENU
2.
or
3. OK / MENU
MODESET
AUTO
PROGRAM
NIGHT
PORTRAIT
SUNSET
EXIT : MENU
In program mode, the metering,
sharpness, effect, WB, frame, shooting
flash & ISO can be adjusted.
MOVE:
1. OK / MENU
2.
or
3. OK / MENU
MODESET
AUTO
PROGRAM
NIGHT
PORTRAIT
SUNSET
EXIT : MENU
Under this mode the settings below
will be locked.
MOVE:
NIGHT MODE
(a) Metering : Multi
(b) Sharpness : Normal
(c) Effect : Normal
(d) White Balance : Auto
(e) Shooting : Single
(f) Flash : Flash Off
Operation St eps
1. OK / MENU
2.
or
3. OK / MENU
MODESET
EXIT : MENU
Under this mode the settings below
will be locked.
MOVE:
(a) Metering : Multi
(b) Sharpness : Normal
(c) Effect : Normal
(d) White Balance : Auto
(e) Shooting : Single
(g) Flash : Only
1. Slow Sync
2. Flash off are available.
BACKLIGHT MODE
Operation St eps
1. OK / MENU
2.
or
3. OK / MENU
MODESET
PROGRAM
NIGHT
PORTRAIT
BACK LIGHT
FIREWORKS
EXIT : MENU
Under this mode the settings below
will be locked as below.
MOVE:
(a) Metering : Spot
(b) Sharpness : Normal
(c) Effect : Normal
(d) White Balance : Auto
(e) Shooting : Single
(f) Flash : Fill-in Flash
PORTRAIT MODE
Operation St eps
1. OK / MENU
2.
or
3. OK / MENU
MODESET
AUTO
PROGRAM
NIGHT
PORTRAIT
SUNSET
EXIT : MENU
Under this mode the settings below
will be locked.
MOVE:
(a) Metering : Multi
(b) Sharpness : Normal
(c) Effect : Normal
(d) White Balance : Auto
(e) Shooting : Single
(f) Flash : Only
1. Auto Flash & Red-eye Reduction
2. Flash off are available.
12
FIREWORKS MODE
Operation St eps
1. OK / MENU
2.
or
3. OK / MENU
MODESET
NIGHT
PORTRAIT
SUNSET
BACK LIGHT
FIREWORKS
EXIT : MENU
Under this mode the settings below will be
locked.
MOVE:
(a) Metering : Multi
(b) Sharpness : Normal
(c) Effect : Normal
(d) White Balance : Auto
(e) Shooting : Single
(f) Flash : Flash Off
13
150mm+-2
AUTO
PROGRAM
NIGHT
PORTRAIT
SUNSET
105mm+-2
Under Still Image Shooting Mode
105mm+-2
Under Still Image Shooting Mode
Other Settings
Zoom In & Zoom Out
Manual Focus
The Zoom Indication Bar, appearing
on the top side of the TFT LCD
Monitor shows the current zoom
status. This camera allows
maximum 3.0x optical zoom and
5.0x digital zoom.
MENU
OK
999
7M
2m
( 2m ) The focus is set at 2M.
(
) The focus is set at infinity.
( 0.8m ) The focus is set at 0.8m.
8
8:08 AM
2007/01/05
With a long press of the Macro Button ( ),
you can enter the manual focus mode.
Anther long press of the Macro Button ( )
allows you to return to audo focus. There
are 3 focus ranges under this mode as
follows:
( 5.0X )
( 3.0X )
X1.1
999
7M
To choose the focus you prefer, please
press the Macro Button.
999
7M
Macro Mode
MENU
OK
MENU
OK
When the shooting subject is within
1cm~60cm, please first press the
Macro Button ( ) and choose the
proper focusing range before you
take the shot.
( ) 10cm~60cm
( ) 1cm~10cm
Normal: 60cm~infinity
MENU
OK
MENU
OK
8:08 AM
2007/01/05
By pressing the Flash Mode Button (
options as follows.
Auto Flash
999
7M
1.The Macro icons will show on the
TFT LCD monitor when the macro
feature is set.
2.Please press the Macro Button ( )
to cancel the macro setting if you
prefer the next image not to have the
macro feature.
8:08 AM
2007/01/05
14
) you can select different flash
The flash fires automatically as required under shooting mode.
Auto Flash with To avoid the subject's eyes appearing red in the image, this
Red-eye
mode can effectively minimize the likelihood of the red-eye effect.
Reduction
This m ode will enable the flash to fire in any
Fill-in Flash
c ircumstances.
The flash will fire and the camera will set the shutter speed at
Slow Sync
a proper speed.
Flash Off
The mode will disable the flash.
15
150mm+-2
Flash MODE
8:08 AM
2007/01/05
105mm+-2
105mm+-2
Under Still Image Shooting Mode
Self-timer
Under Still Image Shooting Mode
Voice Memo
With the 10 sec. Self-timer ( ):
The image wi ll be taken after an inter
val of 10 seconds once the Sh utter
Button is released.
MENU
OK
MENU
OK
There are 2 ways to add the voice
memo to an image:
MENU
OK
MENU
OK
With the 2 sec. Self-timer ( ):
The image wi ll be taken after an
interval of 2 seconds once the Sh utter
Button is released.
2S
999
7M
X1.1
With the Do uble self-timer ( ):
The image wi ll be taken twice once the
Shutter Button is released.
999
7M
8:08 AM
2007/01/05
8:08 AM
2007/01/05
VOICE MEMO
OFF
SINGLE
CONTINUOUS
EXIT : MENU
MOVE:
)
2. At Playback Mo de ( (a) Choose the image to which you wish
to add a voice me mo.
(b) Press Up Button and press the
Shutter Button to start the voice
memo.
(c)10 seconds of voice me mo will be
recorded.
After the voice me mo is added onto the
image, ( ) will be shown on the image
as a notice in the Playback Mo de.
Image Size( Default:3072x2304)
SIZE
3456x2592
7M 3072X2304
5M 2560X1920
3M 2048X1536
1M 1280X960
9M
EXIT : MENU
16
MOVE:
The options of the image size are as
follows:
(9M) 3456 x 2592 (via interpolation)
(7M) 3072 x 2304
Operation St eps
(5M) 2560 x 1920
1. OK / MENU
(3M) 2048 x 1536
2.
or
(1M) 1280 x 960
3.
or
17
150mm+-2
The first image wi ll be taken after 10
seconds and the second image 2
seconds after the first.
1. At Still Image Shooting Mo de
(a) Press OK /Menu Button and choose
"VOICE ME MO"
(b) Choose "SINGLE" to enable a voice
memo for this image you are going
to take or choose "CONTINUOUS"
to have voice me mos for the images
from now on (you can cancel the
voice me mo function by choosing
"OFF").
(c) 10 seconds of voice me mo will be
recorded.
105mm+-2
Under Still Image Shooting Mode
Image Quality ( Default:FINE)
The Image quality options are provided
as follows:
QUALITY
S. FINE
FINE
NORMAL
EXIT : MENU
105mm+-2
Under Still Image Shooting Mode
Continuous Shooting ( Default:SINGLE)
1
(
(
(
) Super Fine
) Fine
) Normal
MOVE:
1.SINGLE: No continuous shooting.
2.CONTINUOUS: You can have the
continuous shooting function starting
by pressing the Shutter Button and on
hold and ending by letting go of the
Shutter Button.
SHOOTING
SINGLE
CONTINUOUS
EXIT : MENU
Operation St eps
Operation St eps
1. OK / MENU
2.
or
3.
or
1. OK / MENU
2.
or
3.
or
MOVE:
Note
The continuous shooting function will
not be canceled until "SINGLE" is
chosen.
Metering ( Default:MULTI)
By changing the camera's metering
pattern you can improve exposure and
brightness of your image if necessary.
METERING
MULTI
SPOT
EXIT : MENU
Multi Metering:
Exposure will be evaluated according
to the average of the available light
sources in the image area. This is
suitable for general use.
MOVE:
Operation St eps
Sharpness( Default:NORMAL)
SHARPNESS
SOFT
SOFT
NORMAL
VIVID
This effect can make the edge of the
NORMAL captured image look sharp, which is
suitable for printing out.
EXIT : MENU
MOVE:
VIVID
Operation St eps
Spot Metering:
If the subject is against the light source
or has little contrast, you can use this
function to have the subject be brighter.
1. OK / MENU
2.
or
3.
or
This effect can make the edges of
your captured image look sharper but
may result in more image noise.
1. OK / MENU
2.
or
3.
or
This feature can only be used under
Program Mode.
This feature can only be used under
Program Mode.
18
This effect can make the edge of the
captured image look smoother, which
is suitable for image editing on PC.
19
150mm+-2
This feature can only be used under
Program Mode.
105mm+-2
Under Still Image Shooting Mode
Norma l
EFFECT
NORMAL
B&w
SEPIA
NEGATIVE
EXIT : MENU
B& W
SEPIA
MOVE:
NEGATIVE
Under Still Image Shooting Mode
OSD Information(Default:DETAIL)
Effect( Default:NORMAL)
NOR
105mm+-2
NOR
No special effect is added to
the picture.
Turn the image into black
and wh ite.
Turn the image into
yellowish brown.
Turn the image into negative
film effect .
OSD INFORMATION
OFF
BASIC
DETAIL
GRID 3X3
GRID 6X4
EXIT : MENU
Operation St eps
Operation St eps
1. OK / MENU
2.
or
3.
or
1. OK / MENU
2.
or
3.
or
MOVE:
Th ere are 5 options for the OSD informat ion.
1.OFF :
No OSD informat ion is displayed.
2.BA SI C: On ly basic informat ion is displayed.
3.DETAI L: De tailed informat ion is displayed.
4.GRI D 3X3 : Gr id lines for 9 grids wi ll show on
the TF T LCD Mon itor for you to
compo se the imag e.
5.GRI D 6X4 : Gr id lines for 24 grids wi ll
show on the TF T LCD Mon itor
for you to compo se the imag e.
Photo Frame ( Default:OFF)
You can put the selected photo frame to the
image you capture.
FRAME
1
OFF
ON
Exposure Value ( Default:0)
999
7M
Cancel the Photo Frame function after use
if you prefer the next image not to be with
Photo Frame.
MENU
OK
Operation St eps
MOVE:
Operation St eps
1. OK / MENU
2.
or
3.
or
SET:OK
Note
This function can only be used when the
resolution is set at less than 7 mega pixels
(3072x2304).
1.
2.
3.
MENU
OK
or
or
-2
-1
0
+1
+2
To adjust the exposure, you will need to set the working mode at Program
Mode (
) and press the Delete Button (
) first.
Press Up or Down to the Exposure Value setting.
You can adjust the value of the exposure compensation which ranges
from -2.0EV to +2.0EV (in 0.5EV increments) with the Right and Left Button.
After the preferred value is chosen, please press OK/Menu Button to confirm
the setting. (
) will be shown on the TFT LCD Monitor if the EV is not set
at +- 0. Please note that the higher the EV value is the brighter the image will
be.
20
21
150mm+-2
No te
Pl ease choose "OFF " to cancel the grid lines
if you prefer not to use them for the next
imag e.
105mm+-2
105mm+-2
Under Still Image Shooting Mode
ISO Value ( Default:AUTO)
Under Still Image Shooting Mode
RGB
999
7M
999
7M
MENU
OK
MENU
OK
MENU
OK
Operation St eps
1.
2.
3.
Operation St eps
1.
2.
3.
AUTO 100 200 400 800 1000
or
or
To adjust the ISO value, you will need to set the working mode at Program
Mode (
) and press the Delete Button (
) first.
Press Up or Down Button to the ISO setting and choose the ISO value you
prefer and press the OK/Menu Button to confirm.
MENU
OK
R
G
or
or
B
-
+
-
+
-
+
To adjust the RGB setting, you will need to set the working mode at Program
Mode (
) and press the Delete Button ( ) first.
Press Up or Down Button to the RGB setting and choose the RGB setting you
prefer by pressing Left or Right Button and press OK/Menu Button to confirm.
999
7M
999
7M
MENU
OK
Operation St eps
1.
2.
3.
MENU
OK
8:08 AM
2007/01/05
or
or
Pr essing the ISH Bu tton (
To ad just the wh ite ba lance, you wi ll need to se t the wo rking mo de at Program
Mo de ( ) an d pr ess the De lete Bu tton (
) first.
You ca n se lect the mo st appropriate wh ite ba lance se tting for a gi ven sh ooting
environme nt by "Custom" setting.
1. Choose the CU STOM
Aut o
Adj us ting the whi te ba lan ce au tomat ica lly
setting.
Day ligh t
Und er the st ron g ligh t en vi ron ment
2.Put a sh eet of white
Cl ou dy
Und er the cl ou dy ligh t en vi ron ment
in front of the ca me ra,
and then pr ess the
Sun se t
Und er the su ns et ligh t en vi ron ment
shutter bu tton.
Fl uo res ce nt Und er the fluo res ce nt ligh t en vi ron ment
3. Press ok /Me nu Bu tton
Tun gs ten
Und er the tun gs ten ligh t en vi ron ment
to co nfirm.
Cus tom
22
) ca n ac tivate this function.
This function wi ll only he lp to "reduce" the ch ance of blurred ima ge du e to
unsteady ho lding of the ca me ra.
No te
1. Ima ge no ise may occur wi th this feature.
2. Wh en yo u pr efer the ne xt ima ge or mo vie cl ip no t to be wi th ISH feature,
please pr ess the ISH Bu tton (
) ag ain.
3. Wh en ISH is us ed, the flash wi ll be au toma tically se t at "Flash Off" an d the
ISO va lue wi ll be se t at "AUTO" . These se ttings ca nnot be ch anged.
4. It is su ggested to us e this feature un der low light conditions wh en the ob ject
is be yond 3. 0m from the ca me ra.
Und er un ce rtai n ligh t en vi ron ment
23
150mm+-2
ISH (Image Stabilizer Helper)
White Balance ( Default:AWB (auto white balance) )
105mm+-2
Under Playback Mode (
105mm+-2
)
Under Playback Mode (
)
Playback Of Still Image, Movie Clip And Audio Clip
Please press Playback Button (
) and the camera will show the
stored still images, movie clips and audio clips (voice recording). Use
the Right and Left Button to choose the file you would like to play.
1. Still Image
Still images are the images with no special
signs such like ( ) and ( ).
( ) represents that the images are with
voice memos.
MENU
OK
Operation St eps
1.
2.
3.
MENU
OK
or
or
999
7M
2. Movie Clip
Movie clips are the ones with (
).
1. Audio Clip (voice recording)
Audio clips are the ones with (
).
Thumbnail Display (Small Images)
100-0002
1
2
8:08 AM
2007/01/05
Explore A Part Of A Still Image
X 1.6
X 1.6
1. Pressing and holding the T Button ( T ) you can enlarge a still image up
to 8.0x (depending on the original size of the image).
2. Use the direction buttons to explore the image.
3. By pressing and holding the W Button ( W ) you can return to the normal
size image.
24
25
150mm+-2
By pressing the W Button ( W ) you can display the stored files by
thumbnails (Pressing the T Button ( T ) returns you to the normal
playback display). Select a file and press OK/Menu Button to enlarge the
selected image or file.
105mm+-2
Under Playback Mode (
105mm+-2
)
Trim A Still Image
Under Playback Mode (
)
Set An Image With Protection
100-0021
PROCCESSING!
8:08 AM
2007/01/05
X1.9
The camera will save the trimmed image as a new image after you
confirm the request.
Display Image Information
Set All Images With Protection
1. Press the OK/Menu Button and
choose "PROTECT".
2. Choose "ALL" and press OK/Menu
Button to confirm the request.
(
) will show on the TFT LCD Monitor
when the protection is set.
3. To cancel the protection, please press
T Button ( T ) and W Button( W ).
100-0066
W
LOCK
T
EXIT : SH
Slideshow
999
Press Menu/OK Button to enter the menu and
choose SLIDE.
SIZE:1792X1344
AV:F3.5
TV:1/17S
ISO:200
FLASH:OFF
DATE:2007/01/05
Pressing and holding the payback button ( ) can show the image
information. Pressing the playback button ( ) again will cancel the
information display.
26
There are three options in this feature which are:
SHOW
This option is to start the slideshow after you set up
the settings of INTERVAL and EFFECT. In this
option you can also choose to play the slideshow just once or repeatedly.
INTERVAL
This option is to choose the interval time between each still image.
EFFECT
This option is to choose the effect of the slideshow.
Note
After you complete the setting of INTERVAL and EFFECT, please go to
SHOW
PLAY/ REPEAT to start the slideshow.
27
150mm+-2
1. Select an image.
2. Press the T Button( T ) or W Button( W )to choose the size of the
enlargement.
3. Press OK/Menu Button and choose "TRIM" and press the OK/Menu
Button again to confirm the request.
Set Selected Image(s) With Protection
1.Press the OK/Menu Button and choose "PROTECT".
2.Choose "SELECT" and press OK/Menu Button.
3.Choose one image and press T Button ( T ).
4.Choose another image and press T Button ( T ) or W Button( W ).
(
) will show on the TFT LCD Monitor when the protection is set.
5.Press OK/Menu Button to confirm the request for the protection of the
selected image(s).
6.To cancel the protection, please press T Button ( T ) or W Button( W ).
105mm+-2
Under Playback Mode (
105mm+-2
)
Delete Image
Under Playback Mode (
Copy To Card
Operation St eps
1. OK / MENU
2.
or
3.
or
DELETE
SELECT
ALL
EXIT : MENU
)
MOVE:
Operation St eps
1. OK / MENU
2.
or
3.
or
COPY TO CARD
NO
YES
EXIT : MENU
You can delete the selected image(s) or all images with this function.
Please press OK/Menu Button and choose "DELETE" and following the
steps below.
MOVE:
This function allows you to copy the images stored in the internal flash
memory into the memory card.
Delete All Image(s)
1.Push the OK/Menu Button.
2.Choose "ALL" and press the OK/Menu Button.
3.Choose "DELETE" to confirm the deleting request or choose "CANCEL"
to cancel the request. Press the OK/Menu Button again to proceed.
DPOF-Standard
Operation St eps
1. OK / MENU
2.
or
3.
or
DPOF
STANDARD
INDEX
PRONT SIZE
CANCEL
EXIT : MENU
00 PIC
NO
DEF AULT
NO
MOVE:
This function can only be used when a memory card is inserted.
This option allows you to put the print quantity (MAX. 30 pcs) on your
memory card.
[ONE PIC] - specifies the number of copies for a selected image and you
can press LEFT/RIGHT Button to go to next image.
[ALL PICS] - specifies the number of copies for all pict ures apart from
movie clips and voice recording files.
Note: You cannot see the "PRINT" function on the TFT LCD Monitor if a
memory card is not inserted.
28
29
150mm+-2
Delete Single Image
Select the image you'd like to delete and press the Delete Button (
).
Select "DELETE" to proceed or select "CANCEL" to cancel the request.
105mm+-2
Under Playback Mode (
105mm+-2
)
Resize A Still Image
Under Playback Mode (
Rotate An Image
Operation St eps
1. OK / MENU
2.
or
3.
or
RESIZE
2560 X 1920
2048 X 1536
1600 X 1200
1024 X 768
640 X 480
EXIT : MENU
)
MOVE:
Operation St eps
O
RIGHT90
LEFT90O
O
180
HORIZONTAL
VERTICAL
EXIT : MENU
Set A Still Image As An Option Of The Start-up
Images
This function allows the option of using your own image as the start-up
screen.
1.Choose the image you would like to use.
2.Press OK/Menu Button and choose "RESIZE".
3.Choose"USER IMAGE 1" or "USER IMAGE 2" and press OK/Menu
Button to confirm.
Note
To set the "USER IMAGE 1" or "USER IMAGE 2" as the start-up image
please refer to "Setting The Start-Up Image".
MOVE:
With this setting you can rotate the image RIGHT 90 o, LEFT 90 o, 180 o,
HORIZONTAL and VERTICAL.
1.Choose the image you would like to rotate.
2.Press OK/Menu Button and choose "ROTATE".
3.Choose the rotation you prefer and press OK/Menu Button.
4.The image after rotation will be stored as a new image.
Set An Image With Special Effect
Operation St eps
1. OK / MENU
2.
or
3.
or
EFFECT
NORMAL
B&W
SEPIA
NEGATIVE
EXIT : MENU
MOVE:
This function allows you to set an image with special effect.
1.Choose the image you would like to set with a special effect.
2.Press OK/Menu Button and choose "EFFECT"..
3.Choose the special effect you prefer and press OK/Menu Button.
4.The image with the special effect will be stored as a new image.
30
31
150mm+-2
This function allows you to resize a still image.
1.Choose the image you would like to resize.
2.Press OK/Menu Button and choose "RESIZE"..
3.Choose the image size you prefer and press OK/Menu Button to confirm.
4.The resized image will be stored as a new image.
1. OK / MENU
2.
or
3.
or
ROTATE
105mm+-2
105mm+-2
PC Connection
TV Connection
General Introduction
How to Connect with a Computer
Computer / Notebook Connection
Computer
When the USB/Video Cable is in connection with the computer while
the camera is on, the camera will automatically go to the PC Mode
from any working mode and turn off TFT LCD monitor.
Turn on the TV and switch the TV/Video switch to A/V mode.
In this Mode, you can download images to your computer .
Power on the camera and then switch to the Playback Mode.
Press down the LEFT or RIGHT direction Button to go to the next or
last image for TV reviewing.
50
51
150mm+-2
Connect the USB/Video connector of the camera to video input ports
of the TV set with the supplied Video/USB Cable.
105mm+-2
105mm+-2
PC Connection
PC Connection
Installing The Camera's Driver
Under Microsoft Windows 98SE
1
2
If the auto run program fails under certain situation, please go
to the Start Menu, click "Run" and key in "CD-ROM Drive:\
AutoRun.exe" and then click "OK" Button.
3
Under Microsoft Windows 2000
5
1
2
3
52
53
150mm+-2
If the computer h as been installed with \
Direct X 8.0 or later already, the
installation procedure will skip above
step 4 and go to the following window
directly completing the driver
installation.
4
105mm+-2
105mm+-2
PC Connection
PC Connection
I nstalling Ulead Photo Explorer
4
Under Windows Operating System (Windows 98SE/2000/ME/XP)
1
2
3
4
Having DirectX 8.0 or later already, the
computer will skip the installation
procedure from step 2 above and go to
the following window directly. Please
complete the driver installation with a
"OK" Click.
150mm+-2
Under Microsoft Windows ME / XP
The camera's driver is not required
under Windows ME and Windows XP.
Please go to page 57 for installing of
Ulead Photo Explorer or go to page 62
for downloading the stored image(s)
onto the PC. Please click "OK", if the
below window prompts.
5
5
8.5
6
Under Mac 9.X or later
This camera, supporting only Mac 9.X or later versions, does not require
any driver installation. Please refer to Page 59 for installing Ulead
Photo Explorer or Page 63 for downloading the stored images onto
the PC.
54
8.5
8.5
55
8.5
105mm+-2
PC Connection
PC Connection
7
105mm+-2
8
8.5
8.5
13
8.5
14
8.5
8.5
8.5
8.5
9
10
8.5
8.5
Under Macintosh Operating System (Mac 9.X or later)
Step 1 :
Turn on the computer.
150mm+-2
8.5
Step 2 :
Insert the CD into the CD-ROM
Drive. The computer will
create an icon named "Driver
CD" on the desktop.
11
12
8.5
8.5
8.5
Step 3 :
Double click on the icon and
choose the language you
prefer by double clicking on
one of the folders below.
PEX 2.0: English
8.5
PEX 2.0F: French
PEX 2.0G: German
PEX 2.0I: Italian
PEX 2.0J: Japanese
PEX 2.0P: Portuguese
PEX 2.0S: Spanish
56
57
105mm+-2
105mm+-2
PC Connection
PC Connection
Step 4 :
Select PEX2.0 Installer to
install.
Step 5 :
Press Continue for the
next step.
Step 7 :
Step 6 :
A welcome screen will jump
out. Please press Continue
for the next step.
Please read through the
contract.
If you agree with the
contract, please press
Agree.
If not, please press
Disagree, and installation
will be cancelled
simultaneously.
Step 9 :
Select the folder you just
installed, and press Choose
for the next step.
PEX2.0 will now start to
install.
6
5
If a warning window shows up
please visit Apple's official
web-site http:// kbase.info.
apple.com to download the latest
version of CarbonLib.
a.Key in "CarbonLib" in the search
bar and click "Search" button.
b.Download the latest version of
CarbonLib.
c.Reboot the computer.
7
9
8
58
d.Go to the desktop and double click
on the icon "Ulead Photo Explorer"
to start Ulead Photo Explorer.
59
150mm+-2
Step 8 :
4
Step10 :
Installation completed, please
press Quit to exit.
105mm+-2
105mm+-2
PC Connection
PC Connection
Downloading the Image(s)
Under Windows Operating System (Windows 98SE/2000/
ME/XP)
Downloading Image(s) From Removable Disk
Under Macintosh Operating System (Mac 9.X or later)
Downloading Image(s) From Removable Disk
1. Turn on the PC.
1. Turn on the PC.
2. Switch on the camera.
2. Switch on the camera.
3. Connect the camera to the PC by USB
cable under any working mode. Please
make sure the USB Cable is well
connected to both the PC and camera.
3. Connect the camera to the PC by USB cable
under any working mode. Please make sure
the USB cable is well connected to both the
PC and camera.
4. When the USB cable is connected to the
PC, there will be a new hard disk named
Removable Disk showing on the computer.
4. When the USB cable is connected to the PC,
there will be a new icon named "untitled"
showing on the computer.
6. View the image with a double-clicks.
5. Double click on the icon.
6. The stored image(s) can be found in the
folder of DCIM \ 100MEDIA.
7. View the image(s) with double-clicks.
Downloading Image(s) Through Ulead Photo Explorer
1. Connect the camera to the PC by USB
cable under any working mode. Please
make sure the USB cable is well
connected to both the PC and camera.
2. Start Ulead Photo Explorer 8.5 SE Basic.
3. Click "File \Download From Memory Card"
to get the stored image(s).
60
D ownloading I mage(s) T hrough U lead P hoto E xplorer
1. Turn on both the PC and switch on the
camera. Connect the camera to the
PC by USB table and a new disk such
as "Unlabeled" will be created
automatically.
2. Start with Ulead Photo Explorer
8.5 SE Basic. The stored image(s)
can be found in the folder of DCIM
\ 100MEDIA \. Please view the
image(s) with double-clicks.
61
150mm+-2
5. The stored image(s) can be found in"
Removable Disk\Dcim\100media" .
105mm+-2
105mm+-2
Appendix
Appendix
Specifications
Error Message Table
Messages
Solutions
CARD FULL
Delete the stored image(s)
in the memory card or insert
a new memory card.
MEMORY FULL
There is insufficient
internal memory capacity
for storing an image.
Delete the stored image(s)
in the flash memory.
CARD LOCKED
(ICON BLINKING)
The memory card is under
protection.
Set the card protection switch
at non-protection position.
LOCK
The Image can not be
deleted under protection.
Unlock the protected image.
NO IMAGE
There is no image stored
in the memory card or
built-in flash memory.
FILE ERROR
File format error.
Insert a new memory card
or format the built-in flash
memory.
MEMORY ERROR
Memory is damaged
or fails.
Format the memory card or
built-in flash memory.
CARD ERROR
Card is damaged or fails.
Insert a new memory card.
Battery power is drained.
Insert a new battery.
LOW BATTERY !
(ICON BLINKING)
LOW LIGHT!
The environment is too dark Set the flash mode at Auto
in Flash off or "Night Scene''. Flash or Fill-in Flash.
HAND SHAKE ICON
Avoid shake.
The environment is too dark
Set the flash mode at Auto
in Flash off or "Night Scene''.
Flash or Fill -in Flash.
NO PAPER!
Paper has run out.
Please put more paper in the
paper tray of the Printer.
150mm+-2
Causes
There is insufficient card
memory capacity for
storing an image.
Internal memory: 32MB flash memory
External memory: supporting SD/MMC card
DPOF1.1,
1. Remove the battery.
2. Reload the battery.
3. Switch on the camera.
Camera Hangs
62
63
105mm+-2
Appendix
105mm+-2
Appendix
About ArcSoft ,Inc
Customer Service
For the best experience with your ArcSoft software, register each of your
titles right after you've completed the installation process. Contact our
customer service department if you have any questions or concerns.
Product FAQ
(without battery and card)
http://arcsoft.custhelp.com/cgi-bin/arcsoft.cfg/php/enduser/std_alp.php?
Search the ArcSoft Knowledge Base to get information on how-to's,
troubleshooting tips, features, and more.
Phone technical support (for registered users only)
For Windows
or later
"Specifications and product desing are subject to change without any notice for further improvement"
64
65
150mm+-2
http://www.arcsoft.com/support/custservice_phone.asp
Contact our phone support representatives and have your issues resolved
right away.
105mm+-2
Appendix
105mm+-2
Appendix
Things You Can Do With "ArcSoft
VideoImpression"
About Ulead Photo Explorer
Software license
You could choose :
1. Open an Existing Project .
2. Create a New Video.
3. Create a New Slide Show.
The software mentioned in this manual is furnished under a License
Agreement which is included with the product. This Agreement specifies
the permitted and prohibited uses of the product.
When you choose option and click on next page,you could edit the files by
following steps:『MEDIA』、『EDIT』、『EFFECTS』、『TEXT』
、『NARRATE』、『PRODUCE』.
ICI Library 1991-1992 C-Cube Microsystems.Ulead Systems, Inc. And the
Ulead logo are trademarks of Ulead Systems, Inc. All other product names
and any registered and unregistered trademarks mentioned in this manual
are for identification purposes only and remain the exclusive property of
their respective owners.
Licenses and trademarks
Technical supports
Headquarters:Ulead Systems, Inc.
Http://www.ulead.com.tw
E-mail: [email protected]
Japan:Ulead Systems, Inc.
Http://www.ulead.co.jp
E-mail: [email protected]
Europe:Ulead Systems GmbH
http://www.ulead.de
http://www.ulead.co.uk
http://www.ulead.co.uk/fr
E-mail: [email protected]
North & South America: Ulead Systems, Inc.
Http://www.ulead.com
E-mail: [email protected]
Asia-Pacific:Ulead System, Inc.
Http://www.asiapac.ulead.com
E-mail: [email protected]
China: Ulead Systems, Inc.
Http://www.ulead.com.cn
E-mail: [email protected]
66
67
150mm+-2
Registered users are entitled to Ulead technical support. This Web site has
valuable up-to-date information about Photo Explorer, other Ulead products,
and free downloads. Visit our Web site at www.ulead.com, or send an e-mail
at [email protected].
105mm+-2
105mm+-2
Appendix
Appendix
Things You Can Do In Ulead Photo
Explorer 8.5 SE Basic
Browse thumbnails
Ulead Photo Explorer displays files as thumbnails, allowing you to visually browse
through images and media files. (picture 4)
Here's an overview of what you can do in Ulead Photo Explorer. Refer to the
chapters in this user guide for more details.
Acquire images
Acquire images from digital cameras, scanners, or memory card readers.
(picture 1)
picture 1
picture 4
picture 5
Preview images and other media
Instantly preview images, video and audio files in Photo Explorer without actually
opening them. (picture 5)
picture 2
Capture and trim video
Capture video clips from DV camcorders, PC cameras, WebCams,
motion cameras or capture boards. Later, you can trim, convert and
optimize video clips.(picture 3)
picture 6
picture 3
68
View images
Display images in larger views by switching to Viewer mode or opening
images in Ulead Instant Viewer. (picture 6)
69
150mm+-2
Adjust images
Make adjustments to images, such as straighten, rotate, crop, balance
color, remove red eye, etc. Image adjustments can be applied to
multiple images at one time.(picture 2)
105mm+-2
105mm+-2
Appendix
Print images in various layouts
Output single-image prints, greeting cards, or print images in different photo sizes.
You can also print an index sheet of thumbnails for your image collection. (picture 7)
Create slideshows
Assemble images, video and audio files into
a multimedia slideshow. Apply cool transition
effects to your slideshow. (picture 8)
picture 7
picture 8
150mm+-2
Output Web thumbnails and Web slideshows
Create Web photo albums and Web slideshows ready to be
uploaded to the Internet. (picture 9)
picture 9
picture 10
Share on the Internet
To share selected images on the Web, upload
them to iMira.com, Ulead's free image sharing
Web site. (picture 10)
70
71
105mm+-2
105mm+-2
150mm+-2