1
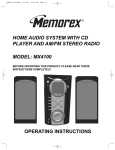
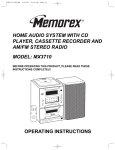
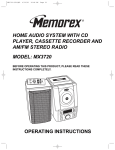
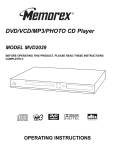
MPH2089 O/M.QXD
9/4/01
10:30 AM
Page 21
DIGITAL ANSWERING MACHINE WITH
DATE/TIME STAMP
MODEL: MPH2089
BEFORE OPERATING THIS PRODUCT,
PLEASE READ THESE INSTRUCTIONS COMPLETELY.
OPERATING INSTRUCTIONS
MPH2089 O/M.QXD
9/4/01
10:30 AM
Page 1
Warning: Changes or modifications to this unit not expressly approved by
the party responsible for compliance could void the user’s authority to
operate the equipment.
NOTE: This equipment has been tested and found to comply with the
limits for a Class B digital device, pursuant to Part 15 of the FCC Rules.
These limits are designed to provide reasonable protection against
harmful interference in a residential installation. This equipment
generates, uses, and can radiate radio frequency energy and, if not
installed and used in accordance with instructions, may cause harmful
interference to radio communications. However, there is no guarantee that
interference will not occur in a particular installation. If this equipment
does cause harmful interference to radio or television reception, which can
be determined by turning the equipment off and on, the user is
encouraged to try to correct the interference by one or more of the
following measures:
• Reorient or relocate the receiving antenna.
• Increase the separation between the equipment and receiver.
• Connect the equipment into an outlet on a circuit different from that to
which the receiver is connected.
• Consult the dealer or an experienced radio/TV technician for help.
SURGE PROTECTORS:
It is recommended to use a surge protector for AC and telephone
connection. Lightning and power surges ARE NOT covered under
warranty for this product.
IMPORTANT:
PLEASE KEEP ALL PACKAGING MATERIAL FOR AT LEAST 90
DAYS IN CASE YOU NEED TO RETURN THIS PRODUCT TO YOUR
PLACE OF PURCHASE OR MEMOREX.
1
MPH2089 O/M.QXD
9/4/01
10:30 AM
Page 2
IMPORTANT SAFETY INSTRUCTIONS
When using your telephone equipment, basic safety precautions should always be followed to
reduce the risk of fire, electric shock and injury to persons, including the following:
1. Read and understand all instructions.
2. Follow all warnings and instructions marked on this product.
3. Do not use this product near water- for example, near a bath tub, wash bowl, kitchen
sink, or laundry tub, in a wet basement, or near a swimming pool.
4. Do not place this product on an unstable cart, stand, or table. The product may fall,
causing serious injury and serious damage to the product.
5. Slots and openings in the cabinet and in the back or bottom are provided for ventilation
and to ensure reliable operation of the product and to protect it from overheating.
These openings must not be blocked or covered. The openings should never be
blocked by placing the product on a bed, sofa, rug, or other similar surface. This
product should never be placed near or over a radiator or heat source. This product
should not be placed in a built-in installation unless proper ventilation is provided.
6. Never push objects of any kind into this product through cabinet slots as they may
touch dangerous voltage points or short out parts that could result in a risk of fire or
electric shock. Never spill or spray any type of liquid on the product.
7. To reduce the risk of electric shock, do not disassemble this product, but take it to a
qualified service personnel under the following conditions:
A. If liquid has been spilled into the product.
B. If the product has been exposed to rain or water.
C. If the product does not operate normally by following the
operating instructions. Adjust only those controls that are
covered by the operating instructions, as an adjustment of
other controls may result in damage and will often require
extensive work by a qualified technician to restore the
product to its normal operation.
D. If the product has been dropped or the cabinet has been
damaged.
E. If the product exhibits a distinct change in performance.
8. Avoid using a telephone (other than a cordless type) during an electrical storm. There
may be a remote risk of electric shock from lightning.
9. Do not use the telephone to report a gas leak in the vicinity of the leak.
10. Do not allow anything to rest on the telephone cord. Do not locate this product where the
cord will be abused by persons walking on it.
11. Never install telephone wire during a lightning storm.
12. Never install telephone jacks in wet locations unless the jack is specifically designed for
wet locations.
13. Never touch uninsulated telephone wires or terminals unless the telephone line has been
disconnected at the network interface.
14. Use caution when installing or modifying telephone lines.
SAVE THESE INSTRUCTIONS
2
MPH2089 O/M.QXD
9/4/01
10:30 AM
Page 3
IMPORTANT SAFETY INSTRUCTIONS
1. If your local telephone exchange only accepts Pulse dialing, you may have to
switch the Tone/Pulse switch to Tone to access certain services that require
Tone signalling (such as home banking). After the initial line is connected to the
number you are calling, switch the Tone/Pulse switch to Tone to access Tone
signalling. When you have completed your call, please switch the Tone/Pulse
switch back to Pulse.
2. Hearing aid compatibility - Your telephone is compatible for use with hearing aids.
FCC and Phone Company Information
Your telephone company is required by the Federal Communications Commission to
allow you to connect FCC registered telephones to their lines. The FCC requires you
to provide information, if requested by the local telephone company, about the
connection of an FCC registered telephone to their lines. They may ask you for the
FCC registration number and the ringer equivalence number (REN); both are at the
bottom of the base. They may also ask for the Universal Service Order Code
(USOC), which is the RJ-11C.
The REN is used to determine the quantity of devices which may be connected to
the telephone line. Excessive REN’s on the telephone line may result in the devices
not ringing in response to an incoming call. In most, but not all areas, the sum of the
REN’s should not exceed five (5.0). To be certain of the number of devices that may
be connected to the line, as determined by the total REN’s, contact the telephone
company to determine the maximum REN for the calling area.
Should your equipment cause trouble on your line which may harm the telephone
network, the telephone company shall, where practical, notify you that temporary
discontinuance of service may be required. Where prior notice is not practicable and
the circumstances warrant such action, the telephone company may temporarily
discontinue service immediately. In case of such temporary discontinuance, the
telephone company must: (1) promptly notify you of such temporary discontinuance;
(2) afford you the opportunity to correct the situation; (3) inform you of your right to
bring a complaint to the Commission pursuant to procedures set forth in of Part 68 of
FCC Rules and Regulations.
The telephone company may make changes in its communication facilities,
equipment operations or procedures where such action is required in the operation
of its business and not consistent with FCC Rules and Regulations. If these changes
are expected to affect the use of performance of your telephone equipment, the
telephone company must give you adequate notice in writing, to allow you to
maintain uninterrupted service.
This equipment cannot be used on telephone company provided coin service.
Connection to Party Line Service is subject to state tariffs.
Any changes or modifications not expressly approved by (state party responsible for
compliance) can void the user’s authority to operate the equipment.
3
MPH2089 O/M.QXD
9/4/01
10:30 AM
Page 4
LOCATION OF CONTROLS
1 2
1.
2.
3.
4.
5.
6.
7.
8.
9.
10.
11.
12.
13.
3
4 5 6 7 8 9 10 11 12 13
DELETE Button
SKIP➛➛/MEMO Button
PLAY/PAUSE Button
Display
Battery Compartment (Bottom of Unit)
DATA Jack (Rear of Unit)
LINE Jack (Rear of Unit)
SKIP❿❿/OGM Button
TIME Button
DC Jack (Rear of Unit) + NEW MESSAGE Indicator
ON/OFF Button
VOLUME Control (Side of Unit)
4
MPH2089 O/M.QXD
9/4/01
10:30 AM
Page 5
INSTALLATION
This section has been designed to provide a reference guide to help set up the unit.
AC POWER
ADAPTOR
DC 9V POWER TELEPHONE
JACK LINE JACK DATA JACK
TELEPHONE LINE CORD
TO EXTERNAL
TELEPHONE
1. Unpack and make sure all the items have been included:
Base Unit, Power Adaptor and Telephone Line Cord.
2. Connect one end of the provided telephone line cord into the LINE jack on the
rear of the unit and the other end into a modular telephone jack.
3. If connecting another telephone or another piece of telephone equipment, plug
the external unit’s phone cord into the DATA jack.
4. Insert the small plug on the end of the AC adaptor into the
DC power jack located on the rear of your unit. Use only
the Center Negative AC adaptor provided with your unit:
INPUT: 120VAC, 60Hz
OUTPUT: 9V DC
83mm
5. If desired, you can mount the unit on a wall by inserting 2
screws 83mm apart as in the illustration to the right.
6. Plug the AC adaptor into a standard 120V AC wall outlet.
Once plugged in, the display will count up from 0 to 15.
“Lo” will light to indicate that the battery is not inserted, see
page 6 to install the batteries. “Cl” will light to indicate that
the date/time is not set, see page 7 to set the clock.
7. This unit uses digital technology, so a microcassette is not used. Follow the
instructions on the following pages to operate your unit.
8. During AC power failure, a 9V battery provides battery backup so the unit can
maintain the memory information. However, the unit cannot answer incoming
calls without AC power.
E–5
MPH2089 O/M.QXD
9/4/01
10:30 AM
Page 6
POWER SOURCES
AC Power Adapter
To operate the unit using AC power, connect the AC adapter to the DC jack on the
rear of the unit and to a wall outlet having 120V, 60Hz only.
CAUTION: Use only the AC adapter provided with
the unit. Using another AC adapter may damage
the unit. When not using AC power, disconnect the
AC Outlet
AC adapter from the wall outlet by pulling the plug
(not the cord). Do not touch the AC adapter with
wet hands.
AC Adapter's Plug
Battery Installation
To protect the memory if there is a power failure, insert a 9V battery (not included).
To install the battery, open the battery compartment, insert the battery and replace
battery compartment cover.
Replace the batteries when “Lo” lights in the display.
9V
BATTERY PRECAUTIONS
Follow these precautions when using batteries in this device:
1. Use only the size and type of batteries specified.
2. Be sure to follow the correct polarity when installing the batteries as indicated in the
battery compartment. Reversed batteries may cause damage to the device.
3. Do not mix different types of batteries together (e.g. Alkaline and Carbon-zinc) or old
batteries with fresh ones.
4. If the device is not to be used for a long period of time, remove the batteries to prevent
damage or injury from possible battery leakage.
5. Do not try to recharge batteries not intended to be recharged; they can overheat and
rupture.
(Follow battery manufacturer’s directions.)
6
MPH2089 O/M.QXD
9/4/01
10:30 AM
Page 7
OPERATION
SETTING THE DATE/TIME
1
2
2
3
1
2
3
1
Press and hold the TIME button ❶ for
2 seconds and the unit will announce
the day of the week (i.e. Monday).
Press the SKIP➛➛/MEMO button ❷
to decrease or the SKIP❿❿/OGM
button button ❸ to increase until the
present day of the week is heard.
Press the TIME button ❶ again and
the unit will announce the hour of the
time (i.e. 12 AM). Press the
SKIP➛➛/MEMO button ❷ to decrease
or the SKIP❿❿/OGM button ❸ to
increase until the present hour is
heard.
3
4
2
3
1
Press the TIME button ❶ again and
the unit will announce the minute of the
time. Press the SKIP➛➛/MEMO
button ❷ to decrease or the
SKIP❿❿/OGM button ❸ to increase
until the present minute is heard.
Press the TIME button; the unit will
announce the date/time and they will
be set.
NOTES:
• To hear the time and date at any time, press the TIME button.
• A button must be pressed within 8 seconds of pressing the previous button,
otherwise the unit will revert back to the previous mode.
• When the date/time is set, the unit will announce the date/time of the call when
the ICM’s (Incoming Messages) are being played back.
• “Cl” will appear in the display when the date/time needs to be set.
7
MPH2089 O/M.QXD
9/4/01
10:30 AM
Page 8
OPERATION (CONTINUED)
RECORDING OGM (OUTGOING MESSAGE )
Recording an OGM allows the caller to hear the OGM and then be able to leave a
message. Please note that there is an automatic message on this unit, recording
a new OGM will disable this default message.
1
2
1
2
When finished recording, press the
PLAY/STOP button ❶. The newly
recorded outgoing message will then
play once. Make sure the VOLUME
control ❷ is at a desirable level.
To record a new outgoing message,
please repeat steps 1 and 2.
Press and hold the SKIP❿❿/OGM
button for approximately 2 seconds
until a short beep is heard, and then
release the button. Begin recording
your outgoing message speaking in a
normal tone of voice.
Typical Message: “You have reached
the Smith residence. We are not able
to come to the phone right now. If
you’ll leave your name, phone number
and a brief message after the beep,
we will call you back.”
NOTES:
• If an invalid OGM is left, the unit will revert back to the default OGM.
• Make sure to raise the SPEAKER VOLUME when setting the OGM.
• TO REVERT BACK TO THE DEFAULT OGM: While in the Power Off or Play
OGM mode, press the DELETE button.
VERIFYING THE OUTGOING MESSAGE
1
Press and release the SKIP❿❿/OGM
button and the selected Outgoing
Message will play.
8
MPH2089 O/M.QXD
9/4/01
10:30 AM
Page 9
OPERATION (CONTINUED)
SETTING THE UNIT TO ON MODE (Incoming Messages will be
recorded)
When the answering machine is turned on, when a call is received the unit will
play the OGM and then record a message.
1
Make sure the OGM is recorded.
Press the ON/OFF button; the NEW
MESSAGE indicator will light solid and
the unit will announce, “Answer On”
NOTES:
• If the unit detects a dial tone, silence or a busy signal, the unit will hang up and
may not register the message.
• When the memory is full, no ICMs can be recorded.
• When the batteries are low, dead or not installed, “Lo” will appear in the display.
SETTING THE UNIT TO THE ANSWER-OFF MODE
Press the ON/OFF button and the NEW MESSAGE indicator will go out and the unit
will announce, “Answer Off”
TOLL SAVER
This unit has a built-in toll saver feature that will have the answering machine answer
the call after 4 rings when no new messages have been recorded and it will answer
after 2 rings when messages have been recorded. This is useful in if calling in to get
your messages.
9
MPH2089 O/M.QXD
9/4/01
10:30 AM
Page 10
OPERATION (CONTINUED)
RECORDING/PLAYING A PERSONAL MEMO
1
To record a personal memo which will
be played the next time somebody
retrieves the memos, press and hold
the SKIP➛➛/MEMO button for
approximately 2 seconds; a beep will
sound. When the beep is heard,
release the SKIP➛➛/MEMO button.
2
2
1
After the message is recorded, press
the PLAY/STOP button ❶ to stop the
recording. “oo” will appear in the
display when memo’s have been
recorded. To hear the memo(s), press
the SKIP➛➛/MEMO button ❷. “oo”
will appear in the display when new
memo(s) has been recorded.
TO REPEAT OR SKIP MEMOS:
To repeat a memo while you are listening to it, simply press the SKIP➛➛/MEMO
button. Repeatedly press this button to skip back to previous memos.
To skip a memo while you are listening to it, press the SKIP❿❿/OGM button and
the next recorded memo will play.
SCREENING YOUR CALLS
1
2
Adjust the SPEAKER VOLUME
control on the side of your unit to hear
the caller.
When a call is received, you may listen
to the caller leaving an incoming
message. If you wish to speak with the
caller, just pick up the handset to talk
(the machine will turn off automatically).
10
MPH2089 O/M.QXD
9/4/01
10:30 AM
Page 11
OPERATION (CONTINUED)
PLAYING BACK INCOMING MESSAGES (ICMs)
The NEW MESSAGE indicator will blink when the unit has recorded new
messages and the display will show the total amount of messages.
To hear messages, proceed as follows:
1
2
Make sure the SPEAKER VOLUME
control is adjusted as desired.
Press the PLAY/STOP button to hear
only the new ICM/MEMO messages.
As the messages are played back,
the unit will say the time they were
received before playing the ICM.
3
4
1
If no new messages have been
recorded, press the PLAY/STOP
button to hear the previously heard
messages that were not deleted.
After playing the messages, the
display will show the total ICM
messages received.
NOTE: Messages will automatically
be saved. To delete messages, see
page 12.
2
To repeat a message while you are
listening to it, simply press the
SKIP➛➛/MEMO button ❶.
Repeatedly press this button to skip
back to previous messages. To skip a
message while you are listening to it,
press the SKIP❿❿/OGM button ❷
and the next recorded message will
play.
11
MPH2089 O/M.QXD
9/4/01
10:30 AM
Page 12
OPERATION (CONTINUED)
5
CHANGING THE REMOTE CODE
To change the remote code, please
follow the instructions given on page
17.
NOTES:
• If a power failure occurs and there
is a dead or no battery, the Remote
Code resets to 000.
• If you forget the Remote Code,
unplug the AC adaptor and
disconnect the battery and it will
reset to 000.
• Be sure to write down your new
Remote Code and store it in a safe
place.
To stop playback, press the
PLAY/STOP button and the unit will
save the previous messages.
NOTES:
• After playing the ICMs, the unit will automatically reset to take new messages.
• The maximum recording time for an ICM (Incoming Message) is 60 seconds.
IF MEMORY IS FULL
If the memory is full, the unit will not allow any new messages.
DELETING INCOMING MESSAGES AND MEMOS
1
2
To erase a single message or memo
while playing it back, press the
DELETE button. The unit will delete
the current message and play the next
message.
To delete all the messages, press and
hold the DELETE button while in the
Stop mode for 3 seconds, “E5” will
appear in the display and all
messages will be deleted.
12
MPH2089 O/M.QXD
9/4/01
10:30 AM
Page 13
REMOTE OPERATION
TURNING THE ANSWERING MACHINE OFF
1
2
Call the answering machine from a
separate line. After the OGM is played
(press “*” to skip OGM), and the beep
is heard, enter your remote code
within 10 seconds.
Press the “*” pad, then the “5” pad to
turn the unit off.
REMOTELY PLAYING THE OGM (OUTGOING MESSAGE)
1
2
Call the answering machine from a
separate line. After the OGM is played
(press “*” to skip OGM), and the beep
is heard, enter your remote code
within 10 seconds.
Press the “1” pad and the OGM will
play.
REMOTELY RECORDING A NEW OGM
1
2
Call the answering machine from a
separate line. After the OGM is played
(press “*” to skip OGM), and the beep
is heard, enter your remote code
within 10 seconds.
Press the “*” pad followed by the “1”
pad and record a new OGM. Press the
# button to stop OGM recording and
new OGM will be played back. Press
the “#” pad when done.
13
MPH2089 O/M.QXD
9/4/01
10:30 AM
Page 14
REMOTE OPERATION
REMOTELY PLAYING INCOMING MESSAGES (ICM’S)
1
2
Call the answering machine from a
separate line. After the OGM is played
(press “*” to skip OGM), and the beep
is heard, enter your remote code
within 10 seconds.
Press the “4” pad to play all messages
or the “5” pad to play only new
messages.
TO ENTER THE PLAYBACK MENU
1
2
Call the answering machine from a
separate line. After the OGM is played
(press “*” to skip OGM), and the beep
is heard, enter your remote code
within 10 seconds.
Press the “9” pad to access the Play
menu as described in the next few
sections.
REPEATING ICM’S
SKIPPING ICM’S
1
1
WHILE IN THE PLAY MENU:
To repeat the currently playing
message, press the “3” pad.
To skip backward to previous
messages, press “the 3” pad.
WHILE IN THE PLAY MENU:
To skip forward to the next message,
press the “5” pad.
14
MPH2089 O/M.QXD
9/4/01
10:30 AM
Page 15
REMOTE OPERATION (CONTINUED)
TO STOP PLAYBACK
TO DELETE A MESSAGE
1
1
WHILE IN THE PLAY MENU:
To stop playback, press the “7” pad.
WHILE IN THE PLAY MENU:
To delete a message, press the “6”
pad.
TO PAUSE PLAYBACK.
RECORDING A MEMO
1
1
WHILE IN THE PLAY MENU:
To pause playback, press the “4” pad.
To release pause, press the “4” pad
again.
After the OGM is played, and the beep
is heard, enter your remote code within
10 seconds. Press the “*” pad, followed
by the “2” pad to record a memo.
Press the # button to stop recording.
PLAYING THE MEMOS
1
Call the answering machine from a
separate line. After the OGM is played
(press “*” to skip OGM), and the beep
is heard, enter your remote code within
10 seconds. Press the 3” pad to play
all memos.
2
You can skip, delete, stop or repeat
memos using the “3”, “4”, “5”, “6” and
“7” pads as described previously
15
MPH2089 O/M.QXD
9/4/01
10:30 AM
Page 16
REMOTE OPERATION (CONTINUED)
ERASING ALL MESSAGES
1
After the OGM is played, and the beep
is heard, enter your remote code
within 10 seconds. Press the “*” pad,
followed by the “4” pad to erase all
ICMs and memos.
REMOTE ROOM MONITORING
This feature will allow you to call in and monitor the room in which the answering
machine is located.
1
2
After the OGM is played, and the beep
is heard, enter your remote code
within 10 seconds.
Press the “2” pad and the unit will
monitor the situation for 30 seconds. If
you want to continue monitoring,
immediately press the “2” pad again
for an additional 30 second room
monitoring.
To stop monitoring, press the “#” pad.
16
MPH2089 O/M.QXD
9/4/01
10:30 AM
Page 17
REMOTE OPERATION (CONTINUED)
TO CHANGE THE REMOTE CODE (REMOTELY)
1
2
After the OGM is played, and the beep
is heard, enter your remote code
within 10 seconds.
Press the “*” pad, followed by the “3”
pad to change the remote code.
STOP CALL:
Press the “#” pad to stop the remote function.
TO CHANGE THE REMOTE CODE (FROM THE UNIT)
1
2
1
Press and hold the ON/OFF button for
2 seconds; the display will show “se”
and the remote number.
2
3
Press the SKIP➛➛/MEMO button ❶
and/or SKIP❿❿/OGM button ❷ to
select the new remote code number.
Press the ON/OFF button ❸ again to
confirm.
17
MPH2089 O/M.QXD
9/4/01
10:30 AM
Page 18
CONVENIENT REMOTE ACCESS CARD
For your convenience, cut out this card and keep it in your wallet as a
reference guide when remotely calling your answering machine.
IDLE MODE (No Messages Playing)
Button
Function
1
Play OGM
2
Starts room monitoring
3
Playback memos
4
Playback all ICMs
5
Playback new ICMs
7
Stop or save all messages
9
Enter the Playback menu.
*,1
Record OGM
*,2
Record a memo
*,3
Change the Remote Code
*,4
Erase all ICMs, memos
*,5
Set answer mode off
#
Stop remote menu
*
Skip OGM
PLAY MODE (Messages or Memos Playing)
Button
Function
3
Skip backward to the previous message
4
Pause or release pause
5
Skip forward to next message
6
Erase single memo / ICM message
7
Stop current operation
Care and Maintenance
1. Clean your phone with a damp (never wet) cloth. Solvent or detergent should
never be used.
2. Avoid operating your unit under direct sunlight or in hot, humid or dusty places.
3. Keep your unit away from heating appliances.
18
MPH2089 O/M.QXD
9/4/01
10:30 AM
Page 19
TROUBLESHOOTING GUIDE
Before requesting service, please refer to the following chart and check for the
symptom you are experiencing.
SYMPTOM
No Power.
POSSIBLE CAUSE
AC adaptor not connected to unit.
AC adaptor not connected to the AC outlet.
No power.
No OGM.
No OGM recorded.
Volume is too low.
Message recorded
too low.
Unit not answer- Line cord(s) are not
ing the phone. connected properly.
Unit is not on.
Phone line problems.
No sound.
Volume is too low.
Remote features Procedure was not
not functioning. done properly.
Using wrong Access
Code.
POSSIBLE SOLUTION
Connect AC adaptor to
DC 9V jack on unit.
Connect AC adaptor to
the AC outlet.
Move to another outlet.
Record an OGM.
Increase volume.
Record message again.
Connect line cord(s)
securely.
Turn unit on.
Call local phone company
for service.
Increase volume.
Repeat.
Use correct Access
Code.
FOR ADDITIONAL SET-UP OR OPERATING ASSISTANCE, PLEASE VISIT
OUR WEBSITE AT
WWW.MEMCORPINC.COM
OR CONTACT CUSTOMER SERVICE AT 1-800-919-3647
PLEASE KEEP ALL PACKAGING MATERIAL FOR AT LEAST 90 DAYS IN
CASE YOU NEED TO RETURN THIS PRODUCT TO YOUR PLACE OF
PURCHASE OR MEMOREX.
FOR PARTS AND ACCESSORIES, CONTACT FOX INT’L AT
1-800-321-6993.
19
MPH2089 O/M.QXD
9/4/01
10:30 AM
Page 20
Memcorp, Inc.
Weston, FL
Printed in Hong Kong
Visit our website at www.memcorpinc.com