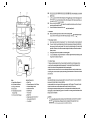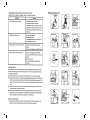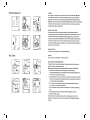
1
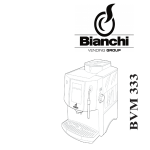
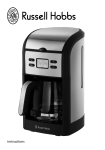
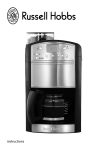
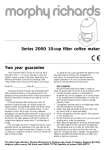
Never use scouring agents.
Never immerse the appliance itself in water. To clean, simply wipe off with a soft, damp cloth.
Never use a cloth to clean inside of the water chamber, as this might leave fuzzy deposits in the
chamber. Just rinse with cold water periodically.
DECALCIFYING OF THE COFFEEMAKER
The coffeemaker must be decalcified regularly. The frequency depends on the hardness of your water and
how often you use the coffeemaker.
Recognizable indications that descaling is necessary are:
8 increased noise during boiling
@® longer preparation time.
If usage is frequent, descaling should be carried out as follows:
e with soft water once a year
@ with medium hard water every quarter year
@ with hard water once a month.
In doubt regarding the water hardness in your area, you may call your local water department.
For ecological and health reasons, we recommend the exclusive use of biological materials such as citric
acid, which can be obtained from drugstores.
Dissolve 2 tablespooniuls of citric acid in 1/2 quart water and pour into the water container. Run this
through 2 or 3 time as if making coffee, but using no ground coffee. The hot descaling solution must be
allowed to cool down before being poured into the water container. Finally do the same twice using clear
water.
ellerware
29001
Instruction Manual
COMBINATION COFFEE MAKER
Before operating this product, please read these instructions carefully.
A
Re
| |
в 00
c- |
о 7==
:—N
2
NU
Coffee
A - Hinged Water Chamber Lid
B - Drip Coffee OrvOff Button
C - Swing-Out Filter Holder
D - Glass Carafe
E - Thermostatically Controlled
Warming Plate
F - A/C Cord and Cord Storage
Espresso/Cappuccino
a - Boiler Cap
b - Espresso/Cappuccino On/Off Button
с - Espresso Strength Control
d - Steam Control Knob
e - Steam Nozzle
f - Filter Holder
g - Metal Filter
h - Glass Carafe with Handle and Lid
i - Removable Qverflow Grid
j - Cup Adaptor
@ Use your hands to conform the filter to the contours of the filter holder. This will enable you to achieve
better results.
2. Put ground coffee into the filter holder (see figure 3). We suggest using one level measuring spoon of
ground coffee for each cup of robust brewed coffee. After using your coffee maker several times, you
can adjust the quantity to suit your own taste.
® We do not recommend using coffee that is ground to a powder-like consistency, as this will prevent
water from passing through the coffee.
3. Close the filter holder and make sure that it is completely close (see figure 4).
ATTENTION
e Make sure that the filter paper does not fold over when closing the filter holder. Otherwise the water
might run between the filter paper and the filter holder producing a weak cup of coffee.
Filling The Water Chamber
1. Open the hinged water chamber lid (see figure 5). Pour in the desired quantity of water (see figure 6).
e The amount of freshly brewed coffee delivered after the brewing process will always be slightly less
than the amount put into the water chamber. This is due to the minimal absorption of the water by the
ground coffee. Therefore, put in a little more water to begin with so that you will have the number of
cups that you desire.
2. Place the glass carafe with lid in position on the warming plate.
3. Turn on your Coffee Bar using the on/off button. The indicator light will illuminate indicating that the
brewing process has begun (see figure 7).
Stop & Serve Feature
This device automatically stops the flow of brewed coffee through the filter cone if the glass carafe is
removed from the warming plate during the brewing cycle. You have about 20 seconds between the
removal of the carafe and it being reinserted back onto the warming plate.
The Stop a Serve device closes off the filter cone so effectively that there is virtually no coffee-drip onto
the warming plate. Once the carafe is replaced, the brewing process and the flow of coffee into the carafe
can be resumed.
CAUTION
If the coffee DOES drip onto the warming plate after the removal of the carafe, it is usually an indication
that the seal in the filter holder is missing or defective.
It is also possible that too much ground coffee has been placed in the filter paper. This causes the water
that jets into the filter cone to overflow between the filter and the sides of the filter cone.
If this blockage and subsequent dripping does occur, put the glass carafe immediately back onto the
warming plate, and allow the full brewing cycle to run its course. Do not swing out the swive! filter until the
brewing process is completed.
CLEANING
@ Always unplug this appliance before cleaning. Clean the filter basket, carafe and lid in a solution of
warm water and mild liquid soap. These parts can also be placed in the upper level of your
dishwasher away from the heating element for safe effective cleaning.
PROBLEMS AND CAUSES IN MAKING ESPRESSO OR CAPPUCCINO
(Always check if the appliance is plugged in and is in the proper on position.)
Problem
Causes
1. Espresso leaking from filter holder
Filter holder not properly inserted
Filter holder not pushed in far enough
Internal gasket is dirty and needs to be cleaned
Gasket without elasticity, replace it with a new one
Coffee powder not cleaned off the edge of the
filter holder
2. Espresso does not come out
No water in boiler container
No coffee in filter holder
Filter clogged because coffee is ground too fine
and or pressed down to hard
3. Steam does not come out of steam nozzle
No water or not enough water in the boiler
chamber
Steam nozzle is clogged (see CLEANING section)
4. Not enough froth when frothing the milk
Steam nozzle is clogged (see CLEANING)
Insufficient water left in the boiler to steam 45-60
seconds
Milk not cold enough
Did not use a stainless steel frothing pitcher
Stale milk
PREPARING COFFEE
Before making your first pot of delicious coffee, we recommend rinsing the coffee maker once or twice
with water only, without ground coffee in the filter basket. This will remove any possible dust which may
have settled during shipping.
Be sure that the water chamber is empty. Remove any literature, etc. if found in the water chamber.
e Make sure that the swivel filter is closed properly during the brewing process. When closing the swivel
filter you will feel a noticeable resistance when the handle of the swivel filter is approximately 1/2 inch
away from the nonremovable side piece. Push in firmly until the handle touches the side of the coffee
maker.
e Caution: If the filter holder is not pushed in properly the Stop & Serve trigger cannot function. This
may cause hot water or hot coffee to overflow.
e The Stop & Serve mechanism is opened as long as the glass carafe is inserted into the machine
and sits properly on the warming plate and the swivel filter is closed properly. When brewing coffee
make sure the glass carafe is in place (see Stop & Serve Feature section.)
Putting in The Ground Coffee
1. Swing out the filter holder (C) (see figure 1) and insert a paper filter. When inserting a paper filter
make sure the seam is pointing towards the handle of the filter holder (see figure 2).
Espresso/Cappucci
no
\
Espresso/Cappuccino
( “IZ |
7
u 16
И Ny
|6
Filter Coffee
NN
CLEANING
Before cleaning, turn off the machine, unplug it, and allow it to cool down. The filter holder, filter basket,
carafe, carafe lid, and overflow grid can be putin the dishwasher’s upper rack, away from the heating /
drying element. The machine can be wiped clean by using a damp cloth. Never immerse the body of your
Coffee Bar in water or any other liquid. Clean the brewing head with a damp cloth and remove ground coffee.
If there is water left in the boiler chamber, let the machine cool down, remove all loose parts and empty
through the top opening by turning upside down.
Cleaning The Steam Nozzle
Clean the steam nozzle each time after you have immersed it in milk, otherwise the inside of the
nozzle becomes clogged and the milk deposits on the outside harden and become difficult to remove. The
froth attachment can be removed for cleaning (See figure19) If clogging does occur, remove all milk
particles using a sewing needle. Immediately after you are done with frothing milk, wipe off the outside of
the nozzle with a wet cloth, Hold the wet cloth very close to the tip of the nozzle and turn on the steam
control knob. Let the steam escape into the wet cloth for one or two seconds. Any milk residue will then be
flushed out. Then turn of the machine.
Cleaning The Drip Tray
The overflow grid can be cleaned by removing the grid (see figure 20).
CAUTION
DO NOT try to open or disassemble the main body of the machine.
DECALCIFYING OF THE ESPRESSO MACHINE
The espresso machine must be decalcified regularly. The frequency depends on the hardness of your
water and how often you use the espresso machine.
Before descaling, the brewing sieve on the brewing head MUST first be screwed off. (See figure 21)
1. Remove all lime and coffee residues from the brewing sieve and the brewing head.
For ecological and health reasons, we recommend the exclusive use of biological materials such as
citric acid, which can be obtained from drugstores.
2. Dissolve 2 tablespoonfuls of citric acid in 10 fluid ounces of lukewarm water and pour it into the boiler
container. Put one receptacle under the brewing head and another under the steam nozzle (Note: Do
not use the filter holder during decalcification).
3. Turn on the machine and the steam control knob, and wait until steam comes out of the steam
nozzle. Let steam run for approximately 30 seconds.
4. Then turn off the steam contro knob and allow the descaling solution to pass through the brewing
head.
5. After each brewing cycle, switch off the appliance and allow the appliance to cool down.
6. Repeat this operation once again.
Following this, aliow 2 boiler containerfuls of clear water to run through the system. Switch off the
appliance. Allow the appliance to cool down. Insert the brewing sieve into the brewing head again and
screw tight.
ATTENTION
AN HOT SURFACE
The filter holder may be hot during operation, to remove the filter holder, turn the filter to the left, until the
holder dislodges from the machine. (See figure 14)
The metal parts might still be hot and can be cooled down by running cold water over them.
To make more espresso, proceed as follows: Chack to see if the boiler chamber is empty and not under
pressure (see section CAUTION - PRESSURE).
Remove filter holder (f). Empty metal filter (See figure 15). Repeat steps 1-4 of this section.
Preparation of Cappuccino
1. The first step in making cappuccino is to make espresso. Therefore, fill the glass carafe with the
amount of water which is required to make the desired amount of espresso, plus additional water for
frothing milk (see section Making Espresso).
2. Fill a small stainless steel pitcher 1/3 to 1/2 full with fresh, cold milk and set aside.
3. To make espresso, turn on the machine. As soon as half the required amount of espresso is
produced, turn the strength control knob clockwise until tight. At this time the boiler has created
enough pressure and steam to start frothing milk. The indicator light of stream will turn on (See figure
16) frothing milk before finishing the espresso prevents you from running out of steam. This will
happen if you froth milk towards the end of the brewing process.
4. To froth milk, take your pitcher with fresh, cold milk and insert steam nozzle with froth attachment
halfway into the milk (See figure 17). Then turn the steam control knob in anti-clockwise direction
(See figure 18) for approximately 45-60 seconds depending on how much froth you want.
Tum the steam control knob clockwise till tight after use.
ATTENTION
HOT SURFACE
Do not bring milk to a boil (this will happen if large bubbles start forming at the surface of the milk).
5. After the milk is frothed, set aside, and allow it to settle. Turn the stream control knob clockwise to
shut steam.
6. Tum the strength control knob anti-clockwise to the desired level to finish making the espresso.
7. Pour the espresso into a cup which has a capacity of at least 5 ounces. Add the steamed milk to the
espresso and spoon on the frothed milk. The proportion between espresso and milk is to taste: in
Italy it is normally 1 part espresso to 2 parts milk plus froth.
The steam nozzle may be hot during operation.
Steam Only
If you only want to froth milk, fill the glass carafe with water up to the Ch " mark. This will give you
approximately one minute of steaming. Make sure the strength control knob is set to the rightmost
position.
1. Pour the water into the water chamber and turn on the machine.
2. Place a cup under the steam nozzle to collect any water which may escape. As soon as the indicator
light is on, turn on the steam control knob.
3. Now follow steps 4 & 5 and when finished frothing the milk turn off the machine.
IMPORTANT
When using electrical appliances, basic safety precautions should always be followed, including
the following:
® Read all instructions and information in this instruction book and any other literature
included in this carton referring to this product before operating or using this appliance.
® Do not touch hot surfaces. Use handles or knobs.
© To protect against fire, electric shock and personal injury do not immerse cord, plugs, or
appliance in water or other liquid.
e Close supervision is necessary when any appliance is used by or near children.
e Unplug from outlet when not in use and before cleaning. Allow to cool before putting on or
taking off parts, and before cleaning the appliance.
® Do not operate any appliance with a damaged cord or plug or after the appliance
malfunctions, or has been damaged in any manner. Return appliance to the nearest
authorized Service Center for examination, repair or adjustment.
The use of accessory attachments not recommended by the appliance manufacturer may
result in fire, electric shock, or personal injury.
Do not use outdoors.
Do not let cord hang over edge of table or counter, or touch hot surfaces.
Do not place on or near a hot gas or electric burner, or in a heated oven.
To disconnect, turn any control to off then remove plug from wall outlet.
Do not use appliance for other than intended use.
Do not unscrew or remove boiler cap while the machine is in operation. Wait until
brewing cycle Is completed and all water and steam has been used up.
Use of the Glass Carafes.
A. The carafe is designed for use with this appliance. It must never be use on a range top.
B. Do not set a hot carafe on a wet or cold surface.
C. Do not use a cracked carafe or a carafe having a loose or weakened handle.
D. Do not clean carafe with cleansers, steel wool pads, or other abrasive material.
CAUTION: SAVE THESE INSTRUCTIONS
This appliance Is for household use. Any servicing other than cleaning and use maintenance
should be performed by an authorized service representative.
® Do not immerse base in water or try to disassemble.
e To reduce the risk of fire or electric shock, do not remove the base. No user serviceable
parts inside. Repair should be done by authorized service personnel only.
@ Check voltage to be sure that the voltage indicated on the name plate agrees with your
voltage.
@ Never use warm or hot water to fill the water container! Use cold water only!
© Never refill the water chamber while this coffeemaker Is In the on-position. Turn the
coffeemaker off and let it cool down for ten minutes before refilling with water. |
© Before turning your coffemaker on, please make sure that carafe sits flat on inside circle of
heating plate.
® Keep your hands and the cord away from hot parts of the appliance during operation.
® Never clean with scouring powders or hard implements.
The Coffee Bar is a state of the art combination coffee, espresso, and cappuccino maker that
incorporates all of these functions in an all in one space saving coffee/espresso making system, This
appliance offers ease of operation and flawless performance.
BEFORE YOU START...
We recommend that you get familiar with all the parts of your Coffee Bar before operating the machine. With
the unit unplugged, begin by inserting the metat filter (g) into the filter holder (f), fit the filter holder into the
brewing head, and remove and replace the boiler cap (a). Try the on/off button and steam controller, and
check out all parts of the coffeemaker as well. Wash all loose parts in warm, soapy water, rinse thoroughly
and dry.
It is also recommended that you operate your Coffee Bar once without coffee using the instructions provided
for espresso and coffee making.
CAUTION - PRESSURE
Itis important to remember to NEVER open the boiler cap (a) or remove the filter holder (f) while your
Coffee Bar turned “on ”, or as long as there is pressure in the boiler.
Please follow the instructions listed below to see if the machine is still under pressure. These safety
precautions should be followed while your machine is in use and ten to fifteen minutes after last
use of the machine.
1. Make sure the machine is in the “ off ” position.
2. Unplug the machine.
3. Hold a pitcher with cold water underneath the steam nozzle and insert nozzle into the pitcher.
4, Once the steam nozzie is immersed in the pitcher of water, turn the steam control knob in anti-
clockwise direction. Continue this procedure until no more steam comes out of the steam nozzle.
5. Turn the steam control knob to the clockwise direction.
6. Now you can remove the boiler cap and filter holder.
In case there is still water in the boiler chamber, remove the glass carafe and drip tray, and turn the
machine upside down to empty any remaining water in the chamber.
GENUINE ESPRESSO
Espresso is a far richer and stronger brew than regular coffee. It should be deep, dark, and delicious. Most
people find that they enjoy it in small quantities because of its richness, and for that reason, espresso is
usually served in small (2-2 1/2 oz.) demitasse cups.
Your Coffee Bar properly used, will always produce espresso that is deep, dark and delicious. Just follow the
instructions and use fresh, well-roasted, pre-ground espresso beans.
Remember: Espresso requires a finer grind than regular coffee.
Making Espresso
1. Place your Coffee Bar near an electrical outlet, then plug in the machine. Make sure the espresso
button is in the off position.
2. Place your metal filter (9) into the filter holder (f) (see figure 1). The meta! is marked on the inside
indicating 2 or 4 cups. Fill to the desired level.
3. Fill the metal filter with ground espresso coffee (see figure 2). Pack the coffee lightly and clear any
excess coffee from the rim of the filter holder. This will ensure the filter holder will fit properly into the
brewing head.
ATTENTION
Do not pack coffee tightly. Do not fill more coffee than indicated by the 4-Cup marking.
This might cause clogging or overflow (see section Problems & Causes).
4. Insert the filter holder to the machine. Raise the filter holder up into brewing head and turn the filter
holder firmly to the right, until it can go no further. The filter holder should be as far right in the lock
range as possible. If the filter is not at least in the middle of the lock range, do not operate the
machine. Rather, remove the filter holder and reinsert it as described above until the filter is within the
lock rage (see figure 3).
By following this procedure this will prevent the fiiter holder from being dislodged as pressure
builds up during the brewing process.
5. Unscrew the boiler cap (a) by turning it anti-clockwise (see figure 4).
6. Using the glass carafe, fill the boiler chamber with fresh, cold water (see figure 5) to the
corresponding water level.
Measuring Guidelines
The glass carafe (i) has markings for 2 cups and 4 cups and steaming. 2 cups of water yields 2 cups of
espresso. 3 cups of water yields 2 cups espresso, plus steam for frothing milk for cappuccino. 4 cups of
water yields 4 cups espresso. 5-5 1/2 cups of water is the upper rim of the metal band surrounding the
carafe.
CAUTION
Never fill the boiler chamber while your Coffee Bar is in operation. It should be in the off position.
Never pour more than 12 oz. of water into the boiler chamber.
7. Place the boiler cap (a) on the machine and turn it clockwise until it is secure (see figure 6).
8. Next, place the carafe lid on the carafe (h) so that the opening points towards the pouring spout on
the carafe (see figure 7).
9. Position the carafe under the filter holder. Make sure that the nozzle in the filter holder points through
the opening of the carafe lid (see figure 8).
ATTENTION
Make sure that the overflow grid (1) is in place.
10. To make espresso directly into the cups, clip the cup adapter (j) onto the filter holder (see figure 9).
Place cups directly under the two spouts (see figure 10).
11. Now you are ready to make espresso. Simply press the “Espresso / Cappuccino” button to turn on.
(See figure 11). The on/off indicator light will illuminate. Turn the espresso strength control (c) to
desired level. (See figure 12 & 13).
12. After approximately 2 minutes the water will have reached the proper temperature. The water at this
time will pass through the ground coffee, producing espresso in the glass carafe or in the cups,
whichever you choose.
13. Once the espresso has stopped brewing, turn off the machine by depressing the “Espresso /
Cappuccino” button. (See figure11). The control light will go out, indicating that the machine is off.
14. Before you remove the filter holder for cleaning, make sure that the boiler is no longer under pressure
(see section CAUTION - PRESSURE).