1
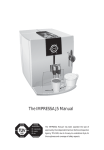
1
INFORMATION TO THE USERS
Under art. 13, Legislative Decree 25 July 2005, no.151 “Implementation
of Directives 2002/95/EC and 2003/108/EC, regarding the reduction of
use of hazardous substances in electrical and electronic equipment as
well as waste disposal”.
The barred waste container symbol on the equipment means that the
product, at the end of its service life, must be disposed of separately
from the other types of waste.
The user must therefore convey the equipment, at the end of its service
life, to the appropriate separate collection centres for electronic/electrotechnical waste products or return it to the dealer when purchasing a
new equivalent equipment.
The appropriate separate collection and the following sending of the
used equipment to recycling, treatment and eco-friendly disposal will
help avoid negative effects on the environment as well as on health
along with an easier recycling of the materials forming the equipment.
Any unauthorized disposal of the product by the user will imply the enforcement of the administrative sanctions as set out in Legislative Decree no. 22/1997 (article 50 and following articles, Legislative Decree
no. 22/1997).
3
SUPER-AUTOMATIC COFFEE-MAKER ESPRESSION
1 IMPORTANT
• Please read these instructions carefully before using the coffee-maker for the first time. Keep them in a safe place so that you can refer to
them whenever you need to.
MOD. BVM 333
• Do not touch the hot surfaces; use the controls and handles that have
been specifically designed for this purpose.
• Disconnect the coffee-maker when it is not in use and before cleaning. Leave the coffee-maker to cool before adding or removing parts
and, especially, before cleaning it.
Thank you for choosing this Bianchi Vending product and for placing
your trust in our brand. This super-automatic coffee-maker has a maximum performance pressure pump (18 Bar) to offer you the best professional espresso coffee in the comfort of your home. With the touchscreen technology, you can easily select the espresso you prefer by
pressing directly on the digital screen. This high-tech coffee-maker will
tell you at any given moment which selection you have made and what
it is making by means of graphic messages. Its menu is highly intuitive
and easy to use so that you can adapt the machine to your personal preferences without any great complications. We recommend you read the
instructions handbook carefully to discover all the options your BVM333
has to offer. We hope you enjoy this coffee-maker and the delicious
coffee it makes.
• This coffee-maker has been designed for indoor use; do not use it
outdoors.
• Do not place the coffee-maker on a hot surface or too near heat
sources.
• Do not leave the cable hanging over the edge of the table or in contact with hot surfaces.
• Do not use the coffee-maker for any purpose other than that for which
it has been designed: making coffee in a domestic environment.
• When disconnecting the coffee-maker, first switch it off by pressing
the on/off switch (OFF position at the rear) and then unplug the cable
from the mains.
• Take particular care when using steam.
• Do not wet the coffee-maker or submerge it in water or any other
liquid.
• Keep the coffee-maker out of the reach of children.
• Use the grinder for grinding coffee only.
CAUTION!
When you want to dispose of the appliance, NEVER
throw it in the rubbish bin. Take it to your nearest CLEAN
POINT or the waste collection centre closest to your
home for processing. You will thus be helping to take
care of the environment.
4
2 PRECAUTION
4 SAFETY STANDARDS
• Remove all the used elements to protect the product during transport, as well as all material used for promotions, such as plastic
bags, cardboard, stickers, the digital screen protection, etc. on both
the outside and inside of the coffee-maker. Keep these elements out
of the reach of children.
In the event of an emergency
Unplug the coffee-maker immediately.
The coffee-maker must be used only:
• Indoors.
• If the mains cable is damaged, it must be replaced by the manufacturer or by an authorised technical service to prevent any possible
danger.
• At a room temperature of between 10°C and 40°C.
• To make coffee, hot water, steam milk or heat liquids using steam.
• For domestic use.
• Do not use warm or hot water to fill the tank under any circumstances. Use only water at room temperature.
• By adults who are in full possession of their physical and mental
faculties.
• Never clean the coffee-maker with a scouring pad or a rough sponge.
Use only a soft cloth moistened with water.
Power cable
• To avoid lime scale deposits in the pipes in your coffee-maker, we
recommend you use purified water or still mineral water.
Connect the coffee-maker to an appropriate socket; the voltage must
coincide with that indicated on the specifications plate.
IMPORTANT! Check that the socket is connected to the mains.
3 IMPORTANT
Installation
The manufacturer will not accept any liability whatsoever for damage
caused by:
• Place the coffee-maker on a completely flat surface. Do not place it
on a hot surface under any circumstances.
• Inappropriate use of the coffee-maker for any purpose other than
that for which it has been designed.
• Manipulation of the mains cable.
• Keep it at a distance of 10 cm from walls and heat sources (gas,
oven, etc.). Do not keep the coffee-maker at a room temperature of
below 0°C; the coffee-maker may be damaged by the water inside
freezing.
• Manipulation of any part of the coffee-maker.
• The mains plug must be accessible at all times.
• Use of spares or accessories that are not supplied by the manufacturer.
• The mains plug must not be damaged, hanging or placed on hard
surfaces.
• Removal of lime scale from the coffee-maker using any method that
is not in accordance with the instructions given in chapter 16. REMOVAL OF LIME SCALE.
• Do not use the power cable to move the coffee-maker by pulling on
it under any circumstances.
• Repairs carried out by unauthorised persons.
In these cases, the warranty will be void.
5
5 PARTS
Hazards
• Do not aim the steam jet or hot water directly at anyone, since there
is a risk of burns.
• Do not place any objects inside the coffee-maker under any circumstances (electrical hazard).
Switch
• Do not touch the coffee-maker if your hands are wet. Do not unplug
the coffee-maker by pulling on the power cable
Responsibilities
• Do not use the coffee-maker if it does not work correctly or if you suspect that it may be faulty, e.g. after it has accidentally been dropped.
Brewing unit
• Have the product repaired at an authorised centre.
• Turn off the coffee-maker before opening the side cover.
Spares
To guarantee your safety and the correct operation of your coffeemaker, use only spares and accessories that are authorised by the manufacturer.
Cover open
lever
Coffee grounds tray
6
Grounds compartment
Coffee bean tank cover
Grind level adjustment
Coffee bean compartment
Ground coffee
tank/sugar cube
compartment
Water tank cover
Cup-warmer
Water tank
Standby switch
Information screen
Steam regulator
Steam nozzle
Touchscreen
Height-adjustable coffee outlet
Handles
Tray water level
indicator
Removable drip tray
7
6 ACCESSORIES
7 BREWING UNIT, THE HEART OF THE
COFFEE-MAKER
For your convenience, all the accessories are in a box with the instructions handbook:
This super-automatic coffee-maker has a
professional unit manufactured and developed by BIANCHI, the best manufacturer of
professional machines (vending) in Italy. The
brewing unit automatically prepares an excellent espresso coffee and deposits the grounds
in a compartment. It has been designed for
professional use and, consequently, does not
require maintenance work until it has made
6,000 cups.
1. Ground coffee dispensing spoon. Capacity 8 g, approx.
2. Lime scale remover.
3. Cleaning brush.
4. Strip of reagent to check water hardness. Levels 1 to 5.
5. Brewing unit switch.
5
8 TOUCHSCREEN
2
LCD display
4
Navigation
button
Programme
button
Outlet
Preparation
of 1 espresso
Hot water
Preparation
of 2 espresso
Steam
Light coffee
Ground coffee
3
1
Preparation of 1
large coffee
8
Strong
coffee
Preparation of 2
large coffees
9 INSTALLATION
6. The first time you use the coffee-maker, its internal circuits need to be
filled with water. The steam jet/hot water regulator icon appears on
the LCD screen to indicate that the circuit needs to be filled
If you find coffee grounds, it is because the coffee-maker has been
tested to make sure it works perfectly
Before switching on the coffee-maker, make sure you have removed
the protection from the screen.
1. Fill the coffee bean tank with coffee beans (the tank has a capacity
for up to 250 g).
IMPORTANT! Perform this operation BEFORE any other.
2. Fill the water tank with clean, cool water. You can fill it directly (a) or
under the tap (b)
a) Lift the water tank cover
IMPORTANT! The circuit must be filled each time the steam regulator
icon appears on the display. This icon appears each time the machine
is PLUGGED IN.
b) Remove the tank by the handle.
7. Place a compartment (glass or jug) under the steam nozzle.
8. To fill the circuits with water, turn the steam regulator anticlockwise
as far as it will go.
9. Wait until water or steam comes out of the steam nozzle.
10. Close the steam regulator to complete the circuit filling process.
11. Remove the compartment with the hot water.
12. The coffee-maker will turn off and is ready for use. Press the standby button.
When placing the tank back in position, make sure it fits into the flap on
the body, so that it is perfectly in place.
13. An hourglass will appear on the display to indicate that the system
is heating up.
3. Connect the power cable.
4. Turn on the on/off switch at the rear of the coffee-maker. Turn it to the “I” position to switch
the coffee-maker on.
14. The coffee-maker auto-cleans the pipes to remove possible remains of coffee or water. During this process, water comes out of
the coffee outlet. This enables you enjoy a coffee made with clean,
fresh water.
5. The standby button will come on (blue).
9
15. The coffee-maker will indicate when it is ready with a beep and a
hand will be displayed on the screen.
Important! If you grind the coffee too finely (grinding level regulator
full to the left), the coffee will brew very slowly.
N.B. You can turn off the beep by proceeding as indicated in chapter
18 PROGRAMMING YOUR COFFEE-MAKER.
10 SUGAR CUBE COMPARTMENT
If you normally use sugar cubes, you can
store them in the coffee-maker. Lift the sugar cube compartment cover and place the
cubes inside. This compartment can be removed for cleaning and to make the filling
process easier.
• Coarse grind: The coffee will brew more quickly. Press and turn the
regulator to the right (clockwise).
IMPORTANT! Take care not to place the
sugar cubes in the ground coffee dispenser by mistake.
11 ADJUSTMENTS
IMPORTANT
A) Adjusting the grinding level.
The adjustment must be made when the grinder is in operation.
By adjusting the grinding level, you can regulate the
size of the ground coffee. This size has a direct effect
on the coffee made by the coffee-maker and it is advisable to test the grinding level until you obtain the type
of grind you prefer. To adjust the grinding level, use the
regulator inside the coffee bean tank.
Use coffee bean blends specially prepared for espresso coffee. If you
do not obtain the desired result, try different blends until you get the
one you prefer. Store any coffee not placed in the tank in a hermetically
closed compartment in a cool place.
IMPORTANT! Do not use high roast coffee; this type of coffee is
roasted with sugar (caramelised) and may damage the coffeemaker.
* Fine grind: The coffee will brew more slowly since it needs more time
and pressure to obtain the coffee. Turn the regulator to the left (anticlockwise). The finer the grind, the creamier the coffee will be.
10
B) Adjusting the amount of coffee
Espresso coffee
Before dispensing the coffee, choose the amount of coffee you want to
make, depending on whether you want a strong or weak coffee.
Large coffee
1 coffee cup
If you want a weak coffee, press the button:
If you want a strong coffee, press the selector:
2 coffee cups
12 OBTAINING THE COFFEE
C) Adjusting the coffee outlet
1. Check that the coffee-maker is ready.
The coffee outlet can be adjusted to different heights depending on the
size of the cups that are being used:
1. To use large cups, slide the coffee outlet up to the top position.
2. Check that you have adjusted the coffee-maker to obtain the coffee
you prefer.
3. Place one or two warmed cups under the coffee outlet.
A) Coffee made from coffee beans
IMPORTANT! The first coffee you get from your coffee-maker will
not be good quality. Throw it away. This occurs because the first
time the grinder is used, it cannot load the complete amount required by the brewing unit.
2. To use espresso cups, slide the coffee outlet down to the bottom
position.
4. Press the button for the type of coffee you wish to obtain.
A frame will appear around the selected button to indicate your selection.
Espresso coffee
N.B. The coffee outlets can be removed for cleaning.
1 coffee cup
D) Regolazione della quantità di acqua per tazza
2 coffee cups
Per regolare la quantità di acqua per tazza, premere i seguenti pulsanti:
11
Large coffee
5. Next, the coffee-maker performs a preliminary infusion of the ground
coffee. The coffee is injected with hot water, which is distributed
evenly around the coffee. The preliminary infusion obtains the maximum aroma and flavour of the coffee. During the preliminary infusion, you will see the following symbol on the screen:
2. Use the dispensing spoon to calculate the amount of ground coffee.
IMPORTANT! The maximum amount is one flat spoonful of coffee (8
g). Then close the cover.
3. Press the ground coffee button. The frame around the icon will light
up.
4. Press the button for the coffee you want. The frame around your
selection will light up.
6. During the extraction of the coffee, you will see the following symbols
on the screen:
Espresso coffee
Large coffee
1 coffee cup
1 coffee cup
N.B. When you use ground coffee, you cannot make two cups of coffee
at the same time.
2 coffee cups
5. When the coffee-maker finishes dispensing the coffee, you can remove the cup.
7. When the coffee-maker finishers dispensing the coffee, it will indicate that you can remove the cups through icons and beeps, as long
as you have the beeps option activated.
1 coffee cup
6. If you are not going to any make more cups of coffee using ground
coffee, press the ‘one coffee bean’ or ‘two coffee beans’ button.
1 coffee cup
2 coffee cups
The frame around the ‘ground coffee’ icon will disappear.
8. After dispensing the coffee, the coffee-maker is ready to make more
coffee.
IMPORTANT! While the coffee-maker is dispensing the coffee, you
can stop the extraction by pressing the ESCAPE button.
B) Coffee made with ready-ground coffee.
Esc
This coffee-maker can use ready-ground coffee without needing to use
the grinder. This function is particularly useful when making decaffeinated coffee.
N.B. If the side door is opened or if the drip tray is removed during the
extraction or brewing process, the process will stop.
1. Open the ground coffee dispenser cover.
12
13 HOT WATER
14 STEAM
1. Check that the coffee-maker is ready.
1. Check that the coffee-maker is ready.
2. Place the glass or cup under the steam nozzle.
2. Place a glass or jug under the steam nozzle.
3. Press the ‘steam’ button. The frame around the steam symbol will
light up.
3. Press the ‘hot water’ button. The hot water
symbol will appear inside a square frame.
While the coffee-maker is heating up, the screen will display the
hourglass symbol:
The screen also indicates your selection:
When the coffee-maker is ready to obtain steam, the steam symbol
is displayed on the screen:
4. Turn the steam regulator anticlockwise as far
as it will go (180°). Close it when you have obtained sufficient hot water.
5. Remove the glass or cup filled with hot water.
6. Press the ‘hot water’ button or the ESCAPE
button to disable this function.
4 Place a container under the steam nozzle and open it by turning the
steam regulator clockwise to empty any possible residual water that
may have been left in the steam nozzle. Close the steam nozzle and
throw the water away.
The frame around the hot water symbol will disappear.
5. Position the cup or jug with the liquid that is to
be heated up. To obtain steam, turn the steam
regulator anticlockwise. Close the steam regulator when you have finished heating up the liquid. N.B. To heat up the milk and make it frothy,
move the cup or jug in circles.
Esc
7. The coffee-maker is ready to make coffee.
6. Remove the cup or jug with the heated liquid
or frothy milk.
13
7. Press the ‘steam’ or ESCAPE button to turn off the steam. The frame
surrounding the steam will disappear.
o
5. Open the steam nozzle, turning the steam regulator.
Esc
8. The coffee-maker automatically stabilises the temperature inside the
system. This automatic process takes approximately 25 seconds,
during which water is expelled through the coffee outlet.
The display shows the hourglass symbol:
6. Move the cup in circles to heat the milk evenly.
7. After heating the milk and making it frothy, close the steam outlet.
9. The coffee-maker is ready to make coffee.
15 CAPPUCCINO
1. Fill a large cup up to 1/3 with cold milk.
2. Check that you have selected the steam function and
that the coffee-maker is ready.
8. Press the ‘steam’ or ESCAPE button. The frame around the steam
symbol goes off.
Steam ready:
o
Esc
9. The coffee-maker automatically stabilises the temperature inside the
system. This automatic process takes approximately 25 seconds.
During this process, you will see the hourglass symbol on the screen
and water will come out of the coffee outlet.
3. Place a glass or jug under the steam nozzle.
Open the steam regulator to empty any residual
water that may have been left in the steam nozzle. When steam comes out, close the regulator.
4. Place the cup with the milk under the steam nozzle.
14
10. The coffee-maker is ready to make coffee.
1. The coffee-maker will indicate when the lime scale needs to be removed from the circuits by displaying the following symbols on the
screen:
11. Place the cup with the frothy milk under the coffee outlet.
12. Pour the coffee directly into the cup for a delicious cappuccino
N.B. The lime scale removal process takes approximately 35 minutes
and does not necessarily have to be carried out when the coffee-maker displays the symbols. When this happens, you can continue making coffee, but the appliance will indicate the need for the lime scale
removal. If this is not done, the machine may become damaged.
2. Press the ‘P’ button to enter the programming menu.
P
3. Press the ‘arrow’ icon until the lime scale removal symbol is displayed.
>
4. The lime scale removal symbol is displayed on the screen.
5. To select it, press the ‘P’ button again.
16 LIME SCALE REMOVAL
P
Lime scale should be removed regularly to clean the deposits from the
internal circuits of the coffee-maker. The frequency with which your coffee-maker needs to be cleaned depends on the hardness of
the water you use. Consequently, you first of all need to test the
hardness of the water. To do this, proceed as indicated in section 18
PROGRAMMING YOUR COFFEE-MAKER.
6. The coffee-maker tells you to fill the water tank before beginning the
lime scale removal process. Do not pour water in yet; to remove the
lime scale, you have to prepare the removal solution.
7. Prepare the lime scale removal solution as indicated on the sachet
containing the removal agent supplied by Bianchi Vending. Pour the
content into the water tank and add water up to the lime scale removal mark on the tank.
IMPORTANT!! DO NOT USE VINEGAR OR ANY OTHER LIME
SCALE REMOVAL AGENT NOT SUPPLIED BY BIANCHI VENDING
UNDER ANY CIRCUMSTANCES. You will find a sachet of lime scale
removal agent containing the exact amount for one removal with the
accessories to your coffee-maker
8. Owing to the lengthiness of this process, you need to confirm that
you want to carry it out at that time. Before confirming, make sure
you have poured the removal agent into the water tank.
15
a) To confirm the lime scale removal process, press the ‘P’ button.
12. Once the lime scale removal process has finished, the system must
be rinsed to make sure that all remains of the removal agent are removed. To rinse the appliance, press the ‘P’ button again.
P
P
b) To exit the process, press the ‘ESC’ button.
13. The coffee-maker will indicate that the rinse process has begun.
Esc
IMPORTANT! If you have poured the removal agent into the water
tank, remove it to make sure you do not use it by mistake to prepare
a coffee.
N.B. if you exit the lime scale removal process once it has begun,
press the ESC button for the programme to continue the rinse cycle.
This will prevent traces of the removal agent remaining inside the appliance.
14. The bar will be completed as time progresses.
9. Once the lime scale removal process has been confirmed, the coffee-maker will indicate that the process is starting on the screen.
15. After the rinse process, the coffee-maker is ready to make coffee.
The duration of the process will be indicated on the bar that appears on
the screen. The bar will complete as time progresses.
N.B. The ‘no water’ icon may appear during the lime scale removal and
rinse processes. Once the water tank is filled, this symbol will disappear
and the process will continue.
10. The screen will indicate the need to fill the water tank with clean
water and will tell you to empty the drip tray.
17 CLEANING AND MAINTENANCE
IMPORTANT! Do not place the coffee-maker in water or any other
liquid or place any of its parts in a dishwasher.
IMPORTANT! Do not dry the coffee-maker or any of its parts in an
oven and/or microwave.
11. Empty the remaining water from the tank and fill it with clean water.
Empty the drip tray.
A) BASIC CLEANING
1. Turn off the coffee-maker (position ‘0’).
2. Unplug the coffee-maker.
3. Clean the water tank.
16
4. Remove the drip tray and empty it. Wash it with water.
2. Remove the grounds compartment.
5. Remove the grounds compartment (used coffee) and empty it. Wash
it with water.
6. Unscrew the steam nozzle together with the
outlet and clean all the parts. If it is blocked,
clean the air inlet hole of the steam nozzle
with a needle to optimise the steam function.
When putting it back in place, make sure that
this hole is at the top of the steam nozzle.
3. Remove the coffee grounds collection tray.
7. Eliminate the coffee remains left in the coffee dispenser with the
brush.
8. Remove the sugar cube compartment and wash it with water.
9. Remove the coffee outlet and wash it with water.
IMPORTANT! The coffee-maker and its parts must be
cleaned at least once a week.
4. Move the unit lever to the left.
B) BREWING UNIT
This unit is a professional unit and does not need any special maintenance until it has been operating for five years (6,000 cups), when you
should take the coffee-maker for service by authorised personnel.
We recommend you clean the coffee-maker thoroughly every so often,
removing and cleaning the brewing unit every 1,000 cups or whenever
you consider that the coffee flow has decreased. To do this, proceed as
indicated in the following section.
5. Unscrew the top of the unit.
In addition, we recommend you eliminate any coffee remains that may have been left in the piston
filter using the brush included in the accessories
box.
CLEANING
1. Open the side cover.
17
6. Remove the unit.
10. Move the unit lever to the right.
7. Wash the unit under the tap with plenty of hot water.
11. Screw up the top of the unit.
8. Wait until the unit is completely dry.
12. Place the tray in position.
9. Replace the unit, making sure the indicated points coincide.
13. Place the grounds compartment in position.
18
14. Close the side cover.
2) Before turning off and to prevent the coffee outlet from being blocked
with coffee remains, the coffee-maker expels a little water and cleans
the coffee outlet. This function has been designed to save you from
having to carry out this cleaning process manually.
3) If the auto-off function is disconnected, the coffee-maker will perform auto-cleaning every 14 cups (when the grounds compartment
is emptied).
IMPORTANT! When handling the unit for cleaning, the internal system that compacts the coffee may move easily. To return it to its original position, use the brewing unit spanner supplied with the coffeemaker. Make sure that the marks on the fixed and
moving parts coincide. If not, proceed as follows:
18
Insert the spanner in the lock.
PROGRAMMING
MAKER
YOUR
COFFEE-
The coffee-maker is programmed for use without it being necessary
to modify any parameters, but it offers the possibility of adapting it to
your personal preferences easily and intuitively. Consequently, we have
designed a simple menu for defining the various functions of the coffee-maker.
You can programme the amount of water per cup. By default, the coffee-maker is programmed with a certain amount of water for an espresso or large coffee. You can modify the amount of water set for each type
of coffee and adapt it to your personal preferences.
Turn the spanner to the left (anticlockwise) until the two marks on the
fixed and moving parts coincide.
The coffee-maker can turn itself off to save energy and you can relax
when you leave your home, knowing that it will disconnect. Depending
on the use you make of your coffee-maker, you can programme the time
when you want your coffee-maker to turn off after it has been used.
The water in each area has a certain amount of lime that affects the
life of the coffee-maker. You can check the hardness of the water you
use and programme your coffee-maker to tell you when the lime scale
should be removed from the appliance. You can also select the contrast
level of the screen and whether or not you want the coffee-maker to
beep to tell you when the coffee or the steam is ready.
C) AUTO-CLEANING FUNCTION
The coffee-maker automatically performs three system-cleaning processes:
The following is a detailed explanation of how to use the programming
menu:
1) When you turn on the coffee-maker, it cleans the pipes with a little hot
water to make sure that the coffee it makes does not contain any traces
of water left in the pipes from coffee made previously.
19
A) ADJUSTING THE AMOUNT OF WATER FOR AN ESPRESSO COFFEE
Press the
button
Sequence
1. The coffee-maker is ready.
P
2. Press the ‘P’ button to enter the programming menu.
3. The first programme is for adjusting the amount of water per cup. You
can programme the amount for each type of coffee you can obtain. To help
you, the four possibilities will begin to flash.
4. To programme the amount of water for an espresso coffee, press the
corresponding button.
5. After pressing the button for 1 cup of espresso coffee, you enter the
menu for programming the amount of water.
Press the ‘arrow’ to increase the amount of water by 10 ml from 30 ml to
60 ml.
>
By default, the coffee-maker is programmed with 40 ml for an espresso
coffee.
P
6. To confirm your selection, press ‘P’.
To exit the programming mode, press ‘Esc’.
Esc
7. The coffee-maker is ready.
20
Message on screen.
B) ADJUSTING THE AMOUNT OF WATER FOR A LARGE COFFEE
Press the
button
Sequence
1. The coffee-maker is ready.
P
2. Press the ‘P’ button to enter the programming menu.
3. The first programme is for adjusting the amount of water per cup. You
can programme the amount for each type of coffee you can obtain. To help
you, the four possibilities will begin to flash.
4. To programme the amount of water for a large coffee, press the corresponding button.
5. After pressing the button for 1 large cup of coffee, you enter the menu for
programming the amount of water.
Press the ‘arrow’ to increase the amount of water by 25 ml from 75 ml to
150 ml.
>
By default, the coffee-maker is programmed with 100 ml for a large cup of
coffee.
P
6. To confirm your selection, press ‘P’.
To exit the programming mode, press ‘Esc’.
Esc
7. The coffee-maker is ready.
21
Message on screen.
C) ADJUSTING THE AMOUNT OF WATER FOR 2 ESPRESSOS
Press the
button
Sequence
1. The coffee-maker is ready.
P
2. Press the ‘P’ button to enter the programming menu. .
3. The first programme is for adjusting the amount of water per cup. You
can programme the amount for each type of coffee you can obtain. To help
you, the four possibilities will begin to flash.
4. To programme the amount of water for 2 espresso coffees, press the
corresponding button.
5. After pressing the button for 2 espresso coffees, you enter the menu for
programming the amount of water.
Press the ‘arrow’ to increase the amount of water by 10 ml from 30 ml to
60 ml.
>
By default, the coffee-maker is programmed with 40 ml for each cup of
espresso coffee.
P
6. To confirm your selection, press ‘P’.
To exit the programming mode, press ‘Esc’
Esc
7. The coffee-maker is ready. .
22
Message on screen.
D) ADJUSTING THE AMOUNT OF WATER FOR 2 LARGE COFFEES
Press the
button
Sequence
1. The coffee-maker is ready
P
2. Press the ‘P’ button to enter the programming menu
3. The first programme is for adjusting the amount of water per cup. You
can programme the amount for each type of coffee you can obtain. To help
you, the four possibilities will begin to flash.
4. To programme the amount of water for 2 large coffees, press the corresponding button.
5. After pressing the button for 2 large coffees, you enter the menu for
programming the amount of water.
Press the ‘arrow’ to increase the amount of water by 25 ml from 75 ml to
150 ml.
>
By default, the coffee-maker is programmed with 100 ml for each large cup
of coffee.
P
6. To confirm your selection, press ‘P’.
To exit the programming mode, press ‘Esc’.
Esc
7. The coffee-maker is ready.
23
Message on screen.
E) ENERGY SAVING
Press the
button
Sequence
1. The coffee-maker is ready.
2. Press the ‘P’ button to enter the programming menu.
P
3. Press the ‘>’ button until the ‘auto-off’ symbol appears on the screen.
>
4. To programme this function, press ‘P’.
P
5. The ‘auto-off’ symbol is displayed on the screen.
Press the ‘>’ button to increase the time from disconnection to one hour, two
hours, three hours and disconnection again.
>
By default, the coffee-maker will turn itself off at the programmed time when
no instructions are received.
P
6. To confirm your selection, press ‘P’.
To exit the programming mode, press ‘Esc’.
Esc
7. The coffee-maker is ready
24
Message on screen.
F) WATER HARDNESS
The hardness of the tap water varies with each region and you should test the hardness of the water you are going to use in your coffee-maker. Once
the coffee-maker has been programmed with the hardness of the water, it will indicate when the lime scale should be removed from the system.
First of all, test the water hardness. To do this, put the strip of reagent in the water for one second. Some of the squares on the strip of reagent will
change colour. The hardness of the water will be equal to the number of squares that change colour.
Press the
button
Sequence
1. The coffee-maker is ready
2. Press the ‘P’ button to enter the programming menu.
P
3. Press the ‘>’ icon until the ‘water hardness’ icon is displayed.
>
4. To programme the water hardness, press ‘P’. .
P
5. After pressing ‘P’, the water hardness menu is displayed on the screen.
Press ‘>’ to increase the water hardness level from 1 to 5 (after 5, it returns
to 1).
>
By default, the coffee-maker is programmed with a water hardness
level of 5.
P
6. To confirm your selection, press ‘P’.
To exit the programming mode, press ‘Esc’.
Esc
7. The coffee-maker is ready.
25
Message on screen
G) DIGITAL SCREEN CONTRAST
Press the
button
Sequence
1. The coffee-maker is ready.
2. Press the ‘P’ button to enter the menu.
P
3. Press the ‘>’ icon until the ‘contrast’ icon is displayed.
>
4. To programme the screen contrast, press ‘P’.
P
5. After pressing ‘P’, the contrast menu is displayed on the screen.
Press ‘>’ to increase the contrast level from 1 to 4 (after 4, it returns to 1).
>
By default, the coffee-maker is programmed with a contrast level of 4.
P
6. To confirm your selection, press ‘P’.
To exit the programming mode, press ‘Esc’.
Esc
7. The coffee-maker is ready.
26
Message on screen
H) SEGNALI ACUSTICI
Press the
button
Sequence
Message on screen
1. The coffee-maker is ready.
2. Press the ‘P’ button to enter the programming menu.
P
3. Press the ‘>’ icon until the ‘beep’ icon is displayed.
>
4. To enter the beeps programme, press ‘P’.
P
5. After pressing ‘P’, the beeps menu is displayed on the screen.
Press ‘>’ to move between the two alternatives: ‘ON’ and ‘OFF’.
>
By default, the coffee-maker is programmed with the beeps ON.
P
6. To confirm your selection, press ‘P’.
To exit the programming mode, press ‘Esc’.
Esc
7. The coffee-maker is ready.
I) COUNTER
The coffee-maker has a coffee cup counter to inform you of the number of cups it has made. This amount is for information
purposes only and cannot be changed. The counter has five digits. You will see the number of cups the appliance has made
on the screen, next to the 1coffee cup symbol.
J) LIME SCALE REMOVAL
See section 16 LIME SCALE REMOVAL
27
19 MESSAGES
Function
Icon on display
Comment
Fill the system with water.
The coffee-maker needs to fill its internal circuits with water. Before transporting the coffee-maker, the circuits are emptied to prevent the forming
of bacteria and must then be refilled. To fill the system, use the steam
regulator..
The steam nozzle has not
been closed correctly.
CLOSE THE STEAM NOZZLE before making the coffee. This will prevent
the steam nozzle from dripping when you are making a coffee. Once closed, the symbol disappears
No water.
FILL THE WATER TANK. The coffee-maker will not make any more cups of
coffee until the water tank has been filled.
Grounds compartment
full.
CLEAN THE COMPARTMENT. The coffee-maker will not make any more
cups of coffee until the coffee grounds have been emptied.
Main cover open
CLOSE THE SIDE COVER. The coffee-maker will not make more cups of
coffee until the cover is closed.
No grounds compartment.
PUT THE COMPARTMENT IN POSITION. The coffee-maker will not make
any more cups of coffee until the grounds compartment has been put in
position.
No brewing unit.
FIT THE BREWING UNIT. The coffee-maker will not make any more cups
of coffee until the brewing unit has been fitted.
No drip tray.
PUT THE DRIP TRAY IN POSITION. The coffee-maker will not make more
cups of coffee until the drip tray has been put in position.
28
Function
Icon on display
Comment
Lime scale removal
SELECT COFFEE/LIME SCALE REMOVAL. The coffee-maker will continue to make coffee but indicate that the lime scale needs to be removed
from the machine.
Cleaning the tray at the
end of the lime scale
removal process.
EMPTY THE DRIP TRAY AND FILL THE WATER TANK WITH CLEAN
WATER. The coffee-maker has finished removing the lime scale from the
pipes and has poured the removal agent on to the drip tray, which is now
full. First of all, empty it and then fill the water tank with clean water for the
rinse cycle.
RESET THE COFFEE-MAKER SOFTWARE by turning off the main switch
(position ‘0’), wait a few seconds and then turn it on again.
Something is not working
correctly.
N.B.
If, after turning off and turning on the coffee-maker, the symbol continues,
THE COFFEE-MAKER NEEDS TO BE REPAIRED AT AN AUTHORISED
TECHNICAL SERVICE CENTRE. The coffee-maker will not work until it
has been repaired.
When the situation has been corrected, the coffee-maker is again ready
to make coffee.
29
20 TROUBLESHOOTING
PROBLEM
CAUSE
SOLUTION
Press the switch, position ‘I’ (on).
The coffee-maker does not come
on.
The coffee-maker is not connected to the
mains
Check the cable and the plug.
If it still does not come on, take the coffee-maker to an authorised
technical service centre.
The first coffee is of poor quality.
The first time the grinder is started, it does
not pour sufficient quantity into the brewing
unit.
Throw the coffee away. The other coffees will always be of good
quality.
When I turn the machine on, a
little dirty water comes out.
The coffee-maker automatically cleans
the pipes to make sure the coffee is of
optimum quality, free from the remains of
previous coffees.
Throw the coffee away. The other coffees will always be of good
quality.
When I turn the machine off, a
little dirty water comes out.
Before turning off and to prevent the coffee outlet from being blocked with coffee
remains, the coffee-maker expels a little
water and cleans the coffee outlet.
No solution is required; this function has been designed to prevent you from having to clean it manually.
The coffee is not hot enough.
The cups are cold.
Preheat the cups.
When coffee made with ground
coffee is selected, the coffeemaker pours out only water.
You have not put the ground coffee in the
coffee dispenser.
Add ground coffee using the dispensing spoon (maximum one
flat spoonful) and select the coffee again.
You have put too much coffee in the dispenser.
Pulire il dispenser di caffè macinato. Ripetere l’operazione usando il cucchiaio dosatore e mettere al massimo 1 cucchiaio raso
You have not pressed the
button and the coffee bean
compartment is empty.
Press the button again.
You have put the ground coffee in the
dispenser when the coffee-maker was
switched off.
Clean the ground coffee from the dispenser.
Repeat the operation, first of all pressing the button. .
You have used ground coffee
and no coffee is made.
30
PROBLEM
CAUSE
SOLUTION
Part of the ground coffee may have been
left in the inlet
Use the brush included with the accessories to make the coffee
drop or use the back of the dispensing spoon.
Clean the blocked pipe with a needle.
No steam or hot water is obtained.
The steam nozzle is blocked.
The coffee-maker needs a lot of
time to make the coffee.
The grind is too fine.
Select a coarser grind.
The brewing unit does not fit in
place after it has been removed
for cleaning.
The piston that presses down the coffee
has moved.
Use the brewing unit spanner to position the piston in place (as
indicated in section 17. CLEANING AND MAINTENANCE, section B) BREWING UNIT).
The coffee outlet is blocked with dry coffee
remains.
Remove the coffee outlet and wash it under the tap.
No coffee comes out of the
outlets.
IMPORTANT! During this operation, the steam regulator must be
closed and the coffee-maker turned off.
The pipes through which the coffee comes
out of the coffee-maker into the removal
outlet are blocked.
Remove the coffee outlet. Clean the blocked pipe(s) with a needle.
IMPORTANT! During this operation, the coffee-maker must be
turned off.
The coffee flow decreases or the
brewing time increases.
The brewing unit needs to be cleaned
31
Clean the unit as indicated in section 17 CLEANING AND MAINTENANCE.