1
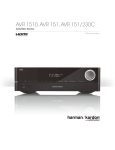
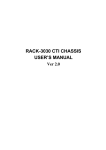
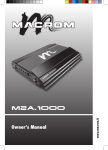
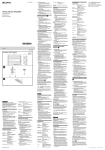
Owner’s Manual
www.macrom.ch
M1A.4150
Front/Rear view
2
1
3
4
6
5
7
8
9
10 11 12
13
14 15 16 17 18
19
1
2
3
4
5
6
7
8
9
10
11
12
13
14
15
16
17
18
20
21
22
Low Level Input (CH1/CH2)
Low Level Input (CH3/CH4)
Gain Control (CH1/CH2)
High pass switch (CH1/CH2)
High pass cutting adjustment
Input Mode selector
Output Mode selector
EBC (External Remote control)
EBC ON/OFF switch
High pass cutting adjustement for Line Out
High pass switch (Line Out)
Led indicator
Line Output
Gain Control (CH3/CH4)
High pass switch (CH3/CH4)
High pass cutting adjustment (CH3/CH4)
Low pass switch (CH3/CH4)
Low pass cutting adjustment (CH3/CH4)
19
01
23 24 25 26
19
20
21
22
23
24
25
26
27
28
29
30
27 28 29 30
Fuse
12V (DC) power terminal
Remote terminal
GND terminal
+ CH1 terminal (+ MONO)
- CH1 terminal
+ CH2 terminal
- CH2 terminal (- MONO)
+ CH3 terminal (+ MONO)
- CH3 terminal
+ CH4 terminal
- CH4 terminal (- MONO)
Input setting CH1/CH2
1
Low Level Input
2
����
�
�
3
(Eng) Connect the output Audio coming from the car radio, in to the Low level input of the amplifier.
(FR) Relier l’output Audio provenant de l’autoradio, au input Low level de l’amplificateur.
����
�
�
4
�In
pu
t
(IT) Collegare l’uscita Audio proveniente dall’autoradio, all’ingresso Low level dell’amplificatore.
�
5
�
6
(D) Das Ausgang Audiokommen von vom Autoradio anschließen, das niedrige Niveau des Verstärkers
einzugeben.
(SP) Para conectar venir audio de la salida de la radio de coche, entrar el nivel bajo del amplificador.
7
8
1
9
2
10
(Eng) Adjust the gain control, according to the Audio level output.
3
11
(IT) 14
Regolare il controllo di guadagno, in funzione del segnale Audio in uscita.
15
1
16
Justieren
2
(D)
Sie die Gewinnsteuerung, entsprechend dem waagerecht ausgerichteten
Audioausgang.
17
3
el control del aumento, según la salida llana audio.
1
2
10
3
4
5
13
6
7
Line
Out setting
8
15
9
16
10
9
17
11
10
18
Flat/High switch
11
19
Pre-Output Line out
12
14
13
15
14
16
15
17
16 ����
18
17
19
����
����
8
9
14
8
��
��
7
12
7
12
6
11
6
13
��
5
13
18
4
(SP)19
Ajuste
5
Gain Control
4
(FR)12Ajustez la commande de gain, selon le rendement de niveau audio.
�����
1
18 2 range.
(Eng) Select “FLAT” for a compleate frequency
19 3
(FR) Choisissez “FLAT” pour une gamme de fréquence
de compleate.
4
(IT) Selezionare “FLAT” per una completa risposta in frequenza.
5
(D) Wählen Sie “FLAT” für einen compleate Frequenzbereich
vor.
6
(SP) Seleccione “FLAT” para una gama de frecuencia
del
compleate.
7
8
9
(Eng) The cut frequency is selectable between 30 to 600 Hz.
(FR) La fréquence de coupe est sélectionnable entre 30 à 600 hertz.
(IT) La frequenza di taglio è selezionabile fra 30 a 600 Hz.
(D) Die Schnittfrequenz ist zwischen 30 bis 600 Hz.
(SP) La frecuencia del corte es seleccionable entre 30 a 600 hertzios.
10
High pass cutting adjustment
11
���
�
���
��
12
13
14
15
����
16
02
17
18
19
����
�����
�����
Input setting CH3/CH4
1
1
2
�In
pu
Low Level Input
3
����
�
�
4
����
(Eng) Connect the output Audio coming from
2 the car radio, in to the Low level input of the amplifier.
3
(FR) Relier l’output Audio provenant de l’autoradio,
au input Low level de l’amplificateur.
4
�
�
�
5
�
6
t
7
5
(IT) Collegare l’uscita Audio proveniente dall’autoradio,
all’ingresso Low level dell’amplificatore.
6
7
(D) Das Ausgang Audiokommen von vom Autoradio anschließen, das niedrige Niveau des Verstärkers
8
einzugeben.
9
8
10
9
(SP) Para conectar venir audio de la salida de la radio de coche, entrar el nivel bajo del amplificador.
11
10
11
12
12
13
(Eng)
Adjust the gain control, according to the Audio level output.
13
14
14
(FR) Ajustez la commande de gain, selon le rendement de niveau audio.
15
15
16
(IT) 16
Regolare il controllo di guadagno, in funzione del segnale Audio in uscita.
17
18
(D) Justieren
Sie die Gewinnsteuerung, entsprechend dem waagerecht ausgerichteten
19
Audioausgang.
19
17
Gain Control
18
��
��
��
����
����
(SP) Ajuste el control del aumento, según la salida llana audio.
1
2
3
4
5
6
7
8
EBC (External Bass Control)
(IT) Tramite Il controllo Remote EBC, è possibile controllare il livello del Volume dell’amplificatore.
Collocate il controllo EBC nella parte anteriore del veicolo.
11
12
13
16
(Eng) Through control Remote EBC, it is possible to control the level of the Volume of the
amplifier. Placed control EBC in the front part of the vehicle.
(FR) Par la commande EBC à distance, il est possible de commander le niveau du volume de
l’amplificateur. Commande placée EBC dans la partie avant du véhicule.
9
10
14
���
15
���
���
(D) Durch Steuerung Remote-EBC, ist es möglich, das Niveau des Volumens des Verstärkers zu
steuern. Gesetzte Steuerung EBC im Vorderteil des Trägers.
���
(SP) Con el control EBC alejado, es posible controlar el nivel del volumen del amplificador.
Control puesto EBC en la parte delantera del vehículo.
17
(Eng)
18 Control EBC is active on channels CH3 and CH4 in configuration 4 CH input and Dual single Mono with active the Low Filter pass.
(FR)19La commande EBC est en activité sur les canaux CH3 et CH4 dans la configuration 4 ch entrée et conjugue mono simple avec actif le bas passage de filtre.
(IT) Il controllo EBC è attivo sui canali CH3 e CH4 in configurazione 4 CH input e in Dual Mono solo con il Filtro Low pass attivo.
(D) Steuerung EBC ist auf Führungen CH3 und CH4 in der Konfiguration 4 CH eingegeben aktiv und verdoppelt einzelnes Mono mit aktivem der niedrige Filterdurchlauf.
(SP) El control EBC es activo en los canales CH3 y CH4 en la configuración 4 CH entrada y se dobla solo mono con activo el paso bajo del filtro.
03
Crossover setting
CH1/CH2
1
2
3
(Eng) Select “FLAT” for a compleate frequency range.
Flat switch
4
(FR) Choisissez “FLAT” pour une gamme de fréquence de compleate.
5
(IT) Selezionare “FLAT” per una completa risposta in frequenza.
6
7
(D) Wählen Sie “FLAT” für einen compleate Frequenzbereich vor.
8
(SP) Seleccione “FLAT” para una gama de frecuencia del compleate.
9
����
�����
10
11
1
12
2
13
3
14
4
15
5
16
6
17
7
18
8
19
9
����
(Eng) Select “HIGH” for a high frequency range.
(FR) Choisissez la “HIGH” pour une gamme à haute fréquence.
(IT) Selezionare “HIGH” per la risposta delle frequenze alte.
(D) Wählen Sie “HIGH” für eine Hochfrequenzstrecke vor.
(SP) Seleccione el “HIGH” para una gama de alta frecuencia
1
10
2
11
3
12
4
13
5
14
16
(IT) La frequenza di taglio è selezionabile fra 30 a17600 Hz.
8
11
12
�����
15 30 à 600 hertz.
(FR) La fréquence de coupe est sélectionnable entre
7
9
����
(Eng) The cut frequency is selectable between 30 to 600 Hz.
High pass cutting adjustment
6
10
High pass switch
���
18
(D) Die Schnittfrequenz ist zwischen 30 bis 600 Hz.
�
���
19
��
(SP) La frecuencia del corte es seleccionable entre 30 a 600 hertzios.
13
14
15
16
17
18
19
04
�����
8
7
9
8
10
9
11
10
12
11
13
12
14
13
15
14
16
15
17
16
18
17
19
18
Crossover setting CH3/CH4
(Eng) Select “FLAT” for a compleate frequency range.
(FR) Choisissez “FLAT” pour une gamme de fréquence de compleate.
(IT) Selezionare “FLAT” per una completa risposta in frequenza.
(D) Wählen Sie “FLAT” für einen compleate Frequenzbereich vor.
(SP) Seleccione “FLAT” para una gama de frecuencia del compleate.
19
1
(IT) Selezionare “LOW” per la risposta delle frequenze basse.
2
(D) Wählen Sie “LOW” für eine Niederfrequenzstrecke vor.
3
4
(SP) Seleccione el “LOW” para una gama de la frecuencia baja.
5
(Eng) Select “HIGH” for a high frequency range.
(FR) Choisissez
la “HIGH” pour une gamme à haute fréquence.
1
2
(IT) Selezionare
“HIGH” per la risposta delle frequenze alte.
2
4
4
6
5
7
(D) Wählen Sie “HIGH” für eine Hochfrequenzstrecke vor.
(SP)
el “HIGH” para una gama de alta frecuencia
5
3 Seleccione
6
8
7
9
(Eng) Select “LOW and High” for a band pass frequency range.
(FR)
“LOW et HIGH” choisis pour une gamme de fréquence de passage de bande.
8 10
(IT)9 Selezionare
“LOW e HIGH” per la risposta passa banda.
11
12
(D)10Wählen
6
1
7
2
8
3
9
4
10
5
11
6
12
7
13
8
14
9
15
10
16
11
17
12
18
13
Sie “LOW” für eine Niederfrequenzstrecke vor.
16
12 14
17
13 15
18
14 16
19
Low &High pass cutting adjustment
17 19
7
8
Flat switch
9
10
11
1
12
2
13
3
14
����
4
�����
15
5
Low pass switch
18
8
19
9
10
11
12
���� ����
�����
13
14
High pass switch
15
16
17
18
19
����
����
�����
����
(Eng) The cut frequency is selectable between 30 to 600 Hz.
(IT) La frequenza di taglio è selezionabile fra 30 a 600 Hz.
19
(D) Die Schnittfrequenz ist zwischen 30 bis 600 Hz.
���
�
���
��
�����
Low &High pass switch
(FR) La fréquence de coupe est sélectionnable entre 30 à 600 hertz.
18
�����
15
11 13
16 18
6
19
14
(SP) “LOW y HIGH selectos” para una gama de frecuencia del paso de la venda.
15 17
4
5
17
7
(FR) Choisissez l’”LOW” pour une gamme de basse fréquence.
3
3
16
6
(Eng) Select “LOW” for a low frequency range.
1
2
(SP) La frecuencia del corte es seleccionable entre 30 a 600 hertzios.
05
�����
Input/Output Mode setting
(Eng) Loudspeakers configuration in function of the Inputs and Set up.
(FR) Configuration de haut-parleurs en fonction des entrées et de l’installation.
(IT) Configurazione altoparlanti in funzione degli ingressi e Set up.
(D) Lautsprecherkonfiguration in Abhängigkeit von den Eingängen und aufgestellt.
(SP) Configuración de los altavoces en la función de las entradas e instalada.
���������
�������
�������
������������
���
���
����
�������������
��
����
����������������������������
*
���
�������
����������
�
* * *
�
����������
�
���������������
�
�
����������������
�
���������������
*
����������
�
*
����������
�
*
���
�������
*
���
�������
����������
�
* * *
�
����������
�
���������������
�
* *
���
�������
����������
�
�
*
�
����������������
�
���������������
*
���
�������
����������
�
*
�
�
���������������
�
�
���
�������
����������
�
�������������������
�
*
���������������
�
06
CH1/CH2 Speakers connection
S
pe
ak
�
��� �
�
���
er
�
����
���������
�
�
(Eng) Minimal acceptable Impedance 2 ohm. To adhere itself to the illustrations for the connections.
(FR) Impédance acceptable minimale 2 ohms. Pour s’adhérer aux illustrations pour les raccordements.
(IT) Minima Impedenza accettabile 2 ohm. Attenersi alle illustrazioni per i collegamenti
(D) Minimaler annehmbarer Widerstand 2 Ohm. Sich die Abbildungen für die Anschlüsse befolgen.
(SP) Impedancia aceptable mínima 2 ohmios. Para adherirse a las ilustraciones para las conexiones.
�����
���������� ����������
�
�
�
�
���������������
���
�����
�
�
�
�
�
��������������
�
�
��������������
�����
�����
�����
�
�
�
�
���������������
���
���
���
������������������
��������
���������
�������
���������
�������
���������
��������������
��
��
������
������
07
�
CH3/CH4 Speakers connection
S
pe
ak
�
�
���
er
�
�
���
����
���������
�
�
(Eng) Minimal acceptable Impedance 2 ohm. To adhere itself to the illustrations for the connections.
(FR) Impédance acceptable minimale 2 ohms. Pour s’adhérer aux illustrations pour les raccordements.
(IT) Minima Impedenza accettabile 2 ohm. Attenersi alle illustrazioni per i collegamenti
(D) Minimaler annehmbarer Widerstand 2 Ohm. Sich die Abbildungen für die Anschlüsse befolgen.
(SP) Impedancia aceptable mínima 2 ohmios. Para adherirse a las ilustraciones para las conexiones.
�����
���������� ����������
�
�
�
�
���������������
���
�����
�
�
�
�
�
��������������
�
�
��������������
�����
�����
�����
�
�
�
�
���������������
���
���
���
������������������
��������
���������
�������
���������
�������
���������
��������������
��
��
������
������
08
�
Power connection
���������
�����
��������
+
-�
CAR CHASSIS
CAR CHASSIS
(Eng) Connect the Positive (+12V) directly to the Battery of the car. To make sure itself to insert a fuse of adequate amperage in order protect the system.
Connect the Ground in to the car chassis, close as possible to the amplifier.
(FR) Reliez le positif (+12V) directement à la batterie de la voiture. Pour s’assurer soi-même pour insérer un fusible d’àampérage proportionné dans l’ordre
protégez le système.
Reliez le négatif dedans au châssis de voiture, fin comme possible à l’amplificateur.
(IT) Collegare il Positivo (+�
Collegare il Negativo al telaio dell’automobile, più vicino possibile all’amplificatore.
(D) Schließen Sie das Positiv (+12V) direkt an die Batterie des Autos an. Um sicherzustellen selbst zum einer Sicherung der ausreichenden Stromstärke im
Auftrag einzusetzen schützen Sie das System.
Schließen Sie das Negativ innen an das Autochassis an, Ende, wie möglich zum Verstärker.
(SP) Conecte el positivo (+12V) directamente con la batería del coche. Para cerciorarse de sí mismo para insertar un fusible del amperaje adecuado en orden
proteja el sistema.
Conecte la negativa adentro con el chasis del coche, cierre como sea posible al amplificador.
09
Features
•
•
•
•
•
•
•
•
•
•
•
•
Four channel power amplifier
150 watts into 2 ohms load
75 watts into 4 ohms load
High efficiency TO3PL transistor on amplifier stage
Variable 18/12dB/oct Low-High-Band pass x-over on rear section
Variable 12dB/oct High pass x-over on front section
In/Out mode selector (2/4 ch In)(ST/Dual mono Out)
Adjustable x-over from 30Hz to 600Hz
EBC external bass control on rear section
Pre-amplified output with High pass crossover option
PWM Mos-Fet power supply
20sq.mm power terminals
Technical data
RMS Power at 4 ohm Stereo load at 14,4 volts
RMS Power at 2 ohm Stereo load at 14,4 volts
RMS Power at 4 ohm Bridged load at 14,4 volts
THD (total Harmonic Distortion)
Frequency response (+0/-1 dB)
Signal to noise ratio
Low Input sensitivity
High Input sensitivity
Input impedance
Crossover type
Crossover frequency & filter slop (High-pass)
Crossover frequency & filter slop (Low-pass)
Line Output
Dimension (w * h * d) mm
75 x 4 watts
150 x 4 watts
300 x 2 watts
< 0,1%
10 - 30,000Hz
> 100dB
200-8,000mV
1-10V
22k/100 ohm
Variable
30 to 600Hz -12dB/octave
30 to 600Hz -18dB/octave
1-1 (with High pass)
250 x 55 x 360
10