1
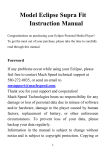
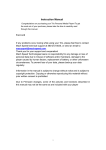
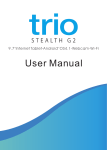
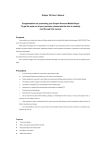
Trio V5000
Instruction Manual
Congratulations on purchasing your Trio
Personal Media Player! To get the most out
of your purchase, please take the time to
carefully read through this manual.
Foreword
If any problems occur during while using your Trio, please feel free to contact Mach
Speed technical support at 580-272-0035, or sending an email to
[email protected].
Thank you for your support and cooperation!
Mach Speed Technologies bears no responsibility for any damage or loss of
personal data due to misuse of software and/or hardware, damage to the player caused by
human factors, replacement of battery, or other unforeseen circumstances. To prevent loss
of your data, please backup your data regularly.
Information in the manual is subject to any change without notice and is subject to
copyright protection. Copying or otherwise reproducing this material without prior
written consent is prohibited.
Due to Firmware changes, some of the pictures and functions described in this
manual may not be the same as are included with your player.
1
Note:
● The playback times listed refer to the maximum playback times possible, using the best
power savings. The actual playback time may differ as adjustments to screen brightness,
power savings modes, volume, etc are made.
● As there are many brands of Micro SD cards in market, using different quality and
speed standards. Therefore, we are unable to guarantee that our product will be
compatible with all types or brands of Micro SD cards, but will be compatible with those
Micro SD cards with mainstream specifications in the market, and we will constantly
strive to provide the largest selection of cards possible.
● As parameters such as formats, bitrate, codecs, framerates, and resolutions differ, the
player will not be compatible with all listed files. If you are experiencing issues playing
your files on this player, we recommend using a supported conversion tool to reconvert
your file to the specifications of the device.
Caution
Modifications not approved by the party responsible for compliance could void the user’s
authority to operate the equipment.
NOTE- This equipment has been tested and found to comply with the limits for Class B
Digital device, pursuant to part 15 of the FCC rules. These limits are designed to provide
reasonable protection against harmful interference in a residential installation. This
equipment generate, uses and can radiate radio frequency energy and, if not installed and
used in accordance with the instructions, may cause harmful interference to radio or
telephone reception, which can be determined by turning the equipment off and on, the
user in encouraged to try to correct the interference by one or more of the following
measures:
•
Reorient or relocate the receiving antenna.
•
Increase the separation between the equipment and the receiver
•
Connect the equipment to an outlet on a circuit different from that to which
the receiver is connected.
•
Consult the dealer or an experienced radio/TV technician for help.
2
Contents
Foreword……………………………………………………………………… 1
Kind reminder….……………………………………………………….…….. 2
Contents.....………………………………………….………………...……… 3
Key Functions……………………………………………..………….….…… 4
Points for Attention………………………………………….…………...…… 5
Shapes and Keys…….……………………………………………...………… 6
Display Screen…………………………………………………...…………… 7
Basic Operation…………………………………………………..…………… 9
Main Interfaces……………………………………………………………… 18
Playing Music………………………..……………………………………… 18
Playing Video…………………………..……………………………….…… 21
Picture………………………………………….……………………….…… 24
Reading Text………………………………………………………………… 26
E-Book Viewing…………………………………………………………….. 27
Record…………………………………………………….………………… 29
FM Radio….……………….…..…………………………………………… 26
System Set………………….……………..………………………………… 31
TV-out……………………….……………………………….……………… 32
OTG………………………….……………………………………………… 33
3
Features
· 5.0-inch 800*480 dot matrix full color high speed TFT display;
· Supports multiple audio formats such as MP3, WMA, AAC, APE and FLAC,
etc;
· Supports lyric synchronous display;
· Supports multiple video formats such as RM/RMVB, AVI, MKV, VOB, MOV,
DAT and FLV, etc;
· Supports picture browsing of JPG, BMP, GIF and PNG formats;
· FM radio;
· Built-in microphone and extra long time recording;
· Energy saving settings, a variety of font color settings, adjustable brightness,
automatic shutdown and background setting;
· Multiple Playback and equalizer modes;
· Supports E-book reading, independent bookmarks and automatic browsing
functions;
· USB2.0 high speed USB interface;
· Upgradeable firmware;
· Supports OTG function, access the files you have saved on your external
drive;
· Supports Micro SD Card;
· Integrated HDMI output function;
4
Caution
1. Do not use the player in exceptionally cold or hot, dusty, damp or dry
environments.
2. Do not drop, strike, or throw your player. Physical damage to your player
will void ALL warranties.
3. Please charge your battery when
A. Battery power icon shows an empty icon;
B. The system automatically shuts down and the power is soon off when
you switch on the unit once again;
C. There is no response if you operate on any key
4. Please always follow the correct disconnect procedures for your operating
system. Do not disconnect power abruptly when the player is being
formatted or in the process of uploading or downloading files. Otherwise it
may lead to file corruption, firmware failure, and even hardware damage.
5. We are not liable for any loss of data stored on this device.
6. Please do not dismantle this player. Any disassembly not done by an
authorized technician will void ALL warranties
7. This product and manual are change without subject to notice.
5
Shapes and Keys
1. Volume +
2. Volume 3. Power on/off
4. HDMI out
5. Micro SD
6. Play/pause
7. Charging jack
8. EAR/ AV jack
9. Exit
10. Wheel key
11. USB
12. Infrared receiver
6
Display Screens
Music
Video
7
FM Radio
Recording
8
Basic Operations
Power on
When powered off, slide the power switch to the ON position, and then press and
hold the PLAY button for 5 seconds.
Power off
When powered on, press and hold the power switch for 5 seconds to power off.
Please note that if you set the power switch to the OFF position, you will lose any
saved settings.
Volume Control
When playing music, FM radio, and video, you can perform volume control using
the "+/-" button. "+" button is for increased volume and "-" key is for reduced
volume. Hold the key "+" or key"-" to continuously increase or reduce volume
Charging
This unit can be recharged by USB port, you can also use the designated normal
charger which was provided to you with the unit (output current 2A, output
voltage 5V~5.2V) to charge it. Simply connect the player to the charger or USB
port to charge it.
Using the Micro SD card
After this unit is connected with the computer, you will find two removable disks.
The first one is the built-in memory disk for this unit and the other is the disk for
the Micro SD card. If no card is inserted, the second disk can not be accessed.
This unit supports Micro SD cards from 1GB to 32GB.
9
Inserting and removing the Micro SD card
Inserting: Ensure that the player is powered off, and disconnected from the
computer. Hold the Micro SD card face up (side with words) (with the direction of
the display screen as the face), and slide the card into the socket on the player,
slightly past flush. When you hear the card click into place, you can access the
Pulling: Ensure that the player is powered off, and push the SD card just past
flush. When you hear the click, release pressure, and the card will slide out.
Caution: Please ensure that the power is off when you connect or disconnect your
SD card, or damage may occur to the player or your card.
Use only the authorized power adaptor or your computer’s USB port. Use of an
unauthorized charger will lessen the battery life of the device, and often damage
the player.
Loading Files to your Player
Using Windows Media Player
(Note: you must use Windows Media Player 10 or later to use this feature.)
(Note: this player does not support DRM encrypted audio or video files, such as
those downloaded from the Windows Media Player “Overdrive” download
service.)
10
1. Open Windows Media Player and connect the player to a working USB port.
Windows Media player will prompt you with a setup screen asking you to name
the MP3 player.
2. Once you have named your MP3 player, select Finish, and your Windows
Media Player will open to the Sync tab.
11
3. Drag your music to the sync list (on the right of the screen) from the list on the
left. Once you have selected the music you wish to add to the player, press Sync.
4. Windows Media player will load the songs on to your player.
12
5. Once all the songs you have added are synced to the unit, and Windows Media
Player says that is safe to disconnect your MP3 player, disconnect the device.
COPY AND PASTE
Note- This alternate method is used to load videos, pictures, and
ebook files as well as audio files
1. Connect the MP3 player to a working USB port.
13
2. When the unit is connected to your computer, it will create a gray and green
icon in the system tray (lower right hand corner of your desktop). The icon will be
called safely remove hardware.
3. Go to the “My Computer” section of your computer. In there you will find
a section called “devices with removable storage”
14
4. Locate the drive created by the unit, generally just called Removable Disk,
with a letter in Parenthesis. Drive letters vary depending on your system
configuration.
5. Open the drive by either double left clicking on the drive itself, or by right
clicking to open the option menu then left click on the desired drive.
15
6. Locate the music stored on your computer. Generally this is stored in the “My
Music” folder of your computer.
NOTE: if you are unable to locate the music on your computer, click on start,
search, files and folders, then search for “*.MP3, *.WMA”.
16
7. Once you have located the song files, you can right click on the song itself, and
select “copy”. Open the removable disk drive, right click on in the empty space,
and select Paste. This will transfer the song on to your player.
8.
Repeat step 7 for as many songs as you want to copy on to the unit.
NOTE: MAC Computers
When connected to your MAC computer, the device will act as a removable
drive. Simply drag your files to the device.
17
Main Menu
Functions of keys in the master interface list:
z
Wheel key: roll the wheel up or down to move the selection left or right
z
Wheel key: briefly press the button to select your item.
z
Exit key: briefly press this button to return the last menu, or press and hold
this button to return to the main menu.
Playing Music
In the main menu, select the "Music" option and briefly press the wheel button to
access the Music library. This menu includes 5 options such as Now Playing,
Media library, Local disk, SD Card and External Disk
Description of functions:
z
Now Playing
z
Media library
Returns you to the last song which was playing.
Allows you to update your media library after adding songs, or sort your
audio files by several categories such as "All music", "Directory", "Disk",
"Artist", "Album", "Genre”, etc.
18
z
Local disk
Allows you to browse your drive using a standard folder structure.
z
SD Card
z
External Disk
Allows you to browse the files on your SD Card
With OTG features users can add other USB devices and select the file of
external USB device
Music playing interface
Functions of keys:
z
z
z
z
z
"+/-" key: to control the volume up/down;
Wheel key: Briefly roll the wheel up or down to select the next or
previous track, or roll and hold the wheel to fast forward or rewind the
current track;
Wheel key: briefly press the wheel key to enter the Music submenu;
"
" key: briefly press it to play or pause the current file, press and
hold the button to power the player off;
Exit key: briefly press this button to return to the music library, or
press and hold the button to return to the main menu.
19
Music Submenu:
1. Playmode
Allows you to set your playmode, including, "Once", "Repeat One", "Repeat All",
"Sequence" and "Random".
2. Speed mode
Allows you to adjust your Tempo rate, creating some neat effects. Select either
"Very slow", "Slow", "Normal", "Fast" and "Very fast";
3. EQ select
Allows you to select one of seven equalizer settings, such as Normal, Pop, Classic,
Jazz, Rock, Soft and DBB.
4. Show lyric
The default setting is "On", if you select "Off", music player interface will not
display lyrics, and will show only the spectrum
5. Resume play
You can continue playing music from the place where you stopped the last time.
The default setting is "On", if you select "Off", re-entering the music feature will
not begin playing the last played file from where you left off, but play from the
beginning;
6. File Information
File information displays the currently playing music file information, including
the file’s directory location, artist and album, genre, and ID3 information
7. Setting stars
Allows you to rate the file by giving a number of “stars” which will allow you to
sort your files in the Music library
20
Playing Video
In the main menu, select the "video" option and briefly press the wheel button to
access the video library. This menu list includes 4 options; Media library, Local
disk, SD Card and External Disk
Description of functions:
z
Media library
Allows you to update your media library after adding videos, or sort your
video files by several categories such as, "All video", "Directory", "Disk",
"Star", "Format" etc.
z
Local disk
Allows you to browse your drive using a standard folder structure.
z
SD Card
z
External Disk
Allows you to browse the files on your SD Card
With OTG features users can add other USB devices and select the file of
external USB device
21
Video playing interface
Functions of keys:
z
"+/-" key: to control the volume up/down;
z
Wheel key: Briefly roll the wheel up or down to select the next or
previous video, or roll and hold the wheel to fast forward or rewind
the current video;
z
Wheel key: briefly press the wheel key to enter the video submenu;
z
"
" key: briefly press it to play or pause the current file, press and
hold the button to power the player off;
z
Exit key: briefly press this button to return to the video library, or
press and hold the button to return to the main menu.
Video submenu:
1. Zoom mode
Allows you to adjust the video display area. This player provides 4 display
options:
Full screen (video ratio)- this will fill the screen to the best of the players ability
while retaining the video ratio, without cutting the picture off,;
Full screen (screen ratio)- this option will fill the screen to the best of the players
ability, using the screen ratio, without cutting the picture off;
Origin size – plays the file in its original resolution, which may cut the picture off,
depending on the file resolution.
2. Playmode setup
In the music option list interface, select the "Play Mode" option to setup the repeat
mode, there are 5 modes such as "Only Once", "Rotate One", "Rotate All",
"Sequence" and "Random".
3. Resume play
You can continue playing a video from the place where you stopped the last time.
The default setting is "On", if you select "Off", re-entering the video feature will
not begin playing the video where you left off, but play from the beginning;
4. File Information
22
File information can display the currently playing video file information,
including the file name, file directory location, stars and other information
5. Setting stars
Allows you to rate the file by giving a number of “stars” which will allow you to
sort your files in the Video library
Note:
z
Subtitle display
This player supports "*.SRT" subtitle files for displaying subtitles when a
video is playing.
To display subtitles, the .srt subtitle file must be named identically to the
video file, and loaded into the same directory as the video file
For example:
If the name of the video file is: Yesterday once more .avi
Then the name of the subtitle file is: Yesterday once more. srt
z
The player supports a maximum 1280 x 1080 resolution video file, with
support for H.264 high-definition video coding
z
It’s supports video playing in multiple formats such as RM/RMVB, AVI,
MKV, VOB, MOV, DAT and FLV, etc. As parameters such as formats,
bitrate, codecs, framerates, and resolutions differ; the player will not be
compatible with all listed files. If you are experiencing issues playing your
files on this player, we recommend using a supported conversion tool to
reconvert your file to the specifications of the device.
23
Picture
In the main menu, select the "Photo" option and briefly press the wheel button to
access the photo library. This menu list includes 4 options; Media library, Local
disk, SD Card and External Disk
Description of functions:
z
Media library
Allows you to update your media library after adding pictures, or sort your
video files by several categories such as, "All video", "Directory", "Disk",
"Star", "Format" etc.
z
Local disk
Allows you to browse your drive using a standard folder structure.
z
SD Card
z
External Disk
Allows you to browse the files on your SD Card
With OTG features users can add other USB devices and select the file of
external USB device
Picture viewing interface
Functions of keys:
z "+/-" key: to control the volume up/down (if music is playing while viewing
a picture);
z Wheel key: roll up or down to switch over to the previous or next photo;
z Wheel key: briefly press this to enter the Picture submenu;
z "
" key: briefly press to zoom in or out of the picture, press and hold this
button to power the device off;
z Exit key: briefly press this button to return to the picture mode, or press and
hold this button to return to the main menu.
24
Picture submenu:
1. Setting the wallpaper
Allows you to set the current picture as the desktop background
2. Rotating pictures
Allows you to rotate the current picture 90 degrees clockwise
3. Playmode setup
In the music option list interface, select "Play Mode" option to set up your
pictures as a slideshow, there are 12 modes which will allow you to select how
long a picture is displayed: "off", "1 second", "2 second ", "3 second ", "4 second",
"5 second ", "5 second ","10 second", "20 second ", "30 second ","45 second" and
"60 second ".
4. Switch mode
Allows you to select how your slideshow is displayed. There are 3 modes to
choose from such as "Normal", "Sequence" and "Random";
5. File Information
File information can display the currently file information, including the file name,
file directory location, stars and other information
6. Setting stars
Allows you to rate the file by giving a number of “stars” which will allow you to
sort your files in the Picture library
25
Reading Text
In the main menu, select the "Book" option and briefly press the wheel button to
access the ebook library. This menu list includes 4 options; Media library, Local disk,
SD Card and External Disk.
Description of functions:
z
Media library
Allows you to update your media library after adding eBooks, or sort your
video files by several categories such as, "All video", "Directory", "Disk",
"Star", "Format" etc.
z
Bookmark
Displays a list of saved bookmarks, which will allow you to easily return to a
place in an ebook you had been reading.
z
Local disk
z
SD Card
z
External Disk
Users can choose the file and its subdirectories from local drive.
Users can choose the file and its subdirectories from SD Card
With OTG features users can add other USB devices and select the file of
external USB device
26
E-Book viewing interface
Functions of keys:
z "+/-" key: to control the volume up/down (if a song is playing while you read
your eBook);
z Wheel key: roll up or down to “turn the page” forward or backward;
z Wheel key: Briefly press this button to enter the eBook submenu;
z "
" key: Press and hold this button to power the player off;
z Exit key: briefly press this button to return to the ebook library, or press and
hold this button to return to the main menu.
eBook submenu:
1. Next file
Switch to the next book
2. Prev file
Switch to the previous book
3. E-Book fonts
You can set the font size as big ,small and normal for reading
4. Book text color setting
There are 11 different colors for you select, such as black, white, red, green, blue,
olive, teal, sliver, navy, purple, maroon and yellow
5. Line color
In order to facilitate reading, the user can set the text color of current row to
distinguish between the colors.
There are 11 different colors for you select, such as black, white, red, green, blue,
olive, teal, sliver, navy, purple, maroon and yellow
6. Book rotate setting
Horizontal or vertical direction to rotate the screen
7. Book speed setting
Users can choose to begin or stop the e-book auto-browsing, when the book
auto-browsing features was opened, the users can choose the automatic switching
time from 1 second to 60
27
8. Set Bookmark
Set the current page as a bookmark, which will allow you quickly return to this page
in the future
9. Manage mark
Lists all of your current bookmarks, which will allow you to easily swap between
files.
10. File Information
File information can display the currently book file information, including the file
name, file directory location, stars and other information
Note- this player will only display ebooks in .txt format.
28
Record
In the main menu, select the "Record" option and briefly press the wheel button to
access the Recording menu. This menu list includes 3 options such as Start record,
Quality and Record Files
Description of functions:
1. Start record
Select the "Start Record" option and press the wheel key to access the recording
interface;
2. Recording Quality
Allows you to create different quality of recording files. The higher quality you set,
the larger the file will be once saved.
3. Playing Recorded Voice
Select Recorded files to access and play recordings you have made.
Function of keys(recording interface):
•
Wheel key: briefly press the button to begin or pause the recording
•
"
" key: Press and hold this button to power the player off
• Exit key: briefly press this button to save the file and return to the
recording interface, press and hold the button to return to the main menu
29
FM Radio
NOTE-Before entering the FM Radio mode, ensure that you
connect your headphones. These will act as the antenna for the
player, and FM Radio will not function without them.
In the main menu, select the "FM" option and briefly press the wheel button to
access the FM menu. This menu list includes 6 options such as Manual play, Auto
play, Scan, Set channel, Frequency and Stereo
Adjusting the frequency or “band”
(1) Manual play
Rolling the wheel button up or down will adjust your current frequency by .1 MHz
(2) Auto play
Automatically searches for the next frequency with good reception
(3) Scan
Automatically searches for frequencies with good reception and saves those
frequencies as a “saved channel”
(4)Set channel
Allows you to listen to a saved channel, or delete a saved channel
(5)FM area
Allows you to select which radio frequencies to receive, by world region
(6) Stereo switch
Allows you to turn “stereo” reception on and off
30
System Settings
In the main menu, select the "Settings" option and briefly press the wheel button to
access the Settings menu.
1. About this Unit
In this interface you can view the information on the capacity of the disk, the
available capacity of your SD card, model and firmware version of the player.
2. Language
Allows you to change the display language.
3. Key sound
Allows you to set whether an audio sound will play when a button is used
4. Display output
Allows you to select which output option you wish to use, either AV out, or HDMI
out
5. LCD Auto close
This power savings setting will allow you to adjust how long the screen will stay lit
once the buttons are not being pressed. Setting this option to “Close” will leave the
screen on at all times.
6. LCD brightness
The player offers 0-5 different screen brightness levels to adjust brightness, 0 is the
faintest while 5 is the brightest, the higher the brightness of the screen, the greater
the player's power consumption
7. Auto off
This power savings setting will allow you to set a time for the player to power off
after the device is idle
8. Save setting
This feature allows you to save your settings, even if the power switch is set to the
OFF position. We recommend using this anytime you make a settings change.
9. Restore to Default
To restore the factory default stat
31
TV-out
This player support TV output function. You can use wither AV or HDMI outputs
AV OUTPUT
(1)
Connects one AV cable terminal to the player’s “earphone/ AV” port. The
other terminal’s three connecters connect to your TV sets’ input ports.
(2)
Set your television’s signal input as AV IN.
(3)
Under the “setting” function the main menu, set “display output” as “AV
output”, the player screen will power off, and the interface will display on
your television’s screen.
HDMI output
(1)
Connect HDMI cable one terminal to MP4 player “ HDMI output” port, the
(2)
Set your television’s input as HDMI INPUT.
(4)
(3)
other end connects to television’s HDMI input port.
Under the “setting” function the main menu, set “display output” as
“HDMI output”, the player screen will power off, and the interface will
display on your television’s screen.
Note:
1, After switching to a TV out function, the screen on the player will be powered off,
but you can still operate the device using the buttons on the player or the remote
control.
2, If you select HDMI output, you cannot use the volume control on your player or
remote. Use your televisions volume control.
3,Please use only an authorized HDMI cable for the best viewing experience.
32
OTG
OTG is an abbreviation for “On-The-Go”. This technology allows two hard disks to
communicate without a go between or “host” item such as your computer. In other
words, you can simply connect your external hard disk to the player and access the
memory on the drive, allowing you massive storage options!
OTG Connection Steps:
1.
Power on the external drive you will be connecting to the player.
2.
Connect the device using the OTG cable to your player.
3.
in the “music” “video” “photo” “ebook” function lists, select “External Disk”
to access the drive
Note:
1.
Due to the number of different drives available as well as the hardware and
software used by drives, it is possible that some may not be recognized by the
player. If your external drive is not recognized, we apologize for the
inconvenience.
2.
using the OTG feature of this player puts a heavy strain on the internal battery
of the device. Please ensure that your player is fully charged before activating
the OTG feature.
3.
Currently the OTG software only allows one way communication. You can
access files on the other device, but cannot delete them, or load files from the
player to your external drive.
33
34